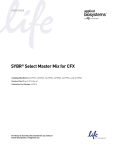
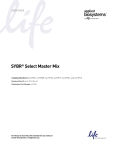
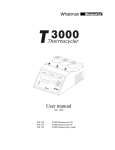
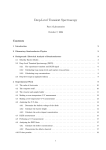
1
New Software
Version
Refer to red highlighted
text for additional
updates
Mutation Discovery Kit
User Guide
(DNF-920-K1000T)
(DNF-910-K1000T)
(DNF-480-3000)
For use with the Fragment Analyzer™ Automated CE System
Fragment Analyzer™ Software Version 1.0.2
PROSize® 2.0 Software Version 1.3
Revised March 10th, 2014
Advanced Analytical Technologies, Inc.
2711 South Loop Drive, Suite 4150
Ames, IA 50010
www.aati-us.com
Rev. 2014MAR13
Ph: 515-296-6600
Fax: 515-294-7141
Advanced Analytical Technologies, Inc.
Mutation Discovery Overview
Genetic studies have been further supported by the
emergence of a variety of tools to identify mutations such
as single nucleotide polymorphisms (SNPs). One such
technique widely employed in plant genomics is TILLING,
an acronym for Targeting Induced Local Lesions in
Genomes. It is a reverse genetics (genotype to phenotype)
technique designed to detect unknown mutations in a gene.
The TILLING method utilizes the availability of whole
genome sequences, well-established chemical mutagenesis
methods and high-throughput automated detection
technologies to deliver a rapid mutation screening tool.
The method involves enzymatic cleavage of
heteroduplexes formed as a result of mixing wild-type and
mutated genes. An enzyme specifically recognizes the
mismatched base pairs and cleaves the DNA at the site of
mismatch. For higher throughput, the genes derived from
individuals are pooled and PCR amplified, followed by
heteroduplex formation, and subsequent enzymatic
digestion. The digested cleaved DNA fragments are
analyzed on a suitable detection platform.
Figure 1 Mutation detection process
AATI has developed an efficient Mutation Discovery Kit and a detection platform (Fragment
Analyzer™) that offers a simple, high-throughput and cost-effective solution for mutational
screening in a format similar to but improved over the traditional TILLING process.
FIGURE 2: Electropherogram of enzyme cut DNA fragments
2
Rev. 2014MAR13
Advanced Analytical Technologies, Inc.
Mutation Discovery Kit Benefits
1. Sensitive detection allowing pooling of at least 8 diploid
individuals.
2. No labeled primers required for detection.
3. No desalting clean up step required.
4. No pouring gels, cleaning plates or loading samples
thereby minimizing labor.
5. The enzyme cuts both strands of dsDNA, producing cut
dsDNA fragment sizes which add up to the uncut
dsDNA fragment.
6. Fast electrophoresis run times of an hour or less.
7. Capable of analyzing large dsDNA fragments up to
10,000 bp, increasing the span of coverage and flexibility
in primer design.
Gel Kit Contents:
1. dsDNA Separation Gel
2. dsDNA Inlet Buffer
3. Capillary Conditioning
Solution
4. 35 bp\5,000 bp Markers
5. DNA Sizing Ladder
6. Mineral Oil
Cleavage Kit Contents:
1. dsDNA Cleavage
Enzyme
2. T-Digest Buffer
3. Dilution Buffer
8. Uses nanoliter amounts of samples for analysis, leaving
majority of the sample for further manipulations.
9. Potential to reduce PCR reaction volume because the digestion step requires only 2 µL of
PCR products.
10. Decreased assay time and costs by eliminating the use of a stop buffer.
11. The enzyme kit contains enough reagents for 3,000 samples. For eight-fold diploid DNA
pooling, this is equivalent to scanning 24,000 individuals with 1 kit.
12. Analytical software for fragment sizing.
13. In addition to analyzing the digested DNA fragments, the Fragment Analyzer™ system can be
used in the initial steps of the assay for quantifying genomic DNA and optimizing the PCR
amplification process.
Materials Available from AATI:
The following hardware, reagents and software are needed to perform the mutation discovery assay.
Note two different separation gel kits are available for mutation discovery, depending upon the
intact amplified gene length. The DNF-910-K1000T gel kit provides slightly improved resolution
below 1,000 bp; the DNF-920-K1000T gel kit provides improved resolution between 1,000 bp to
3,000 bp. Each gel kit provides enough reagents for analysis of 1,000 samples.
The dsDNA Cleavage Kit contains enough enzyme and buffer for processing 3,000 samples.
3
Rev. 2014MAR13
Advanced Analytical Technologies, Inc.
Hardware
•
Fragment Analyzer™ 12-capillary or 96-capillary CE system with LED fluorescence detection
•
12-Capillary Array Cartridge (Fluorescence), 33 cm effective/55 cm total length, 50 µm ID (part #
A2300-1250-3355); OR
•
12-Capillary Array Cartridge (Fluorescence), 55 cm effective/80 cm total length, 50 µm ID (part #
A2300-1250-5580); OR
•
96-Capillary Array Cartridge (Fluorescence), 33 cm effective/55 cm total length, 50 µm ID (part #
A2300-9650-3355); OR
•
96-Capillary Array Cartridge (Fluorescence), 55 cm effective/80 cm total length, 50 µm ID (part #
A2300-9650-5580)
Software
•
Fragment Analyzer™ instrument control software (Version 1.0.2 or higher)
•
PROSize® 2.0 data analysis software (Version 1.3 or higher)
Reagents
Gel Kits
1. Mutation Discovery 910 Gel Kit, 1,000 samples (part # DNF-910-K1000T)
a. FA dsDNA Gel 35-1500 bp, 500 mL, AATI part # DNF-810-0500
b. Intercalating Dye, 30 µL x 2, AATI part# DNF-600-U030
c. 5X 930 dsDNA Inlet Buffer, 300 mL, AATI part # DNF-355-0300 (dilute with
sub-micron filtered water prior to use)
d. 5X Capillary Conditioning Solution, 100 mL, AATI part # DNF-475-0100
(dilute with sub-micron filtered water prior to use)
e. Mutation Detection Kit DNA Ladder, 1.0 mL, AATI part # FS-SLR480-0001
f. 35bp and 5000bp Markers, 3.2 mL, AATI part # FS-SMK480-0003
g. Mineral Oil Dropper Bottle, 15 mL, AATI part # FS-SMO15
2. Mutation Discovery 920 Gel Kit, 1,000 samples (part # DNF-920-K1000T)
a. dsDNA Gel 75-15000 bp, 500 mL, AATI part # DNF-920-0500
b. Intercalating Dye, 30 µL x 2, AATI part# DNF-600-U030
c. 5X dsDNA Inlet Buffer, 300 mL, AATI part # DNF-455-0300 (dilute with submicron filtered water prior to use)
d. 5X Capillary Conditioning Solution, 100 mL, AATI part # DNF-475-0100
(dilute with sub-micron filtered water prior to use)
e. Mutation Detection Kit DNA Ladder, 1.0 mL, AATI part # FS-SLR480-0001
f. 35bp and 5000bp Markers, 3.2 mL, AATI part # FS-SMK480-0003
g. Mineral Oil Dropper Bottle, 15 mL, AATI part # FS-SMO15
4
Rev. 2014MAR13
Advanced Analytical Technologies, Inc.
Cleavage Kit
1. dsDNA Cleavage Kit, 3000 samples (part # DNF-480-3000)
a. T-Digest Buffer, 6 mL, AATI part # FS-CLKTBF
b. dsDNA Cleavage Enzyme, 50 µL, AATI part # FS-CLKENZ
c. Dilution Buffer E, 60 mL, AATI part # FS-CLKDBE
Other Consumables (Sold Separately)
1. Capillary Storage Solution, 100 mL (AATI Part # GP-440-0100)
Storage Conditions
Store at 4°C
(DO NOT FREEZE):
Store at Room Temperature
Store at –20°C:
(DO NOT FREEZE):
dsDNA Gel
Intercalating Dye
5X Capillary Conditioning
Solution
5X dsDNA Inlet Buffer
35 bp and 5000 bp Markers
Mineral Oil
Mutation Detection Kit DNA Ladder
Capillary Storage Solution
dsDNA Cleavage Kit
The number of freeze-thaw cycles and duration for which the dsDNA Cleavage Kit components
stay outside –20°C should be minimized as much as possible. If desired, the enzyme stock can be
divided into working volume aliquots.
IMPORTANT! Do NOT dilute the dsDNA Cleavage Enzyme stock prior to long term storage, as this
may reduce the activity of the Enzyme.
Equipment/Reagents to Be Supplied by User
•
•
PCR primers and template DNA (Homozygous and Heterozygous)
Reagents required for performing PCR
•
Thermal cycler (for PCR and enzymatic digestion)
•
Ice, for arresting the heteroduplex digestion reaction
•
96-well PCR sample plates. Recommended vendor: Eppendorf (semi skirted, part # 951020303). For
additional sample plate options refer to the Fragment Analyzer™ User Manual.
•
Multichannel pipettor(s) and/or liquid handling device capable of dispensing 1 – 100 µL
volumes (sample plates) and 1000 µL volumes (Inlet Buffer plate)
•
Pipette tips
•
96-well plate centrifuge (for spinning down bubbles from sample plates)
5
Rev. 2014MAR13
Advanced Analytical Technologies, Inc.
•
Sub-micron filtered DI water system (for diluting the 5X dsDNA Inlet Buffer, 5X 930
dsDNA Inlet Buffer and/or 5X Capillary Conditioning Solutions)
•
Fisherbrand 96 DeepWell 1mL Plate, Natural Polypropylene, part # 12-566-120 (Inlet
Buffer and Waste plate). Also available from AATI (AATI part # P60-20).
•
Reagent Reservoir, 50 mL (VWR 82026-355 or similar) (for use in pipetting Inlet Buffer
plates/sample trays)
•
Clean graduated cylinder (for measurement of dsDNA Gel volume and dilution of 5X Inlet
Buffer and 5X Capillary Conditioning Solution)
Safety
When working with chemicals, always follow usual safety guidelines such as wearing a suitable lab
coat, disposable gloves, and protective eyewear. For more information about the specific reagents,
please refer to the appropriate material safety data sheets (MSDSs) that can be obtained from the
product supplier.
Protocol
The Mutation Discovery Kit format constitutes the following steps, presented in the order in
which they are to be followed:
1.
2.
3.
4.
5.
6.
7.
8.
Extraction of Genomic DNA
Pooling Gene Copies
Primer Design
PCR Amplification
Heteroduplex Formation of the PCR Products
Enzymatic Digestion of the Heteroduplex
Dilution of the Digested Product
Analysis of Digested DNA Fragments Using the Fragment Analyzer™ System
1. Extraction of Genomic DNA
Use a relevant protocol for extracting the genomic DNA (gDNA) from the species of interest.
Optimal purity of the extracted samples is important for the success of PCR amplification and
subsequent assay steps.
a) Determine the concentration of the extracted gDNA before making the pools. Using a
suitable quantitation technique such as slab gel electrophoresis or UV-Vis
spectrophotometry, normalize the gDNA concentration to approximately 10 ng/µL.
b) Alternatively, the Fragment Analyzer™ system can be used to qualify and quantify the gDNA
using one the following kits:
6
Rev. 2014MAR13
Advanced Analytical Technologies, Inc.
a. Standard Sensitivity Genomic DNA Analysis Kit, AATI Part # DNF-487-0500
i. Input sample concentration range 5 – 100 ng/µL
b. High Sensitivity Genomic DNA Analysis Kit, AATI Part # DNF-488-0500.
i. Input sample concentration range 50 – 5000 pg/µL
2. Pooling Gene Copies
Genomic DNA can be pooled prior to PCR amplification. Based on the sensitivity of the assay,
the recommended maximum pooling ratio is at least 1 mutant allele in a total of 16 alleles (e.g.,
8-fold pooling for a diploid species or 4-fold pooling for a tetraploid species).
3. Primer Design
It is critical to design primers so that only the target region is amplified and no extraneous DNA
is present in the sample after PCR. Several design considerations described below are key to
achieving a specific amplification with high yield of the PCR product.
•
•
•
•
•
•
•
Complementary to flanking sequences of target region
Length of the primers
Melting and annealing temperature
Primer secondary structure (hairpins, self-dimer, cross dimers)
G/C content
G/C clamp
Runs of three or more Cs or Gs at the 3'-ends of primers
IMPORTANT! New sets of primers need to be designed if the previously designed primers do not
yield satisfactory results. Please refer to available PCR guidelines/books/papers to troubleshoot
the primer design process.
Many web-based applications as well as standalone software can assist in designing suitable
primers. These programs often incorporate most of the above mentioned parameters in
suggesting the primer sequences.
4. PCR Amplification
Amplify the gene of interest using the designed primers and a standard PCR protocol.
Optimized primer sequences and PCR conditions need to be established prior to carrying out
the assay. The following factors are critical in the efficacy of PCR and must be optimized to
obtain a single desired product.
•
•
•
•
•
Concentration of dNTPs
Concentration of KCl and MgCl2
Primer concentration
DNA polymerase
Reaction buffer
When optimizing PCR conditions, the annealing temperature can be varied on a gradient
thermocyler to obtain the best possible condition giving a single desired product. The Fragment
Analyzer™ system can be used to verify the amplicons during PCR optimization steps.
7
Rev. 2014MAR13
Advanced Analytical Technologies, Inc.
It is recommended to have a PCR yield in the range of 25 ng/uL - 100 ng/uL of Uncut
Amplicon before moving to the subsequent steps in the assay. If the concentration is higher
than this range, it is recommended to dilute the samples using nuclease free water. Absence of
sample peaks (uncut and cut fragments) in an electropherogram after digestion strongly indicates
a failed PCR.
IMPORTANT! A single PCR product is vital for best results. If the PCR gives non-specific products,
reduced yield, primer bands etc., then troubleshoot the PCR conditions to obtain a single PCR product
with good yield before proceeding to the heteroduplex formation.
Fidelity of the DNA polymerase is increasingly critical when amplifying large DNA fragments.
Reduced fidelity can create undesired heteroduplexes, which in turn can reduce the performance
of the assay by producing non-specific DNA fragments upon enzymatic digestion. Standard Taq
polymerase can easily amplify fragments up to 2,000 bp with good fidelity. However, highfidelity polymerases can be used to amplify larger DNA fragments.
5. Heteroduplex Formation of the PCR Products
After the PCR amplification, heteroduplexes can be created by first denaturing the DNA
amplicons followed by slow cooling. Thermocylers can be programmed to perform user-defined
cycles of heating and cooling.
a) Pooling of the extracted DNA prior to PCR amplification precludes the need to take out the
plate from the thermocyler and separately perform heteroduplex formation.
b) The heteroduplex formation step can be performed subsequently after the PCR
amplification step. The thermocyler program for the heteroduplex formation can be
appended to the thermocyler program for the PCR amplification step.
c) Based on the amplicons, users can select the denaturing temperature, cooling rate and # of
cycles required for the heteroduplex formation.
d) After the heteroduplex formation cycles are over, the resulting product can now be
subjected to the enzymatic digestion to cleave the mismatched heteroduplex.
6. Enzymatic Digestion of the Heteroduplex
a) Prepare a working solution of the dsDNA Cleavage Enzyme by diluting the Enzyme with
the T-Digest Buffer in the ratio of 1:125. Only 2 µL of this working enzyme solution will be
required for each sample well. Therefore, to process an entire 96-well plate of samples, add
1.6 µL of the dsDNA Cleavage Enzyme to 198.4 µL of the T-Digest Buffer to prepare a 200
µL volume of the working enzyme solution. It is recommended to optimize the digestion
reaction prior to conducting large scale screening. Refer to Appendix A for suggested
approaches in optimizing the digestion reaction.
IMPORTANT! It is recommended to only use freshly prepared working dsDNA Cleavage Enzyme
solution. When adding dsDNA Cleavage Enzyme to the T-Digest Buffer, only prepare a volume of
working Enzyme solution necessary for digesting one sample plate or set of samples at a time. The
number of freeze-thaw cycles and duration for which the Enzyme stays outside –20°C should be as
minimal as possible. Do not let the stock Enzyme solution remain at room temperature for more
than 30 minutes at a time.
8
Rev. 2014MAR13
Advanced Analytical Technologies, Inc.
b) Upon completion of the heteroduplex formation cycles (Step 5 above), remove the cap or
film from the 96-well plate and transfer 2 µL of each product from each well into a new 96well plate. Ensure that the sample identity (sample number etc.) is tracked properly during
the transfer.
c) Pipette 2 µL of the working dsDNA Cleavage Enzyme solution (Step 6a) to each well of the
96-well plate from Step b containing the heteroduplex products. Mix the contents using the
pipettor by aspiration/expulsion in the pipette tip. Alternatively, reseal the plate, vortex
gently and spin down in a plate centrifuge.
IMPORTANT! Make sure there are no air bubbles after mixing and the contents sit at the
bottom of each well. Reduced performance is observed when the contents are in the middle or
upper section of the well.
d) Place the plate in a thermocycler and incubate the samples at 45°C for 45 minutes followed
by a 4°C hold. On completion of the digestion, immediately place the sample plate on ice.
This reduces further nuclease activity. If not analyzing immediately, the sample plate can be
stored at -20°C.
7. Dilution of the Digested Product
a) Spin down the sample plate in a centrifuge and add 20 µL of the Dilution Buffer to each
well. Mix the contents well. Make sure there are no air bubbles trapped in the bottom of the
wells. Centrifuge the plate if necessary. The presence of trapped air bubbles can lead to
injection failures.
8. Analysis of Digested DNA Fragments Using the Fragment Analyzer™ System
After preparation according to the steps 1-7 above, the samples are ready to be analyzed in the
Fragment Analyzer™ instrument as outlined in the following sections.
Fragment Analyzer™ Start Up / Instrument Preparation
Gel Preparation
1. Store the dsDNA Separation Gel at 4°C upon arrival.
2. The Intercalating Dye is supplied as a 20,000X concentrate in DMSO and should be stored
at -20°C.
NOTE: For this assay, it is recommended to use the Intercalating Dye at 2X normal
concentration (1:10,000 dilution). Additional dye is now provided with this kit.
3. Bring the dsDNA Separation Gel and Intercalating Dye to room temperature prior to
mixing.
9
Rev. 2014MAR13
Advanced Analytical Technologies, Inc.
4. Mix appropriate volumes of Intercalating Dye and Separation Gel necessary for less than
two weeks of operation. Use a 50 mL conical centrifuge tube to allow a small minimum
working volume. For larger volumes, use a 250 mL conical centrifuge tube and remove the
collar of the tube holder in the instrument reagent compartment. For maximum accuracy, it
is recommended to dispense Separation Gel into a clean glass graduated cylinder for volume
measurement and transfer to the working tube prior to adding Intercalating Dye.
NOTE: Some loss of detection sensitivity will be observed over a two week period after the
gel/dye mixture has been prepared. For best results, it is recommended to prepare
gel/dye mixture daily. It is not recommended to use gel/dye mixture that is more than
two weeks old.
5. The volume of Separation Gel required per run varies between 12-capillary and 96-capillary
Fragment Analyzer™ systems. The volumes required are summarized below.
For a 12-capillary Fragment Analyzer™ system:
# of samples to be
analyzed
12
24
36
48
96
Volume of Intercalating dye
Volume of Separation Gel
1.0 µL
1.5 µL
2.0 µL
2.5 µL
4.5 µL
10 mL1
15 mL
20 mL
25 mL
45 mL
1
A 5 mL minimum volume should be initially added to the tube.
NOTE: For a 12-capillary array, it is recommended to digest 12 samples at a time to ensure
lowest levels of background noise arising due to non-specific digestion outside the 45 min
digestion time period.
For a 96-capillary Fragment Analyzer™ system:
# of samples to be
analyzed
96
192
288
384
480
Volume of Intercalating dye
Volume of Separation Gel
4.0 µL
8.0 µL
12.0 µL
16.0 µL
20.0 µL
40 mL
80 mL
120 mL
160 mL
200 mL
6. Place the prepared Separation Gel/Intercalating Dye mixture onto the instrument and insert
into the desired gel fluid line (Gel 1 or Gel 2 pump position). Ensure the fluid line is
positioned at the bottom of the conical tube to avoid introducing air bubbles, which can
cause pressurization errors.
7. When adding Separation Gel to the instrument, update the solution levels in the Fragment
Analyzer™ instrument control software. From the Main Menu, select Utilities – Solution
Levels. A menu will be displayed to enter in the updated fluid levels (Figure 3).
10
Rev. 2014MAR13
Advanced Analytical Technologies, Inc.
Figure 3. Solution Levels menu
8. When switching applications (e.g., between kits), prime the appropriate gel fluid line after
loading fresh gel/dye mixture. From the Main Menu of the Fragment Analyzer™ instrument
control software, select Utilities – Purge… Select the desired fluid line(s) (Conditioning,
Gel 1, or Gel 2) and press OK to purge the fluid line with fresh gel.
Figure 4. Prime menu
Inlet Buffer Preparation
a) Store the 5X dsDNA Inlet Buffer at 4°C upon arrival. DO NOT FREEZE.
b) Bring the 5X dsDNA Inlet Buffer to room temperature prior to mixing and use.
c) In a clean container, add 20 mL of the 5X dsDNA Inlet Buffer per 80 mL of deionized submicron filtered water. Agitate to mix. The entire bottle can be mixed to 1X concentration
and stored at 4°C if desired.
11
Rev. 2014MAR13
Advanced Analytical Technologies, Inc.
Capillary Conditioning Solution Preparation
1. Store the 5X Capillary Conditioning Solution at room temperature upon arrival. DO NOT
FREEZE.
2. In a clean container (e.g. 50 mL or 250 mL conical centrifuge tube), add 20 mL of the 5X
Capillary Conditioning Solution per 80 mL of deionized sub-micron filtered water. Agitate to
mix. The entire bottle can be mixed to 1X concentration and stored at room temperature if
desired.
3. Once mixed, place the 1X Capillary Conditioning Solution onto the instrument and insert
the CONDITIONING fluid line (Conditioning Solution pump position). Ensure the fluid
line is positioned at the bottom of the conical tube to avoid introducing air bubbles, which
can cause pressurization errors.
4. The 1X Capillary Conditioning Solution should be added to the system as use demands. A
typical 12-capillary experiment cycle consumes less than 4 mL; a typical 96-capillary
experiment consumes less than 35 mL.
5. When adding fresh 1X Capillary Conditioning Solution to the instrument, update the
solution levels in the Fragment Analyzer™ instrument control software. From the Main Menu,
select Utilities – Solution Levels. A menu will be displayed to enter in the updated fluid
levels (Figure 3).
Instrument Preparation
1. Check the fluid level of the waste bottle and waste tray daily and empty as needed.
2. Prepare a fresh 96 DeepWell 1mL Plate filled with 1.0 mL/well of 1X dsDNA Inlet Buffer
daily. (12-Capillary System: Row A only; 96-Capillary System: All Rows) Do NOT overfill
the wells of the inlet buffer plate.
3. 12-Capillary Systems: In Row H of the same prepared buffer plate, place 1.1 mL/well of
Capillary Storage Solution (AATI # GP-440-0100). Row H of the buffer plate is used for the
Store location, and the array moves to this position at the end of the experimental sequence.
4. 96-Capillary Systems: In the Sample 3 drawer, place a sample plate filled with 100 µL/well of
Capillary Storage Solution (AATI # GP-440-0100). Sample 3 is used for the Store location,
and the array moves to this position at the end of the experimental sequence.
IMPORTANT! Ensure Row H of the buffer tray (12-capillary systems) or Sample 3 (96capillary systems) is always filled with Capillary Storage Solution, and the capillary array is
placed against Storage Solution when not in use, to prevent the capillary tips from drying out
and potentially plugging.
5. Place the prepared inlet buffer plate into Drawer “B” (top drawer) of the Fragment
Analyzer™. Ensure that the plate is loaded with well A1 toward the back left on the tray.
6. Place an empty 96 DeepWell 1mL Plate into Drawer “W” (second from top) of the Fragment
Analyzer™. This plate serves as the capillary waste tray, and should be emptied daily.
Alternatively, the supplied open reservoir waste plate may be used.
12
Rev. 2014MAR13
Advanced Analytical Technologies, Inc.
Marker/Ladder/Sample Plate Preparation
1. General Information
a. The recommended 96-well sample plate for use with the Fragment Analyzer™ system is a
semi-skirted PCR plate from Eppendorf (#951020303). Please refer to Appendix C –
Fragment Analyzer™ Compatible Plates and Tubes in the Fragment Analyzer™ User
Manual for a complete approved sample plate list. The system has been designed to
operate using these dimensions/styles of PCR plates. Plates with similar dimensions
may be used, but note that capillary damage may occur with the use of poor quality PCR
plates.
IMPORTANT! Contact AATI if a different vendor or style of PCR plate is to be used in order to
verify compatibility. The use of PCR plates with different dimensions to the above
recommended plate could possibly damage the tips of the capillary array cartridge.
2. 35 bp/5,000 bp Marker Preparation
a. Store the 35 bp and 5,000 bp Marker solution at -20°C upon arrival.
b. Bring the 35 bp and 5,000 bp Marker solution to room temperature prior to use; agitate
solution to ensure it is properly mixed and centrifuge vial prior to dispensing.
c. The Marker solution is supplied as a ready-to-use solution, containing 0.5 ng/µL of
each fragment in a 1X TE buffer solution. It is intended for use as an external standard
marker plate.
d. Prepare the Marker solution plate by dispensing 30 µL/well into Row A only (12Capillary) or every well (96-Capillary) of a separate sample plate. Cover the wells with 20
µL/well of the supplied mineral oil to allow reuse for at least 30+ injections.
e. The prepared Marker solution plate should be placed into Drawer “M” (third from top)
of the Fragment Analyzer™. Ensure that the plate is loaded with well A1 toward the back
left on the tray.
3. Mutation Detection Kit DNA Ladder
a. Store the DNA Ladder solution at -20°C upon arrival.
b. Bring the DNA Ladder solution to room temperature prior to use; agitate solution to
ensure it is properly mixed and centrifuge vial prior to dispensing.
c. The DNA Ladder solution is supplied as a ready-to-use solution, containing
approximately 0.1 ng/µL total DNA concentration in a 0.1X TE buffer solution. It is
used for calibrating the size of analyzed DNA fragments, and is typically placed in a well
of the sample plate and run in parallel with the samples.
12-Capillary Systems: Pipette 24 µL of DNA Ladder solution into well 12 of each row
of the sample plate.
96-Capillary Systems: Pipette 24 µL of DNA Ladder solution into well H12 of the
sample plate.
13
Rev. 2014MAR13
Advanced Analytical Technologies, Inc.
Alternatively, once the DNA Ladder has been run under the experimental method and
additional samples are to be run under the same experimental conditions, the ladder can
be imported in the PROSize® software, enabling use of all 96 wells of the sample plate.
4. Sample Plate
a. A minimum of 20 µL/well is required for proper sample injection. The standard
Mutation Detection assay format results in a total sample volume of 24 µL after
digestion and dilution, which is sufficient for a successful injection.
b. Samples should be loaded into every well of the Sample Plate. If less than 96 samples
are to be analyzed the user should place 1X TE buffer into these empty wells of the
Sample Plate prior to performing the experiment.
Performing Experiments
Running an Experiment
1. To set up an experiment, from the Main Menu of the Fragment Analyzer™ instrument control
software, select the Operation tab (Figure 5). Select the sample tray location to be analyzed
(1, 2, or 3) by left clicking the Sample Tray # dropdown or by clicking the appropriate
sample plate tab (alternate plate view) and choosing the appropriate location. 96-Capillary
Systems: Note that Sample 3 is typically assigned to the Capillary Storage Solution.
2. Left click a well of the desired sample plate row with the mouse. The selected row will be
highlighted in the plate map (e.g., Row A in Figure 5). Enter the sample name if desired into
the respective Sample ID cell by left clicking the cell and typing in the name. Alternatively,
sample information can be imported from .txt or .csv file by selecting the Load from File…
option.
14
Rev. 2014MAR13
Advanced Analytical Technologies, Inc.
Manually enter Sample ID data, OR load
from file (option of save information by
“Save Tray” or “Save Selected Row”)
Select Row
After entering data,
select “Add to queue”
Figure 5. Main Screen showing selection of sample row and entering sample information
3. After sample information for the row or plate has been entered, under the Run Selected
Row field press Add to queue. The Separation Setup form will be displayed enabling the
user to select the experimental method and enter additional information (Figure 6).
Figure 6. Separation Setup form to select experimental Method and enter tray/folder information
4. In the Separation Setup pop-up form, left click the dropdown and select the appropriate
preloaded experimental Method file. The available methods are sorted by kit number and
15
Rev. 2014MAR13
Advanced Analytical Technologies, Inc.
are linked to the directory containing methods for the currently installed capillary array
length (e.g., 33cm or 55cm). Select the following method:
a. Select MUT-910-33 –Mutation Discovery 910 kit 35-5000 bp.mthds when the 33
cm effective, 55 cm total “short” capillary array is installed (with a 910 kit)
b. Select MUT-910-55 –Mutation Discovery 910 kit 35-5000 bp.mthds when the 55
cm effective, 80 cm total “long” capillary array is installed (with a 910 kit)
c. Select MUT-920-33 –Mutation Discovery 920 kit 35-5000 bp.mthds when the 33
cm effective, 55 cm total “short” capillary array is installed (with a 920 kit)
d. Select MUT-920-55 –Mutation Discovery 910 kit 35-5000 bp.mthds when the 55
cm effective, 80 cm total “long” capillary array is installed (with a 920 kit)
5. Select the appropriate Gel line being used for the experiment (Gel 1 or Gel 2) using the
dropdown.
6. The Tray Name can be entered to identify the sample plate. The Folder Prefix if entered
will amend the folder name (normally a time stamp of HH-MM-SS from the start of the CE
run).
7. To copy the experimental results to another directory location in addition to the default save
directory (C:\AATI\Data), check the Copy results box and select the desired Copy
path: directory by clicking the … button and navigating the desired save directory.
8. Any Notes can be entered regarding the experiment; they will be saved and displayed in the
final PDF report generated by the PROSize® 2.0 software.
9. Once all information has been entered, press OK to add the method to the instrument
queue (press Cancel to abort adding the method).
10. Repeat Steps 3-9 for any remaining sample rows to be analyzed.
11. On 96-capillary systems, or in 12-capillary systems if the entire 96-well sample tray is to be
run using the same experimental method, under the Run Entire Tray field press Add to
queue. A form similar to Figure 6 will be displayed for entering information and adding the
run to the instrument queue for the entire 96-well sample tray.
12. After a row or tray has been added to the queue, the method(s) will be listed on the main
screen under the Method Queue field (Figure 7).
16
Rev. 2014MAR13
Advanced Analytical Technologies, Inc.
13. Prior to starting the experiment, verify all trays (buffer/storage, marker, waste, sample, etc.)
have been loaded into their respective drawer locations.
14. Press the Play icon (
) to start the sequence loaded into the queue. To Pause the queue
after the currently running experiment is completed, press the
queue of all loaded runs press the
button. To Clear the run
button.
To start running
the queue, press
the Play button
Figure 7. Main Screen after selection of samples to the run queue.
15. Once an experiment has been loaded onto the queue, the user can view or edit the method
(Administrator level only can edit a method) by pressing the Method Summary field. To
remove the method from the queue, press the “X” button; to view the stepwise details of the
method press the double down arrow icon.
16. The user may add a Pause or Prime step into the queue by right clicking the mouse while
over the queue and selecting “Insert Pause” or “Insert Prime”.
17. The order of the experimental queue can be rearranged by dragging down individual entries.
Further information regarding the Method Queue operation is provided in the Fragment
Analyzer™ User Manual.
18. Once started, the instrument will perform all the programmed experiments in the Method
Queue uninterrupted unless a pause step is present. Note that additional experiments can be
17
Rev. 2014MAR13
Advanced Analytical Technologies, Inc.
programmed and added to the Method Queue at any time while the instrument is running
if desired. After completion of the last queued experiment, the instrument stage will
automatically move to the Store location (12-Capillary Systems: Row H of the inlet buffer
tray containing the Capillary Storage Solution; 96-Capillary Systems: Sample 3 location).
Viewing and Editing Experimental Methods
1. A User level operator can View the steps of the experimental method by pressing the View
link on the Separation Setup screen, or by pressing the Method Summary option once a
method has been loaded onto the experimental queue. User level operators cannot edit any
steps of a queued separation method.
2. Administrator level operators can Edit certain steps of the experimental method. To open
the method editor screen, press the Edit link from the Separation Setup screen. The
method editor screen is displayed, showing the steps of the method (Figure 8).
3. The preloaded, optimized steps for the MUT-910-33 (Figure 8), MUT-920-33 (Figure 9),
MUT-910-55 (Figure 10), and MUT-920-55 (Figure 11) methods are shown below. The
general steps of the method are as follows:
1) Full Condition flushing method (Automatically enabled). Gel Selection: Gel 1.
2) Perform Prerun (ENABLED) (6-10 kV, 30 sec)
3) Rinse (DISABLED)
4) Marker Injection (ENABLED) Voltage Injection (5-7.5 kV, 15 sec). This step injects the
35 bp/5,000 bp marker plate.
5) Rinse (DISABLED)
6) Sample Injection (ENABLED) Voltage Injection (5-7.5 kV, 45 sec). This step injects the
prepared sample plate.
7) Separation (ENABLED) Voltage (6-10 kV, 45-80 min). This step performs the CE
Separation.
18
Rev. 2014MAR13
Advanced Analytical Technologies, Inc.
Figure 8.MUT-910-33 Mutation Discovery method
Figure 9.MUT-920-33 Mutation Discovery method
19
Rev. 2014MAR13
Advanced Analytical Technologies, Inc.
Figure 10.MUT-910-55 Mutation Discovery method
Figure 11.MUT-920-55 Mutation Discovery method
20
Rev. 2014MAR13
Advanced Analytical Technologies, Inc.
4. An Administrator level user has the option to adjust the Gel Selection; Prerun settings;
Rinse settings including Tray, Row and # Dips; Sample Injection settings; and the
Separation settings. For example, if the marker solution is loaded into a row other than
Row A on a 12-capillary instrument, this can be adjusted prior to or while the method is
loaded on the experimental queue.
5. To apply any adjustments to the method being placed on the experimental queue, press the
OK button. To exit the editor screen without applying any changes press the Cancel button.
IMPORTANT! Any edits made to the experimental method from the Separation Setup or
Method Summary screen will only apply to the currently loaded experiment in the queue. No
changes are made to the original separation method file.
Processing Experimental Data
1
When processing data, the PROSize® 2.0 software (Version 1.3 and higher) will
automatically recognize the separation method performed and apply the appropriate
matching configuration file from the C:\PROSize 2.0\Configurations directory:
a. The MUT-910-33 (or 55) separation method will be processed using the MUT-91033 (or 55) Mutation Discovery 910 Kit 35-5000bp configuration file;
b. The MUT-920-33 (or 55) separation method will be processed using the MUT-92033 (or 55) Mutation Discovery 910 Kit 35-5000bp configuration file.
NOTE: If the preloaded PROSize® 2.0 software configuration files shown above are not
located in the C:\PROSize 2.0\Configurations directory, contact AATI
Technical Support to obtain the files.
2
The data should be normalized to the 35 bp lower marker and 5,000 bp upper marker and
calibrated to the 100 bp Plus DNA Ladder run in parallel to the samples or imported from a
previous run. Figure 12 shows an example of the 35 bp and 5,000 bp markers injected with
the 100 bp Plus DNA Ladder. A total of 16 peaks should be observed.
3
A positive assay result is indicated by the presence of cut DNA fragments that sum to the
intact, original DNA fragment within a reasonable sizing Error %. An example positive
result is shown in Figure 2.
21
Rev. 2014MAR13
Advanced Analytical Technologies, Inc.
Figure 12. Example 100 bp Plus DNA Ladder injected with 35 bp and 5,000 bp markers (910 Gel Kit).
Fragment Analyzer™ Shut Down/Storage
Instrument Shut Down/Storage
The instrument automatically places the capillary array in the Store position against Capillary
Storage Solution (12-Capillary Systems: Row H of the buffer tray; 96-Capillary Systems: Sample
3) after each experiment; no further action is required.
If the instrument is to be idle for more than one day, turn off power to the system to preserve
lamp lifetime.
22
Rev. 2014MAR13
Advanced Analytical Technologies, Inc.
Appendix A
Optimizing the Digestion Reaction
Common to many heteroduplex cleavage enzymes is the non-specific digestion of the DNA, which
can contribute to undesired background signals. Therefore, the ratio of the input DNA
concentration to the cleavage enzyme concentration becomes important for the successful cleavage
of the heteroduplexes while minimizing background. Too little enzyme and too much DNA cause
insufficient cleavage of the heteroduplex within the reaction timescale. This can result in less intense
cut fragment signals, increasing the difficulty when scoring results. Likewise, too much enzyme in
comparison to too little DNA will result in more non-specific digestion resulting in increased
background signals.
In light of the above considerations, typically the range of DNA and enzyme concentrations should
be evaluated and optimized as a first step in the mutation discovery process. It becomes all the
more important for such empirical experiments, given the fact that each lab typically has its own set
of PCR protocols producing slightly different DNA concentration ranges.
Recommended below is a matrix of sixteen (16) digestion reactions to be performed with known
samples as a step towards optimizing the mutation discovery process. The digestion reaction volume
remains the same; 2 µL of DNA (diluted or concentrated) plus 2 µL of the Enzyme (diluted or
concentrated).
DNA
FS
FS/2
FS/5
FS/10
Enzyme
2E
E
E/2
E/3
In the above table, ‘FS’ refers to Full Strength DNA concentration, which is the straight up PCR
product after heteroduplex formation. FS/2, FS/5 and FS/10 refer to PCR products diluted by 1/2,
1/5 and 1/10, respectively, with nuclease free water.
‘E’ refers to the Enzyme concentration suggested in Section 6 (Page 7) of this manual. 2E, E/2 and
E/3 refers to 2X, 1/2, and 1/3, respectively, of the suggested enzyme concentration. The enzyme
must be diluted using T-Digest Buffer. NOTE: If during optimization the enzyme concentration is
determined to be more dilute than the suggested concentration in Section 6 of this User Manual,
additional T-Digest Buffer can be ordered from AATI.
It is recommended to perform the sixteen digestion reactions outlined in the table above in triplicate
for reproducibility purposes. NOTE: If the signals for uncut DNA at the FS/10 concentration are
above 10,000 RFUs under the standard injection conditions, the DNA should be further diluted.
23
Rev. 2014MAR13
Advanced Analytical Technologies, Inc.
Appendix B
Troubleshooting Guide
The following table lists several potential assay specific issues which may be encountered when using
the Mutation Discovery Kit and suggested remedies. For a full list of instrument specific
troubleshooting information, refer to the Troubleshooting and Maintenance Guide for the
Fragment Analyzer™ system.
Issue
A. No cut DNA fragment
signals AND saturated
uncut DNA signal for
known mutation
control/sample.
B. No signals for cut DNA
fragments NOR uncut
DNA fragment. Marker
peaks are visible.
Cause
Corrective Action
1. Input DNA concentration
too high relative to Enzyme
concentration. Ensure total
signal height does not
exceed 10,000 RFU for
uncut DNA.
1. Dilute input DNA sample
concentration and repeat
digestion with same Enzyme
concentration.
2. No heteroduplex formed.
2. Check if any heteroduplexes are
being formed or not. Digest only
the heterozygous mutant or 1:1
mixture of homozygous mutant
and wild-type.
1. Input DNA concentration
too low or failed PCR.
1. Check the PCR product
concentration/quality using
Fragment Analyzer™ system.
2. Failed injection of the
sample.
2. Check for the presence of air
bubbles in the sample well.
Centrifuge the plate and ensure
no air bubbles are in the sample
wells.
3. Enzyme concentration too
high compared to input DNA
concentration, causing nonspecific digestion of majority
of input DNA present.
3. If input DNA concentration is
verified to be sufficient, decrease
the enzyme concentration and/or
decrease the digestion time.
24
Rev. 2014MAR13
Advanced Analytical Technologies, Inc.
C. Little or no cut DNA
fragment signals when
expected AND uncut DNA
signals visible and less
than 10,000 RFU.
D. No cut DNA fragment
signals AND very low
uncut DNA signal.
1. No detectable levels of cut
DNA fragments due to
lowered enzyme efficiency.
1. Increase the enzyme
concentration and/or digestion
time. Verify expiration date of
enzyme.
2. No heteroduplex formed.
2. Check if any heteroduplexes are
being formed or not. Digest only
the heterozygous mutant or 1:1
mixture of homozygous mutant
and wild-type.
3. Mutant allele might be more
dilute than maximum
recommended of 1:16.
3. Check the ratio of pooled alleles.
Ensure minimum of 1 mutant
present in total of 16 alleles.
4. Significant levels of primerdimers inhibiting the
enzyme efficiency.
4. Data from Fragment Analyzer™
system can reveal the amount of
primer-dimers present in the
sample. Optimize primer and PCR
design to reduce primer-dimers.
5. Significantly higher amount
of gDNA used for PCR,
inhibiting the cleavage
efficiency.
5. Optimize PCR to utilize
decreased amount of gDNA.
1. DNA concentration is
significantly lower than
recommended.
1. Optimize a more robust PCR to
yield at least 25 ng/uL of uncut
DNA.
2. Increase the injection time.
3. Decrease the digestion time and
enzyme concentration.
E. Background noise
comparable to cut DNA
fragment signals.
1. Decrease the digestion time from
45 min to 30 min.
1. Increased non-specific
digestion.
Decrease the Enzyme
concentration.
2. Sample may be ‘dirty’: too
much residual gDNA,
dNTPs, primers etc.
2. Additional sample clean up or
PCR optimization may be
necessary.
25
Rev. 2014MAR13
Advanced Analytical Technologies, Inc.
F. No signals from cut DNA
fragments, uncut DNA or
markers.
1. Air trapped at the bottom of
sample plate and/or marker
plate well, or bubbles
present in well.
1. Check sample/marker plate wells
for trapped air bubbles. Centrifuge
plate.
2. Insufficient sample volume.
A minimum of 20 µL is
required.
2. Verify proper volume of solution
was added to sample well.
3. Capillary is plugged.
3. Check waste plate for liquid in the
capillary well. If no liquid is
observed, follow the steps
outlined in Appendix G –
Capillary Array Cleaning of the
Fragment Analyzer™ User
Manual for unclogging a capillary
array.
Appendix C
Technical Support and Contact Information
1. For questions with Fragment Analyzer™ operation or about the Mutation Discovery Kit,
contact AATI Technical Support by phone at (515)-296-6600 or by email at [email protected].
26
Rev. 2014MAR13
Advanced Analytical Technologies, Inc.
Notes
27
Rev. 2014MAR13
Advanced Analytical Technologies, Inc.
Notes
28
Rev. 2014MAR13
Advanced Analytical Technologies, Inc.