1
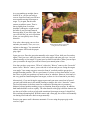
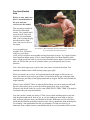
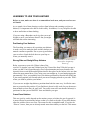
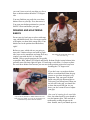
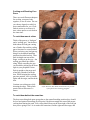
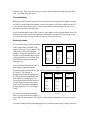
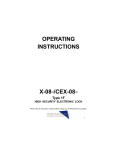
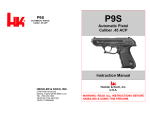
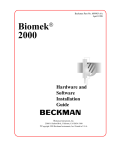
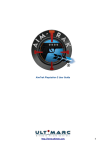
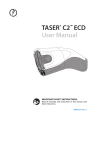
REVOLVERS
A pair of single action revolvers is required. A single action revolver is one in which the
shooter must manually cock the firearm before pulling the trigger. This is different from a
double action revolver in which the trigger pull will both cock and fire the gun.
The rules also mandate that the firearm be either an original or replica of one that was
available in the period up to 1899. This includes: the S&W Model 3, variations and
reproductions; the Colt Single Action Army and reproductions (including the Ruger
Vaquero and Blackhawk); the Colt Bisley and reproductions (including the Ruger Bisley
Vaquero), the Remington 1875 and reproductions; and various cap and ball guns made by
Colt, Remington, and others (as well as reproductions).
Selecting a revolver is a matter of personal choice and comfort. The shooter should try
out as many different varieties as possible before determining the preferred model. Go to
several different gun shops and handle as many varieties as you can before buying.
Once a model has been selected, caliber and barrel length is the next choice. In general,
shorter barrels and smaller calibers handle better than longer barrels and bigger calibers.
However, it is possible to load a .45 Colt cartridge so that the recoil is similar to .38
Special, though shot precision can suffer. Less experienced shooters may be better served
by one of the smaller caliber revolvers as there is less recoil to absorb.
Competitive Note: Look for revolvers that fit your hand well and point at the target
naturally. Select one with sights that are comfortable and natural. A square rear sight
notch is essential for quick sight acquisition.
CONFIDENCE AND FUNDAMENTALS
Now that you have selected your revolvers and leather, it’s time to develop complete
confidence and basic techniques. The first thing to do is take the revolvers down for a
good cleaning. This will help you become familiar with their operation and any quirks
they may have. In addition, it will ensure that you start out with clean, well-maintained
equipment. If you have questions or problems with disassembly and cleaning, check the
user manual that came with the guns or contact the shop where they were purchased.
Proper grip, stance, sighting, target acquisition, drawing and holstering all need to be
perfected. Grip, stance, sighting, and trigger squeeze are the basic fundamentals every
shooter needs to know. Learning target acquisition, and drawing and holstering are the
first steps to becoming a competitive shooter.
WARNING: When practicing at home, MAKE ABSOLUTELY SURE that there is no
live ammunition in the room or in the gun. This is an easy way to make a mistake and
have an accidental discharge (AD). Spend the time to go through the area and move
any ammunition to another part of your house or apartment.
The dry fire drills covered in this
section are ones that I use and some
of the top shooters in the game use.
They are designed to help you
become comfortable with your
equipment and learn the basic gun
handling skills needed to excel.
Spend some time on the dry fire
drills listed and become familiar
with your guns and learn basic
sighting, stance, and grip. I can’t
over-emphasize the importance of
these drills. I return to them at the
beginning of every practice session.
Dean Perry (Punch) practices his revolver fundamentals
using a modified Weaver stance.
The live fire drills covered in this
section will help you learn to shoot
and get you comfortable. Making sure that your guns print on paper to exactly the same
spot they are aimed is important in developing confidence in your equipment. If they
don’t shoot where you aim, take the guns, some of your ammunition, and targets with you
to a gunsmith to have the point of aim (POA) adjusted to the point of impact (POI).
Occasionally I will use the term “break the shot.” This refers to the act of squeezing the
trigger and waiting for the shot to go off. There is a time lag between when the trigger
disengages the sear and when the hammer actually causes the firing pin to set off the
shot. While minimal, the delay is real. When you “break a shot,” make sure to follow
through the entire shot.
Everything follows fundamentals. If your fundamentals are solid, you can perform well.
Until your fundamentals are sound, you can’t learn to shoot fast accurately.
DRY FIRE PRACTICE
Dry fire practice is one of the most effective means of training you can do. While range
time is needed to ensure that you haven’t picked up any bad habits, the time you spend on
dry fire practice (especially transitions and target acquisition) can really make a big
difference in your scores.
In order to perform the dry fire drills you will need some small targets (I use small sheets
of paper taped to the wall), snap caps, your gun leather, and no distractions. Make sure to
wear your shotgun belt or slide as well. You want your practice to be as close to match
conditions as possible.
There are four fundamentals to revolver shooting: grip, trigger pull, stance, and sights.
Once you have found your grip and stance, using the sights comes much more naturally.
Grip and Trigger
Before we start, make sure there is no
ammunition in the area, and your revolvers are
not loaded.
If your grip isn’t natural, comfortable, or strong,
you won’t be able to shoot well consistently. And,
you won’t be able to recover from recoil because
Jeff Moser (Three Finger Jake)
your grip shifted during the recoil of the shot.
demostrates proper grip.
Your grip must be exactly the same every time
you pick up the revolver and for every shot. It
must be strong and comfortable without causing fatigue. In addition, the grip must put
your trigger finger into the trigger guard for a pull that is straight back into the web
between your thumb and forefinger.
To find this grip, hold the gun in your weak hand with the barrel pointing forward and the
grip toward the rear. Line the web between your thumb and forefinger up to the middle of
the grip strap and push your hand straight forward until the web of your hand hits the grip
strap. Wrap your finger snugly around the grip so that your forefinger naturally finds the
trigger. Depending on your revolver and the size of your hands, there may not be enough
room on the grip for all of your fingers. That’s just fine. Put your little finger under the
front of the grip. If you shoot with a one-hand hold (duelist style), then this is your grip.
You should hold the revolver as if you are giving a firm handshake; you aren’t trying to
strangle something. Most of the tension should be in the bottom three fingers on the grip.
This leaves the trigger finger relaxed and free to work the trigger. However, you need a
tight enough grip that the recoil can be managed.
If you shoot with a two-hand hold, grip the gun in your strong hand as described above.
With your weak hand, wrap your fingers around the front of your strong hand in such a
way as they are lined up in the gaps between the fingers of your strong hand. Bring your
palm into the grip, with your thumb free to work the hammer. The forefinger on your
weak hand should find a comfortable place on the front of the trigger guard. Billy Abbate
(TG Reaper) puts his first two fingers in front of the trigger guard. This puts his hand in
position to use his wrist to move his thumb. This uses big muscles, is less fatiguing, and
is faster for him than any other method.
There are a few different thoughts regarding the weak hand. One is that it is there for
support and to help hold the gun steady. The other is that it is there only to provide a
platform for the thumb to cock the gun. I subscribe to the latter. Many excellent shooters
subscribe to the former. While my left hand does provide some support, I look for a way
to place it so that I can best work the hammer with my thumb.
If you use the weak hand as part of the support platform for the gun (and this does
stabilize it), then you should used the “push-pull” method. This means that your strong
hand pushes the gun forward and your weak hand pulls the gun toward you. These
pressures are fairly light and help to promote a stable platform.
Note: Every time you pick up your revolver, use this grip. You must ingrain the grip into
muscle memory by repetition. Repeat the grip over and over until it becomes natural and
automatic.
Now that you know how to find your grip, load your revolver with SNAP CAPS. Pick up
your revolver. You are using the new grip, right? Draw the hammer back (using the
thumb of your weak hand with a two-hand hold, or with the thumb of your strong hand
using a one-hand hold). With the pad of your forefinger on the trigger, slowly squeeze it
straight back into the web of your strong hand. At some point, the sear will disengage and
the hammer will fall. It took you by surprise, didn’t it? If it didn’t, try it again only much
slower. When you squeeze the trigger, the gun shouldn’t move up or down, or right or
left. Do this over and over until it becomes natural and automatic.
One last note: Throughout the rest of this section, I will keep mentioning the grip. I can’t
stress it enough. The proper grip is vitally important to keep control of your revolver,
maintain accuracy, and speed recovery from recoil.
Stance
There are several different options for stance. In general, the shooter must find the one
that works the best. I have a
different one for each shooting
style, and for different holster
configurations. In this case, I’ve
broken it down to options for a
two-hand hold and for a one-hand
hold.
Two-Hand Hold
Before we start, make sure there is
no ammunition in the area, and
your revolvers are not loaded.
Let’s try this exercise first. Tape a
small target up on the wall. Grip
your revolver with a two-hand
hold. You are using the grip
described earlier, right? Now, aim
your revolver at the target.
Jim Sutphin (Geronimo Jim) prefers the Weaver stance.
Are you standing up straight, knees
locked? If so, you are not ready to
recover from recoil and you will have
more trouble moving from target to
target. Try it again, but this time
assume an athletic stance. That is:
knees slightly bent; feet about
shoulder width apart; weight toward
the balls of your feet and centered
between them. If you did it right, then
you will feel like you are in a position
where you can quickly move in any
direction.
Now relax, then regrip your revolver
and take your stance, close your eyes,
and aim at the target. You assumed an
athletic stance AND used the proper
grip, right?
Andrea Beale (Dang It's Darlin)
using the Isosceles Stance.
Open your eyes. Does the gun point naturally at the target? If not, shift your feet and try
again. Close your eyes, take your stance, aim at the target, and open your eyes. Are you
aimed naturally at your target? You may need to shift several times. When you can open
your eyes and be on target you will have found your natural point of aim.
Now that you have your stance, I’ll bet it’s either the “Weaver” stance or the “Isosceles”
stance. In the “Weaver” stance, your weak side is in front and you are facing the targets
at an angle. Your strong arm goes across the front of your body and the gun projects
straight from that position. This is a good stance if you use a cross-draw holster, as you
don’t have to shift your position very much to draw or reholster. However, this stance is
not very good for transitioning between targets, as there is a lot of tension in your body.
Alternatively, if you are facing the targets square and your arms extend out in front of
you and your hands meet in the middle forming a triangle, this is the “Isosceles” stance.
The Isosceles stance is the best stance for competitive shooting since it promotes a
balanced, relaxed position making it easy to transition from target to target. In addition,
both hands hold the revolver equally. The other benefit to this grip is that the shooter can
use the recoil of the revolver to help with transitions from target to target. It should feel
like watching a bouncing ball. With this stance and a firm grip, the revolver will naturally
rise during recoil and move back to target naturally.
Practice your stance until it becomes automatic. You are using the proper grip on the
revolver, right?
One-Hand (Duelist)
Hold
Before we start, make sure
there is no ammunition in
the area, and your
revolvers are not loaded.
This is going to sound a lot
like the two-hand hold
section. Tape a small target
up on the wall. Grip your
revolver with a one-hand
hold. You are using the grip
described earlier, right?
Now, aim your revolver at
the target.
Ben Landers (Macon Rounds) shows his duelist stance. Note how
Are you standing up
his weak hand is anchored for balance.
straight? If so, you are not
ready to recover from
recoil, and you will have more trouble moving from target to target. Try it again, but this
time assume an athletic stance. That is: knees slightly bent; feet about shoulder width
apart; weight toward the balls of your feet and centered between them. If you did it right,
then you will feel like you are in a position where you could quickly move in any
direction.
Now, relax, then regrip your revolver, take your stance, and aim at the target. You
assumed an athletic stance AND used the proper grip, right?
When you aimed your revolver, did it point naturally at the target or did you have to
move your arms or your body to get it there? If you had to shift to get it on target, then
relax and move your body to the right position and try it again. Do this until you find the
target naturally.
Where is your off-hand? There are many different things you can do with your off-hand.
Put it in your pocket, put it on your hip, hold it against your chest, or let it hang.
Whatever you decide works for you, do it the SAME WAY EVERY TIME! You must be
consistent with your setup and motions.
Now that you have found your stance, I’ll bet you are either standing square to the line
with the gun straight out in front of you, or you are standing at some angle to the line
with your arm going out from your shoulder to the side. Both stances work well. I have
found that the shooters preference has more to do with eye dominance than anything else.
For example, I am right handed, but left-eye dominant. (To find out which eye is
dominant, form a square between your thumbs and the rest of your hands, hold it at arms
length and look through the gap, bring it straight back while looking through the gap. The
gap will naturally end up over the dominant eye.) I find that my natural position is almost
square to the line. In addition, being square to the line facilitates movement for stage
situations.
Practice your stance until it becomes automatic. You are using the proper grip on the
revolver, right?
Sights
Before we start, make sure there is no ammunition in
the area, and your revolvers are not loaded.
Put a small target up on the wall. I like to use a piece of
paper with a 1-inch orange circle. Load up your revolver
with snap caps. Grip your revolver using the correct grip.
Assume the stance you learned above. Take careful aim
at the target.
Fig. 1. Sight Alignment Example
What are your eyes focusing on? I’ll bet it was the target. If you are focused on the target,
you can’t be sure exactly what the sights are on. In addition, you don’t know for sure
what your sight picture looks like. I can’t stress this next item enough, so I’ll put it in
bold and caps.
FOCUS ON YOUR FRONT SIGHT!
By focusing on your front sight, you know exactly what your sight picture looks like,
even though the target is a little fuzzy.
Using a one-inch orange dot for a target, your sight picture should be similar to the one
depicted in Fig. 1. Granted, the dot in this example is black. The front sight should be
centered in the gap made by the rear sight, and they should be level across the top. If your
revolver has a V-notch-type rear sight, it will look a little different, but the principle is the
same. The front sight should be level with the rear sight, and centered in the notch.
Ok, relax and take a short break now.
Make sure your revolver is loaded with snap caps and there is no ammunition in the
area.
Grip your revolver (are you using the right grip?) and take your stance. Aim at the target
on the wall with the orange dot held above the sights as in Fig. 1 above. Pull the hammer
back, take careful sight, and very slowly squeeze the trigger using the method outlined
above. Keep focused on the front sight. Did the revolver move as you squeezed the
trigger? Try it again keeping the revolver stable and on target. Repeat this over and over
until it becomes automatic. You may need to come back to this drill periodically.
LEARNING TO USE YOUR LEATHER
Before we start, make sure there is no ammunition in the area, and your revolvers are
not loaded.
As we spend a lot of time drawing revolvers from holsters and returning revolvers to
holsters, it’s important to be able to do this safely. In addition, it’s very helpful to be able
to draw and holster without looking.
If you are using a Buscadero-style rig, then you won’t
be able to move your holsters around—but you might
still find this section interesting.
Positioning Your Holsters
The first thing you want to do is position your holsters
in such a way as to make the draw and the reholster as
natural a motion as possible. Put on your rig and holster
your revolvers. Settle the belt down on your hips to
where you normally wear it.
Strong Side and Straight Drop Holsters
Bev Luetkemeyer (Prairie Dawn)
shows off her straight drop
holster rig.
Relax your arms at your side. Where is butt of the
revolver? Is it under your arm? Behind your hip? Toward the front? Why did you put it
where you did? I have found through a lot of experimentation and conversations with
shooters from several different disciplines that the best place for the holster is the one that
allows the most natural draw. Now, bring your arm straight up. Is your hand gripping the
gun naturally? If so, you probably have your holster positioned so that the butt of the gun
is just resting against your forearm when your arm is hanging relaxed at your side. That’s
where you want to position your holster.
If you use two straight drop holsters, position them both the same way. It will take some
time to get used to this position. If you find that it doesn’t really work for you, then move
them around to where they do work well. You really want to be sure that the holster(s) is
positioned so that you can SAFELY draw and holster your gun.
Cross Draw Holsters
This one is tricky, and it depends on the motion you use to holster the gun. In general, it
is most efficient to position the holster so that it is a little to the side of your belly button,
often the width or one or two fists. The reason for this is straightforward. If you use the
“Weaver” stance, then you are already turned somewhat sideways to the line. This means
you won’t have to swivel your hips very far to
draw or holster and not break the 170-degree
rule.
You may find that you prefer the cross-draw
holster closer to your hip. If so, then move it.
You want your holster positioned so you can
SAFELY draw and holster your gun.
DRAWING AND HOLSTERING
BASICS
Put on your rig, load your revolvers with snap
caps, and holster them. Put a few targets on the
wall (again, use those little orange dots). Your
holsters are in the position described above,
right?
Before we start, which side are you going to
start with? I almost always start with my right
Jim Sutfin (Geronimo Jim) shows off
side, however the transitions and stage flow may
his cross draw rig.
require I start with the left. As I am right
handed, I like to get the gun into play as quickly
as possible. Billy Abbate (TG Reaper) and Randy Jackson (Single Action Jackson) also
generally start with their right side guns. If I am using a cross-draw, it’s faster to shoot
the cross-draw holster first because you can start in the position required to keep from
breaking the 170- degree rule.
If you don’t use a cross-draw holster
and use a two hand hold, then the grip
you use as you draw that gun is very
important. Grip your gun with both
hands using the grip discussed above.
Take away your strong hand. What you
are left with is the grip you should use
to draw that weak side gun. As you
draw, you don’t want to have to adjust
your grip.
Clayton Diehl (Slick Silver Kidd) demonstrates his
weak side grip. NOTE: it is safer for the thumb to be
on the backstrap rather than the hammer.
One word of warning for the weak side
draw: the natural spot for your thumb is
over the hammer spur. This can lead to
accidentally cocking the gun on the
draw. Instead, move your thumb up over
the backstrap as you draw your
gun. Your hand position will
end up with your first finger on
the front of the trigger guard
and your thumb on the
backstrap. Make sure to have a
firm grip with that hand.
This practice should be done
slowly, so as to imprint the
actions on your muscle
memory.
Get yourself ready. You are in
the stance we discussed above,
right? Focus on the first target.
Draw your first gun, paying
attention to the 170-degree
rule. Did you watch the gun
come out of the holster? If so,
holster it and try again. Do this
until you can comfortably draw
the gun without watching, and
without taking your eyes off
the first target.
When you draw the gun, bring
your hands together at your
natural “hand clap” position.
Bev Luetkemeyer (Prairie Dawn) shows her
Think about where your hands
natural handclap position.
are when you clap your hands.
If your hands meet at this
position to take a two-hand hold on the revolver, you can push it forward toward the
target giving yourself lots of time to find the sights and the target. When your arms get to
extension, you should be on target and ready to break the shot (squeeze the trigger).
Paying attention to grip, sighting, and trigger pull, cycle through five shots and holster.
Did you watch the gun into the holster? Did you break the 170-degree rule? If you
answered ‘yes’ to either of these questions, then try it again.
Repeat this with the first gun until it is automatic, natural, and comfortable.
Now that you have mastered one gun, the second will be easier. Continue to draw, cycle
through five shots (you are using the correct grip, focusing on the front sight, and correct
stance, right?) and holster. Draw the second gun, cycle through five shots and holster.
Continue this until it is automatic, natural, and comfortable. You did remember to use
the right grip, trigger pull, sight picture (focus on the front sight), and stance, right?
Here’s the last thing. Remember how I suggested you keep your eyes on the first target?
This time, draw the gun (grip, stance) and bring the sights in line with your vision and
cock the hammer. Shift your eyes to the front sight to verify that it’s on target, and
squeeze the trigger. That’s pretty fast, isn’t it?
Continue to practice all of this until you can do it without thinking.
LIVE FIRE PRACTICE
The purpose of this live fire practice session is to become familiar with actually shooting
the guns. You should be focusing on grip, stance, and sight picture. The idea is to make
one ragged hole on the target at CAS™ distances. Once you get to the point that you
KNOW where each shot went when you break it, you’ll be ready to move on to the next
section. In other words, you will get to a point where you will know that you pulled the
shot to the right or pushed it to the left, this is what you are looking for.
Many of the top shooters practice on small steel targets at longer distances than we shoot
at matches. This helps them to refine their sight picture and find it quickly. When they get
to match size targets at normal match distances, they can shoot with a less-defined sight
picture and shoot much faster.
Many of the drills listed involve sighting at an orange dot on the target. When you are
using one, don’t adjust your aim to hit the dot. The dot is there to provide a consistent
point of aim, not of impact. If your groups are all two inches lower than the dot, don’t
aim higher to compensate. Instead, pay a visit to a gunsmith and have your front sight
filed in order to bring up the point of impact. Again, don’t adjust your aim to hit the dot,
use the dot as a sighting aid to aim consistently.
Now we’ll go to the range and actually try out the techniques we have learned through
dry fire practice. Pack up your guns and bring plenty of ammunition and targets with you
to the range. You’ll also want to get some of those little round orange stickers. We’ll be
making good use of those. Bring along your shot shell belt or your cartridge belt and
slide. Also, check your range rules to be sure that you can practice with your shotgun.
Some ranges may not allow it.
If you have a video camera, it will be helpful to bring it along and tape your practice
sessions. Then you can go back and review to see what you are doing right and what you
are doing wrong.
As you work with the guns, make sure to remember to take the proper grip and stance,
pay attention to your sight picture and focus on the front sight!
Targeting Drill
This drill is designed to improve your targeting confidence and ingrain the fundamentals.
Practicing this drill will help you learn exactly where your revolvers print in relation to
point of aim (POA) and help you learn to call your shots. Once you can call your shots,
you can shoot any target with confidence. Make sure to do this drill with both revolvers.
1. Set up a paper target (I like to use paper plates for this) at 10 yards (30 feet) and put a
1-inch orange dot on the target. Load your revolver with 5 rounds with the hammer on an
empty chamber.
2. Grip the gun as we discussed earlier. If you shoot duelist or gunfighter use a one-hand
grip. If you shoot traditional or modern, use a two hand grip. Gunfighters should practice
this using both left and right hand holds.
3. Take the stance we worked on earlier.
4. Cock your gun and very carefully align the sights to a 6-o’clock hold on the orange dot
(the entire dot should be above your sights as in Fig. 1).
5. Very slowly squeeze the trigger with the pad of your index finger while focusing on
the front sight. The orange dot should appear slightly blurry. Make sure to squeeze
straight back while maintaining the sight picture. After the shot, watch the front sight rise
with recoil and return to the target. Release the trigger after the sights return to target.
6. Repeat for the other 4 shots in your revolver.
7. Reload and repeat.
After the 10 shots, you should have a fairly tight group. If you don’t, then you need to
work on shooting fundamentals. Check your grip and stance. Make sure your stance feels
natural and your grip is secure. Make sure your sight picture is exactly the same from
shot to shot. If you continue to have trouble, seek out a shooting instructor for guidance.
If you have a fairly tight group, it will either be exactly where you aimed or some
distance from the orange dot. If it’s not on the orange dot, then its location on the target
will be an indication of how far off the point of aim (POA) is from the point of impact
(POI). It may be that the barrel will need to be turned or the front sight filed to bring it to
the POA. Seek out a qualified gunsmith for assistance.
The Dot Drill
This is based on a drill that Bill Rogers came up with for IPSC practice. Several cowboy
shooters have modified it over time. Single Action Jackson, Dang It Dan, and many of
the other top shooters use it at the beginning of each practice session.
This drill teaches several things, among them are: patience, trigger control, follow
through, and sighting. This is a boring and tedious drill but is very important for learning
the fundamentals. It takes 70 rounds to shoot this drill and can become a challenge in and
of itself. I can’t emphasize the importance of this drill enough.
Setup
• Set up a piece of cardboard or, better yet, an IPSC target and place it seven yards down
range.
• Using a can of spray paint (black if you have it), paint six pairs of dots. These pairs
should be about four inches apart (up and down) and 12 inches apart (left and right), for a
total of twelve, 3" dots. The cap of the spray is the right size.
• Standing at the firing line, get your natural stance (eyes closed hands out-stretched as if
you were pointing your pistol). Close your eyes again, lower your head and clear your
mind. Take a couple of deep breaths. Let the muscles in your stomach relax and let your
shoulders hunch forward. I know it looks a little silly, but the idea is to concentrate solely
on what you are about to do and become aware of how well you are performing the
basics. By reaching a relaxed state, you will be more apt to be in tune with your visual
and physical awareness and therefore will be able to self-evaluate what you are doing
right and what you are doing wrong.
• Clip your timer to your belt and set it for delay. Load your revolvers with SIX rounds
each.
Procedure
1. At the beep, draw your strong side gun and fire one round at “T-1” (T-1 is the first dot
at the top left-hand side of the pairing). Holster. Repeat this step five more times for a
total of six rounds fired.
2. At the beep, draw your WEAK side gun and fire one round at “T-2” (T-2 is the dot on
the top right-hand side of the pairing). Holster. Repeat this step five more times for a total
of six rounds.
3. At the beep, draw your strong side gun and fire two rounds at “T-3” (second row from
the top, left-hand dot). Holster. Repeat two more times for a total of six rounds.
4. At the beep, draw your WEAK side gun and fire two rounds at “T-4” (second row
from the top, right hand dot). Holster. Repeat two more times for a total of six rounds.
5. At the beep, draw your strong side gun and fire one round at “T-5” and one round at
“T-6” (third row from the top, both dots). Holster. Repeat this two more times for a total
of six rounds.
6. At the beep, draw your WEAK side gun and fire one round at “T-5” and one round at
“T-6”. Holster. Repeat this two more times for a total of six rounds.
7. At the beep, draw your strong side gun and fire three rounds at “T-7” and three rounds
at “T-8” (fourth row from the top both dots) for a total of six rounds.
8. At the beep, draw your WEAK side gun and fire three rounds at “T-7” and three
rounds at “T-8” for a total of six rounds.
9. Transition: At the beep, draw your right hand gun and fire one round at “T-9” (fifth
row, left hand dot), holster, draw your weak side gun and fire one round on “T-10” (fifth
row, right hand dot). Holster. Repeat this five more times for a total of twelve rounds.
10. At the beep, draw your strong side gun and fire FIVE rounds at “T-11” (bottom left
hand dot).
11. At the beep, draw your WEAK side gun and fire FIVE rounds at “T-12” (bottom right
hand dot).
Purpose
Ok, so what does this drill teach?
The goal of this exercise is to put all the rounds in the circle or in the dot. In order to do
this, you must use all the basics of shooting. You might get lucky part of the time, but to
complete this drill without any misses requires concentration on all aspects of shooting.
The time it takes to fire any part of this drill is unimportant. Don’t even look at the times
on the timer. The timer is nothing but a start signal.
Steps 1-8: Work on all the aspects of shooting: stance, grip, trigger control, sight
alignment and sight picture. For example, if you get a bad grip, you may be able to hit the
target with one round as in steps 1 and 2 but, a with a bad grip you will not perform
multiple shots as in Steps 3-8.
Step 9: Practice your transition. Again, it’s not important how fast you can move from
one pistol to another, instead concentrate on smooth. In the beginning, you will want to
look at your holster in order to make sure you are getting the gun into the holster before
you let go of the gun. But with practice, you should be able to do this without looking.
Steps 10 and 11: Get used to following the front sight as it moves up under recoil and
then back down into the rear sight notch. You will notice that in these steps only five
rounds are used. This is because you don’t want to get into a habit of shooting more than
five rounds in a string of fire which is the legal round count in any pistol in SASS
matches.
This drill sets up the rest of the practice session. You will know if you are going to have a
good day or a bad day when you finish. If you are having a bad day, take the opportunity
to go back and focus on the basics and fundamentals. It is inevitable that you will get to a
match and not be shooting well.
Practicing under these conditions will give you more confidence when it comes to pass.
If you are an accomplished shooter then continuing to practice on a really bad day can
damage your confidence and perhaps generate some bad habits that you will have to deal
with later (be honest with yourself—you might be better served staying and practicing
this drill). If it’s a good day, then it’s an opportunity to push your limits.
BUILDING SPEED
Most folks you talk to will tell you that speed comes naturally and with practice. Work on
your fundamentals. In his video How to be a Master Gunfighter, Ken Kupsch (Kanada
Kidd) responds:
“Where do they think the speed will come from? Do they think people wake up
one morning and are faster? Missed targets are not from speed, they are from
loss of focus and concentration. If you want to shoot fast, you have to practice
shooting fast. It’s not going to happen by itself.”
When you reach that point, you’ll find that you aren’t missing targets. Well, you might
drop one or two in a match because you weren’t mentally prepared; but for the most part,
you are hitting all your targets. You will settle into a comfortable pace, and it becomes
very difficult to pick up the speed. You’ve spent a bundle of time working on your
transitions between guns and they are as smooth as can be. So, how do you get to
the next level?
You have to convince yourself that you can shoot your guns faster than you have and still
hit the targets. But you must have proper fundamentals. Grip, stance, and sight picture
must be correct on every shot. Proper fundamentals come about from practicing proper
technique. But you know that.
The drills listed in this section will help you build speed. Each practice session
should be started using the Dot Drill listed earlier.
Each of the drills listed can be done with both your revolvers and your rifle. Most rifles
shouldn’t be dry fired, so some of this should only be done at the range under live fire
conditions.
The first thing to do with your revolver is to find out how fast you can actually cycle it. In
your living room, and with no ammunition in the area, cycle through the action as fast
as you can—until your thumb gets tired. Give it a rest and then do it again, and again, and
again. I think you get the idea.
Next, do it real slow, but keep your finger on the trigger. Take up the slack, break the
shot, relax your finger to reset the trigger, cock the hammer, and do it again. This will
teach you not to slap the trigger. If you slap the trigger, you’ll be pushing your shots low
and left (if you are right handed; low and right if you are left handed). Repeat this until
you have the feel of your trigger. Then go back to the first drill and do it fast.
Pack your stuff up and head to the range. When you get there, do some stretching to get
your body ready to shoot. Do the Dot Drill listed earlier, about 30 minutes worth. Then
try this drill that Dan Beale (Dang It Dan) uses. You can also do this drill with your rifle,
but set the target up at 20 yards.
Make sure that your range rules allow you to have more than one loaded gun on the line
and you are allowed to draw from holster.
Step 1:
• Set up a BIG target close, about 8 yards.
• Load both your revolvers with 5 rounds each, hammers on empty chambers and
holstered.
• Set your timer up for a three second delay and clip it to your belt, out of the way.
• Start the timer and get ready to draw your first gun. At the buzzer, draw and fire all 10
(from both guns) as fast as you can. Hits aren’t important just yet. Speed is. Dump the 10
on the target and record the time.
• Repeat this for ten repetitions.
Step 2:
• Use the same target and load up with 10 rounds (five in each revolver, holstered,
hammer on an empty chamber).
• Start the timer and get ready.
• At the buzzer, draw and fire 10 as fast as you can, but this time watch the front sight.
Try to watch it all the way through each shot. From hammer back, to shot, and through
the recoil. Record your times
• Do this for five repetitions.
Step 3:
• Use the same target and load up with 10 rounds (five in each revolver, holstered,
hammer on an empty chamber).
• Start the timer and get ready.
• At the buzzer, draw and fire 10 as fast as you can.
• This time, make sure to hit the target for each shot. Watch the front sight through the
entire shot and up to the next. Record your times.
The rest of this chapter is strictly live fire drills. These are for:
• 1 shot drills
• 2 shot drills, same target, alternating targets.
• Transitions
Set up some targets at normal CAS™ distances; 25-30 feet for pistols. Put a little orange
sticky dot in the center of the target to help with sight alignment. I like to use paper plates
for these. While smaller than the normal steel, they will help you to focus on a tighter
target and train you not to listen for the “clang.”
Bring some paper and a pencil so you can record your times for the drills listed. Make
sure to include the date as well. This will give you some feedback as to how well your
training is going and provide an indicator for improvement.
Don’t forget to use the proper grip, stance, and sight alignment on each gun. It’s easy to
develop bad habits; always practicing the fundamentals will keep you from having to
break any bad habits you pick up.
These drills are all very similar and they can be tedious. Practice with a friend to help
keep your enjoyment level up. It can also be beneficial to introduce some competition
between you and a friend. Try to practice with someone a little better than you are, this
will encourage you to improve.
First Shot
Put on your rig and load five into the revolver that you draw first. Make sure to wear both
guns so you can get used to the weight and balance. If you wear a shot shell belt, put that
on as well.
Set your timer up for a three second delay and clip it to your belt. Use one of the pistol
targets you have set. Start the timer. Put your hands into a “relaxed at sides” position and
focus on a tiny spot on the center of the target. At the buzzer—draw. Make sure to get
your proper grip, bring the sights in line with your vision, focus on the front sight, and
fire. Pay attention to grip, stance, and sighting. If you missed, try it again. Record each
instance so you can monitor your progress. Make sure to keep your focus on the target
and then front sight. Don’t watch the draw, you should not need to. Practice slowly at
first.
Force yourself to break the shot as soon as the sights are on target. You may miss some at
first, but the faster pace will start to become natural.
Revolver to Revolver
Put on your rig and load five into each revolver with the hammer on an empty chamber.
If you wear a shot shell belt, put that on as well so you can practice in the same
configuration you use in matches.
Set your timer up for a three-second delay and clip it to your belt. Use one of the pistol
targets you have set. Start the timer. Draw your first gun. At the buzzer, fire one shot,
holster, draw the second revolver and fire one shot. Holster. Pay attention to grip, stance,
and sighting. If you missed, try it again. Review the last shot recorded on the timer and
use the “Split” function to find out the time between the last shot and the previous shot.
This will be your transition time. Record each instance so you can monitor your progress.
When you are sighting, make sure to focus your vision on a small spot at the center of
each target (the one inch orange dot). Learn to make the transition without watching the
holsters. Start slowly in order to get the feel; the speed will come with repetitions and
practice.
Practice it some with a 10-shot string. Fire five from each revolver. Then, review the 6th
shot time and use the split function to find the time between the 5th and 6th shots. This will
be your transition time. Record each instance so that you can monitor your progress.
Other Drills
Work up other drills that will help with specific problem areas. If you have trouble
alternating targets, then set up two targets and practice. Some other things that can be
done to add some variety and help with training are:
• Different target shapes. Set up targets with different shapes and practice sweeps and
alternating between them.
• Changes in distance. Set up some targets at different distances and practice sweeps.
Vary the distances by as much as 5 or 6 yards. Make sure to slow down on the far targets
and get a good sight picture before you break the shot. Also try setting up all the targets
at longer distances, this will help you learn to slow down a little and get a good sight
picture before breaking the shot.
• Changes in target size. Set up a big target and then a small four-inch target next to it and
practice alternating back and forth.
You should always practice at your match speed. You want this pace to become
comfortable and natural. The only time that should shoot faster than match pace is if you
are working on specific speed related drills.
GUNFIGHTER CLASS
Gunfighter class can be complicated! There is no way to hide or gloss over it. So how do
you go about getting ready to shoot in this class? In order to find out I had a conversation
with Clyde Harrison (Easy Rider), who is the current World Champion Gunfighter class
shooter.
Sighting
Clyde suggests that you use your dominant eye to sight your guns. This simplifies
shooting. All you need to do to switch guns is to move the active gun in line with your
dominant eye.
Easy Rider demonstrates the GF draw
\
Cocking and Shooting Your
Guns
There are two different techniques
for cocking your guns: both
together, or one at a time. The one
you choose depends on which is
more comfortable for you. Clyde
finds it easiest to cock one at a
time, others prefer to cock both at
the same time.
To cock them one at a time
Think of the guns as a “lead gun”
and a “trailing gun.” On the draw,
think about the lead gun coming
out of leather first and the trailing
gun a fraction of a second behind.
When you bring your lead gun up,
bring it to the natural handclap
position (described earlier). Then
push it straight out toward the
target, cocking it on the way—the
trailing gun should just follow
along. While extending the gun
you should be picking up the front
sight in your peripheral vision.
Push it straight to the target and
when fully extended, break the
shot. While bringing the trailing
gun into position, cock it, find the
sights and the target, and break the
shot.
Continue on cocking one while
shooting the other. With a little
practice this will become 2nd
nature.
Clyde Harrison (Easy Rider) demonstrates the position
of the pistols when shooting gunfighter.
To cock them both at the same time
The draw must bring both guns up together to the natural handclap position (they should
be level and pointed downrange by this point). Push them straight out toward the targets,
cocking them during the push. Your vision should focus on the front sight of the first gun
that you are going to fire. As it reaches full extension, find the sights and the target, and
break the shot. Shift your vision to the next gun, find the sights and target, and break the
shot. Cock both guns and repeat.
Gun positioning
Both guns should be held separately in a vertical position, as opposed to slightly canted to
the side. If you hold the guns slightly canted, your misses will likely be both low and off
to one side as opposed to just low. You are more likely to hit the target with just a low
miss than a low and to the side miss.
Clyde mentions that he moves the “inactive” gun slightly to the side rather than down. He
finds that it is easier to pick the sights back up and get it on target. He also doesn’t cross
over. He makes large swings in order to avoid it, it’s faster this way.
Switching Leads
Do you switch leads or not? Switching
leads requires that you think of the
targets as five sets of two targets. This
works best if you cock both guns
together. Using this method, you will
be able to avoid making large swings
of the guns. However, you will often
be required to shoot the same gun
consecutively.
P1
P2
P3
L1-1
L3-5
R1-2
L2-4
R2-3
R3-6
L5-10
L4-7
R5-9
R4-8
A good example for this is a bank of
Figure 2.
three targets, engaged with two
Nevada sweeps starting from the left. For this example, the targets are designated as P1,
P2, and P3. The left gun is
designated as L and the right gun as
P1
P2
P3
R, with each shot designated by the
shot number, counting from 1 to 5
L1-1
R1-2
L2-3
for each gun and each shot from 1 to
L3-5
R2-4
10 (the second shot from the right
gun is on P3 and will be designated
R3-6
L4-7
R4-8
in the graphic by R2-3). See figures
R5-10
L5-9
2 and 3.
As you can see from this example,
Figure 3.
there are several consecutive pairs of
shots made by the same gun. The benefit to this method is that there is no need to cross
over.
The same example shot by alternating guns for each shot requires large swings in order to
avoid crossing the guns over. However, it is much less complicated! Clyde also finds that
it is much faster because it takes longer to shoot the same gun twice than it does to
alternate.
Deciding which method to use will require a significant amount of practice and testing
with a timer. One may work better for you than the other.
Drills
The drills to excel in Gunfighter class are the same ones outlined earlier in the chapter.
However, they have to be approached differently. For an example, let’s look at the first
shot drill.
Live Fire
The first shot drill is, at the buzzer, draw and fire one shot. When you are practicing for
Gunfighter class, you need to do this drill with both guns.
• Set up a small target at 10 yards downrange.
• Load each revolver with 5 rounds and holster.
• Set your timer for a delayed start and press the start button.
• At the buzzer, draw your left side gun with your left hand using the technique described
earlier, find your sights and the target, and break the shot.
• Holster.
• Restart the timer.
• At the buzzer, draw your right side gun with your right hand using the technique
described above, find your sights and the target, and break the shot.
• Holster.
• Repeat for five shots total from each gun.
You can add to the drill by practicing double taps, sweeps (Nevada sweeps, left to right
sweeps, and right to left sweeps), and other target sequences. Work on the other drills
described in this chapter, but with both guns instead of one, and by alternating the
starting gun. The Dot Drill will be particularly effective. Practice both Gunfighter style
and double duelist style.
Dry Fire
Most of your practice should be done dry fire. Clyde said that he does a few 20 minute
long sessions several days a week. In addition to the drills outlined earlier, he works on
every pistol sequence that he can come up with. He shoots them both Gunfighter style
and double duelist style.
The most effective thing that you can do is to learn to be ambidextrous. If you are right
handed, then practice going through your day as if you are left handed. Eat, write, etc.
using the other hand. It takes a long time to learn to be ambidextrous. For example, if you
want to learn to write with your weak hand, then you will start off by drawing pictures of
what the letters look like. Practice will teach you to write instead of draw.
Authors Note, Added October 2007: I have a few things to add. First off, an incredible
pistol drill is listed in Chapter 8 in Quick Cal’s section. The 50 shot drill. Great stuff.
In this chapter I talked about bringing the pistol up to the natural handclap position and
pushing straight out from there. I’ve since learned that instead you should bring the gun
up as high as you can. The goal is to get the front sight into your peripheral vision.
Bringing the gun high will do that. However, it also means your elbow will be flopping
way out and the gun will be tilted, perhaps all the way sideways. That’s not an issue.
Whatever the sights are lined up on when the shot breaks is what you’ll hit. Regardless of
the orientation of the gun.
I also didn’t talk about a concept called “driving the gun.” This is a technique where you
push the gun into the next target between shots. It’s driven by your eyes, and requires that
your loads have moderate recoil.
This can be done either live fire or dry fire. If dry fire, make sure you are using
snap caps and there is no live ammunition present!
1. Set up a bank of 5 targets. Use different sizes, shapes, and elevations.
2. Set your timer on delay.
3. Look at the center of your first target. At the buzzer draw, aim, and fire at the
first target. Use the techniques listed above for the draw.
4. Once the shot is away, transfer your vision to the center of the next target.
Actively drive the gun to the next target, using the recoil to assist. Once you
verify that the sights are lined up, break your shot.
5. Continue for the rest of the targets.
I also didn’t talk about your shooting platform. I wrote an article on this and it’s posted in
the ‘Tips and Help’ section of my web site at http://www.jspublications.net. Read that
article and learn the technique that is outlined. It will greatly facilitate accurate shooting.