1
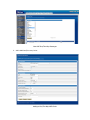
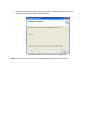
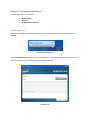
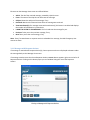
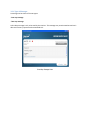
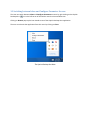
Help Manual
HIPLINK DESKTOP ALERT www.hiplink.com
718 University Avenue > Suite 202 > Los Gatos, CA 95032 USA
TEL 408.399.6120 > FAX 408.395.5404 > WEB www.hiplink,.com
HipLink Desktop Alert - Help Manual
Copyright
© Copyright 2012 Hiplink Software, Inc. All rights reserved
Warning: This document is for use of licensed users only. Any unauthorized copying, distribution or disclosure of information is
a violation of copyright laws. Hiplink Software has made every effort to ensure the accuracy of information contained within this
document. However, Hiplink Software makes no warranties with respect to this document and disclaims any implied warranties of
merchantability or fitness for a particular purpose. All screen images used in this document are for illustrative purposes only and are
intended to provide an example of the screen only. Screens may vary dependent upon the service provided. All rights reserved. No
part of the contents of this document may be reproduced or transmitted in any form or by any means without the written
permission Hiplink Software. Information in this document is subject to change without notice and does not represent a
commitment on the part of Hiplink Software. This document contains information that is confidential and is the property of Hiplink
Software. It may not be copied, published or used, in whole or in part, for any purposes other than as expressly authorized by
Hiplink Software.
At the time of compiling this documentation it complies with HipLink version 4.7
Document version: 1.2
Last revised: September 17, 2012
Disclaimer
Please read carefully the instructions provided in this guide before installing and administering HipLink. Retain these instructions for
future use. Proceed with the installation only if you agree with the terms and conditions stated in the Hiplink Software License
Agreement. If you do not agree with the terms of this license agreement, do not install, copy, or use this software.
Hiplink Software
718 University Ave, Suite 202
Los Gatos, California 95032, USA
Tel: +1 (408) 399-6120
Fax: +1 (408) 395-5404
Web: www.Hiplink.com
Trademark Notice
CrossTM, Cross CommunicationsTM, and HipLinkTM are trademarks of Cross Communications, Inc., a wholly owned subsidiary of
Hiplink Software, Inc.
HipLinkTM, and Hiplink Software® are trademarks of Hiplink Software, Inc.
Minicom: Copyright © 1991, 1992, 1993, 1994, 1995, 1996. Miquel van Smoorenburg.
Other products and companies referred to herein are trademarks or registered trademarks of their respective companies or mark
holders.
Contents Chapter 1: Introduction ................................................................................................................................ 4 1.1 Overview ............................................................................................................................................. 4 1.2 Purpose ............................................................................................................................................... 4 1.3 Prerequisites ....................................................................................................................................... 4 Chapter 2: Getting Started ............................................................................................................................ 5 2.1 Preparing to Setup Your HipLink Desktop Alert .................................................................................. 5 2.2 Installing the HipLink Desktop Alert .................................................................................................... 9 2.3 Configuring the HipLink Desktop Alert .............................................................................................. 13 2.4 Login/Logout ..................................................................................................................................... 14 2.4.1 Logging in via Emergency Mode ................................................................................................ 15 2.5 Help ................................................................................................................................................... 16 2.6 About ................................................................................................................................................. 16 2.7 Support .............................................................................................................................................. 16 Chapter 3: Using the Application ................................................................................................................ 17 3.1 Message View ................................................................................................................................... 17 3.1.1 Messages with Response Actions .............................................................................................. 18 3.2 Inbox ................................................................................................................................................. 19 3.2.1 Type of Messages ....................................................................................................................... 20 3.2.2 Receiving Messages with Various Severity Levels ..................................................................... 22 3.3 Switching between Inbox and Configure Parameter Screens ........................................................... 23 Appendix A: Remote Administration .......................................................................................................... 24 Appendix B: Uninstalling, Repairing and Upgrading ................................................................................... 24 Chapter 1: Introduction 1.1 Overview HipLink’s Desktop Alert application is specially designed for HipLink users who want to stay updated with their inbox activities on their desktops. This desktop application allows users to view messages on their personal computers and to respond to them. 1.2 Purpose This help manual describes the configuration (settings, setup etc...) and usage of the HipLink’s Desktop Alert. This help manual assumes that the user knows how to operate a desktop machine and does not cover the usage of a personal computer. HipLink Desktop Alert Logo
1.3 Prerequisites To install and run the HipLink Desktop Alert the user needs: •
Sufficient amount of free space on your desktop. •
.Net Framework 3.5 or later Chapter 2: Getting Started 2.1 Preparing to Setup Your HipLink Desktop Alert The HipLink Desktop Alert requires some configuration on the server end: 1. The HNP Manager needs to be configured. HNP Manager Configuration
2. Add a HNP One/Two‐way Messenger. Adding a One/Two-Way HNP Messenger
New HNP One/Two-Way Messenger
3. Add a HNP One/Two‐way Carrier. Adding a One/Two-Way HNP Carrier
New HNP One/Two-Way Carrier
4. Add a HNP One/Two‐way Receiver. Adding a One/Two-Way HNP Receiver
New HNP One/Two-Way Receiver
5. Check Services: HNP Manager and HNP One/Two‐way Messenger services should be running. Checking Services Status
2.2 Installing the HipLink Desktop Alert 1. Run the HipLinkDesktopAlertSetup file (.exe file) and click Next. HipLink Desktop Alert Setup File
2. Select the installation folder and click Next. Starting the Installer
3. User can also check for the available disk space by clicking on Disk Cost. Checking Disk Space
4. To confirm installation, click Next. Selecting Installation Folder
5. Click on Next to proceed with the installation process. Confirming Installation
6. The installation process might take some time. If .Net Framework is not installed on your desktop, you will be prompted to download it now. Installation Process
7. Once the Installation is complete click on Close. Check marking the Launch will start the application as soon as you click on the Close button. Successful Installation and Launching HipLink Desktop Alert
Note: Each time you reboot your system, the HipLink Desktop Alert will launch at startup. 2.3 Configuring the HipLink Desktop Alert 1. The first time the HipLink Desktop Alert stars you see the Configuration Parameters form. a. Fill it up with the same values as your server’s HNP Manager Parameters. b. Provide the User ID (HNP Receiver PIN) and Password (HNP Receiver’s password). Defining Configuration Parameters
2. Click on Save. The Activation Progress window will appear indicating that your activation is in progress. Activation Progress Dialog
3. The activation request goes to your HipLink server which can be seen on the server’s HNP Manager Panel under the Activation tab. 4. Authorize the activation request in the HNP Manager’s Activation tab. After successful authorization, user can log in with his/her credentials. 2.4 Login/Logout •
To Login: 1. Enter User Id. 2. Enter Password. Login Dialog
Login Progress Dialog
Once logged in, the user name is visible on top right corner of the HipLink Desktop Alert window. Login sessions can be viewed in the HNP Manager’s Session tab on the HipLink Server. •
To Logout: 1. Click on the Logout link on top right corner of the HipLink Desktop Alert window. This exits the HipLink Desktop Alert. The user session also expires on the HipLink server. 2.4.1 Logging in via Emergency Mode 1. Select Enable Emergency Mode check box on the login screen. 2. This will disable User ID and Password fields. 3. Click on OK button. Emergency Mode Login Dialog
The user will now be logged in as an Emergency User. Logging in via Emergency Mode lets the user view messages sent to HNP Emergency User from the HipLink server. Once logged in via Emergency Mode, the user name on the top‐right corner of the HipLink Desktop Alert window will be displayed as ‘Emergency’. Emergency Mode - Message View
Caution: To login via Emergency Mode, Enable Emergency Mode feature should be enabled in the HNP Manager configuration. Once this feature is enabled the user needs to restart the HNP Manager service. 2.5 Help Clicking on the Help link will open the HTML version of this user manual. 2.6 About Clicking on the About link opens a new window which displays the application version, copyright and trademark notice. About Screen
2.7 Support This pops‐up your personalized email client service and lets you seek support from the HipLink Desktop Alert team. Email Client Service to Communicate with the HipLink Desktop Alert’s Support Team
Chapter 3: Using the Application The Main Application has 3 screens: 1. Message View 2. Inbox and 3. Configuration Parameters 3.1 Message View When a new message is received a notification will be displayed in the system tray notifying a new message. New Message Notification
Also, the Message View screen will pop‐up on the desktop. In this Message View window, the user can view a message, send a reply, and can also listen to the message. Message View
Elements on the Message View screen are defined below: •
•
•
•
•
•
•
•
Job ID: The ID of the received message, created by HipLink server. From: The name of the HipLink user who sent the message. Subject: Shows the subject of the message, if any. Received: Mentions the date and time when the message was received. View Attachment(s): If a message comes with attachment(s) this button is enabled and displays the number of attachments in parenthesis. I WANT TO LISTEN TO THIS MESSAGE: This link reads out the message for you. Previous: Takes you to the previous message, if any. Next Takes you to the next message, if any. Note: Even if an attachment or response action is embedded in a message, the HNP Emergency User cannot see them. 3.1.1 Messages with Response Actions If a message is received with Response Action(s), these response actions are displayed as buttons under the message body on the Message View screen. If a message contains more than three Response Actions, <more> button appears right next to the list of Response Actions. Clicking on this button pops‐up a new window listing the rest of the Response Actions. Viewing a Message with Response Actions
3.2 Inbox The Inbox section displays all the received messages. Clicking on a message opens it up in the Message View window. Inbox Screen
A message with an attachment displays sign in the message list. A Message with Attachment(s)
3.2.1 Type of Messages A message can be either of the two types: ‐ One way message ‐ Two way message A One‐Way message is only to be read by the receiver. This message may contain attachments but it does not have any response actions attached to it. One-Way Message View
A Two‐Way message is the one that the receiver can reply to by executing the response action(s) attached to it. This response is sent back to the server where the message’s status is updated accordingly. Two-way Message View
3.2.2 Receiving Messages with Various Severity Levels There are five levels of Severity for a message: ‐ Normal: A normal message sent by HipLink user. ‐ Warning: Denotes any warning to the user. ‐Important: An important message that needs receiver’s attention. ‐ Critical: Message that is of critical nature and it needs immediate response by the receiver. ‐ Emergency: An emergency message which must not be ignored and needs an immediate response. Each of these message severities are denoted by different coloured spots. The ring tone for each severity level will also be different. Messages with Various Severity Levels
3.3 Switching between Inbox and Configure Parameter Screens The User can switch between Inbox and Configure Parameters screens by right clicking on the HipLink Desktop Alert icon in the left corner of the task bar near the time and date view. Clicking on Restore pops‐up the last viewed screen of the HipLink Desktop Alert application. The user can also exit the application from this menu by clicking on Close. The HipLink Desktop Alert Menu
Appendix A: Remote Administration Remote Administration is a feature that gives Hiplink administrator control over receiver’s inbox data, configurations, and permissions. The changes made by the administrator will be reflected on the HipLink Desktop Alert on next login. Clean User Data –HipLink admin can clean your HipLink Desktop Alert’s Inbox. This will delete all received messages. Server Settings – HipLink admin can change your HipLink Desktop Alert’s Configuration settings which will be auto‐filled on the Configuration Parameters screen on your next login. Configure Permissions – HipLink admin can grant/revoke the user’s right of viewing and receiving messages. Appendix B: Uninstalling, Repairing and Upgrading Uninstalling The user can uninstall the HipLink Desktop Alert from the Control Panel as well as by running the .exe file. Repairing The user can repair the HipLink Desktop Alert by running the .exe file. Note: For Uninstalling or Repairing the HipLink Desktop Alert the .exe file should be same as that at the time of installation. Upgrading To upgrade the HipLink Desktop Alert, download the latest .exe file and install it. The installation process is defined in Section 2.2. If the user is running an old .exe file version on his/her currently installed version, he/she will be notified of the existing newer version.