1
ALTMAN LIGHTING, INC.
SS-CYC-100 Spectra-Cyc™ Series
Installation and Instruction Manual
¤ 2008 Altman Lighting, Inc.
57 Alexander Street, Yonkers
¤ 2010 Altman Lighting, Inc.
57 Alexander Street, Yonkers
New York 10701 U.S.A.
Phone 9)D[3.7304
(Specifications are subject to change without notice)
Copyright© 2010 Rev 2010-08-30
www.altmanlighting.com
i
SAFETY INSTRUCTIONS
INSTRUCTIONS PERTAINING TO A RISK OF
FIRE, ELECTRICAL SHOCK, OR INJURY TO
PERSONS FOR SS-CYC-100 SERIES LED
LIGHTING FIXTURES.
WARNING! - TO REDUCE THE RISK OF FIRE,
ELECTRIC SHOCK, OR INJURY TO PERSONS,
FOLLOW
THESE
IMPORTANT
SAFETY
INSTRUCTIONS:
1)
Turn off, unplug power, and allow fixture
to cool before cleaning or servicing.
INSTRUCTIONS DE SÛRETÉ
LE S INS TRUCTIONS AU S UJE T D'UN
RIS QUE
D'INCE NDIE
LE
CHOC
ÉLE CTRIQUE, OU L A BL E SS URE AU X
P E RS ONNE S P OUR S S -CYC-100.
AVERTISSEMENT! - POUR RÉDUIRE LE
RISQUE D'INCENDIE, LE CHOC ÉLECTRIQUE,
OU LA BLESSURE AUX PERSONNES, SUIVRE
CES
INSTRUCTIONS
DE
SÉCURITÉ
IMPORTANTES:
1)
Éteignez, débranchez la puissance, et
permettez au montage de se refroidir
avant le nettoyage ou l'entretien.
2)
Ensure that fixture is properly grounded.
3)
Ensure that ventilation slots are not
obstructed.
2)
Assurez-vous que le montage
correctement relié à la terre.
est
4)
Do not look directly at lighted LEDs.
3)
Assurez-vous que des fentes
ventillation ne sont pas obstruées.
de
5)
Keep away from flammable materials.
4)
6)
No user serviceable parts
Replace entire LED assembly.
Ne regardez pas directement la LED
allumée.
5)
S'éloigner des materiaux inflammables.
7)
Do not touch the LEDs at any time. Use
a soft lint-free cloth to clean lens. Do not
use solvents to clean. Use cloth
dampened with water. Allow to dry
completely before reenergizing.
6)
Aucunes pièces utiles d'utilisateur à
l'intérieur. Remplacez la LED entière.
7)
Ne touchez pas la LED à tout moment.
Employez un chiffon non pelucheux
mou pour nettoyer l'objectif. N'employez
pas les dissolvants pour nettoyer.peut
employer
le
tissu
humecté
de
l'eau.laissez sécher complètement avant
de reenergizing.
8)
Ne pas faire fonctionner l'appareil avec
un diffuseur antérieur ou une lampe.
8)
inside.
Do not operate the unit with a missing or
damaged lens.
----------SAVE THESE INSTRUCTIONS!-----------
----------GARDER CES INSTRUCTIONS!----------
2
I N S T A L L A T I O N
A N D
I N S T R U C T I O N
M A N U A L
SS-CYC-100 Spectra-Cyc™
LED Series Solid State
Lighting Fixture
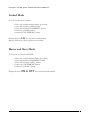
DESCRIPTION
The SS-CYC-100 LED lighting fixture is a portable unit with a flexible power supply cord. The overall
construction of the fixture includes corrosion protected aluminum housing and allows for a yoke or mounting
brackets. The fixture is supplied with a state of the art microprocessor-controlled solid-state LED light engine
incorporating 3-watt Luxeon Rebel Red, Green, Blue, and Amber color LEDs, and an on-board power supply.
The LED substrate is coupled to a highly efficient heat sink and cooling system for prolonged life of the LEDs.
The fixture can be ceiling mounted to a pipe or floor mounted. All components and electrical devices are ETL
Listed or Recognized. A safety cable is provided for use when securing the fixture to a pipe.
PACKING LIST
The SS-CYC-100 LED lighting fixture is shipped with the following:
SS-CYC-100 with Safety Cable.
Power Supply Cord with molded Edison power plug.
Installation and Instruction Manual.
Optional Yoke.
WARNING:
ALL ELECTRICAL WIRING AND CON1(&7,2166+28/'%(3(5)250('%<$48$/,),('
ELECTRICIAN
3
I N S T A L L A T I O N
A N D
I N S T R U C T I O N
M A N U A L
SETUP AND INSTALLATION
Unpacking
Remove the SS-CYC-100 lighting fixture from its shipping box. Set the unit down on a flat surface before
proceeding.
Lamping and Re-lamping
The SS-CYC-100 lighting fixture is provided with an integral LED light engine. Under normal operating
conditions, the LED light engine should have a rated life expectancy of over 50,000 hours. There are no user
serviceable parts inside. The entire LED assembly will need to be changed.
Mounting the fixture
)RU6N\-Cyc ceiling mounting: Install the Yoke kit, and a Pipe Clamp if desired. Loosen the bolt on the pipe
clamp mounted on top of the fixture yoke until the clamp fits snugly around the mounting pipe. Make sure the
clamp wraps securely around the pipe surface. Tighten up the bolt securely to the pipe. Next, loop the safety
FDEOHDURXQGWKHSLSHDQG\RNHDQGWKHQFOLSLWEDFNRQWRWKHFDEOHLWVHOI)RUIORRUPRXQWLQJ/D\WKHXQLW
on a flat leveled surface and adjust the rubber feet to the desired tilt angle . The fixture yoke is not needed for
Ground-Cyc applications.
Connecting power to the fixture
Plug the fixture into a properly grounded receptacle (100-240 vAC) connected to a circuit breaker. An Edison
receptacle is provided on the back of each luminaire for powering a neighboring Spectra-Cyc-100 only. Up to 6
Spectra-Cyc’s maximum should daisy chain power in this fashion.
Focusing the fixture
With the fixture energized, point the unit in the direction of the object to be illuminated. Adjust the yoke or
feet to the desired position. The optimum distance for best results is 4 to 5 feet away from the projection
surface.
Cleaning the fixture
Routine cleaning of the SS-CYC-100 lighting fixture will provide years of prolonged use. Use compressed air to
EORZRIIDQ\GXVWDQGGLUWIURPWKHOHQVUHIOHFWRUHOHFWURQLFVDQGKHDWVLQN)RUWKHOHQVXVHDVRIWOLQW-free
cloth dampened with water to clean the lens of dust and dirt. Dry off completely with compressed air or a dry
lint-free cloth.
ETL FILE LISTING
The SS-CYC-100 lighting fixture is ETL and C-(7/OLVWHGXQGHU$OWPDQ)LOHIRU3RUWDEOH(OHFWULF
Luminaires.
4
I N S T A L L A T I O N
A N D
I N S T R U C T I O N
M A N U A L
)($785(6
The SS-CYC-100 LED lighting fixture is the first of its kind in the Theatrical and Architectural Lighting
Industry and adds to the Spectra-LED family of solid state LED luminaires offered by Altman Lighting.
i
)RXU-Colors: Red, Green, Blue, and Amber for more color combinations and better CRI.
i
Compatible with DMX512 and RDM protocols including Wybron Responder System.
i
8/16 bit DMX512 control for smoother dimming.
i
Patent pending optical system utilizing Homogenized Pixelation™ lens - provides
smooth, even illumination and reduces pixelization from projected view.
i
On board power supply, microprocessor controller, and current drivers.
i
)HHGWKUX'0;5'0GDWDZLWKDPD[LPXPWRWDOUXQRIIHHW
i
On-board convenience power outlet.
i
Push button addressing.
i
Stand-Alone Pre-programmed modes.
i
Built-in flicker-free TV mode.
i
Keypad Lock functions to prevent accidental Re-Programming.
i
(IILFLHQWFRROLQJV\VWHPRIIHULQJ6LOHQW2SHUDWLRQZLWK1R)DQV
5
I N S T A L L A T I O N
A N D
OPERATION
I N S T R U C T I O N
M A N U A L
)LUPZDUH9HUVLRQ9'DWH-03-04)
SETTINGS
7KHUHDUHEXWWRQVEHORZWKHGLJLW/('GLVSOD\RQWKHVLGHRIWKHXQLW7KHEXWWRQVDUH)URPOHIWWR
right) [ HUNDREDS ] , [ TENS ] , [ ONES ].
All settings for Modes, DMX address, Personalities, etc., can be made by using the three buttons on the
back of the unit while power is on. . (Note: Display goes out after no activity for approx 4 sec. Touch
any button once to bring it back on.)
There are 3 main operating Modes: Normal, Fixed Color, and Locked.
Normal Mode:
Normal Mode is used for Setting DMX address, Personalities, and Stand-alone Effects.
This is the default mode for a new unit
DMX address To set, press the buttons repeatedly (or hold) to count up until the desired DMX
address (1-512), appears on the display. Wait a few seconds, the display will blink once quickly, and the
address is set live and retained in memory, even if you remove power.
(RDM addressing sent from a remote unit will overwrite local DMX setting.)
PERSONALITIES:
There are 8 different personalities.
Each personality is made up of 3 settings: RESOLUTION (8 Bit /16 Bit), MASTER (On /Off), and
SMOOTHING (On/Off) which are explained in greater detail below.
The current active Personality # is displayed for about 1 second during power up. The format is Pxx
where xx is replaced by the active personality #01-08.
7RVHWWKHGHVLUHG3HUVRQDOLW\\RXPXVWEHLQ1RUPDOPRGHQRW)L[HG&RORUPRGH
To select the personality:
> Press the buttons until the desired personality address 601-608) appears in the display (see list below).
> Wait a few seconds, and a confirmation display will appear that shows a question mark? on the left,
followed by the personality #. This gives you an opportunity to either accept or reject the new setting.
To accept the personality, press the [ ONES ] button.
To reject the personality, press the [HUNDREDS] button (below the ? ).
Once the new personality is accepted, it is entered into memory and retained even if power is
disconnected. Once personality is either accepted or rejected, the display will go back to the current DMX
address. The default personality for a new unit is #02.
6
I N S T A L L A T I O N
A N D
I N S T R U C T I O N
M A N U A L
EXAMPLE: Let's say that we want to select personality #05. We enter 605 on the display.
After a few seconds the display will show ?05 . Since we want this, we press the [ONES] button
(below the 5 ), and that enters personality #05 into memory.
PERSONALITY ADDRESS SETTINGS LIST ( 601-608 ) 4-COLOR CHANNELS:
------------------------------------------------------------------------------------------------------601 = Personality #01
8 Bit,
0DVWHU2))
6PRRWKLQJ2))
(uses 4 DMX channels )
Channel order is RGBA
------------------------------------------------------------------------------------------------------602 = Personality #02
8 Bit ,
0DVWHU2))
Smoothing ON
(uses 4 DMX channels )
Channel order is RGBA
------------------------------------------------------------------------------------------------------603 = Personality #03
8 Bit,
Master ON,
SmooWKLQJ2))
(uses 5 DMX channels )
Channel order is RGBAM
------------------------------------------------------------------------------------------------------604 = Personality #04
8 Bit,
Master ON,
Smoothing ON
(uses 5 DMX channels )
Channel order is RGBAM
------------------------------------------------------------------------------------------------------605 = Personality #05
16 Bit,
0DVWHU2))
6PRRWKLQJ2))
(uses 8 DMX channels )
Channel order is RrGgBbAa
------------------------------------------------------------------------------------------------------606 = Personality #06
16 Bit,
0DVWHU2))
Smoothing ON
(uses 8 DMX channels )
Channel order is RrGgBbAa
------------------------------------------------------------------------------------------------------607 = Personality #07
16 Bit,
Master ON,
6PRRWKLQJ2))
(uses 10 DMX channels )
Channel order is RrGgBbAaMm
------------------------------------------------------------------------------------------------------608 = Personality #08
16 Bit,
Master ON,
Smoothing ON
(uses 10 DMX channels )
Channel order is RrGgBbAaMm
PERSONALITY ADDRESS SETTINGS LIST ( 609-612 ) 1-COLOR CHANNELS:
------------------------------------------------------------------------------------------------------609 = Personality #09
8 Bit,
6PRRWKLQJ2))
(uses 1 DMX channel )
------------------------------------------------------------------------------------------------------610 = Personality #10
8 Bit,
Smoothing ON
(uses 1 DMX channel )
------------------------------------------------------------------------------------------------------611 = Personality #11
16 Bit,
6PRRWKLQJ2))
(uses 1 DMX channel )
------------------------------------------------------------------------------------------------------612 = Personality #12
16 Bit,
Smoothing ON
(uses 1 DMX channel)
7
I N S T A L L A T I O N
A N D
I N S T R U C T I O N
M A N U A L
RESOLUTION is selectable as either:
8 Bit (one DMX channel per color) this is normal resolution,
or
16 Bit (two D0;FKDQQHOVSHUFRORU&RDUVH)LQHKLJKUHVROXWLRQVLPLODUWRPRYLQJOLJKWV
If unit is in 8 Bit mode, and the unit is set to DMX Channel 001, then the
DMX channels would be:
CH1 = Red,
CH2 = Green,
CH3 = Blue,
CH4 = Amber.
If unit is in 16 Bit Mode, and the unit was set to DMX Channel 001, then the
DMX channels would be:
CH1 = Red Coarse,
CH3 = Green Coarse,
CH5 = Blue Coarse,
CH7 = Amber Coarse,
&+
&+
&+
&+
5HG)LQH
JUHHQ)LQH
%OXH)LQH
$PEHU)LQH
MASTER is selectable as ON or OFF and provides a Master fade channel that dims all 4 colors
proportionally at the same time in order to maintain the color .
If you are in 8 Bit mode and the unit is set to DMX Channel 001, then the DMX channels would be:
CH1 = Red
CH2 = Green
CH3 = Blue
CH4 = Amber
CH5 = Master
If you are in 16 Bit mode and the unit is set to DMX Channel 001, then the DMX channels would be:
CH1 = Red Coarse,
CH3 = Green Coarse,
CH5 = Blue Coarse,
CH7 = Amber Coarse,
CH9 = Master Coarse, &+
&+ 5HG)LQH
&+ *UHHQ)LQH
&+ %OXH)LQH
&+ $PEHU)LQH
0DVWHU)LQH
SMOOTHING is selectable as ON or OFF and provides a smooth transition ramp from one level to
another in a similar way to how an incandescent lamp behaves. This helps to eliminate the "steppiness"
associated with LED fixtures that is caused by the instantaneous response of LEDs.
8
I N S T A L L A T I O N
A N D
I N S T R U C T I O N
M A N U A L
STAND-ALONE EFFECTS (does not require a control console):
Note: stand-alone effects from a single unit will control other units connected via DMX cable to all
synchronize. Set other units to DMX Channel 001.
(Do not use the Stand-Alone Effects while connected to a control console or a conflict will result.)
Color Fades (700-799):
700 - 709 = R>A>G>B fade
740 - 749 = B>G>A>R fade
780 - 789 = R>A>G>B>W fade
790 - 799 = W>B>G>A>R fade
700 = faster
740 = faster
780 = faster
790 = faster
709 = slower
749 = slower
789 = slower
799 = slower
800 = faster
810 = faster
820 = faster
830 = faster
840 = faster
850 = faster
870 = faster
809 = slower
819 = slower
829 = slower
839 = slower
849 = slower
859 = slower
879 = slower
Strobes (800-879):
800 - 809 = WHITE STROBE
810 - 819 = RED STROBE
820 - 829 = AMBER STROBE
830 - 839 = GREEN STROBE
840 - 849 = BLUE STROBE
850 - 858 = R-A-G-B RAINBOW STROBE
870 - 879 = B-G-A-R RAINBOW STROBE
Fixed Color Mode:
This is a special mode that allows you to manually select colors for a single unit using the 3 keys.
7RHQWHU)L[HG&RORU0RGHRU exit to Normal Mode) :
>Wait a few seconds until the display goes blank,
> press and hold the [ ONES ] button
> press and hold the [ TENS ] button
> release the [ ONES ] button
> release the [ TENS ] button.
STAND-$/21(),;('&2/25MODE
While in stand-alone mode, the hundreds button cycles through 'r', 'G', 'b', and 'A'. colors . The tens and
ones digits select 0-99 values. 99 is actually full. The 0-255 scale is spread evenly over the 0-99 display
range.
NOTE: when you go in or out of fixed color mode, the display will go blank. Touch any button to turn
on display.
9
I N S T A L L A T I O N
A N D
I N S T R U C T I O N
M A N U A L
Locked Mode
To Lock (or unlock) the buttons:
>Wait a few seconds until the display goes blank,
> press and hold the [ ONES ] button
> press and hold the [ HUNDREDS ] button
> release the [ ONES ] button
> release the [ HUNDREDS ] button.
Display will show Loc for a moment and then blink.
Buttons will have no effect until they are unlocked.
Master and Slave Mode
To Turn On (or Off) the MASTER:
>Wait a few seconds until the display goes blank,
> press and hold the [ HUNDREDS ] button
> press and hold the [ ONES ] button
> release the [ HUNDREDS ] button
> release the [ ONES ] button.
Display will show ON
or OFF for a moment and then blink.
10
I N S T A L L A T I O N
A N D
I N S T R U C T I O N
M A N U A L
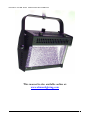
This manual is also available online at:
www.altmanlighting.com
11