1
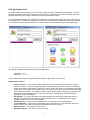
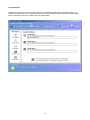
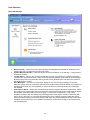
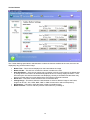
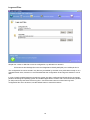
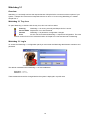
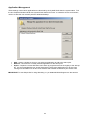
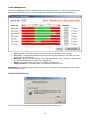
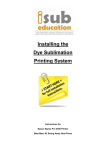
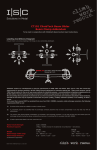
Simple Surf 3
User Manual
Contents
Simple Surf 3
The Browser Interface
Overview
The Tab Bar
Special Buttons
Down, Up and Log Off
Mail+ and Search+
Closing Simple Surf 3
Administrator Options
CyberD Action Links
2
2
2
3
3
3
3
4
4
5
The Settings Interface
Web Settings
Basic Settings
Search Settings
Mail Settings
Web Restrictions
Banned File Types
Allowed Web Sites
Custom Buttons
User Interface
Basic GUI Settings
Toolbar Buttons
Custom Buttons
Logs and Files
Administrator Settings
Reset and Restore
6
6
6
7
9
11
11
11
12
13
13
14
15
16
17
18
Watchdog 3.1
Overview
Watchdog 3.1 Tray Icon
Watchdog 3.1 Log In
Watchdog 3.1 Settings
19
19
19
19
20
CyberD Shell
Overview
CyberD System Settings
VPN Settings
White List Updates
eMail Logs Settings
Application Management
Power Management
Install CyberD Services
21
21
21
21
22
23
24
25
25
1
The Browser Interface
Overview
The browser interface of Simple Surf 3 has been designed to combine user familiarity from their experience
with other widely used web browsers and the considerations that must be taken when designing for touch
screens and public devices.
The browser toolbars are fully customizable allow administrators to change the button graphics, button text
and button actions. The toolbars can be set visible or hidden allowing administrators to create an interface
with navigation buttons and no address bar, both address bar and navigation buttons or no toolbars at all
depending on their needs.
The top right hand corner displays a progress bar to indicate web page download progress.
The address bar has a drop down containing the history of the current session; this is cleared when the
browser is logged off or restarts after idle time.
2
The Tab Bar
As with most other modern web browsers Simple Surf 3 supports tabbed browsing, it also uses tabs to
control the opening of new windows and pop-ups. The use of tabs to control new windows allows users to
navigate between web pages easily in the restricted kiosk environment. The tab bar cannot be removed
from the browser interface.
When a secure web page is displayed the containing tab shows a
padlock to alert the user that the page is secure.
On the right hand side of the tab is a close button, when the user clicks
this button the tab is closed. If there is only one tab open when the user
closes it a new tab is automatically opened and navigates to the “New
Tab” address.
Special Buttons
Simple Surf 3 has some special buttons that can be used to help users navigate the web and to protect their
personal information. These buttons are Log Off, Down, Up, Search+ and Mail+.
Down, Up and Log Off
The Down and Up buttons are to assist people with disabilities or when a
touch screen is used. By clicking these buttons the web page is scrolled up
or down in the same way as when Page Up and Page Down buttons is
pressed on a keyboard.
Log Off closes restarts the browser interface during which process all user
information, session cookies, java scripts and applets and navigation history is deleted so that the next user
of the interface does not have access to this information.
Mail+ and Search+
The mail+ and search+ buttons allows
the administrator to configure multiple
web mail and search providers which
are offered to the user in easy to click
drop down menus.
3
Closing Simple Surf 3
To close Simple Surf 3 an operator must know the correct procedure, user name and password. Once the
shutdown procedure has start the operator has 30 seconds to enter the correct user credentials, when this
has been done they have a further 30 seconds to choose a shutdown option.
To access the administration log in panel from Simple Surf 3 click the progress bar in the top right corner of
the navigation bar. If there is no navigation bar visible in the Simple Surf 3 configuration the portal designer
must provide a suitable CyberD Action Link to allow access to the administrator log in panel (see below).
The default credentials when Simple Surf is first installed are:
Username : admin
Password : asecret
These credentials should be changed before the system is deployed in a public area.
Administrator Options
•
•
•
•
•
•
Close for Service – This function closes Simple Surf 3 in the same way as log off but it does not
restart the browser. Security settings imposed on the operating system are also removed allowing
access to keyboard combinations such as CTRL+ESC, CTRL+ATL+DEL, the Windows key and right
mouse click. For systems running Watchdog 3.1 for Simple Surf 3 this function also alerts Watchdog
not to restart the browser. For systems running CyberD Secure Shell the engineer will require a full
size keyboard connected to the PC so that they can access Task Manager and start Windows
Explorer to access the desktop.
Call Support – For clients who have a remote maintenance contract with CyberD this function
initiates a Call Support session with our technical support team, you must have Call Support
installed on the PC for this to have any effect.
Restart Browser – This function is identical to the Log Off button in the navigation bar.
Log Off Windows – This function closes Simple Surf 3 and logs the current Windows user off so
that an engineer can quickly access an administrative account on the PC.
Restart System – This function reboots the PC.
Shutdown System – This function turns off the PC.
4
CyberD Action Links
Action Links are a method of embedding simple but vital controls to Simple Surf 3 into HTML for systems that
do not display a navigation bar.
There are three different Action Links; quit, callsupport and print. The format of an Action Link is
“action:command”, they can be placed in HTML as if they were a normal hyperlink and will have no effect
in other browsers.
e.g.: <a href="action:quit">(quit)</a>
Action Link “quit”
Quit has two formats, a basic action:quit which opens the administrator log in panel and
action:quit=username+password which closes Simple Surf 3 and puts the system in Service Mode.
Action Link “callsupport”
This Action Link starts a Call Support session for clients with a remote maintenance contract with CyberD
and Call support installed.
The format for this Action Link is action:callsupport.
Action Link “print”
For systems not displaying the navigation bar print functionality can be added to the web page by using this
Action Link. When clicked Simple Surf 3 prints the current web page to the default printer with no user
prompts in the same way as the navigation print button would.
The format for this Action Link is action:print.
5
The Settings Interface
The settings interface allows administrators to customize there Simple Surf 3 deployment quickly and easily.
When using this application you must be connected to the internet and signed in as the Windows user under
which the kiosk system will run; using this application from another Windows user account may have limited
or no effect on the system when run as its kiosk account.
Web Settings
Basic Settings
In Basic Settings you set the URLs for your Home Page, the page opened when the browser starts, the New
Tab Page, the page opened when the New Tab button is clicked and the News Page, the page opened when
the News button is clicked.
For systems that require users to first agree to terms and conditions or a disclaimer tick the box below the
Home Page value. If this box is ticked whenever the browser displays the home page all buttons on the
navigation bar will be disabled with the exception of the Log Off, Up, Down and Refresh buttons, the address
bar will also be disabled. All links web page displayed will remain active to allow web designers to create
disclaimer pages that best suit the needs of the deployment.
Ticking the “Do not verify URLs” stops the setting application from test each URL after you have entered it,
this speeds up the configuration process. When you save your settings all URLs entered will be tested so
that no button results in a broken link.
6
Search Settings
By selecting from the two options at the top of this settings page you can opt for the Simple Search or
Search Plus, this will affect the available buttons in the User Interface settings pages.
Simple Search links one search page to the Search button in the navigation bar, set this value in the Search
Page box after selecting Simple Search.
7
Search Plus creates a drop down list of up to four search engine links accessed by clicking the Search+
button in the navigation bar. Each entry has two elements; the name to be displayed in the drop down and
the URL to be linked to the menu item.
8
Mail Settings
By selecting from the two options at the top of this settings page you can opt for the Simple Mail or Mail Plus,
this will affect the available buttons in the User Interface settings pages.
Simple Mail links one web mail log in page to the Mail button in the navigation bar, set this value in the Mail
Page box after selecting Simple Mail.
9
Mail Plus creates a drop down list of up to four web mail links accessed by clicking the Mail+ button in the
navigation bar. Each entry has two elements; the name to be displayed in the drop down and the URL to be
linked to the menu item.
10
Web Restrictions
Web Restrictions allow you to control what users can access.
Banned File Types
Any file extension listed in this setting cannot be displayed by Simple Surf 3 and all navigations to such files
will be cancelled.
Allowed Web Sites
This panel allows administrators to
create an allowed list of websites;
only URLs matching the ones
shown in this list will be viewable
with Simple Surf 3, all navigations to
other URLs will be cancelled.
Use the wildcard character * to allow
multiple matches such as
*.mysite.com/* would allow
www.mysite.com and
mail.mysite.com. All URLs must
end in either a distinct file or /*
By leaving this panel empty Simple
Surf 3 will navigate unrestricted.
11
Custom Buttons
Simple Surf 3 allows up to three custom buttons to be created and added to the navigation toolbar. To
activate a custom button you must make it visible in the User Interface/Toolbar Buttons panel (see below).
Enter a valid URL in the box for each button you make visible.
12
User Interface
Basic GUI Settings
•
•
•
•
•
Screen Layout – These tick boxes control whether the navigation bar (toolbar) or address bar are
visible to the user, by ticking the box they are visible.
Context Menus and Tabs – These tick boxes control the behaviour of the tab strip. Ticking the box
enables the function.
Log Off Action – This tick box controls the behaviour of the Log Off button, by default clicking the
Log Off button closes the browser, clears all private data and restarts the browser at the home page.
By ticking this box the Log Off button will log off the current Windows user and return the system to
the Windows log in screen.
User Messages – This tick box controls the display of error and warning messages to the user.
When the system has web restrictions (see above) by default Simple Surf will display a message box
explaining to the user why the navigation or action has failed, by unticking this box this messages
are disabled.
Screen Saver Reset – Simple Surf 3 measures idle time by using the Windows screen saver. When
the screen saver starts Simple Surf 3 (if it has been used since the last log off or idle time) will delete
all user data, close and restart at the home page. This function of Simple Surf 3 may cause
problems to users if they are reading long web pages without moving the mouse or interacting with
the PC in any other way, to overcome this Simple Surf 3 has a period of grace to allow the user to
cancel the screen saver and continue using the web page they were reading before the screen saver
activated; this period of grace is by default 5 seconds but can be set to a longer or shorter period to
suit the deployment.
13
Toolbar Buttons
The Toolbar Settings panel allows administrators to select the buttons available to the user, the text to be
displayed (if any) and the button image.
•
•
•
•
•
•
•
Button Text – This is the text displayed on the button below the image
Button Visible – This tick box controls if the button is visible to the user
Auto Size Button – Some text or images may not display correctly on the button at its default size,
by ticking this box the button will automatically adjust its size to correctly display the button. If the
auto size option is ticked and the button was displaying correctly at its default size the button may
become narrower than its normal width and the auto size box should be unticked.
Reset Text – This button resets the button text to its default value.
Change Image – This button allows the administrator to select a different image for the button,
images can be GIF, JPG, JPEG, BMP, WMF or PNG formats with or without transparency.
Reset Image – This button resets the button image to its default image.
Button Preview – This is a real time preview of the button as you design it.
14
Custom Buttons
Simple Surf 3 allows up to three custom buttons to be created and added to the navigation toolbar. To
assign a URL to these button use the Web Settings/Custom Buttons panel (see above).
The options for custom buttons are identical to the standard buttons (see above).
The settings shown above create the custom button illustrated below:
15
Logs and Files
Simple Surf 3 uses an XML file to store its configuration, by default this is stored in:
C:\Documents and Settings\%current user%\Application Data\CyberD(UK).com Ltd\Simple Surf 3
The configuration file can be stored in any directory accessible by the kiosk user profile either locally or on a
mapped network drive, however it is recommended that the configuration file and logs are stored on a local
disk.
In many CyberD supplied deployments after the system has been configured and Simple Surf 3 the primary
partition containing the operating system and installed applications is frozen with a second unfrozen partition
(or disk) used for dynamic data such as log files. Use the browse button to locate where logs and
configuration files are to be stored, use the Default button to reset the locations.
16
Administrator Settings
Use this settings panel to change the log in credentials for Simple Surf 3. Before you can set a new
username and password you must enter the correctly the current username and password combination.
17
Reset and Restore
If at anytime you need to cancel changes you are making click “Reset and Restore” then choose one of the
three options listed.
18
Watchdog 3.1
Overview
Watchdog 3.1 continually monitors the responsiveness of Simple Surf 3 to ensure maximum uptime of your
system. If Simple Surf 3 becomes unresponsive due to an error or is not running Watchdog 3.1 restarts
Simple Surf 3.
Watchdog 3.1 Tray Icon
To open Watchdog 3.1 double click the tray icon, this icon has four states:
Running
Watchdog 3.1 is running normally and Simple Surf 3 is active.
Service Mode Simple Surf 3 is in Service Mode.
Paused
Watchdog 3.1 is paused for configuration changes.
Error
An error has occurred and Watchdog 3.1 requires reconfiguration. The most
common reason for this icon is that the location of Simple Surf 3 has not been set in Watchdog.
Watchdog 3.1 Log In
To access the Watchdog 3.1 configuration panel you must enter the Watchdog administrator username and
password.
The default credentials when Watchdog 3.1 is first installed are:
Username : admin
Password : asecret
These credentials should be changed before the system is deployed in a public area.
19
Watchdog 3.1 Settings
Once you have logged into Watchdog it becomes paused.
Find Simple Surf 3
Watchdog will only monitor the executable file SS3Browser.exe; use the “Browse…” button to locate this file.
If SS3Browser.exe cannot be found when Watchdog starts the Error icon is displayed in the system tray.
Log In Credentials
Enter the username and password you want to use to log into Watchdog 3.1, the Password Strength meter
shows the strength of your chosen password.
Save
Save your Watchdog settings.
Stop
Exits Watchdog 3.1 and ends monitoring of Simple Surf 3.
Restart
Restarts Simple Surf 3 and monitoring, Watchdog then minimizes to the system tray.
20
CyberD Shell
Overview
The CyberD Shell is a replacement for the standard Windows environment to increase security of the system
during launching and restarting the browser. The CyberD Shell has now Task Bar, Windows Start Button or
System Tray; to access these functions an engineer must use a full size keyboard, press CTRL+ALT+DEL
and from Task Manager start Windows Explorer which will open the current user’s Windows desktop.
CyberD System Settings
CyberD System Settings is a control panel for the CyberD Shell
VPN Settings
For clients connecting to remote monitoring systems provided by CyberD but do not have a static IP the VPN
Settings is used to locate and control LogMeIn Hamachi VPN software.
IMPORTANT! LogMeIn Hamachi is a third party product; CyberD accepts no responsibility for its suitability
or stability on your system.
21
White List Updates
For clients that subscribe to the White List updating service provided by CyberD these settings control the
way this operation works. To use this functionality tick “Automatic Whitelist Updates On”.
Remote Whitelist
This value will be supplied to you by CyberD when you subscribe.
Remote Count
This value will be supplied to you by CyberD when you subscribe.
Local Update Folder
This is the directory where Simple Surf 3 configuration files are stored.
22
eMail Logs Settings
These settings control the way log files are emailed to an administrator if this functionality is activated on the
system.
Mail Settings
•
•
•
•
SMTP Server – This is the server through which the mail is to be sent.
Send From Email address – This is the email address the mails are sent from.
Send To Email Address – This is the address the mails are sent to.
Kiosk Name – This is the name of the kiosk that is sending the mails
File Settings
•
•
•
Send Files In Folder – This is the location of the log files to be sent via email.
Archive Files to Folder – This is the location where sent log files are moved to after sending.
Send Files With Extension – Simple Surf 3 saves two log files; .txt and .log, use this dropdown to
select the log type you wish to send.
23
Application Management
These settings control which applications are launched by the CyberD Shell when the system starts. Tick
the box “Replace Windows Shell with CyberD Kiosk Shell for this user” to create the secure environment;
untick it to start the user normally with the Windows desktop.
•
•
•
Add – Opens a window so that you can select an application to add to the start up list.
Remove – Removes the currently selected application for the start up list
Import – Copies the current Windows user’s start up programs stored in the registry to the start up
list. It is recommended that you do this first and then remove the applications you do not want
running so that utilities such as anti-virus software and firewalls are started by the secure shell.
IMPORTANT! To start Simple Surf 3 using Watchdog 3.1 you must add WatchDog3.exe to the start list.
24
Power Management
The Power Management system controls when the PC is allowed to power on. If the PC is powered on any
time outside of the times set in the Power Management configuration the system will be powered off.
•
•
•
•
•
Start Up Time – This is the time from which the PC may be powered on after midnight.
Active Day – These are the weekdays on which the PC may be powered on, untick the day to ban
the PC’s use on a specific day.
Shutdown – This is the time at which the PC will be powered off if it is on at that time, after this time
it cannot be powered back on until the next allowed time.
Reboot – This function will reboot the PC instead of powering it off.
Apply and Reboot – This button saves your settings and reboots the PC
IMPORTANT! These settings apply to all user profiles on the PC as the Power Management system starts
before Windows Log On.
Install CyberD Services
Use this window to install the CyberD Power Management System (see above).
25
CyberD(UK).com Ltd
18 St Francis Close
Kettering
Northamptonshire
United Kingdom
NN15 5DT
Web:
www.cyberd.co.uk
Sales:
+44(0)1536 310 291
Accounts: +44(0)1536 310 291
Technical: +44(0)208 144 1995
26