1
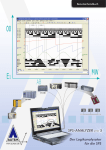
3BNextView®4
3 First Steps …
To be able to start right away, the NextView®4 start project contains a short introduction about how to show,
record and analyze signals. Comprehensive information is provided in the integrated online help.
Live Display
Create new sheet:
Insert new display:
Select display:
Add channels to display:
Configure display:
TIP
Configure DAQ System
Open configuration dialog:
Configure scan:
Configure channels:
Start scan:
TIP
Open menu "Sheet" Æ New Sheet
Open menu "Display" Æ Live Display
Click in the display with your left mouse button. All properties of this display are
shown in the properties bar on the left now.
Pull the desired channels from TAB "Channels" (section "Resources") of the properties
bar in the display (Drag & Drop).
In the properties bar, you can make various adjustments, e.g. show channel name and
digital value or set colors
Use the shortcut [ALT+ENTER] to display and hide the properties bar.
Open TAB "Devices" in the section "Common Tasks" of the properties bar and click the
item "Device configuration".
Select "My Computer" in the treeview and enter scan frequency, measuring period etc.
A click on the sign next to a measurement device displays its channels. Select a channel and define properties like name, unit, measuring range, conversion factors etc.
Open TAB "Start/Stop" in the section "Common Tasks" of the properties bar. Click
"Start scan" to begin sampling to hard disc.
The status bar at the bottom displays the current status of the scan and the remaining
measuring period.
Analysis of Stored Measurement Data
Open menu "Display" Æ Graph Display
Insert new display:
Select display:
Click in the display with your left mouse button. All properties of this display are
shown in the properties bar on the left now.
Open measurement file:
A click on the icon
in the properties bar (section "Resources") opens the file manager. Select the measurement file (*.lfx) and confirm with "OK".
Add signals to display:
Pull the desired signals from TAB "Signals" (section "Resources") of the properties bar
in the display (Drag & Drop).
Set cursors:
and
at the bottom of the graph display to insert the cursors.
Click the symbols
You can move them and display various key data of the graph. Just activate the first two
options of TAB "Cursor" in the properties bar.
Analyze measuring data:
NextView®4 provides a multitude of analysis functions (data reduction, FFT, calculations, export etc.) in the menu "Signals".
TIP
Analysis always happens between the two cursors! Keep in mind to show them.
Page 7