1
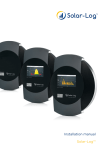
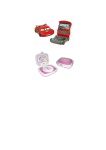
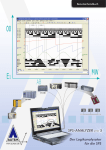
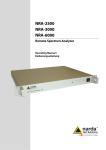
Produkt-Datenblatt Technische Daten, Spezifikationen Kontakt echnischer und kaufmännischer Vertrieb, Preis T auskünfte, Angebote, Test-Geräte, Beratung vor Ort: Tel: (0 81 41) 52 71-0 FAX: (0 81 41) 52 71-129 Aus dem Ausland: Tel: ++49 - 81 41 - 52 71-0 FAX: ++49 - 81 41 - 52 71-129 E-Mail: [email protected] Internet: www.meilhaus.com Web-Shop: www.MEsstechnik24.de | www.MEasurement24.com Web Kontakt-Formular: www.meilhaus.de/infos/Kontakt.htm Per Post: Meilhaus Electronic GmbH Am Sonnenlicht 2 D-82239 Alling bei München MEsstechnik fängt mit ME an. www.meilhaus.com Erwähnte Firmen- und Produktnamen sind zum Teil eingetragene Warenzeichen der jeweiligen Hersteller. Preise in Euro zzgl. gesetzl. MwSt. Irrtum und Änderung vorbehalten. © Meilhaus Electronic bzw. Hersteller. www.meilhaus.de/infos/impressum.htm SOFTWARE FOR PROFESSIONAL ACQUISITION AND PROCESSING OF MEASURING DATA Visualisieren Visualize Erfassen Scan Analysieren Analyze Dokumentieren Document en! grammier o r P e n h O ing! programm Without Steuerung & Regelung Controlling Automatisieren Automating Abläufe Processing ierbar! cript realis S s l e t t i M ! ith scripts Realize w Next T view® 4 ONLINE VISUALISIEREN VISUALIZE ONLINE Visualisierung von beliebig vielen analogen Signalen in einer Anzeige Visualization of as many analog signals as you like in one display Visualisierung in beliebig vielen Anzeigen Visualization in as many displays as you like Anzeige von digitalen Zuständen Display of digital channels Anzeige der Messdaten in ihrer wirklichen physikalischen Messgröße. Digitale Anzeige des aktuellen Messwerts Display of measuring data with their real physical quantity. Numerical display of the current measurement value Gleichzeitige Anzeige von Signalen in verschiedenen Zeitbereichen Display of signals of different time periods at the same time Verschiedene Anzeigearten für verschiedenste Anforderungen Various types of displays for the most different requirements Nachrichtenanzeige als Ausgabemedium und zur Übermittelung von Systeminformationen c visualize Message display as output medium and for the transmission of system information STEUERN & AUTOMATISIEREN CONTROL & AUTOMATE Schieberegler für analoge Ausgänge Slider for analog outputs Schalter / Taster zur Steuerung digitaler Ausgänge Button / Push-button for the control of digital outputs NextView®4 Script: optionales Zusatzmodul (erfordert Lizenz) Benutzerfreundliche, BASIC ähnliche Programmiersprache Automatisierung von Prozessen Realisierung individueller Anwendungen Ereignis orientiert NextView®4 Script: optional add-on module (requires license) User-friendly programming language similar to BASIC Automation of processes Realization of individual processes Event-oriented Digitalmultimeter / Textfeld: Auslösen eines in NextView®4 Script programmierten Events im Alarmfall Digital multimeter /Static text: setting off an event in case of alarm programmed in NextView®4 Script control ext view N T ® 4 KONFIGURIEREN & ERFASSEN CONFIGURE & SCAN Einfach über Standarddialoge konfigurierbar. Messdauer und Messfrequenz frei wählbar. Mehrere 100kHz Summenabtastrate “direct to disc” bei gleichzeitiger Livedaten-Visualisierung. Trigger auf jedem Kanal frei einstellbar. Vorgeschichte 0..100%. Speicherrate und Speicherart zwischen 1:1 und 1:1000 pro Kanal einstellbar (aktueller Wert, avg, min, max, RMS). Formelkanäle. Easy to configure via standard dialog boxes. Free selection of sample period and frequency. Several 100kHz total sampling rate “direct to disc” with live-data visualization at the same time. Set trigger for each channel separately. Prehistory 1..100%. Storage ratio and type separately adjustable between 1:1 und 1:1000 per channel (current value, avg, min, max, rms). Formula channels. MULTISCAN & FILE TRAINS M U LT I SC A N Ermöglicht die Suche nach sporadisch auftretenden Störereignissen. Auf ein definiertes Triggersignal wird die Aufzeichnung über einen bestimmten Zeitraum gestartet. Anschließend wartet NextView® auf das nächste Triggerereignis. Langzeitmessungen durchführen mit regelmäßiger Speicherung (Dateiwechsel). Erzeugung von aufeinanderfolgenden Einzeldateien ohne Datenverlust (backto-back) oder mit erneuter Synchronisation zu Beginn der Teilmessung. Frühzeitige Analyse von bisher erzeugten Dateien ohne Unterbrechung der Dauermessung. Makes the search for sporadically occurring breakdowns possible. A defined trigger signal starts the scan over a certain period of time. Then NextView® is waiting for the next trigger event. Realize long-term measurements with periodical storage (file change). Create successive, single files without any loss of data (back-to-back) or with new synchronization at the beginning of the partial measurement. Premature analysis of files so far created without interruption of the enduring measurement. FILE TRAINS Aneinanderhängen von Einzeldateien eines MultiScans zur Analyse über Dateigrenzen hinweg. configure multiscan Attach single files of a multi-scan for analysis beyond file limits. TEST ext view N T ® 4 HINWEISE ZUR TESTVERSION Als Messhardware lässt sich jedes beliebige Messsystem der BMC Messsysteme GmbH verwenden. Sie können den kompletten Funktionsumfang ausprobieren. Dieser wird nach 30 Tagen erheblich eingeschränkt. Der Wechsel zu einer kostenpflichtigen Version erfordert nur die Eingabe einer gültigen Lizenznummer. Bisher erstellte Signaldateien, Projekte und Konfigurationseinstellungen sind weiter verwendbar. software collection Treiber Programmierschnittstellen Tools Dokumentation Drivers Programming Interfaces Tools Documentation trial NOTES TO THE TRIAL VERSION Any DAQ system from BMC Messsysteme GmbH can be used as measurement hardware. You can try the complete functional range, which will considerably be cut back after 30 days. If you decide for a chargeable version, only a valid license number has to be entered. All previously created signal files, projects, and configuration settings can still be used. Die integrierte Hilfe-Funktion von NextView®4 ermöglicht Ihnen einen schnellen Einstieg. Der Druck auf die F1-Taste oder der Eintrag im Menü öffnet die Hilfethemen. ▲ The integrated help function of NextView®4 enables you to get in fast. Pressing the F1 key or the respective menu item opens the help topics. T view® 4 Next ANALYSIEREN & DOKUMENTIEREN ANALYZE & DOCUMENT x/y- Darstellung FFT-Analyse x/y representation FFT analysis Verrechnung einzelner oder mehrerer Signale miteinander Calculation of individual or several signals with each other Datenreduktion Data reduction Digitale Filter Digital filters Differentiation Differentiation Integration Integration Stapelverarbeitung: Automatisierung von sich wiederholenden Analyseschritten Batch job: Automation of repeating steps of analysis analyze docu ument Detaillierte Anzeige von Signaldaten Detailed display of signal data Import von Messdaten Import of measuring data Export von Messdaten Export of measuring data Individuelle Seiteneinstellungen Formulardruck Druckvorschau Individual page settings Form print Print preview Next T view® 4 VERSIONEN VON NV4 VERSIONS OF NV4 PRO LITE AN F UNCTI ON S Number of DAQ systems 1 unlimited NextView®4 Lite – die abgespeckte Version von NextView®4 Formula channels 16 NextView®4 Professional – für den professionellen Einsatz einer Messdatensoftware in allen Bereichen current value or current, avg, average min, max, rms (rate 1:20) (rate 1:1 to 1:1000) Storage types NextView®4 Trial – 30-Tage Testversion ausgestattet mit allen Funktionen von NextView®4 Professional NextView®4 Analyse – zur Erstellung fundierter Auswertungen von Messdaten mit Hilfe der mächtigen Analysefunktionen von NextView®4 Trigger (with prehistory) MultiScan NextView®4 Trial – 30-day trial version featuring all functions of NextView®4 Professional Automatic numbering of measuring files NextView®4 Lite – the “slim” version of NextView®4 Picture NextView®4 Professional – for professional use of a data acquisition software in all application fields Static text Digital multimeter NextView®4 Analysis – for a well-founded analysis of recorded data by means of the powerful NextView®4 analysis functions Active alarm function Live display Level indicator Stop, scroll back, zoom in live data ZUSATZOPTION / ADD-ON* NextView®4 Script – optionale Skriptfähigkeit / Script add-on module Graph display x/y representation Cursors Cursor jumps SYSTEMVORAUSSETZUNGEN SYSTEM REQUIREMENTS Calculation of signal parameters (e.g. min, max) Windows® 7/XP Pentium-Prozessor, 400MHz 256MB Arbeitsspeicher; Festplatte >50MB Grafikkarte 1024x768, 256 Farben File train Export (ASCII, Diadem, TurboLab, NextView®4, NextView®/NT 3.4) Windows® 7/XP Pentium processor, 400MHz 256MB RAM; hard disc >50MB Graphics card 1024x768, 256 colors Export signal values Import (ASCII, Diadem, ModuLab, NextView®, TurboLab, Data base) Calculation of signals Integration Differentiation FFT Gestaltung: www.deliciousdesign.de SOFT-05/2011 Digital filters Repeat last analysis Batch job Message display (Push-)Button Slider NextView® 4 Script option * * * Lock project Print Print preview = ja / yes Graph and message displays Graph and message displays = nein / no * = kostenpflichtig / subject to a charge Next T view® 4 NextView®4 Software for Data Acquisition and Analysis Visualize. Configure. Scan. Analyze. One software for everything. NextView®4 covers the entire world of PC measurement data acquisition: displaying live data, recording measured values, analyzing your measurement applications - and even much more. Show Signals. Live or Recorded. Application-Oriented. No Programming. NextView®4 puts a main focus on user friendliness and practical use. An intuitive operating concept (e.g. Drag & Drop) guarantees extremely short training periods to get results fast. Programming skills are not necessary. Versions. Something for Everyone. Full functionality, a version with basic functions, or rather an analysis version without DAQ hardware? With NextView®4 Pro, Lite, or Analysis, you will find what meets your needs. You are free to test the software for 30 days. Measurement hardware. NextView®4 supports all currently available data acquisition systems of bmcm. Several devices are represented as one measuring system. Analog, digital, or CAN signals provided by the DAQ hardware can be shown online as graphs, numerical values, or levels. Display and analysis of measuring data stored or imported in a file are done in a graph display. Control & Automate. NextView®4 features switches, push-buttons, and sliders to control analog and digital outputs. With the add-on module NextView®4 Script, it is possible to automate processes or realize individual applications. In case of alarm, for example, an event can be set off, which has been programmed with the BASIC-like script language. MultiScan. Trigger. Prehistory. Ideal for long-term measurements and interference monitoring. The MultiScan creates single files (back-to-back), which are already available for analysis while the scan is still running. If a trigger - optionally with prehistory - has been set, measured data are only stored for a defined period of time when (or before) the trigger event occurred. FileTrain. With the FileTrain function, single files of a MultiScan are coupled. This is necessary for analyses beyond file limits, for example. Functional diagram 3BNextView®4 1 Software Installation and Hardware Configuration All software and documentation are integrated on the "Software Collection"-CD included with delivery. When inserting the CD, a CD starter opens automatically (otherwise: start: openhtml.exe). Change to the NextView®4 page by selecting the entry of the same name in the CD starter. For detailed information about installing or operating the software, please see the corresponding manuals. The Adobe Acrobat Reader is required to open the documentation in PDF format. You can run the installation directly from CD. If your browser prevents this, first save the setup program to hard disc before running it separately. Category Software Notes Documentation Operating program NV4.6 measuring software NextView®4 available in the Standalone versions: • Lite: "slim" version with basic functions full version with complete functional range • Pro: • Analysis: version for the analysis of stored measuring data DS-NV4 (data sheet) UM-NV4 (user manual) "First steps" in the NextView®4 demo project (displayed when first starting the software) Add-on 1.1 NextView®4 can be tested for free as a fully functional 30-day trial version. After purchasing the software, all projects, measurement files and settings can still be used. optional add-on module (requires license number, no freeware!) to automate processes and realize individual applications using a BASIC-like, event-oriented script language UM-SCRIPT (user manual) Installation of NextView®4 The installation program is included on the NextView®4 page of the "Software Collection" CD. During installation, you will be prompted to choose the desired program group for opening NextView®4 via the Start menu (Windows® XP7/) or Start screen (Windows® 8), and the directory path, in which the software is to be installed. If using default settings, the item "NextView 4.6" will be available under "Programs" in the Windows® Start menu or directly on the Start screen of Windows® 8 after installation. Page 2 3BNextView®4 1.2 1.2.1 First Start of NextView®4 Licensing When first starting the program, NextView®4 asks for various user data. • Holders of NextView®4.6 Lite, Pro or Analysis: Owners of a Lite, Pro or Analysis version enter the 10-digit serial number received at purchase of NextView®4. • NextView®4.6 Trial Version: If you want to test the 30-day trial version, checkmark the option "30 days free trial version". In this case, entering a serial number is not necessary. • Update NextView®4.x Æ NextView®4.6: To install a free update of a previous 4.x version, enter the old 4.x license number (up to version 4.3: 20digit) in the field of the serial number. This also applies to users of the Live! version. The old license number is provided in the "License" dialog (menu "Options") of the previous 4.x version of NextView®4. Now click the button "Request License". After accepting the licensing agreement, you can choose if you want to request the license number via e-mail or via our website. • Request License Number via E-Mail: If selecting this option, your e-mail program will automatically be opened. The e-mail shown contains important data required for licensing and must not be changed. Send the e-mail ([email protected]) for the license number to be sent to your e-mail address. Page 3 3BNextView®4 • Request License Number via Internet: If the PC on which NextView®4 is installed has no connection to the internet or if no e-mail program is configured, write down the serial number and the request code. Enter those on the webpage "NextView® Licensing" (accessible via: www.nextview.de) on any PC. With an existing internet connection choose the button "Open" instead. Your default browser will automatically show your licensing data on the webpage "NextView® Licensing" (see above). Now enter the e-mail address to which you want the license number to be sent. To complete the licensing process, enter the license number (25-digit) received by e-mail in the NextView®4 dialog "License Information" and press "OK". • The license number decides about the version (Trial, Lite, Pro, Analysis) to be installed. It is only valid on the PC requesting the license number. • The trial is valid for 30 days after requesting the license number. If a license is not purchased within this period, the functional range of NextView®4 will considerably be cut back. Page 4 3BNextView®4 1.2.2 Device Setup The following dialog "Device Setup" (Lite, Pro) shows all installed and connected data acquisition systems. Measurement hardware to be used with NextView®4 is selected by placing a checkmark next to the device in the bottom field. In addition, 16 formula channels can be installed (NV4 Pro only). With the sound card, audio signals can be displayed, recorded and analyzed in NextView®4 allowing the use of the 30-day trial license without bmcm measuring hardware. It is strongly recommended to verify the device-specific properties of some DAQ systems before installation by selecting the device in the top field and pressing the button "Properties…" which is active now. DAQ System Setting LAN data acquisition Selection of virtual channels 17-19: system (iM series) • temperature sensor (measures internal device temperature) • hot-wired ground channel as 0V reference • clock signal for external synchronization PCI(e) data acquisi- To check the module configuration, select the module and press "Properties": tion card • input modules (MAD series): operating mode (single-ended/differential) (PCI/PCIe series) • various output modules (MDA series): output range (±5V/±10V) The settings must correspond to the jumper configuration on the module! Page 5 3BNextView®4 2 Subsequent Changes 2.1 Change Hardware Configuration The "Device Setup" dialog (see chapter 1.2.2) can be reached by choosing the command "Hardware setup" in the program group of NextView®4. Here you can add or remove measurement hardware in NextView®4 at any time without making a new installation necessary. • Windows® XP/7: Start / (All) Programs / NextView 4.6 / Hardware Setup • Windows® 8: Right-click Start screen / "All Apps" / NextView 4.6 / Hardware Setup 2.2 Install Another NextView®4 Version (Upgrade) Changing to a different NextView®4 version (e.g. from NextView®4 Trial or Lite to NextView®4 Professional) is possible via the "License" dialog (menu "Options") showing the activated licenses. The "Licensing" dialog is opened (see chapter 1.2.1) by pressing "Add". If the newly requested license number is input, the version will be changed without a reinstallation being necessary. Upgrading to another version does not require reinstalling. All previously created projects and measurement files can still be used. 2.2.1 Upgrade Testversion Æ Pro, Lite, Analysis Enter the serial number received upon purchase of the new version in the dialog "License Information" and follow the instructions about "Licensing" in chapter 1.2.1 (see p. 3). 2.2.2 Upgrade Lite Æ Pro Enter your previous (Lite) serial number in the dialog "License Information" and follow the instructions about "Licensing" in chapter 1.2.1 (see p. 3). The hitherto existing serial number is changed to a professional serial number upon purchase of a Professional version so that your NextView®4 version will be activated as full version when entering the newly requested license key. 2.3 Install Add-On Modules Like changing to another NextView®4 version (see chapter 0), the activation and licensing of an add-on option (e.g. NextView®4 Script) is done via the "License" dialog (menu "Options"). Page 6 3BNextView®4 3 First Steps … To be able to start right away, the NextView®4 start project contains a short introduction about how to show, record and analyze signals. Comprehensive information is provided in the integrated online help. Live Display Create new sheet: Insert new display: Select display: Add channels to display: Configure display: TIP Configure DAQ System Open configuration dialog: Configure scan: Configure channels: Start scan: TIP Open menu "Sheet" Æ New Sheet Open menu "Display" Æ Live Display Click in the display with your left mouse button. All properties of this display are shown in the properties bar on the left now. Pull the desired channels from TAB "Channels" (section "Resources") of the properties bar in the display (Drag & Drop). In the properties bar, you can make various adjustments, e.g. show channel name and digital value or set colors Use the shortcut [ALT+ENTER] to display and hide the properties bar. Open TAB "Devices" in the section "Common Tasks" of the properties bar and click the item "Device configuration". Select "My Computer" in the treeview and enter scan frequency, measuring period etc. A click on the sign next to a measurement device displays its channels. Select a channel and define properties like name, unit, measuring range, conversion factors etc. Open TAB "Start/Stop" in the section "Common Tasks" of the properties bar. Click "Start scan" to begin sampling to hard disc. The status bar at the bottom displays the current status of the scan and the remaining measuring period. Analysis of Stored Measurement Data Open menu "Display" Æ Graph Display Insert new display: Select display: Click in the display with your left mouse button. All properties of this display are shown in the properties bar on the left now. Open measurement file: A click on the icon in the properties bar (section "Resources") opens the file manager. Select the measurement file (*.lfx) and confirm with "OK". Add signals to display: Pull the desired signals from TAB "Signals" (section "Resources") of the properties bar in the display (Drag & Drop). Set cursors: and at the bottom of the graph display to insert the cursors. Click the symbols You can move them and display various key data of the graph. Just activate the first two options of TAB "Cursor" in the properties bar. Analyze measuring data: NextView®4 provides a multitude of analysis functions (data reduction, FFT, calculations, export etc.) in the menu "Signals". TIP Analysis always happens between the two cursors! Keep in mind to show them. Page 7 3BNextView®4 4 NextView®4 Versions Function Lite Professional, Trial Analysis 1 current value, mean value (rate 1:20) + + + + + + + unlimited 16 current value, mean value, min, max, RMS (rate 1:1 to 1:1000) + + + + + + + + + + live display, graph display + + + + + + - + + graph display + + + + + + - + + + + + + + graph display, message display + + + + + + + + + + + + + + + + + + + + + number of DAQ systems formula channels storage types trigger, prehistory MultiScan aut. numbering of measuring files picture static text, digital multimeter active alarm function live display level indicator stop, scroll, zoom in live data graph display signal representation in panes x/y-representation cursors cursor jumps calc. of signal parameters (e.g. min/max) FileTrain export (ASCII, Diadem, TurboLab, NextView®4, NextView®/NT 3.4) export signal values to clipboard import (ASCII, Diadem, ModuLab, NextView®, TurboLab, data base) calculation of signals integration, differentiation FFT, digital filters repeat last analysis setup batch job message display button (push-button) slider NextView®4 Script option 3 lock project print, print preview 3 subject to a charge 5 System Requirements System Requirements PC Operating system: Processor: RAM: Hard disc: Video card: Minimum ® Windows XP/7/8 Pentium, 400MHz 256MB RAM >50MB 1024x768, 256 colors Recommended Windows® XP/7/8 Pentium, 1GHz 512MB RAM >200MB 1600x1200, True Color Manufacturer: BMC Messsysteme GmbH. Subject to change due to technical improvements. Errors and printing errors excepted. Rev. 4.6 08/20/2014 Page 8 NV4SCRIPT Script Option for NextView®4 Automate Your NextView®4. You want to automate and control measurement processes in NextView®4? Your measurement task is to be realized individually? A certain action needs to be set off in case of alarm? Very easy with the script option NV4SCRIPT for the data acquisition and analysis software NextView®4. BASIC as Basis. And Much More. The script language is based on the programming language BASIC to make the first steps easier. It has been supplemented by special commands and functions, however, to extend the standard commands and features of NextView®4 in an ideal way. Event-Oriented. The programmed commands of a NextView®4 Script are executed when an event occurs, e.g. a button is clicked in NextView®4 or a trigger is set off. Events are either time-related or are provided by certain objects (e.g. slider, graph display). Functional diagram Script Editor. Programming is done in the integrated script editor in NextView®4, which opens by doubleclicking an event. Help. For Example. Programming support is provided by an online help integrated in NextView®4 as well as by several programming examples in the documentation. Individual example scripts for bmcm measurement hardware can be downloaded at www.bmcm.de/us . For All Versions. Whether Lite, Pro, or Analysis: NV4SCRIPT can be used with all versions of NextView®4. Installation is not necessary. To activate the script option, only the license number of NV4SCRIPT has to be entered in NextView®4. NV4SCRIPT 1 Activation and Licensing The software NextView®4 (version: Lite, Professional, Analysis) must have been installed and licensed before activating NV4SCRIPT. The add-on module NV4SCRIPT is activated directly in NextView®4. Choosing the item "License" in the "Options" menu opens a window displaying the installed NextView®4 version as well as the corresponding license key. To unlock the script option, click "Add". Figure 1 In the window "License Information", enter the serial number received at purchase of NV4SCRIPT to get a license key for this PC. Now click the button "Request License". Figure 2 After accepting the licensing agreement, you can choose if you want to request the license number via e-mail or via our website (if necessary from a different PC). Figure 3 • Request License Number via E-Mail: If selecting this option, your e-mail program will automatically be opened. The displayed e-mail contains important data required for licensing and must not be changed. Send the e-mail ([email protected]) for the license number to be sent to your e-mail address. • Request License Number via Internet: If the PC on which NextView®4 is installed has no connection to the internet, or if no e-mail program is configured, write down the serial number and the request code. Enter those on the webpage "NextView® Licensing" (accessible via: www.nextview.de) on any PC. Page 2 NV4SCRIPT With an existing internet connection, choose the button "Open" instead. Your default browser will automatically show your licensing data on the webpage "NextView® Licensing". Now enter the e-mail address to which you want the license number to be sent. Figure 4 To complete the licensing process, enter the license number (25-digit) received by e-mail in the NextView®4 dialog "License Information" (see Figure 2) and press "OK". After closing and reopening the "License" dialog in NextView®4, the item "NextView Script" will have been added to the list of licensed products (see Figure 1) and the extended script functionality is activated. 2 Create Script Script files have the file format *.nvs. They are always saved with the same file name and in the same directory as the NextView®4 project file (*.nvp) itself. Scripts can be used with any standard editor (not Word!). The script editor integrated in NextView®4 is opened with <STRG>+F12 or via the tab "Script" in the property bar on the left by double-clicking a provided NV4SCRIPT event (see chapter 3). Figure 5 Page 3 NV4SCRIPT 3 Available Events Script events in NextView®4 can be defined in relation to time or an object. If an event occurs, the corresponding commands of a NV4SCRIPT will be executed. 3.1 Time-Based Events Time-controlled events are set off, for example, when loading, saving, or closing a project. A regularly occurring time event (event: OnTimer) is provided while NextView®4 is running to initialize DAQ systems or realize time-oriented sequential controls (e.g. rectangle signal at analog output). Figure 6 Time-based events can be viewed in tab "Script" of the property bar if you select the project *.nvp in the treeview of the "Project" tab (section "Ressources") first. Time-based event OnProjectLoad OnTimer OnTrigger OnProjectClose OnProjectSave Description Routine is executed when loading a project. Project-based initializations are one example in this connection. Routine is executed periodically in the defined interval. Time-controlled events can be processed in this connection. Routine is executed after reaching the defined trigger. Routine is executed when closing a project. Routine is executed when saving a project. Page 4 NV4SCRIPT 3.2 Object-Based Events With object-based events, it is possible to start user-controlled processes or to react to alarm conditions. Simple controls can be realized by means of the objects switch and slider. For example, a relay could be turned on or off by a switch. Alarm events can be realized by means of display elements, such as digital multimeters, text boxes, or level indicators. For instance, if a defined signal level is exceeded, an alarm will be set off and a certain reaction can be programmed, e.g. turning on a cooling system. Figure 7 The tabs in the section "Properties" on the left side of the user interface show the current settings of the active object (click object to activate) on the sheet. Objects which can trigger an event feature a "Script" tab in addition listing the programmable events of the object in the left column. The right column contains the corresponding name of the function to be executed if an event occurs (becomes editable by clicking it). Object-based event OnCalc Object graph display OnClick switch slider slider static text, digital multimeter, level indicator OnMove OnAlarm Routine is executed when calculating key values of a signal (e.g.min, max) on tab "Cursor". Routine is executed when clicking a switch. Routine is executed when clicking or releasing the slider handle. Routine is executed when shifting the slider. Routine is executed when the alarm state changes. Page 5 NV4SCRIPT 4 Programming Examples for NV4SCRIPT The following programming examples demonstrate in an easy way how to use NV4SCRIPT. 4.1 Example "Switch" Figure 8 This example shows the current state of the switch (in or out) in the message display when being pressed. Button ' shows state of the switch in the message display Sub OnClick (State As Boolean) if state then print "Switch is on..." else print "Switch is off..." end if End Sub Page 6 NV4SCRIPT 4.2 Example "Slider" Figure 9 The message display indicates in this example when the slider handle has been clicked or released. If the defined limit of 70% (range 0..1; 0 = bottom, 1 = top) has been exceeded, a window opens containing a warning. Slider ' shows the slider position in the message display ' and opens a warning when exceeding a limit Sub OnMove (Pos as Double) Dim i as Integer If (Pos > 0.70) then i = MsgBox("Reached " & Format(Pos * 100,"###") _ & "%", mbOk,"") End if End Sub Sub OnClick () Print "Clicked!" End Sub Page 7 NV4SCRIPT 4.3 Example "Static Text" Figure 10 As soon as the static text has reached the alarm state, a window opens prompting to enter the serial number of the device causing the alarm. The serial number will be displayed in the message display then. Static Text Sub OnAlarm (Alarmed As Boolean) Dim str As String If Alarmed Then str = InputBox ("Enter Serial Number of the Product", _ "Alarm", format(0,"000")) print "Alarm caused by product with serial number: " & str End if End Sub Page 8 NV4SCRIPT 4.4 Example "OnProjectLoad" and "OnTimer" Figure 11 The current time and counter state will be shown in the message display every 10th call of the OnTimer event. In addition, a scan starts about 10 seconds after opening NextView®4. Page 9 NV4SCRIPT OnProjectLoad OnTimer ' example for time-controlled event processing Dim Dim Dim Dim cnt as Integer ' simple counter variable startms as Integer ms as Integer ' milliseconds variables fScan as Boolean ' scanning flag Sub OnProjectLoad () print "Load project..." 'set OnTimer interval to 100ms NvSetTimerInterval(100) ' initialize variables cnt = 0 startms = TickCount fScan = False End Sub Sub OnTimer () Dim sec as Double ' increment at each timer call cnt = cnt + 1 ' time in msec since start of Windows ms = TickCount ' seconds since start of NextView 4 sec = (ms - startms)/1000 ' execute sth upon 10th call if (cnt Mod 10) = 0 then print sec & "sec" & " counter state = " & cnt end if ' automatically start scan 10sec after NextView 4 start if Not(fScan) And (sec > 10) then print "Scan start..." NvStartScan False fScan = True end if End Sub Manufacturer: BMC Messsysteme GmbH. Subject to change due to technical improvements. Errors and printing errors excepted. Rev. 4.6 08/19/2014 Page 10