1
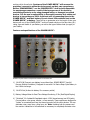
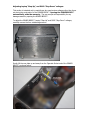
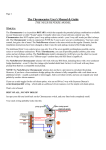
POWER BRICK™ - USER MANUAL v1.3
1-27-15
Written by: Alex Zarvis
Email - [email protected]
Web - www.zengineering.us
ZENGINEERING™
Thank you for purchasing The POWER BRICK™ by ZENGINEERING™. The POWER
BRICK™ is a 12v DC power distribution hub. It was designed for astronomers and
terrestrial photographers to meet the power connection requirements of all of the
radically different hardware devices that are out there.
Primary features of the POWER BRICK™ include:
-A total of NINE 12v Outs
-Full Reverse Polarity protection
-Two 8v DSLR Outs
-Fully adjustable laptop power system (Switched & Fused) (Mac and PC)
-Two fully isolated outputs for monitors and cameras.
-Real-time voltage monitoring
This user manual will describe the features, functions and usage of the POWER BRICK™.
The POWER BRICK™ has connections for all types of devices and uses the RCA
connector as a low voltage standard. The POWER BRICK™ was designed to be used
with a user supplied 12v Marine Deep Cycle Battery with an amp-hour rating of + or –
100Ah. This type of battery is available at your local Wal-Mart or farm center. The
POWER BRICK™ will also work with any other 12v battery. Just remember, the higher
the amp hour (Ah) rating of a battery, the more current load can be placed on that
battery, and the longer you may be able to run your devices off that battery.
Working with batteries and 12v DC is relatively simple, safe, and generally a reliable
source of power. However there are always inherent dangers involved when working
with electricity. Because users have different experience levels, they are solely
responsible for the correct usage of the device as described within this User Manual
(Included with your purchase and available on the POWER BRICK™ page of the
website).
The POWER BRICK™ contains full reverse polarity protection for up to 60v @ +/- 1000A.
It is NOT possible to damage the POWER BRICK™ or any devices connected to the
POWER BRICK™ by incorrectly connecting a battery to the POWER BRICK™ while
working within those limits. Purchase of the POWER BRICK™ will serve as the
purchaser’s consent to utilize the device purely on their own recognizance.
Neither ZENGINEERING™ nor the POWER BRICK™ shall be held responsible
for any damages caused as a result of the improper use of the device by
overloading the device or by using damaged cables, or damaged connected
devices. It is the user’s responsibility to thoroughly examine their cables and
devices to insure they are 100% functional prior to connecting them to the
POWER BRICK™ and their battery. Do not exceed 15A combined load on the
POWER BRICK™ or battery. There will be no guarantee as to the length of time your
devices will run off the POWER BRICK™ as this is based entirely on the Amp-Hour (Ah)
rating, Age and Health of your Battery, as well as the type of device load you apply to
your battery.
Features and specifications of the POWER BRICK™:
Numbers in photo above correspond to numbers in the below text.
1) 12v RCA IN (Connect your battery here without fear. POWER BRICK™ has full
Reverse Polarity Protection). Designed for use with 12v Marine Deep Cycle Battery in
the 100Ah size range.
2) 12v RCA Out (A direct to battery 12v accessory outlet)
3) Battery Voltage Meter for Real-Time Voltage Monitoring 3-30v (Red Digital Display)
4) “Switched” 12v Isolated & Regulated output 1.25A (shared among two RCA jacks).
Connect either a low power monitor, or two cameras. These outputs are designed to
“isolate” a connected load from the shared ground of all the other devices. This can
eliminate noise, wavy lines, rolling bars, etc. Note: Isolating both the camera and
the monitor it attaches to will sometime be necessary to completely eliminate noise
issues in a DC environment. We offer the stand alone ISOLATOR™ to provide
additional isolated power ports for your devices. Contact us for more info.
5) “Switched” 12v out 6A, with 2 RCA outputs.
6) “Switched” 12v out 6A, with 3 RCA outputs (Best for Dew Heaters, Focusers, etc.).
7) “Switched” Laptop Power Output (Factory set to 19.5v, user adjustable 12-35v). This
output can power any laptop, PC and MAC.
8) Laptop circuit is protected with externally accessible 6A GMA Fuse.
9) Cigarette Style 12v Out (Direct to battery) [Use with our “Cigarette Multi Port
Adapters”].
10) “Switched” Adjustable “Step Down” Outputs x2 RCA @ 3A shared (Set @ 8v for
DSLR Cameras).
11) Rugged, Stylish, Compact Aluminum Housing.
12) Rubber Feet (POWER BRICK™ Stays where you put it!).
13) Rated @ 15A Continuous Load with equivalent 100Ah Marine Deep Cycle Battery.
14) Max Current Rating 15A (Per POWER BRICK™ & Battery).
15) Chassis Approx. 2.25”H x 4.75”W x 3.75”D.
POWER BRICK™ usage:
1) Using a 14ga. “12v Battery Terminal Clip to RCA” cable (we offer this cable in
standard and custom lengths), connect the RCA side to the POWER BRICK™ “12v
In” port, and then connect the terminal ends to the respective positive and negative
terminals on your battery. At this point the digital display will light up indicating the
current voltage of your 12v battery.
2) Next, connect an 18ga. “Universal RCA to 2.1mm DC Male” cable (we offer this cable
in standard and custom lengths) to the “Laptop Out” port on the POWER BRICK™,
and the other end to a “DC Tip” that fits your laptop. Then connect that to your
laptop. Power on the “Laptop Out” switch on the POWER BRICK™ and then power
on your laptop. The POWER BRICK’s™ “Laptop Out” port is set at 19.5v at the
factory to power the most common laptop voltage varieties. However the output of
this power section is fully adjustable within the POWER BRICK™. NOTE: Opening
the POWER BRICK™ voids the warranty due to the fragile nature of the internal
components. However, I cannot stop knowledgeable users from adjusting their
POWER BRICK™ device outputs to suit their individual needs. See the “Voltage
Adjustment” section of this manual for more info.
3) I find it best to allow the laptop to fully power on before adding additional devices so
as to more accurately be able to gauge the battery’s current voltage, and the voltage
“hit” of each additional added device.
4) At this point add your cameras and monitors insuring you have all devices
functioning and producing clean images.
5) Add all additional devices one at a time. Add your telescope mount last as they are
most susceptible to large voltage hits while powering things on.
6) At this point the POWER BRICK™ should provide power to your connected devices
for many hours depending on the size and amp hour rating of your 12v battery.
7) Depending on the load you apply to the various “step-up” and “step-down” power
sections of the POWER BRICK™, the device may get warm to the touch. This is
normal, and is in fact a design feature. The chassis was designed to act as a heat
sink to dissipate the internal heat while the outside of the chassis is in contact with
the ambient air. This has the added benefit of ensuring the unit stays free of all but
the most serious dew formation. (This is of huge value to astronomers that know the
effects dew can have on their gear throughout an observing session).
8) The POWER BRICK™ is not waterproof; care must be given in the event of heavy
precipitation.
Voltage loading and monitoring notes:
1) As you add devices (load) to the power brick you will notice the battery’s voltage
level drop in tenths of a volt on the voltage meter built into the POWER BRICK™.
2) Starting with a freshly charged Marine Deep Cycle Battery, the voltage meter’s
display will likely read around 12.3 volts. Once all devices are powered up the
display could read in the low 11v range or even in the high to mid 10v range (This
assumes a 10 to 15A device load). These voltages are completely normal, and
testing has shown that when using a deep cycle marine battery in the +100Ah
range, the user should expect between 8 to 14 hours of use before they would want
to disconnect and recharge their battery. Do not fully discharge a 12v battery!
Disconnect your battery as it approaches approximately 9.7v. Of course this
information is only offered as a general guideline because every hardware device is
different, as is every battery, YMMV.
Additional tips and usage advice:
1) Consider where you connect your devices on the POWER BRICK™. Some devices
may only be needed during certain periods of the observing session. For instance,
perhaps you only want to run your dew heaters during the night time and not during
the day when they aren’t needed, you would put them on a separate switched
output section to allow them to be turned on and off with ease.
2) We offer Cigarette style 12v plug adapters (quality, not the cheapos that are out
there) that offer additional Cigarette plugs as well as 5v USB plugs to power a USB
Hub as well as Cell Phones and Tablets. These cigarette adapters mate perfectly with
the POWER BRICK™ to provide for the power needs of all the latest devices.
Adjusting Laptop “Step-Up”, and DSLR “Step-Down” voltages:
This section is intended only to assist those who need custom voltages other than those
set during the construction of the POWER BRICK™. Opening the POWER BRICK™
automatically voids the warranty. The user accepts all responsibility for any
damage caused by opening the POWER BRICK™.
To adjust the POWER BRICK™ Laptop “Step-Up” and DSLR “Step-Down” voltages,
carefully remove the four outside edge screws.
Gently lift the rear plate up and away from the Cigarette Socket end of the POWER
BRICK™ as shown below.
By using a multi-meter to measure the voltages of the respective power sections
(measured at the RCA sockets), the user can slowly turn the small adjustment screws to
alter the voltages of those specific power sections. Turning the screw to the right
increases the voltage, turning to the left decreases the voltage. These components are
quite fragile; the user is advised to tread extremely lightly.
Laptop “Step-Up” power section adjustment range: 12-35v (Default factory
setting: 19.5v)
DSLR “Step-Down” power section adjustment range: 3-12v (Default factory
setting: 8v)
(Space Reserved for future content)
Copyright Notice. All materials, devices, products, and software published on or used within
zengineering.us are protected by copyright, and are owned or controlled by or licensed to
ZENGINEERING™. UNAUTHORIZED COPYING, REPRODUCTION, REPUBLISHING, UPLOADING,
POSTING, TRANSMITTING OR DUPLICATING OF ANY OF THE MATERIAL IS PROHIBITED. You may
download any downloadable materials displayed on zengineering.us only for personal,
noncommercial and informational purposes, provided that the documents are not modified and
provided you maintain and abide by all copyright, trademark and other notices contained in such
material.
© Copyright 2015 ZENGINEERING™, All rights reserved. All use subject to Terms and Conditions
of Use set forth here.