1
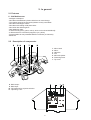
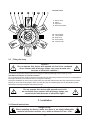
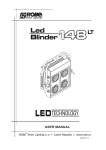
Intelligent Centerpiece Dominator 1200 USER MANUAL www.robe.cz DOMINATOR 1200 XT Table of contents 1. Introduction .................................................................................................................... 4 1.1 Safety instructions ..................................................................................................... .4 1.2 Operating instructions ................................................................................................ 4 2. In general ........................................................................................................................ 5 2.1 Features ................................................................................................................... .5 2.2 Description of components ........................................................................................ 5 2.3 Fitting the lamp .......................................................................................................... 6 3. Installation ...................................................................................................................... 6 3.1 General instructions ................................................................................................... 6 3.2 Connection to the mains ............................................................................................. 7 3.3 DMX-512 connection ................................................................................................. 7 3.4 Test sequence ............................................................................................................ 7 3.5 Projector addressing .................................................................................................. 7 4. Operation ........................................................................................................................ 7 4.1 Reset ......................................................................................................................... 7 4.2 Operation LED ........................................................................................................... 7 4.3 DMX protocol ............................................................................................................. 8 5 Maintenance and cleaning ............................................................................................. 9 6 Technical Specifications ................................................................................................ 9 7. Appendix ........................................................................................................................ 9 3 Caution ! Keep this device away from rain and moisture ! Unplug mains lead before opening the housing ! FOR YOUR OWN SAFETY, PLEASE READ THIS USER MANUAL CAREFULLY BEFORE YOU INITIAL START-UP! Every person involved with the installation, operation and maintenance of this device have to: - be qualilfied - follow the instructions of this manual Caution ! Be careful with your operations. Dangerous electric shock when touching the wires ! 1. Introduction Thank you for having chosen a DOMINATOR 1200 XT. You will see you have acquired a powerful and versatile device. Unpack your DOMINATOR 1200 XT. Before you initial start-up, please make sure that there is no damage caused by transportation. Should there be any, consult your dealer and do not use the device. 1.1 Safety instructions This device has left our premises in absolutely perfect condition. In order to maintain this condition and to ensure a safe operation, it is absolutely necessary for the user to follow the safety instructions and warning notes written in this user manual. Important: Damages caused by the disregard of this user manual are not subject to warranty. The dealer will not accept liability for any resulting defects or problems. If the device has been exposed to drastic temperature fluctuation (e.g. after transportation), do not switch it on immediately. The arising condensation water might damage your device. Leave the device switched off until it has reached room temperature. During the initial start-up some smoke or smell may arise. This is a normal process and does not necessarily mean that the device is defective. Please consider that damages caused by manual modifications to the device are not subject to warranty. 1.2 Operating instructions This device was designed for indoor use only. Do not shake the device. Avoid brute force when installing or operating the device. You can install the device at any desired place. Please make sure that the device is not exposed to extreme heat, moisture or dust. There should not be any cables lying around. You endanger your own and the safety of others! Operate the device only after having familiarized with its functions. Do not allow an operation by persons who do not know the device well enough. Most damages are the result of an unprofessional operation! Please consider that for safety reasons unauthorized modifications to the device are forbidden! When taking the device into operation, please make sure that the housing is closed firmly with all the necessary screws tightened up. 4 2. In general 2.1 Features 6 - fold Multiscanner - Intelligent centrepiece - New! Now with additional cylinder-effect for even more change - The rotation speed of the opposed cylinders is freely controllable - New! Now with stepper-motors - New! Now with rotating 3-fold prism-effect - New! All in all 6 different gobos - New! Multicolor-effect - 2 effect-wheels (prism, gobos, colors), which can be mixed individually - 3 different dichroic color filters (magenta, cyan, yellow) - Programmable via every standard DMX-512 controller (12 channels) - Black-Out 2.2 Description of components 1 - Mirror head 2 - Mirror 3 - Objective 4 - Fan 5 - Mirrored cylinder 6 - Fastening screw 7 - Top cover 8 - DMX-output 9 - DMX-input 10 - DIP-switches for projector selection 11 - Operating - LED ! 5 ! Internal view 1 - Mirror head 2 - Mirror 3 - Objective 5 - Mirrored cylinder 12 - lense holder 13 - Lamp holder 14 - Side cover 15 - Gobo holder 16 - Prism holder 2.3 Fitting the lamp Caution ! Do not operate this device with opened service lid as continued direct contact with discharge lamps can cause burned skin because of ultraviolet radiation ! To insert the lamp (HMI 1200W) open the housing by loosening fastening screws at the top cover. CAUTION: The lamp is very shock-sensitive! Do not install a lamp with a higher wattage! A lamp like this generates temperatures the device is not designed for. Damages caused by non-observance are not subject to warranty. During the installation do not touch the glass-bulbs bare-handed! Please follow the lamp manufacturers notes! Before you close the housing again, make sure that the lamp is installed tightly into the lampholder system. Reclose the housing and tighten the fastenig screws. Caution ! Do not operate this device with opened service lid as continued direct contact with discharge lamps can cause burned skin because of ultraviolet light ! 3. Installation 3.1 General instructions Danger of fire ! When installing the device, make sure there is no highly-inflammble material (decoration articles, etc.) within a distance of min. 0,5m. 6 The projector can be installed in any postition without altering its operation characteristics. Caution ! Make sure that the device is fixed properly ! Ensure that the structure to which you are attaching the projector is secure ! For fixing the projector use the hole provided in the bracket. The hole in the adjustable mounting bracket has a diameter of 8mm. For overhead use, fit a safety chain or cord 3.2 Connection to the mains Caution ! The electric connection has to be carried out by a qualified employee only ! Connect the projector with the mains plug to the mains 3.3 DMX-512 connection Connect the controller with the projector using a stereo shielded cable and 3-pin XLR-connectors. In order to connect the controller, you have to adjust the starting address of the DOMINATOR like shown under 3.5. 3.4 Test sequence In order to run the test sequence, adjust the starting address of the DOMINATOR as follows: 3.5 Projector addressing If the DOMINATOR is to be connected with a Universal DMX Controller , adjust the starting address of the DOMINATOR as follows: 4. Operation 4.1 Reset As soon as the projector is switched on, the motors are adjusted (Reset) and the device is ready for use within c. 10 seconds. 4.2 Operation LED If the projector is connected with a controller via the DMX-input, but does not receive any data, the operation LED is flashing. 7 4.3 DMX protocol Channel 1 2 3 4 5 6 7 8 9 10 11 Value Function Type of control 0-255 Pan-movement mirrorhead 1and 4 Gradual pan mirror movement proportional 0-255 Tilt-movement mirrorhead 1and 4 Gradual tilt mirror movement proportional 0-255 Pan-movement mirrorhead 2and 5 Gradual pan mirror movement proportional 0-255 Tilt-movement mirrorhead 2and 5 Gradual tilt mirror movement proportional 0-255 Pan-movement mirrorhead 3and 6 Gradual pan mirror movement proportional 0-255 Tilt-movement mirrorhead 3and 6 Gradual tilt mirror movement proportional 0-79 80-159 160-239 240-255 Effect wheel 1 Full circle,white Multicolour gobo 6 gobos with 6 colours Rainbow effect step step step step 0 1-85 86-124 125-127 128-192 193-255 Effect wheel 2 Blackout Dimmer intensity (85-max.intensity) Full circle,white Reset Magenta,cyan,yellow Rotating 3-fold prism step step step step step step 0-126 127-128 129-255 Prism rotation Anti-clokwise rotation with decreasing speed No rotation Clokwise rotation with increasing speed proportional step proportional Rotation of the mirrored cylinders between mirrorhead 1/2 and 4/5 0 No rotation 1-126 Anti-clokwise rotation with decreasing speed 127-128 No rotation 129-254 Clokwise rotation with increasing speed 255 No rotation step proportional step proportional step Rotation of the mirrored cylinders between mirrorhead 2/3 and 5/6 0 No rotation 1-126 Anti-clokwise rotation with decreasing speed 127-128 No rotation 129-254 Clokwise rotation with increasing speed 255 No rotation step proportional step proportional step 8 Channel 12 Value Function Rotation of the mirrored cylinders between mirrorhead 3/4 and 6/1 0 No rotation 1-126 Anti-clokwise rotation with decreasing speed 127-128 No rotation 129-254 Clokwise rotation with increasing speed 255 No rotation Type of control step proportional step proportional step 5 Maintenance and cleaning Danger to life ! Disconnect from mains before starting maintenance operation ! It is absolutely essential that the projector is kept clean and that dust, dirt and smoke fluid residues must not build up on or within the projector. If this happens, the light output from the projector will be significantly reduced. Regular cleaning will not only ensure the maximum light output, but will also allow the projector to function reliably throughout its life. A soft lint-free cloth moistened with any good glass cleaning fluid is recommended, under no circumstances should alcohol or solvents be used! The front mirror and objective lens will require monthly cleaning as smoke fluid tends to building up residues, reducing the light output very quickly. The cooling fan should also be cleaned monthly. The gobos may be cleaned with a soft brush. The dichroic colour filters, the gobo-wheel and the internal lenses should be cleaned every three months. The interior of the projector should be cleaned at least annually using a vacuum cleaner or air jet. To ensure a proper function of the rotating gobos, we recommend lubrication in six month intervals. The quantity of oil must not be excessive in order to avoid that oil run out when the gobo wheel rotates. 6 Technical Specifications Power supply Power supply: Power consumption: Fuse: 208V / 60Hz (US Version) or 230V / 50Hz (EU Version) 1500W T10A Lamp - HMI 1200W GS double-sided Motor - 21 microstepping stepper motors controlled by microprocessor - 6 DC-motors Electronics - Digital serial input DMX-512 - 12 control channels Housing - Easy access to lamp and main components thanks to large opening cover Dimensions and weight - W x H x D: - Weight: 1000 x 1000 x 500mm 48kg 7. Appendix We hope you will enjoy your DOMINATOR 1200. We can assure you that you will enjoy this device for years if you follow the instructions given in this manual. Should you have further questions, do not hesitate to contact your local dealer.. Version 1.0 9