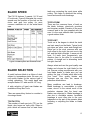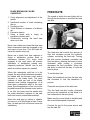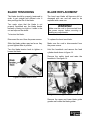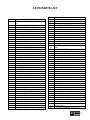
1
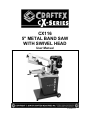
CX116 5" METAL BAND SAW WITH SWIVEL HEAD User Manual Version 1.0 TABLE OF CONTENTS General Safety Instructions .......................................................................... 3 Specific Safety Instructions........................................................................... 4 Features ....................................................................................................... 5 Physical Features ......................................................................................... 6 Setup ............................................................................................................ 7 Unpacking .................................................................................................... 7 Proper Grounding ......................................................................................... 8 Cabinet, Wheels and Feet ............................................................................ 9 Stop Bolt Adjustment ....................................................................................10 Squaring Vise to Blade .................................................................................10 Stop Rod ......................................................................................................10 Stop Bracket .................................................................................................11 Test Run .......................................................................................................11 Blade Speed .................................................................................................12 Blade Selection.............................................................................................12 Feed Rate.....................................................................................................13 Blade Guides ................................................................................................14 Blade Tensioning..........................................................................................15 Blade Replacement ......................................................................................15 Blade Tracking..............................................................................................17 Maintenance .................................................................................................18 Lubrication ....................................................................................................18 CX116 Stand Diagram..................................................................................19 CX116 Band Saw Diagram...........................................................................20 CX116 Parts List...........................................................................................21 Warranty .......................................................................................................23 2 GENERAL SAFETY INSTRUCTIONS Extreme caution should be used when operating all power tools. Know your power tool, be familiar with its operation, read through the user manual and practice safe usage procedures at all times. ALWAYS read and understand the user manual before operating the machine. router bits, shaper heads, blades, knives or making other adjustments or repairs. CONNECT your machine ONLY to the matched and specific power source. NEVER leave a tool unattended while it is in operation. ALWAYS wear safety glasses respirators, hearing protection and safety shoes, when operating your machine. NEVER reach over the table when the tool is in operation. DO NOT wear loose clothing or jewelry when operating your machine. A SAFE ENVIRONMENT is important. Keep the area free of dust, dirt and other debris in the immediate vicinity of your machine. BE ALERT! DO NOT use prescription or other drugs that may affect your ability or judgment to safely use your machine. DISCONNECT the power source when changing drill bits, hollow chisels, ALWAYS keep blades, knives and bits sharpened and properly aligned. ALL OPERATIONS MUST BE performed with the guards in place to ensure safety. ALWAYS use push sticks and feather boards to safely feed your work through the machine. ALWAYS make sure that any tools used for adjustments are removed before operating the machine. ALWAYS keep the bystanders safely away while the machine is in operation. 3 CX116 – 5" METAL BAND SAW WITH SWIVEL HEAD SAFETY INSTRUCTIONS CX116 is designed to cut metal only. ALWAYS inspect the blade for any crack or missing teeth before operating the band saw. ALWAYS ensure that the blade tension is properly set for the type and width of blade installed. NEVER LEAVE the band unattended while it is running. saw DO NOT attempt to remove jammed pieces unless the band saw has come to a complete stop and the power switch has been turned to the OFF position. NEVER turn ON the band saw if the blade is in contact with your stock. NEVER place your fingers or hands in the line of cut. If you slip, your hands or fingers may come into contact with the blade. ALWAYS make certain that the bearings are properly adjusted to guide the blade. ALL THE GUARDS must be in place while operating the band saw to ensure safety. MAINTAIN AND SERVICE your band saw regularly as instructed in the user manual. ALWAYS feed the stock smoothly. Do not force or twist the work-piece while cutting. MAKE SURE before making any adjustments, the switch is in the “OFF” position and the cord is un-plugged. MAKE SURE you have read and understood all the safety instructions in the manual and you are familiar with your band saw, before operating the CX116. If you fail to do so, serious injury could occur. WARNING! The safety instructions given above can not be complete because the environment in every shop is different. Always consider safety first as it applies to your individual working conditions. 4 CX116 – 5" METAL BAND SAW FEATURES MODEL CX116 - 5" METAL BAND SAW WITH SWIVEL HEAD As part of the growing line of Craftex CX-Series metalworking equipment, we are proud to offer the CX116 - 5" Metal Band Saw with Swivel Head. By following the instructions and procedures laid out in this user manual, you will receive years of excellent service and satisfaction. The CX116 is a professional tool and like all power tools, proper care and safety procedures should be adhered to. Motor ...................................................................... 3/4 HP, 120 V, Single Phase, 60 Hz Amps ...................................................................... 7.8 Amps Speed ..................................................................... 1700 R/min Blade Speeds ......................................................... 24 / 35 / 61 m/min Blade Length .......................................................... 64-1/2" Head Swivel............................................................ 45° - 60° Angle Cuts .............................................................. 45° - 60° Vise Jaw Depth....................................................... 6-1/4" Vise Jaw Height...................................................... 2-1/2" Max. Capacity @ 90° ............................................. 5" Max. Capacity @ 45° ............................................. 3-3/4" Max. Capacity @ 60° ............................................. 2" Hydraulic Down Feed with Auto Shut Off ............... Yes Heavy Duty Cast Iron Table.................................... Yes Powdered Coated Paint.......................................... Yes 2 Wheels and a Carrying Handle for Mobility.......... Yes Approximate Weight ............................................... 174 lbs (79 kg) Warranty ................................................................. 3 Years 5 CX116 – 5" METAL BAND SAW WITH SWIVEL HEAD PHYSICAL FEATURES Blade Tracking Assembly Blade Tension Knob Blade Guides Pulley & Belt Cover Blade Guide Knob 3/4 HP Motor Vise Clamp Hydraulic Feed Vise Hand Wheel ON/OFF Switch Carrying Handle Table Angle Scale Work Stop Wheel Rubber Foot Stand 6 SETUP UNPACKING Before setting up your machine you need to read and understand the instructions given in this manual. The machine is properly packaged and is shipped completely in two cartons for safe transportation. When unpacking, carefully inspect the cartons and ensure that nothing has been damaged during transit. The unpainted surfaces of this band saw are coated with rust prevention waxy oil and you will want to remove this before you begin assembly. Use a solvent cleaner that will not damage painted surfaces. WARNING! CX116 is a very heavy machine, do not over-exert yourself. For safe moving method use fork truck or get the help of an assistant or friend. 7 PROPER GROUNDING Grounding provides a path of least resistance for electric current to reduce the risk of electric shock. Make sure the cord is plugged into a properly installed and grounded power outlet. To prevent electrical hazards, have a qualified electrician ensure that the line is properly wired. Make sure that the band saw is connected to an outlet having the same configuration as the plug. If an adaptor plug is used, it must be attached to the metal screw of the receptacle. It is strongly recommended not to use extension cords with your CX116. Always try to position your machine close to the power source so that you do not need to use extension cords. If you really find it necessary to use an extension cord, make sure the extension cord does not exceed 50-feet in length and the cord is 14-gauge to prevent motor damage. WARNING! Improper connection of the equipmentgrounding conductor can result in a risk of electric shock. Check with a qualified electrician if you are in doubt as to whether the outlet is properly grounded. Figure-1 120-Volts outlet for CX116 8 CABINET, WHEELS AND FEET Now position the base on the floor and adjust the feet until the base is stable on the floor. The CX116 comes with two rubber feet and two wheels. The rubber feet and the wheels are installed to the cabinet allowing for easy moving around the shop. Tighten the hex nuts against the base to lock the rubber feet. To install the wheels, feet and the cabinet: Insert the axle into the axle holes at the end of the base. Slide the washer and wheels onto each end of the axle. Slide another washer and thread the hex nuts on both ends of the axle to secure the wheels to the axle. Position the front and rear panels on the base and secure the panels to the base with four screws and washers provided. Position the left panel between the front and rear panels and secure it using screws and washers provided. Install the right panel in the same manner. WARNING! CX116 is a heavy machine. Do not overexert yourself. Get the help of a friend lifting the band saw on the cabinet. Align the holes on the band saw with the holes on the stand and secure it using hex bolts and flat washers provided. Figure-2 Installing the wheels Thread the two rubber feet into the base. See figure-3. Figure-4 Securing band saw on the cabinet Figure-3 Installing the rubber feet 9 STOP BOLT ADJUSTMENT Adjust the stop bolt and jam nut using a proper size wrench so that the band saw blade teeth are just below the table surface when the cut is complete. Now, place a small machinist square on the vise and adjust the vise so that it is square with the blade. Tighten the hex nuts securing the vise in position. WORK STOP ROD Insert the rod into the saw and slide the word stop onto the rod. Tighten the set screws to secure the rod and the work stop. Figure-5 Adjusting the stop bolt and jam nut SQUARING VISE TO BLADE Make sure the vise is square with the blade to get the angled cuts matching the degree scale on the band saw. To square the vise to the blade: Loosen the headstock lock lever. Rotate the headstock until the pointer reads "0" on the tabletop scale and tighten the headstock lock lever. Figure-7 Installing the work stop rod Use a proper size wrench and loosen the two hex nuts securing the vise to the table. Figure-6 Squaring the vise to the blade 10 AUTO SHUT-OFF BRACKET The auto shut-off bracket should be adjusted properly, so that the band saw shuts OFF automatically when a cut is complete. To adjust the auto shut-off bracket: With the headstock in complete down position, loosen the screw securing the auto shut-off bracket. Push down on the auto shut-off bracket, so that the off switch is completely depressed. While keeping the auto shut-off bracket depressed tighten the screw securing the stop bracket. TEST RUN Once you have assembled your band saw completely, it is then time for a test run to make sure that it works properly and is ready for operation. WARNING! For the protection of your eyes, make sure you are wearing safety glasses or safety goggles while doing the test run. Read and understand the instructions given in this manual before turning the machine on. Remove all the tools and foreign objects from the machine. Wear safety glasses and secure loose clothing and long hair. Connect the cord to the power outlet. Raise the band saw with hand and turn on the saw. The band saw should run smoothly with little or no vibration. Figure-8 Adjusting the stop bracket During the test run if there is any unusual noise coming from the machine or the machine vibrates excessively, stop the machine immediately and disconnect from the power source and investigate to find out the problem with your machine. 11 BLADE SPEED The CX116 features 3 speeds; 24, 35 and 61 m/minute. Figure-9 illustrates the correct speeds and the position of the belt on the motor and gear box pulley for most common materials cut on the metal band saw. Figure-9 Blade speed and material chart BLADE SELECTION A metal bad saw blade is a ribbon of steel subject to tremendous strain. Be sure you use quality blades for the various type of cutting operations. This metal band saw accepts blades 1/2" wide and 64-1/2" long. A wide selection of band saw blades are available at Busy Bee Tools. There are several key factors to consider in choosing a blade: TOOTH PITCH The number of teeth per inch (TPI) on the blade, also known as tooth pitch. Select a pitch which will assure that at least three teeth are contacting the work piece while cutting. This helps to distribute the cutting forces and avoids tooth breakage. TOOTH FORM There are four common forms of teeth on the blade: buttress, claw-tooth, precision and tungsten carbide. Precision is the most common and is the type supplied with the saw. It is the most versatile and it provides a good surface finish. TOOTH SET Tooth set is the degree to which the teeth are bent away from the blade. Typical tooth set styles are raker, wave and straight set. Raker set is the most common with one tooth offset to the right, the next one to the left, and the third is straight. A wave set will have 3-4 teeth bent progressively one direction then to the other in a wave-like pattern. A straight set is alternating teeth set right, then left. Always select and use the good quality saw blades and choose the right blade for the job. Discuss cutting requirements with your saw blade dealer to make sure you are getting the type of blade which best suits your need. Poor quality blades and improper use are often the cause of premature blade failure. Many conditions can lead to breakage. Blade breakage is unavoidable in some cases, since it is the natural result of the particular stresses that the band saw blades are subjected to. Blade breakage is also due to avoidable causes. Avoidable breakage is most often due to the poor judgement on the part of the operator when mounting or adjusting the blade or blade guides. 12 BLADE BREAKAGE CAN BE CAUSED BY: 1. Faulty alignment and adjustment of the guides 2. Insufficient number of teeth contacting the cut 3. Feeding too fast 4. Tooth dullness or absence of sufficient set 5. Excessive tension 6. Using a blade with a lumpy or improperly finished weld 7. Continuously running the band saw when not in use Never use a blade so coarse that less than three consecutive teeth are engaged in the work piece at one time. (Too few teeth will cause the teeth to strip out). Never use a blade finer than required to obtain a satisfactory surface finish or satisfactory flatness (Too many teeth engaged in the work piece will prevent attainment of satisfactory sawing rate; frequently produces "dished" cuts or cuts which are neither square nor parallel). When thin rectangular solid bar is to be sawed, the work should whenever possible, be loaded with the thinnest cross section exposed to the blade teeth. The pitch (number of teeth per inch of the blade) selected must provide engagement of at least three consecutive teeth in the work piece. Should application of this rule not be possible because the thinnest cross section is too thin, the piece must be loaded with the wider dimension exposed to the saw teeth and a more coarse blade selected. When thin wall pipe or tubing or channel iron are cut, a 14 pitch blade is used. Fewer than 14 teeth per inch will almost never be satisfactory. FEED RATE The speed at which the saw blade will cut through the work piece is controlled by feed rate dial. Figure-10 Feed rate dial The feed rate dial controls the amount of fluid that circulates around the hydraulic cylinder, controlling the feed rate. Turning the dial counter clockwise, increases the fluid circulation, allowing the head to move downward while turning it clockwise decreases the fluid circulation. When the dial knob is turned all the way, it locks the head in place. To set the feed rate: Raise the headstock and turn the feed rate dial clockwise to lock the headstock in position. Clamp the work piece in the table vise. Turn the feed rate dial counter clockwise and move the headstock so that blade is a few inches above the work piece. Make sure the correct blade is installed and the correct blade speed is selected. Connect the cord to the power source and turn the saw ON. 13 Slowly turn the feed rate dial counter clockwise, allowing the blade to cut the work piece. WARNING! Make sure the cord is disconnected from the power source, before servicing or making any adjustments. Rotate the side bearing eccentrics until the space between the blade and the bearing is about 0.000" to 0.001". Tighten the nuts. Loosen the lock knob and slide the blade guide close to the work piece so the blade is supported and will not twist while cutting. See figure-12. BLADE GUIDES The blade guides side bearings support the blade and allow it to cut the work piece perpendicular to the table and the support bearings prevent the blade from being pushed back while cutting. To adjust the bearings: Make sure the cord is disconnected from the power source. Figure-12 Lock knob Use the proper sized wrench and loosen the guide bearing adjustment hex bolt. See figure-11. Figure-11 Blade guide adjustment Adjust the blade guide assembly so that the support bearing touches the blade. Now, loosen the two nuts securing the side bearings. See figure-11. 14 BLADE TENSIONING BLADE REPLACEMENT The blade should be properly tensioned in order to get straight and efficient cuts. It also prolongs the life of the blade. The band saw blade will become dull or damaged with use and will need to be replaced with a new one. Two major signs that the blade is not properly tensioned are; the blade breaks because of being too tight or it stalls in the cut and slips on the wheel. WARNING! Make sure the cord is disconnected from the power source, before servicing or making any adjustments. To tension the blade: Disconnect the cord from the power source. To replace the band saw blade: Slide the blade guides apart as far as they go and tighten them in position. Make sure the cord is disconnected from the power source. Turn the blade tension knob to tighten or loosen the blade. Hold the headstock and remove the feed cylinder knob shown in figure-14. Remove the safety knob and raise the headstock. See figure-14. Figure-13 Blade tension knob Figure-14 Raising the headstock to 90° Remove the upper and lower blade guide guards and loosen the blade guides. 15 Remove the screws securing the wheel guard and remove the wheel guard to access the blade and the wheels. See figure-15. Use the blade tension knob and tension the blade as necessary so that it does not slip off the wheels. Spin the wheel with hand and observe how the blade tracks on the wheels. If the tracking is fine, proceed to blade tensioning on page-15. If the blade is not tracking properly on the wheels, adjust the tracking. See page-17. Reinstall the blade wheel guard and blade guides. Re-attach the feed cylinder to the headstock and secure it with the feed cylinder knob. Figure-15 Wheel guard removed For the protection of your hands, wear safety gloves. Loosen the blade tension knob and remove the blade from the wheels. Slide the new blade through the guide bearings and install it around the bottom wheel. Make sure the teeth of the blade are facing toward the work piece. Hold the blade on the lower wheel with one hand and slide it through the guide bearings onto the top wheel with the other hand. Adjust the blade on the wheel so that the back of the blade is against the shoulder of the wheels. 16 BLADE TRACKING The blade tracking on the CX116 has been properly set at the factory but we recommend you to check and adjust it (if needed) before turning on the machine. To adjust the blade tracking: Tightening the set screw will move the blade towards the shoulder of the wheel. The blade is tracking properly when the back of the blade is touching the edge of the wheel flange and it is not rubbing against the flange. Retighten the lower hex bolt. Make sure the cord is disconnected from the power source. Reinstall the wheel guard. Hold the headstock and remove the feed cylinder knob shown in figure-15. page-16. Reinstall the blade guard and blade guide assemblies. Remove the safety knob shown in figure15, page 16 and raise the headstock to the full vertical position. Adjust the blade guides as instructed on page-14. "Blade Guides". Remove the blade guide assemblies. Remove the wheel guard. Loosen the lower hex bolt on the blade wheel assembly, but do not remove it. See figure-16. Figure-16 Blade tracking set screw Use a hex wrench and adjust the set screw shown in figure-16. Loosening the set screw will move the blade away from the shoulder of the wheel. 17 MAINTENANCE LUBRICATION During the life of your machine, you will need to practice some regular maintenance to keep your band saw in peak performance condition. Check the band saw daily for: The gearbox and all the bearings on the CX116 are permanently lubricated and do not need any more lubrication. However you should lubricate some of the adjustment locations and unpainted surfaces. Loose mounting bolts Lubricate the following areas. Worn or damaged wires BLADE TENSION MECHANISM Open the main blade guard and drop a few drops of oil on the tension knob lead screw. Worn or damaged saw blade Worn switch Any other unsafe condition Protect the unpainted cast iron surfaces and the band saw mechanism by cleaning the chips after every use using a shop vacuum or brush. Wipe with a dry piece of cloth. BLADE AND GUIDES Lubricate the blade and guides daily with a few drops of light machine oil. VISE LEAD SCREW Drop a few drops of machine oil on the vise lead screws once a week. WARNING! Make sure the cord is disconnected from the power source, before servicing or making any adjustments. 18 CX116 STAND DIAGRAM 19 CX116 BAND SAW DIAGRAM 20 CX116 PARTS LIST IM 1 2 3 4 5 6 7 8 9 10 11 12 13 14 15 16 17 18 19 20 21 22 23 24 25 26 27 28 29 30 31 32 33 34 35 36 37 38 39 40 41 42 43 DESCRIPTION BOLT - CARRIAGE M10-1.5 x 30 SH361001 NUT - LOCKING M12-1.75 WORK TABLE CABLE W/ PLUG SWITCH SUPPORT BRACKET SCREW - PAN HD M5-0.8 X 10 WASHER - FLAT M5 STRAIN RELIEF LOWER SWITCH BOX HOUSING SWITCH PLATE MAG SW. MINI WASHER - FLAT M4 SCREW - SELF TAPPING ST4 X 16 SCREW - SELF TAPPING ST3 X 12 WASHER - FLAT M4 BOLT - HEX HD M10-1.5 X 30 WASHER - FLAT M10 LOWER ADJUSTMENT GUIDE LOWER GUARD COVER SCREW - PAN HD M4-0.7 X 10 C-RING EXT M9 BEARING 629ZZ ECCENTRIC SHAFT WASHER - LOCK M8 NUT - HEX M8-1.25 PIN Φ9 X 36 (SH361-026) BLADE GUIDE PLATE SCREW - FLAT HD M6-1.0 X 12 BOLT - HEX M8-1.25 X 30 WHEEL COVER SAW BLADE BOLT - HEX HD M5-0.8 X 16 C-RING EXT M5 DRIVEN WHEEL DRIVEN WHEEL POSITION TUBE DRIVEN WHEEL SHAFT ADJUSTMENT BLOCK ELEVATING BLOCK PIN - SPRING 3 X 20 SCREW - CAP M6-1.0 X 12 DRIVE WHEEL DRIVE WHEEL POSITION TUBE DRIVE WHEEL FLANGE 44 45 46 47 48 49 50 51 52 53 54 55 56 57 58 59 60 61 62 63 64 65 66 67 68 69 70 71 72 73 74 75 76 77 78 79 80 81 82 83 84 85 86 87 BEARING 6202 C-RING EXT M15 DRIVE WHEEL SHAFT KEY C5 X 20 WORM SHAFT TUBE GASKET WORM PIN - SPRING 4 X 24 HANDLE SCREW - PAN HD M4-0.7 X 30 POSITION SWITCH POSITION SWITCH BOX SCREW - CAP M12-1.75 X 65 ANGLE ADJUSTMENT BASE POSITION TUBE Φ20 X 3 X 10 (SH361058) ANGLE POINTER ANGLE SCALE LABEL SCREW - CAP M6-1.0 X 16 NUT - HEX M12-1.75 BOLT - HEX M12-1.75 X 60 SAW BED NUT - SQUARE M12-1.25 (SH361-065) SPRING SPRING HOLDER WASHER - FLAT M10 WASHER - LOCK M10 BOLT - HEX M10-1.5 X 18 HYDRAULIC CYLINDER HOLDER HYDRAULIC CYLINDER CONNECTING ROD WASHER - FLAT M4 KNOB SLEEVE LIFT POLE PIN - 2.5 X 40 ADJUSTMENT ROD BOLT - HEX M6-1.0 X 16 WASHER - LOCK M6 WASHER - FLAT M6 GEAR BOX COVER GASKET WORM SHAFT WORM SHAFT TUBE Φ33 X 1.5 X 43 (SH361-086) SCREW - PAN HEAD M4-0.7 X 10 21 88 89 90 91 92 93 94 95 96 97 98 99 100 101 102 103 104 105 106 107 108 109 110 111 112 113 114 115 116 117 118 119 120 121 122 123 124 125 126 127 128 129 130 131 132 133 ST01 ST02 BOLT - HEX HD M12-1.75 X 30 WASHER - FLAT M12 BOLT - HEX HD M8-1.25 X 25 MOTOR BASE BOLT - HEX HD M12-1.75 X 30 MOTOR 3/4 HP 1725 RPM 120V 8.5A WASHER - FLAT BOLT - HEX HD M8-1.25 X 40 KNOB PULLEY - MOTOR PULLEY COVER BOLT - HEX HD M4-0.7 X 10 PULLEY - GEAR BOX V-BELT (2) CONNECTING BLOCK KNOB - (POSITION) PIN - (SDH361-104) TURNING SHAFT SCREW - CAP M8-1.25 X 20 SLIDING PLATE PRESSING PLATE UPPER GUARD HOLDER SPRING BLADE TENSION KNOB UPPER GUARD COVER UPPER GUARD COVER HOLDER KNOB - (LOCK) STOCK STOP STOCK STOP ROD ST03 ST04 ST05 ST06 ST07 ST08 ST09 ST10 ST11 ST12 ST13 ST14 ST15 MOT BOLT - CARRIAGE M6-1.0 X 12 WASHER - FLAT M6 NUT - HEX M6-1.0 BOLT - HEX HD M6-1.0 X 12 WASHER -SPRING M6 NUT - LOCK M10-1.5 WASHER - FLAT M10 WHEEL AXLE REAR PANEL RIGHT PANEL RUBBER PAD FRONT PANEL MOTOR 3/4 HP 1725 RPM 120V 8.5A VISE POSITION TUBE Φ15 X 2.5 X 1 (SH361-117) REAR VISE JAW FRONT VISE JAW VISE BED THREADED ROD NUT FRONT JAW HOLDER THREADED ROD HAND WHEEL HAND WHEEL HANDLE BOLT - HEX HD M6-1.0 X 30 STOP BLOCK POSITION TUBE Φ19 X 1.5 X 10.5 GUARD HOLDER WASHER - FLAT M16 PLATE SCREW - CAP M8-1.25 X 20 SCREW - CAP M8-1.25 X 30 BASE LEFT PANEL 22 WARRANTY CRAFTEX 3 YEARS LIMITED WARRANTY Craftex warrants every product to be free from defects in materials and agrees to correct such defects where applicable. This warranty covers three years for parts and 90 days for labor (unless specified otherwise), to the original purchaser from the date of purchase but does not apply to malfunctions arising directly or indirectly from misuse, abuse, improper installation or assembly, negligence, accidents, repairs or alterations or lack of maintenance. Proof of purchase is necessary. All warranty claims are subject to inspection of such products or part thereof and Craftex reserves the right to inspect any returned item before a refund or replacement may be issued. This warranty shall not apply to consumable products such as blades, bits, belts, cutters, chisels, punches etceteras. Craftex shall in no event be liable for injuries, accidental or otherwise, death to persons or damage to property or for incidental contingent, special, or consequential damages arising from the use of our products. RETURNS, REPAIRS AND REPLACEMENTS To return, repair, or replace a Craftex product, you must visit the appropriate Busy Bee Tools showroom or call 1800-461-BUSY. Craftex is a brand of equipment that is exclusive to Busy Bee Tools. For replacement parts directly from Busy Bee Tools, for this machine, please call 1-800-461-BUSY (2879), and have your credit card and part number handy. All returned merchandise will be subject to a minimum charge of 15% for re-stocking and handling with the following qualifications. Returns must be pre-authorized by us in writing. We do not accept collect shipments. Items returned for warranty purposes must be insured and shipped pre-paid to the nearest warehouse Returns must be accompanied with a copy of your original invoice as proof of purchase. Returns must be in an un-used condition and shipped in their original packaging a letter explaining your reason for the return. Incurred shipping and handling charges are not refundable. Busy Bee will repair or replace the item at our discretion and subject to our inspection. Repaired or replaced items will be returned to you pre-paid by our choice of carriers. Busy Bee reserves the right to refuse reimbursement or repairs or replacement if a third party without our prior authorization has carried out repairs to the item. Repairs made by Busy Bee are warranted for 30 days on parts and labour. Any unforeseen repair charges will be reported to you for acceptance prior to making the repairs. The Busy Bee Parts & Service Departments are fully equipped to do repairs on all products purchased from us with the exception of some products that require the return to their authorized repair depots. A Busy Bee representative will provide you with the necessary information to have this done. For faster service it is advisable to contact the nearest Busy Bee location for parts availability prior to bringing your product in for repairs. 23