1
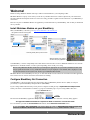
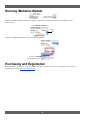
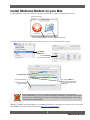
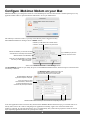
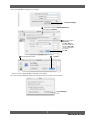
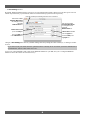
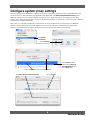
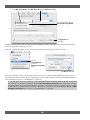
iMobimac Modem
User Manual
Contents
Welcome.......................................................................................................1
Install iMobimac Modem on your BlackBerry ..............................................1
Configure BlackBerry Net Connection..........................................................1
Running iMobimac Modem ..........................................................................2
Purchasing and Registration ..........................................................................2
Install iMobimac Modem on your Mac .........................................................3
Configure iMobimac Modem on your Mac ...................................................4
Configure Firefox..........................................................................................5
Configure Mail..............................................................................................6
Configure system proxy settings ...................................................................9
iMobimac Modem © 2007-2009 Andrew Green and iMobimac
All Rights Reserved
2009-03-05
Copyright
iMobimac Modem © 2007-2009 Andrew Green and iMobimac
All Rights Reserved
Andrew Green and iMobimac (THE AUTHOR) hereby disclaims all warranties relating to this software, whether express or implied, including without
limitation any implied warranties of merchantability or fitness for a particular purpose. THE AUTHOR will not be liable for any special, incidental,
consequential, indirect or similar damages due to loss of data or any other reason, even if THE AUTHOR or an agent of THE AUTHOR has been advised of
the possibility of such damages. In no event shall THE AUTHOR be liable for any damages, regardless of the form of the claim. The person using the
software bears all risk as to the quality and performance of the software. United States Government End Users: If you are acquiring this software on behalf
of any unit or agency of the United States Government, the following provisions apply.
The Government agrees:
(i) if the software is supplied to the Department of Defense, the software is classified as “commercial computer software” and the Government is acquiring
only “restricted rights” in the Software and its documentation as that term is defined in Clause 252.227-7013(c)(1) of the DFARS; and
(ii) if the software is supplied to any unit or agency of the United States Government other than Department of Defense, the Government’s rights in the
software and its documentation will be as defined in Clause 52.227 19(c)(2) of the FAR or, in the case of NASA, in Clause 18-52.227-86(d) of the
NASA Supplement to the FAR.
iMobimac Modem is built in part
with code from ZooLib
http://www.zoolib.org
http://www.imobimac.com
Welcome!
Thanks for using iMobimac Modem. We hope it will be a useful addition to your computing toolkit.
iMobimac Modem is a proxy server which you can run on your Mac all the time. It takes requests from your web browser
and other applications and passes them on to real servers using your Mac’s regular network connection or your BlackBerry’s
connection.
There are two parts to iMobimac Modem: an application you install and run on your BlackBerry, and one that you install and
run on your Mac.
Install iMobimac Modem on your BlackBerry
With your BlackBerry 's browser, go to http://www.imobimac.com/ota/imm.jad
…the application download screen appears.
Download the application…
…which will generally take only a few seconds.
iMobimac Modem’s icon appears
with other third-party applications.
Your BlackBerry’s screens will probably look a little different from the above. Look for iMobimac Modem or its icon in the
applications or downloads folders, or at the top level depending on the model you’re using.
Before using iMobimac Modem ensure that your data plan is appropriate for your needs. Standard accounts often
charge significant amounts for very small data transfers. $15 per megabyte is not unusual, and a megabyte is only
two uncached fetches of news.yahoo.com. In short, get an unlimited data account.
iMobimac Modem on the BlackBerry has one job: to make and handle network connections on behalf of the Mac application.
So it needs to have its own net connection, and it needs to be running.
Configure BlackBerry Net Connection
Your BlackBerry’s network connection may support direct TCP via BlackBerry Internet Service. (BIS), or it may be
provided by a corporate BlackBerry Enterprise Server (BES/MDS).
If you’re using a BIS connection then you may need to configure an APN gateway in Options/Advanced Options/TCP.
Check your carrier’s documentation for details, or google for “blackberry apn”. If you’re using a BES connection…
…go to the Connect via menu…
…choose
BES/MDS.
The first time the BlackBerry application attempts to make an HTTP or socket connection a security dialog appears:
The application iMobimac Modem has requested an HTTP connection to some.domain.name.
It is essential that you click the all connections radio button, and the Allow this connection button.
If you click Deny this connection you can fix things by going to Options/Security Options/Application
Permissions/iMobimac Modem/Edit Permissions/Connections and setting Carrier Internet to Allow.
1
iMobimac Modem
Running iMobimac Modem
When running
its icon has a
subtle glow
around its
perimeter…
…which is absent
when its not running
When first installed, iMobimac Modem starts running automatically, and will start whenever the BlackBerry restarts.
To prevent this…
…go to the Run at startup menu…
…choose
No.
When you exit iMobimac Modem’s main screen, it keeps running.
To quit, choose Quit
from the application menu.
Purchasing and Registration
iMobimac Modem can be used to fetch up to 10MB of data before it requires that you enter a registration code, which you
can purchase by visiting http://www.imobimac.com.
2
Install iMobimac Modem on your Mac
The Mac application can be placed anywhere, although most commonly you’ll put it in the Applications folder.
Mount the disk image…
…and drag the iMobimac Modem icon over the Applications folder alias.
If you use iMobimac Modem regularly then you may want to have it run automatically when you login…
Open System
Preferences
and click Accounts
to show the accounts panel.
Click Login Items…
If you check the Hide box
iMobimac Modem will start when
you login, but its windows will be
hidden initially.
…then click the add button.
Locate iMobimac Modem
using the file dialog.
Research in Motion does not provide a means for Mac applications to share access to USBconnected BlackBerrys. If you have installed PocketMac for BlackBerry or BlackBerry Media Sync
you will need to uninstall them and restart your Mac before iMobimac Modem will be able to
communicate with your BlackBerry.
Mark/Space's Missing Sync For BlackBerry 2.0.1 and iMobimac Modem are compatible with each other when you install the
ZooLib BBDaemon, which can be downloaded from http://www.em.net/bbdaemon.
3
iMobimac Modem
Configure iMobimac Modem on your Mac
iMobimac Modem is pre-configured to listen on several standard ports. Ports less than 1024 are considered privileged, so any
application which wishes to open them must be authorized to do so by an administrator.
The authority is cached for a time, so you may not be asked if you have logged in recently.
When iMobimac Modem is running it shows its Status window.
Indicates if your Mac thinks it has a usable network
connection, via ethernet, AirPort or any other means.
Indicates if a BlackBerry is connected via USB,
If your BlackBerry is password
protected, click here to enter it.
and if the Mac has succesfully connected with
iMobimac Modem on the BlackBerry.
Check this to use the BlackBerry’s connection
even when your Mac thinks it has a usable
network connection.
Click to show the Active Connections and Port Settings windows.
The Port Settings window lets you modify the ports on which iMobimac Modem listens, and the host/port to which it should
forward any connection.
The HTTP Proxy Port is probably the single most
important setting. Web browsers and many other
applications will use this port to contact servers.
By default iMobimac Modem will
only forward simple HTTP requests.
If your account lets you make
socket connections, check this box
to allow the forwarding of any port,
and secure web (HTTPS) connections.
iMobimac Modem listens on these ports and contacts the corresponding host and port.
Your other applications need to know that they should contact iMobimac Modem rather than trying to reach their real server
directly. Most of the work is thus in configuring those applications. Ironically, Apple's own web browser Safari is the
trickiest to configure. So we'll start with Firefox, move on to Mail and by then you'll be better prepared to tackle the several
steps required by applications that use the system proxies settings.
4
Configure Firefox
Select Preferences…
from the Firefox
application menu.
Click Advanced,
then Network,
and Settings…
to show…
Select Manual proxy
configuration
…the proxy settings sheet.
In HTTP Proxy type localhost
and in Port type 3128.
Check Use this proxy
server for all
protocols…
…click OK and you’re
done.
5
iMobimac Modem
Configure Mail
Mail uses one connection for sending messages and another for receiving. Outgoing mail will generally contact a server on
port 25 (smtp) or port 587 (submission). Incoming mail using the POP protocol will use port 110 (pop3) or port 995 (pop3s).
Incoming mail using IMAP will generally use port 143 (imap), port 220 (imap3), port 993 (imaps) or occasionally port 585
(imap4-ssl).
For simplicity we'll assume you have just one account, but if you have more the steps are the same – you'll be setting a pair of
local ports that will forward to a pair of ports on the real server.
Bring up Mail’s
preferences window.
1 Click Accounts,
2 Make a note of what’s in Incoming MailServer, you’ll need it later,
then change it to localhost.
3 Click Advanced…
5 …then return to
Account Information…
…and you’re done configuring Mail’s incoming server settings.
6
4 Make a note of what’s in
Port.
If it is 110 or 995 then
leave it alone, otherwise
change it to 110 or 995
( it's not important which you
choose.)
Now we’ll tackle Mail’s outgoing server settings.
1 …click Server Settings…
2 …make a note of what’s in Outgoing Mail Server,
then change it to localhost.
3 Make a note of what’s in
Server port.
If it is 25 or 587 then
leave it alone, otherwise
change it to 25 or 587
( it's not important which
you choose.)
4 Click OK …
6 …click Save…
5 Close the preferences window…
…and you’re done configuring Mail’s outgoing server settings.
Now we’ll configure iMobimac Modem with the ports and server names you noted earlier.
Click Port Settings…
to show…
7
iMobimac Modem
… the Port Settings window.
By default, iMobimac Modem listens on ports 25, 110, 587 and 995 and forwards connections to the same ports on servers
named smtp.domain.tld, pop3.domain.tld, submission.domain.tld and pop3s.domain.tld respectively.
Check this to enable port forwarding and secure HTTP connections.
Take what was in Mail’s
Outgoing Mail Server
box, and type it into the
appropriate
Remote Host box.
Take what was in Mail’s
Incoming Mail Server
box, and type it into the
appropriate
Remote Host box.
If Server Port said 25
put it in the smtp box
If Server Port said 110
put it in the pop3 box
and if it said 587 put it
in the submission box.
and if it said 995 put it in
the pop3s box.
Changes in Port Settings take effect as you finish editing each one by hitting the return or tab keys, or clicking in another
text box.
If you enter a local port which cannot be opened because it is already in use or because you did not authenticate as
an administrator, then the value will revert to zero.
You’ve now configured Mail so that it will contact iMobimac Modem on your Mac, and you’ve configured iMobimac
Modem so that it will contact the real mail server(s).
8
Configure system proxy settings
Mac OS X has a powerful mechanism for specifying the proxies to be used by applications when a particular location and
connection is active. Safari and many other applications use information in the Network System Preferences panel to
determine which proxy to use when a particular connection is active. Theoretically this is a good thing, because many
settings can be changed automatically as you move your machine from home, to coffee shop, to work and as your connection
switches between AirPort and ethernet.
This works very well, until your Mac has no connection at all. So the situation where you most need to use iMobimac
Modem is also the situation in which some applications have nowhere from which to fetch their proxy information.
There is a workaround which we’ll get to shortly, but first we’ll configure your AirPort proxies settings.
Open System
Preferences
and click Network
to show the network panel.
Ensure AirPort is enabled.
Enable it using the Network
Port Configurations panel
from the Show menu.
Double click AirPort, or select it from the Show menu.
Check Show AirPort status in menu bar,
then click Proxies
9
iMobimac Modem
Select Web Proxy (HTTP), then in Web Proxy Server type localhost and 3128.
You may also enter the same for
Secure Web Proxy (HTTPS)
Click Apply Now and
you’re done.
Your Mac now knows that when your connection is provided by the AirPort, web and secure web connections should be
proxied by contacting localhost on port 3128.
Here’s the workaround for when you’re in an environment with no connectivity. Go to the AirPort menu…
…choose
Create Network…
to show the
Computer-to-Computer
dialog…
…click OK and you’re done.
This causes your Mac to behave as if the AirPort connection is active, so Safari and other applications will get their web
proxy information from the AirPort proxies settings. They will now contact localhost on port 3128 and iMobimac Modem
will forward their requests over your BlackBerry 's connection.
As your Mac gains and loses a functioning connection applications like iChat and iMobimac Modem are informed.
This notification is what drives iMobimac Modem's Mac Has Network Connection line. Surprisingly, switching
from a functioning (or non-functioning) AirPort connection to a Computer-to-Computer connection does not change
the Mac’s notion of whether it has a functioning connection. So, you may need to check iMobimac Modem’s Prefer
BlackBerry's Connection box to force it to use the BlackBerry 's connection.
10