1
Legitronic Labeling Software
Legitronic Secure Series Labeling Software
User Manual
Copyright © 2004 Weber Marking Systems, Inc.
Legitronic is a registered trademark of Weber Marking Systems, Inc.
This program or documentation contains confidential information and trade secrets of
Weber Marking Systems, Inc. and its suppliers.
Reverse engineering of object code prohibited.
Version 3.4.0
Weber Marking Systems, Inc.
711 W. Algonquin Road
Arlington Heights, IL 60005-4457
Phone: 847-364-8500 Fax: 847-364-8575
www.webermarking.com
(P) January 2004
1.
INTRODUCTION
1
ABOUT LEGI .....................................................................................................................................................................1
HOW THIS GUIDE IS ORGANIZED ....................................................................................................................................2
CONVENTIONS USED IN THIS GUIDE ...............................................................................................................................3
CUSTOMER SUPPORT ......................................................................................................................................................3
2.
INSTALLATION
4
MINIMUM SYSTEM REQUIREMENTS .................................................................................................................................4
GENERAL REQUIREMENTS ..............................................................................................................................................4
INSTALLING LEGI ..............................................................................................................................................................4
UNINSTALLING LEGI .........................................................................................................................................................6
3.
GETTING STARTED
7
LEGI UNDER WINDOWS ...................................................................................................................................................7
Using the Mouse.......................................................................................................................................................8
Using Keyboard Shortcuts and the Mouse ...........................................................................................................8
Entering Field Data ................................................................................................................................................10
Working with Tab Displays....................................................................................................................................12
Accessing Online Help ..........................................................................................................................................12
Using Dialog Boxes and Command Buttons ......................................................................................................13
OPENING THE LEGI APPLICATION ..................................................................................................................................14
THE LEGI APPLICATION WINDOW ..................................................................................................................................15
Title Bar....................................................................................................................................................................16
Status Bar................................................................................................................................................................16
Menu Bar .................................................................................................................................................................16
Tool Bar ...................................................................................................................................................................22
4.
DESIGNING LABELS
27
OPENING THE LABEL DESIGN WINDOW ........................................................................................................................27
Creating a New Label Design...............................................................................................................................28
Using an Existing Label Design ...........................................................................................................................29
SPECIFYING LABEL PROPERTIES ..................................................................................................................................30
Procedure ................................................................................................................................................................30
Label Properties — Settings Tab .........................................................................................................................31
Label Properties — Options Tab..........................................................................................................................32
Label Properties — Size Tab................................................................................................................................33
Label Properties — Summary Tab ......................................................................................................................34
Label Properties — Queried Tab .........................................................................................................................35
SPECIFYING THE LABEL FIELDS.....................................................................................................................................36
.
Deleting a Field .............................................................................................................................................72
OBJECT LINKING AND EMBEDDING (OLE) ....................................................................................................................72
Inserting an Existing Object ..................................................................................................................................72
Creating a New Object ..........................................................................................................................................73
Editing an Object ....................................................................................................................................................74
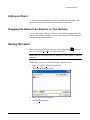
Dragging File Names From Explorer or Your Desktop .....................................................................................74
SAVING THE LABEL ........................................................................................................................................................74
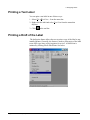
PRINTING A TEST LABEL ................................................................................................................................................75
PRINTING A DRAFT OF THE LABEL .................................................................................................................................75
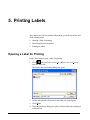
5.
PRINTING LABELS
76
OPENING A LABEL FOR PRINTING..................................................................................................................................76
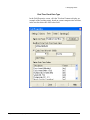
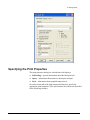
SPECIFYING THE PRINT PROPERTIES ...........................................................................................................................77
.
.
.
Job Settings ...................................................................................................................................................78
Query ..............................................................................................................................................................81
Ports................................................................................................................................................................82
PRINTING THE LABELS ...................................................................................................................................................82
6.
SECURITY ADMINISTRATION
83
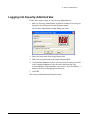
LOGGING INTO SECURITY ADMINISTRATOR ..................................................................................................................84
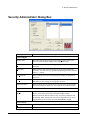
SECURITY ADMINISTRATOR DIALOG BOX .....................................................................................................................85
MAINTAINING GROUPS ..................................................................................................................................................86
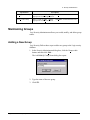
Adding a New Group..............................................................................................................................................86
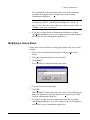
Modifying a Group Name ......................................................................................................................................87
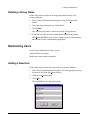
Deleting a Group Name.........................................................................................................................................88
MAINTAINING USERS .....................................................................................................................................................88
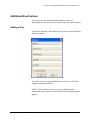
Adding a New User ................................................................................................................................................88
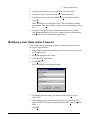
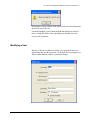
Modifying a User Name and/or Password ..........................................................................................................89
Deleting a User Name ...........................................................................................................................................90
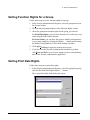
SETTING FUNCTION RIGHTS FOR A GROUP ..................................................................................................................91
SETTING PRINT DATA RIGHTS.......................................................................................................................................91
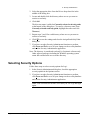
SELECTING SECURITY OPTIONS ...................................................................................................................................92
7.
TRACKING SERIAL NUMBER SUPPORT
93
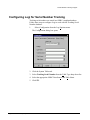
CONFIGURING LEGI FOR SERIAL NUMBER TRACKING ..................................................................................................94
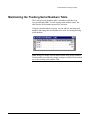
MAINTAINING THE TRACKING SERIAL NUMBERS TABLE ...............................................................................................95
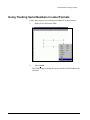
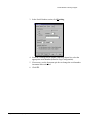
USING TRACKING SERIAL NUMBERS IN LABEL FORMATS .............................................................................................96
8.
AUDIT SUPPORT
98
ACTIVATING AUDIT SUPPORT ........................................................................................................................................99
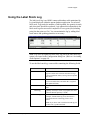
USING THE LABEL STOCK LOG ....................................................................................................................................100
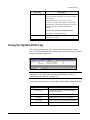
USING THE SYSTEM PRINT LOG ..................................................................................................................................101
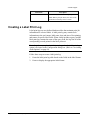
CREATING A LABEL PRINT LOG ...................................................................................................................................102
9.
CONFIGURATION
104
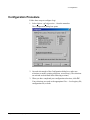
CONFIGURATION PROCEDURE ....................................................................................................................................105
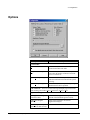
OPTIONS ......................................................................................................................................................................106
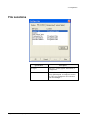
FILE LOCATIONS ..........................................................................................................................................................107
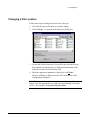
Changing a File Location.....................................................................................................................................108
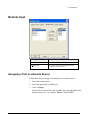
REMOTE INPUT ............................................................................................................................................................109
Assigning a Port to a Remote Source ...............................................................................................................109
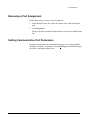
Removing a Port Assignment .............................................................................................................................110
Setting Communication Port Parameters .........................................................................................................110
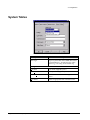
SYSTEM TABLES ..........................................................................................................................................................111
10.
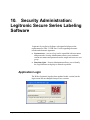
SECURITY ADMINISTRATION: LEGITRONIC SECURE SERIES LABELING SOFTWARE
113
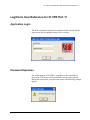
APPLICATION LOGIN ....................................................................................................................................................113
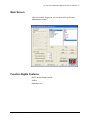
Main Screen ..........................................................................................................................................................114
Function Rights Features ....................................................................................................................................114
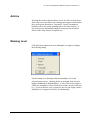
Archive ...................................................................................................................................................................115
Meaning Level.......................................................................................................................................................115
System Settings Features ...................................................................................................................................116
Additional New Features .....................................................................................................................................117
LEGITRONIC USER REFERENCE FOR 21 CFR PART 11 ............................................................................................124
Application Login ..................................................................................................................................................124
Password Expiration ............................................................................................................................................124
Periodic Relogin....................................................................................................................................................127
Label Archiving .....................................................................................................................................................129
Setting Label Mode (Meaning Level).................................................................................................................133
Changes to Automation Interface ......................................................................................................................134
11.
VISUAL BASIC FOR APPLICATIONS
135
INTRODUCTION .............................................................................................................................................................135
VISUAL BASIC FOR APPLICATIONS ..............................................................................................................................136
AUTOMATION SERVER .................................................................................................................................................136
VISUAL BASIC FOR APPLICATIONS (VBA)...................................................................................................................137
Type Library ..........................................................................................................................................................137
Type Library Usage..............................................................................................................................................137
Object Creation.....................................................................................................................................................138
Event Handling......................................................................................................................................................138
APPENDIX A. DATA EXPRESSIONS
139
DATA EXPRESSION FUNCTIONS ..................................................................................................................................139
APPENDIX B.
PRINTER DRIVER INSTALLATION AND CONFIGURATION
170
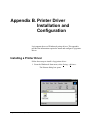
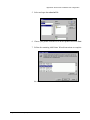
INSTALLING A PRINTER DRIVER ...................................................................................................................................170
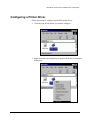
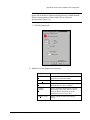
CONFIGURING A PRINTER DRIVER ..............................................................................................................................173
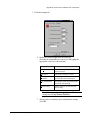
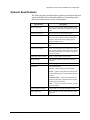
OPTIONAL SPECIFICATIONS .........................................................................................................................................176
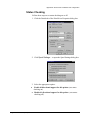
Status Checking....................................................................................................................................................177
APPENDIX C.
AUTOMATED PRINT CONTROL
178
USING AUTOMATED PRINT CONTROL .........................................................................................................................178
BATCH PRINT CONTROL COMMANDS ..........................................................................................................................179
Advanced Commands .........................................................................................................................................185
APPLICATION DESIGNER..............................................................................................................................................186
Syntax Rules .........................................................................................................................................................186
Performance Notes ..............................................................................................................................................186
Automated Print Control Rules...........................................................................................................................187
Application Designer Commands.......................................................................................................................187
SAMPLE FILE ................................................................................................................................................................211
APPENDIX D. TRUE TYPE FONT SUPPORT
213
OVERVIEW ...................................................................................................................................................................213
ZEBRA PRINTERS .........................................................................................................................................................214
Downloading Fonts ..............................................................................................................................................214
Procedure ..............................................................................................................................................................214
Notes ......................................................................................................................................................................215
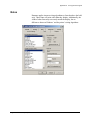
Configuring Legi Print Drivers.............................................................................................................................215
Add Font Procedure.............................................................................................................................................215
Delete Font Procedure ........................................................................................................................................216
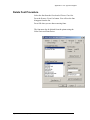
SATO PRINTERS...........................................................................................................................................................217
Downloading Fonts ..............................................................................................................................................217
Procedure ..............................................................................................................................................................217
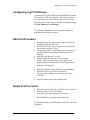
Configuring Legi Print Drivers.............................................................................................................................218
Add Font Procedure.............................................................................................................................................218
Delete Font Procedure ........................................................................................................................................218
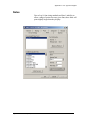
Notes ......................................................................................................................................................................219
DATAMAX PRINTERS ....................................................................................................................................................220
Downloading Fonts ..............................................................................................................................................220
Procedure ..............................................................................................................................................................220
Configuring Legi Print Drivers.............................................................................................................................221
Add Font Procedure.............................................................................................................................................221
Delete Font Procedure ........................................................................................................................................221
Notes ......................................................................................................................................................................222
APPENDIX E. GRAPHICS SUPPORT
223
OVERVIEW OF SUPPORT ..............................................................................................................................................223
ZEBRA PRINTERS: GRAPHICS ....................................................................................................................................225
Downloading Graphics ........................................................................................................................................225
Procedure ..............................................................................................................................................................225
Notes ......................................................................................................................................................................226
Configuring Legi Print Drivers.............................................................................................................................226
Add Graphic Procedure .......................................................................................................................................226
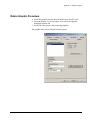
Delete Graphic Procedure...................................................................................................................................227
SATO PRINTERS: GRAPHICS .......................................................................................................................................228
Downloading Graphics ........................................................................................................................................228
Procedure ..............................................................................................................................................................228
Configuring Legi Print Drivers.............................................................................................................................229
Add Graphic Procedure .......................................................................................................................................229
Delete Graphic Procedure...................................................................................................................................230
DATAMAX PRINTERS: GRAPHICS ...............................................................................................................................231
Downloading Graphics ........................................................................................................................................231
Procedure ..............................................................................................................................................................231
Notes ......................................................................................................................................................................231
Configuring Legi Print Drivers.............................................................................................................................232
Add Graphic Procedure .......................................................................................................................................232
Delete Graphic Procedure...................................................................................................................................233
INDEX 234
Contents
Legitronic User Manual (v3.4)
i
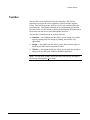
1. Introduction
Welcome to the Legi User Guide. This guide provides an overview of
Legi, describes its windows and dialog boxes, and explains how to use its
functions.
About Legi
Legi enables you to design labels on any PCs running under Microsoft
Windows®. You can print those labels on the industrial-grade printers
supplied by Weber Marking Systems.
Legi is a flexible system that allows you to:
Create label formats that include varied combinations of barcodes,
graphics, constant data, date and time, lines, and boxes. You can also
link label fields to database tables and print labels only for those
records that match the print queries you create. You can print label
fields in four orientations and in reverse print.
Create label print jobs and save them for future use.
Use Windows® Print Manager to delete, pause, restart, and change
the order of print jobs stored in the print queue.
Use the Labels Print Log feature to track print jobs, capturing data
from specified label fields.
Select the audit trail options you will use.
Configure Legi for use with other languages.
Select the appropriate level of system security. You can require
password verification at login and assign users to user groups with
access to specific Legi functions and data.
Use two supported packages: A Professional package that supports all
features and a Print-Only package that supports the Label Design
feature. A separate CD is mastered for each product.
Use seven supported languages, as follows:
English (United States), German, French (Standard), Spanish
(Standard), Portuguese (Iberian), Danish, Dutch.
Legitronic User Manual (v3.40)
1
1. Introduction
How This Guide Is Organized
This guide contains 11 chapters and five appendixes:
Chapter 2, Installation, explains how to install Legi in both standalone and network environments.
Chapter 3, Getting Started, explains the basic concepts and terms required to use Legi. It provides
a brief review of Windows→ conventions used in Legi, describes the Legi application window, and
explains the use of dialog boxes and command buttons.
Chapter 4, Designing Labels, explains how to design label formats using text, barcode, graphic,
line, box, and raw data fields.
Chapter 5, Printing Labels, explains how to print labels.
Chapter 6, Security Administration, explains how to select, establish, and maintain the level of
system security you require.
Chapter 7, Serial Number Tracking Support, explains how to use Legi’s Serial Number
Tracking feature.
Chapter 8, Audit Support, explains how to establish an audit trail of label stock usage and print
activity.
Chapter 9, Configuration, explains how to configure Legi for your use.
Chapter 10, Security Administration: Legitronic Secure Series Labeling Software, explains
administrator and user features to assist in be 21 CFR Part 11 compliance.
Chapter 11, Visual Basics for Applications, discusses the development facilities of an integrated
development environment.
Appendix A, Data Expressions, lists and describes the functions available for use in data
expressions.
Appendix B, Printer Driver Installation and Configuration, explains how to install and
configure printer drivers for use with Legi.
Appendix C, Automated Print Control, lists and describes the automated print control commands
used in Legi.
Appendix D, Downloading TrueType Fonts, discusses using downloaded True Type fonts in the
printer.
Appendix E, Legi Graphics Support, discusses support for recalling downloaded PCX graphics in
the printer.
To help you locate the information you need quickly, the Index at the back of this guide provides an
alphabetical, cross-referenced list of topics and their page numbers.
Legitronic User Manual (v3.4)
2
1. Introduction
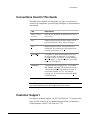
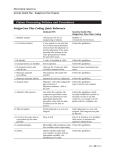
Conventions Used In This Guide
The table below explains how this guide uses type as visual cues to
certain Legi components, special keying techniques, or documentation
conventions.
This
Represents
SMALL CAPITAL
LETTERS
Keys on your keyboard, such as the ENTER key or
the ALT key.
italic
Emphasized words and variables (names used to
represent data items whose value can change).
Italic
Menus and menu options. The shortcut key is
underlined. For example, the Tools menu can be
selected by pressing ALT+T.
Italic
Italic
Command
A sequence of menu selections that can be used
to open a window or dialog box. For example,
File New means “click the File menu and select
the New option.” Using the keyboard, you would
press ALT+F and then N.
Command buttons in dialog boxes. For example,
OK, Cancel, and Help. The underlined letter on
a button label identifies the shortcut key used in
conjunction with the ALT key. For example,
pressing ALT+H is the same as clicking the Help
command button.
Note: This guide includes sample displays of representative data that will
not exactly match specific data displayed on your screen.
Customer Support
For software technical support, call 847-364-8500 (ext. 773) between the
hours of 8:00 AM and 4:30 PM, Monday through Friday. For hardwarerelated problems, call 847-364-8500 (ext. 776).
Legitronic User Manual (v3.4)
3
2. Installation
This chapter lists Legi’s hardware and software requirements and
explains how to install and uninstall Legi.
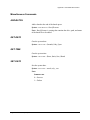
Minimum System Requirements
Pentium III class processor
Windows 95®, 98®, NT 4.0®, 2000, XP
General Requirements
256 MB RAM
25-30 MB hard disk space
CD-ROM drive
256-color, SVGA, or better video display
Installing Legi
Follow these steps to install Legi:
1. Insert the Legi CD in the appropriate drive.
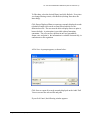
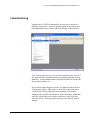
2. If Windows® Autorun is not enabled, open the subdirectory that
contains the setup.exe and double-click that file name.
The Welcome box opens.
3.
Click Next.
The Software License Agreement is displayed.
4. Click Yes to accept the agreement.
5. Type your name and company name and click Next.
Legitronic User Manual (v3.40)
4
2. Installation
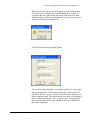
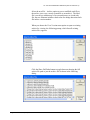
6. In the Choose Destination Location section, accept the default
location for Program Files\Weber Marking Systems\Legi or select a
different location.
To choose a destination other than the default, click Browse to open
the Choose Directory dialog box. Find and select the appropriate
location. Then click OK.
7. Select the Legi for Windows system directory. Then click Next.
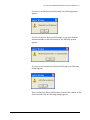
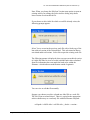
8. If necessary, select the appropriate license type. Click Next.
The Select Program Folder dialog box opens.
9. Use the default Legi folder name, select another existing folder, or
create a new folder.
10. Click Next.
The Setup program allows you to review the selected settings. To
change settings, click Back and make the appropriate selections.
When the settings are satisfactory, click OK.
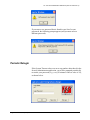
The setup program copies the required fields and creates icons in the
program folder. When these tasks are completed, the system asks if
you want to add a printer.
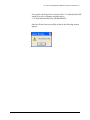
11. If you want to add a printer, click Yes and follow the Add Printer
Wizard prompts. If you don’t want to add a printer, click No.
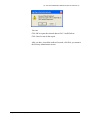
The Setup Complete dialog box opens.
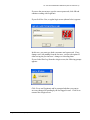
12. Click Finish.
Legi is added to the list of programs accessible through the Start
menu. The Setup program gives you the option of restarting your
computer now or later.
Note: Legi will not operate correctly until you restart your computer.
Legitronic User Manual (v3.4)
5
2. Installation
Uninstalling Legi
Follow these steps to uninstall Legi:
1. From the Start menu, select Settings Control Panel Add/Remove Programs.
2. Select Legi.
3. Click Add/Remove.
4. When the uninstall process is complete, click OK.
Legitronic User Manual (v3.4)
6
3. Getting Started
Legi follows standard Windows® conventions for display, data entry, and
navigation. This chapter contains a brief review of Windows®
conventions used in Legi.
This chapter also describes the Legi application window, where you do
all of your Legi work. It includes a description of each area that appears
in all of the Legi windows:
Title bar
Menu bar
Tool bar
Status bar
Legi Under Windows
The Legi application runs just like any other Microsoft Windows®
application. This guide assumes that you are familiar with Windows and
know how to navigate within and among applications. Refer to your
Microsoft Windows® documentation for detailed information about using
Windows.
This chapter provides a brief review of the Windows® features used
throughout Legi.
Legitronic User Manual (v3.40)
7
3. Getting Started
Using the Mouse
You use the left (dominant) mouse button for most of your work in Legi.
Instructions to click or double-click refer to the left mouse button. When
the right mouse button can be used, you are instructed to right-click.
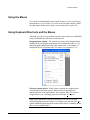
Using Keyboard Shortcuts and the Mouse
Although you can use Legi without a mouse, most people are comfortable
using a combination of the mouse and keyboard.
Dropping down a menu. The options in a menu can be dropped down
(displayed) by clicking the menu name or by holding down the ALT key
and pressing the underlined letter in the menu name. For example, to
drop down the list of options in the File menu, you can press ALT+F.
Selecting a menu option. When a menu’s options are dropped down,
click the option you want or press the key that corresponds to the
underlined letter in the option name. For example, if the File menu is
dropped down, you can simply press N to select the New option.
Note: Some options have shortcuts defined so you can access them
without dropping down the menus. For example, you can select the New
option without dropping down the menus shown above by holding down
the CTRL key and pressing N.
Legitronic User Manual (v3.4)
8
3. Getting Started
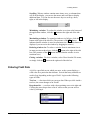
When an ellipsis (…) appears to the right of a menu option name, a dialog
box opens when you click or select that option. For example, when you
drop down the File menu and click Open Label for Design… or press D
to select the Open Label for Design option, the Open Label for Design
dialog box opens.
When the4symbol appears to the right of a menu option name, an
additional menu drops down when you click or select that option. For
example, when you drop down the View menu and click Toolbars or press
T to select the Toolbars option, an additional menu drops down.
Selecting a command button. The buttons you click to perform
functions provided by dialog boxes are called command buttons. Some
command buttons have a corresponding shortcut key. When a command
button label includes an underlined letter, its command may be invoked
by pressing ALT + the underlined letter or by clicking the command
button. For example, the shortcut key for the Open command button is
ALT+O. Standard command buttons are described on page 13.
Legitronic User Manual (v3.4)
9
3. Getting Started
Scrolling. When a window contains more items, rows, or columns than
will fit in the display, you can use the mouse and scroll bars to display
additional data. You can also use the arrow keys to scroll up, down,
right, or left in the display.
Minimizing a window. To reduce the window to an icon at the bottom of
the application window, click the 0 button at the right end of the title
bar.
Maximizing a window. To expand a window to its full size, click the 1
button at the right of the title bar. (The presence of the 1 button
indicates that the window is not at its maximum size. When this button is
displayed, you can resize the window by dragging its corners.)
Reducing window size. To reduce a window from its maximum size to
its most previous reduced size, click the 2 button at the right of the title
bar. (The presence of the 2 button indicates that the window is at its
maximum size.)
Closing a window. To close a window, select Close from the File menu,
or simply click the r button at the right end of the title bar.
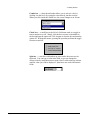
Entering Field Data
A field is a specified area in which you enter, or the system displays, a
valid value for a particular data element. Several data entry methods are
used in Legi, depending on the type of field. Legi uses the following
types of fields:
Text box — a box into which you can type data. When you click inside a
text box, the cursor changes to an I-beam.
Drop-down list — a text box with a down-pointing arrow at its right end.
Clicking the arrow drops down a list of values so that you can select a
value by clicking it.
Legitronic User Manual (v3.4)
10
3. Getting Started
Combo box — a drop-down list that allows you to select a value by
clicking it in the list or by typing the value directly into the text box.
When you click inside the combo box, the cursor changes to an I-beam.
Check box — a small box to the left of a field name used as a toggle to
turn an option on or off. Simply click the box to insert a checkmark in
the box and turn the option on. Click it again to clear the box and turn the
option off. Without the mouse, pressing the spacebar performs the toggle
between on and off.
Spin box — a text box with both an up arrow and a down arrow at its
right end. You can type a value in the field, or you can change the
current value by using the mouse to spin a list of valid values up or down
until the value you want is displayed. Spin boxes are used with numeric
fields.
Legitronic User Manual (v3.4)
11
3. Getting Started
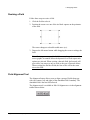
Radio button ― a small round button that appears with others in a
section of a display where you can select only one of several options. To
select an option, simply click its label or its radio button. In the example
below, you click one of the three radio buttons to select the Preview ―
none, first label only, or every label.
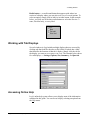
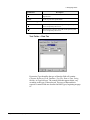
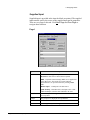
Working with Tab Displays
Several windows in Legi include multiple displays that are accessed by
clicking tabs that look like the tabs on file folders. Each tab has a label
that identifies the function of that tab’s display. Simply click the tab for
the display you want to see or press CTRL-TAB. The example below shows
five tab displays ― Settings, Options, Size, Summary, and Queried.
Accessing Online Help
Legi’s online help system allows you to display most of the information
contained in this guide. You can access help by selecting an option from
the Help menu.
Legitronic User Manual (v3.4)
12
3. Getting Started
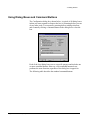
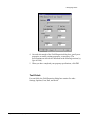
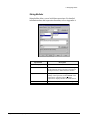
Using Dialog Boxes and Command Buttons
The Configuration dialog box, shown below, is typical of all dialog boxes
in that you must respond to whatever the box is presenting before you can
do any other work. You respond by entering data or making selections,
and eventually clicking a command button in the dialog box to close the
box.
Each of the Legi dialog boxes serves a specific purpose and includes one
or more command buttons. However, each command button always
performs the same function, regardless of the dialog box it appears in.
The following table describes the standard command buttons.
Legitronic User Manual (v3.4)
13
3. Getting Started
Command
Button Label
Action
Apply
Applies your selections to the label format
displayed.
Close
or OK
Closes the dialog box. If you have made changes
that you have not saved, the system first gives you
the opportunity to save them. You can press the
ENTER key as a substitute for clicking the OK
button.
Cancel
Closes the dialog box, ignoring any changes since
you last saved data in the dialog box. Pressing the
ESC key has the same effect as clicking the Cancel
button.
Help
Opens the online help topic that explains the dialog
box. The dialog box remains open.
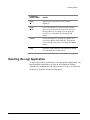
Opening the Legi Application
To access any of the Legi functions, you must open the application. You
start by double-clicking the Legi icon on the Windows® desktop.
Alternatively, highlight the icon and press the ENTER key, or select Legi
for Windows from the Windows® Start menu.
Legitronic User Manual (v3.4)
14
3. Getting Started
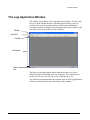
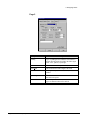
The Legi Application Window
Title Bar
The window shown below is the Legi application window. All your work
in Legi is done with this display as the background. During your Legi
work sessions, you select menu options or click buttons that display
secondary windows or dialog boxes within the application workspace (the
area below the tool bar at the top of the window).
Menu Bar
Tool Bar
Workspace
Status
Bar
The layout of the application window remains the same even when
different windows and dialog boxes are displayed. The common areas
are the title bar, the menu bar, the tool bar, and the status bar.
The following sections describe the common areas of the Legi application
window, moving from the top to the bottom of the window.
Legitronic User Manual (v3.4)
15
3. Getting Started
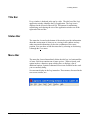
Title Bar
Every window is bordered at the top by a title. The title bar of the Legi
application window identifies the Legi application. The Legi icon is
displayed at the left end of the tool bar. The buttons for minimizing,
maximizing, and reducing the size of the application window are at the
right end of the tool bar.
Status Bar
The status bar, located at the bottom of the window provides information
about the current state of what you are viewing in the window and any
other contextual information, such as the coordinates of the cursor
position. You can show or hide the status bar by selecting or deselecting
it through the View menu.
Menu Bar
The menu bar, located immediately below the title bar, is a horizontal list
of items. Each item contains one or more options. When selected, each
option invokes a function, opens a dialog box, or displays a list of
additional options. Options in dimmed text are not available for the work
you are currently doing.
Seven menus display in the Legi menu bar. These menus, discussed in the
next seven sections, are:
Legitronic User Manual (v3.4)
16
3. Getting Started
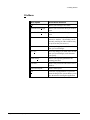
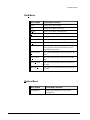
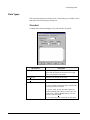
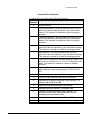
File Menu
Menu Option
Action When Selected
New
Allows you to design a new label.
Open Label for Design…
Allows you to select the label you want to
open.
Open Label for Printing… Allows you to select the label you want to
print.
Legitronic User Manual (v3.4)
Close
Closes the active window. (There is only
one active window the window you are
currently working in. Other windows may
be open, but they are inactive.)
Save
Saves any changes you made since the last
time you saved changes.
Save As…
Saves any changes you made since the last
time you saved changes, under the name
you specify.
Printer Setup…
Allows you to specify parameters for
printing your label.
Test Print…
Prints a test print of the label in the active
window.
Print Label Report…
Prints a label report.
Exit
Closes the Legi application. If you have
unsaved changes, the system allows you to
save them before closing the application.
17
3. Getting Started
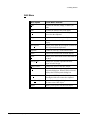
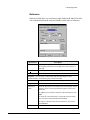
Edit Menu
Legitronic User Manual (v3.4)
Menu Option
Action When Selected
Undo
Reverses the last add, change, or delete you
made.
Redo
Reverses the action of the Undo option.
Cut
Deletes the selected item from the display and
moves it to the clipboard.
Copy
Copies the selected item to the clipboard.
Paste
Inserts an item from the clipboard into the
display.
Paste Special…
Allows you to paste an OLE object or link to an
OLE object from the clipboard.
Duplicate
Creates an exact copy of the selected field.
Delete
Removes the selected item from the display.
Select
Allows you to select all or none of the fields in
the label.
Change Icon…
Changes the icon that represents the OLE
object in Label Design.
Change Source…
Changes the source of the OLE Object.
Properties…
When no field is selected, displays the Label
Properties dialog box. When a field is selected,
displays the Field Properties dialog box.
Links…
Manages an OLE object in the label, by
allowing the link to be removed or updated.
Insert New Object…
Opens the Insert Object dialog box so that you
can insert a new OLE object.
Object
Allows you to open or edit an OLE Object.
18
3. Getting Started
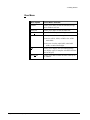
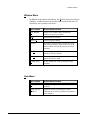
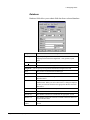
View Menu
Menu Option
Action When Selected
Toolbars
Allows you to show or hide the standard, design,
and/or window tool bars.
Status Bar
Allows you to show or hide the status bar.
Label Parameters
Opens the Label Properties dialog box.
Zoom
Allows you to select a zoom option:
Zoom in to a 50%, 100%, or 200% view of the
entire label.
Zoom out to view the entire label, entire label
width, or entire label height.
Legitronic User Manual (v3.4)
Grid
Allows you to display the Grid Settings dialog
box, display a grid, or snap the selected field to the
lines in the grid,
Show Ruler
Allows you to hide or show the ruler at the top of
the window.
19
3. Getting Started
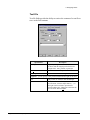
Field Menu
Menu Option
Action When Selected
Select
Allows you to select a field.
Text
Allows you to draw a text field.
Barcode
Allows you to draw a barcode field.
Graphic
Allows you to draw a graphic field.
Line
Allows you to draw a line.
Box
Allows you to draw a box.
Raw
Allows you to draw a raw data field.
Zoom In
Allows you to zoom in on the selected field. Each
time you click on the selected field, the zoom
magnification increases.
Move to Front
Moves the selected field to the front layer of the
label.
Move to Rear
Moves the selected field to the rear layer of the
label.
Move Forward
Moves the selected field forward in the layers of
the label.
Move Back
Moves the selected field backward in the layers of
the label.
Options Menu
Legitronic User Manual (v3.4)
Menu Option
Action When Selected
Configuration
Allows you to update your Legi system
configuration.
20
3. Getting Started
Window Menu
In addition to the options listed below, the Window menu lists all open
windows. Numbers next to the window names indicate the order in
which they were opened or last active.
Menu Option
Action When Selected
New Window
Opens a new window whose contents are
identical to the active window.
Close
Closes the active window.
Close All
Closes all open windows.
Cascade
Rearranges open windows so that they overlap,
one on top of another. Shows a full view of the
active window and only the title bar of inactive
windows.
Tile Horizontal
Rearranges open windows in a horizontal tile
pattern, from top to bottom.
Tile Vertical
Rearranges open windows in a vertical tile
pattern, from left to right.
Arrange Icons
Neatly arranges the icons of minimized Legi
windows.
Help Menu
Legitronic User Manual (v3.4)
Menu Option
Action When Selected
Help Topics
Displays the Legi online help system’s table of
contents.
About Legi for
Windows
Opens the About Legi dialog box, which
identifies the version of Legi that is installed on
your computer.
21
3. Getting Started
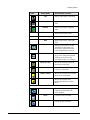
Tool Bar
The tool bar is located directly below the menu bar. The tool bar
functions are always the same, regardless of which window appears
below. This tool bar provides quick access to Legi windows and major
print functions. Each button contains an icon representing its function.
Pass the cursor over the button to display its description. All functions in
the tool bar can also be accessed through the menu bar.
The tool bar is actually made up of three tool bars:
Standard ― the leftmost tool bar allows you to design a new label,
open an existing label for design or printing, and exit the Legi
application.
Design ― the middle tool bar allows you to insert various types of
fields in your label and to test print the label.
Window ― the rightmost tool bar allows you to open new windows
and specify how the open windows should be displayed.
Note: You can show or hide each of the three tool bars by selecting or
deselecting it through the View menu.
Legitronic User Manual (v3.4)
22
3. Getting Started
Icon
Description
Action When Clicked
Standard Tool Bar
New
Allows you to design a new label.
Open for Design
Allows you to select the label
you want to open.
Open for Printing
Allows you to select the label
you want to print.
Save
Saves any changes you made
since the last time you saved
changes.
Configuration
Allows you to update your Legi
system configuration.
Exit
Closes the Legi application. If
you have unsaved changes, the
system allows you to save them
before closing the application.
Design Tool Bar
Legitronic User Manual (v3.4)
Test Print
Prints a test print of the label in
the active window.
Undo
Reverses the last add, change, or
delete you made.
Redo
Reverses the action of the Undo
option.
Cut
Deletes the selected item from
the display and moves it to the
clipboard.
Copy
Copies the selected item to the
clipboard.
Paste
Inserts an item from the clipboard
into the display.
Delete
Removes the selected item from
the display.
Select
Allows you to select all or none
of the fields in the label.
23
3. Getting Started
Icon
Description
Text
Action When Clicked
Allows you to draw a text field.
Barcode
Allows you to draw a barcode
field.
Graphic
Allows you to draw a graphic
field.
Line
Allows you to draw a line.
Box
Allows you to draw a box.
Raw
Allows you to draw a raw data
field.
Zoom In
Allows you to zoom in on the
selected field. Each time you
click on the selected field, the
zoom magnification increases.
Zoom Out
Allows you to zoom out for a
larger view of the selected field.
Each time you click on the
selected field, the view enlarges.
Move to Front
Moves the selected field to the
front layer of the label.
Move to Rear
Moves the selected field to the
rear layer of the label.
Move Forward
Moves the selected field forward
in the layers of the label.
Move Back
Moves the selected field
backward in the layers of the
label.
Window Tool Bar
New Window
Legitronic User Manual (v3.4)
Opens a new window whose
contents are identical to the
active window.
Close
Closes the active window.
Close All
Closes all open windows.
24
3. Getting Started
Icon
Description
Cascade Windows
Legitronic User Manual (v3.4)
Action When Clicked
Rearranges open windows so that
they overlap, one on top of
another. Shows a full view of the
active window and only the title
bar of inactive windows.
Tile Horizontally
Rearranges open windows in a
horizontal tile pattern, from top
to bottom.
Tile Vertically
Rearranges open windows in a
vertical tile pattern, from left to
right.
25
3. Getting Started
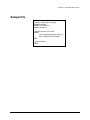
Designing Labels
Legitronic User Manual (v3.4)
26
4. Designing Labels
Label design requires advance planning. It is a good idea to finalize the
label content and format before you begin creating the design in Legi.
When you are ready to use Legi, you can create an entirely new label
format, or use the format for an existing label as the basis for your design.
This chapter provides the detailed information you need to perform each
of the label design steps:
1. Opening the Label Design window
2. Specifying the label properties
3. Specifying the label fields
4. Saving the label
5. Printing a test label
This chapter also discusses object linking and embedding (OLE), a feature
that allows you to link a file created in another application to a specific
field.
Opening the Label Design Window
When you open the Label Design window, you must indicate whether
you are creating a new label design or using an existing label as the basis
for your design.
Legitronic User Manual (v3.40)
27
4. Designing Labels
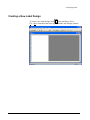
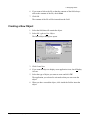
Creating a New Label Design
To create a new label design, click
in the tool bar or select
File New from the menu bar to open a blank Label Design window.
Legitronic User Manual (v3.4)
28
4. Designing Labels
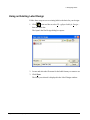
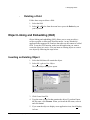
Using an Existing Label Design
Follow these steps to use an existing label as the basis for your design:
1. Click
in the tool bar or select File
from the menu bar.
Open Label for Design…
The Open Label for Design dialog box opens.
2. Locate and select the file name for the label format you want to use.
3. Click Open.
The label you selected is displayed in the Label Design window.
Legitronic User Manual (v3.4)
29
4. Designing Labels
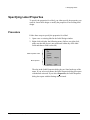
Specifying Label Properties
To specify the properties for a label, you either specify the properties you
want for a new label design or modify the properties of an existing label
design.
Procedure
Follow these steps to specify the properties for a label:
1. Open a new or existing label in the Label Design window.
2. Right-click to display the following menu. (Before you right-click,
make sure that the cursor is not positioned within any of the label
fields and that no field is selected.)
Label Properties Tabs
Menu Options
The tabs in the Label Properties dialog box are listed at the top of the
menu. If you select a tab name, the Label Properties dialog box opens
with that tab activated. If you select Properties, the Label Properties
dialog box opens with the Settings tab activated.
Legitronic User Manual (v3.4)
30
4. Designing Labels
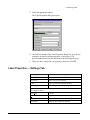
3. Select the appropriate option.
The Label Properties dialog box opens.
4. On each relevant tab of the Label Properties dialog box, specify new
properties or modify existing properties, as necessary. (The
specifications on each tab are described in the following sections.)
5. When you have completed your property selections, click OK.
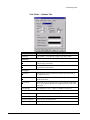
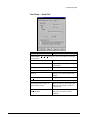
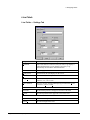
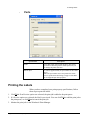
Label Properties — Settings Tab
Specification
Description
Label
Label description.
Label Stock
Stock to be used for the label.
Printer
Type of printer that will print the label.
Print Mode
Print mode to be used for printing the label.
Print Log – the print log feature allows you to capture information from one or
more fields on a label.
Legitronic User Manual (v3.4)
User Name
User ID.
User Password
User password, if required.
Data Source
Name of database that contains the print log.
Table Name
Name of table contains the print log
31
4. Designing Labels
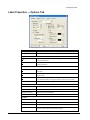
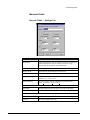
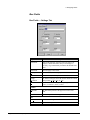
Label Properties — Options Tab
Specification
Field Type
Description
Type of field — Text, Barcode, Graphic, Line, Box, or Raw.
Alignment
Horz
Horizontal justification to be used — Left, Right, Center, or Justify (left
and right justification).
Vert
Vertical justification to be used — Top, Bottom, Center, or Justify (top and
bottom justification).
Paragraph
Auto Wrap
When checked, text is automatically separated into lines based on the width
of the field.
Dynamic Fit
When checked, the font size is automatically adjusted so that the text fills
the entire field.
Object Wrap
When checked, the paragraph field is wrapped around another field, known
as the object field when it is dragged against any side of the object field.
Line Spacing
Line spacing to be used — single (1), double (2), and so on.
Color
Screen Foreground
Field text color for on-screen display.
Screen Background
Field background color for on-screen display.
Printed Foreground
Field text color for printed labels.
Printed Background
Field background color for printed labels.
Variable
Variable
When checked, the field is processed as a variable field on a label template.
Designator
Enter a unique designator for the field.
Max Chars
Enter the maximum number of characters in the variable field.
Auto Calc
When checked, Legi automatically calculates the maximum number of
characters based on the size of the field rectangle.
Legitronic User Manual (v3.4)
32
4. Designing Labels
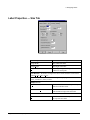
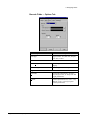
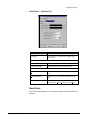
Label Properties — Size Tab
Specification
Description
Design Width
The width of the label.
Design Height
The height of the label.
Margin
The margin along the left edge of the label in
which text cannot print.
Print Rotation – the number of degrees the label contents should be rotated when
printed: 0°, 90°, 180°, or 270°.
Unit of Measure – unit to be used for entering and displaying measurements:
Inches, Centimeters, Points, or Dots.
Multiple Across
Horizontal Count
The number of labels that will print side by
side across the label stock.
Horizontal Print Interval
The distance between the left edge of one
label and the left edge of the next label.
Continuous Label Stock
Vertical Print Interval
Legitronic User Manual (v3.4)
The distance between the top of one label and
the top of the next label.
33
4. Designing Labels
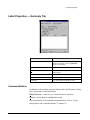
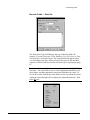
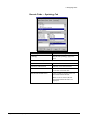
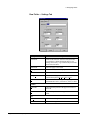
Label Properties — Summary Tab
Specification
Description
Author
User name used when signing into Legi.
When no user name was used, Unknown
appears as the author.
Creation Date
The date and time the label was created.
Automatically save history
When checked, revision history is saved
automatically.
Revision Date
Date of label revision.
Author
User name associated with the revision.
Comments
Free-form remarks about the revision.
Command Buttons
In addition to the standard command buttons, the Label Properties dialog
box contains these command buttons:
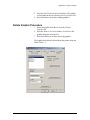
Make Revision – used to log a revision and enter a comment.
Delete – used to delete a highlighted revision.
(For a description of the standard command buttons, refer to “Using
Dialog Boxes and Command Buttons” in Chapter 3.)
Legitronic User Manual (v3.4)
34
4. Designing Labels
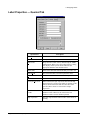
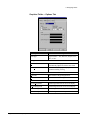
Label Properties — Queried Tab
Specification
Legitronic User Manual (v3.4)
Description
User Name
User ID.
User Password
User password (required for some data sources).
Data Source
Drop-down list of data sources defined using the ODBC
Administrator. When you a select a data source, a dialog
box displays so that you can locate and select the
appropriate database from that data source.
Table Name
Name of the table that contains the data you want to use.
Search Field
The field in the table to search for particular values.
Start Value
The first value for which a label should be printed.
End Value
The last value for which a label should be printed.
Use SQL Expression
When checked, the SQL expression entered in the SQL
Expression box is used to select labels for printing. If this
field is checked when start and end values have been
specified, those values are converted to an SQL
expression.
Reevaluate Auto
Counts
When checked, the field value is re-evaluated for every
database record. Otherwise, the value for the first
database record is used for all labels printed.
SQL Expression
The SQL expression that will be used to select labels for
printing.
35
4. Designing Labels
Specifying the Label Fields
Each label you design is made up of elements called fields. There are six
types of fields:
Text
Barcode
Graphic
Line
Box
Raw Data
New Label Design
When you are creating a new label design, you begin your work in a
blank Label Design window. You create new fields by defining the space
they will occupy, specifying their properties, and entering their content.
Once you have created a field, you may need to delete it or change its
position, properties, or content.
Existing Label Design
When you are using an existing label as the basis for your design, you
work with the existing fields displayed in the Label Design window. You
can change the position, properties, and content of the existing fields.
You may also need to delete certain fields and create new ones.
Positioning a Field and Defining Its Space
Follow these steps to create a new field:
1. Specify the type of field you want to create by clicking the
appropriate tool bar button or by selecting the field type from the
Field menu.
The cursor changes to the crosshairs symbol (+).
2. Move the cursor to the appropriate position on the label.
3. Depress the left mouse button while dragging the cursor to define the
area to be occupied by the field.
Repositioning a Field
Follow these steps to reposition a field:
Legitronic User Manual (v3.4)
36
4. Designing Labels
1. Click the field to select it.
2. Position the cursor within the field.
3. Depress the left mouse button while dragging the field to the
appropriate position on the label.
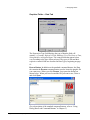
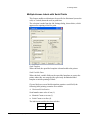
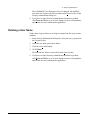
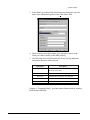
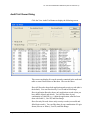
Selecting a Field
Selection of individual fields to edit via Select Edit Fields is
supported. The dialog shown below appears allowing the user to select
any number of fields.
Non-printing fields appear with this symbol to the left of the field name.
Non-display fields appear with this symbol to the left of the field name.
Legitronic User Manual (v3.4)
37
4. Designing Labels
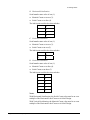
Resizing a Field
Follow these steps to resize a field:
1. Click the field to select it.
2. Position the cursor over one of the six black squares on the perimeter
of the field.
The cursor changes to a double-ended arrow (↔).
3. Depress the left mouse button while dragging the cursor to enlarge the
field.
Note: Resizing a text or graphic field does not change the size of the
text or graphic it contains unless the dynamic fit or fixed aspect ratio
options are selected. When resizing a barcode field, the barcode will
grow taller, but can grow only as wide as the type of barcode allows.
When resizing line and box fields, the line or box will be the same
size as the field.
Field Alignment Tool
The alignment feature allows users to align a group of fields along any
side (top, bottom, left, and right) of the dominant field’s boundary. The
dominant field is the last field selected.
The alignment tool is available in Edit
toolbar shown below.
Legitronic User Manual (v3.4)
Alignment or via the alignment
38
4. Designing Labels
Specifying Field Properties
Field properties are specified in the Field Properties dialog box. The
number of tabs in the Field Properties dialog box and the contents of each
tab vary according to the type of field.
Follow these steps to specify the properties for a field:
1. Click the field to select it.
2. Position the cursor within the field and right-click to display the
following menu.
Menu Options
Field Properties Tabs
The tabs in the Field Properties dialog box are listed at the bottom of
the menu. If you select a tab name, the Field Properties dialog box
opens with that tab activated. If you select Properties, the Field
Properties dialog box opens with the Settings tab activated.
Note: The menu options displayed will vary according to the type of
field selected.
3. Select the appropriate option.
The Field Properties dialog box opens.
Legitronic User Manual (v3.4)
39
4. Designing Labels
4. On each relevant tab of the Field Properties dialog box, specify new
properties or modify existing properties, as necessary. (The
specifications on each tab are described in the following sections, by
type of field.)
5. When you have completed your property specifications, click OK.
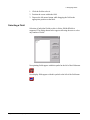
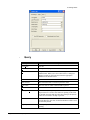
Text Fields
For text fields, the Field Properties dialog box contains five tabs –
Settings, Options, Font, Data, and Serial.
Legitronic User Manual (v3.4)
40
4. Designing Labels
Text Fields — Settings Tab
Specification
Description
Field Name
Name of the field. For each new field you create, Legi
displays a default field name that you can change as
necessary. Legi automatically increments the default
field name.
Data Result
For a field that uses a data expression, the result of that
expression. For a field that uses supplied data, the
default data entered, if any.
Display Field
When checked, the field displays on the screen.
Print Field
When checked, the field prints on the label.
Design Orientation
The number of degrees the field contents should be
rotated when printed: 0°, 90°, 180°, or 270°.
Unit of Measure
Unit to be used for entering and displaying
measurements: Inches, Centimeters, Points, or Dots.
Position
Horizontal
The horizontal position of the upper left corner of the
field.
Vertical
The vertical position of the upper left corner of the field.
Size
Legitronic User Manual (v3.4)
Horizontal
The horizontal length of the field.
Vertical
The vertical length of the field.
41
4. Designing Labels
Text Fields — Options Tab
Specification
Field Type
Description
Type of field — Text, Barcode, Graphic, Line, Box, or Raw.
Alignment
Horz
Vert
Horizontal justification to be used — Left, Right, Center, or Justify
(left and right justification).
Vertical justification to be used — Top, Bottom, Center, or Justify
(top and bottom justification).
Paragraph
Auto Wrap
When checked, text is automatically separated into lines based on
the width of the field.
Dynamic Fit
When checked, the font size is automatically adjusted so that the text
fills the entire field.
Object Wrap
When checked, the paragraph field is wrapped around another field,
known as the object field when it is dragged against any side of the
object field.
Line Spacing
Line spacing to be used — single (1), double (2), and so on.
Color
Screen Foreground
Field text color for on-screen display.
Screen Background
Field background color for on-screen display.
Printed Foreground
Field text color for printed labels.
Printed Background
Field background color for printed labels.
Legitronic User Manual (v3.4)
42
4. Designing Labels
Text Fields — Font Tab
The Font property page, as shown below, allows the user to select any
installed character set for system TrueType fonts. This feature is
available only in Windows NT 4.0 installations.
Specification
[Selected Font]
Description
The font to be used in the selected field.
Text Size
Height
For a scalable font, the exact height of the text.
Width
For a scalable font, the exact width of the text.
Use point sizes
When checked, point size is used for the Height and Width
specifications.
Style
Inverse
When checked, the foreground and background colors will
be reversed.
Italic
When checked, the text will print in italic. (Available for
soft fonts only.)
Bold
When checked, the text will print in bold. (Available for
soft fonts only.)
Underline
When checked, the text will print underlined. (Available
for soft fonts only.)
Strikeout
When checked, the text will print with strikeout characters
through it. (Available for soft fonts only.)
Magnification
Height
Legitronic User Manual (v3.4)
For a non-scalable font, the amount of height
magnification.
43
4. Designing Labels
Specification
Description
Width
For a non-scalable font, the amount of width
magnification.
Preview
Results of your font specifications.
Inverse Dithering
Height
When the Style is Inverse, the height of the space beyond
the text occupied by the reverse.
Width
When the Style is Inverse, the width of the space beyond
the text occupied by the reverse.
Text Fields — Data Tab
Expression Type identifies the type of data the field will contain –
Constant, Reference Field, Database, Text File, Date or Time, String
Builder, or Supplied Input. The control fields that appear below vary
according to the type of data selected. The types of data and their
respective control fields are described in Data Types, beginning on page
61.
Legitronic User Manual (v3.4)
44
4. Designing Labels
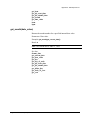
Text Fields — Serial Tab
Specification
Description
Serial Number – No, Yes, Tracking (keep track of last number used for this
serial number).
Start Value
Beginning serial number value.
Increment
The number to be used to increment the
serial number.
Tracking Serial Number Name
Name of serial number to be used.
Leading Fill Character
Character
Character to be used to pad the serial
number.
Length
Length (in characters) of serial number.
Automatic Label Counts
Legitronic User Manual (v3.4)
This field determines number of
identical labels printed
When checked, the value of this field
determines the number of identical
labels printed.
This field determines number of
labels serialized
When checked, the value of this field
determines the number of labels
serialized.
45
4. Designing Labels
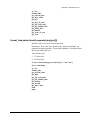
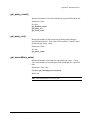
Barcode Fields
Barcode Fields — Settings Tab
Specification
Description
Field Name
Name of the field. For each new field you create, Legi displays a
default field name that you can change as necessary. Legi
automatically increments the default field name.
Data Result
Does not apply to barcode fields.
Display Field
When checked, the field displays on the screen.
Print Field
When checked, the field prints on the label.
Design Orientation
The number of degrees the field contents should be rotated when
printed: 0°, 90°, 180°, or 270°.
Unit of Measure
Unit to be used for entering and displaying measurements:
Inches, Centimeters, Points, or Dots.
Position
Horizontal
The horizontal position of the upper left corner of the field.
Vertical
The vertical position of the upper left corner of the field.
Size
Horizontal
The horizontal length of the field.
Vertical
The vertical length of the field.
Legitronic User Manual (v3.4)
46
4. Designing Labels
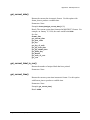
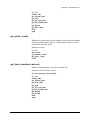
Barcode Fields — Options Tab
Specification
Field Type
Description
Type of field – Text, Barcode, Graphic,
Line, Box, or Raw.
Color
Screen Foreground
Field foreground color for on-screen
display.
Printed Foreground
Field foreground color for printed labels.
Alignment
Horizontal
Vertical
Legitronic User Manual (v3.4)
Horizontal justification to be used —
Left, Right, Center, or Justify (left and
right justification).
Vertical justification to be used — Top,
Bottom, Center, or Justify (top and
bottom justification).
47
4. Designing Labels
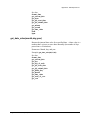
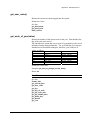
Barcode Fields — Data Tab
The Expression Type field displays the type of data the field will
contain --Constant, Reference Field, Database, Text File, Date or Time,
String Builder, or Supplied Input. The control fields that appear below
vary according to the type of data selected. The types of data and their
respective control fields are described in Data Types, beginning on page
61.
Note: A wizard is available for constructing the data for UCC/EAN128
bar codes. The wizard allows you to select Application Identifiers (AI),
check digits, and other parameters associated with these bar codes. To
access the wizard, click the bar code field to select it, position the cursor
within the field, and right-click to display the menu shown below. Then
select Wizard.
Legitronic User Manual (v3.4)
48
4. Designing Labels
Barcode Fields — Serial Tab
Specification
Description
Serial Number — No, Yes, Tracking (keep track of last number used for this
serial number).
Start Value
Does not apply to barcode fields.
Increment
Does not apply to barcode fields.
Tracking Serial Number Name
Does not apply to barcode fields.
Leading Fill Character
Character
Does not apply to barcode fields.
Length
Does not apply to barcode fields.
Automatic Label Counts
Legitronic User Manual (v3.4)
This field determines number of
identical labels printed
When checked, the value of this field
determines the number of identical
labels printed.
This field determines number of
labels serialized
When checked, the value of this field
determines the number of labels
serialized.
49
4. Designing Labels
Barcode Fields — Symbology Tab
Specification
Symbology
Description
The barcode symbology (type) to be
used.
Preview — results of your barcode specifications.
NBE Size
The size of the barcode.
Overall size characteristics
Summary of size characteristics.
Checksum
Checksum formula to be used for
verification of barcode data.
HRI (Human Readable Info)
Fonts available for display of the text
associated with the barcode.
When NO HRI is selected, the text
associated with the barcode is not
displayed.
Legitronic User Manual (v3.4)
50
4. Designing Labels
Graphics Fields
Legi supports the following graphic file formats:
WindowsBitmap (.BMP)
Encapsulated PostScript (.EPS – a vector format)
JPEG (Joint Photo Experts Group – JPG)
Zsoft PCS (.PCX)
Windows Metafile (.WMF – a vector format)
TIFF (.TIFF – in all formats except LZW compression)
WordPerfect Graphic (.WPG)
Targa (.TGA)
Legitronic User Manual (v3.4)
51
4. Designing Labels
Graphics Fields — Settings Tab
Specification
Description
Field Name
Name of the field. For each new field you create, Legi
displays a default field name that you can change as
necessary. Legi automatically increments the default field
name.
Data Result
Does not apply to graphics fields.
Display Field
When checked, the field displays on the screen.
Print Field
When checked, the field prints on the label.
Design Orientation
The number of degrees the field contents should be rotated
when printed: 0°, 90°, 180°, or 270°.
Unit of Measure
Unit to be used for entering and displaying measurements:
Inches, Centimeters, Points, or Dots.
Position
Horizontal
The horizontal position of the upper left corner of the
field.
Vertical
The vertical position of the upper left corner of the field.
Size
Horizontal
The horizontal length of the field.
Vertical
The vertical length of the field.
Legitronic User Manual (v3.4)
52
4. Designing Labels
Graphics Fields — Options Tab
Specification
Field Type
Description
Type of field — Text, Barcode, Graphic, Line,
Box, or Raw.
Sizing
Dynamic Fit
When checked, the graphic size is
automatically adjusted to fill the entire field.
Fixed Aspect Ratio
When checked, the graphic’s proportions are
maintained during resizing.
Magnification
Horizontal
The amount of height magnification.
Vertical
The amount of width magnification.
Color
Legitronic User Manual (v3.4)
Screen Foreground
Field foreground color for on-screen display.
Screen Background
Field background color for on-screen display.
Printed Foreground
Field foreground color for printed labels.
Printed Background
Field background color for printed labels.
53
4. Designing Labels
Graphics Fields — Data Tab
The Expression Type field displays the type of data the field will
contain ― Constant, Reference Field, Database, Text File, Date or Time,
String Builder, or Supplied Input. The control fields that appear below
vary according to the type of data selected. The types of data and their
respective control fields are described in Data Types, beginning on page
61.
Browse Button. In addition to the standard command buttons, the Data
tab contains the Browse command button, used to locate the graphic file
you want to use. When you click Browse, Legi opens the dialog box
shown below. When you have located the file you want to use, select it
and click Open.
(For a description of the standard command buttons, refer to “Using
Dialog Boxes and Command Buttons” in Chapter 3.)
Legitronic User Manual (v3.4)
54
4. Designing Labels
Line Fields
Line Fields — Settings Tab
Specification
Description
Field Name
Name of the field. For each new field you create, Legi displays a
default field name that you can change as necessary. Legi
automatically increments the default field name.
Data Result
Does not apply to line fields.
Display Field
When checked, the field displays on the screen.
Print Field
When checked, the field prints on the label.
Design Orientation
The number of degrees the field contents should be rotated when
printed: 0°, 90°, 180° or 270°.
Unit of Measure
Unit to be used for entering and displaying measurements: Inches,
Centimeters, Points, or Dots.
Position
Horizontal
The horizontal position of the upper left corner of the field.
Vertical
The vertical position of the upper left corner of the field.
Size
Horizontal
The horizontal length of the field.
Vertical
The vertical length of the field.
Legitronic User Manual (v3.4)
55
4. Designing Labels
Line Fields — Options Tab
Specification
Field Type
Description
Type of field — Text, Barcode, Graphic,
Line, Box, or Raw.
Color
Legitronic User Manual (v3.4)
Screen Foreground
Field foreground color for on-screen
display.
Printed Foreground
Field foreground color for printed labels.
56
4. Designing Labels
Box Fields
Box Fields — Settings Tab
Specification
Description
Field Name
Name of the field. For each new field you create, Legi
displays a default field name that you can change as
necessary. Legi automatically increments the default field
name.
Data Result
Does not apply to box fields.
Display Field
When checked, the field displays on the screen.
Print Field
When checked, the field prints on the label.
Design
Orientation
The number of degrees the field contents should be rotated
when printed: 0°, 90°, 180°, or 270°.
Unit of Measure
Unit to be used for entering and displaying measurements:
Inches, Centimeters, Points, or Dots.
Position
Horizontal
The horizontal position of the upper left corner of the
field.
Vertical
The vertical position of the upper left corner of the field.
Size
Legitronic User Manual (v3.4)
Horizontal
The horizontal length of the field.
Vertical
The vertical length of the field.
57
4. Designing Labels
Box Fields — Options Tab
Specification
Field Type
Description
Type of field — Text, Barcode, Graphic, Line,
Box, or Raw.
Color
Screen Foreground
Field foreground color for on-screen display.
Printed Foreground
Field foreground color for printed labels.
Border
Horizontal Thickness
Thickness of the horizontal lines that make up the
box.
Vertical Thickness
Thickness of the vertical lines that make up the
box.
Unit of Measure
Unit to be used for entering and displaying
measurements: Inches, Centimeters, or Points.
Raw Fields
Raw fields contain data to be used by the printer when the labels are
printed.
Legitronic User Manual (v3.4)
58
4. Designing Labels
Raw Fields — Settings Tab
Specification
Description
Field Name
Name of the field. For each new field you create,
Legi displays a default field name that you can
change as necessary. Legi automatically increments
the default field name.
Data Result
Does not apply to raw fields.
Display Field
When checked, the field displays on the screen.
Print Field
When checked, the field prints on the label.
Design Orientation
The number of degrees the field contents should be
rotated when printed: 0°, 90°, 180°, or 270°.
Unit of Measure
Unit to be used for entering and displaying
measurements: Inches, Centimeters, Points, or Dots.
Position
Horizontal
The horizontal position of the upper left corner of
the field.
Vertical
The vertical position of the upper left corner of the
field.
Size
Legitronic User Manual (v3.4)
Horizontal
The horizontal length of the field.
Vertical
The vertical length of the field.
59
4. Designing Labels
Raw Fields — Options Tab
Specification
Field type
Description
Type of field – Text, Barcode, Graphic,
Line, Box, or Raw.
Color
Screen Foreground
Field foreground color for on-screen
display.
Screen Background
Field background color for on-screen
display.
Send Data
Selection of when the content of the
raw data field is to be sent to the
printer:
After label is sent
At beginning of label data
At end of label data
Send field origin
Legitronic User Manual (v3.4)
When checked, the coordinates of the
raw data will be sent to the printer.
60
4. Designing Labels
Data Types
This section describes the controls for the various data types available on the
Data tab of the Field Properties dialog box.
Constant
Constant data remains unchanged every time the label is printed.
Specification
Description
Padding
Type of padding desired when the field content is
shorter than the length specified in the Fill Length
field – none, pad left, or pad right.
Fill Character
Character to be used to pad the field.
Fill Length
The maximum allowable length of the field.
Constant
For text fields, the text that will print on each label.
For barcode fields, the data that sill be translated into
a barcode printed on each label.
For graphic fields, the file name that contains the
graphic (including path). When you don’t know the
graphic name, click the Browse button, select the
file name, and click Open.
For raw fields, the printer commands for each label.
Legitronic User Manual (v3.4)
61
4. Designing Labels
Reference
Reference fields allow you to reference other fields on the label. The field
will combine data from the referenced fields in their order of reference.
Specification
Description
Padding
Type of padding desired when the field content is shorter than
the length specified in the Fill Length field – none, pad left, or
pad right.
Fill Character
Character to be used to pad the field.
Fill Length
The maximum allowable length of the field.
Fragment – you can specify a start position and maximum length for each
referenced field or for the entire group of referenced fields.
Start
The position at which the data should begin.
Length
The maximum length of the field.
Referenced
Fields
From the drop-down List of Fields, select each field you want to
reference. Once selected, the field name appears in the List of
Fields box.
To add the selected field to end of the referenced field list, click
Add.
To insert the selected field before a particular referenced field
list, select that referenced field and click Insert.
To remove a field from the referenced field list, select it and
click Remove.
List of Fields
Legitronic User Manual (v3.4)
A drop-down list of fields available for reference in this field.
62
4. Designing Labels
Database
Database fields allow you to obtain field data from a selected database.
Specification
Description
Padding
Type of padding desired when the field content is shorter than the
length specified in the Fill Length field – none, pad left, or pad
right.
Fill Character
Character to be used to pad the field.
Fill Length
The maximum allowable length of the field.
Fragment – you can specify a start position and maximum length for the field.
Start
The position at which the data should begin.
Length
The maximum length of the field.
Queried Print
When checked, the field will get its data from the data source
identified below.
Data Source
Drop-down list of data sources defined using the ODBC
Administrator. When you select a data source, a dialog box displays
so that you can locate and select the appropriate database from that
data source.
Database
Database that contains the table you want to use.
Table
Name of the table that contains the data you want to use.
Search Col
The database column to be searched for the appropriate record.
Return Col
The database field in the selected record that contains the data to be
used in the label field.
Key Field on
Label
The label field that contains the data used to select the database
record.
Legitronic User Manual (v3.4)
63
4. Designing Labels
Text File
Text file fields provide the ability to retrieve the contents of a text file to
serve as the field contents.
Specification
Description
Padding
Type of padding desired when the field content
is shorter than the length specified in the Fill
Length field – none, pad left, or pad right.
Fill Character
Character to be used to pad the field.
Fill Length
The maximum allowable length of the field.
Fragment – you can specify a start position and maximum length for the field.
Legitronic User Manual (v3.4)
Start
The position at which the data should begin.
Text
The name of the text file. If you don’t know the
text file name, click the ellipsis button (….) to
the right of the Text field to open the File
Selection dialog box. Then locate and select the
text file name and click Open.
64
4. Designing Labels
Date or Time
Date or Time fields allow you to select a date or time format to print on
the labels, calculate expiry dates, and print four-digit year fields.
Specification
Legitronic User Manual (v3.4)
Description
Expiry Date Offset
When checked, the current date is offset by the
number of days (1-9999) specified in the spin box
below, and the resulting date prints on the label.
For example, assume that Expiry Date Offset is
checked and an offset of 30 days is specified. If
the label is printed on January 1, the date printed
on the label will be January 31.
Date or Time Setting
List of available date formats. Highlight the format
you want to use on the label.
65
4. Designing Labels
String Builder
String builder allows you to build data expressions. For detailed
information about data expression functions, refer to Appendix A.
Specification
Legitronic User Manual (v3.4)
Description
Function Category
Available functions.
Function Name
The elements that can be included in the string
for the Function selected. To paste a function in
the Expression box, double-click the function.
Expression
The expression you are building. To evaluate the
validity of the expression, click Evaluate. If the
expression is valid, the results of the data
expression is displayed below the Fields list box.
Fields
The fields that can be included in the string.
66
4. Designing Labels
Supplied Input
Supplied input is provided at the time the labels are printed. The supplied
input controls specify the source of the supplied input and its properties.
There are two pages to this tab. Click Next Page and Prev Page to
navigate between them.
Page 1
Specification
Data Source
Description
The source of the supplied input:
Keyboard – Data will be entered at the keyboard.
DDE – a Dynamic Data Exchange (DDE) server application
is the data source. The actual server name and link
information are set up in Print Labels by clicking Paste
Link.
Remote input – a COM port is the data source.
Table Lookup – a Paradox table is the input source. Click
Table Lookup to select the table and field to be used.
Legitronic User Manual (v3.4)
Entry Time
When the input will be supplied – for the first label only or
for every label.
Prompt
The prompt to be displayed for keyboard data.
Default
Default data for the field.
DDE Data
Data to supplied by the other application.
67
4. Designing Labels
Page 2
Specification
Legitronic User Manual (v3.4)
Description
Padding
Type of padding desired when the field content is
shorter than the length specified in the Fill Length
field – none, pad left, or pad right.
Fill Character
Character to be used to pad the field.
Fill Length
The maximum allowable length of the field.
Remote Source
For supplied input, the remote source (device)
number.
Input Length
The minimum and maximum number of characters
that will be accepted.
Custom Filter
Series of special characters (tokens) that control the
types of characters that can be entered.
68
4. Designing Labels
Custom Filter Characters
A custom filter can consist of the following characters.
Filter
Character
#
Digit placeholder.
.
Decimal placeholder. The actual character used is the one
specified as the decimal placeholder in your international
settings. This character is treated as a literal for masking
purposes.
,
Thousands separator. The actual character used is the one
specified as the thousands separator in your international
settings. This character is treated as a literal for masking
purposes.
:
Time separator. The actual character used is the one
specified as the time separator in your international settings.
This character is treated as a literal for masking purposes.
/
Date separator. The actual character used is the one
specified as the date separator in your international settings.
This character is treated as a literal for masking purposes.
\
Treats the next character in the mask string as a literal. This
allows you to include the '#', '&', 'A', and '?' characters in the
mask. This character is treated as a literal for masking
purposes.
&
Character placeholder. Valid values for this placeholder are
ANSI characters in the following ranges: 32-126 and 128255.
>
Converts all the characters that follow to uppercase.
<
Converts all the characters that follow to lowercase.
A
Alphanumeric character placeholder (entry required) – for
example: a E z, A E Z, or 0 E9.
a
Alphanumeric character placeholder (entry optional).
9
Digit placeholder (entry optional) – for example: 0 E9.
C
Character or space placeholder (entry optional). This
operates exactly like the & placeholder and ensures
compatibility with Microsoft Access.
?
Letter placeholder – for example: a E z or A EZ.
Literal
Legitronic User Manual (v3.4)
Description
Displays all other symbols as literals (that is, as themselves).
69
4. Designing Labels
Real Time Clock Data Type
In the Field Properties screen, click the "Evaluate" button to display an
example of the resulting string, based on current computer time and date,
in the text box below the offset value field.
Legitronic User Manual (v3.4)
70
4. Designing Labels
The time unit options in the dropdown list are: Years, Months, Weeks,
Days, Hours, Minutes and Seconds. The master list for Printer Date
Time Codes is:
Code
[dw]
[d3]
[D3]
[d0]
[dn]
[w0]
[wn]
[dd]
[d2]
[ma]
[m3]
[M3]
[mn]
[m2]
[y2]
[y4]
[jd]
[jb]
[jz]
[TM]
[TZ]
[tm]
[tz]
[mt]
[mz]
[sc]
[s2]
[ap]
[AP]
[si]
Legitronic User Manual (v3.4)
Printer Date Time
"Day of week (Monday)"
"Day of week (Mon - Sun)"
"Day of week (MON - SUN)"
"Numeric day of week (0-6)"
"Numeric day of week (1-7)"
"Week (00 - 53)"
"Week (01 - 54)"
"Numeric day (1 - 31)"
"Numeric day (01 - 31)"
"Month (January-December)"
"Month (Jan - Dec)"
"Month (JAN - DEC)"
"Numeric month (1 - 12)"
"Numeric month (01 - 12)"
"Year (00 - 99)"
"Year (2000 - 2099)"
"Julian date (1 - 366)"
"Julian date (leading blanks)"
"Julian date (leading zeros)"
"12 hour time (1 - 12)"
"12 hour time (01 - 12)"
"24 hour time (0 - 23)"
"24 hour time (00 - 23)"
"Minutes (0 - 59)"
"Minutes (00 - 59)"
"Seconds (0 - 59)"
"Seconds (00 - 59)"
"am/pm"
"AM/PM"
"Shift Information"
71
4. Designing Labels
.
Deleting a Field
Follow these steps to delete a field:
1. Select the field.
2. Select Edit Delete from the menu bar or press the Delete key on
your keyboard.
Object Linking and Embedding (OLE)
Object linking and embedding (OLE) allows you to create an object –
such as a graphic or Microsoft Word document – in any Windows®
application that supports OLE and use that object as the content of a label
field. To use the OLE function, make sure the application you want to
create the object in is active. You can insert an existing object or create a
new object by following the steps below.
Inserting an Existing Object
1. Select the field that will contain the object.
2. Select Edit
Insert New Object.
The Insert Object dialog box opens.
3. Click Create from File.
4. Type the name of the file that contains the object. If you don’t know
the file name, click Browse. When you locate the file name, select it
and click Insert.
5. If you want the object to display as an application icon, check Display
As Icon.
Legitronic User Manual (v3.4)
72
4. Designing Labels
6. If you want to link to the file so that the contents of the field always
reflects the contents of the file, check Link.
7. Click OK.
The contents of the file will be inserted into the field.
Creating a New Object
1. Select the field that will contain the object.
2. Select Edit
Insert New Object.
The Insert Object dialog box opens.
3. Click Create New.
4. If you want the object to display as an application icon, check Display
As Icon.
5. Select the type of object you want to create and click OK.
The application you selected is activated so that you can create the
object.
6. When you have created the object, click inside the field to insert the
object.
Legitronic User Manual (v3.4)
73
4. Designing Labels
Editing an Object
To edit an object embedded in a field, just double-click the object. The
application it was created in activates so that you can edit it.
Dragging File Names From Explorer or Your Desktop
You can also insert a file as an object in a label field by dragging the file
name to the field from Explorer or from your desktop. The file contents is
inserted into the field and linked.
Saving the Label
When saving the label under the same name, simply click
bar or select from File Save from the menu bar.
in the tool
Note: When you have not made any changes to a label, the Save function
is inactive.
Follow these steps to save the label under a different name:
1. Select File
Save As from the menu bar.
The Save As dialog box opens.
2. Enter a file name for the label.
3. Click the Save button.
Legitronic User Manual (v3.4)
74
4. Designing Labels
Printing a Test Label
You can print a test label in one of three ways:
1. Select File
Test Print… from the menu bar.
2. Right-click the label and select Test Print from the menu that
displays.
3. Click
in the tool bar.
Printing a Draft of the Label
The draft print feature allows the user to print a copy of the label to any
installed printer. Generally, the feature is used to print copies of the label
to an office-type laser or ink-jet printer for review. A Draft Print is
initiated by clicking File Draft Print. See below.
Legitronic User Manual (v3.4)
75
5. Printing Labels
This chapter provides the detailed information you need to perform each
of the printing steps:
1. Opening a label for printing
2. Specifying the print properties
3. Printing the labels
Opening a Label for Printing
Follow these steps to open a label for printing:
1. Click
in the tool bar or select File
from the menu bar.
Open Label for Printing…
The Open Label for Printing dialog box opens.
2. Locate and select the file name for the label you want to print.
3. Click Open.
4. The print properties dialog box opens, with the label name displayed
in the title bar.
Legitronic User Manual (v3.40)
76
5. Printing Labels
Specifying the Print Properties
The print properties dialog box includes three tab displays:
Job Settings – general information about the label print job.
Query – information about where to obtain queried input.
Ports – information about supplied input sources.
On each relevant tab of the print properties dialog box, specify the
appropriate print properties. (The specifications on each tab are described
in the following sections.)
Legitronic User Manual (v3.4)
77
5. Printing Labels
.
Job Settings
Specification
Description
Print Job Description
Name of label print job. This is the job name that will
appear in Windows® Print Manager.
Label Stock
Stock to be used for printing the label.
Submit Job Suspended
When checked, the print job goes to the Windows® print
queue as a paused document, to be released later.
Clear Printer Buffer
When checked, the currently printing job is cleared from
the printer memory.
Auto Repeat
When checked, the print job automatically starts printing
again upon completion.
Disable Auto Print
When checked, the label does not automatically print after
the last supplied input field is entered. You must click Print
to continue printing.
Submit job ASAP
When checked, the print job is submitted immediately.
When not checked, the Windows® Print Manager must be
empty before the print job is submitted.
Note: When a label format includes time fields, leaving this
box unchecked will result in more accurate time
information on the labels.
Preview
Type of preview desired: none, preview of first label only,
or preview of every label.
Print Count
Number of labels to print:
Number of Identical – number of identical (duplicate)
labels to print.
Number of Serial – number of serial labels (identical
except for serial number) to print.
Cut / Pause – number of labels to print before cutting or
pausing.
Multiple Across
Horizontal serialization – across the web specification at
print time.
Vertical serialization down the web specification at print
time.
Legitronic User Manual (v3.4)
78
5. Printing Labels
Multiple-Across Labels with Serial Fields
This feature enables serialization to be specified as Horizontal (across the
web) or Vertical (down the web) at print time.
The selection is made from the Job Settings dialog, shown below, which
appears after opening a label for print.
Send Template
When checked, the open label template is downloaded to the printer.
Send Variable Data
When checked, variable fields on the open label template are sent to the
printer where they are merged with a previously downloaded label
template to initiate printing of labels.
Given a label two-across label design that contains a serial field, the
following label printing scenarios are available.
A. Horizontal Serialization
Serial number start value of one (1).
Identical Count set to one (1).
Serial Count set to four (4).
The labels print serialized as shown below.
Legitronic User Manual (v3.4)
1
2
3
4
79
5. Printing Labels
B. Horizontal Serialization
Serial number start value of one (1).
Identical Count set to two (2).
Serial Count set to four (4).
The labels print serialized as shown below.
1
2
1
2
3
4
3
4
C. Vertical Serialization
Serial number start value of one (1).
Identical Count set to two (2).
Serial Count set to two (2).
The labels print serialized as shown below.
1
1
2
2
D. Vertical Serialization
Serial number start value of one (1).
Identical Count set to four (4).
Serial Count set to three (3).
The labels print serialized as shown below.
1
1
1
1
2
2
2
2
3
3
3
3
Notes:
With Horizontal Serialization, the Serial-Count value must be an even
multiple of the Horizontal Label Count set in Label Design.
With Vertical Serialization, the Identical-Count value must be an even
multiple of the Horizontal Label Count set in Label Design.
Legitronic User Manual (v3.4)
80
5. Printing Labels
.
Query
Specification
Description
User Name
User ID.
User Password
User password (required for some data sources).
Data Source
Drop-down list of data sources defined using the ODBC
Administrator. When you a select a data source, a dialog box
displays so that you can locate and select the appropriate
database from that data source.
Table Name
Name of the table that contains the data you want to use.
Search Field
The field in the table to search for particular values.
Start Value
The first value for which a label should be printed.
End Value
The last value for which a label should be printed.
Use SQL Expression
When checked, the SQL expression entered in the SQL
Expression box is used to select labels for printing. If this field
is checked when start and end values have been specified, those
values are converted to an SQL expression.
Reevaluate Auto Counts
When checked, the field value is re-evaluated for every database
record. Otherwise, the value for the first database record is used
for all labels printed.
SQL Expression
The SQL expression that will be used to select labels for
printing.
Legitronic User Manual (v3.4)
81
5. Printing Labels
.
Ports
Specification
Description
Printer
Printer that will be used to print the labels. The printer
specified in Label Design is the default printer, but you
can change the printer selection.
Remote Input
For remote supplied fields, the port number for the remote
device.
Note: The port number must correspond to the remote
sources specified in Label Design, on page 2 of the Data
tab for Supplied Input field properties.
Printing the Labels
When you have completed your print property specifications, follow
these steps to print the labels:
1. Click Print. If no Preview option was selected, the print job is added to the print queue.
2. If a Preview option was selected, the label is previewed. You can click Print to add the print job to
the print queue, or click Abort to cancel the print job.
3. Monitor the print job via the Windows® Print Manager.
Legitronic User Manual (v3.4)
82
6. Security Administration
This chapter explains how to use the Legi Standard Security
Administrator to establish and maintain three types of system security:
System access – access to Legi can be controlled with user names and
passwords. Security Administrator allows you to maintain current
user names and passwords and to assign each user to a user group.
Function rights – Security Administrator allows you to identify the
Legi functions each group is allowed to perform.
Print data rights – Security Administrator allows you to identify the
directories each group is allowed to access when using the Print
Labels function (described in Chapter 5).
Your entries are stored in the Legi security database, which provides the
information Legi needs to maintain its security.
Note: Clicking the red Legi logo in any Security Administrator dialog
box displays information about the current version of Legi Security
Administrator.
Legitronic User Manual (v3.40)
83
6. Security Administration
Logging into Security Administrator
Follow these steps to login to Legi Security Administrator:
1. Run Legi Security Administrator by double clicking its icon on your
desktop or by selecting it from the Programs menu.
The Security Administrator Login dialog box opens.
2. Enter your user name in the Login Name field.
3. Enter your user password in the Login Password field.
4. Verify that the pathname in the Location of Legi Security Files field
is the complete pathname for the directory that stores the Legi
security database. If the pathname is not correct, click the ellipsis (…)
button to browse for the appropriate directory.
5. Click OK.
The Security Administrator dialog box opens.
Legitronic User Manual (v3.4)
84
6. Security Administration
Security Administrator Dialog Box
Specification
Description
Function Rights
Group Name
The name of the group currently selected in the Groups list box to the
right. The functions rights settings below apply to this group.
Label Design
When checked, users in the selected group can perform label design
operations.
Print labels
When checked, users in the selected group can perform label printing
operations. To restrict access to specific label printing operations, click the
ellipsis (…) button.
Configuration
When checked, users in the selected group can modify all configuration
parameters.
Security
When checked, users in the selected group can run Security Administrator
and modify security settings for Legi groups and users.
Print Data Rights
When checked, allows Legitronic-level read-only access to label format
files located in specific directories when using the Print Labels function.
Options
Enforce Function
Rights
When checked, function rights security is enabled and enforced through
the use of user names, passwords, and function rights settings.
When not checked, function rights security, user names, and passwords
are disabled. When opening Legi, users are not required to log in. If any
logging functions are used, the user name Anonymous is logged.
User Controls
Groups [list box]
List of all groups in the Legi security database.
Users [list box]
List of all users in the selected group.
Legitronic User Manual (v3.4)
85
6. Security Administration
Specification
Description
Groups [radio button]
When clicked, the Add…, Modify…, and Delete command buttons to the
right operate on the Groups list box.
Users [radio button]
When clicked, the Add…, Modify…, and Delete command buttons to the
right operate on the Users list box.
Maintaining Groups
Legi Security Administrator allows you to add, modify, and delete group
names.
Adding a New Group
Legi Security Follow these steps to add a new group to the Legi security
database:
1. In the Security Administrator dialog box, click the Groups radio
button, and then click Add…
The Add/Modify Group Name dialog box opens.
2. Type the name of the new group.
3. Click OK.
Legitronic User Manual (v3.4)
86
6. Security Administration
The Add/Modify Group Name dialog box closes. The group name
you added now appears in the Groups list box of the Security
Administrator dialog box.
Note: When adding a new group, you should set the function rights
for the group. (Refer to “Setting Function Rights for a Group” on
page 91.) You may also want to add users to the new group. (Refer to
“Adding a New User” on page 88.)
4. If you have no other Security Administrator functions to perform,
click Save and Exit to save all your changes to the security database
and exit the Security Administrator application.
Modifying a Group Name
Follow these steps to modify an existing group name in the Legi security
database:
1. In the Security Administrator dialog box, click the Groups radio
button.
2. Select the group name that you want to modify.
3. Click Modify…
The Add/Modify Group Name dialog box opens.
4. Type the new name for the group.
5. Click OK.
The Add/Modify Group Name dialog box closes. The modified group
name now replaces the old group name in the Groups list box of the
Security Administrator dialog box.
6. If you have no other Security Administrator functions to perform,
click Save and Exit to save all your changes to the security database
and exit the Security Administrator application.
Legitronic User Manual (v3.4)
87
6. Security Administration
Deleting a Group Name
Follow these steps to delete an existing group name from the Legi
security database:
1. In the Security Administrator dialog box, click the Groups radio
button.
2. Select the group name that you want to delete.
3. Click Delete.
The selected group name is removed from the Groups list box.
4. If you have no other Security Administrator functions to perform,
click Save and Exit to save all your changes to the security database
and exit the Security Administrator application.
Maintaining Users
Legi Security Administrator allows you to:
Add and delete user names.
Modify user names and/or passwords.
Adding a New User
Follow these steps to add a new user to the Legi security database:
1. In the Security Administrator dialog box, select the appropriate group
for the new user from the Groups list box.
2. Click the Users radio button.
3. Click Add…
The Add/Modify User dialog box opens.
Legitronic User Manual (v3.4)
88
6. Security Administration
4. Type the name of the new user in the New User Name field.
5. Type the new user’s password in the New Password field.
6. Type the new user’s password again in the Verify Password field.
7. Click OK.
The Add/Modify User dialog box closes. The user name you added
now appears in the Users list box of the Security Administrator dialog
box.
8. If you have no other Security Administrator functions to perform,
click Save and Exit to save all your changes to the security database
and exit the Security Administrator application.
Modifying a User Name and/or Password
Follow these steps to modify an existing user name and/or password in
the Legi security database:
1. In the Security Administrator dialog box, select the user’s group from
the Groups list box.
2. Select the appropriate user name.
3. Click the Users radio button.
4. Click Modify…
The Add/Modify User dialog box opens.
5. If modifying the user name, type the new name in the New User
Name field.
6. If modifying the user password, type the new password in the New
Password field. Then type the password again in the Verify Password
field.
7. Click OK.
Legitronic User Manual (v3.4)
89
6. Security Administration
The Add/Modify User dialog box closes. If changed, the modified
user name now replaces the old user name in the Users list box of the
Security Administrator dialog box.
8. If you have no other Security Administrator functions to perform,
click Save and Exit to save all your changes to the security database
and exit the Security Administrator application.
Deleting a User Name
Follow these steps to delete an existing user name from the Legi security
database:
1. In the Security Administrator dialog box, select the user’s group from
the Groups list box.
2. Select the user name you want to delete.
3. Click the Users radio button.
4. Click Delete.
The selected user name is removed from the Users list box.
5. If you have no other Security Administrator functions to perform,
click Save and Exit to save all your changes to the security database
and exit the Security Administrator application.
Legitronic User Manual (v3.4)
90
6. Security Administration
Setting Function Rights for a Group
Follow these steps to set the function rights for a group:
1. In the Security Administrator dialog box, select the group name from
the Groups list box.
2. The selected group name displays in the Function Rights section.
3. Check the appropriate function rights for the group you selected.
For Print Data Rights, you can select directories for read-only access
when using the Print Labels function.
For Print Labels, you can allow the group to modify print quantities
or save print settings by clicking the ellipsis (…) button and checking
the Modify Print Quantities or Save Print Settings checkbox.
4. Click Apply Settings to apply the settings to the group.
5. If you have no other Security Administrator functions to perform,
click Save and Exit to save all your changes to the security database
and exit the Security Administrator application.
Setting Print Data Rights
Follow these steps to set print data rights:
1. In the Security Administrator dialog box, select the appropriate group
and click the Print Data Rights ellipsis (…) button.
The Assign Read-Only Paths dialog box opens.
Legitronic User Manual (v3.4)
91
6. Security Administration
2. Select the appropriate drive from the Drives drop-down list in the
middle of the dialog box.
3. Locate and double-click the directory whose access you want to
restrict to read-only.
4. Click Add.
The directory name is added to Currently selected read-only paths
at the bottom of the dialog box. (To remove a directory name from
Currently selected read-only paths, highlight the name and click
Remove.)
5. Repeat steps 3 and 4 for each directory whose access you want to
restrict to read-only.
6. Click OK to save the settings and close the Assign Read-Only Paths
dialog box.
7. If you have no other Security Administrator functions to perform,
click Save and Exit to save all your changes to the security database
and exit the Security Administrator application.
Note: The directory is considered read-only by Legitronic software only.
Other software packages including the Windows operating system
retain full read and write access to the directory.
Selecting Security Options
Follow these steps to select security options for Legi:
1. In the Security Administrator dialog box, check the appropriate
security options in the Options section.
2. If you have no other Security Administrator functions to perform,
click Save and Exit to save all your changes to the security database
and exit the Security Administrator application.
Note: Your selections do not take effect until you exit Legi and login
again.
Legitronic User Manual (v3.4)
92
7. Tracking Serial Number Support
Tracking serial numbers are serial numbers that are given a name and
tracked by Legi. When a label includes a tracking serial number field, the
initial value of that field is obtained from the Tracking Serial Numbers
table when the label prints. When the label print job is submitted, the next
serial number to be used is stored in the Tracking Serial Numbers table.
When a label includes a regular serial number field, Legi does not keep
track of the next serial number to be used. Each time the label is printed,
the serial number begins at the specified start point.
This chapter explains how to:
Configure Legi for serial number tracking.
Maintain the Tracking Serial Numbers table.
Use tracking serial numbers in label formats.
Legitronic User Manual (v3.40)
93
7.Serial Number Tracking Support
Configuring Legi for Serial Number Tracking
Tracking serial numbers are stored in a ODBC compliant database.
Follow these steps to configure Legi to work with the Tracking Serial
Number database:
1.
Select Configuration from the Legi Options menu.
The Configuration dialog box opens.
2. Click the System Tables tab.
3. Select Tracking Serial Number from the Table Type drop-down list.
4. Select the appropriate ODBC Data Source and Table Name.
5. Click OK.
Legitronic User Manual (v3.4)
94
7.Serial Number Tracking Support
Maintaining the Tracking Serial Numbers Table
The Tracking Serial Numbers table is a database table that Legi
accesses through ODBC. For all existing serial number names, the
table lists the serial number that will be used next.
Using the parent database program, you can add new tracking serial
numbers and change the next number to be used for existing tracking
serial numbers.
Note: When you change a serial number name in the Serial Numbers
Tracking table, you must also change its name in all label formats that
use it as a tracking serial number field.
Legitronic User Manual (v3.4)
95
7.Serial Number Tracking Support
Using Tracking Serial Numbers in Label Formats
Follow these steps to use tracking serial numbers in label formats:
1.
Right-click a field on the label.
2.
Select Serial.
The Field Properties dialog box opens with the Serial Numbers tab
activated.
Legitronic User Manual (v3.4)
96
7.Serial Number Tracking Support
3. In the Serial Number section, click Tracking.
4. From the Tracking Serial Number Name drop-down list, select the
appropriate serial number (defined in Legi Configuration).
5. If necessary, use the Increment spin box to change the serial number
increment after each label.
6. Click OK.
Legitronic User Manual (v3.4)
97
8. Audit Support
Legi’s Audit Support module provides three audit options. Each option
can be enabled or disabled through the Configuration module to track
printing information in an ODBC-connected database table. The audit
options are:
Label stock tracks the stock levels of selected label stock. You can
add label stock names to this table and update quantities, as necessary.
System print log keeps track of all print jobs. For each print job
submitted, Legi captures the print run information.
Label print logs are user-defined ODBC-connected tables that
maintain print job information for selected labels. For example, a
label print log might include the stock name, label name, date and
time the label was printed, and label field data.
This chapter explains how to:
Activate audit support.
Use the label stock log.
Use the system print log.
Create a label print log.
Legitronic User Manual (v3.40)
98
8. Audit Support
Activating Audit Support
Follow these steps to activate audit support:
1. Select Options
in the tool bar.
Configuration…
from the menu bar or click
The Configuration dialog box opens.
2. Click the System Tables tab.
3. From the Table Type drop-down list, select the appropriate audit
option.
4. From the Data Source drop-down list, select the appropriate audit
support table for the selected option.
5. Click OK.
Legitronic User Manual (v3.4)
99
8. Audit Support
Using the Label Stock Log
The label stock log is an ODBC-connected database table maintained by
Legi and displayed within the parent database application. For selected
label stock, Legi tracks the number of labels printed, the quantity in stock,
and when stock should be reordered. Legi updates this information in the
label stock log after successful completion of every print job (including
print jobs that print to a file). You can maintain the log by adding label
stock names and updating quantities as necessary.
Note: Legi does not update the label stock log unless the label stock log
option is activated in the Configuration dialog box. (Refer to “Activating
Audit Options” on page 99).
To use the label stock log, create a table containing the following fields.
Field Name
Description
Stock Name
Label stock name. All stock names in this column
appear as label stock selections elsewhere in Legi.
(You can add stock names, but Legi does not update
this field.)
Start Date
State date – this can be the date that the stock was
received or ordered or some other date. (Legi does
not update this field.)
Labels Printed
Total number of labels printed on this label stock to
date.
Current Qty
Quantity currently in stock. (Legi updates this field
when the Reorder Quantity is not 0.)
Reorder Qty
The stock level for reordering label stock – for
example, if the Reorder Qty is 50, label stock is
reordered when the Current Qty falls to 50 or
below.
Note: If you don’t want to track the Reorder Qty for
a label stock, type 0 in this field.
Legitronic User Manual (v3.4)
100
8. Audit Support
Field Name
Description
Reorder Now
An asterisk (*) indicates that label stock should be
reordered (when Current Qty is less than or equal to
Reorder Qty).
Note: When Notify low stock at print time is
selected in the Options dialog box, Legi checks the
Reorder Now field when this label stock is selected.
When an asterisk is found, Legi displays the
message:
Stock reorder quantity reached! Continue?
Click OK to continue the print job.
Comments
Comments about the label stock, such as the type of
print job it is used for.
Using the System Print Log
The system print log keeps track of print run information for all print
jobs. The log is a database table maintained by Legi and displayed within
the parent database application.
Note: Legi does not update the system print log unless the system print
log option is activated in the Configuration dialog box. (Refer to
“Activating Audit Options” on page 99).
To use the system print log, create a table containing the following fields.
Field Name
Legitronic User Manual (v3.4)
Description
Stock Name
If label stock was selected for the printed job,
the name of the stock.
Label Name
Name of the label used in the print job, if any.
Date Time
Dateand time the print job was submitted.
User Name
Name of the user who submitted the print job.
Total Labels
Total number of labels printed in the label run.
101
8. Audit Support
Field Name
Job Aborted
Description
An asterisk (*) identifies aborted print jobs.
Note: When a print job aborts, the value of the
Total Labels field may not be accurate.
Creating a Label Print Log
Label print logs are user defined database tables that maintain print job
information for selected labels. A label print log may contain such
information as the stock name, label name, date and time of last printing,
and names of specific label fields. When a label includes a query and the
label print log contains the name of the query field, the log lists all of the
corresponding records printed in the label print run.
Note: Legi does not update the label print log unless the label print log
option is activated in the Configuration dialog box. (Refer to “Activating
Audit Options” on page 99).
Follow these steps to create a label print log:
1. Create the label print log table based on the fields in the label format.
2. Create or display the appropriate label format.
Legitronic User Manual (v3.4)
102
8. Audit Support
3. In the Print Log section of the Label Properties dialog box, type the
name of the label print log table in the Table Name field.
4. When creating a new label format, give descriptive names to the
fields you want to identify in the label print log.
5. The following reserved field names may be used to log additional
information about the label print job.
Field Name
Description
Stock Name
If label stock was selected for the printed job,
the name of the stock.
Label Name
Name of the label used in the print job, if any.
Date Time
Dateand time the print job was submitted.
User Name
Name of the user who submitted the print job.
Total Labels
Total number of labels printed in the label run.
Chapter 4, “Designing Labels,” provides detailed instructions for creating
label formats and fields.
Legitronic User Manual (v3.4)
103
9. Configuration
This chapter provides the detailed information you need to configure
Legi. Configuration settings are organized into four categories:
Options – information to be tracked in system tables, the unit of
measure used to create new labels, and Application Designer
information.
File Locations – fully qualified pathname for the directory that stores
each type of file (labels, graphics, configuration, and print control).
Remote Input – the port assigned to each remote source of supplied
input.
System Tables – the ODBC data source and table name for each type
of system table (System Print Log, Label Stock Log, and Tracking
Serial Numbers).
Configuration settings are stored in two locations – in the local registry
file for the current user and in LegiConfiguration.dat, the configuration
file stored on a local or network drive. Both the local registry and
configuration files are required because some settings are specific to each
Legi workstation, while others must be globally accessible to all users
running Legi on a network.
Your Legi configuration is established and maintained using the
Configuration dialog box, which contains a tabbed display for each of the
configuration categories listed above. When you click OK, Legi saves the
configuration settings to the appropriate file – local registry file,
configuration file, or both.
Legitronic User Manual (v3.40)
104
9. Configuration
Configuration Procedure
Follow these steps to configure Legi:
1. Select Options
Configuration… from the menu bar.
The Configuration dialog box opens.
2. On each relevant tab of the Configuration dialog box, make new
selections or modify existing selections, as necessary. (The selections
on each tab are described in the following sections.)
3. When you have completed your configuration selections, click OK.
Your selections are saved to the appropriate files — local registry file,
configuration file, or both.
Legitronic User Manual (v3.4)
105
9. Configuration
Options
Specification
Description
System Tables
Update label stock
When checked, the number of labels printed is
tracked in the label stock table.
Notify low stock at print
time
When checked, the user is alerted (at print
time) when the number of labels in stock fall
below a certain level.
Update system print log
When checked, the labels printed, user name,
and other information is tracked in the system
print log.
Update label print logs
When checked, the (user-specified) print log
identified in the label is updated.
Unit of Measure – unit to be used for entering and displaying measurements
when creating a new label: Inches, Centimeters, Points, or Dots.
Application Designer
Run Application Designer
from Print Labels
When checked, Application Designer runs
instead of the standard Legi Print session.
Application Designer
filename
Name of the batch file to be used for
Application Designer.
Use default printer at print
time if driver does not exist.
Legitronic User Manual (v3.4)
106
9. Configuration
File Locations
Specification
Legitronic User Manual (v3.4)
Description
File Types
File types – such as graphic, label format, or
configuration.
Location
Directory in which each file type is located
(fully qualified path). To change the location
for a file type, highlight the current location
and click Change…
107
9. Configuration
Changing a File Location
Follow these steps to change the location for a file type.
1. Select the file type and location you want to change.
2. Click Change… to open the Select Directory dialog box.
3. Locate and click the directory to be used for the selected file type.
The pathname for that directory is displayed at the bottom of the
dialog box in the Current Directory field.
4. When the appropriate pathname is displayed, click Select.
The new pathname is displayed on the File Locations tab of the
Configuration dialog box.
Note: The example above shows the pathname using mapped drive
letters. Legi also supports the use of the Universal Naming Convention
(UNC) – for example: \\Enterprise\Shipping\Labels
Legitronic User Manual (v3.4)
108
9. Configuration
Remote Input
Specification
Description
Remote Source
List of remote sources for supplied input.
Available ports
List of available serial port IDs that can be
assigned to a remote source.
Assigning a Port to a Remote Source
Follow these steps to assign an available port to a remote source:
1. Select the remote source.
2. Select the appropriate available port.
3. Click <<Assign.
The port ID is removed from the Available Ports list and added to the
Remote Source list – for example, Source 1 from COM1.
Legitronic User Manual (v3.4)
109
9. Configuration
Removing a Port Assignment
Follow these steps to remove a port assignment:
1. In the Remote Source list, select the remote source and its assigned
port.
2. Click Remove>>.
The port ID moves from the Remote Source list to the Available Ports
list.
Setting Communication Port Parameters
Parameters associated with communication ports are set using standard
Windows® facilities, accessed by clicking Settings on the Remote Input
tab of the Configuration dialog box.
Legitronic User Manual (v3.4)
110
9. Configuration
System Tables
Specification
Table Type
Description
Type of system table whose ODBC data source
is specified below – System Print Log, Label
Stock Log, or Tracking Serial Number Log.
Settings
Legitronic User Manual (v3.4)
User Name
User name (supplied by user).
User Password
User password (supplied by user).
Data Source
OBDC data source for the table type identified
above.
Table Name
Name of appropriate table in the data source.
111
10. Security Administration:
Legitronic Secure Series Labeling
Software
Legitronic Secure Series Software is designed to help meet the
requirements for FDA 21 CFR Part 11 rules regarding electronic
records and electronic signatures.
System access – access to Legi can be controlled with user names
and passwords. Security Administrator allows you to maintain
current user names and passwords and to assign each user to a user
group.
Function rights – Security Administrator allows you to identify
the Legi functions each group is allowed to perform.
Application Login
The Weber Legitronic logo has been updated in this version, but the
login screen has not changed from previous versions.
Legitronic User Manual (v3.40)
113
10. User and Administrator Reference (FDA 21 CFR Part 11)
Main Screen
After successfully logging in, you see the main Legi Security
Administrator screen.
Function Rights Features
New Function Rights include:
Archive
Meaning Level
Legitronic User Manual (v3.4)
114
10. User and Administrator Reference (FDA 21 CFR Part 11)
Archive
Selecting the Archive function allows you to save files to the Archive.
Some users can create labels, but a manager must approve them before
they can be put in the archives. In general, if a user is printing for
production, he or she will be printing from a file in the archives. A
user may have an authorship meaning level but may also be able to
archive if the client wants it set up that way.
Meaning Level
Click the browse button next to the Meaning Level option to display
the following dialog.
Use this dialog to set the highest allowed meaning level for the
selected group of users. Meaning levels are arranged from lowest to
highest (Authorship to Responsibility). A user is allowed to assign to
a label any meaning level at or below the level that you set for the user
(e.g., if you set the user level at Approval, the user can assign a label a
meaning level of Approval, Review, and Authorship).
Legitronic User Manual (v3.4)
115
10. User and Administrator Reference (FDA 21 CFR Part 11)
System Settings Features
The System Settings section is also new, allowing you to set several
new global values that affect Legitronic:
System timeout: the number of minutes that elapse before the
Legitronic user is prompted to reenter his password. A value of 0
means the system will not time out.
Password expiration: the number of days that elapse before each
Legitronic user must enter a new password. A value of 0 means user
passwords will not expire.
Audit data retention: the number of days that audit trail records and/or
archived label files are kept. A value of 0 means all records will be
kept.
Purge Audit Trail button: Clicking deletes audit trail records older than
the audit data retention period.
Purge Archive Files button: Clicking deletes archived label files older
than the audit data retention period, but never deletes latest version of
an archived label file.
Legitronic User Manual (v3.4)
116
10. User and Administrator Reference (FDA 21 CFR Part 11)
Additional New Features
You can still use the Add and Modify buttons to enter user
information, but now there are more fields (and more required fields).
Adding a User
Several new fields have been added to user name and password in the
Add User window.
Text Name is a new required field that acts as the user’s electronic
signature within the audit trail.
NOTE: If you attempt to create a new user without entering
information in the required Text Name field, the following message
appears:
Legitronic User Manual (v3.4)
117
10. User and Administrator Reference (FDA 21 CFR Part 11)
Description is a new optional field which can be used for information
such as job title, SSN, etc.
Username Enabled is a new Boolean field that defaults to checked
(true); setting this field to false (unchecking it) disables the user’s
access to the Legitronic.
Modifying a User
Because of the newly added user fields, you can modify more user
information than just the password. By default, the screen appears as
follows and minimally requires a password change.
Legitronic User Manual (v3.4)
118
10. User and Administrator Reference (FDA 21 CFR Part 11)
The date this user’s password was last changed is also displayed as a
read-only field.
If you need to change information such as the Text Name or
Description fields, uncheck the Change Password checkbox. When
you do this, you won’t need to--nor be able to--change the password at
that time.
Disable
The Delete button has been renamed Disable. When you work with
users, 21CFR11 does not allow you to delete user records. Because
you want an audit trail of actions and who performed them, by
pressing Disable, you disable the currently highlighted user. User
information remains in the database, but that user is not allowed access
to Legitronic.
Legitronic User Manual (v3.4)
119
10. User and Administrator Reference (FDA 21 CFR Part 11)
Set up Audit Trail Database Info
Because the client can set up the audit trail table (and the database
containing it), you can set up connection information by clicking the
Audit Database button. The following window appears:
Here are the settings for the fields:
User Name: username for access to the database. This often defaults
to “admin.”
User Password: password for access to the database. For full
21CFR11 compliance, the database must be password protected.
Data Source: a system DSN name that is used to access the database
containing the audit trail table. The data source can be on the local
machine or on a network.
Table Name: the name of the database table where the audit trail
records are stored. The default name is Audit.
Legitronic User Manual (v3.4)
120
10. User and Administrator Reference (FDA 21 CFR Part 11)
Audit Trail Viewer Dialog
Click the View Audit Trail button to display the following screen.
This screen can display all records currently contained in the audit trail
table or some filtered subset of that data. Here are the filters:
Show All Records: shows both application and security records (this is
the default). You can filter these by User ID and/or Date Range.
Show Application Records: shows only application records (what you
have added, deleted, and edited). You can filter these by any
combination of Label ID (e.g., within the application, what has been
done with Label 1), User ID, and Date Range.
Show Security Records: shows only security records (successful and
failed login results). You can filter these by any combination of Login
Status (success or failure), User ID, and Date Range.
Legitronic User Manual (v3.4)
121
10. User and Administrator Reference (FDA 21 CFR Part 11)
To filter data, select the desired filter(s) and click Refresh. Every time
you change filtering criteria, click Refresh (clicking Enter does the
same thing).
Click Export Displayed Data to export any currently displayed records
(whether all audit trail records or some filtered subset) to a tabdelimited text file. The user must be able to display data or to print it,
but not do both. A print option is provided without formatting
constraints. The user can save the data in an Excel spreadsheet,
format, sort, and print it: the information is available electronically, in
conformance to the regulation.
A File Save As prompt appears, as shown below.
Click Save to export all records currently displayed on the Audit Trail
Viewer screen to the selected file and path.
If you click Cancel, the following window appears:
Legitronic User Manual (v3.4)
122
10. User and Administrator Reference (FDA 21 CFR Part 11)
You can:
Click OK to export the selected data to file C:\AuditTrail.txt.
Click Cancel to not do the export.
After you have viewed the audit trail records, click Exit; you return to
the Security Administrator screen.
Legitronic User Manual (v3.4)
123
10. User and Administrator Reference (FDA 21 CFR Part 11)
Legitronic User Reference for 21 CFR Part 11
Application Login
The Weber Legitronic logo has been updated in this version, but the
login screen has not changed from previous versions.
Password Expiration
One of the changes for 21CFR11 compliance is the expiration of
passwords. This forces you to periodically change your password.
During the week before your password expires, the following prompts
appear:
Legitronic User Manual (v3.4)
124
10. User and Administrator Reference (FDA 21 CFR Part 11)
During this period, you can decide to change your password through
the Legi Security Administrator (with the administrator’s help). If
your password was created before the time period set in the System
Settings of the Legi Security Administrator screen, and your password
expires, the following prompt appears:
Click OK and the following dialog appears.
You can enter a new password. For security purposes, be sure to enter
the expired password. The user table keeps track of the last nine (9)
passwords entered. Any new password is not allowed to match any of
these recent passwords. This means that the you must cycle through at
least 10 different passwords. Once you enter a new, valid password,
that password change date is also updated in the security database as
the current change date.
Legitronic User Manual (v3.4)
125
10. User and Administrator Reference (FDA 21 CFR Part 11)
If you leave the Old Password field empty, the following prompt
appears:
If you leave the New Password field empty or type more than the
maximum number of allowed characters, the following prompt
appears:
If you leave the Confirm New Password field empty, the following
prompt appears:
If the Confirm New Password field does not match the contents of the
New Password field, the following prompt appears:
Legitronic User Manual (v3.4)
126
10. User and Administrator Reference (FDA 21 CFR Part 11)
If you enter a new password that is found in your list of recent
passwords, the following prompt appears (and you must select a
different password):
Periodic Relogin
If the System Timeout value was set to any number other than 0 in the
Security Administrator application, you will be prompted periodically
to reenter your password (e.g., every 30 minutes if the set value is 30),
as shown below.
Legitronic User Manual (v3.4)
127
10. User and Administrator Reference (FDA 21 CFR Part 11)
If you are the current user, type the correct password, click OK and
continue working with Legitronic.
If you click New User, a regular login screen (shown below) appears.
In this case, you must type both a username and a password. If any
changes were left pending from the last user, you have the option of
either saving the previous user’s changes or canceling them.
If you clicked Exit Legi from the relogin screen, the following prompt
appears:
Click Yes to end Legitronic and be prompted whether you want to
save any changes left pending by the last logged in user. Click No to
return to the relogin screen.
Legitronic User Manual (v3.4)
128
10. User and Administrator Reference (FDA 21 CFR Part 11)
Label Archiving
Using the new 21CFR11 functionality, you can store versions of a
label file in an archive. New File options related to this feature have
been added under Open Archive Label for Design, as shown below.
View Version allows you to view and do test prints of any version of
any archived label (all archived labels are tracked within the security
database). To deter modifications, the archived labels are stored with
the read-only attribute set.
If you wish to make changes to a label, you should use the Edit Last
Version menu option. This creates a “work file” copy of the latest
version of the selected label that can be modified. If you make
changes to the work file, but decide to “undo” all changes within that
work file, select Edit Last Version to fetch a new copy of the last
archived version. This copy replaces the previous work file and its
changes.
Legitronic User Manual (v3.4)
129
10. User and Administrator Reference (FDA 21 CFR Part 11)
Select the new File – Archive option to save a modified work file to
the archive (or to save a newly created file to an archive). The label
file is saved to a subdirectory of its current directory as a read-only
file; the new filename includes a hash value for change detection and a
file archive version number.
When you choose the View Version menu option to open an existing
archive for viewing, the following prompt, which lists all existing
archive files, appears:
Click the Show Full Paths button to toggle between showing the full
archive file path or just the archive file as shown in the following
dialog.
Legitronic User Manual (v3.4)
130
10. User and Administrator Reference (FDA 21 CFR Part 11)
Note: When you choose the Edit Last Version menu option to open an
existing archive for editing, the Select Archive dialog only shows
latest version of each archived file.
If you choose to edit a label for which a work file already exists, the
following prompt appears.
Select Yes to overwrite the previous work file with a fresh copy of the
last archived version of the selected label. This selection also throws
out related audit trail actions. Select No to open the existing work file.
The following prompt is displayed when you open an archived version
of a label file either to view or to edit it and the hash value calculated
from file information does not match the hash value within the
filename—which indicates modification outside Legitronic:
You can view or edit the file normally.
Suppose you choose to archive a brand new label file or a work file.
The file is first saved and closed. Then it is copied to the appropriate
archive subdirectory as a read-only file with this filename and path:
<old path>\<old file title>\<old file title>_<hash>.<version>
Legitronic User Manual (v3.4)
131
10. User and Administrator Reference (FDA 21 CFR Part 11)
For example, the first archived version of file “C:\Labels\MyLabel.lbl”
would be saved to a filename and path such as
“C:\Labels\MyLabel\MyLabel_D4AIKKHF.001”.
Once the file has been successfully archived, the following prompt
appears:
Legitronic User Manual (v3.4)
132
10. User and Administrator Reference (FDA 21 CFR Part 11)
Setting Label Mode (Meaning Level)
One of the new properties added to the label document is the Label
Mode. During initial creation, you should set the mode to Authorship.
After reviews, you should progressively set the mode through Review
and Approve (and perhaps also Responsibility). Authorship is
considered the lowest mode and Responsibility the highest.
You can set any mode at or below your permission level. In the
following screen, if you had Authorship permissions you could only
set the Author mode. If you had Responsibility permissions, you
could set any of the levels of label mode.
Legitronic does not require you to set the label mode. It offers this
setting for client use. You can change Label Mode on only a new
label file or a work file. You cannot edit a read-only archived version
of a label file.
Legitronic User Manual (v3.4)
133
10. User and Administrator Reference (FDA 21 CFR Part 11)
Changes to Automation Interface
While running in 21 CFR Part 11 compliance mode, client applications
will need to set the username and password before they call other
Legitronic automation methods.
To set the username and password for automation calls, use this
method:
SetUserNamePassword(strName, strPassword)
The following methods check to ensure that username and password
have been set with valid entries:
LoadLabel(strLBLFile)
PrintLabel( )
SetPrinterName(strPrinter)
SetSuppliedData(strFieldName, strData)
Until SetUserNamePassword( ) is called during a Legi automation
session, calls to the other methods listed above will fail and return the
error code:
AutFailureNoValidUser = (AutFailureOther + 1)
Legitronic User Manual (v3.4)
134
11.
Visual Basic for Applications
Introduction
Legitronic Label Printing Software provides functionality for label
printing in a feature-rich MS-Windows desktop application. The user
interface provides ease-of-use while following current MS-Windows
user interface conventions. However, clients often design solutions for
label printing that require a custom user interface or custom feature not
available in Legi.
Legi 3.2.0 provides two automated printing solutions for these
scenarios called Application Designer and Batch Print Control. While
fully functional, both methods are antiquated by current development
standards and have limitations that prevent their use in many solutions
for label printing.
Legi 3.3.0 is a VBA-enabled (Visual Basic for Applications)
application that can be tailored to fit specific labeling needs, using the
industry-standard Visual Basic development environment. The vast
amount of resources available for Visual Basic can be used to design,
develop, and deploy customized label printing applications.
Legitronic User Manual (v3.40)
135
Visual Basic for Applications
Visual Basic for Applications
Microsoft Visual Basic® for Applications (VBA) is a development
technology for rapidly customizing desktop applications, like Legi,
and integrating them with existing data and systems. VBA offers an
extensive set of programming tools based on the Microsoft Visual
Basic development system.
Visual Basic for Applications provides an integrated development
environment (IDE) that features the same development facilities as
Visual Basic, including a Project Window, a Properties Window, and
debugging tools. VBA also includes support for visually creating
custom forms and dialog boxes to build custom user interfaces.
Integrated directly into Legi, VBA offers performance and usability
improvements over Application designer and Batch Print Control.
Integration of the software components for label printing and user
interface handling offers the fastest processing. Clients access to the
VBA development environment directly from Legi allows them to
purchase and install one software product they can use to create,
maintain, and implement a custom label printing solution.
Automation Server
Legi 3.3.0 implements a Microsoft OLE Automation Server based on
Microsoft's Component Object Model (COM) architecture. Through
Automation, Legi for Windows exposes some common internal
functions through COM objects. Software applications can invoke
tasks for label printing, which are normally selected interactively from
the Legi user interface.
Legi 3.3.0 uses a dual-interface in its OLE Automation Server
implementation. One method is best suited for Microsoft Visual Basic
and other clients that support Microsoft ActiveX automation. The
other method is best suited for higher performance clients like
Microsoft Visual C++ and non-Microsoft clients that support COM
technology.
Customers can design and implement their own label printing
solutions, using Legi for label creation, maintenance, and printing
tasks. This allows customers to focus on their own user interface and
data resolution rule sets. In addition, existing software systems can
implement functionality for label printing by modifying those systems
to access Legi’s printing functions.
Legitronic User Manual (v3.4)
136
Visual Basic for Applications
Visual Basic for Applications (VBA)
Legi 3.3.0 includes a VBA integrated development environment (IDE)
accessed from the menu bar by clicking Tools Run Legi VBA. Refer
to the IDE help system for usage information.
Type Library
Legi 3.3.0 includes a Type Library file (Legi32.tlb) that contains
information on all implemented objects, methods and properties. The
client software of choice, including VBA, requires access to the Type
Library file.
To install the Type Library in the VBA IDE:
Click Edit References
Check the Weber Marking Systems Legi Type Library in the list of
references,
Then click OK.
To display objects and methods:
Click Debug Browse
In the Library list, select Legi32.
Type Library Usage
When entering a code statement, enter a period (.) after an object name
to display a dialog containing all associated members and properties.
Enter a period (.) after a member name to display all properties.
Legitronic User Manual (v3.4)
137
Visual Basic for Applications
Object Creation
Legi 3.3.0 supports the following ways to create its objects.
Dim MyLabel as Object
Set MyLabel = CreateObject(“Legi32.label”)
This method follows ActiveX conventions and creates an object with a
late bind. A reference to the object is created during program
execution.
Dim MyLabel as Legi32.label
Set MyLabel = CreateObject(“Legi32.label”)
This method creates an object with an early bind. A reference to the
object is created during program compilation to increase performance.
Dim MyLabel as Object
Set MyLabel = New Legi32.label
This method requires clients to use the Type Library. It creates an
object with an early bind. A reference to the object is created during
program compilation to increase performance.
Event Handling
Legi 3.3.0 objects can notify client applications when predetermined
label printing events occur. For example, Legi 3.3.0 implements a
Notification object to notify a client when a label print request is sent
to the Windows print manager. This notification process is called
“firing an event.”
An object that fires an event is called an event source. Declare a
variable’s object using the WithEvents keyword.
Legitronic User Manual (v3.4)
138
Appendix A. Data Expressions
The Data Tab of the Field Properties dialog box provides a String
Builder for building data expressions. This appendix lists and explains
the String Builder functions used in data expressions. For more
information about data expressions, refer to “String Builder” in
Chapter 4.
Data Expression Functions
Data expression functions are the various commands used in String
Builder. These functions generally accept one or more parameters as
input and return a result. Functions can be combined by using the
result returned by one function as an input to another. For example,
abs(fld("quantity")) returns the absolute value of the number stored in
the quantity field on the label. If the value in the quantity field was 50, fld("quantity") would return a value of -50, which would be the
input parameter for the abs function. The function abs(-50) would
then return a value of 50.
Constant parameters like quantity are generally enclosed in quotes as
shown above. This ensures that characters like commas and math signs
are interpreted correctly by the function. For example, cat("Conner,
Inc. part #",fld("part number") combines the constant information
Conner, Inc. part # and the value held in the part number field into
one string. If Conner, Inc. part # were not enclosed in quotes, the
comma would be interpreted as part of the command and generate an
error.
Legitronic User Manual (v3.40)
139
Appendix A: Data Expressions
In an expression like:
format_time(value,format[,separator[,am[,pm]]])
the parameters that appear between the brackets [] are optional. If you
include them, do not type the brackets as part of the expression. They
only indicate that the parameters are not required in this particular data
expression function.
The operator precedence is:
Multiple, division, and modulo arithmetic (*, /, %).
Addition and subtraction (+, -).
Relational operations: equal to (=), greater than (>), less than (<), not
equal to (<>), equal to or less than (<=), and equal to or greater
than (>=).
abort()
Returns message at print time that the printing has been aborted. Use
in conjunction with computer repetition and if statement to
conditionally stop the print job.
Parameters: None.
See also:
if
abs(number)
Returns absolute value of number.
Parameters: Number.
Example: abs(-100)
Result: 100
See also:
precision
sgn
Legitronic User Manual (v3.4)
140
Appendix A: Data Expressions
asc(char)
Returns numeric equivalent of ASCII character.
Parameters: ASCII character
Note: If a character string is given for the parameter, only the first
character is used.
Example: asc("!")
Result: 33
See also:
chr
auto_identical(identical_count)
Equivalent to the Auto Identical check box on the Data Expression
dialog box. Prints number of identical labels specified. This number
can be overridden at print time.
Parameters: Number of identical labels.
Example: auto_identical(10)
Result: Ten identical labels.
See also:
auto_serial
auto_tracking_serial
get_identical_count
auto_serial(serial_count)
Equivalent to the Auto Serial check box on the Data Expression dialog
box. If a serial number is on the label, increments the serial number
the number of times specified. This number can be overridden at print
time.
Parameters: Number of times to increment the serial number.
Example: auto_serial(10)
Result: The serial number will increment ten times.
Legitronic User Manual (v3.4)
141
Appendix A: Data Expressions
See also:
auto_identical
auto_tracking_serial
get_serial_count
serial
auto_tracking_serial
Allows you to combine the auto serial and the serial number tracking
options on the Data Expression dialog box.
The tracking serial option creates a tracking serial number field based
on the parameters entered.
The auto serial option increments a serial number the number of times
specified.
See also:
auto_serial
tracking_serial
blank()
Returns a null character that has a length of zero.
Parameters: None.
Example: blank()
See also:
isblank
cat(string1,string2,...)
Concatenates strings.
Parameters: String 1, string 2, etc. (variable number of strings).
Example: cat("Weber ","Marking ","Systems")
Result: Weber Marking Systems
See also:
left
len
mid
pad_left
pad_right
right
Legitronic User Manual (v3.4)
142
Appendix A: Data Expressions
C128fncl()
Returns a Code 128 Function 1 character to a barcode.
checksum(type,string)
Generates a checksum of specified type for the given string.
Parameters: Type, string.
Type codes are:
1 HIBCC (Mod 43)
2 UCC (Mod 10)
Example: checksum(2,1234567890)
Result: 5
chr(ascii_code)
Returns the ASCII equivalent of a number.
Parameters: ASCII code.
Example: chr(33)
Result: !
See also:
asc
dll(library_name,
function_name,[string1,[string2,[string3,[string4,[string5]]]]])
This function allows calling into an external program called a DLL or
Dynamic Link Library. This is provided to allow customization of the
software and requires a custom DLL to be written by a programmer.
For proper use of this function contact Weber Marking Systems.
Example: dll("custdll.dll","Mod87","123422234");
Result: 1234222349
Note: This example would require that a DLL be written and be called
custdll.dll. It would need to have an entry point within it called Mod87
which accepts a single string parameter.
Legitronic User Manual (v3.4)
143
Appendix A: Data Expressions
false()
Synonymous with 0. True is synonymous with non-zero values.
Parameters: None.
See also:
if
true
first_label()
Indicates whether a label is the first label in the print job. Returns 1 if
the label is the first label in the print job. Returns 0 if not the first
label.
Parameters: None.
See also:
last_label
fld(fld_name)
Returns the value of a specified field in the label format.
Parameters: Label field name.
Example: fld("Product number")
Result: The data in the label field named Product number.
format_date(date_value,format[,separator])
Returns a date value in the format specified. A date value is a number
that Legi uses to store dates internally (the number of days passed
since a certain date).
Parameters: Date value, date format code, and the separator desired
(optional). The default separator is /.
Date format codes are:
1 MM/DD/YY
5 DD/MMM/YY
2 DD/MM/YY
6 DD/MM/YYYY
3 YY/MM/DD
7 MM/DD/YYYY
4 YYDDD
8 YYYY/MM/DD
Example: format_date(get_current_date(),1,"/")
Result: 06/11/99
Legitronic User Manual (v3.4)
144
Appendix A: Data Expressions
See also
format_time
get_current_date
get_date_value
get_day
get_day_of_week
get_job_start_date
get_job_submit_date
get_julian_day
get_month
get_week_of_year
get_year
format_time(value,format[,separator[,am[,pm]]])
Returns a time value in the format specified.
Parameters: Time value, time format code, separator (optional), am
(optional) and pm (optional). The default separator is : and the default
for am is a and for pm is p.
Time format code:
1 12-hour clock
2 24-hour clock
Example: format_time(get_current_time(),1,":","am","pm")
Result: 12:01:00pm
See also:
format_date
get_current_time
get_hour
get_job_start_time
get_job_submit_time
get_minute
get_second
get_time_value
isam
ispm
Legitronic User Manual (v3.4)
145
Appendix A: Data Expressions
get_current_date()
Returns the current date in numeric format. Use this option with
format_date to produce a readable date.
Parameters: None.
Example: format_date(get_current_date(),1,"/")
Result: The current system date formatted in MM/DD/YY format. For
example, on January 15, 1996, the result would be 01/15/96.
See also
format_date
get_current_time
get_date_value
get_day
get_day_of_week
get_job_start_date
get_job_submit_date
get_julian_day
get_month
get_week_of_year
get_year
get_current_label_in_run()
Returns the number of unique labels that have printed.
Parameters: None.
get_current_time()
Returns the current system time in numeric format. Use this option
with format_time to produce a readable time.
Parameters: None.
Example: get_current_time()
Result: 43260
Legitronic User Manual (v3.4)
146
Appendix A: Data Expressions
See also:
format_time
get_current_date
get_hour
get_job_start_time
get_job_submit_time
get_minute
get_second
get_time_value
isam
ispm
get_date_value(month,day,year)
Returns the internal date value for a specified date. A date value is a
number that Legi uses to store dates internally (the number of days
passed since a certain date).
Parameters: Month, day, and year.
Example: get_date_value(06,11,99)
See also:
format_date
get_current_date
get_day
get_day_of_week
get_job_start_date
get_job_submit_date
get_julian_day
get_month
get_time_value
get_week_of_year
get_year
Legitronic User Manual (v3.4)
147
Appendix A: Data Expressions
get_day(date_value)
Returns the day of the month for an internal date value. A date value
is a number that Legi uses to store dates internally (the number of days
passed since a certain date).
Parameters: Date value.
Example: get_day(get_current_date())
Result: 911
Note: The current date is June 11, 1999.
See also:
format_date
get_current_date
get_date_value
get_day_of_week
get_job_start_date
get_job_submit_date
get_julian_day
get_month
get_week_of_year
get_year
get_day_of_week(date_value)
Returns a day of week number between 1 and 7 (1 is Sunday, 7 is
Saturday) based on the date value entered. A date value is a number
that Legi uses to store dates internally.
Parameters: Date value.
Example: get_day_of_week(get_current_date())
Result: 6
Note: The current date is Friday, June 11, 1999.
Legitronic User Manual (v3.4)
148
Appendix A: Data Expressions
See also:
format_date
get_current_date
get_date_value
get_day
get_job_start_date
get_job_submit_date
get_julian_day
get_month
get_week_of_year
get_year
get_day_of_week_iso(value)
This function returns the day of the week based on the algorithm
outlined in ISO 8601.
Day number one of any week is Monday, and day number seven is
Sunday.
Please note: This function is not compatible with Legi 220. For
compatibility with Legi 220, use the function get_day_of_week().
get_hour(time_value)
Returns the hour of the day between 0 and 23 for a specified internal
time value.
Parameters: Time value.
Example: get_hour(get_current_time())
Result: 12
Note: The current time is 12:01 pm.
See also:
format_time
get_current_time
get_job_start_time
get_job_submit_time
get_minute
get_second
get_time_value
isam
ispm
Legitronic User Manual (v3.4)
149
Appendix A: Data Expressions
get_identical_count()
Returns the current settings for the number of identical labels executed
at print time. This function cannot be used in conjunction with
auto_identical.
Parameters: None.
See also:
auto_identical
get_serial_count
get_query_count
get_job_start_date()
Returns the date value for the job start date. This function can be used
in conjunction with format_date to make the date value human
readable. The job start date or time is the time that the print job
actually began printing. The job submit date or time is the time when
the print job was submitted to the print manager.
Parameters: None.
See also:
format_date
get_current_date
get_date_value
get_day
get_day_of_week
get_job_start_time
get_job_submit_date
get_julian_day
get_month
get_week_of_year
get_year
Legitronic User Manual (v3.4)
150
Appendix A: Data Expressions
get_job_start_time()
Returns the time value for the job start time. This function can be used
in conjunction with format_time to make the time value human
readable. The job start date or time is the time that the print job
actually began printing. The job submit date or time is the time when
the print job was submitted to the print manager.
Parameters: None.
See also:
format_time
get_current_time
get_hour
get_job_start_date
get_job_submit_time
get_minute
get_second
get_time_value
isam
ispm
get_job_submit_date()
Returns the date value for the job submit date. This function can be
used in conjunction with format_date to make the date value human
readable. The job start date or time is the time that the print job
actually began printing. The job submit date or time is the time when
the print job was submitted to the print manager.
Parameters: None.
See also:
format_date
get_current_date
get_date_value
get_day
get_day_of_week
get_job_start_date
get_job_submit_time
get_julian_day
get_month
get_week_of_year
get_year
Legitronic User Manual (v3.4)
151
Appendix A: Data Expressions
get_job_submit_time()
Returns the time value for the job submit time. This function can be
used in conjunction with format_time to make the time value human
readable. The job submit time is the time the job was submitted to
print manager, not the time it printed. The job start date or time is the
time that the print job actually began printing. The job submit date or
time is the time when the print job was submitted to the print manager.
Parameters: None.
See also:
format_time
get_current_time
get_hour
get_job_start_time
get_job_submit_date
get_minute
get_second
get_time_value
isam
ispm
get_julian_day(date_value)
Returns the julian calendar day value. The julian calendar day is the
number of days since January 1 of the current year.
Parameters: Date value.
Example: get_julian_day(get_current_date())
Result: 162
Note: The current date is June 11, 1999.
Legitronic User Manual (v3.4)
152
Appendix A: Data Expressions
See also:
format_date
get_current_date
get_date_value
get_day
get_day_of_week
get_job_start_date
get_job_submit_date
get_month
get_week_of_year
get_year
get_label_name()
Returns the file name for the label format.
Parameters: None.
See also:
get_label_stock
get_user_name
label_version
get_label_stock()
Returns the name of the label stock selected for the label format.
Parameters: None.
See also:
get_label_name
get_user_name
label_version
get_minute(time_value)
Returns the minute for a specified internal time value.
Parameters: Time value.
Example: get_minute(get_current_time())
Result: 1
Note: The current time is 12:01 pm.
See also:
format_time
get_current_time
Legitronic User Manual (v3.4)
153
Appendix A: Data Expressions
get_hour
get_job_start_time
get_job_submit_time
get_second
get_time_value
isam
ispm
get_month(date_value)
Returns the month number for a specified internal date value
Parameters: Date value.
Example: get_month(get_current_date())
Result: 6
Note: The current date is June 11, 1999.
See also:
format_date
get_current_date
get_date_value
get_day
get_day_of_week
get_job_start_date
get_job_submit_date
get_julian_day
get_week_of_year
get_year
Legitronic User Manual (v3.4)
154
Appendix A: Data Expressions
get_query_count()
Returns the number of records found during a queried label print run.
Parameters: None.
See also:
get_identical_count
get_query_rec
get_serial_count
get_query_rec()
Returns the number of the current record being printed during a
queried label print run. This value will be between 1 and the values
returned by get_query_count.
Parameters: None.
See also:
get_query_count
get_second(time_value)
Returns the number of seconds for a specified time value. A time
value is the number of seconds passed since midnight for a specified
time.
Parameters: Time value.
Example: get_second(get_current_time())
Result: 10
Note: The current time is 12:01:10 pm.
Legitronic User Manual (v3.4)
155
Appendix A: Data Expressions
See also:
format_time
get_current_time
get_hour
get_job_start_time
get_job_submit_time
get_minute
get_time_value
isam
ispm
get_serial_count()
Returns the current setting for the number of times the serial number
will increment during a serial run. This function cannot be used in
conjunction with auto_serial.
Parameters: None.
See also:
auto_serial
get_identical_count
get_query_count
serial
get_time_value(hour,min,sec)
Returns the internal time value for a specified time.
Parameters: Hour, minute, second.
Example: get_time_value(12,01,00)
See also:
format_time
get_current_time
get_date_value
get_hour
get_job_start_time
get_job_submit_time
get_minute
get_second
isam
ispm
Legitronic User Manual (v3.4)
156
Appendix A: Data Expressions
get_user_name()
Returns the current user name logged into the system.
Parameters: None.
See also:
get_label_name
get_label_stock
label_version
get_week_of_year(value)
Returns the number of the current week in the year. Note that the first
day of the year starts week 1.
The function now returns the correct week of year number with a week
defined as Sunday through Saturday. The year 2000 has 54 weeks per
standard week calculation techniques; therefore, year 2000 has 54
weeks as follows.
Week
1
2
3
.
.
53
54
Date
Jan. 1
Jan. 2-8
Jan. 9-15
Day
Saturday
Sunday - Saturday
Sunday - Saturday
Dec. 24-30
Dec. 31
Sunday - Saturday
Sunday
Parameters: Date value.
Example: get_week_of_year(get_current_date())
Result: 24
Note: The current date is June 11, 1999.
See also:
format_date
get_current_date
get_date_value
get_day
get_day_of_week
get_job_start_date
get_job_submit_date
get_julian_day
get_month
get_year
Legitronic User Manual (v3.4)
157
Appendix A: Data Expressions
get_week_of_year_iso(value)
This function returns the year number based on the algorithm outlined
in ISO 8601. Week number one of any year is defined as the first
week of the year where the majority of its days (four or more) are in
that year. Also, weeks are defined as starting on Monday.
Please note: This function is not compatible with Legi 220. For
compatibility with Legi 220, use the function get_week_of_year().
The year 2000 breaks down as follows.
Week
52 of 1999
52 of 1999
1
2
.
.
51
52
Date
Jan. 1
Jan. 2
Jan. 3 – 9
Jan. 10 –16
Day
Saturday
Sunday
Monday – Sunday
Monday – Sunday
Dec. 18-24
Dec. 25 – 31
Monday – Sunday
Monday – Sunday
get_year(date_value)
Returns the year for a specified internal date value
Parameters: Date value.
Example: get_year(get_current_date())
Result: 1993
Note: The current date is June 11, 1999.
See also:
format_date
get_current_date
get_date_value
get_day
get_day_of_week
get_job_start_date
get_job_submit_date
get_julian_day
get_month
get_week_of_year
Legitronic User Manual (v3.4)
158
Appendix A: Data Expressions
if(test_value,true_value,false_value)
Returns a value based on the test value entered. True is not equal to
zero, and false is equal to zero.
Parameters: Test value, value if true, value if false.
Example: if(2<1,"TRUE!","FALSE!")
Result: FALSE!
See also:
false
isam
isblank
isnumber
ispm
isstring
true
index(index,value_if_1[,value_if_2]...)
Returns the value according to the index value. An index value of 1
returns the first value, an index value of 2 returns the second value,
and so on.
Parameters: index, value_if_1, value_if_2, etc.
Example: index(1,one,two,three)
Result: one
isam(time_value)
Based on the time value entered, returns true (1) if the time is an AM
time, returns false (0) if the time entered is not an AM time.
Parameters: Time value.
Example: isam(get_current_time())
Result: 0
Note: The current time is 12:01 pm.
See also:
format_time
get_current_time
get_hour
get_job_start_time
get_job_submit_time
Legitronic User Manual (v3.4)
159
Appendix A: Data Expressions
get_minute
get_second
get_time_value
if
ispm
isblank(value)
Returns true (1) or false (0) based on whether the value of the
parameter is blank.
Parameters: Value.
Example: isblank(blank())
Result: 1
See also:
blank
if
isnumber
isstring.
isnumber(value)
Returns true (1) or false (0) based whether the value of the parameter
is numeric (1) or alpha (0).
Parameters: Value.
Example: isnumber("abc")
Result: 0
See also:
if
isblank
isstring.
ispm(time_value)
Based on the time value entered, returns true (1) if the time is a PM
time, returns false (0) if the time entered is not a PM time.
Parameters: Time value.
Example: ispm(get_current_time())
Result: 1
Note: The current time is 12:01 pm.
Legitronic User Manual (v3.4)
160
Appendix A: Data Expressions
See also:
format_time
get_current_time
get_hour
get_job_start_time
get_job_submit_time
get_minute
get_second
get_time_value
if
isam
isstring(value)
Returns true (1) or false (0) based whether the value of the parameter
is numeric (0) or alpha (1).
Parameters: Value.
Example: isstring("abc")
Result: 1
See also:
if
isblank
isnumber
label_version()
Returns the number of times the label has been saved. Each time you
save the label, a counter is increased in the label format.
Parameters: None.
See also:
get_label_name
get_label_stock
get_user_name
last_label()
Indicates whether a label is the last label in the print job. Returns 1 if
the label is the last label in the print job. Returns 0 if not the last label.
Parameters: None.
See also:
first_label
Legitronic User Manual (v3.4)
161
Appendix A: Data Expressions
left(string,len)
Returns characters specified beginning from the left of the string.
Parameters: String, number of characters.
Example: left("ABCDEFGHIJK",5)
Result: ABCDE
See also:
cat
len
mid
pad_left
pad_right
right
len(string)
Returns the number of characters in a string.
Parameters: String.
Example: len("ABCDEFGHIJK")
Result: 11
See also:
cat
left
mid
pad_left
pad_right
right
Legitronic User Manual (v3.4)
162
Appendix A: Data Expressions
lower(string)
Forces a specified string to lower case.
Parameters: String.
Example: lower("ABCDE")
Result: abcde
See also:
upper
mid(string,pos,len)
Returns the characters in a string based on the starting position and
length. The first position in the string is 1.
Parameters: String, starting position, length.
Example: mid("ABCDEFGHIJK",3,3)
Result: CDE
See also:
cat
left
len
pad_left
pad_right
right
ODBC_query(fld_name)
Reads the data from an ODBC table and allows you to set up an
ODBC query. Before using this data expression, the ODBC drivers
must be installed and configured using the ODBC option from the
Legi for Windows program group.
Parameters: Field name.
Example: ODBC_query(ProdName)
Result: No result is produced until the query is completed using the
Specify query option in Print Labels.
See also:
ODBC_srch
Legitronic User Manual (v3.4)
163
Appendix A: Data Expressions
ODBC_update(data_source, [user_name], [user_pswd], table_name,
put_col_name, put_col_value, key_col_name1, key_col_value1
[,key_col_name2, key_col_value2, ]…)
Read the data from an ODBC-supported table format, searching a
selected column for a specific value and replacing that value with the
updated value. Before using this data expression, the ODBC drivers
must be installed and configured using the ODBC option from the
Legi program group.
Parameters: Data source, user name (optional), user password
(optional), the table name, the name of the return field, the search field
name and the search field value, key column name, key column value.
More key values may be entered.
ODBC_srch(data_source,[user_name],[user_pswd],table_name,ret_fld_n
ame,srch_fld_name1,srch_fld_value1[,srch_fld_name2,srch_fld_value
2])
ODBC_srchRead the data from an ODBC-supported table format and
return the values that match the search criteria. Before using this data
expression, the ODBC drivers must be installed and configured using
the ODBC option from the Legi program group.
Parameters: Data source, user name (optional), user password
(optional), the table name, the name of the return field, the search field
name and the search field value. Up to 32 search field names and
values can be entered.
See also:
ODBC_query
Legitronic User Manual (v3.4)
164
Appendix A: Data Expressions
pad_left(string,len,fill)
Returns the characters left-aligned based on the length and the fill
character.
Parameters: String, length, fill character.
Example: pad_left("ABCDEFGHIJK",14,"@")
Result: @@@ABCDEFGHIJK
See also:
cat
left
len
mid
pad_right
right
pad_right(string,len,fill)
Returns the characters right-aligned based on the length and the fill
character.
Parameters: String, length, fill character.
Example: pad_right("ABCDEFGHIJK",14,"@")
Result: ABCDEFGHIJK@@@
See also:
cat
left
len
mid
pad_left
right
Legitronic User Manual (v3.4)
165
Appendix A: Data Expressions
precision(number,places,zeros_flag)
Returns the number specified with the number of decimals specified.
Includes zeroes if specified. This function does not round.
Parameters: Number, number of decimal places, zero flag.
Zero flag values:
0
Do not remove the zeroes (zero suppression false)
1
Remove the zeroes (zero suppression true)
Example: precision(55,3,0)
Result: 55.000
See also:
abs
sgn
right(string,len)
Returns characters specified beginning from the right of the string.
Parameters: String, number of characters.
Example: right("ABCDEFGHIJK",5)
Result: GHIJK
See also:
cat
left
len
mid
pad_left
pad_right
Legitronic User Manual (v3.4)
166
Appendix A: Data Expressions
serial(base[,increment[,length[,fill[,persistant]]]])
Equivalent to the serial Yes radio button on the Data Expression dialog
box. Creates a serial number field based on the parameters entered.
Parameters: Starting number, increment number (optional), length
(optional), fill character (optional). The increment defaults to 1, the
length defaults to zero (all), and the fill defaults to spaces.
Example: serial("25",5,10,"0")
Result: The serial number will begin at 25, will increment by 5, and
will be 10 characters long. If it is not 10 characters long, the 0 symbol
will fill in the extra spaces. The first serial number will be
0000000025. Due to printer limitations any character other than a
space or a zero as the fill character requires computer repetition.
See also:
auto_serial
auto_tracking_serial
get_serial_count
tracking_serial
set_nonprinting(), fld("Text2")
Use this command to conditionally control printing of a label format
field. For example, use the following expression to disable printing of
a field, if there is no data in the field it is referencing. The reference
field is named Text2.
if( fld("Text2") = "", set_nonprinting(), fld("Text2") )
sgn(number)
If the number specified is positive, returns 1. If the number specified
is negative, returns -1. If the number specified is 0, returns 0.
Parameters: Number.
Example: sgn(-23)
Result: -1
See also:
abs
precision
Legitronic User Manual (v3.4)
167
Appendix A: Data Expressions
textfile(filename)
Equivalent to the Text File radio button on the Data Expression dialog
box. Returns the contents of the text file specified.
Parameters: File name.
Example: textfile("c:\config.sys")
Result: Contents of config.sys file.
tracking_serial(key[,increment[,length[,fill]]])
Equivalent to the Serial Number Tracking radio button on the Data
Expression dialog box. Creates a tracking serial number field based on
the parameters entered. See also serial.
Parameters: Serial number name, increment number (optional), length
(optional), fill character (optional). The increment defaults to 1, the
length defaults to zero (all), and the fill defaults to spaces.
Example: tracking_serial("serial 1",5,10,"0")
Result: The tracking serial number will be serial 1, the numbers will
increment by 5, and be 10 characters long. If the number is not 10
characters long, the 0 symbol will fill in the extra spaces. Due to
printer limitations any character other than a space or a zero as the fill
character requires computer repetition.
See also:
auto_serial
serial
true()
Synonymous with 1. False is synonymous with 0.
Parameters: None.
See also:
auto_tracking_serial
false
get_serial_count
if
Legitronic User Manual (v3.4)
168
Appendix A: Data Expressions
upper(string)
Forces a specified string to upper case.
Parameters: String.
Example: upper("abcde")
Result: ABCDE
See also:
lower
Legitronic User Manual (v3.4)
169
Appendix B. Printer Driver
Installation and
Configuration
Legi supports the use of Windows® printer drivers. This appendix
provides the information required to install and configure Legi printer
drivers.
Installing a Printer Driver
Follow these steps to install a Legi printer driver:
1. From the Windows® Start menu, select Settings
Printers.
The Printers dialog box opens.
Legitronic User Manual (v3.40)
170
Appendix B: Printer Driver Installation and Configuration
2. Click the Add Printer icon to activate the Windows® Add Printer
Wizard. Then follow the instructions on your screen.
3. When prompted to select a printer, click Have Disk…
4. When prompted for a disk, select the drive that your Weber Printer
Driver resides on.
Legitronic User Manual (v3.4)
171
Appendix B: Printer Driver Installation and Configuration
5. Select and open the weber.inf file.
6. Choose your printer from the list of Weber printers and click Next.
7. Follow the remaining Add Printer Wizard instructions to complete
the installation.
Legitronic User Manual (v3.4)
172
Appendix B: Printer Driver Installation and Configuration
Configuring a Printer Driver
Follow these steps to configure an installed printer driver:
1. Click the icon for the printer you want to configure.
2. Right click and select Properties to open the Print Driver Properties
dialog box.
Legitronic User Manual (v3.4)
173
Appendix B: Printer Driver Installation and Configuration
Note: Depending on the operational characteristics of your Weber
printer, the Print Driver Properties dialog box may contain optional
fields. For descriptions of those fields, refer to “Optional
Specifications” (page 176).
3. Click the Options tab.
4. Modify the values displayed as necessary.
Specification
Legitronic User Manual (v3.4)
Description
Label Size
The width and height of the label and the
appropriate measurement standard.
Cutter installed
Check if the printer has a cutter installed.
Cut during print
Check to use cutter option during label printing.
(Disabled when no cutter is installed.)
Computer
repetition
Check to send label information for each copy
when multiple copies of the label are printed.
When not checked, the printer repeats the
information received for every label.
Cut/Pause count
Number of labels to print before cutting or
pausing.
174
Appendix B: Printer Driver Installation and Configuration
5. Click the Settings tab.
6. Modify the values displayed as necessary by
checking the commands you want to use and typing the
appropriate value for each command.
Specification
Description
Darkness
Print darkness (darkness intensifies as
number increases).
Print Speed
Print speed in inches per second.
Label top
adjustment
Position (in printer dots) at which the
top of the label format should print.
Tear off adjustment
The distance from the print head the
label feeds after printing.
Rotation setting
Number of degrees to rotate the label
when printing.
Note: You can restore the original (unmodified)
settings by clicking Restore Defaults.
7. When you have completed your configuration settings,
click OK.
Legitronic User Manual (v3.4)
175
Appendix B: Printer Driver Installation and Configuration
Optional Specifications
The following table lists and explains optional specifications that may
appear in the Print Driver Properties dialog box, depending on the
operational characteristics of your Weber printer.
Specification
Description
Module designator
The code for the memory options installed on the
printer. Refer to the printer user guide for specific
codes.
Module size in bytes
The size (in bytes) of the memory option.
Contrast
The level of contrast between the black and white
areas of the label. This specification determines
how heavy the inking will be, ranging from 1
(lightest) to 20 (heaviest).
Label stock continuous
Check to print labels on continuous feed label
stock.
Label sensor reflective
Check when the printer uses transmissive (“black
strip” media) sensing to detect end of label. When
not checked, the printer uses reflective sensing to
detect end of label.
Independent ribbon control
Check to use the ribbon saving feature.
Media darkness
Print darkness (darkness intensifies as number
increases).
Media tracking
Label stock type — continuous or non-continuous.
Print mode
Print mode selection:
Tear off — labels will be torn off manually.
Peel off — printer will separate the backing from
the label. (Backing only rewind assembly must be
installed.)
External rewind — Label stock winds onto the
external rewind spool. (Optional external rewind
assembly must be installed.)
Cutter — cutter will cut between labels. (A cutter
must be installed.)
Legitronic User Manual (v3.4)
Installed graphics module
Location and size of installed graphics module.
Select edge sensor
Select to use die cut stock with a reflective label
edge sensor.
176
Appendix B: Printer Driver Installation and Configuration
Status Checking
Follow these steps to set status checking on or off:
1. Click the Details tab of the Print Driver Properties dialog box.
2. Click Spool Settings… to open the Spool Settings dialog box.
3. Select the appropriate option:
Enable bi-directional support for this printer (sets status
checking on).
Disable bi-directional support for this printer (sets status
checking off).
Legitronic User Manual (v3.4)
177
Appendix C. Automated Print
Control
Legi supports two automated methods for printing and manipulating
labels:
Batch Print Control allows you to control printing activity via
commands stored in a file.
Application Designer allows you to develop customized labeling
applications, including specialized user interfaces, data
manipulation, and programmatic logic control.
Using Automated Print Control
Batch Print Control and Application Designer both require an input
file called a script file. The script file is an ASCII file containing print
job parameters required by Legi. The script file may contain such
parameters as the label name, the port to print to, and identical and
serial counts.
To execute a script file, you run the LEGI32.EXE file, specifying the
script filename in the command line:
legi32/batch filename
where filename is the name and full path of the script file.
Note: When you pass a label format or print job as the filename
parameter, that format or job will be printed. This is a useful practice
when the label data or number of labels to print does not change, and
when the label data comes from database tables and label expressions.
Legitronic User Manual (v3.40)
178
Appendix C: Automated Print Control
There are two ways to run script files in Legi:
Run LEGI32.EXE, specifying the script filename in the command
line:
legi32.exe/batch filename
where filename is the name and full path of the script file
containing the application designer commands.
Specify the name of a script file containing Application Designer
commands in the Options dialog box and check the Run
Application Designer from Print Labels checkbox. This causes
the Application Designer commands to run when the print session
is invoked.
Run Legi32.exe /batch batch.end to remove the Legi batch print
program from memory.
Batch Print Control Commands
ALTERNATE-AUTO-COUNTS
Specifies method of computing alternate automatic and identical label
counts for a queried print job.
Value: Yes or No
Default: None
Notes: When the value is Yes, the identical and serial counts are reevaluated as the field that specifies automatic or identical label counts
is re-evaluated during a label run. When the value is No, the
automatic identical and automatic serial counts do not change, even
though the field that specifies automatic or identical counts changes
across several different records of a queried run.
AUTO-REPEAT
Automatically repeats this job in an endless loop.
Value: Yes or No
Default: None
Legitronic User Manual (v3.4)
179
Appendix C: Automated Print Control
BEGIN
Begins accepting field data
Value: none
Default: none
CLEAR-BUFFER
Clears the current job from the printer when this job starts.
Value: Yes or No
Default: None
None
DELETE-BATCH
Deletes the batch when it has been completely processed.
Value: None
Default: None
DISABLE-AUTO-PRINT
Specifies whether job will auto print on last supplied input.
Value: Yes or No
Default: None
END
Stops accepting field data.
Value: None
Default: None
ERROR-ACTION
Specifies the error handling method.
Values: Abort (abort batch) or Ignore (ignore error and continue)
Default: Ignore
Legitronic User Manual (v3.4)
180
Appendix C: Automated Print Control
ERROR-LOG
Specifies where to direct an error.
Value: =drive:path\filename.ext, Display ( to display), or None.
Default: Display
Notes: When the drive and path are not supplied, the value in SETDIRECTORY is used.
FMT-GDIPRINTERNAME
Selects the print mode for the label format.
Value: The name of the Windows printer as it appears in Print
Manager (for example, HP LaserJet 4 Plus/4M Plus).
Default: None
Notes: The printer names must match exactly.
FORMAT
Selects a label format for printing.
Value: drive:path\filename.LBL
Default: None
Notes: When the drive and path are not supplied, the value specified
in SET-DIRECTORY is used.
IDENTICAL-COUNT
Specifies the number of identical labels to print.
Value: 0-99999999 (0=auto identical)
Default: 1
ODBC-QUERY-DATA-SOURCE
Specifies the data source for an ODBC query.
Value: Data source
Default: None.
Legitronic User Manual (v3.4)
181
Appendix C: Automated Print Control
ODBC-QUERY-END-VALUE
Specifies the end value for the ODBC query.
Value: Ending value of the field for the query
Default: None
ODBC-QUERY-PASSWORD
Specifies the password for an ODBC query.
Value: Password
Default: None
ODBC-QUERY-SEARCH-FIELD
Specifies the key field for the ODBC query
Value: Field name
Default: None
ODBC-QUERY-SQL-EXPRESSION
Specifies the SQL expression for the ODBC query.
Value: SQL expression
Default: None
ODBC-QUERY-START-VALUE
Specifies the start value for the ODBC query.
Value: Start value of the field for the query
Default: None
ODBC-QUERY-TABLE
Specifies the table for an ODBC query.
Value: Table name
Default: None
Legitronic User Manual (v3.4)
182
Appendix C: Automated Print Control
ODBC-QUERY-USER-NAME
Specifies the user name for an ODBC query
Value: User name
Default: None
ODBC-QUERY-USE-SQL-EXPRESSION
Specifies that the ODBC SQL expression will be used for the ODBC
query.
Value: Yes or No
Default: None
Notes: When this statement is omitted, the SQL expression is not
used for the query.
OUTPUT-FILE
Redirects output to this file for the current label.
Value: drive:path\filename.ext
Default: None
PRINT
Prints the current format or job.
Value: None
SERIAL-COUNT
Specifies the number of serialized labels to print.
Value: 0-99999999 (0=auto serial)
Default: 1
Legitronic User Manual (v3.4)
183
Appendix C: Automated Print Control
SUPPLIED-PORT
Specifies remote group 1 as communication port to receive serial
supplied data
Value:
COMn
(where n is 1 – 9)
Default: None
Notes: same as FLD-OP-REMOTE-ID1
TEST-PRINT
Test prints the current format or job.
Value: None
Default: None
USER-NAME
Specifies the user name for Legi login.
Value: User name
Default: None
Notes: Used to set a user name for print logs.
Legitronic User Manual (v3.4)
184
Appendix C: Automated Print Control
Advanced Commands
FMT-LBLVIEW-EACHQUERIED
Displays a label preview for each queried label.
Value: Yes or No
Default: None
FMT-LBLVIEW-EACHSERIAL
Displays a label preview for each serial label.
Value: Yes or No
Default: None
FMT-LBLVIEW-PRINTLABELS
Displays a label preview when a print job is submitted.
Value: Yes or No
Default: None
FMT-LBLVIEW-PRINTSTART
Displays a label preview when a print job is started.
Value: Yes or No
Default: None
JOB-DESCRIPTION
Describes a print job.
Value: Print job description
Default: None
PRINT-SUSPENDED
Starts a print job that is suspended in Print Manager.
Value: Yes or No
Default: No
Legitronic User Manual (v3.4)
185
Appendix C: Automated Print Control
Application Designer
Syntax Rules
1. Lines beginning with : are GOTO labels.
2. Variable names must begin with $. Anywhere a value can be used,
a variable can be used in place of it.
3. A variable value can be a numeric or a string value. All string
values containing blank spaces should be enclosed in quotation
marks.
4. $ERRORCODE and $DLGITEMID are predefined variables that are
updated by commands.
Performance Notes
Running Application Designer from another application such as a
Visual Basic program can be very disk intensive. To improve
performance, make sure that the hard disk drive is cached. Smart
Drive is a hard disk drive cache program that is included with
Windows. Set the cache size to at least 1024KB.
The Application Designer program remains in memory even after the
batch has been processed. This allows for much faster processing of
additional batches. Legi can run while Application Designer is
running. To close Application Designer, click on the Legi Batch icon
and select Close.
Legitronic User Manual (v3.4)
186
Appendix C: Automated Print Control
Automated Print Control Rules
Keep the following automated print control rules in mind when
creating an Application Designer file:
1. Enter only one command per line.
2. Blank space (spaces and tabs) is ignored except in field and
expression data.
3. Blank lines are ignored.
4. Lines beginning with an asterisk (*) are ignored.
5. Keywords must be uppercase.
6. Field data is referenced by field name.
7. Non-operator fields can accept any data expression.
8. Non-operator constant data for fields should be enclosed in
quotation marks.
9. The full path, filename, and extension must be supplied for all
files.
10. Referenced field names cannot be keywords.
Application Designer Commands
Assignment Statement
Syntax: $var = value
Note: Assign the value to $var.
Goto and Conditional Goto Commands
GOTO
Jumps to a label.
Syntax: GOTO = label
Note: The syntax defining a label is :label
Legitronic User Manual (v3.4)
187
Appendix C: Automated Print Control
IF Commands
Syntax:
IF-EQUAL
= para1, para2, label
(Syntax is similar for all IF commands.)
Note: These commands perform a jump if para1 is =, ¹, >, £, <, or ³
para2 respectively.
IF-EQUAL
IF-GREATERTHAN
IF-LESSTHAN
IF-NOT-EQUAL
IF-NOT-GREATERTHAN
IF-NOT-LESSTHAN
Legitronic User Manual (v3.4)
188
Appendix C: Automated Print Control
String Commands
ANSI-CHAR
Converts an integer to an ANSI character
Syntax: ANSI-CHAR = ansicode, $char
Note: $char will hold the ANSI character whose ANSI code is
ansicode.
STRING-CAT
Concatenates strings.
Syntax:
STRING-CAT
= string1, string2, ..., $result
Note: Concatenate string1, string2, ... . The concatenated string will
be saved to $result.
STRING-FIND
Scans a string for the occurrence of a given substring.
Syntax:
STRING-FIND
= string1, string2, $index
Note: $index holds the character position of the first occurrence of
the string2 in string1. The $index is 0 if string2 is not in string1.
STRING-LEN
Gets the length of the string.
Syntax:
STRING-LEN
= string, $length
STRING-LOWER
Converts uppercase letters in a string to lowercase.
Syntax:
Legitronic User Manual (v3.4)
STRING-LOWER
= $string
189
Appendix C: Automated Print Control
STRING-MID
Gets a substring.
Syntax:
STRING-MID
= string, index, count, $result
Note: $result stores count characters from string, starting at character
index. The index parameter is zero-based (for example,
index = 0 references the first character in the string).
STRING-PARSE
Parses one string.
Syntax:
STRING-PARSE
= string, delimiter, n, $result
Note: Get the nth token from string, where the string delimiter is used
as the delimiter. The selected token will be in ‘$result’. $ERRORCODE
is 1 if end of string is reached. Otherwise, 0.
STRING-UPPER
Converts lowercase letters in a string to uppercase.
Syntax:
Legitronic User Manual (v3.4)
STRING-UPPER
= $string
190
Appendix C: Automated Print Control
Math Commands
Syntax:
MATH-ADD
= para1, para2, $result
(Syntax is similar for other all MATH commands.)
Note: These commands perform mathematics operation on para1 and
para2. The result will be stored in $result.
MATH-ABS
Replace the value of a variable by its absolute value.
Syntax:
MATH-ABS
= $var
MATH-ADD
MATH-DIV
MATH-MOD
MATH-MUL
MATH-SUB
Legitronic User Manual (v3.4)
191
Appendix C: Automated Print Control
Screen Input/Output Commands
When using screen I/O commands to define a dialog box and its
controls, make sure that the definitions are executed only once. (It’s a
good idea to define them at the beginning of the batch file.)
$DLGITEMID is a predefined variable that holds the ID of the dialog
control item just defined. $DLGITEMID will be overwritten by most
dialog commands. If it will be needed, it should be saved to another
variable right after the dialog command. When more than one
pushbutton is defined, save the IDs of pushbutton controls to compare
with the $BUTTON_ID of the DIALOG command. You should also save
any control items in the dialog box that will use the DIALOG-SET-TEXT
command.
DIALOG
Defines a dialog box
Syntax:
DIALOG
= DlgName, title, x, y, width, height, $button_id
Notes:
DlgName is the name of the dialog box, which will be used in the
DIALOG-SHOW command.
x is the x-coordinate(in pixels) of dialog box’s upper-left corner in
screen coordinates.
y is the y-coordinate(in pixels) of dialog box’s upper-left corner in
screen coordinates.
width is the dialog box width (in pixels).
height is the dialog box height (in pixels).
$button_id is the ID of the push-button been clicked.
Legitronic User Manual (v3.4)
192
Appendix C: Automated Print Control
DIALOG-CHECKBOX
After a pushbutton is clicked, the selected file name (and its drive and
path) will be saved in $file.
Syntax:
DIALOG-CHECKBOX
= text, x, y, width, height, $Status
Notes:
text is the text that follows the check box.
When the $Status is assigned a value before the DIALOG-SHOW
command, its value at the moment of executing DIALOG-SHOW
determines whether the box is checked.
After a pushbutton is clicked, $Status will be 1 if the box is
checked. If the box is not checked, $Status will be 0.
DIALOG-CLOSE
Closes the dialog box and its controls.
Syntax:
DIALOG-CLOSE = DlgName
Notes:
This command applies only to MANUALCLOSE dialog boxes.
DlgName is the name of the dialog box to be closed.
DIALOG-COMBOBOX
Defines a combo box control in the latest dialog box.
Syntax:
DIALOG-COMBOBOX
= style, x,y,width,height, $ComboText
Notes:
style can be SIMPLE, DROPDOWN, or DROPDOWNLIST.
If $ComboText is assigned a value before the DIALOG-SHOW
command, its value at the moment of executing DIALOG-SHOW will
be highlighted if the value is in the list.
After a pushbutton is clicked, the selected item will be stored in
$ComboText.
Legitronic User Manual (v3.4)
193
Appendix C: Automated Print Control
DIALOG-COMBOBOX-FILES
Defines a combobox control that contains file names.
Syntax:
DIALOG-COMBOBOX-FILES=filename,
style, x, y, w, h, $file
Notes:
filename can include wildcards.
style can be SIMPLE, DROPDOWN, or DROPDOWNLIST.
w is the combo box box width (in pixels).
h is the combo box height (in pixels).
When $file is assigned a value before the DIALOG-SHOW command, its
value at that moment of executing DIALOG-SHOW will be highlighted if
the value is in the list.
DIALOG-COMBOBOX-ITEM
Adds a string to the latest combo box control.
Syntax:
DIALOG-COMBOBOX-ITEM
= string
Notes:
An empty or duplicate string will not be added to the list.
This command must be placed immediately after the DIALOGCOMBOBOX command.
DIALOG-EDIT
Defines an edit box control in the latest dialog box
Syntax:
DIALOG-EDIT
= x, y, width, height, $EditText [,PASSWORD]
Notes:
When $EditText is assigned a value before the DIALOG-SHOW
command, its value at the moment of executing DIALOG-SHOW will
be the initial value of the edit box.
After a pushbutton is clicked, the edited text will be stored in
$EditText.
When the keyword PASSWORD is specified, Legi displays all
characters as asterisks (*) as they are typed into edit control.
Legitronic User Manual (v3.4)
194
Appendix C: Automated Print Control
DIALOG-FRAME
Defines a box with the specified frame style in the latest dialog box.
Syntax:
DIALOG-FRAME
= framestyle, x, y, width, height
Note: framestyle must be BLACKFRAME, GRAYFRAME, or
WHITEFRAME.
DIALOG-GROUPBOX
Defines a group box control in the latest dialog box.
Syntax:
DIALOG-GROUPBOX
= title, x, y, width, height
Notes:
The control is a rectangle that groups other controls together.
The controls between this command and DIALOG-GROUP-END belong to
one group.
DIALOG-GROUP-END
Ends a group.
Syntax:
DIALOG-GROUP-END
DIALOG-LIST
Defines a list box control in the latest dialog box.
Syntax:
DIALOG-LIST
= x, y, width, height, $ListText
Notes:
When $ListText is assigned a value before the DIALOG-SHOW
command, its value at the moment of executing DIALOG-SHOW will
be highlighted if the value is in the list box.
After a pushbutton is clicked, $ListText will contain the text of the
selected item.
Legitronic User Manual (v3.4)
195
Appendix C: Automated Print Control
DIALOG-LIST-FILES
Defines a list box control that contains all the specified file names.
Syntax:
DIALOG-LIST-FILES=filename,
x, y, width, height, $file
Notes:
filename can include wildcards.
When $file is assigned a value before the DIALOG-SHOW
command, its value at the moment of executing DIALOG-SHOW
will be highlighted if the value is in the list.
After a pushbutton is clicked, the selected file name (and its
drive and path) will be saved in $file.
DIALOG-LIST-ITEM
Adds a string to the latest list box.
Syntax:
DIALOG-LIST-ITEM
= string
Notes:
An empty or duplicate string will not be added to the list.
This command must be placed immediately after the DIALOG-LIST
command.
DIALOG-PUSHBUTTON
Defines a push-button control in the latest dialog box.
Syntax:
DIALOG-PUSHBUTTON
= text, x, y, width, height
Note: When no pushbutton is defined, the software displays a default
OK button.
Legitronic User Manual (v3.4)
196
Appendix C: Automated Print Control
DIALOG-RADIOBUTTON
Defines a radio button in the latest dialog box.
Syntax:
DIALOG-RADIOBUTTON
= text, x, y, width, height, $Status
Notes:
text is the text that follows the radio button.
When $Status is assigned a value before DIALOG-SHOW command,
its value at the moment of executing DIALOG-SHOW will determine
whether the box is checked.
After a pushbutton is clicked, $Status will be 1 if the box is
checked. If the box is not checked, $Status will be 0.
DIALOG-SET-TEXT
Sets the title or text of a control item to the specified text.
Syntax: DIALOG-SET-TEXT = $id, text
Notes:
This command applies only to MANUALCLOSE dialog boxes.
This command must appear after DIALOG-SHOW and before
DIALOG-CLOSE.
$id is the ID of the control item that $DLGITEMID is saved to.
Legitronic User Manual (v3.4)
197
Appendix C: Automated Print Control
DIALOG-SHOW
Displays the dialog box and its controls, and pauses the batch.
Syntax:
DIALOG-SHOW
= DlgName, type
Notes:
DlgName is the name of the dialog box to be displayed.
type is AUTOCLOSE or MANUALCLOSE:
- When one of the pushbuttons is clicked, Legi
updates all variables attached to control items, closes the dialog
box, and unpauses the batch.
AUTOCLOSE
MANUALCLOSE - The dialog box
CLOSE is executed. Legi updates
remains open until DIALOGall variables attached to
control items and unpauses the batch when the user does any of
the following:
Clicks one of the dialog box pushbuttons, check boxes, or radio
buttons
Moves the focus off an edit box or combo box whose style is
SIMPLE or DROPDOWN
Selects another item from a list box or DROPDOWNLIST combo
box.
The user can change the values of the related controls if the
value of one control has been changed.
When the dialog box is already displayed in the case of
MANUALCLOSE, the DIALOG-SHOW command moves to the top
and pauses the batch. The type is ignored.
DIALOG-TEXT
Defines a text field in the latest dialog box
Syntax:
DIALOG-TEXT
= text, x, y, width, height
MESSAGE-BOX
Displays a message on the screen.
Syntax:
Legitronic User Manual (v3.4)
MESSAGE-BOX
= title, text
198
Appendix C: Automated Print Control
File Input/Output Commands
FILE-CLOSE
Closes the opened text file.
Syntax:
FILE-CLOSE
= $filehandle
FILE-DELETE
Deletes a DOS file.
Syntax: drive:path\filename.lbl
Default: None
FILE-OPEN
Opens a DOS text file.
Syntax:
FILE-OPEN
= filename, access, $filehandle
Notes:
access must be one of the following:
RDONLY
- Open for reading only
WRONLY -
Open for writing only. When the file exists, it is
cleared. When the file does not exist, it is created.
RDWR -
Open for reading and writing.
- Open for reading and writing. The file pointer is set
to the end of the file prior to each write.
APPEND
$filehandle is the file handle. On error, the $filehandle is -1.
$ERRORCODE
0 = Success
1 = Failure
Legitronic User Manual (v3.4)
199
Appendix C: Automated Print Control
FILE-READ
Reads n bytes from the opened text file.
Syntax:
FILE-READ
= $filehandle, n, $string
Note: FILE-READ attempts to read n bytes from the file associated
with $filehandle into $string.
It begins reading at the current file
pointer. When the read is complete, the file pointer is incremented by
the number of bytes read. $ERRORCODE is set to 1 on end-of-file.
FILE-READ-TOKEN
Reads the file for tokens, which are separated by the delimiter
character.
Syntax:
FILE-READ-TOKEN
= $filehandle, C, $string
Notes:
FILE-READ-TOKEN
reads from file associated with $filehandle into
$string until it reaches the delimiter character C. It begins reading
at the current file pointer. When the read is complete, the file
pointer is incremented by the number of bytes read. $ERRORCODE
is set to 1 on end-of-file.
(C is limited to one character.)
The delimiter is truncated.
FILE-READ-LINE
Reads the current line from the opened text file.
Syntax:
FILE-READ-LINE
= $filehandle, $line
Notes:
$line will hold the one-line text.
The LF is truncated.
The current line changes to the next line when the read is
complete.
$ ERRORCODE is 1 on end-of-file.
FILE-WRITE
Writes a string to the opened text file.
Syntax:
Legitronic User Manual (v3.4)
FILE-WRITE
= $filehandle, text
200
Appendix C: Automated Print Control
FILE-WRITE-LINE
Writes a line to the opened text file.
Syntax:
FILE-WRITE-LINE
= $filehandle, text
Note: LF is appended to text before writing.
Legitronic User Manual (v3.4)
201
Appendix C: Automated Print Control
Port Input/Output Commands
HARDWARE-INPUT
Reads byte from the hardware I/O port.
Value: Portaddress, $state
Default: None
Notes: The First argument is the port address. The second argument is
the variable for storage of the return value.
HARDWARE-OUPUT
Writes byte to hardware I/O port
Value: Portaddress, Data
Default: None
PORT-CHECK
Returns the status of a communication port.
Syntax:
PORT-CHECK=port,$status,
$inbytes, $outbytes,
Notes:
port is COMn or LPTn.
$status specifies the status of transmission.
$inbytes specifies the number of bytes in the receive buffer.
$outbytes specifies the number of bytes in the transmit buffer.
$JobsInQueue specifies the number of jobs in the printer manager
queue for this port.
The port must be opened by PORT-OPEN.
$ERRORCODE
0 = Success
1 = Failure
Legitronic User Manual (v3.4)
202
Appendix C: Automated Print Control
PORT-CLOSE
Closes an opened communication port.
Syntax:
PORT-CLOSE
= port
Notes:
port is COMn or LPTn.
This command closes only the port opened by PORT-OPEN.
PORT-OPEN
Opens a communication port.
Syntax:
PORT-OPEN
= port [, speed, parity, bytesize, stopbits]
Notes:
port specifies the device in the form of COMn (where n is 1-9), or
LPTn, where n is 1-3.
speed, parity, bytesize and stopbits are used to set up the port for
COMn only.
On a successful open, $ ERRORCODE is 0. On failure, $ ERRORCODE
is 1.
PORT-READ
Reads bytes from a communication port.
Syntax:
PORT-READ
= port, nbytes, $data
Note:
port is COMn or LPTn.
nbytes specifies number of bytes to read.
$data is the data read from the port.
The port must be opened by PORT-OPEN.
$ERRORCODE
0 = Success
1 = Failure
Legitronic User Manual (v3.4)
203
Appendix C: Automated Print Control
PORT-WRITE
Writes a string to a communication port.
Syntax:
PORT-WRITE
= port, string
Notes:
port is COMn or LPTn.
The port must be opened by PORT-OPEN.
$ERRORCODE
0 = Success
1 = Failure
Legitronic User Manual (v3.4)
204
Appendix C: Automated Print Control
Database Input/Output Commands
DB-CLOSE
Closes a database.
Syntax:
DB-CLOSE
= $tblhandle
Note: $tblhandle is the table handle obtained from DB-OPEN.
DB-DELETE-RECORD
Retrieves the field(s) from the next record.
Syntax:
DB-DELETE=$tblhandle,name1,value1,name2,value2,…
Notes: The record identified by namen and $valuen is deleted. When
more than one record matches, the first record is deleted.
$ERRORCODE
0 = Success
1 = Failure
DB-OPEN
Opens a database.
Syntax: DB-OPEN = DataSourceName, tablename, $tblhandle, mode,
[username, password]
Notes:
This command returns the table handle that will be used by other
database I/O commands (in $tblhandle).
$ERRORCODE
0 = Success
1 = Failure
Legitronic User Manual (v3.4)
205
Appendix C: Automated Print Control
DB-INSERT
Adds a record to a database.
Syntax:
…
DB- INSERT
= $tblhandle, name1, $value1, name2, $value2,
Notes:
The specified record will be added. All non-specified fields will be set
to 0 or spaces.
$ERRORCODE
0 = Success
1 = Failure
DB-READ
Retrieves a record by key match.
Syntax: DB-READ = $tblhandle, FieldName, $RTNFIELDVALUE,
name1, $value1, name2, $value2, ...
Notes:
Searches the open table specified by $tblhandle to find the record
that has value n on key field name n.
$ERRORCODE
0 = Success
1 = Failure
DB-READ-NEXT
Returns the record pointed to by the ‘record pointer’.
Syntax: DB-READ-NEXT=$HANDLE, COL1, $VAR1, [COL2,
$VAR2, ..., COLN, $VARN], [START-AT, KEY1, VAL1, [KEY2,
VAL2, ..., KEYN, VALN]]
where;
$HANDLE is the handle of an open file (must have been opened using
the DB-OPEN command)
COL1, COL2, ..., COLN are the column names of the fields to be
returned
$VAR1, $VAR2, ..., $VARN are variables that will contain the values
of the columns when the read is completed
Legitronic User Manual (v3.4)
206
Appendix C: Automated Print Control
KEY1, KEY2, ..., KEYN are the key column names
VAL1, VAL2, ..., VALN are the key values
Notes:
DB-READ-NEXT returns the record pointed to by the 'record pointer'.
When a file is opened, a 'record pointer' for the DB-READ-NEXT
function is set to point to the first record in the file. This 'record
pointer' can be changed in several ways:
1) By calling DB-READ-NEXT without the START-AT clause When DB-READ-NEXT is called (without the START-AT clause),
the next record in the file is returned and the 'record pointer' is
incremented to point to the following record in the file.
2) By calling any other database function (DB-READ, DB-UPDATE,
DB-INSERT, DB-DELETE-RECORD, DB-OPEN), which will set the
'record pointer' to the beginning of the file.
3) By calling DB-READ-NEXT with a START-AT clause. This will
create a record set of all records in the file with key value greater than
or equal to the specified key. The 'record pointer' will point to the first
record in that record set. Subsequent DB-READ-NEXT commands
that don't contain a START-AT clause will return records from this
record set.
If end-of-file is reached, or any other error occurs, $ERRORCODE is
set to 1. For example:
DB-OPEN="ADDRESSES", "EMPLOYEES", $HANDLE, QUERY
:LOOP
DB-READ-NEXT=$HANDLE, "LAST NAME", $NAME
IF-EQUAL=$ERRORCODE, 1, EXIT
MESSAGE-BOX="NAME", $NAME
GOTO=LOOP
:EXIT
DB-CLOSE=$HANDLE
This will display one message box containing the last name for every
entry in the table "EMPLOYEES'. Here's another example:
DB-OPEN="ADDRESSES", "EMPLOYEES", $HANDLE, QUERY
DB-READ-NEXT=$HANDLE, "LAST NAME", $NAME, STARTAT, "LAST NAME", "WEBER"
:LOOP
IF-EQUAL=$ERRORCODE, 1, EXIT
MESSAGE-BOX="NAME", $NAME
DB-READ-NEXT=$HANDLE, "LAST NAME", $NAME
GOTO=LOOP
Legitronic User Manual (v3.4)
207
Appendix C: Automated Print Control
:EXIT
DB-CLOSE=$HANDLE
This will display a message box for every record in the table
"EMPLOYEES" which has a last name lexicographically greater-than
or equal-to "WEBER".
DB-UPDATE
Updates a record in a database.
Syntax: DB-UPDATE = $tblhandle, fieldname1, fieldvalue1, name1,
value1, ...
Notes:
fieldname1 is the name of the field to be updated.
fieldvalue1 is the new value for fieldname1.
name1,… are the key field names.
value1,… are the key field values.
$ERRORCODE
0 = Success
1 = Failure
Legitronic User Manual (v3.4)
208
Appendix C: Automated Print Control
Miscellaneous Commands
ADD-BATCH
Adds a batch to the end of the batch queue.
Syntax:
ADD-BATCH
= Batchfilename
Note: Batchfilename is a string that contains the drive, path, and name
of the batch file to be added.
GET-DATE
Gets the system date.
Syntax:
GET-DATE
= $month, $day, $year
GET-TIME
Gets the system time.
Syntax:
GET-TIME
= $hour, $min, $sec, $hund
SET-DATE
Sets the system date.
Syntax:
SET-DATE
= month, day, year
Note:
$ERRORCODE
0 = Success
1 = Failure
Legitronic User Manual (v3.4)
209
Appendix C: Automated Print Control
SET-TIME
Sets the system time
Syntax:
SET-TIME
= hour, min, sec, hund
Notes:
hund = hundredths of seconds
$ERRORCODE
0 = Success
1 = Failure
SLEEP
Suspends the batch for an interval (specified in milliseconds).
Syntax:
SLEEP
= msecs
Notes:
msecs = number of milliseconds.
The limit is 4294967296 or 49 – 50 days.
WIN-EXEC
Runs a specified application.
Syntax:
WIN-EXEC
= CmdLine
Notes:
CmdLine is a string containing the command line (filename and
optional parameter) for the application to run. If the string does not
contain a path, Windows® searches the directories in this order:
Directory that contains the executable file for the current task.
Current directory.
Windows® system directory.
Windows® directory .
Directories listed in the PATH environment variable.
$ERRORCODE
0 = Success
1 = Failure
Legitronic User Manual (v3.4)
210
Appendix C: Automated Print Control
Sample File
* Select the bolts label for printing.
FORMAT=bolts.lbl
IDENTICAL-COUNT=10
SERIAL-COUNT=2
* Set data values into the fields
BEGIN
0001="Special Bolt design A230-yt1"
0015="Expiration Date: 6/30/95"
END
* Print this format
PRINT
Legitronic User Manual (v3.4)
211
Legitronic User Manual (v3.40)
212
Appendix D. True Type Font
Support
Overview
Legi version 3.4 supports recalling downloaded TrueType
fonts in the printer. These fonts are then accessed as
printer-resident fonts and, therefore, do not need to be
downloaded with every label. This process greatly
improves the time it takes to print a label and is
accomplished in two steps.
First, the fonts are downloaded to the printers using various
tools provided by the different printer vendors.
Second, the font information is entered into the Legi print
driver property pages so that Legi is aware of which fonts
are printer resident.
Downloading fonts through the Legi drivers will be
supported in future versions.
This document describes the methods printer vendors use to
download TrueType fonts and to configure the Legi print
drivers to use the fonts.
When you select fonts in Legi, Legi does not distinguish
the downloaded TrueType fonts from other TrueType fonts.
Just select the font as you normally would. If it is printer
resident, the font is properly selected at print time.
However the user must remember which fonts are printer
resident.
Legitronic User Manual (v3.40)
213
Appendix D: True Type Font Support
Zebra Printers
Downloading Fonts
Zebra printers supports downloading of TrueType fonts
into the printer. These fonts are then accessed as resident
printer fonts, and therefore do not need to be downloaded
with every label.
You download the fonts using the Zebra Universal Print
Driver.
NOTE: Make sure that the printer is powered on and
attached to the computer before starting this procedure.
Procedure
1. Display the properties pages of the Zebra driver and
select the Printer tab.
2. Select Printer Options, Settings.
3. Press the Download Font button at the bottom of the
page.
4. Select the font you wish to download.
5. Select TrueType from the Download As: list.
6. Select the desired memory location (usually B:).
NOTE: R: is used for label data and is cleared at the
beginning of every label printed. Therefore, do not use
R: for storing fonts.
7. Select the style. (Regular, Bold, Italic, Bold + Italic)
8. Press the Font Download button.
You will be returned to the previous screen. In the Font
Information group box, the downloaded font name and
location are displayed. Make a note of this for later use.
Legitronic User Manual (v3.4)
214
Appendix D: True Type Font Support
Notes
The Zebra Universal Print Driver has a bug that limits use
of each TrueType font to one style. For example, you must
choose Courier, Courier Bold, or Courier Italic; you cannot
use more than one. If you do, the latest font downloaded
will overwrite the previous font.
Configuring Legi Print Drivers
You must tell Legi what fonts are downloaded and resident
in the printer. Do this by using the Fonts property page of
the Legi print driver. Note that the fonts you want to use
must have previously been downloaded to the printer using
the Zebra Universal Print Driver.
You will need administrative access to the computer to
perform the following procedures.
Add Font Procedure
Display the property pages of the Legi driver you are using
and select the Fonts tab.
Select the TrueType font you want to access in the printer
from the list Installed Computer Fonts.
Enter the font filename in the Download Filename edit
control.
NOTE: This is the name that was used when you
downloaded the font to the printer using the Zebra
Universal Print Driver. You do not need to enter the .FNT
extension.
Select the memory location that was used when you
downloaded the font. (usually B:).
NOTE: Check that R: was not used. R: is used for label
data and is cleared at the beginning of every label printed.
Press the Add To Downloaded List button. The font will be
added to the Downloaded Printer Fonts list.
Press OK when you are done adding fonts.
Legitronic User Manual (v3.4)
215
Appendix D: True Type Font Support
Delete Font Procedure
Select the font from the Downloaded Printer Fonts list.
Press the Remove From List button. You will see the font
disappear from the list.
Press OK when you are done removing fonts.
The font must also be deleted from the printer using the
Zebra Universal Print Driver.
Legitronic User Manual (v3.4)
216
Appendix D: True Type Font Support
Sato Printers
Downloading Fonts
Sato printers support downloading of TrueType fonts into
the printer. However, Sato requires that you select a
specific point size of the font to download. Only those label
fields that contain text in this size will use the downloaded
font. This is much more restrictive than the other printer
families and requires that you know exactly what size fonts
you will use.
You download the fonts using the Sato Memory Card
Manager.
NOTE: Make sure that the printer is powered on and
attached to the computer before starting this procedure.
Procedure
1.
2.
3.
4.
5.
6.
7.
Start the Memory Card Manager application.
Select Options, Settings and select Slot number 1.
Select File, New.
Select Fonts, Add.
In the Font data dialog, press the Select button.
Choose a font, style, and point size and press OK.
Press OK in the Font data dialog.
You will now see a list of all downloaded fonts. Make a
note of the complete font name.
8. Select Fonts, Download to download the fonts shown in
the list. The letter D appears next to the font name to
indicate the fonts has benn downloaded.
9. Select Fonts, Test print.
The printer prints a sample of the font along with the
font ID that has been assigned. Record the font ID for
later use.
10. Select File, Save.
This saves all the downloaded font information. You can
add or delete fonts at a later date by opening this file.
Legitronic User Manual (v3.4)
217
Appendix D: True Type Font Support
Configuring Legi Print Drivers
You must tell Legi what fonts are downloaded and resident
in the printer. Do this by using the Fonts property page of
the Legi print driver. Note that the fonts you want to use
must have previously been downloaded to the printer using
the Sato Memory Card Manager.
You will need administrative access to the computer to
perform the following procedures.
Add Font Procedure
1. Display the property pages of the Legi driver you are
using and select the Fonts tab.
2. Select the TrueType font you want to access from the
list Installed Computer Fonts.
3. Choose the memory card slot that was used when you
downloaded the font using the Sato Memory Card
Manager.
4. Select it in the Memory Card list.
5. Enter the font ID in the Font ID edit control.
NOTE: This is the value that was assigned by the
printer when you downloaded the font using the Sato
Memory Card Manager.
6. Enter the point size of the font that was downloaded.
7. Press the Add To Downloaded List button.
The font will be added to the Downloaded Printer
Fonts list.
8. Press OK when you are done adding fonts.
Delete Font Procedure
1. Select the font from the Downloaded Printer Fonts list.
2. Press the Remove From List button.
You will see the font disappear from the list.
3. Press OK when you are done removing fonts.
Use the Sato Memory Card Manager to delete the font from
the printer.
Legitronic User Manual (v3.4)
218
Appendix D: True Type Font Support
Notes
Due to Legi’s font sizing methods and Sato’s inability to
allow a range of point sizes on a given font, these fonts will
print slightly larger than they display.
Legitronic User Manual (v3.4)
219
Datamax Printers
Downloading Fonts
Datamax printers support downloading of TrueType fonts into the
printer. These fonts are then accessed as resident printer fonts and
therefore do not need to be downloaded with every label.
You download the fonts using the Datamax Print Driver.
NOTE: Make sure that the printer is powered on and attached to the
computer before starting this procedure.
Procedure
1. Display the properties page of the Datamax driver and select the
Fonts tab.
This displays all currently downloaded fonts.
2.
3.
4.
5.
Press the Download Font button.
Select the font and style.
Select TrueType font from the Download As: list.
In the Font Storage group box, select the location to store the font
to.
NOTE: Do not choose module C or D. These modules are used for
label data and are cleared every time a label is printed.
6. Select the font name.
The font name should be as short as possible, yet accurately
describe the font and style. You can take the default.
7. Press OK. The font is now sent to the printer and the Font property
page is displayed.
8. Select the font from the Font Name list.
Make a note of the file name, location, and ID displayed in the
Font Information group box.
9. Press OK to save your changes.
Legitronic User Manual (v3.40)
220
Appendix D: True Type Font Support
Configuring Legi Print Drivers
You must tell Legi what fonts are downloaded and resident in the
printer. Do this by using the Fonts property page of the Legi print
driver. Note that the fonts you want to use must have previously been
downloaded to the printer using the Datamax Print Driver.
You will need administrative access to the computer to perform the
following procedures.
Add Font Procedure
1. Display the properties page of the Legi driver you are using and
select the Fonts tab.
2. Select the TrueType font you want to access in the printer from the
list Installed Computer Fonts.
3. Enter the font filename in the Download Filename edit control.
NOTE: This is the name that was used when you downloaded the
font to the printer using the Datamax Print Driver.
4. Enter the font ID in the Font ID edit control.
NOTE: This is the value (e.g. S50) that was assigned when you
downloaded the font using the Datamax Print Driver.
5. Choose the location (e.g. F) that you used when you downloaded
the font. Select it from the Location list.
6. Press the Add To Downloaded List button.
The font is added to the Downloaded Printer Fonts list.
7. Press OK when you are done adding fonts.
Delete Font Procedure
1.
2.
Select the font from the Downloaded Printer Fonts list.
Press the Remove From List button. You will see the font
disappear from the list.
3.
Press OK when you are done removing fonts.
Use the Datamax Print Driver to also delete the font from the printer.
Legitronic User Manual (v3.4)
221
Appendix D: True Type Font Support
Notes
Datamax applies incorrect sizing algorithms to fonts that have the bold
style. These fonts will print wider than they display. Additionally, the
width of other fonts may not exactly match the display, due to
differences between Windows’ and the printer’s sizing algorithms.
Legitronic User Manual (v3.4)
222
Appendix E. Graphics
Support
Overview of support
Legi 3.4 supports recalling downloaded PCX graphics in
the printer. These graphics are then accessed as printer
resident graphics and therefore do not need to be
downloaded with every label. . This process greatly
improves the time it takes to print a label and is
accomplished in two steps
First, the graphics are downloaded to the printer using
various tools provided by the different printer vendors.
Second, the graphic information is entered into the Legi
driver property pages so that Legi is aware of which
graphics are printer resident.
Downloading graphics through the Legi drivers will be
supported in future versions.
This document describes both the methods used by printer
vendors to download graphics and how to configure the
Legi print drivers to use the graphics.
When you select graphics in Legi, Legi does not distinguish
the downloaded graphics in any way from other graphics.
Just select the graphic as you normally would. If it is
printer resident, the graphic will be properly selected at
print time. However the user must remember which
graphics are printer resident.
Legitronic User Manual (v3.40)
223
Appendix E: Graphics Support
Graphics cannot be dynamically sized once they are
downloaded. At label design time, if a graphic in Legi is
dynamically sized larger or smaller, it will not match the
graphic in the printer when the label prints. This is a printer
limitation.
Legitronic User Manual (v3.4)
224
Appendix E: Graphics Support
Zebra Printers: Graphics
Downloading Graphics
Zebra printers support downloading PCX graphics into the
printer. Zebra requires that the PCX file first be converted
into its proprietary format and then downloaded. Zebra
does not support rotation of graphics. Once the graphic is
downloaded, it will only print in that one orientation.
You convert graphics using Zebra Tools 3.1.
NOTE: Make sure that the printer is powered on and
attached to the computer before starting this procedure.
Procedure
1.
2.
3.
4.
Load the Zebra Tools application.
Select Convert, Graphics.
Enter the graphic name to download in Source.
Enter the name to use for the converted file in
Destination.
NOTE: The destination name is limited to 8 characters.
This can be the same name (without the PCX
extension) as the source graphic, because the extension
will be changed to GRF.
5. Select the destination device (usually B:).
NOTE: R: is used for label data and is cleared at the
beginning of every label printed. Therefore, do not use
R: for storing graphics.
6. Enter the name the printer will use to identify this
graphic.
NOTE: This name is limited to 8 characters. It can also
be the same as the previously entered names.
7. Select rotation if a rotation other than 0° is desired.
Once downloaded, the graphic cannot be rotated.
Legitronic User Manual (v3.4)
225
Appendix E: Graphics Support
8. Locate the converted file according to the directory
paths setup under Options, Directories.
9. Send the file to the printer using a communications
program or DOS.
Notes
Use the front panel setup to display the memory module
contents. Do this to verify that the graphic was stored in the
printer.
Configuring Legi Print Drivers
You must tell Legi what graphics are downloaded and
resident in the printer. Do this by using the Graphics
property page of the Legi print driver. Note that the
graphics you want to use must have previously been
downloaded to the printer using the Zebra Tools 3.1.
You will need administrative access to the computer to
perform the following procedures.
Add Graphic Procedure
1. Display the property pages of the Legi driver you are
using and select the Graphics tab.
2. Enter the name of the graphic as it is used by Legi in
the Filename edit control.
NOTE: Do not include the drive letter or path.
For example: In a Legi graphic field, the name might
be C:\Graphics\Logo.pcx. Enter only Logo.pcx in this
edit control.
3. Enter the graphic filename in the Download Filename
edit control.
NOTE: This is the name that was used when you
downloaded the font to the printer using Zebra Tools
3.1. You do not need to enter the .GRF extension.
4. Select the memory location that was used when you
downloaded the font (usually B:). NOTE: Check that
R: was not used. R: is used for label data and is cleared
at the beginning of every label printed.
Legitronic User Manual (v3.4)
226
Appendix E: Graphics Support
5. Press the Add To Downloaded List button. The graphic
will be added to the Downloaded Printer Graphics list.
6. Press OK when you are done adding graphics.
Delete Graphic Procedure
1. Select the graphic from the Downloaded Printer
Graphics list.
2. Press the Remove From List button. You will see the
graphic disappear from the list.
3. Press OK when you are done removing graphics.
The graphic must also be deleted from the printer using the
Zebra Tools 3.1.
Legitronic User Manual (v3.4)
227
Appendix E: Graphics Support
Sato Printers: Graphics
Downloading Graphics
Sato printers support downloading PCX graphics into the
printer. Unlike other printer families, Sato allows graphics
to be rotated after they are downloaded.
You download the fonts using the Sato Memory Card
Manager.
NOTE: Make sure that the printer is powered on and
attached to the computer before starting this procedure.
Procedure
1. Start the Memory Card Manager application.
2. Select Options, Settings. Choose Slot number 1 or 2
from the list, depending on which slot your memory
card is using.
3. Press OK.
4. Select Graphics, Add.
5. Select PCX files in the List files of type: list box.
6. Select the graphic you want to download and press OK.
7. Select the graphic name from the Graphics column on
the main screen.
8. Select Graphics, Download.
NOTE: This downloads the PCX graphic to the printer.
The D next to the graphic indicates this graphic has
been downloaded.
9. Use the Test Print feature to verify the download
operation: Select Graphics, Test Print.
NOTE: This prints the graphic along with its assigned
ID. This ID is the location in the printer where the
graphic is stored. Record this ID for later use.
Legitronic User Manual (v3.4)
228
Appendix E: Graphics Support
Configuring Legi Print Drivers
You must tell Legi what graphics are downloaded and
resident in the printer. Do this by using the Graphics
property page of the Legi print driver. Note that the
graphics you want to use must have previously been
downloaded to the printer using the Sato Memory Card
Manager.
You will need administrative access to the computer to
perform the following procedures.
Add Graphic Procedure
1. Display the property pages of the Legi driver you are
using and select the Graphics tab.
2. Enter the name of the graphic as it is used by Legi in
the Filename edit control.
NOTE: Do not include the drive letter or path.
For example: In a Legi graphic field, the name might
be C:\Graphics\Logo.pcx. Enter only Logo.pcx in this
edit control.
3. Choose the memory card slot that was used when you
downloaded the graphic using the Sato Memory Card
Manager.
4. Select it in the Memory Card list.
5. Enter the graphic ID in the Storage Area edit control.
NOTE: This is the value that was assigned by the
printer when you downloaded the graphic using the
Sato Memory Card Manager.
6. Press the Add To Downloaded List button.
7. The graphic will be added to the Downloaded Printer
Graphics list.
8. Press OK when you are done adding graphics.
Legitronic User Manual (v3.4)
229
Appendix E: Graphics Support
Delete Graphic Procedure
1. Select the graphic from the Downloaded Printer
Graphics list.
2. Press the Remove From List button.
You will see the graphic disappear from the list.
3. Press OK when you are done removing graphics.
The graphic must also be deleted from the printer using the
Sato Memory Card Manager.
Legitronic User Manual (v3.4)
230
Datamax Printers: Graphics
Downloading Graphics
Datamax printers support downloading PCX graphics into the printer.
Datamax does not support rotation of graphics; that is, once the
graphic is downloaded, it will only print in that one orientation.
Datamax does not supply any tools for downloading graphics. You
must add a special header to the PCX graphic you want to download
and then copy or send that file to the port to which the printer is
connected.
Header format:
<STX>I<module>P<graphic name><CR>data
where
<STX> = 02 hex,
I stands for Input Image Data,
<module> is the memory module to which the graphic is
downloaded: A, B or F
P stands for PCX image format,
<graphic name> is the name the graphic will be stored under
in the printer (maximum 16 characters),
<CR> stands for Carriage Return, which is 0D hex,
<data> is the PCX file
NOTE: Make sure that the printer is powered on and attached to the
computer before starting this procedure.
Procedure
1. Open the PCX file using a hex or binary editor.
2. Insert the header shown above at the beginning of the file,
substituting a module identifier and graphic name in the
appropriate places.
3. Save the file under a new name.
4. Send the file to the printer use a communications program or DOS.
Notes
You can display memory module contents using the front panel setup.
Do this to verify that the graphic was stored in the printer.
Legitronic User Manual (v3.40)
231
Appendix E: Graphics Support
Configuring Legi Print Drivers
You must tell Legi what graphics are downloaded and resident in the
printer. Do this by using the Graphics property page of the Legi print
driver. Note that the graphics you want to use must have previously
been downloaded to the printer.
You will need administrative access to the computer to perform the
following procedures.
Add Graphic Procedure
1. Display the properties page of the Legi driver you are using and
select the Graphics tab.
2. Enter the name of the graphic as it is used by Legi in the Legi
Filename edit control. NOTE: Do not include the driver letter or
path.
For example, in a Legi graphic field, the name might be
C:\Graphics\Logo.pcx. Enter only Logo.pcx in this edit control.
3. Enter the graphic filename in the Download Filename edit control.
This is the name that was used when you downloaded the graphic
to the printer.
4. Choose the location that was specified when you downloaded the
graphic to the printer. Select it from the Location list box.
5. Press the Add To Downloaded List button.
The graphic is added to the Downloaded Printer Graphics list.
6. Press OK when you are done adding graphics.
Legitronic User Manual (v3.4)
232
Appendix E: Graphics Support
Delete Graphic Procedure
1. Select the graphic from the Downloaded Printer Graphics list.
2. Press the Remove From List button. You will see the graphic
disappear from the list.
3. Press OK when you are done removing graphics.
The graphic must also be deleted from the printer.
Legitronic User Manual (v3.4)
233
Index
4symbol, 10
abort, 142
abs, 142
activating
audit support, 101
Add Graphic Procedure, 230
Datamax printers, 236
Sato printer, 233
Add Printer
icon, 173
Wizard, 173
Add/Modify Group Name dialog box, 88, 89
Add/Modify User dialog box, 91, 92
ADD-BATCH, 212
adding
groups, 88
users, 90
Adding a User, 119
ALTERNATE-AUTO-COUNTS, 181
ANSI-CHAR, 192
Application Designer, 188
commands, 189
conditionalGOTO, 190
database input/output, 208
file input/output, 202
IF, 191
math, 194
miscellaneous, 212
port input/output, 205
screen input/output, 195
string, 192
performance notes, 188
syntax rules, 188
Archive function, 117
asc, 143
Assign Read-Only Paths dialog box, 93
assigning
ports to remote sources, 111
assignment statement, 189
Audit Database button, 122
audit support, 100
how to activate, 101
label print log, 104
label stock log, 102
system print log, 103
auto_identical, 143
auto_serial, 143
Legitronic User Manual (v3.4)
auto_tracking_serial, 144
automated print control, 180, 217
how to use, 180
rules, 189
sample file, 214
Automation Server, 138
AUTO-REPEAT, 181
barcode fields, 47
batch print control, 180
commands, 181
BEGIN, 182
blank, 144
box fields, 58
c128fnc, 145
cat, 144
Changes to Automation Interface, 136
changing
group names, 89
user names, 91
user passwords, 91
check boxes, how to use, 12
checksum, 145
chr, 145
CLEAR-BUFFER, 182
closing
Legi, 27
windows, 11
combo boxes, how to use, 12
command buttons
selecting, 10
standard, 15
commands
Application Designer, 189
conditional GOTO, 190
database input/output, 208
file input/output, 202
GOTO, 190
IF, 191
math, 194
miscellaneous, 212
port input/output, 205
screen input/output, 195
string, 192
communication port parameters
setting, 112
conditionalGOTO commands, 190
configuration
234
Index
file locations, 109
options, 108
procedure, 107
remote input, 111
settings, 106
system tables, 113
Configuration dialog box, 96, 101, 107
configuring
printer drivers, 175
configuring Legi, 106
file locations, 109
options, 108
procedure, 107
remote input, 111
system tables, 113
Configuring Legi Print Drivers, 230, 233
constant data, 62
data expression functions
abort, 142
abs, 142
asc, 143
auto_identical, 143
auto_serial, 143
auto_tracking_serial, 144
blank, 144
c128fnc, 145
checksum, 145
chr, 145
dll, 145
false, 146
fld, 146
format_time, 147
get_current_date, 148
get_current_label_in_run, 148
get_date_value, 149
get_day, 150
get_hour, 151
get_identical_count, 152
get_job_start_date, 152
get_job_start_time, 153
get_job_submit_date, 153
get_job_submit_time, 154
get_julian_day, 154
get_label_name, 155
get_label_stock, 155
get_minute, 155
get_month, 156
get_query_count, 157
get_query_rec, 157
get_second, 157
get_serial_count, 158
get_time_value, 158
get_user_name, 159
get_week_of_year, 159
get_week_of_year_iso, 160
get_year, 160
if, 161
index, 161
isam, 161
isblank, 162
isnumber, 162
Legitronic User Manual (v3.40)
ispm, 162
isstring, 163
label_version, 163
left, 164
len, 164
lower, 165
mid, 165
ODBC_query, 165
ODBC_update, 166
pad_left, 167
pad_right, 167
precision, 168
right, 168
serial, 169
set_nonprinting(), fld("Text2"), 169
sgn, 169
textfile, 170
tracking_serial, 170
true, 170
upper, 171
data expression functions:, 166
database fields, 65
database input/output commands, 208
Datamax Printers, 235
date fields, 67
DB-CLOSE, 208
DB-DELETE-RECORD, 208
DB-INSERT, 209
DB-OPEN, 208
DB-READ, 209
DB-READ-NEXT, 209
DB-UPDATE, 211
Delete Graphic Procedure, 231
Datamax printers, 237
Sato printer, 234
DELETE-BATCH, 182
deleting
groups, 90
label fields, 74
users, 92
Design tool bar, 23
designing labels, 27
DIALOG, 195
dialog boxes
Add/Modify Group Name, 88, 89
Add/Modify User, 91, 92
Assign Read-Only Paths, 93
Configuration, 96, 101, 107
Field Properties, 40, 98
Insert Object, 74, 75
Label Properties, 32, 105
Open Label for Design, 30
Open Label for Printing, 78
Options, 181
Print Driver Properties, 175
additional options, 178
Print Properties, 79
Printers, 172
Save As, 76
Security Administrator, 87, 93, 94
Security Administrator Login, 86
235
Index
standard command buttons, 14
DIALOG-CHECKBOX, 196
DIALOG-CLOSE, 196
DIALOG-COMBOBOX, 196
DIALOG-COMBOBOX-FILES, 197
DIALOG-COMBOBOX-ITEM, 197
DIALOG-EDIT, 197
DIALOG-FRAME, 198
DIALOG-GROUPBOX, 198
DIALOG-GROUP-END, 198
DIALOG-LIST, 198
DIALOG-LIST-FILES, 199
DIALOG-LIST-ITEM, 199
DIALOG-PUSHBUTTON, 199
DIALOG-RADIOBUTTON, 200
DIALOG-SET-TEXT, 200
DIALOG-SHOW, 201
DIALOG-TEXT, 201
Disable button, 121
DISABLE-AUTO-PRINT, 182
dll, 145
Downloading Graphics, 232
Datamax printers, 235
zebra printers, 229
draft labels
printing, 77
drop-down lists
how to use, 11
Edit menu, 19
ellipsis, 10
END, 182
ERROR-ACTION, 182
ERROR-LOG, 183
Event Handling, 140
expression types
constant, 62
database, 65
date or time, 67
reference, 63
string builder, 68
supplied input, 69
text, 66
false, 146
FDA 21 CFR Part 11, User and Administrator Reference, 115
field alignment tool, 39
Field menu, 21
Field Properties dialog box, 40, 98
fields
entering data in, 11
fields, deleting, 74
file input/output commands, 202
File menu, 18
FILE-CLOSE, 202
FILE-DELETE, 202
FILE-OPEN, 202
FILE-READ, 203
FILE-READ-LINE, 203
FILE-READ-TOKEN, 203
files
script, 181
weber.inf, 174
Legitronic User Manual (v3.40)
FILE-WRITE, 203
FILE-WRITE-LINE, 204
fld, 146
FMT-GDIPRINTERNAME, 183
FMT-LBLVIEW-EACHQUERIED, 187
FMT-LBLVIEW-EACHSERIAL, 187
FMT-LBLVIEW-PRINTLABELS, 187
FMT-LBLVIEW-PRINTSTART, 187
FORMAT, 183
format_date, 146
format_time, 147
function rights, CFR compliance, 116
function rights, setting for groups, 93
general requirements, 5
get_current_date, 148
get_current_label_in_run, 148
get_date_value, 149
get_day, 150
get_day_of_week, 150
get_day_of_week_iso, 151
get_hour, 151
get_identical_count, 152
get_job_start_date, 152
get_job_start_time, 153
get_job_submit_date, 153
get_job_submit_time, 154
get_julian_day, 154
get_label_name, 155
get_label_stock, 155
get_minute, 155
get_month, 156
get_query_count, 157
get_query_rec, 157
get_second, 157
get_serial_count, 158
get_time_value, 158
get_user_name, 159
get_week_of_year, 159
get_week_of_year_iso, 160
get_year, 160
GET-DATE, 212
GET-TIME, 212
GOTO commands, 190
graphics fields, 52
Graphics Support, 227
group names
adding, 88
deleting, 90
modifying, 89
groups
adding, 88
deleting, 90
maintaining, 88
modifying, 89
setting function rights for, 93
HARDWARE-INPUT, 205
HARDWARE-OUTPUT, 205
Help menu, 22
help, how to access, 13
icons
Add Printer, 173
236
Index
icons in tool bars, 23
IDENTICAL-COUNT, 183
if, 161
IF commands, 191
IF-EQUAL, 191
IF-GREATERTHAN, 191
IF-LESSTHAN, 191
IF-NOT-EQUAL, 191
IF-NOT-GREATERTHAN, 191
IF-NOT-LESSTHAN, 191
index, 161
input, supplied, 69
Insert Object dialog box, 74, 75
installing
printer drivers, 172
installing Legi, 5
isam, 161
isblank, 162
isnumber, 162
ispm, 162
isstring, 163
italics, conventions for, 3
JOB-DESCRIPTION, 187
keyboard shortcuts, 9
Label Archiving, 131
Label Design window, 28
label fields
barcode, 47
box, 58
creating new, 37
data types, 62
constant, 62
database, 65
date or time, 67
reference, 63
string builder, 68
supplied input, 69
text, 66
defining space for, 37
deleting, 74
graphics, 52
line, 56
positioning, 37
raw, 59
repositioning, 38
resizing, 39
selecting. See selecting: label fields
specifying properties of, 40
text, 41
types of, 37
using existing, 37
label print log
how to use, 104
label properties
specifying, 31
Label Properties dialog box, 32, 105
label stock log
how to use, 102
label_version, 163
labels
creating a new design, 29
Legitronic User Manual (v3.40)
designing, 27
draft printing, 77
printing, 84
opening for, 78
saving, 76
test printing, 77
using an existing design, 30
left, 164
Legi
application window, 8, 16
menu bar, 17
title bar, 17
application workspace, 16
audit support, 100
how to activate, 101
label print log, 104
label stock log, 102
system print log, 103
configuration, 106
file locations, 109
options, 108
procedure, 107
remote input, 111
system tables, 113
general requirements, 5
how to close, 27
how to open, 15
icon, 15
installing, 5
minimum system requirements, 5
printer drivers
configuring, 175
installing, 172
security, 85
Security Administrator, 85
logging in, 86
tool bars, 23
Design, 23
Standard, 23
Window, 23
under Windows, 8
uninstalling, 7
Windows conventions used in, 8
Legitronic User Reference for 21 CFR Part 11, 126
len, 164
line fields, 56
logging into Security Administrator, 86
lower, 165
maintaining
groups, 88
users, 90
math commands, 194
MATH-ABS, 194
MATH-ADD, 194
MATH-DIV, 194
MATH-MOD, 194
MATH-MUL, 194
MATH-SUB, 194
maximizing
windows, 11
Meaning Level option, 117
237
Index
menu bar, 17
menus
dropping down, 9
Edit, 19
Field, 21
File, 18
Help, 22
Option, 21
options, 17
Options, 96
selecting an option, 9
View, 17, 20, 23
Window, 22
Windows Start, 15, 172
MESSAGE-BOX, 201
mid, 165
minimizing windows, 11
minimum system requirements, 5
modifying
group names, 89
user names, 91
user passwords, 91
Modifying a User, 120
mouse, how to use, 9
multiple-across labels, 81
Object Creation, 140
object linking and embedding (OLE). See OLE
ODBC_query, 165
ODBC_srch, 166
ODBC_update, 166
ODBC-QUERY-DATA-SOURCE, 183
ODBC-QUERY-END-VALUE, 184
ODBC-QUERY-PASSWORD, 184
ODBC-QUERY-SEARCH-FIELD, 184
ODBC-QUERY-SQL-EXPRESSION, 184
ODBC-QUERY-START-VALUE, 184
ODBC-QUERY-TABLE, 184
ODBC-QUERY-USER-NAME, 185
ODBC-QUERY-USE-SQL-EXPRESSION, 185
OLE, 74
creating a new object, 75
dragging file names from desktop, 76
editing an object, 76
inserting an existing object, 74
online help, how to use, 13
Open Label for Design dialog box, 30
Open Label for Printing dialog box, 78
opening
labels for printing, 78
Legi, 15
Option menu, 21
options
configuration, 108
security, selecting, 94
Options dialog box, 181
Options menu, 96
OUTPUT-FILE, 185
pad_left, 167
pad_right, 167
parameters
communication port, 112
Legitronic User Manual (v3.40)
Password Expiration, 126
passwords
modifying, 91
Periodic Relogin, 129
port assignments, 111
removing, 112
port input/output commands, 205
PORT-CHECK, 205
PORT-CLOSE, 206
PORT-OPEN, 206
PORT-READ, 206
ports
assigning to remote sources, 111
removing from remote sources, 112
PORT-WRITE, 207
positioning label fields, 37
precision, 168
PRINT, 185
print control
automated, 180, 217
how to use, 180
rules, 189
batch, 180
commands, 181
print data rights, setting, 93
Print Driver Properties dialog box, 175
additional options, 178
Print Manager, 84
print properties
specifying, 79
Print Properties
dialog box, 79
printer drivers
configuring, 175
installing, 172
printing
draft labels, 77
labels, 84
test labels, 77
PRINT-SUSPENDED, 187
properties
label
specifying, 31
radio buttons, how to use, 13
raw fields, 59
real time clock data, 72
reducing size of
windows, 11
reference fields, 63
remote input, 111
remote sources
assigning ports to, 111
removing ports from, 112
repositioning
label fields, 38
resizing label fields, 39
right, 168
Sato Printers, 232
Save As dialog box, 76
saving
labels, 76
238
Index
screen input/output commands, 195
script files
how to run, 181
scrolling, 11
Security Administration, FDA 21 CFR Part 11, 115
Security Administrator, 85
logging in, 86
Security Administrator dialog box, 87
Security Administrator Login dialog box, 86
security options
selecting, 94
selecting
security options, 94
serial, 169
serial numbers
tracking, 95
configuring Legi for, 96
use in label formats, 98
SERIAL-COUNT, 185
SET-DATE, 212
SET-TIME, 213
setting
communication port parameters, 112
function rights for groups, 93
print data rights, 93
Setting Label Mode (Meaning Level), 135
sgn, 169
shortcut keys, 9, 10
SLEEP, 213
smallcaps, conventions for, 3
spin boxes, how to use, 12
Standard tool bar, 23
Start menu, 172
string builder, 68
string commands, 192
STRING-CAT, 192
STRING-FIND, 192
STRING-LEN, 192
STRING-LOWER, 192
STRING-MID, 193
STRING-PARSE, 193
STRING-UPPER, 193
supplied input, 69
SUPPLIED-PORT, 186
syntax
Application Designer, 188
system
configuration, 106
tables, 113
system print log
how to use, 103
system requirements
general, 5
minimum, 5
system security, 85
System Settings, 118
tab displays, how to use, 13
Legitronic User Manual (v3.40)
tables
Tracking Serial Numbers
how to maintain, 97
test labels
printing, 77
TEST-PRINT, 186
text boxes, how to use, 11
text fields, 41
text file fields, 66
textfile, 170
time fields, 67
title bar, 17
tool bars, 23
tracking serial numbers, 95
configuring Legi for, 96
use in label formats, 98
Tracking Serial Numbers table
how to maintain, 97
tracking_serial, 170
true, 170
Type Library, 139
Type Library Usage, 139
uninstalling Legi, 7
upper, 171
User and Administrator Reference (FDA 21 CFR Part 11),
115
user names
adding, 90
deleting, 92
modifying, 91
user passwords
modifying, 91
USER-NAME, 186
users
adding, 90
deleting, 92
maintaining, 90
modifying, 91
View Audit Trail button, 123
View menu, 20, 23
Visual Basic for Applications, 137
weber.inf file, 174
Window menu, 22
Window tool bar, 23
windows
Label Design, 28
maximizing, 11
minimizing, 11
reducing size of, 11
Windows
Add Printer Wizard, 173
conventions used in Legi, 8
Print Manager, 84
Start menu, 15, 172
windows, closing, 11
WIN-EXEC, 213
Zebra Printers, 229
239
Index
Legitronic User Manual (v3.40)
240