1
1
Control Center
Installation and Operation Manual
This user guide is explaining usage of Control Center.
Please be informed of this user guide before use of the product.
This user guide along with software, hardware explained in this manual will be protected by copyright law.
So any attempt to copy part or whole of this manual, translation into other languages without permission of
WEBGATE will be prohibited except copy for normal use within the range of copyright law.
Warranty of product and limitation on liability
Manufacturer is not liable for sales of this products and do not delegate authority to 3 rd party to be liable
instead of manufacturer. This document is used only for regular information and any risk following the use of
this information will belong to user and all contents in this manual will not be assured.
Contents of this manual could be different based on software upgrade and product design along with
specification can be subject to be changed without any pre-notice to users.
Copyright ©2012 WEBGATE. All rights reserved.
2
Contents
Product Over view 5
Basic Information 5
Main Features 6
Installation 7
System Requirements 7
Notice before installation 7
Installation Program 8
Getting Started 11
Running Program/Log-in 11
Unit Registration 11
Live Viewer (Monitor) 14
Screen structure and name of functions 14
Site mode 18
Viewset mode 22
Map mode 24
Option Configuration 32
Playback Viewer 38
Screen Composition and Function name 38
Unit connection and File Open 40
Basic control 42
Control Panel 45
Timeline 48
Search 50
Option 53
Configuration Tools 54
Screen Composition 54
Unit Connection 55
Basic Function 56
Tools 58
Schedule Backup 58
MiniPlayer 62
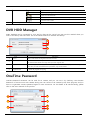
DVR HDD Manager 63
OneTime Password 63
3
File Converter 64
Appendix 70
Introduction of WESP SDK 70
Specifications 74
4
Product Over view
Basic Information
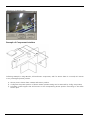
Control Center is managing software that can control max 1,024 units installed in remote area.
It provides functions such as real-time monitoring, search and backup of recorded image and setting. It also
supports dual monitor with 64 split screen and can monitor max 128 channels simultaneously. It can be done
with designated motion area, and text search is also possible.
Multichannel monitoring, optimal can be monitored even when multi-streaming WEBGATE’s advantage of
partitioned to fit on the screen and the ability to automatically select a stream.
This feature is to show HD Stream (1080p, 720p) in single screen mode and SD Stream (D1, Half, CIF) in 16
split or more smaller split screen mode to reduce unnecessary consumption of network resources and to help
efficient use of CPU resources. This feature works automatically so no need to set user to transfer images
directly or wait.
Through this technology is applied in the distributed connection management, and it uses less CPU and
network load, real-time management of many units..
With more than 8channels of 1080p/30fps video can be smoothly monitored using a high-performance display
engine newly mounted from the Control Center 3.0 version, and other programs lack the performance of the
PC by momentarily, it turns channel monitoring only minimal frame rate to reduces to guarantee the stability
of the system, and when the performance restored, the system always returned to the monitoring of the
original frame rate automatically.
There are several way to notified and able to cope the situation that occurs in the registered units in real time,
it also provides the ability to store and retrieve the events that occurred and when an event occurs, it pops-up
the related video.
The Control Center provides Viewset and Map grouping function to efficiently and conveniently managing the
number of units.
Viewset function is to let user wish to select the channels with a new name from several units.
And the Map feature is to placing the camera, sensor, MIC and relay in the map to managing the units and
you can operate each device icon to view the image and control.
In addition, since it supports dual monitor, so you can monitor and control units at the same time, and also
you can check the units status in real-time such as event, alarm log,
5
Main Features
Support FULL HD Video
Control Center supports live monitoring/playback and backup with SD CIF/HALF/D1 normal image and also
HD 1080p(1920x1080), 720p(1280x720) high quality image.
Support up to 8ch at 1080p with 30fps each channel in live real-time monitoring
Support up to 50ch at CIF with 30fps each channel in live real-time monitoring
Live Monitoring
Support various monitoring screen and high quality image display without delay for each channel.
Supports various screen split for monitoring “1/4/9/16/25/36/49/64”
Full Screen Mode
Can add the image to the desired position by drag-and-drop operation with mouse
Function for management of group viewset
Layered map function
Auto Sequence
Event Pop-up
Real-time audio output
Support Mic
Playback
Support convenient function for search and playback.
Support 16 split screen playback simultaneously
Full Screen Mode
Search by Calendar/time line/text/smart/thumbnail
Playback by time, date, channel
Playback by event image separately
Support various speed playback (Max. 64x)
Support watermark check
Support image adjustment by channel
Digital Zoom In/Out
Playback/Search/Backup by direct connect DVR’s HDD to PC
Recording and Back-up
Support the function to store the image recording or real-time video monitoring, schedule and real-time backup
unit’s recorded data.
Support Quick Recording and Image save for monitoring’s image
Real-time backup of unit’s recorded image
Auto backup via schedule backup
Event log record/search/backup
Others
6
Support all WEBGATE models which are IP Camera, SD DVR, HD DVR, NVR, WinDVrS, WinRDS
Max. 1024 units can be connected
Support user rights, user operating limitation and user log-in
Support saving of unit’s setting information
Import/Export setting information
Support Keyboard hotkey and joystick
Support Jog/Shuttle device for playback
Installation
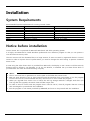
System Requirements
Recommended system requirements for running Control Center.
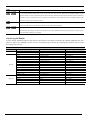
Items
CPU
Main Memory
Video Card
Display Resolution
HDD
OS
Others
Min. Requirements
Intel Core2Duo
2GB
128MB Graphic Card
1280 x 1024 (with 32bit color) or higher
100GB or higher
Windows XP 32bit
DirectX 11 or higher
Recommended
Intel i7 2.8GHz or higher
4GB or higher
Radeon HD6800 or higher
1920 x 1080 (with 32bit color) or higher
500GB or higher
Windows 7 32Bit
DirectX 11 or higher
Notice before installation
Control Center Pro is optimized for Microsoft Windows7 and 32bit operating system.
It is highly recommended to install Windows Update and virus detection program so that you can protect a
virus and serious security code.
The PC’s resource will be decreased due to a large amount of event occurred by registered device in Control
Center. In order to improve the PC’s performance, you need to change the unit’s setting to prevent unwanted
event occurs.
In case using the video driver which is provided from Microsoft, the display in user’s screen could be seriously
flickering and its efficiency can decrease, so do not use DirectX, or establish the up-to-date driver which is
provided from the video card manufacturing company.
<Note>
1.
2.
3.
4.
5.
The PC user who has no permission to set the path to the folder that cannot write.
May not work properly if two or more users through the transition from one system to run the program
from the account. It is recommended that only one account to use to install the program.
When you upgrade from version v3.x or below, the sub log storage method is changed. And when you
first log after the upgrade, the search time will take longer time.
In order to avoid a conflict with the program that is used in the PC, close all programs that are running
and encouraged to proceed with the installation.
Exit the program or web viewer provided by WEBGATE, and must to be proceed with the installation.
7
Installation Program
Installation
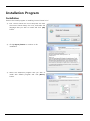
Execute the install program to installing Control Center in PC.
1) Run “Control Center Pro 3.x.x.x Setup.exe” file from
the Control Center Setup CD or PC, and select the
language that you wish to install and click [OK]
button.
2) Click [I Agree] button to continue to do
installation.
3) Select the additional program that you wish to
install with default program and click [Next>]
button.
8
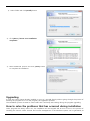
1) Select folder and click [Install] button.
2) Click [Next>] button once installation
completed.
3) Select additional options and click [Close] button
to complete the installation.
Upgrading
In case the Control Center already installed on your PC, upgrade directly without going through the process of
deleting the program file to run the program, the upgrade is possible.
The installation process is same as “new install” and it will keep exist setting during the program upgrading.
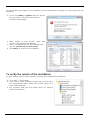
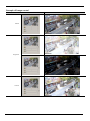
How to solve the problems that has occurred during installation
Other programs are being used in PC, the installation will be stopped and an error occurs in the process of
installing the Control Center. Process and conflict management in the Windows system can be generated, at
9
this time follows the progress of the installation process terminates and normally you can proceed with the
installation.
1) Do not click [Abort] or [Ignore] when you get the
error as shown in the picture and open the
“Windows Task manager”.
2) Select “display all users process” option from
bottom of the Windows Task Manager.
3) Select “ControllerService.exe” and “Controller.exe”
and click [End Process] to close process.
4) Click [Retry] to continue to do installation.
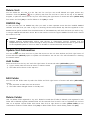
To verify the results of the installation
To check whether Control Center installed in properly after completed the installation.
1) Go to Start → All program.
2) If the Control Center installed in proper way, you will notice
the “Digital Image World” folder with “Control Center” and
other related programs.
3) The programs under the Tools folder which you selected
during the installation.
10
Getting Started
Running Program/Log-in
You need to log-in before using Control Center.
1) Double the “Control Center Monitor” icon from PC.
2) Type in the User ID and PW.
- Default User ID : Administrator
- Default PW : admin
3) Click [OK] button.
4) You can save user ID/PW by selecting the Save User ID/Save
Password option, and you won’t need to type in again when
you log-in next time.
◈ if you set the option to “do not ask information when you log-in” then the program won’t ask any
information and log-in directly.
<Warning>
1.
2.
There is a risk of exposure to the default password, after you install the product change to a new
password. Responsible for the security of other problems caused by the use of default password to the
user.
If several people use the same PC or installed where other users access other administrators, please
careful about what you are used to check the password stored.
Unit Registration
To register/edit/delete the unit only can do it from Control Center Monitor program, and the registered unit
will be displayed from “My Unit” and this registered unit can be used both in Playback and Configuration Tools
program. It is easy to manage several units in one folder which if you can create folder to add them.
Add Unit
Click the [Add]
icon or [Action] item from the tool bar or menu at the top of the Monitor Program, or
place the mouse on the “my unit” and clicking the right button of mouse and select [Add Unit] from menu. In
case the unit is in the local network area then just drag the unit to “my unit” to add the unit.
11
Add Fixed IP Uint
1) Select the fixed IP when the unit registration window
executed.
2) Type in IP address and click [Find] button. If the unit
is in the LAN then click the [Auto Detect] button.
3) Check the information that you wish to add the unit.
4) Type in user ID and PW and click [OK] button.
5) The added unit will be shown in the “my unit” list.
Add Dynamic IP Unit
1) Select the dynamic IP when the unit registration
window executed.
2) Type in dynamic IP server in “Registration Server”
and type in Group ID.
3) Click [Find By Group ID …] button.
4) The unit will be shown in the list and select one of
them that you wish to add unit.
5) Check the information that you wish to add the unit.
6) Type in user ID and PW and click [OK] button.
7) The added unit will be shown in the “my unit” list.
<Remarks>
1.
Currently the WEBGATE has it’s own DDNS server, you can use www.webgateinc.com.
Edit Unit
You can edit port, number, user ID, PW, and RADIUS key of the unit that is registered in the “My Unit”.
By click the [Edit]
icon or [Action] item from the tool bar or menu at the top of the Monitor Program, or
place the mouse on the “my unit” and clicking the right button of mouse and select [Edit unit] from menu.
1) Edit the information that you wish to change and
click [OK] button.
2) The edited information will be saved to the unit.
12
Delete Unit
You can delete the unit that is in the “My unit” list. And you can re-add deleted unit again without any
limitation. Click the [Delete]
icon or [Action] item from the tool bar or menu at the top of the Monitor
Program, or place the mouse on the “my unit” and clicking the right button of mouse and select [Delete Unit]
from menu. and click [Yes] to confirm delete or click [No] to cancel.
RADIUS Key
In case you wish you use RADIUS Key then you need to have separate server that has installed RADIUS
software. And after that you need to log-in by entering the ID & PW, Shared Key that has registered on the
RADIUS server grants received from the administrator of the RADIUS Key and check the items you wish to login using a RADIUS authentication server. But in that case the unit must support RADIUS function and it should
be turned to be ON.
<Remarks>
1.
RADIUS (Remote Authentication Dial-In User Service) is client/server protocol software that the
RAS(Remote Access Server) connect through a dial-up modem to authenticate users and to grant access
to the requested system or service to them to be able to communicate with central server.
Update Unit Information
You can use
icon from tool bar or place the mouse on the unit item window and click right button of
mouse and select [Refresh] option to update unit information. You can use it for edit information or checking
the network status.
Add Folder
Place the mouse on the “my unit” and click right button of mouse and select [Add Folder] option.
1) Type in folder name and click OK button to add the folder.
2) The folder will be shown in the “My Unit”.
Edit Folder
You can edit the folder name by select the folder and click right button of mouse and select [Edit Folder]
option.
1) Edit the name of folder and click OK button.
2) The folder name changed shown in the “My Unit”.
Delete Folder
User can delete folder registered in “my unit”. Please be noted that if folder is deleted, units registered in sub
folder will be deleted together. Deleted folder will be removed from list and it can be registered with no limit
later on at anytime. Choose folder with mouse then click on right button to select [Delete Folder] to run
confirmation window of folder delete. Click [Yes] to delete folder and to cancel delete, please click [No].
13
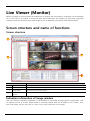
Live Viewer (Monitor)
Monitor program of Control Center can enable user to monitor real time image of connected unit and manage
site or user. Also it is possible to check real time event information and system log along with supporting
convenient and easy operation with external device such as keyboard joystick and other external device.
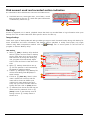
Screen structure and name of functions
Screen structure
1
3
2
4
Item
Description
1
Menu/Toolbar
This is menu and function button used in program
2
Unit list window
This indicates unit/viewset/map registered in program. User can click on the list to show image
3
Image window
This indicates live monitoring image
4
Status & Action
This indicates status of unit, event information and alarm log
window
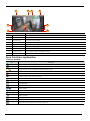
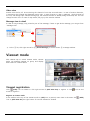
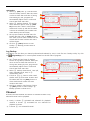
Indication information of image window
User can configure indication information to be indicated on live image through caption configuration. Click
on caption bar icon in monitor viewer mode of “including caption area” set as default to use “record”, “PTZ”
and “listen audio” function and click on “close” icon to end connection of live image.
14
1
2
5
3
9
8
7
4
6
Item
Description
1
Unit name
Show unit name of the channel
2
Channel number
Show number of the channel
3
Channel name
Show name of the channel
4
Time
Show time of the unit
5
Event
Show event information of the channel
6
Speed
Show monitoring image frame of the channel
7
Time zone
Show time zone setting value of the channel
8
Number of user
Show number of users connected to the unit
9
Function button
Execute record /PTZ / listen audio / close window
Icon function explanation
Unit list window
Icon
Description
Folder to register and manage unit
Show unit which is not registered in “My units” but detected in local network.
Registered unit can be managed by sub folder made by user
Connection fail of no HDD unit
Login fail of IP camera or encoder
Login successful of IP camera or encoder
Blinks for 5 sec when alarm comes in
All video channels of unit is under monitoring
DVR with HDD
WinDVrS, WinRDS unit
Video channel
Sensor
Relay out
Audio out (talk)
Viewset
Map
Sub folder of map (channel, relay, sensor, audio out)
15
Tool bar
Button
Function
Hide unit list window
Hide even viewer window
Change the view area to full screen of PC monitor
Run Control Center Playback
Run Control Center Configuration Tool
Search on saved event by date, unit, category
Run option configuration window
Add unit, viewset, map
Edit Unit/Viewset/Map.
Delete Unit/Viewset/Map
Save current status of monitor as a viewset
Refresh information of unit tree (connection status, unit list detected in local area)
Auto sequence on registered unit, viewset for monitoring
On/Off alarm popup
Change monitoring frame speed
Close all connection monitoring or map window
Decide map to be located at the top level among various map in map mode
Close all connection monitoring or map window
Arrange various maps in step style
Arrange various maps in tile style
~
Divide monitor screen into 1, 4, 9, 13, 16, 25, 36, 49, 64 division
Change the resolution of monitor (in case of multi monitor, there will be separated menu)
Select if current monitor is used in sequence mode
Select if current monitor is used as alarm popup monitor
Show information about Control Center Monitor version and Copyright
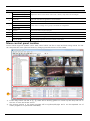
Description of unit list window popup
Click right button of mouse on each unit list window of site / viewset / map mode to popup menu. It is
possible to register, edit, delete unit and folder management, open unit list functions can be used.
3
1
7
1
2
1
4
2
5
6
2
16
Item
Description
Add Unit/View set/Map
1
Edit Unit/View set/Map
Registration status of each device used in site / viewset / map mode can be managed
Delete Unit/View set/Map
2
Expand All
Open tree of all devices registered in unit list window
Collapse All
Close tree of all devices registered in unit list window
Add Folder
3
Edit Folder
Create folder to manage unit in group in site mode for management
Delete Folder
4
Playback
Run Control Center Playback program
5
Configuration
Run Control Center Configuration Tools program
6
Refresh
Refresh on unit list window
Play All channel
Images of all channels registered in map are shown through live viewer
Stop All channel
Close all images registered in map and shown in live viewer
7
Move control panel location
Control Center supports dynamic UI for each control which can fee to move and dock using mouse. So user
can composite the most optimized screen by changing internal structure of live viewer.
1
2
1) If user drag control title bar of ①, ②, there will be docking guide icon comes up and drop title bar on
the icon to move and locate control.
2) The moving position in live viewer program will be up/down/left/right and it can be separated out of
viewer program to be positioned individually.
17
Site mode
Site connection
Click to unit in the “my unit” that registered in the list, it can see live view of the unit via window video,
basically, you can see all the channels of the unit is shown in split mode and you can get any individual
channel which you want, In addition, it’s possible to see the video by dragging the unit icon or camera icon
Such a operation, it may be same with viewset and map mode
2
1
1) Like above, click or dragging
① unit to the ② area, video are shown in the video window.
Video connection end
There are 2 ways to end video connection, click to
icon to end the corresponding video connection..
icon to end all of monitoring video connection, click to
Video split mode change
Split mode is 1~64 split and switch the channel by clicking the split mode icon or double clicking the video
window.
1
2
1) Like above, click to
channels.
18
① split mode icon or double click to ② video window to switch single or multi
Full screen mode
it supports full split screen that hides Control Center’s control, click
[Full Screen] to execute full screen mode and finish full screen
mode by [ESC] key.
Move image position
To move image position, it drags the image and drop it where you want on mouse and it can
at different monitor image. .
1
move it freely
2
1) Like above, drag ① to ② position, ① and ② picture position is shown interchangeably.
Video window pop-up menu
the mouse on the image and click right to see pop-up menu and it can use main function quickly on the
video, this function applies to the channel only.
19
Item
Description
It can set caption list.
1
Caption
2
Stream
3
REC start
It can record live video by RE4 format, max 10 minutes record available
4
Save As
It can save live video on JPEG, BMP format.
5
Listen
It can on/off audio out and adjust volume.
6
Buffering
When it is not showing natural video on low bandwidth environment, it can make natural video using
When you reconnect the video, depending on the setting of the option, the caption will be displayed.
It can change vide stream.
When you reconnect the video, depending on the size of window, the stream will be displayed.
on buffering function.
7
Camera setup
It can control camera menu that connects on DVR.
8
PTZ
It can control PTZ camera on mouse.
9
Instant Playback
It can playback the video of 10 minutes ago.
Digital Zoom
It can zoom in the image by mouse drag in the single-mode and see the entire video footage shows. it
10
can also click on the minimap to move the zoom area.
<caution>
1.
Transmission frame rate can be reduced at low system requirements. Uncheck caption Options or the
image of the pop-up menu, in this case, uncheck caption of the popup menu , you can see better
transmission frame rate.
Status & Action
It can check the status and action of units that are registered on the "my unit". In addition, it can schedule
using the microphone and alarm notification.
1
2
3
Item
1
5
6
7
Icon status
8
9
10
11
Description
Unit
It displays unit name in the unit list window.
,
2
4
,
,
,
It displays video channels that supports at unit
It displays all the units that are supported by the video channel and
MD/No Video
channel to display the connection status, and motion detection. (camera
connect, video loss, camera inactivated, motion detected)
3
Sensor Input
Relay Output
,
It displays units that are supported by the sensor and sensor operating
status. (sensor OFF / sensor ON)
,
,
It displays units that are supported by the relay and relay operating
4
status, it can control the relay clicking the icon.
(relay inactivated, relay off, relay on)
5
6
Talk
,
It can send audio on audio output by pressing microphone icon.
(Microphone OFF , microphone ON)
Recording
,
,
,
It displays unit HDD status.
(Not Recording / No Error, Recording / No Error, Not Recording / Error,
20
Recording / Error)
7
Alarm notification
It can set alarm notification action status and depending on setting, it
works audio alarm and monitor display
8
Time
It displays current date and time.
9
DVrS Serial Number
It displays series number of DVrS / WinRDS
10
Serial Number
It displays serial number of unit..
11
Auto Hide / Close
It can set or close auto hide mode of window.
Video view
Double click to the list, it monitor all channels of the unit. The number of channels that are supported by the
unit is set to show split-screen, in case of map mode, monitor window was shown on pop-up.
Alarm notification setup
In the right-most “alarm notification” for each unit by alarm notification methods can be set. Three ways,
"schedule applies," "Always On" "Always Off", for the unit, alarm notification policies.
Set the alarm notification and schedule setup at menu option> Alarm Notifications tab,.
Alarm log
“my unit” are registered on the list can check alarm log of the unit.. it displays real time log and can set to see
only the information that users may want.
9
1
2
3
Item
4
5
Icon Status
6
Time
It displays alarm occurred date and time
2
Site
It displays alarm occurred unit name.
3
Serial
It displays serial number of alarm occurred unit.
4
,
,
,
,
,
,
,
,
,
8
Description
1
Event
7
It displays icon and number on alarm occurred information.
(motion detected, sensor off, sensor on, alarm on, video connect, video
disconnect, text input, login fail, setup changed)
5
Message
It displays message on alarm occurred information
6
Unit
Alarm log can be sorted by unit,
Select only one unit can be selected, and all are registered in all units of the
alarm log can be shown.
7
Category
Alarm log can be viewed by selecting the event, error, status, text. Select
only one unit can be selected, and all are registered in all units of the
alarm log can be shown.
8
Auto Hide / Close
It can setup or close auto hide mode of window
9
List fix
It can fix updated alarm log list and keeps the fixed list even the new
alarm information comes.
21
Video view
Double click the list, it’ll be monitoring the channel of unit that occurred event.. in case of motion detection,
is monitoring the channel that detected motion only.. in case of sensor or relay, is playback whole channel of
the unit, will change split channels belongings. the selected channel is already being monitored, this unit will
change monitor focus. In case of map mode, will pop up the monitor window
Message view in detail
In case of long message, only printed a part of the message, if want to get whole message, you can get from
“message view”
1
2
3
1) In the
① list, click right mouse for ② [Show Message], it will be shown ③ message window.
Viewset mode
Click viewset tap to switch viewset mode. viewset
mode can manage cameras on group and display
event status to confirm admin.
Viewset registration
Click
[Add] icon at viewset or click right mouse of [Add View Set] to register it. click
mode to register it
icon at site
Register at viewset mode
In the toolbar at the top of the viewset mode or [add] icon or [Action] menu item in the menu click
icon or [Add View Set] the right button of a mouse viewset list window
22
[Add]
3
4
5
6
2
1
7
1) In the viewset add, click video window and choose ① camera or drag ① icon drop ②, the camera is
registered. Click ⑥ icon to change split mode.
2) Register camera, input viewset name to ③, click ⑤ [Check] to designated ④ for double check.
3) Click ⑦ [OK] to save at viewset list window, if cancel to register, click [cancel].
Register at site mode
In the site ode, click
icon of above tool bar.
1) In the “viewset quick save” window, input viewset name to
①, click ③ to double check designated ②.
2) Click ④ [OK] to save at viewset window if cancel to
register, click [cancel].
2
3
1
4
23
Viewset edit
Choose viewset list, click
[edit] or mouse right to
edit [viewset edit] in the menu
In the “viewset edit”, it can change viewset name, split
mode, video allocation. The edit is same way with
viewset registration on same operation.
Viewset delete
Choose viewset list, click
[viewset delete] to delete.
[delete] icon or mouse right click to select
In the viewset delete confirm window, click [Yes] delete viewset in the list ,
click [No] to cancel the delete.
Map mode
You can change into the MAP MODE by click the “MAP” tap on the bottom of the unit list window. In the MAP
MODE, you can register and control the camera, audio out, relay out, sensor, and microphone on the map, and
it offers the convenience by registering the smaller map and extending it to the layer type. The registered
installations display the operational status, or event occurrence, it makes administrator to check it in real time.
Map editor
Select the toolbar of Tools > [MapEditor] in the MAP MODE, and it is possible to add, edit or delete the map
through “Map Editor”.
24
1
3
4
2
5
Item
Description
1
Menu/tool bar
It displays menu and function button at program and can use them to click
2
Unit list window
It displays all installation registered in my unit and you can drag and add the icon to the map.
3
Map window
It displays the selected or new map from the Map list window.
4
Map Tree window
It displays the registered map list
5
Properties window
It displays the registration information of registered map, you can edit it.
USER ICON REGISTRATION
You can register and use the installation icon that is registered on the map as you want.
Select the [Register User Icon] on the menu toolbar, and “Register User Icon” window pop-ups.
6
1
8
2
9
4
3
10
5
7
1) In User icon registration, ① click the [Change] button, ② It pop-ups “Map image file loading” window,
③ select the type of file
2) Among the file of designated type ④ Select the file, ⑤ click the [Open] button, ⑥ icon is set up to
new one. ⑦ When you click the [Apply] button below, it is applied to these items.
3) ⑧ When you click the [Restore] button, it returns to the default icon, ⑨ when you select [All], ⑩ all
icons in a group are set up to new ones.
25
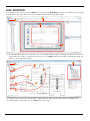
MAP ADDITION
In the Map mode, when you click [Add] icon or select the [Add Map] on menu by clicking with the right
mouse button, the map editor runs. You can add the new map through map editor.
2
1
3
4
1) In the map editor, when you click the icon ①, it displays “Map image file loading” window, you select the
route that has a map, ③ select the map file, ④ click [Open] button and make it display the map you
want to use on the map window.
3
4
2
1
2
1
2
1
2
1
1) Drag ① icon of “my unit” to the map, it registers on ② map, and it is also shown at
2) After setting up the map click ④ [Save] icon on the map.
26
③Map Tree.
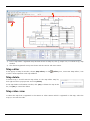
2
1
1) In the “map editor” registered map has been shown at map list, click ① map’s icon, it is shown at
window.
2) The devices registered at map are shown real time action and event status
Map editor
In the popup of map list window, choose [Map editor] or click
to edit is same operation with map addition.
② map
[Editor] icon, it executes “Map editor”, how
Map delete
To delete map, it should execute map editor. In the map editor map list,
click right mouse to popup menu and click [delete].
In the map delete confirmation window, click [Yes] to delete the map at the
list, click [No] to cancel the delete.
Map video view
to select the map that is registered in the camera or video camera which is registered on the map, select the
map you can see the video
27
2
6
4
8
5
1
3
7
1) Like above, choose ① map, click right mouse ② [Play All Channel] it is shown all camera video at ⑤
live viewer.
2) In the map device list click ③ camera or click ④ camera at map window, you can get video, click again
to connect video.
3) In the popup menu, click ⑥ [Stop All Channel], it disconnect all channel and now shown at ⑦ live
viewer.
4) Choose camera icon and click right mouse for popup menu, click ⑧ [Playback] it executes Control
Center Playback program and connect the unit, you can see recorded data by search.
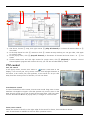
PTZ control
Pan, Tilt control
In the popup menu, choose “PTZ” menu or
button. Cross mark in the
display, it can control pan, tilt by mouse control. Click left/right direction at
the center, it can control pan, click up/down, it can control tilt.. As you click
away from the center portion of the Pan / Tilt will run faster.
Area Zoom In control
In case of dotted box at the center, it’s area zoom mode. drag zoom in area.
Interface is changed to support units that operate only zoom in area. in the
Area Zoom In mode, go to pan tilt and clock mouse when “shift” key enter.
choose “Normal PTZ Mode” at popup menu, it changes to control mode..
Zoom, Focus control
Move the mouse to the left, to the right edge of the control for Zoom, Focus window is shown..
Unit of Area Zoom In available is at Zoom Zero operation button.
28
Preset move
In case of preset, add "Goto Preset" is displayed in the pop-up menu, select a preset list will move to the
selected preset position.
Auxiliary action
In case of preset, "Auxiliary" in the pop-up menu to add the registered menu is displayed, select the
appropriate action is performed.
Group mode
In case of group mode, Group mode operation of PTZ to Enable in the upper right-hand corner of the screen
("GM") is displayed.
Auido control
In case of Audio connected channel, “audio listening” is available or
the icon of video window is available. Default is Mute status and
mute off to control audio volume. You can get mixed multiple
channel audio.
1) Click right mouse at video popup and choose [Listen] and recheck
Mute, audio is available and move ② volume bar to adjust volume.
2
①
1
Auto switch
Live monitoring of video conversion cycle for each monitor by setting the time auto switching can be
operated.. Site / viewset / map mode and can be used both in the corresponding mode has been registered
by using the channel, viewset, map auto-switching action
To monitor the first automatic switching action, choose
[Use as sequential switching monitor]. Terminate
the choice, the auto switch will not operated even it starts auto switch, click
[Sequential Switcher]
automatically switch “duration time” by option. The default is 10 seconds
Alarm popup
it may see a pop-up video of each monitor channel alarm occurred.
Site / viewset / map mode and can be used both in the pop-up when an event occurs in the channel has
been registered by the appropriate mode operation.
1) To monitor the first automatic switching action, choose
[Use as alarm popup monitor]. Terminate the
choice, the alarm popup will not operated even it starts alarm popup
2) click
[Alarm Popup On/Off] icon, alarm popup will start, is shown the channel that event occurred.
When the event occurred at event list of alarm popup option, the alarm popup will be operated by
“duration time”
3) during alarm popup operation, the alarm of other channel has occurred, it’ll be shown added video with
legacy video, the duration time is fitted by the last alarm time.
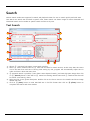
Event search
Event logs can be searched using the event search utility.. Search by selecting a specific unit or classification
and search results can be printed or saved.
click
[Event Search Utility] or choose [Event Search Utility] at tool tap.
29
7
1
5
3
2
4
6
1) In the “Event Search Utility”, select ① start time, ② duration, ③ unit and ④ event category.
2) All the information is set to search, click ⑤ [Find] to start the search. Search cancel while the search is in
progress, showing the search progress window appears
3) After search is completed, you can see the ⑦ search results. The search result is listed 40 each and click
⑥ [More] to check another results.
It can print or playback event search through the results of a search. Through the Advanced menu, you can
delete the log and print settings..
1
2
3
4
Item
30
5
6
Description
1
Playback
Playback will be executed for the selected video.
2
Print
Print out the results.
3
Print Preview
Preview the results.
4
Save
Save on CVS file of the results.
5
Advanced
Log delete (all / section / MD delete only) and print set is available.
6
Exit
Finish event search utility
Config information export/import
It can export/import the configuration information of Control Center.
export
1) At the file tab of menu, choose [Export Configuration Info.].
Set ① save file path, name, and choose ② options.
2) Click ③ [OK] to save it on zip file.
1
2
import
1) At the file tab of menu, choose [Import Configuration Info.].
The window is executed, choose the saved zip file and click
[Open] then confirmation window will appear to restart the
program. Click [OK] to complete the import.
3
User set
Registered users can use the program to change the administrator or management information can be used.
At Admin tab, select [Users and Passwords] from the menu, below window appears.
1
7
2
4
3
5
Item
1
2
6
Description
Users for this software
Add
It displays user list registered at program, the default admin can’t delete and
change the user account information
User added window is appeared, input user information to add account of the
user and it’s up to 100 account available..
3
Remove
Choose user list and click button to delete the user.
4
Edit
Choose user list and click button to show edit window, edit user information and
save it to get updated one
5
User
It sets user’s account information, the confirmation of user ID, PW, PW confirmed
should be required, if not, you can’t register account.
6
Authority
Access rights
It can choose User and Administrator, if choose Administrator, it would be
registered admin account with all right
Monitor
It can execute Control Center monitor program.
Monitor only
It can’t change layout badge, using admin’s site’ view set/ map list
Alarm Popup Only
It can use alarm popup function only.
Restricted Control
It can use a same unit information with administrator.
Alarm log
It displays alarm log information at alarm log window.
Event Search Utility
It can execute to use event search utility
31
7
Playback
It can execute Control Center Playback program.
Backup Authority
It can backup recorded data.
Configurations
Control Center Configuration Tools 프로그램을 실행할 수 있습니다.
TLS Configuration
TLS security server and account security server information
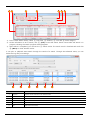
Option Configuration
User can configure some of function options. If you click
Tools tap, Option window will be shown.
[Option] icon on Tool bar or select [Option] on
Display
Monitor option and Map option are able to be configured and together with Live viewer configuration such as
Log in / Program shutdown authorization / Auto shutdown.
10
1
11
2
4
5
3
12
6
7
8
13
9
14
15
16
17
Item
Monitoring
Monitor Viewer Mode
Options
Description
Caption
Area
inclusion
Adjust ratio
1
Full
32
2
Use DirectX Draw
Show video using DirectX
3
Apply Deinterlace
In monitoring mode, apply De-interlace function on D1
resolution video
4
Color Space
YUV
It maximizes monitoring performance.
For Live view, app. 8ch at 1080p/30fps or 12ch at Half
D1/30fps or 50ch at CIF/30fps is possible.
RGB
When PC system does not support YUV mode, user can use
RGB mode. However its performance will be down respectively.
On RGB mode, 3ch at 1080p/30fps or 4ch at Half D1/30fps or
10ch at CIF/30fps is possible.
5
Bandwidth adjustment
Auto
System diagnoses automatically CPU possession and if it is
over 80%, for best performance, system changes monitoring
mode into low frame monitoring.
If there is frame delay due to network bandwidth, system
changes monitoring mode into low frame monitoring.
Low frame monitoring mode is applied per channel from the
last channel which problem occurs.
If network possession is down or CPU possession is under
70%, low frame monitoring mode will be back to normal
automatically.
Low
According to device, its mode requires JPEG video for low
Bandwidth
bandwidth under low frame monitoring mode and it is not
Mode
changed by user control
Off
It keeps original video framerate from device regardless
network delay or PC load.
In case that video delay is getting worsen and PC performance
is down, monitoring program can not work properly.
6
Don’t ask login information
When running program, user can access it without login
window.
7
8
Checking authorization before program
Before program shutdown, user certification is shown and
shutdown
after certification, it will be closed.
Buffering
Gathering live video in Buffer and show video smoothly in
order.
9
Caption
Configure if some of information such as unit name, channel
number, channel name, time, event, video display speed, time
zone, the number of login user will be shown or not.
10
Caption color
Configure Caption color
11
Caption size
Configure caption font size
12
Map Option
Display Unit Name
Display registered unit name on Map.
13
Sequential
duration time (Sec)
Configure auto sequence duration time
14
Switcher
Monitor 1 Only
Monitor 1 is only switched. But in viewset mode or Map mode
Options
is not available.
15
Display Some Viewset Only
User selects registered viewset at discretion and it works only
in selected viewset.
16
17
Auto
Down
Shut
Set Viewset to Display
Select viewset to use auto sequence.
Enable
If there are no user action during Idle time, program will
shutdown automatically.
33
<Caution>
Monitoring performance depends on system performance like CPU, graphic card or memory etc.
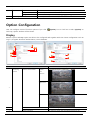
Recording
It is the configuration for file save route
1
2
3
4
5
6
7
Item
1
Recording
Description
Drive
Select Drive for recording. CCQuickRecording folder will be
created in selected drive.
2
3
4
Save Image
Save Path (by Quick Recording)
Display folder route which recorded video file will be saved.
Default Image Filename
Image file will be saved automatically
File format
BMP
Save image file as BMP
JPEG
Save image file as JPG
5
Drive
Select Drive for image saving. CCImage folder will be created
6
Saving Path
Display folder route where image file will be saved.
7
Preservation
Delete saved file automatically after configured duration date.
in the selected Drive.
34
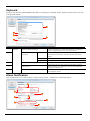
Keyboard
Shortcut key and PTZ keyboard(WKC-100) will be configured. If external device supports shortcut key, user can
configure like below.
1
2
3
4
5
Item
1
Keyboard
Description
Show commands containing
Display command list to control with shortcut key. If selecting
the list, configured shortcut key value will be shown.
2
Shortcut for selected
Input box
Selected shortcut key value is shown and if clicking input and
command
press keyboard shortcut key, input shortcut key value will be
shown.
3
Shortcut currently used by
4
WKC-100 port
Remove
Delete shortcut key value in the selected list.
Assign
Configure shortcut key value in the selected list
Display command of input shortcut key value. With pressing
shortcut key, user can easily search the configured command.
Select connected port of keyboard. And can control keyboard
through the selected port.
5
Use Only Monitor For WKC-100
Limit keyboard user environment to control keyboard only on
the configured monitor
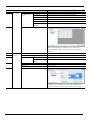
Alarm Notification
This configuration is for video popup / popup event/ buzzer / schedule etc with Alarm signal
1
2
3
4
5
6
7
8
35
Item
Description
1
Alarm Pop-
Duration
Keep alarm popup screen during the configured time.
2
up Options
Configuration
Fix Division
Shows pop-up video on the selected screen division
item
Only for Viewset
Camera only registered in viewset will be run.
Text Input
With text input event
MD On
With motion detection event
Sensor Input On
With sensor event
Only for Displaying
Alarm popup only in monitoring video
Channel
3
Sensor-Channel Mapping
Sensor can be mapping to channel per unit. Sensor event
alarm popup will appear in accordance with the configured
mapping.
4
Other
Buzzer
5
Options
Duration
6
Sound
Buzzer will ring once alarm occurs.
Buzzer will ring during the configured duration time
Use Default Sound
Configure default alarm sound.
Use Customized
Configure alarm sound with user choice.
Sound
7
8
Live Monitor Blink
Display red frame line on the alarm video
Alarm Log
Save alarm log
Ignore MD Alarm
MD event is not dealt with alarm.
Alarm Notification Schedule
Schedule can be configured per 1 hour and configure alarm
popup and buzzer and alarm log and video monitor display.
36
Layout manager
Control Center Monitor layout can be configured. Using templete, user can expand monitor up to 2 monitors
quick and easily.
1
2
3
4
5
6
item
1
Layout
Description
Templetes
It displays monitors according to the number of connected
manager
2
monitors, and you can check the monitor to use.
Available Monitors
3
Use monitor
Configure monitor to be available.
Preview
Display real monitor screen according to monitor configuration
window
4
Identify
Display Control Center monitor number on PC monitor and
5
Composition
Select monitor composition to use
6
Monitor
Configure monitor as exclusive use.
user can check monitor connection status.
window
<Reference>
1.
Layout expansion can be possible up to 6 monitors with Control Center Pro. For Control Center Pro
purchase, please, contact us.
37
Playback Viewer
Control Center provides dynamic UI for easy docking and monitor control with mouse movement. Therefore,
user can compose the best screen configuration. (Please, refer to Layout manager)
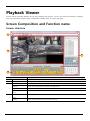
Screen Composition and Function name
Screen structure
1
2
3
4
Item
Description
1
Menu/Toolbar
Display menu and function button.
2
Video window
Display playback video
Log viewer
Display log related to the loaded timeline section.
Disk info
Display disk use information and whole recording section
Channel selection
Select channel for playback
Calendar / Time
Select the date from calendar and search the data.
3
search
Playback control
4
Timeline
38
Control playback function using button.
button
Display saved information of unit and search time line.
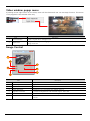
Video window display information
Configure display information on playback video via caption configuration
1
2
4
5
3
6
Item
1
2
Channel
Description
Show the channel number
number
Channel
Show channel name
name
3
Time
Show the time of unit
4
Event
Show the event information of the channel
5
Time Zone
Show time zone configuration value
6
Speed
Show video playback frame information of the channel
Icon function
Toolbar
Button
Description
Open saved file or connect to Site
Terminate the current connection
Select button for backward
Select button for forward
Adjust Brightness, Contrast, De-interlace
Save the current playback image as JPEG or BMP type. And selected caption, name, date/time, event
information can be saved.
Print the currently selected playback video. Basically print video and channel name and recording date
and event information and even caption memo.
Show full screen of view area
~
Divide playback screen into 1,4,9,16. And can do search playback up to 16 channels together
Search text in accordance with search section and channel keyword
Appoint Motion area and search video with motion.
Search thumbnail with search area and interval.
It displays the version of Control Center Monitor and copyright information
39
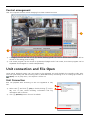
Control arrangement
User can compose the best screen changing live viewer internal structure.
1
2
1) If dragging control title bar of ①, ② above, docking guide icon will be shown and controller will be
moved to the ending point of drag.
2) Live viewer program can be moved to Up/Down/Left/Right and if user wants, Live viewer program can be
separated and arranged to outside independently.
Unit connection and File Open
Using search playback viewer, user can access to the registered unit and playback the recording video. Also,
user can open backup file and recording video in DVR HDD directly connecting to PC. If clicking top toolbar or
[Open] icon in [File] menu, ‘Unit explorer’ will be run
Unit Connection
User can playback after accessing to the unit registered in ‘My
unit’.
1) Select Unit ① and click ② [OK] or double clicking ① unit in
‘My unit’. If then, saved recording information and log
information will be shown.
2) click ③ [Refresh] button for unit list refresh.
3
1
2
40
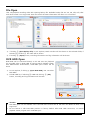
File Open
User can playback recording video with opening backup file. Available backup file are “re3, re4, vsf2, vsf3, vsf4”
and other format is not supported. User can see all the same information like direct unit connection.
2
1
4
3
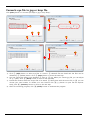
1) if clicking ① [Open Backup File] in Unit explorer, search window will be shown. In the selected folder, if
selecting ② file and ③ file name will be shown.
2) If clicking ④ [Open] button, recording information and log information will be shown.
DVR HDD Open
DVR HDD can be connected directly to PC and user can playback
the recorded video in DVR HDD. If running search playback viewer
with ‘Administrator authorization’, ‘DVR HDD open’ button will be
active.
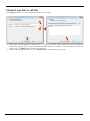
1) In Unit explorer, if clicking ① [Open DVR HDD], user can select
DVR HDD.
2) In DVR HDD list, if selecting ② HDD and clicking ③ [OK]
button, recording and log information will be seen.
1
2
3
<Caution>
1.
2.
DVR HDD open can be available over H.264 SD DVR v2.14.10 and all HD DVR. But MPEG SD DVR is not
supported.
Do not format or edit DVR HDD partition or factory default. After DVR HDD connection, run search
playback viewer program and ‘DVR HDD open’.
41
Connection termination (Disconnect)
If clicking
[Disconnect] icon in top toolbar, user can close DVR HDD connection or unit or backup file.
Basic control
Screen division mode change
The maximum screen division is 1 to 64 division.
1
1) If clicking ① division icon or ② double
clicking ② the certain channel, Single or
division mode will be shown.
2
Full screen mode
If clicking
[Full Screen Mode] icon, user can
run full screen mode and close it with [ESC]
button.
Using ① playback control button displayed on left
button of full screen mode, user can control
playback speed. If clicking [X] button, Full screen
mode will be closed.
1
Video poition change
To move video potion, select video with mouse and drag it to the position user wants. Position change in
between different monitor is also possible.
1
2
1) Do mouse dragging
42
① video to ② position, ① and ② will be changed each other.
Video window popup menu
If pushing mouse right button on the video, menu will be shown and user can use major function. This action
is only applied to the selected video only.
Item
Description
1
Check Watermark
2
Digital Zoom
Display if original data is damaged or not.
In single mode, using mouse dragging, user can zoom in video and if clicking minimap, user can
change zoom area.
Image Control
1
2
5
3
6
7
4
Item
Description
1
Video View
It displays the selected video channel.
2
Default Brightness
Brightness turns to the default value. Default value is 0.
3
Default Contrast
Contrast turns to the default value. Default value is 0.
4
Default Deinterlace
Deinterlace turns to the default value. Default value is 1.
5
Brightness Control Bar
It controls the brightness of video. Available range is -100 to 100.
6
Contrast Control Bar
It controls the contrast of video. Available range is -1000 to 1000.
7
Deinterlace Control Bar
It controls the use of deinterlace function. 0 means de-interlace off, and available range is
0 to 100.
43
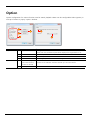
Example of Image control
Item
Default
Brightness
Contrast
44
Description
De-Interlace
Control Panel
In the control panel, there are information of connected disk, whole recorded section along with log of
searched section and user can select playback section through channel selection and calendar search. Also
information in the disk can be backed up via image and log backup utility.
Log Viewer
There are log lists for searching section loaded on time line in the log
viewer. Log information for selected channel will be shown and user
can select classification to classify them. Double click on log in the log
list to move to recorded data of the log to check its recorded image.
1) There are log lists ② for loaded section on timeline in log viewer
window.
2) Select All/Status&Control/Text/Motion/Alarm in classification ①
to classify and see preferred log data.
3) Double click on log list ③ to move to playback section of the log
to see recorded image for the log.
1
2
3
45
Disk amount used and recorded section indication
It is information about disk amount used and recorded section.
1) Total disk amount / extra space area , record start / record
End are shown at the top ①. Used disk space information
is indicated by status bar ②.
2
1
Backup
Access to registered unit in search, playback viewer then back up recorded data or log information. Also open
backup file or file of DVR’s HDD then select specific section for back up.
Image backup
There are 2 types of backup RE4 and AVI type. RE4 type support multi channels backup along with backup for
event information and other information. AVI backup support playback in widely used player, only single
channel using XVID compression method. Click on
[Backup] icon in control panel on the left side of
program to execute “Backup utility”.
RE4 Backup
1) Select ① [RE4] in backup utility window
and set ②start and end time for backup
section. Start time must not be set later
than end time. If wrong time setting by
user, program will automatically adjust
time in order end time is later than start
time.
2) Select ③ backup channel then set up
④ file size partition. It will save backup
file based on partition setting.
3) If select ⑤ Miniplayer copy, Backup file
will be saved along with Miniplayer in
same location.
4) If click on ⑥ [Save As], “Save in other
name” window will come up and file
name will be shown as default (unit
number-unit name-backup start-end
time). Set up location and file name for
backup file then click on [Save] button.
5) ⑦ Password can be set and the max 14
letters used for password. Click on ⑧
[Start] button to start backup once all
setting is done. ⑨ backup status is
shown as %.
46
1
2
4
3
5
6
7
9
8
AVI Backup
1) Select ① [AVI] then ② start and end
time for backup section. Start time must
not be set later than end time. If wrong
time setting by user, program will
automatically adjust time in order end
time is later than start time.
2) Select ③ backup channel, ④ caption,
audio inclusion option. Click ⑤ [Save
As] button then “Save in other name”
window will come up and the file name
is shown as a default (unit number-unit
name-backup start-end time).
3) Set up save location and file name for
backup file then click on [Save] button.
The “save in other name” window will be
closed and file save location and name
will be shown.
4) Click on ⑥ [Start] button to start
backup. ⑦ Backup process status is
shown as %.
1
2
3
4
5
7
6
Log Backup
Log backup can be done per channel preferred and selected by user in CVS file. Run “backup utility” by click
on
[Log Backup] icon in control panel located on the left side of program.
1) Set ①start and end time for backup
section in log backup window. Start time
must not be set later than end time. If
wrong time setting by user, program will
automatically adjust time in order end
time is later than start time.
2) Select ② backup channel and item (all,
event, status&control, text) in ③
classification menu.
3) If click on ④ […], “save in other name”
winder come up then enter location and
file name and click on [Save] button to
close window and confirm file save
location and name.
4) Log file is saved in CSV format. Click on
⑤ [Start] button to start backup. ⑥
Backup process is shown as %.
1
2
3
4
6
5
Channel
It shows recorded channel and status of activated channel. Only
selected channel can be playback.
3
1
2
1) Firstly, it shows ① activated and selected for playback
channel is shown. ② Activated but not selected for
playback is shown.
2) It shows ③ not activated channel.
47
Calendar Search
It indicates recorded date. Selecting date or enter time to
search recorded data directly.
1) Calendar is shown and ① recorded date will be market in
block letter in connected disk so user can select date.
Selected date is shown by ② marking.
2) Move to ③ previous year. Move to ④ next year. Move
to ⑤ previous month. Move to ⑥ next month. Move to
⑦ today’s calendar. ⑧ Enter the time in selected date
for search.
3) Click on ⑨ the button to search based on entered time
then show it on timeline.
2
1
4
3
6
5
8
7
9
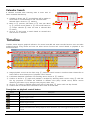
Timeline
Timeline viewer support graphical indication for normal recorded and event recorded section. User can select
preferred section using mouse and user can select various function and control related to playback in this
timeline window.
1
2
3
5
6
4
1) Image playback control can be done using ① playback control buttons in timeline viewer. Please refer to
below table to know description of playback control buttons.
2) It indicates date/time information for searching section shown in ② timeline.
3) Timeline is shown in ③ graph and playback is enabled by selecting search section using ④ slide bar.
The log properties of timeline are classified in different color (Grey: normal record, Yellow: motion
detection, Red: sensor input, Orange: event pre/post, Wine: text).
4) Click on ⑤ button to maintain search time with one day back, ⑥ button with one day forward.
5) Timeline will re load and show information about time of moved date.
Description on playback control button
Button
Description
Shows one step back image
Playback image in reverse
Stop playback.
Playback image in forward.
Shows one step forward image
Playback all recorded section showing images. If click on this button, only “event triggered images playback” will be
achieved
48
It shows image for only event triggered section. If click on this button, it turn into “all image playback” mode.
~
It can control playback speed (0.5x, 1x, 2x, 4x, 8x, 16x, 24x, 32x, 64x, all). Select [all] to enable playback in max
playback speed. The rest of playback speed will be following selected playback speed. Playback speed is following
real-time as much as possible but will be affected by performance of PC, Network speed. So playback speed might
create any margin of error based on them.
Select whether record status for all channels or selected channel will be shown. Select channel for playback then
click on this will show log for selected channel on the timeline then playback.
~
Section (10min, 30min, 1hour, 3hour, 6hour, 12hour, 24hour) to be shown in timeline can be selected. There will be
popup window marking record section of selected time on the timeline and showing loading status of log. User can
cancel this while timeline log is loading.
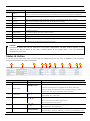
Use of Jog & Shuttle
Control Center Playback supports key shortcut and various controller connected can operate playback with this
shortcut. Device for playback control such as controlling Jog & Shuttle by entering key shortcut can be used
by setting key shortcut.
Input
Jog
Shuttle
Buttons
Value
Clockwise
Counter-clockwise
Move and center
Left1
Left2
Left3
Left4
Left5
Left6 or over
Right1
Right2
Right3
Right4
Right5
Right6 or over
Leftmost
Left
Center
Right
Rightmost
Key map
Action
Forward Frame Play
Backward Frame Play
1x Backward Play
2x Backward Play
4x Backward Play
8x Backward Play
16x Backward Play
32x Backward Play
64x Backward Play
2x Forward Play
4x Forward Play
8x Forward Play
16x Forward Play
32x Forward Play
64x Forward Play
Backward Frame Play
Backward Play
Pause
Forward Play
Forward Frame Play
Key Value
Alt+Shift+Right
Ctrl+Shift+Left
Ctrl+Shift+`
Ctrl+Shift+1
Ctrl+Shift+2
Ctrl+Shift+3
Ctrl+Shift+4
Ctrl+Shift+5
Ctrl+Shift+6
Alt+Shift+1
Alt+Shift+2
Alt+Shift+3
Alt+Shift+4
Alt+Shift+5
Alt+Shift+6
Alt+Shift+Left
Alt+Shift+<
Alt+Shift+?
Alt+Shift+>
Alt+Shift+Right
49
Search
Various search modes are supported in search and playback viewer for user to search quickly and with ease.
Text search can search test recorded in specific time, Smart search can detect image of motion detected and
Thumbnail search can be made on specific search section set by user.
Text Search
1
2
3
4
5
8
7
6
9
10
1) Shows ① connected unit name in text search window.
2) Select ② search channel then set ③ start and end time for search section. At this time, Start time must
not be set later than end time. If wrong time setting by user, program will automatically adjust time in
order end time is later than start time.
3) ④ Keyword search is possible, if user doesn’t want keyword search, just leave this space empty then click
on ⑤ [Search] button. There will be ⑥ status bar showing search status and ⑦ searched text lists will
be shown once search is done.
4) Select text list to see ⑧text description. Double click on the lists to move to the timeline and show image
related with text.
5) Click on ⑨ [Save] button to save searched text in TXT file format then click on ⑩ [Close] button to
complete text search and close window.
50
Smart Search
2
3
4
1
11
5
6
7
9
10
8
12
13
1) Indicates ①connected unit name in smart search window.
2) Select ②search channel and set ③ start and end time for search section. At this time, Start time must
not be set later than end time. If wrong time setting by user, program will automatically adjust time in
order end time is later than start time.
3) ④Search interval can be set. If select “all image examine” , it will search motion image in all images and if
select “configured time interval examine”, it will search motion image at configured sec, hour time interval.
4) Select ⑥motion detect area to search only section containing motion in selected area and select
⑤“image with motion detected search” to find out recorded images only with motion and event to
improve search speed.
5) Click on ⑦ [Clear] button to clear motion detection area and click on ⑧ [Set All] button to select all
motion detection area.
6) Start search by click on ⑨ [Search] button and ⑩ search status is shown in progress bar. Number of
searched image frame will be shown once the search is done.
7) ⑫Searched image list is shown in Thumbnail and if user click on Thumbnail, it will enlarge image into
⑪look ahead window. Click on ⑫searched image to move to recorded time and playback image
8) Click on ⑬ [Close] button to complete smart search and close search window.
51
Thumbnail Search
2
7
10
1
14
3
11
4
12
5
13
6
8
9
1) It shows ①connected unit name in thumbnail search window.
2) Select ②search channel then set ③start time of search section.
3) Set ④search interval then click on ⑤ [Search] button to start search. Once search is done, ⑥searched
image list will be shown in thumbnail and click on thumbnail to show image in ⑦page preview window.
4) Playback on recorded image of the time instantly is possible using playback control button. Search result
is output as much as it can be shown in the search result window and click on ⑧ [Previous] and ⑨
[Next] button to continue to search.
5) Move timeline to recorded time of thumbnail then playback instantly by click on ⑩ move button. Set ⑪
search time range then click on [Search] button and configured search time range will be entered
automatically running “smart search” so the connection search is possible.
6) Select thumbnail and click on ⑫ [Print] button for print and click on ⑬ [Save] button to save image.
7) Click on ⑭ [Close] button to complete thumbnail search and close search window.
52
Option
Option configuration for various function used in search playback viewer can be configurable. Select [option] in
tool tap of menu to popup “option” window.
2
3
5
4
1
6
Item
Caption
Description
1
Caption list
Configures whether information about channel number, channel name, time,
2
Select all
Select all caption lists.
3
Unselect all
Clear all caption lists.
4
Font Color
Can configure preferable color via color configuration window.
5
Automatically adjust
Auto screen division is executed based on number of channel when user select
split screen mode for
channel. It runs whenever channel is selected up to 16 screen division.
event, time zone, transmission speed will be displayed on image window or not.
Screen
number of channels
6
Color Space
There are 2 modes YUV , RGB can be configurable.
53
Conf iguration Tools
Registration on Control Center or configuration on unit connected via local network is possible.
It can be used for all units having WESP protocol supporting effective and integrated management.
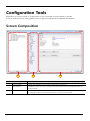
Screen Composition
1
2
Item
1
2
3
3
Description
Unit list window
It shows units registered in user’s account. Click on unit to access to it.
Menu window
It shows list of menu. Click on it to connect to the menu. Menu will be shown differently based on
connected model.
System window
It shows configuration information of selected menu and user can change configuration value.
For configuration details on each item, please refer to user guide of each model.
54
Unit Connection
It shares unit list registered in “my unit” of live viewer. When connect to
the unit not registered in “my unit”, authorization process is required for
use.
1) If user select unit already registered in “my unit” in unit list window,
user can access to unit. If user select unit registered in “local area
unit”, the window asking manager password will pops up and user
can access to the unit once entered password is authorized.
2) Once user access to the unit, the menu of the unit will be shown in
menu window.
3) Click on ③ [Refresh] button to update unit list.
1
2
3
V4 UI use
If connected to unit of FW version over V4.x, it will
supply same UI of unit’s menu OSD. To use this UI,
additional plugin is required but it will be downloaded
and installed automatically once connected to unit.
For more information about configuration method,
please refer to user’s guide of each product.
<note>
1.
V4 UI is supportable only in products of FW version over v4.x.
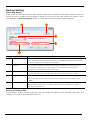
55
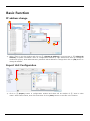
Basic Function
IP address change
1
2
4
3
1) Select ①unit in unit list window and click on ② [Change IP Address] in popup menu or ③ [Change IP
Address] in system information menu of configuration window by right mouse click then ④ Change IP
window will pop up. Enter administrator’s password and IP address to change then click on [OK] button to
change IP address.
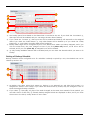
Export Unit Configuration
2
1
1) Click on ① [Export] button in configuration window and there will be window of ② “save in other
name”. Select save location, enter file name then click on [Save] button to save file in the location.
56
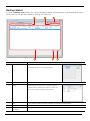
Import unit configuration
1
6
4
5
2
7
3
10
8
9
11
12
Import configuration of same device
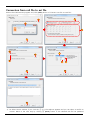
1) Click on ① [Import] button in configuration window to activate import wizard. Select file saved as ②
“export” then click on ③ [Next] button.
2) Select ④ [Same Device] in step 2 then click on ⑤ [Next] button.
3) Turn into step 4, there will be popup window asking ⑥ “admin password”. Enter password and click on
[OK] button to proceed with configuration import.
4) Click on ⑦ [Finish] button to complete configuration import and the window is closed.
Import configuration of same product family
1) Click on ① [Import] button in configuration window to activate import wizard window. Select file saved
as ② “export” then click on ③ [Next] button.
2) Select ⑧ [Same Model Type] in step 2 then click on ⑨ [Next] button. Select ⑩unit to adopt
configuration then click on ⑪ [Next] button.
3) Turn into step 3, there will be items adopting configuration shown. Click on ⑫ [Next] to move to step 4.
4) There will be ⑥ “admin password” window pops up. Enter password and click on [OK] button to activate
configuration import.
5) Click on ⑦ [Finish] button to complete configuration import and window will be closed.
Unit restart and factory default
Unit restart and unit factory default can be controlled in
configuration tool. We recommend to save configuration
setting value through configuration export feature since
all configuration value will not be recovered once factory
default is done.
1
2
1) Click on ① [Reboot] button in configuration
window then click on [Apply] button to restart unit.
2) Click on ② [Factory Default] button then click on
[Apply] button to make unit to achieve factory
default.
Hide tree
Click on
icon to hide unit list window and the icon will convert into
icon. Click again
icon to show
unit list window again.
57
Tools
Schedule Backup
Recording data of DVR or WinDVrS can be backed up to a PC by Schedule Backup program. Only
Administrator account can use the Schedule Backup.
Reservation of Schedule Backup is available and it is automatically executed by reserved schedule. Schedule
Backup program should be run at background to execute the backup. If Control Center was properly installed,
Schedule Backup is automatically registered and it will be executed after PC booting.
Schedule Backup works at only 1 PC for only 1 unit at the same time, and regarding 1 unit, only 1
Administrator can reserve the backup. Created backup file can be played by Control Center Playback program.
<Note>
1.
Schedule backup PC and DVR must have same time zone
Screen Configuration
2
4
1
3
Function
Description
1
Unit List
It displays the unit list, and user can connect the unit by click.
2
Backup Data setting window
Channel to backup, Backup period can be configured.
3
Backup Schedule Setting window
Configures the time schedule. Only 1 unit can be configured at the same time.
4
Backup State Window
It shows Backup progress and completion state. User can open the history file and
check the details by date.
58
Backup Setting
Recording Option
Drive to save the backup file, backup file password, conservation of minimum HDD space, retention period of
backup file can be configured. Drive setting is applied to all units, but the other settings are applied to each
unit separately. If [Recording Option] button is clicked, below Recording Option window appears.
1
2
3
5
4
Item
File Path and Name
1
Description
Backup file name and path is automatically decided and it can not be altered by user. Recording
path is /Backup/Unit name/ and file name is assigned as YYYYMMDD_HH_MM_SS. Be careful that if
unit name is changed, it also changes the recording path.
Password
2
User can assign a password to the backup file. The default condition has no password, so if you
want to make a password then you have to leave the current password as blank. Password
protected file can be played after proper password input.
3
Recording Drive
4
Available HDD Space
User can assign the drive to save the backup file. Selected drive is displayed as “Drive C,D”. User
can assign more than 1 drive at the same time, and this drive setting is applied to all units.
If there is no enough space, old backup files are automatically overwritten. If user assigns the
minimum disk space to keep as GB unit, Backup process will keep the space. Available range is
1~100GB.
5
Preservation
User can assign the period to keep the backup file. Period elapsed files will be automatically
deleted, and the available range is 1~365 days. Retention period is calculated by first frame’s
recording time of backup file.
Setting of Backup data
Diverse backup settings can be configured. User can decide the backup period, channels, date, time, and
whether to use index frame backup per each unit.
59
2
1
3
4
5
7
6
8
1) The backup period is set based on the date which is recorded in the unit. If you check the "From Date” ①,
date input box will be enabled, and you can assign the start data of backup.
2) If you check the “To Date” ②, date input box will be enabled and backup will executed to the assigned
date. If you check the “Index Frame” ③, only index frames will be backed up. If you check the “Today
Data Only” ④, only Today’s recording data will be backed up.
3) Backup data range can be configured by hour unit. White block means no backup assigned, and if you
click the white block, the color changes to blue. If you click [Select All] button, all 24 hours will be
selected, and if you click [Clear All], all assigned hours will be cleared.
4) ⑧ Only backup available channels will be enabled, and you can check the channels which you want to do
backup.
Setting of Backup Schedule
Backup schedule can be configured at PC. If a schedule is already occupied by a unit, the schedule can not be
shared by another unit.
1
2
3
1) At Backup time table, white block means no backup is not assigned yet, and blue block means it is
assigned for another unit’s backup. If you select the white blocks by mouse, they are changed to blue to
show the assigned backup schedule.
2) If you select ① “Everyday”, all days of the week changed at the same time. Instead of that method, you
can select hours of each day ②. Already backup assigned blocks are displayed as blue, and if you move
the mouse to the block, tooltip shows its unit’s name.
60
Backup Status
If you click [Backup state] button, you can see the backup details. All completed or ongoing backup process is
shown, and you can get more details by opening the history file.
1
6
2
Item
History File
5
4
3
Description
It shows the file path of history file and its name.
By selecting the date, you can get the details.
1
2
Backup List Window
It shows the backup state of already completed or ongoing backup.
3
Detail
By selecting the backup list, you can check the details.
It displays Backup schedule, Unit name, File name and
you can see the backup progress step-by-step.
4
Stop
It stops backup. If there are another schedules, the next backup will be started.
5
Date/Time
It displays Date and time
6
Backup Disk
It shows backup disk and its free disk space
Information
61
Tray Icon
After PC booting, schedule backup program is automatically executed and
icon is displayed at tray window.
During the backup progress,
icon shows Red marking. When this icon is in display, schedule backup is run
as background program. You can open the popup menu by clicking the right mouse button and you can exit
or configure the schedule backup program.
MiniPlayer
MiniPlayer can play the Re4 file. It is useful when a user could not install the Control Center, so when you
made a video backup, this MiniPlayer helps its easy play. After execution of the MiniPlayer, “Open” dialog box
will be automatically executed, and you may select a Re4 file which you want to play.
1
2
4
3
5
Item
Menu
Description
File
You can open a file or exit the program (Open / Exit)
Window Mode
It changes the split display modes. (1 / 4 / 9 / 16 Channel)
Filter
It can enable De-interlace mode.
1
De-interlace mode only works for playback of D1 resolution video.
(De-interlace / Screen Adjustment)
Log
It opens log viewer. Log is recorded along with video image. (Log View)
About…
It shows the software information like version, copyright..
2
Display window
It plays the video
3
Time line
You can move the playback position by slider bar.
4
Play, Image save,
You can change the play method by clicking buttons.
Print, Audio,
(Step Backward / Play Backward / Pause / Play Forward / Step Forward)
Channel change
It saves the current image as JPEG, BMP format. Caption, Name, Date/Time,
buttons
Event information can be saved optionally.
It prints the current image. Along with image, Channel name, Recording
62
time, Event information is printed, and you can add memo into caption.
It shows Open dialog box. You can select a file.
It turns on or off the audio.
If there are another channels, this buttons move to previous/next channel.
It controls audio volume.
5
File recording interval
It shows start and end date/time information of the selected file.
DVR HDD Manager
DVR's harddisk can be connected to a PC and its data can be copied. You may use this method when you
want to do backup the entire disk. This is the fastest method to execute the backup.
1
2
3
4
Item
1
2
3
Description
Source
Select a disk where the original source data is saved.
Destination
Select a disk where the copied data to be saved.
The selected disk should have larger free space than original disk.
Copy
If pressed Copy button, a popup window will appear which asks whether you proceed the copy.
And, after you enter the Administrator's password, copy will be started.
4
Progressive bar
It shows the progress of copying.
OneTime Password
OneTime Password Generator can be used for IP camera, and you can use it by checking "Use Onetime
Password" of User Account at IP camera setting. You can connect to IP camera by FTP client program, and you
have to re-generate onetime password again for next connection. For the details of IP camera setting, please
refer to the user's manual of the product.
1
2
3
4
6
5
7
63
Item
Description
1
Address
Enter the address of IP camera.
2
Port
Enter the port number which IP camera uses.
3
FTP ID
Enter the User ID which is assigned for FTP User Account of the IP Camera.
4
Password
Enter the Password which is assigned for FTP User Account of the IP Camera.
5
Generator
After you enter all necessary IP camera information, click it to generate One Time Password.
6
One Time Password
It shows generated One Time Password.
7
Cancel
It terminates the program.
File Converter
eye format still image file and rec3, rec4 format video clip files can be converted to bmp, jpg, avi files by this
converting program. Besides, multiple eye files can also be converted to video clip file.
2
1
4
3
5
Item
64
Description
1
Convert eye file(s) to jpg or bmp file(s).
It converts eye file to jpg or bmp file.
2
Convert sequential eye files to a rec file
It converts eye file to re4 file.
3
Convert sequential eye files to a avi file
It converts eye file to avi file.
4
Convert a rec file to a avi file
It converts rec3, rec4 file to avi file.
5
OK
It terminates the program.
Converts eye file to jpg or bmp file
Click [Start] button of “Convert eye file(s) to jpg or bmp file(s).”
5
7
2
6
1
3
8
4
9
11
10
13
12
1) Click ① [Add] button to select eye files to convert. ② selected files are listed and the files can be
deleted by ③ [Delete] button. Click ④ [Next] button to move the next step.
2) You can choose the output type between ⑤ bmp or ⑥ jpg. When you choose jpg file, you can adjust
its ⑦ quality. Click ⑧ [Next] button to move to the next step.
3) Decide the location where the output file to be saved. ⑨ Same place with the source file, or ⑩ you can
choose your own location. To decide your own location click ⑪ […] button to open the file explorer.
Lastly, Click ⑫ [Convert!] button to move to the next step.
4) After file converting progress, click ⑬ [Finish] button to terminate the program.
65
Converts eye file to re4 file
Click [Start] button of “Convert sequential eye files to a rec file”.
1
2
3
4
1) After open the file explorer by Clicking ① […] button, select the folder where the source eye files are
located. By clicking ② […] button, decide the folder where the output file to be saved, and input file
name. Click ③ [Next] button to start file converting.
2) After file converting progress, click ④ [Finish] button to terminate the program.
66
Converts eye file to avi file
Click [Start] button of “Convert sequential eye files to a avi file”.
1
4
2
6
3
5
7
8
1) After open the file explorer by Clicking ① […] button, select the folder where the source eye files are
located. By clicking ② […] button, decide the folder where the output file to be saved, and input file
name. Click ③ [Next] button to move to the next step.
2) You can decide the avi compression method and quality at "Setting avi condition" step. ④ Select the
compression method, ⑤ Bitrate and ⑥ Quality. Note that you can select the compression bitrate and
quality only when XVID compression method is selected. Click ⑦ button to start file converting.
3) After file converting progress, click ⑧ [Finish] button to terminate the program.
<Note>
1.
2.
To play a avi file which was created by Uncompressed, Compressed(XVID) method, "XVID" CODEC should
be installed on your PC.
To play a avi file which was created by Compressed(WISE) method, ‘DWISEFilterInstall.exe’ should be
installed on your PC.
67
Conversion from re4 file to avi file
Execute the FileConverter program and, Click [Start] button of “Convert a rec file to a avi file”.
4
1
3
5
2
6
11
13
12
7
9
14
8
10
15
1) At Select Source window, if you click the ① […], File explorer appears and you can select a re4 file to
convert. Move to the next step by clicking ② [Next] button. If the selected re4 file has password
68
protection, ③ password window appears and after the password authentication, you can move to the
next step. You can decide the converting interval and whether to include audio. Decide the interval ④
and decide the channel and audio ⑤. After the selection, move to the next step by clicking ⑥ [Next].
2) You can select avi compression method and quality at Setting avi condition window. Select the
compression Type ⑦, Bitrate ⑧, Quality ⑨. Note that compression bitrate and quality can be changed
only when compression type was selected as XVID. Click [Next] button and move to the next step.
3) At Destination Folder window, decide the place where the converted file to be saved. Same folder with
original file ⑪ or you may select a folder. To select a folder, click ⑬ […] button to open the file explorer.
After decision the folder, click ⑭ [Convert!] button to start file conversion.
4) After confirmed the 100% of converting, click ⑮ [Finish] button to close the window.
69
Appendix
Introduction of WESP SDK
WESP SDK(WEBGATE Embedded System Protocol Software Development Kit) supports software programmer to
easily develop a software application that interfaces with WEBGATE products.
Because WESP SDK includes all functions which Control Center provides, you can easily make your own
application. Through this SDK, you can manage all configuration of products, can get live monitoring and
playback video image.
Besides, WESP SDK is based on Microsoft COM technology, it supports diverse development languages like
Visual Basic, Visual C++, Visual Basic Script, Java Script, .Net. WEBGATE’s all products were designed under
WESP protocol, so your designed application software can be used for all WEBGATE products.
Main features
Provides same instructions for all WEBGATE equipment
Easy development environment and method
Supports all functions of products
SDK Composition
SDK consists of Monitor, Discovery, Event, Config, PTZ, and Playback components.
SDK Examples
Example of live monitoring
When you want to get video from network camera or DVR, you can easily implement it by using Monitor
component.
Following example shows that if you click the "Live monitoring!" button, application connect a product by
entering IP address, port, ID, password. And after the connection, it displays channel 1 video with normal
quality, 30frame/second speed.
< visual basic 6.0>
‘ If button clicked, try the connection
Private Sub Command_connect_Click()
Call MonitorCtrl.Connect(“192.168.63.1”, 80, “guest”, “guest_password”)
End Sub
‘ After connection, request the video
Private Sub MonitorCtrl_AckReceived(ByVal ackCode As Long, ByVal param As Long)
If AckCode = ACK_CONNECT Then
Call MonitorCtrl.PlayVideo(1, RESOLUTION_NORMAL, 30)
End If
End Sub
70
< Execution of sample code >
Example of Recording
If you want to record current video during the live monitoring, following codes provide it.
< visual basic 6.0>
Private Sub start_recording_Click()
Call MonitorCtrl.StartRecording("c:\quickRec\", "testRecording.re3")
End Sub
Private Sub stop_recording_Click()
End Sub
MonitorCtrl.StopRecording
Example of PTZ control
If PTZ is connected, you can turn on/off the PTZ control function during live monitoring by following codes.
< visual basic 6.0>
Private Sub start_ptz_Click()
‘ Input the PTZ channel number to parameter
Call MonitorCtrl.StartPTZ(1)
End Sub
Private Sub stop_ptz_Click()
MonitorCtrl.StopPTZ
End Sub
71
<Execution of sample code>
Example of Component interface
Following example is using Monitor, PTZ and Event component, and if a sensor alarm is occurred, PTZ moves
to an pre-assigned preset position.
1) Above picture shows dome camera and sensor position.
2) Configures the preset position of dome camera. (Preset setting can be executed by Config component)
3) Following codes support that PTZ moves to the corresponding Preset position according to the alarm
sensor input.
72
< visual basic 6.0>
‘ If start button is clicked, Event, Monitor, and PTZ ActiveX component connect to
the equipment.
Private Sub Command_start_Click()
Call Event1.Connect(“192.168.63.1”, 80, “guest”, “guest_password”, 0)
Call Monitor1.Connect(“192.168.63.1”, 80, “guest”, “guest_password”)
Call PTZ1.Connect(“192.168.63.1”, 80, “guest”, “guest_password”)
End Sub
‘ If stop button is clicked, close the connection.
Private Sub Command_stop_Click()
Monitor1.Disconnect
PTZ1.Disconnect
Event1.Disconnect
End Sub
‘ When a event is occurred at server, below function will be executed.
‘ If Event category is 1 and Event ID is 16 then,
‘ Sever executes preset command 16 which is correspond to sensor input
Private Sub Event1_EventReceived(ByVal pIEvent As WESPEVENTLibCtl.IEvent)
If pIEvent.EventCategory = 1 And pIEvent.EventID = 16 Then
Call PTZ1.GotoPreset(pIEvent.NumberField)
End If
If pIEvent.EventCategory = 1 And pIEvent.EventID = 17 Then
‘ If Sensor input is Off, it will not work.
End If
End Sub
‘ After Monitor component succeeded to the connection, it displays video.
Private Sub Monitor1_AckReceived(ByVal AckCode As Long, ByVal Param As Long)
If AckCode = ACK_CONNECT Then
Monitor1.PlayVideo 1, 3, 15
End If
73
Specifications
Standard
Professional
Enterprise
6
4+50 External Monitor
GENERAL
Max. Unit
1024
Max. Monitor(View)
2
Max. Supported Division
1 / 4 / 9 / 13 / 25 / 36 / 49 / 64
H/W Support
HD Series DVR, LH/EH/MH Series DVR, MD Series DVR, MPEG-4 WebEye Series, NVS04S, WinDVrS,
WinRDS
Video Format
H.264 / MPEG4 / JPG
Audio Format
ADPCM / True speech / G.723
User Management
YES
Account Level
YES
Max account
100
WNS (DDNS)
YES
WRS (Dynamic IP Registration
Server)
YES
YES
Manage Units, Monitor by user
separately
YES
Manage Units, Monitor by user
separately
12 HD 1080p30
12 HD 1080p30 / PC
MONITOR
Performance
8 HD 1080p30
Real-Time Audio
YES
Remote PTZ Control
YES
Remote I/O Control
YES
Save snapshot image
YES
Quick Recording
YES
Alarm Log Viewer, Save/Search
Event List
YES
Auto Action
YES
Alarm Popup, Buzzer
YES
Alarm Popup, Buzzer, Latch Window, Relay, e-Mail, Preset, Recording,
Save image
Rule based auto action
NO
YES
Error Management (Latch
Function)
NO
YES
Item of errors to be managed are selectable freely
Action Log
NO
YES
User action, auto action
Log Save
YES
Status Viewer
YES
Auto Connection (Lost &
Recovery)
YES
Watermark
YES
Keyboard Shortcuts
NO
YES
Joystick (WKC-100)
NO
YES
View Set (group)
YES
Map
YES
Remote Login
NO
PLAYBACK
Playback
YES
Backup (re4, avi)
YES
Log Viewer
YES
Timeline display(log) Timeline
index search
YES
Go to a certain time Calendar
search
YES
Playback event image
YES
74
YES
Section, Sub Map, Map Link
YES
Standard
Speed playback(0.5~64x)
YES
Smart Search
YES
Thumbnail Search
YES
Text Search
YES
Snapshot / Print
YES
Zoom in/out image
Brightness/Contrast
YES
Audio play
YES
Fix Layout
NO
Professional
Enterprise
YES
UTILITY
Web Viewer
NO
Schedule Backup
YES
DVR HDD Manager
YES
File Converter (eye to bmp, rec
to avi…)
YES
YES
System Requirement
Recommended
Intel Core i7 2.8GHz, 4GB of RAM, 500GB HDD, Radeon 1024MB PCI-E Graphic Cards, Support AGP
Acceleration, Support PCI-E 2.0 16x of higher, 100/1000 Ethernet NIC, Sound Card
Minimum
Intel Core2Duo 2.93GHz, 2GB of
RAM, 100GB HDD, 128MB
Graphic Card, Support AGP
Acceleration, 10/100/1000
Ethernet NIC, Sound Card
OS
Windows XP 32bit, Windows 7 32bit
Intel Core2Quad 2.4GHz, 4GB of RAM, 500GB HDD, 256MB PCI-E
Graphic Card, Support AGP Acceleration, 10/100/1000 Ethernet NIC,
Sound Card
75
Open Source License Report on the Product
The software included in this product contains copyrighted software that is licensed under the GPL/LGPL. You may obtain the complete Corresponding Source
code from us for a period of three years after our last shipment of this product by sending email to < [email protected] >.
If you want to obtain the complete Corresponding Source code in the physical medium such as CD-ROM, the cost of physically performing source distribution
might be charged.
LGPL : Miniplayer.exe, WespMonitor.dll, WespPlayback.dll, WESPRecorder.dll
BSD License : Configuration.dll, AuthCodeGenerator.lib, UserManager.dll, libcdkey.lib, XCrashReport.exe
Copyright (c) 1998-2000 University College London
All rights reserved.
GNU LESSER GENERAL PUBLIC LICENSE
Version 2.1, February 1999
Copyright (C) 1991, 1999 Free Software Foundation, Inc.
51 Franklin Street, Fifth Floor, Boston, MA 02110-1301 USA
Everyone is permitted to copy and distribute verbatim copies
of this license document, but changing it is not allowed.
[This is the first released version of the Lesser GPL. It also counts
as the successor of the GNU Library Public License, version 2, hence
the version number 2.1.]
Preamble
The licenses for most software are designed to take away your freedom to share and change it. By contrast, the GNU General Public Licenses are intended to
guarantee your freedom to share and change free software--to make sure the software is free for all its users.
This license, the Lesser General Public License, applies to some specially designated software packages--typically libraries--of the Free Software Foundation
and other authors who decide to use it. You can use it too, but we suggest you first think carefully about whether this license or the ordinary General Public
License is the better strategy to use in any particular case, based on the explanations below.
When we speak of free software, we are referring to freedom of use, not price. Our General Public Licenses are designed to make sure that you have the
freedom to distribute copies of free software (and charge for this service if you wish); that you receive source code or can get it if you want it; that you can
change the software and use pieces of it in new free programs; and that you are informed that you can do these things.
To protect your rights, we need to make restrictions that forbid distributors to deny you these rights or to ask you to surrender these rights. These restrictions
translate to certain responsibilities for you if you distribute copies of the library or if you modify it.
For example, if you distribute copies of the library, whether gratis or for a fee, you must give the recipients all the rights that we gave you. You must make
sure that they, too, receive or can get the source code. If you link other code with the library, you must provide complete object files to the recipients, so that
they can relink them with the library after making changes to the library and recompiling it. And you must show them these terms so they know their rights.
We protect your rights with a two-step method: (1) we copyright the library, and (2) we offer you this license, which gives you legal permission to copy,
distribute and/or modify the library.
To protect each distributor, we want to make it very clear that there is no warranty for the free library. Also, if the library is modified by someone else and
passed on, the recipients should know that what they have is not the original version, so that the original author's reputation will not be affected by problems
that might be introduced by others.
Finally, software patents pose a constant threat to the existence of any free program. We wish to make sure that a company cannot effectively restrict the
users of a free program by obtaining a restrictive license from a patent holder. Therefore, we insist that any patent license obtained for a version of the library
must be consistent with the full freedom of use specified in this license.
Most GNU software, including some libraries, is covered by the ordinary GNU General Public License. This license, the GNU Lesser General Public License,
applies to certain designated libraries, and is quite different from the ordinary General Public License. We use this license for certain libraries in order to
permit linking those libraries into non-free programs.
When a program is linked with a library, whether statically or using a shared library, the combination of the two is legally speaking a combined work, a
derivative of the original library. The ordinary General Public License therefore permits such linking only if the entire combination fits its criteria of freedom.
The Lesser General Public License permits more lax criteria for linking other code with the library.
We call this license the "Lesser" General Public License because it does Less to protect the user's freedom than the ordinary General Public License. It also
provides other free software developers Less of an advantage over competing non-free programs. These disadvantages are the reason we use the ordinary
General Public License for many libraries. However, the Lesser license provides advantages in certain special circumstances.
76
For example, on rare occasions, there may be a special need to encourage the widest possible use of a certain library, so that it becomes a de-facto standard.
To achieve this, non-free programs must be allowed to use the library. A more frequent case is that a free library does the same job as widely used non-free
libraries. In this case, there is little to gain by limiting the free library to free software only, so we use the Lesser General Public License.
In other cases, permission to use a particular library in non-free programs enables a greater number of people to use a large body of free software. For
example, permission to use the GNU C Library in non-free programs enables many more people to use the whole GNU operating system, as well as its variant,
the GNU/Linux operating system.
Although the Lesser General Public License is Less protective of the users' freedom, it does ensure that the user of a program that is linked with the Library
has the freedom and the wherewithal to run that program using a modified version of the Library.
The precise terms and conditions for copying, distribution and modification follow. Pay close attention to the difference between a "work based on the library"
and a "work that uses the library". The former contains code derived from the library, whereas the latter must be combined with the library in order to run.
TERMS AND CONDITIONS FOR COPYING, DISTRIBUTION AND MODIFICATION
0. This License Agreement applies to any software library or other program which contains a notice placed by the copyright holder or other authorized party
saying it may be distributed under the terms of this Lesser General Public License (also called "this License"). Each licensee is addressed as "you".
A "library" means a collection of software functions and/or data prepared so as to be conveniently linked with application programs (which use some of those
functions and data) to form executables.
The "Library", below, refers to any such software library or work which has been distributed under these terms. A "work based on the Library" means either the
Library or any derivative work under copyright law: that is to say, a work containing the Library or a portion of it, either verbatim or with modifications and/or
translated straightforwardly into another language. (Hereinafter, translation is included without limitation in the term "modification".)
"Source code" for a work means the preferred form of the work for making modifications to it. For a library, complete source code means all the source code
for all modules it contains, plus any associated interface definition files, plus the scripts used to control compilation and installation of the library.
Activities other than copying, distribution and modification are not covered by this License; they are outside its scope. The act of running a program using the
Library is not restricted, and output from such a program is covered only if its contents constitute a work based on the Library (independent of the use of the
Library in a tool for writing it). Whether that is true depends on what the Library does and what the program that uses the Library does.
1. You may copy and distribute verbatim copies of the Library's complete source code as you receive it, in any medium, provided that you conspicuously and
appropriately publish on each copy an appropriate copyright notice and disclaimer of warranty; keep intact all the notices that refer to this License and to the
absence of any warranty; and distribute a copy of this License along with the Library.
You may charge a fee for the physical act of transferring a copy, and you may at your option offer warranty protection in exchange for a fee.
2. You may modify your copy or copies of the Library or any portion of it, thus forming a work based on the Library, and copy and distribute such
modifications or work under the terms of Section 1 above, provided that you also meet all of these conditions:
a) The modified work must itself be a software library.
b) You must cause the files modified to carry prominent notices stating that you changed the files and the date of any change.
c) You must cause the whole of the work to be licensed at no charge to all third parties under the terms of this License.
d) If a facility in the modified Library refers to a function or a table of data to be supplied by an application program that uses the facility, other
than as an argument passed when the facility is invoked, then you must make a good faith effort to ensure that, in the event an application does
not supply such function or table, the facility still operates, and performs whatever part of its purpose remains meaningful.
(For example, a function in a library to compute square roots has a purpose that is entirely well-defined independent of the application. Therefore,
Subsection 2d requires that any application-supplied function or table used by this function must be optional: if the application does not supply it,
the square root function must still compute square roots.)
These requirements apply to the modified work as a whole. If identifiable sections of that work are not derived from the Library, and can be reasonably
considered independent and separate works in themselves, then this License, and its terms, do not apply to those sections when you distribute them as
separate works. But when you distribute the same sections as part of a whole which is a work based on the Library, the distribution of the whole must be on
the terms of this License, whose permissions for other licensees extend to the entire whole, and thus to each and every part regardless of who wrote it.
Thus, it is not the intent of this section to claim rights or contest your rights to work written entirely by you; rather, the intent is to exercise the right to
control the distribution of derivative or collective works based on the Library.
In addition, mere aggregation of another work not based on the Library with the Library (or with a work based on the Library) on a volume of a storage or
distribution medium does not bring the other work under the scope of this License.
3. You may opt to apply the terms of the ordinary GNU General Public License instead of this License to a given copy of the Library. To do this, you must
alter all the notices that refer to this License, so that they refer to the ordinary GNU General Public License, version 2, instead of to this License. (If a newer
77
version than version 2 of the ordinary GNU General Public License has appeared, then you can specify that version instead if you wish.) Do not make any
other change in these notices.
Once this change is made in a given copy, it is irreversible for that copy, so the ordinary GNU General Public License applies to all subsequent copies and
derivative works made from that copy.
This option is useful when you wish to copy part of the code of the Library into a program that is not a library.
4. You may copy and distribute the Library (or a portion or derivative of it, under Section 2) in object code or executable form under the terms of Sections 1
and 2 above provided that you accompany it with the complete corresponding machine-readable source code, which must be distributed under the terms of
Sections 1 and 2 above on a medium customarily used for software interchange.
If distribution of object code is made by offering access to copy from a designated place, then offering equivalent access to copy the source code from the
same place satisfies the requirement to distribute the source code, even though third parties are not compelled to copy the source along with the object code.
5. A program that contains no derivative of any portion of the Library, but is designed to work with the Library by being compiled or linked with it, is called a
"work that uses the Library". Such a work, in isolation, is not a derivative work of the Library, and therefore falls outside the scope of this License.
However, linking a "work that uses the Library" with the Library creates an executable that is a derivative of the Library (because it contains portions of the
Library), rather than a "work that uses the library". The executable is therefore covered by this License. Section 6 states terms for distribution of such
executables.
When a "work that uses the Library" uses material from a header file that is part of the Library, the object code for the work may be a derivative work of the
Library even though the source code is not. Whether this is true is especially significant if the work can be linked without the Library, or if the work is itself a
library. The threshold for this to be true is not precisely defined by law.
If such an object file uses only numerical parameters, data structure layouts and accessors, and small macros and small inline functions (ten lines or less in
length), then the use of the object file is unrestricted, regardless of whether it is legally a derivative work. (Executables containing this object code plus
portions of the Library will still fall under Section 6.)
Otherwise, if the work is a derivative of the Library, you may distribute the object code for the work under the terms of Section 6. Any executables containing
that work also fall under Section 6, whether or not they are linked directly with the Library itself.
6. As an exception to the Sections above, you may also combine or link a "work that uses the Library" with the Library to produce a work containing portions
of the Library, and distribute that work under terms of your choice, provided that the terms permit modification of the work for the customer's own use and
reverse engineering for debugging such modifications.
You must give prominent notice with each copy of the work that the Library is used in it and that the Library and its use are covered by this License. You
must supply a copy of this License. If the work during execution displays copyright notices, you must include the copyright notice for the Library among them,
as well as a reference directing the user to the copy of this License. Also, you must do one of these things:
a) Accompany the work with the complete corresponding machine-readable source code for the Library including whatever changes were used in
the work (which must be distributed under Sections 1 and 2 above); and, if the work is an executable linked with the Library, with the complete
machine-readable "work that uses the Library", as object code and/or source code, so that the user can modify the Library and then relink to
produce a modified executable containing the modified Library. (It is understood that the user who changes the contents of definitions files in the
Library will not necessarily be able to recompile the application to use the modified definitions.)
b) Use a suitable shared library mechanism for linking with the Library. A suitable mechanism is one that (1) uses at run time a copy of the library
already present on the user's computer system, rather than copying library functions into the executable, and (2) will operate properly with a
modified version of the library, if the user installs one, as long as the modified version is interface-compatible with the version that the work was
made with.
c) Accompany the work with a written offer, valid for at least three years, to give the same user the materials specified in Subsection 6a, above, for
a charge no more than the cost of performing this distribution.
d) If distribution of the work is made by offering access to copy from a designated place, offer equivalent access to copy the above specified
materials from the same place.
e) Verify that the user has already received a copy of these materials or that you have already sent this user a copy.
For an executable, the required form of the "work that uses the Library" must include any data and utility programs needed for reproducing the executable
from it. However, as a special exception, the materials to be distributed need not include anything that is normally distributed (in either source or binary form)
with the major components (compiler, kernel, and so on) of the operating system on which the executable runs, unless that component itself accompanies the
executable.
It may happen that this requirement contradicts the license restrictions of other proprietary libraries that do not normally accompany the operating system.
Such a contradiction means you cannot use both them and the Library together in an executable that you distribute.
7. You may place library facilities that are a work based on the Library side-by-side in a single library together with other library facilities not covered by this
License, and distribute such a combined library, provided that the separate distribution of the work based on the Library and of the other library facilities is
otherwise permitted, and provided that you do these two things:
78
a) Accompany the combined library with a copy of the same work based on the Library, uncombined with any other library facilities. This must be
distributed under the terms of the Sections above.
b) Give prominent notice with the combined library of the fact that part of it is a work based on the Library, and explaining where to find the
accompanying uncombined form of the same work.
8. You may not copy, modify, sublicense, link with, or distribute the Library except as expressly provided under this License. Any attempt otherwise to copy,
modify, sublicense, link with, or distribute the Library is void, and will automatically terminate your rights under this License. However, parties who have
received copies, or rights, from you under this License will not have their licenses terminated so long as such parties remain in full compliance.
9. You are not required to accept this License, since you have not signed it. However, nothing else grants you permission to modify or distribute the Library or
its derivative works. These actions are prohibited by law if you do not accept this License. Therefore, by modifying or distributing the Library (or any work
based on the Library), you indicate your acceptance of this License to do so, and all its terms and conditions for copying, distributing or modifying the Library
or works based on it.
10. Each time you redistribute the Library (or any work based on the Library), the recipient automatically receives a license from the original licensor to copy,
distribute, link with or modify the Library subject to these terms and conditions. You may not impose any further restrictions on the recipients' exercise of the
rights granted herein. You are not responsible for enforcing compliance by third parties with this License.
11. If, as a consequence of a court judgment or allegation of patent infringement or for any other reason (not limited to patent issues), conditions are
imposed on you (whether by court order, agreement or otherwise) that contradict the conditions of this License, they do not excuse you from the conditions
of this License. If you cannot distribute so as to satisfy simultaneously your obligations under this License and any other pertinent obligations, then as a
consequence you may not distribute the Library at all. For example, if a patent license would not permit royalty-free redistribution of the Library by all those
who receive copies directly or indirectly through you, then the only way you could satisfy both it and this License would be to refrain entirely from distribution
of the Library.
If any portion of this section is held invalid or unenforceable under any particular circumstance, the balance of the section is intended to apply, and the
section as a whole is intended to apply in other circumstances.
It is not the purpose of this section to induce you to infringe any patents or other property right claims or to contest validity of any such claims; this section
has the sole purpose of protecting the integrity of the free software distribution system which is implemented by public license practices. Many people have
made generous contributions to the wide range of software distributed through that system in reliance on consistent application of that system; it is up to the
author/donor to decide if he or she is willing to distribute software through any other system and a licensee cannot impose that choice.
This section is intended to make thoroughly clear what is believed to be a consequence of the rest of this License.
12. If the distribution and/or use of the Library is restricted in certain countries either by patents or by copyrighted interfaces, the original copyright holder
who places the Library under this License may add an explicit geographical distribution limitation excluding those countries, so that distribution is permitted
only in or among countries not thus excluded. In such case, this License incorporates the limitation as if written in the body of this License.
13. The Free Software Foundation may publish revised and/or new versions of the Lesser General Public License from time to time. Such new versions will be
similar in spirit to the present version, but may differ in detail to address new problems or concerns.
Each version is given a distinguishing version number. If the Library specifies a version number of this License which applies to it and "any later version", you
have the option of following the terms and conditions either of that version or of any later version published by the Free Software Foundation. If the Library
does not specify a license version number, you may choose any version ever published by the Free Software Foundation.
14. If you wish to incorporate parts of the Library into other free programs whose distribution conditions are incompatible with these, write to the author to
ask for permission. For software which is copyrighted by the Free Software Foundation, write to the Free Software Foundation; we sometimes make exceptions
for this. Our decision will be guided by the two goals of preserving the free status of all derivatives of our free software and of promoting the sharing and
reuse of software generally.
NO WARRANTY
15. BECAUSE THE LIBRARY IS LICENSED FREE OF CHARGE, THERE IS NO WARRANTY FOR THE LIBRARY, TO THE EXTENT PERMITTED BY APPLICABLE LAW.
EXCEPT WHEN OTHERWISE STATED IN WRITING THE COPYRIGHT HOLDERS AND/OR OTHER PARTIES PROVIDE THE LIBRARY "AS IS" WITHOUT WARRANTY
OF ANY KIND, EITHER EXPRESSED OR IMPLIED, INCLUDING, BUT NOT LIMITED TO, THE IMPLIED WARRANTIES OF MERCHANTABILITY AND FITNESS FOR A
PARTICULAR PURPOSE. THE ENTIRE RISK AS TO THE QUALITY AND PERFORMANCE OF THE LIBRARY IS WITH YOU. SHOULD THE LIBRARY PROVE DEFECTIVE,
YOU ASSUME THE COST OF ALL NECESSARY SERVICING, REPAIR OR CORRECTION.
16. IN NO EVENT UNLESS REQUIRED BY APPLICABLE LAW OR AGREED TO IN WRITING WILL ANY COPYRIGHT HOLDER, OR ANY OTHER PARTY WHO MAY
MODIFY AND/OR REDISTRIBUTE THE LIBRARY AS PERMITTED ABOVE, BE LIABLE TO YOU FOR DAMAGES, INCLUDING ANY GENERAL, SPECIAL, INCIDENTAL
OR CONSEQUENTIAL DAMAGES ARISING OUT OF THE USE OR INABILITY TO USE THE LIBRARY (INCLUDING BUT NOT LIMITED TO LOSS OF DATA OR DATA
BEING RENDERED INACCURATE OR LOSSES SUSTAINED BY YOU OR THIRD PARTIES OR A FAILURE OF THE LIBRARY TO OPERATE WITH ANY OTHER
SOFTWARE), EVEN IF SUCH HOLDER OR OTHER PARTY HAS BEEN ADVISED OF THE POSSIBILITY OF SUCH DAMAGES.
END OF TERMS AND CONDITIONS
How to Apply These Terms to Your New Libraries
If you develop a new library, and you want it to be of the greatest possible use to the public, we recommend making it free software that everyone can
redistribute and change. You can do so by permitting redistribution under these terms (or, alternatively, under the terms of the ordinary General Public
License).
79
To apply these terms, attach the following notices to the library. It is safest to attach them to the start of each source file to most effectively convey the
exclusion of warranty; and each file should have at least the "copyright" line and a pointer to where the full notice is found.
one line to give the library's name and an idea of what it does.
Copyright (C) year name of author
This library is free software; you can redistribute it and/or modify it under the terms of the GNU Lesser General Public License as published by the Free
Software Foundation; either version 2.1 of the License, or (at your option) any later version.
This library is distributed in the hope that it will be useful, but WITHOUT ANY WARRANTY; without even the implied warranty of
MERCHANTABILITY or FITNESS FOR A PARTICULAR PURPOSE. See the GNU Lesser General Public License for more details.
You should have received a copy of the GNU Lesser General Public License along with this library; if not, write to the Free Software
Foundation, Inc., 51 Franklin Street, Fifth Floor, Boston, MA 02110-1301 USA
Also add information on how to contact you by electronic and paper mail.
You should also get your employer (if you work as a programmer) or your school, if any, to sign a "copyright disclaimer" for the library, if necessary. Here is a
sample; alter the names:
Yoyodyne, Inc., hereby disclaims all copyright interest in the library `Frob' (a library for tweaking knobs) written by James Random Hacker.
signature of Ty Coon, 1 April 1990
Ty Coon, President of Vice
That's all there is to it!
Configuration.dll, AuthCodeGenerator.lib, UserManager.dll, libcdkey.lib,
XCrashReport.exe license:
Copyright (c) 1998-2000 University College London
All rights reserved.
Redistribution and use in source and binary forms, with or without modification, is permitted provided that the following conditions are met:
1.
Redistributions of source code must retain the above copyright notice, this list of conditions and the following disclaimer.
2.
Redistributions in binary form must reproduce the above copyright notice, this list of conditions and the following disclaimer in the documentation
and/or other materials provided with the distribution.
3.
All advertising materials mentioning features or use of this software must display the following acknowledgement:
This product includes software developed by the Computer Science Department at University College London
4.
Neither the name of the University nor of the Department may be used to endorse or promote products derived from this software without
specific prior written permission.
THIS SOFTWARE IS PROVIDED BY THE AUTHORS AND CONTRIBUTORS ``AS IS'' AND ANY EXPRESSED OR IMPLIED WARRANTIES, INCLUDING, BUT NOT
LIMITED TO, THE IMPLIED WARRANTIES OF MERCHANTABILITY AND FITNESS FOR A PARTICULAR PURPOSE ARE DISCLAIMED. IN NO EVENT SHALL THE
AUTHORS OR CONTRIBUTORS BE LIABLE FOR ANY DIRECT, INDIRECT, INCIDENTAL, SPECIAL, EXEMPLARY, OR CONSEQUENTIAL DAMAGES (INCLUDING, BUT
NOT LIMITED TO, PROCUREMENT OF SUBSTITUTE GOODS OR SERVICES; LOSS OF USE, DATA, OR PROFITS; OR BUSINESS INTERRUPTION) HOWEVER CAUSED
AND ON ANY THEORY OF LIABILITY, WHETHER IN CONTRACT, STRICT LIABILITY, OR TORT (INCLUDING NEGLIGENCE OR OTHERWISE) ARISING IN ANY WAY
OUT OF THE USE OF THIS SOFTWARE, EVEN IF ADVISED OF THE POSSIBILITY OF SUCH DAMAGE.
Copyright (c) 1991 Bell Communications Research, Inc. (Bellcore)
Permission to use, copy, modify, and distribute this material for any purpose and without fee is hereby granted, provided that the above copyright notice and
this permission notice appear in all copies, and that the name of Bellcore not be used in advertising or publicity pertaining to this material without the specific,
prior written permission of an authorized representative of Bellcore. BELLCORE MAKES NO REPRESENTATIONS ABOUT THE ACCURACY OR SUITABILITY OF
THIS MATERIAL FOR ANY PURPOSE. IT IS PROVIDED "AS IS", WITHOUT ANY EXPRESS OR IMPLIED WARRANTIES.
80
81