1
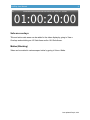
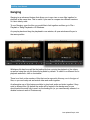
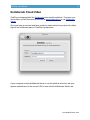
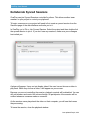
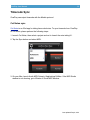
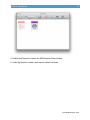
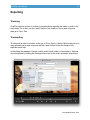
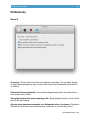
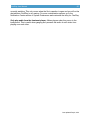
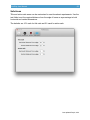
1
CinePlay User Manual
CinePlay!
"
"
"
User Manual!
"
"
CinePlay is a professional Mac media player complete with timecode overlays, markers,
masking, safe areas and much more. It is ideal for dailies, portfolios, client feedback
and mobile note taking."
TIMECODE!
All timings are specified in timecode notation and CinePlay can read timecode stored in
a movie file. You can even add a draggable timecode window or overlay to the movie."
MARKERS!
Add markers during playback and export them to a range of common marker formats."
SAFE AREAS!
View customizable 4:3 and 16:9 title and action safe areas over your movie."
GANGING !
Gang two or more players together to compare different versions of a clip side-by-side. "
KOLLABORATE!
View cloud videos stored on Kollaborate and make comments for the rest of your team.
Synced Sessions allow another team member to control your playhead."
CUT NOTES SYNC!
Sync timecode to Cut Notes for easy note taking."
"
Last updated Sep 3, 2014
2
CinePlay User Manual
Contents!
Playback"
3"
Ganging"
7"
Playlists"
8"
Kollaborate Cloud Video"
9"
Kollaborate Synced Sessions"
12"
Timecode Sync"
14"
Exporting"
17"
Preferences"
19"
Registration"
23"
Frequently Asked Questions"
25"
Support"
26
Last updated Sep 3, 2014
3
CinePlay User Manual
Playback!
Basic controls!
"
The playback window offers the ability to play and pause, rewind and fast forward and
step back and forward by a single frame. You can also jump to the beginning or end of a
movie with the Home and End keys."
"
The current timecode position is displayed to the left of the timeline bar. If the movie
does not have an embedded timecode track the start position defaults to 00:00:00:00.
The total length of the video is located to the right of the timeline."
Timecode overlay
"
A draggable timecode overlay can be added to the video display by going to View >
Overlays > Timecode."
Timecode window
"
A draggable timecode window can be displayed by going to Window > Timecode. This
allows you to move the timecode display to another screen so it doesn’t obscure
playback."
"
Last updated Sep 3, 2014
4
CinePlay User Manual
"
Safe area overlays
"
Title and action safe areas can be added to the video display by going to View >
Overlays and switching on 4:3 Safe Areas and/or 16:9 Safe Areas."
"
Mattes (Blanking)
"
Video can be matted to various aspect ratios by going to View > Matte. "
"
Last updated Sep 3, 2014
5
CinePlay User Manual
Markers!
"
At the bottom right of the player window are controls for adding, editing and navigating
between markers."
"
Click the Add Marker button to create a new marker at the current playhead position. If a
marker already exists at this position a popup window will appear for editing the existing
marker. Enter the name of the marker and choose a color if desired, then press Enter or
click away from the marker popup to save it."
"
To delete a marker, position the playhead above it (you may find it easier to use the
previous / next marker buttons to ensure you’re directly above it) and click the Delete
button in the edit popover that appears."
"
Markers are not saved to the file so they only exist on your computer, however you can
export markers to various text-based marker formats from the File menu. Chapters
stored in the movie file itself cannot be edited or deleted. "
"
All markers stored in the current movie can be viewed at once in the Markers window,
which can be accessed by going to Window > Markers. This makes viewing or editing
multiple markers at once much easier."
"
Last updated Sep 3, 2014
6
CinePlay User Manual
"
Cloud Comments!
"
Comments on Kollaborate videos are shown as markers in the timeline. You can edit
your own comments but cannot edit or delete those created by others. "
"
Comments are live so anyone else viewing the file will be alerted to your comments as
you make them. If anyone makes a new comment while you are viewing a file, you will
be alerted with the following Notification Center alert:"
"
"
"
When used with a video stored on Kollaborate, all markers are synced to the cloud and
project users are notified when you create a new note via Dashboard and email alerts. "
"
Exporting Markers!
"
CinePlay can export to Final Cut Pro 7 and Avid marker lists. Avid locator lists can be
imported directly into Media Composer or Symphony but to import into Final Cut Pro 7,
FCPX or Premiere you will need the free Marker Import tool available at http://
www.digitalrebellion.com/cutnotes .
Last updated Sep 3, 2014
7
CinePlay User Manual
Ganging!
"
Ganging is an advanced feature that allows you to sync two or more files together for
playback at the same time. This is useful if you want to compare two different versions
of a shot side-by-side."
"
To use Ganging, open the files you would like to link together and then go to File >
Playback > Gang Playheads > All Windows."
"
As you play back and drag the playhead in one window, all open windows will sync to
the same position."
"
Whichever file has focus will be the leading file that controls the playback of the others,
as well as being the only file that will play audio by default. To switch to a different file for
playback and audio, click on its window."
"
There is no limit on the number of files that can be synced in this way, nor in the type of
files, so you can freely mix and match video and audio together."
"
An alternative use of this feature would be to play back audio and video together if they
exist in different files. By default the audio will be muted in the background so you
should select the audio clip to use it as the leading file (or you can manually unmute it or
disable frontmost audio in Preferences).
Last updated Sep 3, 2014
8
CinePlay User Manual
Playlists!
"
CinePlay has basic support for M3U playlists. To create a new playlist, go to File > New
Playlist and drag media files into the window that appears."
"
Select a file to launch the player and begin playback. If you find that the playlist window
obscures playback, click on the player and the playlist window will move to the
background. Do not close the playlist window as this will close both the playlist and
player."
"
When the player window is open, use the Skip Previous / Next buttons on the player to
switch between files in the playlist. If you accidentally close the player, click on the file in
the playlist again to reopen."
"
Use File > Save Playlist and File > Save Playlist As to save as .m3u playlist files that
can be played on a variety of devices including iPads and iPhones, provided those
devices have access to the original media files.
Last updated Sep 3, 2014
9
CinePlay User Manual
Kollaborate Cloud Video!
"
CinePlay is integrated with the Kollaborate cloud workflow platform. To access your
cloud videos you will first need an account at www.kollaborate.tv or on Kollaborate
Server."
"
Once you have an account and have created or been invited to a project with videos,
login in the Kollaborate pane of CinePlay’s preferences."
"
"
If your company is using Kollaborate Server to run the platform in-house, ask your
system administrator for the correct URL to enter into the Kollaborate Server tab."
Last updated Sep 3, 2014
CinePlay User Manual
10
"
Click Authorize and if everything is correct CinePlay will confirm that you are connected
to Kollaborate."
"
"
Loading videos
"
Click File > Browse Kollaborate Files to open the Kollaborate browser. This allows you
to switch between projects and browse through the video files you have access to.
Double-click a video to open it."
Last updated Sep 3, 2014
11
CinePlay User Manual
"
If you have multiple versions of a file uploaded, you can switch between them by
clicking the Revisions dropdown in the top right corner. "
"
Tip: To open a revision in a new window, Cmd-click it.!
"
Last updated Sep 3, 2014
12
CinePlay User Manual
Kollaborate Synced Sessions!
"
CinePlay can join Synced Sessions controlled by others. This allows another teammember on your project to control your playhead."
"
To begin, someone on your project will need to first create a synced session from the
Sessions page of the web interface and invite you to it."
"
In CinePlay, go to File > Join Synced Session. Select the project and then double-click
the synced session to join it. If you don’t see any sessions, make sure your colleague
has invited you."
A player will appear. It may not yet display video if the user has not chosen a video to
play back. When they choose a video, it will appear on your screen."
"
Because you are not controlling the session, playback controls will be disabled. You can
still add markers and control the volume though. All participants of the session will be
notified whenever someone makes a comment."
"
As the session owner plays back the video on their computer, you will see the frames
they are seeing."
"
To leave the session, close the playback window."
Last updated Sep 3, 2014
CinePlay User Manual
13
"
Last updated Sep 3, 2014
14
CinePlay User Manual
Timecode Sync!
"
CinePlay can output timecode with the Mackie protocol."
"
Cut Notes sync
"
Cut Notes is an iPad app for taking timecoded notes. To sync timecode from CinePlay
to Cut Notes, please perform the following steps:"
"
1. Launch Cut Notes, then select a project and cut to launch the note-taking UI."
"
2. Tap the Sync button and select MIDI.
"
3. On your Mac, launch Audio MIDI Setup in /Applications/Utilities. If the MIDI Studio
window is not showing, go to Window > Show MIDI Window.
Last updated Sep 3, 2014
15
CinePlay User Manual
"
"
4. Double-click Network to launch the MIDI Network Setup window.
5. Under My Sessions create a new session called Cut Notes."
Last updated Sep 3, 2014
16
CinePlay User Manual
6. Your iPad should be showing in the Directory pane. Select it and click Connect.
"
7. In CinePlay, click View > Timecode Output > Mackie.
"
8. Drag the playhead and the timecode should update in Cut Notes. The playback
buttons in the Cut Notes UI should remotely control the movie."
"
Note: Comments made in Cut Notes will not automatically appear in CinePlay unless
you are viewing a Kollaborate movie. Last updated Sep 3, 2014
CinePlay User Manual
17
Exporting!
"
"
Trimming
"
CinePlay can trim a video to reduce its length without requiring the video or audio to be
transcoded. To do this, use the I and O keys on the timeline to set in and out points,
then go to File > Trim."
Transcoding
"
To transcode a video to another codec, go to File > Export > Movie. Before doing so you
may optionally set in and out points with the I and O keys to limit the length of the
exported movie clip."
"
In the dialog that appears, choose a video and/or audio codec to transcode to. Settings
can be adjusted by clicking the Settings button next to the video and audio dropdowns."
Last updated Sep 3, 2014
18
CinePlay User Manual
"
"
Note: Export codecs are limited to H.264, ProRes 422, ProRes 4444 and JPEG.
Last updated Sep 3, 2014
CinePlay User Manual
19
Preferences!
"
General
"
At startup - Choose what to do when the application launches. You can either display
an Open dialog allowing the user to select a file, launch the Kollaborate file browser or
do nothing."
"
Play media files automatically - Automatically begin playing video and audio files as
soon as they have loaded."
"
Save playback position when reopening a file - Begin playback where you left off last
time the file was viewed"
"
Alert me when someone comments on a Kollaborate video I’m viewing - Displays a
Notification Center alert when someone else comments on a cloud video you’re
Last updated Sep 3, 2014
20
CinePlay User Manual
currently watching. This only occurs when the file in question is open and you will not be
alerted when CinePlay is not running. For more customization options, go to the
Notification Center section of System Preferences and customize the entry for CinePlay."
"
Only play audio from the frontmost player - Mutes players when they move to the
background. This is useful when ganging as it prevents the audio of each video from
playing over each other."
"
"
Last updated Sep 3, 2014
21
CinePlay User Manual
Markers
"
"
"
"
"
"
"
"
"
"
"
"
"
"
"
"
"
"
"
"
"
"
"
"
Marker popups will automatically display when you add a new marker, press M to edit
an existing marker or click a marker to edit it. This pane allows you to control extra
instances in which you may prefer the marker popups to appear."
"
When moving to next / previous marker while playback is stopped - Shows a
popup with the marker’s textual content if you use the Next / Previous Marker buttons or
the Up / Down Arrow keyboard shortcuts to switch between markers while playback is
stopped."
"
When moving to next / previous marker while playing - Shows a popup with the
marker’s textual content if you use the Next / Previous Marker buttons or the Up / Down
Arrow keyboard shortcuts to switch between markers during playback."
"
When hovering over a marker - Shows a popup with the marker’s textual content if
you hover over the marker’s icon.
Last updated Sep 3, 2014
CinePlay User Manual
22
Safe Areas
Title and action safe areas can be customized to meet broadcast requirements. Use the
text fields to set the required distance from the edge of frame as a percentage in both
horizontal and vertical dimensions."
"
The defaults are 10% each for title safe and 5% each for action safe."
"
"
Last updated Sep 3, 2014
CinePlay User Manual
23
Registration!
"
There are two options for registering CinePlay, which can be accessed from the Help >
Register menu. Kollaborate integration is free in CinePlay, so you can unlock cloud
functionality permanently without needing to create an account on our site. In this mode,
however, CinePlay will only open Kollaborate videos and cannot be used to open files
stored locally on your computer."
"
The full version uses an online registration system. When purchasing the app you will
be prompted to create an account at https://www.digitalrebellion.com/account and can
use your account email address and password to register CinePlay. Initial registration
will require an internet connection but you will not need a connection every time you
launch the application."
"
"
"
Last updated Sep 3, 2014
CinePlay User Manual
24
If you wish to install CinePlay on another computer, go to Help > Register, enter your
account password and then click Unregister to free up your license so it can be installed
on a new system. If your hard drive was damaged or you forgot to unregister CinePlay
before formatting it, please contact us to resolve the problem."
"
"
Last updated Sep 3, 2014
25
CinePlay User Manual
Frequently Asked Questions!
"
Q. What codecs are supported?
A. We support all codecs allowed by AV Foundation, including ProRes and H.264.
Legacy formats like MPEG-1 and third-party codecs like DNxHD or CineForm are not
supported.!
Q. Can CinePlay play videos from YouTube, Vimeo or other video-sharing
websites? A. No."
Q. Can CinePlay play copy-protected videos, such as commercial movies I have
purchased from the iTunes Store?
A. No."
Q. If I send a movie to someone else will my markers show up?
A. Markers are stored on your system and not within the file. However, if you want to
send the markers to someone else you can export them as a marker list or use
Kollaborate."
Q. How do I import markers into my NLE? A. Locator lists can be imported into Avid but for all other formats you will need the free
Marker Import tool."
Q. Why does timecode start at 00:00:00:00 for my remote file even though the
video has a timecode track?!
A. CinePlay may be unable to read the timecode tracks of certain video files that are not
stored locally on your computer. To resolve this, download the files or use Kollaborate
which does not have this limitation."
"
Last updated Sep 3, 2014
26
CinePlay User Manual
Support!
"
Bug reports and feature requests can be submitted using the links in the Help menu.
Last updated Sep 3, 2014