1
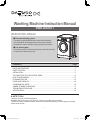
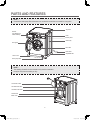
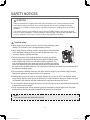
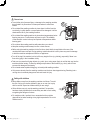
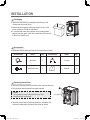
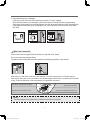
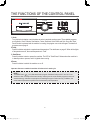
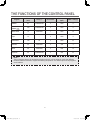
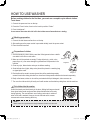
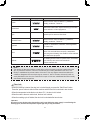
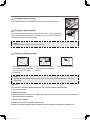
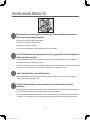
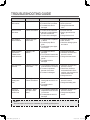
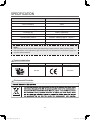
USER MANUAL FOR YOUR
Daewoo Model DWD-GM1011
60 cm 6 kg Freestanding
Washing Machine
Customer Helpline Number : 0844 887 2525
Spare Parts : 0844 557 0290 or www.4daewoo.co.uk / DAEWOO ELECTRONICS Web Site www.daewooelectronics.co.uk
DWD-GM1011_영국향.indd 1
2013-09-23 오전 11:41:56
Washing Machine Instruction Manual
DWD-GM1011
INSTRUCTION MANUAL
■ Economic washing system
The washing machine determines the water level and washing
time automatically by sensing the amount of laundry and water
temperature in order to minimize energy and water consumption.
■ Low noise system
The washing machine minimizes the spinning noise level by sensing
the amount of unbalance of laundry.
CONTENTS
Page
PARTS AND FEATURES . .................................................................................................................2
SAFETY NOTICES.............................................................................................................................3
INSTALLATION...................................................................................................................................5
THE FUNCTIONS OF THE CONTROL PANEL.................................................................................8
HOW TO USE WASHER...................................................................................................................10
CLEANINS ROUTINE........................................................................................................................13
POOR WASH RESULTS...................................................................................................................15
STAIN REMOVAL GUIDE..................................................................................................................16
GENEAL TROUBLE SHOOTINGS....................................................................................................17
TROUBLESHOOTING GUIDE..........................................................................................................18
SPECIFICATION................................................................................................................................19
A NOTE TO YOU
Thank you for buying a DAEWOO appliance.
DAEWOO washers are easy to use, save time, and help you manage your home better.
This manual contains valuable information about how to operate and maintain your washer properly and safely.
Please read it carefully.
1
DWD-GM1011_영국향.indd 2
2013-09-23 오전 11:41:57
PARTS AND FEATURES
NOTE :
Unscrew the drain pump filter to let water run out when the machine is not used for a long time.
Top cover
Drawer
(for detergent or
fabric softener)
Knob
Control panel
Case body
Door glass
Door seal
Drain hose
Adjustable feet
Lower cover
Drain pump filter
NOTE :
The drawing of machine in the manual is only used for instruction.
It may be vary from the model you buy.
Connection Cable
Hot water inlet valve
cold water inlet valve
Transit bolts
Back cover
2
DWD-GM1011_영국향.indd 3
2013-09-23 오전 11:41:57
SAFETY NOTICES
WARNING :
Read and understand thoroughly these safety instructions before use. The items indicated here are
very important safety precautions, which must be followed. We cannot be held liable for damage
caused by non-compliance with the warning and safety instructions or resulting from incorrect use or
operation.
This washing machine is not intended for use by persons (including children) with reduced physical,
sensory or mental capabilities, or lack of experience and knowledge, unless they are supervised whilst
using it or have been shown how to use it by a person responsible for their safety.
Technical safety
● Before setting up the washing machine, check it for any externally visible
damage. Do not install or use a damaged washing machine.
● Before connecting the washing machine, ensure that the connection data
on the data plate (voltage and current) match the electricity supply. If in
any doubt, consult a qualified electrician.
● The electrical safety of this washing machine can only be guaranteed
when continuity is complete between it and an effective earthing system
which complies with current local and national safety regulations. It is
most important that this basic safety requirement is present and regularly
tested, and where there is any doubt the household wiring system should
be inspected by a qualified electrician. The manufacturer cannot be held liable for the consequences of
an inadequate earthing system.
● Do not connect the washing machine to the mains electricity supply by an extension lead. Extension
leads do not guarantee the required safety of the appliance.
● Unauthorized repairs could result in unforeseen dangers for the user, for which manufacturer cannot
accept liability. Repairs should only be undertaken by an approved service technician. Ensure current is
not supplied to the machine until after maintenance or repair work has been carried out.
● If the connection cable is damaged or broken it must only be replaced by an approved service technician
to protect the user from danger.
● Faulty components must only be replaced by genuine manufacturer original spare parts. Only when
these parts are fitted can the safety standards of the machine be guaranteed.
NOTE :
THIS WASHING MACHINE MUST BE EARTHED.
3
DWD-GM1011_영국향.indd 4
2013-09-23 오전 11:41:58
Correct use
● To avoid the risk of personal injury or damage to the washing machine,
do not install it in place where it is damp and where it suffers from
rainfall.
● Do not install the washing machine in place where it suffers from the
sun directly, in which plastic or components will be damaged. It will be
shortened the life of your washing machine.
● Do not install the washing machine in place where temperatures below
freezing may occur. Frozen hoses may burst or split. The reliability
of the electronic control unit may be impaired at temperatures below
freezing point.
● Do not shoot the washing machine with water when you clean it.
● Keep the washing machine away from fire or heat sources.
● Before using the washing machine for the first time, check that the transit bolts at the rear of the
machine have been removed. During spinning, transit bolts which is still in place may result in damage
to both the machine and adjacent furniture or appliances.
● Turn off the tap if the machine is to be left for any length of time (e.g. holiday), especially if there is no
floor drain (gully) in the immediate vicinity.
● Take care to ensure that foreign objects (e.g. nails, pins, coins, paper clips) do not find their way into the
machine with the laundry. These may damage components of the machine (e.g. drum), which in turn
can result in damage to the laundry.
● Do not wash water-repellent things(e.g. raincoats) with washing machine.
● Only remove laundry from the washing machine once the drum has stopped turning. Reaching into a
moving drum is extremely dangerous and could result in injury.
Safety with children
● Keep children away from the washing machine at all times. To avoid
the risk of injury do not allow children to play on or near it or to play
with its controls. Supervise children whilst you are using it.
● Older children may only use the washing machine if its operation
has been clearly explained to them and they are able to use it safely,
recognising the dangers of misuse.
● For machines with a ‘porthole’ door, remember that the porthole
glass will be hot when washing at very high temperatures. Do not let
children touch it.
4
DWD-GM1011_영국향.indd 5
2013-09-23 오전 11:41:58
INSTALLATION
Packaging
● Remove all the packing (including the foam base) or the
vibration and noise may occur.
● Dispose all the wrappage safely and keep them out of the
reach of children. Danger of suffocation!
● It is normal that water drops appear on the packing plastic
bag and the door glass, which are resulted from the water left
in the tub for checking out.
Accessories
● Make sure that you have received all of the items shown below.
Accessories
Name
Qty.
Inlet hose
Transit bolts caps
Accessories
Name
Qty.
1
“U” piece
1
4
Manual
1
Removing transit bolt
● Remove all the transit bolts at the back of the machine with tools.
● Plug the holes with the transit bolts caps supplied.
NOTE :
Strong vibration,noise or failures may occur if the
transit bolts are not removed.
Transit bolts
● Keep the transit bolts for future transportation. Whenever the
machine is transported, the transit bolts must be refitted.
5
DWD-GM1011_영국향.indd 6
2013-09-23 오전 11:41:59
Installation place requirement
● A concrete floor is the most suitable installation surface for a
washing machine, being far less prone to vibration during the
spin cycle than wooden floorboards or a carpeted surface.
● The machine must be level and securely positioned. The
distance between the machine and wall must be more than 10
cm.
10cm
10cm
● To avoid vibrations during spinning, the machine should not be
installed on soft floor coverings.
Level adjustment
The machine must stand perfectly level on all four feet to ensure safe and proper operation. Incorrect
installation may increase electricity and water consumption and may cause the machine to move about.
To do these when the machine is not level:
● Using the spanner turn locknut in a clockwise
direction. Then turn locknuts together with adjust
feet to unscrew.
Locknuts
● Use a spirit level to check the machine is standing
level.
Loose
● Hold adjust feet securely with a pipe wrench. Turn
locknut again using the spanner until it sits firmly up
against the housing.
High
Locked
Low
Adjustable feet
NOTE :
Vibration and noise may occur if the locknuts do not sit firmly up against the houses.
Drain hose connection
1. Direct into a sink If the outlet spigot has not been used before, remove any blanking plug that may be in place. Push the drain hose onto the spigot and secure with a clip if required, ensure a loop is formed in the
drain hose to prevent waste from the sink entering the washing machine. If required, the drain hose can be extended to a length of 4 m.
Loop
6
DWD-GM1011_영국향.indd 7
2013-09-23 오전 11:42:00
“U” piece
supplied
90cm
60cm
30cm
2. Connected securely to a standpipe. Firstly form a hook in the end of the drain hose using the “U” piece” supplied. Place the drain hose into your standpipe, which should have an internal diameter of approximately
38mm thus ensuring there is an air break between the drain hose and standpipe. When discharging into
a standpipe ensure that the top of the standpipe is no more than 90cm and no less than 60cm above
floor level.
Water inlet connection
Connect the inlet hose supplied with the machine to a tap with a 3/4” thread.
Do not use previously employed hoses.
Installation should comply with local water authority and building regulations’ requirements.
When there is a inlet valve at the back of the machine, it must be connected to a cold water supply. If
there are two inlet valve, one is connected to a cold water supply and the other is connected to a hot water
supply. Follow the indication of the picture below to complete the connection.
inlet valve for hot water with a red grid
inlet valve for cold water
inlet hose for cold water with a white nut
inlet hose for hot water with a red nut
NOTE :
The above diagram is only applicable to models that have hot and cold feeds.
7
DWD-GM1011_영국향.indd 8
2013-09-23 오전 11:42:00
THE FUNCTIONS OF THE CONTROL PANEL
PROGRAMME
1. Knob
Turn this knob clockwise or anticlockwise to select a required wash program. The available programs
are Synthetic, Wool, Delicate, Sterilization, Cotton, Standard, Quick Wash and Spin. Once the “Start/
Pause” button is pressed and the machine is running, the program can not be changed. The details of
programs are on page 9.
2.Temp.
Press this button and select a required wash temperature. The details are on page 9. When all the lights
of temperature are off, the wash temperature is “Cold”.
3. Start/Pause
Press this button to start or pause the machine. The LED of “Start/Pause” flickers when the machine is
in standby mode or pauses, and it is lighted when running.
4.Power
Press this button to switch the machine on or off.
Important : Be sure to switch the machine off at the end of a wash cycle.
NOTE :
‘ Standard Cotton
’ is for Standard Cotton program. Standard Cotton at 60 °C and 40 °C are
suitable to clean normally soiled cotton laundry and they are the most efficient programs in terms of
combined energy and water consumptions for washing that type of cotton laundry; in addition, the
actual water temperature may differ from the declared cycle temperature.
8
DWD-GM1011_영국향.indd 9
2013-09-23 오전 11:42:01
THE FUNCTIONS OF THE CONTROL PANEL
Time
(min)
Temp.(℃)
Rinse times
Spin speed
(rpm)
MAX. Load (kg)
Cotton
85
Cold/20/40/60
2
1000
6
Standard
Cotton
108
Cold/20/40/60
2
1000
6
Quick Wash
16
Cold/20/40
1
1000
1.5
Spin
13
--
0
1000
6
Sterilization
138
90
2
1000
3.5
Delicate
50
Cold/20/40
2
400
2
Wool
58
Cold/20/40
2
600
1.5
Synthetic
59
Cold/20/40/60
2
800
3.5
Program
NOTE :
The running time above is for the default programs, which is only for reference, and it may different
because of different laundries, weights and washing temperature. The default options of the programs
are in boldface.
9
DWD-GM1011_영국향.indd 10
2013-09-23 오전 11:42:01
HOW TO USE WASHER
Before washing clothes for the first time, you must run a complete cycle without clothes.
To do these:
1. Connect the power and turn on the tap.
2. Press the “Power’ button, then turn the knob to position “Cotton”.
3. Press “start/pause”.
It can remove the water which is left in the tub because of manufacturer’s testing.
Washing preparation
1. Connect the inlet hoses well and turn on the tap.
2. After making sure the power socket is qrounded reliably, insert the power socket.
3. Place the drain hose well.
Preparation of clothes
1. Sort the laundry by colour and by care label. Most garments have a textile
care label in the collar or side seam.
2. Make sure all the pockets are empty, Foreign objects (e.g. nails, coins,
paper clips, etc.) can cause damage to garments and components in the
machine.
Diagram 1
Diagram 2
3. Close any zips, fasten hooks and eyes etc before washing.
4. Small delicate item (tights, baby socks) should be placed in a washing bag
or zipped pillow case.
Diagram 3
5. Dark textiles often contain excess dye and should be washed separately
several times before being included in a mixed load. Always wash whites and coloureds separately.
6. Badly soiled areas, stains etc. should be pre-treated with liquid detergent, stain removers etc.
7. Turn over the clothes which pill easily and is with woolen surface before putting them into the machine.
Put clothes into the washer
Unfold the laundry and load loosely in the drum. Mixing both large and small
items gives better wash results and also helps distribute the load evenly
during spinning. The most efficient use of energy and water is achieved
when a full load is washed. However, do not overload as this causes
creases and reduces cleaning efficiency.
NOTE :
Make sure that no garments are caught between the door and the seal.
10
DWD-GM1011_영국향.indd 11
2013-09-23 오전 11:42:01
Using the detergent drawer
1. Open the drawer and add adequate detergent into main wash compartment marked “
” or “ ”.
2. Add the fabric softener into compartment marked “ ” or “ ”. Do not exceed the maximum level mark. It does not benefit the appliance or improve performance.
3. Add the detergent into the pre-wash compartment marked “
select.
” or “ ” according to the programme you
4. Close the drawer.
The right amount of detergent will depend on the following:
● The quantity of laundry
Main wash compartment
Fabric softener compartment
Pre-wash compartment
● The soiling level of the laundry -L
ightly soiled No visible dirt or stains. Possibly slight body odour.
-N
ormally soiled
Visibly dirty and/or just a few slight stains.
-H
eavily soiled
Visible dirt and stains and/or dried on soiling.
NOTE :
It is recommended to use low foaming
powder.
● The water hardness level.
Washing steps
1.Turn on the water tap, and connect the power.
2.Open the door, and put the cloth into the drum one by one.
3.Close the door, and put suitable amount of detergent and fabric softener into the dispenser, then close
the drawer.
4.Press the “Power” button, and choose a programme you need by turning the knob .
5.Press the “Temp.” button and select a wash temperature.
6.Press “ Start/Pause” button to start the washing machine.
7.When the cycle is finished, there is a warning tone sounds.
NOTE :
When washing cycle is finished, the machine will change into a standby mode.
And the power will be off after 10 minutes without any control on the control panel.
Important:
The rated voltage and frequency are 220-240V AC and 50Hz.
Please ensure the connection data quoted on the data plate match the household mains supply.
11
DWD-GM1011_영국향.indd 12
2013-09-23 오전 11:42:01
Programme
Washing symbol
Fabric
Cotton
Cottons, linens or cotton mix fabrics, e.g. table linen,
towelling, underwear, T-shirts etc.
Quick Wash
Small loads of items which require freshening up and which
can be washed in a Cotton programme.
Spin
Separate spin for cotton and linen items
Standard Cotton
Cottons, linens or cotton mix fabrics, e.g. table linen,
towelling, underwear, T-shirts etc.
Synthetic
Synthetic or mixed fabrics, underwear, coloured garments,
non-shrink shirts.
Wool
Machine-washable or hand-washable wool or wool blend
fabrics. If the care label does not specify a temperature,
wash using the cold setting. Also suitable for hand-washable
silks. Reduce the spin speed.
Delicate
For delicate garments made of synthetic fibres, mixed fibres,
rayon and easy care cottons. Also suitable for
machine-washable silks.
NOTE :
The machine is fitted with a balance control device, which ensures the machine is stable during the
spin. To protect the machine, it will cut in if the laundry is not evenly distributed in the drum. The
laundry is redistributed by reverse rotation of the drum. This may happen several times before the
unbalance disappears and normal spinning can resume. If, after 15 minutes, the laundry is still not
evenly distributed in the drum, the machine will not spin. In this case, redistributed the load manually
and reselect the spin programme.
Door lock
• When the machine is started, the door lock is locked though you press the “Start/Pause” button. Press the “power” button to switch off the machine and the door lock is unlocked in two minutes.
• When the temperature inside the drum is above 53℃, the door lock is locked.
• When the water is above a certain level, the door lock is locked.
• When the washing cycle is finished, the door lock is unlocked after two minutes.
Important:
Do not try to open the door when the washing cycle is not finished or power supply is cut off during the
washing cycle, because the temperature may be high and you may be scalded.
12
DWD-GM1011_영국향.indd 13
2013-09-23 오전 11:42:01
CLEANINS ROUTINE
D
isconnect the machine from the mains electricity supply and withdraw the plug from the socket before
cleaning the machine.
The washing machine must not be hosed down.
Cleaning the exterior
Clean the exterior with a mild non-abrasive cleaning agent or soap and water using a well wrung-out cloth.
Wipe dry with a soft cloth.
D
o not use solvents, abrasive cleaners, glass cleaners or all-purpose cleaning agents. These might damage plastic surfaces and other components because of the chemicals
theycontain.
The washing drum
Clean the drum every 3 months by using the “Sterilization” programme.
Cleaning the drawer
Remove detergent residues regularly. Clear the drawer following these:
● Pull out the drawer until a resistance is felt. Press down the release catch and at the same time pull the
drawer right out of the machine.
● Remove the siphon from compartment and clean it.
● Clean the dispenser using a brush and warm water.
13
DWD-GM1011_영국향.indd 14
2013-09-23 오전 11:42:01
Cleaning the drawer housing
Use a bottle brush to remove detergent residues inside the drawer housing.
Cleaning the water inlet filter
Use pointed nose pliers to withdraw the plastic filter. Clean, put back and secure.
These filter should be checked every 6 months or so, or more often if there are
frequent interruptions to the water supply.
NOTE :
The filter must be put back in place after cleaning.
Cleaning the drain pump filter
1. Disconnect the machine from
2. Place a container under the
the mains electricity supply and
pump. Unscrew and remove
open the pump cover with a
the filter.
screwdriver.
3. Clean the filter carefully.
NOTE :
The filter should be cleaned every 2 months or so, or when there is fault that the “Rinse” and “Spin”
LEDs flicker.
Important:
If the machine is exposed to temperatures below 0°C, certain precautions should be taken.
1. Turn off the water tap.
2. Unscrew the inlet hose.
3. Unhook the drain hose from the rear support and position the end of this hose and that of the inlet hose in
a bowl. Run the spin programme.
4. Disconnect the appliance.
5. Screw the inlet hose and reposition the drain hose.
6. When you intend to start the machine up again, make sure that the room temperature is above 0°C.
14
DWD-GM1011_영국향.indd 15
2013-09-23 오전 11:42:02
POOR WASH RESULTS
My garments are looking grey and there are limescale deposits present in
the drum of my washing machine.
● There is not enough detergent being added.
● The incorrect detergent is being used.
● Stains are not being pre-treated.
● The correct wash program or wash temperature was not selected.
I have followed the advice given above, but my garments are still coming out
with grey stains on them.
● The garments are soiled with oils, ointments or grease and were washed without enough detergent.
● The wash temperature selected was too low.
● Fabric conditioner has come into contact with the garments. If this happens try to wash out these stains
as quickly as you can and try to avoid getting conditioner on the garments in future.
After the final rinse, I can still see foam.
● Modern detergents can result in there still being foam in the final rinse, this does not mean that the
washing is not being rinsed properly.
There is white residue on my garments when I remove them from the
appliance.
● Modern detergents can contain insoluble contents; white residue after a wash cycle is not necessarily a
sign of the garments being insufficiently rinsed by the washing machine.
● You should shake out the garment or brush it off. In future possibly turn the garment inside out before it
is washed. You may wish to move from a powder detergent and switch to a liquid detergent instead.
15
DWD-GM1011_영국향.indd 16
2013-09-23 오전 11:42:02
STAIN REMOVAL GUIDE Stain
MUSTARD
Removal Method
Alcoholic
beverages
The stain should be first washed with cold water, then wiped with glycerine and water and rinsed
with water mixed with vinegar.
Shoe polish
The stain should be softly scratched without ruining the material, then rubbed with detergent and
rinsed. In case it is not eliminated, rub with 1 unit of pure alcohol (96 degrees) mixed in 2 units of
water and then washed with lukewarm water.
Tea and coffee
Stretch the stained area of material on the top of a container and pour water as hot as the material
can endure on it. If the type of material is suitable, wash it with lye.
Chocolate and
cocoa
Leave your clothes in cold water and rub with soap or detergent, wash it in the highest temperature
that the material type can endure. If there is still a stain of oil left, wipe with oxygenated water (in
proportion of 3%).
Tomato paste
Scrape the dried pieces without ruining the material, then leave in cold water for about 30 minutes
and wash by rubbing with detergent.
Meat broth/
egg
Eliminate the dried stain residues and wipe with a sponge or soft cloth wetted in cold water. Rub
with detergent and wash with diluted lye.
Grease and oil
stains
First wipe the residues. Rub the stain with detergent and then wash with lukewarm soapy water.
Mustard
First apply glycerine to the stained area. Rub with detergent and then wash. If the stain still does
not disappear, wipe with alcohol (on synthetic and coloured cloth, a mixture of 1 unit alcohol, 2 units
water should be used).
Blood stain
Lay your clothes in cold water for 30 minutes. If the stain still does not disappear, lay in mixture of
water and ammonia (3 table-spoons of ammonia in 4 litres of water) for 30 minutes.
Cream, iceLay your clothes in cold water and rub the stained area with detergent. If the stain has still not
cream and milk disappeared, apply lye on the fabric of your clothes in proper proportion. (Do not use lye on coloured
clothes).
MOULD
Mould
Mould stains should be cleaned as soon as possible. The stain should be washed with detergent,
and if it does not disappear, it should be wiped with oxygenated water (in proportion of 3%).
Ink
Hold the stained area under cold water and wait until the inky water completely runs off. Then rub
with water diluted with lemon juice and detergent. Wait five minutes and then wash.
Fruit
Stretch the stained area of your clothes on the top part of a container and pour cold water on it. Do
not pour hot water on the stain. Wipe with cold water and apply glycerine. Wait for 1-2 hours and
rinse after wiping with a few drops of white vinegar.
Grass stain
Rub the stained part with detergent. If the type of fabric is suitable for use of lye, wash it with lye.
Rub your woolen clothes with alcohol (for coloured one, a mixture of 1 unit pure alcohol and 2 units
of water).
Oil paint
The stain should be eliminated before it dries by applying thinner on it. Then it should be rubbed
with detergent and washed.
Burnt stain
If your fabric is suitable for use of lye, you can add lye into your washing water. For woolen fabric, a
cloth dampened in oxygenated water should be pressed on the stain and it should be ironed with a
dry cloth on it. It should be washed after rinsing well.
16
DWD-GM1011_영국향.indd 17
2013-09-23 오전 11:42:02
GENERAL TROUBLE SHOOTINGS
Problem
Possible solutions
The washing machine does not
work.
● Close the washing machine’s door.
● Confirm and press the start button.
● The control panel might be locked – see the “Child lock” section and try unlocking the control panel.
Water leakage.
● Correctly connect the inlet water pipe.
The spin of the clothes is
abnormal.
● Reload and distribute the laundry evenly in the drum.
There is a peculiar smell in the
washing machine.
● Run a “Cotton 90°C” cycle without any clothes.
No water is visible in the drum.
● No fault. The water is under the visible area.
There is remaining water in the
softener compartment.
● No fault. The effect of the softener will not be affected.
The remaining detergent is left
on the clothes.
● The water-fast component of the non-phosphorus detergent left on the clothes will cause lime scale. Select
the rinse and spin program or brush away the detergent when the clothes are dried.
The washing machine does not
fill.
● Open the water tap.
● Check the selection of the program.
● Check the water pressure to see if the water pressure is insufficient.
● Put through the feed-water.
● Close the machine’s door.
● Check if the inlet water pipe is bent or clocked.
Spinning starts late or the
machine does not spin.
● The imbalance control system has activated because the laundry is unevenly distributed in the drum,
● The appliance will redistribute the laundry by reversing the drum rotation. This may take several attempts
before the laundry is evenly distributed and normal spinning can resume.
● If the laundry is still not evenly distributed after 10 minutes, the machine will not spin. In the event of this,
redistribute the load manually and select the program again.
The washing machine fills and
empties at the same time.
● Make sure the end of the drainage pipe is higher than the water level in the machine.
● Check if the drainage pipe and sewage have been sealed. If they have been, there will be poor ventilation
which causes siphoning.
No drainage of the washing
machine.
● Check if the drainage pump is blocked.
● Check if the drainage pipe is bent or blocked.
● Check the height of the drainage nozzle and make sure it is 60-90cm from the bottom of the washing
machine.
Vibration of the washing
machine.
● Level the appliance.
● Fasten the footing.
● Check the transportation bolts have been removed.
The bubbles spill from the
detergent drawer.
● Check if the detergent use is excessive.
● Put one scoop of softener mixed with ½ litre of water into detergent compartment II.
● Reduce the usage amount of detergent in the next wash.
The machine stops when the
program has not finished.
● Power failure or water supply cut-off.
The drainage pump makes a
● The inner barrel water of the washing machine has been drained but there is still a small amount of water in
noise during operation when the
the drainage pump and pipe. The drainage pump continuously operates and takes in the air, and at this time
water has just been drained.
there is noise which is normal.
Machine stops for some time
during a cycle.
● The machine adds water automatically.
● There are too many bubbles in the tube so the machine is cleaning the tube.
17
DWD-GM1011_영국향.indd 18
2013-09-23 오전 11:42:02
TROUBLESHOOTING GUIDE
Problem
Error Code
Possible Cause
Solutions
The machine
fills overtime.
“Spin” LED flickers.
1. The water tap is not open.
2. The drain hose is put down.
3. The water inlet valve is
damaged.
1. Open the water tap.
2. hook up the hose.
3. Change the water inlet
valve.
There is a Door
lock alarm.
“Rinse” LED flickers.
1. The door is not locked well.
2. garment is caught between
the door and the seal.
3. The door lock is damaged.
1. Lock the door well.
2. Put the garment into the
drum.
3. Change the door lock.
The machine
drains overtime.
“Rinse” and “Spin”
LEDs flicker.
1. The drain hose is squashed
or kinked.
2. The drain pump filter is
block.
3. The drainage system pipes
are blocked.
1. Check the drain hose.
2. Clean the filter.
3. Check the drainage system
and clean it.
Water overflows
the machine.
/ Water sensor
works abnormal.
“Washing” LED
flickers.
1. The water inlet valve is
damaged.
2. The connection between the
water sensor and wire is not
secure.
3. The water sensor is
damaged.
1. Change the water inlet.
2. Check the connection and
ensure it is secure.
3. Change the water sensor.
The motor does
not work.
“Washing” and “Spin”
LEDs flicker.
1. The connection between the
motor and wire is not secure.
2. The motor is protected
because of over-heat.
3. The motor is damaged.
1. Check the connection and
ensure it is secure.
2. Check if the machine is
overloaded. Switch off the
machine, and retry when the
motor becomes cool.
3. Change the motor.
There is a
heating tube
fault.
“Washing” and
“Rinse” LEDs flicker.
1. The connection between the
heating tube and wire is not
secure.
2. The heating tube is
damaged.
1. Check the connection and
ensure it is secure.
2. Change the heating tube.
There is a
temperature
sensor fault.
“Washing”, “Rinse”
and “Spin” LEDs
flicker.
1. The connection between the
temperature sensor and wire
is not secure.
2. The temperature sensor is
damaged.
1. Check the connection and
ensure it is secure.
2. Change the temperature
sensor.
NOTE :
Technical repairs should only be undertaken by a suitably qualified person.
18
DWD-GM1011_영국향.indd 19
2013-09-23 오전 11:42:02
SPECIFICATION MODEL
DWD-GM1011
Power Source
A.C 220~240V/50Hz
Power Consumption
2100W
Dimension (mm)
595 x 470 x 845 (W x D x H)
Maximum mass of textile (kg)
6 kg
Unit Weight (kg)
64(NET) / 68(GROSS)
Standard Water Consumption
43ℓ
Operating Water Pressure
0.02MPA ~ 0.8MPa (0.2kgf/cm2 ~ 8kgf/cm2)
Power Of Off-Mode
0.1W
Power Of Left-On Mode
0.3W
NOTE :
Data can vary from the nominal values given depending on water pressure, water hardness, water
inlet temperature, room temperature, type and volume of load, fluctuations in the electricity supply and
any extra options selected.
Symbol expalanation
V
W
~
Hz
Volt
Watt
Safe test
Alternating current
Hertz
CE symbol
Environmental Protection
19
DWD-GM1011_영국향.indd 20
2013-09-23 오전 11:42:02
20
DWD-GM1011_영국향.indd 21
2013-09-23 오전 11:42:02
PRODUCT FICHE
▪ Supplier : DAEWOO ELECTRONICS
▪ Model : DWD-GM1011
▪ Capacity : 6.0 kg
▪ Energy efficiency class : A+
▪ E nergy consumption 180 kWh per year, based on 220 standard washing cycles for cotton
programmes at 60 °C and 40 °C at full and partial load, and the consumption of the low-power
modes. Actual energy consumption will depend on how the appliance is used.
▪ Energy consumption : 0.81 kWh
▪ Power consumption of the off-mode and of the left-on mode : 0.1/0.3 W
ater consumption 9460 litres per year, based on 220 standard washing cycles for cotton
▪ W
programmes at 60 °C and 40 °C at full and partial load. Actual water consumption will depend
on how the appliance is used.
▪ Spin-drying efficiency class C on a scale from G (least efficient) to A (most efficient)
▪ Maximum spin speed : 1000 rpm
▪ T he ‘standard 60 °C cotton programme’ and the ‘standard 40°C cotton programme’ are the
standard washing programmes to which the information in the label and the fiche relates,
that these programmes are suitable to clean normally soiled cotton laundry and that they are
the most efficient programmes in terms of combined energy and water consumption.
▪ P rogramme time of the standard 60 °C cotton programme : 195 minutes (or)
Programme time of the standard 40 °C cotton programme : 182 minutes
uration of the left-on mode (if the household washing machine is equipped with a power
▪ D
management system) : 10 minutes
▪ Airborne acoustical noise emissions : 60/73 dB(A)
21
DWD-GM1011_영국향.indd 22
2013-09-23 오전 11:42:02
FREEPOST RSHU-HKUG-ZBRU
HOME APPLIANCE GUARD
4TH FLOOR KINGSLAND HOUSE
21 HINTON ROAD
BOURNEMOUTH - DORSET
BH1 2DE
HGD2YR (4)
WƌŽƵĚůLJ^ƵƉƉŽƌƟŶŐ
22
Register your FREE Daewoo Electronics guarantee
DWD-GM1011_영국향.indd 23
2013-09-23 오전 11:42:03
We are delighted that you have chosen Daewoo Electronics, and hope that
you are looking forward to many years of trouble-free service.
Your free 24 month guarantee provided by Daewoo Electronics means that your appliance will be repaired or replaced in the event of a fault
or problem. And the best part is that it won’t cost you a penny.
At Daewoo Electronics, we want to offer you the very best advice and customer care, that’s why we recommend registering your free
24 month guarantee.
The Benefits
1. New for old replacement
2. No repair bills
If your appliance cannot be repaired
because it is deemed beyond economic
repair it will be replaced at Daewoo’s
discretion on a like for like basis.
3. Fast & reliable service
You will never have to worry about footing
the bill. When you present your Guarantee
Summary, the Daewoo approved technician
will not ask you for a penny.
To register your 24 month guarantee call FREE on 0808 165 2525
quoting HGD2YR, visit www.registermenow.co.uk/daewoo
or complete and return the attached form.
Computerised reporting systems ensure
fast, efficient service from the network
of Daewoo approved repair agents
or resident engineers.
Daewoo is supporting Marie Curie by committing to
raise at least £60,000, which will fund a Marie Curie
Nurse for three years.
Lines open Monday – Friday 9am – 6pm and Saturday / Bank Holidays 10am – 4pm. Calls may be recorded
for quality control and training purposes. Daewoo is a trading name of Daewoo Electronics Sales U.K. Limited.
Registered in England under registration number: 2815872. Registered office address: Daewoo Electronics
Sales U.K. Limited, 640 Wharfedale Road, Winnersh Triangle, Wokingham, Berkshire, England RG41 5TP.
Your FREE Daewoo guarantee is administered by Home Appliance Guard Limited,Kingsland House,21 Hinton
Road,Bournemouth,Dorset,BH1 2DE. (Registered in England no. 05927936).
Marie Curie Nurses work day and night to care for
people with terminal illnesses, free of charge.
This information can be supplied in large print, braille or audio on request.
Charity reg no. 207994 (England & Wales) SC038731 (Scotland)
To find out more about Marie Curie’s work and
how you can get involved, whether by donating or
fundraising, visit mariecurie.org.uk/daewoo
moisten here
here
Surname
HGD2YR
Postcode
Simply complete this form to register
your FREE guarantee
Initials
Mobile Tel No.
In order to register your free 2 year guarantee, please complete all sections below,
detach form, fold, seal and return it to the FREEPOST address. Alternatively, visit
www.registermenow.co.uk/daewoo to register or call FREE on 0808 165 2525
quoting HGD2YR.
Title
Address
Refrigerator
Your details: (please complete in CAPITALS – don’t forget your postcode).
House No.
Town
Home Tel No.
Email Address
Product type
Washing Machine
Store & place of purchase e.g. Dixons Manchester
Model e.g. FRSU20DCB (Mandatory)
Serial number (if known)
Purchase date (Required)
Daewoo Electronics Sales UK and Home Appliance Guard Limited (including their respective group and
companies) may wish to contact you about product services and offers that might be of interest to you. By
submitting your details you are consenting to receiving marketing communications by post, phone, email and
SMS. If you do not consent to this, please tick boxes to indicate which methods we cannot use to communicate
with you. Post
Phone
Email
SMS
Marie Curie Cancer Care
We would like to forward your contact details to our charity partner, Marie Curie Cancer Care, so that they
can contact you by phone or post to update you occasionally on their work and fundraising activities. If you
do not want us to pass on your details for this purpose please tick here
moisten here
Email is a cost effective way of keeping in touch. We would like to pass your email address to our charity
partner, Marie Curie Cancer Care, for the same purpose. If you are happy for us to pass your email address to
Marie Curie Cancer Care, please tick here
HGD2YR
23
(6)
moisten here
DWD-GM1011_영국향.indd 24
2013-09-23 오전 11:42:03