1
Plug-in Switch Module • Installation Guide
3. To exit mode and return to normal operation, press and hold
both buttons for 2 seconds.
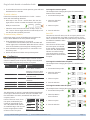
To change the auto-on option:
To unlink a device
This example shows changing the option from Automatically
Determined to Disabled.
Follow the same steps as described in the “To link...” section
above with the following deviations:
▪ After step 1 in the “To link...” section above, click the “Set”
(right) button 3 times to enable the “Remove Link” option.
2. Select the Switched
Auto-On menu.
Ready to remove links.
1. Access Basic Setup mode.
3. Select an option.
▪ Follow the same instructions as shown in Step 2 of the “To
link...” section. The Set (right) LED will turn red briefly to indicate the link was successfully removed.
To restore factory defaults
Follow these steps to clear all linked devices and restore the
Plug-in Switch Module to its factory default settings.
1. Press and hold both buttons for 15 seconds
>> Hold buttons until the Menu (left) LED is solid RED and
the Set (right) LED is solid Amber (Both LEDs will turn various
colors as the module cycles through the resetting process.
2. Press and hold the Set (right) button for 3 seconds to confirm factory reset.
3. Device will reboot and initiate start up LED sequence.
Configuring
The default settings on the module support common control
scenarios. However, some occupancy settings can be adjusted
on the module using the setup interface, if required.
Setting
Default
Auto-On
Automatically If linked to an occupancy senDetermined
sor, the default is Enabled.
Application
If linked to a switch, the default
is Disabled for manual control.
4. Save the selection.
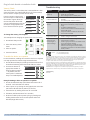
Auto-Off
There are two auto-off menus, one for occupancy sensors, and
one for rocker switches. For linked occupancy sensors, the default is 15 minutes. For linked rocker pads and key card switches,
the default is Disabled to allow
manual control.
Option
Clicks Blinks
From the auto-off timer menu,
the active option is indicated
by the number of green blinks
on the “Set” LED; amber blinks
indicate an unsaved change.
Click the Set button an appropriate number of times to select
an option.
Disabled
If linked to a rocker pad or key
card switch.
3. Select an option.
Motion Auto-Off
15 minutes
If linked to occupancy sensor.
4. Save the selection.
If linked to a key card switch.
Auto-On
The default Auto-On option is automatically determined based
on the type of device that is linked. Auto-On is Disabled if the
first linked device is a switch, or Enabled if the device is an
occupancy sensor.
From the Auto-On menu, the active option is indicated by the
number of green blinks on the
“Set” LED; amber blinks indicate
an unsaved change. Click the “Set”
button an appropriate number
of times to select an option.
Option
Clicks Blinks
Disabled
60 mins.
2. Select the Switched
Auto-Off menu.
Switched Auto-Off
If linked to occupancy sensor.
30 mins.
1. Access Basic Setup mode.
If linked to a occupancy senor
and a door sensor.
30 seconds
15 mins.
This example shows changing the option from Disabled to 5
minutes.
5 minutes
Egress
5 mins.
To change the switched auto-off option:
Vacancy Check
Door/Window Ajar 2 minutes
Disabled
To change the motion auto-off option:
This example shows changing the option from 15 to 5 minutes.
1. Access Basic Setup mode.
2. Select the Motion
Auto-Off menu.
3. Select an option.
4. Save the selection.
Enabled
Automatically
Determined
© 2013 Hubbell Building Automation
|
www.hubbell-automation.com
Page 3