1
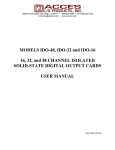
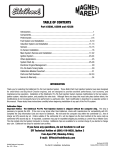
ACCES I/O PRODUCTS INC
10623 Roselle Street, San Diego, CA 92121
TEL (858)550-9559 FAX (858)550-7322
MODEL PIOD24
USER MANUAL
FILE: MPIOD24.B1a
Notice
The information in this document is provided for reference only. ACCES does not assume any liability arising
out of the application or use of the information or products described herein. This document may contain or
reference information and products protected by copyrights or patents and does not convey any license under
the patent rights of ACCES, nor the rights of others.
IBM PC, PC/XT, and PC/AT are registered trademarks of the International Business Machines Corporation.
Printed in USA.
© Copyright 2001 by ACCES I/O Products Inc, 10623 Roselle Street, San Diego, CA 92121. All rights reserved.
U.S. Patent No.s 4,603,320 and 4,972,470.
Page iii
Warranty
Prior to shipment, ACCES equipment is thoroughly inspected and tested to applicable specifications. However,
should equipment failure occur, ACCES assures its customers that prompt service and support will be
available. All equipment originally manufactured by ACCES which is found to be defective will be repaired
or replaced subject to the following considerations.
Terms and Conditions
If a unit is suspected of failure, contact ACCES' Customer Service department. Be prepared to give the unit
model number, serial number, and a description of the failure symptom(s). We may suggest some simple tests
to confirm the failure. We will assign a Return Material Authorization (RMA) number which must appear on
the outer label of the return package. All units/components should be properly packed for handling and
returned with freight prepaid to the ACCES designated Service Center, and will be returned to the
customer's/user's site freight prepaid and invoiced.
Coverage
First Three Years: Returned unit/part will be repaired and/or replaced at ACCES option with no charge for
labor or parts not excluded by warranty. Warranty commences with equipment shipment.
Following Years: Throughout your equipment's lifetime, ACCES stands ready to provide on-site or in-plant
service at reasonable rates similar to those of other manufacturers in the industry.
Equipment Not Manufactured by ACCES
Equipment provided but not manufactured by ACCES is warranted and will be repaired according to the
terms and conditions of the respective equipment manufacturer's warranty.
General
Under this Warranty, liability of ACCES is limited to replacing, repairing or issuing credit (at ACCES
discretion) for any products which are proved to be defective during the warranty period. In no case is
ACCES liable for consequential or special damage arriving from use or misuse of our product. The customer
is responsible for all charges caused by modifications or additions to ACCES equipment not approved in
writing by ACCES or, if in ACCES opinion the equipment has been subjected to abnormal use. "Abnormal
use" for purposes of this warranty is defined as any use to which the equipment is exposed other than that use
specified or intended as evidenced by purchase or sales representation. Other than the above, no other
warranty, expressed or implied, shall apply to any and all such equipment furnished or sold by ACCES.
Page iv
Table of Contents
Notice . . . . . . . . . . . . . . . . . . . . . . . . . . . . . . . . . . . . . . . . . . . . . . . . . . . . . . . . . . . . . . iii
Warranty . . . . . . . . . . . . . . . . . . . . . . . . . . . . . . . . . . . . . . . . . . . . . . . . . . . . . . . . . . . iv
Chapter 1: Introduction . . . . . . . . . . . . . . . . . . . . . . . . . . . . . . . . . . . . . . . . . . . . . . 1-1
Software Compatibility . . . . . . . . . . . . . . . . . . . . . . . . . . . . . . . . . . . . . . . . . . . . . . . . . .
Card and Socket Services . . . . . . . . . . . . . . . . . . . . . . . . . . . . . . . . . . . . . . . . . . . . . . . .
Calibration and Service . . . . . . . . . . . . . . . . . . . . . . . . . . . . . . . . . . . . . . . . . . . . . . . . . .
Utility Software . . . . . . . . . . . . . . . . . . . . . . . . . . . . . . . . . . . . . . . . . . . . . . . . . . . . . . . .
Specifications . . . . . . . . . . . . . . . . . . . . . . . . . . . . . . . . . . . . . . . . . . . . . . . . . . . . . . . . .
1-1
1-1
1-2
1-2
1-3
Chapter 2: Installation . . . . . . . . . . . . . . . . . . . . . . . . . . . . . . . . . . . . . . . . . . . . . . 2-1
CD Installation . . . . . . . . . . . . . . . . . . . . . . . . . . . . . . . . . . . . . . . . . . . . . . . . . . . . . . . . .
3.5-Inch Diskette Installation . . . . . . . . . . . . . . . . . . . . . . . . . . . . . . . . . . . . . . . . . . . . . .
Directories Created on the Hard Disk . . . . . . . . . . . . . . . . . . . . . . . . . . . . . . . . . . . . . . .
Installing the Card . . . . . . . . . . . . . . . . . . . . . . . . . . . . . . . . . . . . . . . . . . . . . . . . . . . . . .
2-1
2-1
2-2
2-4
Chapter 3: Cable Connections . . . . . . . . . . . . . . . . . . . . . . . . . . . . . . . . . . . . . . . . 3-1
Chapter 4: Address Selection . . . . . . . . . . . . . . . . . . . . . . . . . . . . . . . . . . . . . . . . . 4-1
Chapter 5: Software . . . . . . . . . . . . . . . . . . . . . . . . . . . . . . . . . . . . . . . . . . . . . . . . . 5-1
Chapter 6: Programming . . . . . . . . . . . . . . . . . . . . . . . . . . . . . . . . . . . . . . . . . . . . . 6-1
Developing Your Application Software . . . . . . . . . . . . . . . . . . . . . . . . . . . . . . . . . . . . . . 6-1
Digital I/O Port . . . . . . . . . . . . . . . . . . . . . . . . . . . . . . . . . . . . . . . . . . . . . . . . . . . . . . . . . 6-1
Programming Example . . . . . . . . . . . . . . . . . . . . . . . . . . . . . . . . . . . . . . . . . . . . . . . . . . 6-2
Programmable Interval Timer . . . . . . . . . . . . . . . . . . . . . . . . . . . . . . . . . . . . . . . . . . . . . 6-3
Operational Modes . . . . . . . . . . . . . . . . . . . . . . . . . . . . . . . . . . . . . . . . . . . . . . . . . . . . . 6-4
Counter/Timer Registers . . . . . . . . . . . . . . . . . . . . . . . . . . . . . . . . . . . . . . . . . . . . . . . . . 6-5
Counter Source Control . . . . . . . . . . . . . . . . . . . . . . . . . . . . . . . . . . . . . . . . . . . . . . . . . 6-7
Clock Source Select . . . . . . . . . . . . . . . . . . . . . . . . . . . . . . . . . . . . . . . . . . . . . . . . . . . . 6-8
Counter Cascading . . . . . . . . . . . . . . . . . . . . . . . . . . . . . . . . . . . . . . . . . . . . . . . . . . . . . 6-9
Counter Gates . . . . . . . . . . . . . . . . . . . . . . . . . . . . . . . . . . . . . . . . . . . . . . . . . . . . . . . . . 6-9
Reading and Loading the Counters . . . . . . . . . . . . . . . . . . . . . . . . . . . . . . . . . . . . . . . . 6-9
Counter Programming Examples . . . . . . . . . . . . . . . . . . . . . . . . . . . . . . . . . . . . . . . . . 6-10
Page v
List of Figures
Figure 1-1: PIOD24 Block Diagram . . . . . . . . . . . . . . . . . . . . . . . . . . . . . . . . . . . . . . . . . . . 1-4
List of Tables
Table 4-1: Standard Address Assignments for PC and PC/XT Computers . . . . . . . . . . . . . 4-1
Table 6-1: PIOD24 Register Address Selection . . . . . . . . . . . . . . . . . . . . . . . . . . . . . . . . . . 6-1
Table 6-2: 8255 Control Register Bit Assignments . . . . . . . . . . . . . . . . . . . . . . . . . . . . . . . 6-2
Page vi
Chapter 1: Introduction
Features
•
•
•
•
•
•
•
•
•
Type II PCMCIA Card
Plug-N-Play Windows 95/98 Installation
24 Bit Digital I/O port
Four and eight-bit groups independently selectable for digital I/O
Mode 1 and 2 Bi-directional and strobed data transfers supported
Three 16-bit 10MHz counters
Software setup including FINDBASE and TSR setup program
37 pin D-sub Male Connector via cable adaptors
Supports external counter clocks, gates and outputs, and internal control.
Introducing PCMCIA
PCMCIA started as a way to add extra memory to laptop and portable computers. As the market grew,
the absence of a standard expansion slot was recognized and the second release added hardware
support for I/O devices. The PIOD24 is one of a family of PCMCIA devices offered that extend the
ports and functionality of PC systems. This expansion port may be referred on your computer system
as either a PCMCIA or PC CARD port.
Software Compatibility
Drivers and example programs are supplied with the PIOD24 in a variety of programming languages
and operating systems; including DOS, 16-bit and 32-bit Windows (Windows 3.x vs Windows 95 and
Windows NT).
Many packaged application programs support similar cards, but to use the full functionality requires
a customized driver. Please call ACCES to acquire the appropriate driver or DLL for your program.
Card and Socket Services
PCMCIA Card and Socket services must be loaded on the host computer system before using the
PIOD24 card and is typically supplied by the PCMCIA slot provider (the laptop or adaptor
manufacturer) to provide the software interface to the card slot drive. In addition, our TSR
memory-resident program, described below, is required to configure the card once it is recognized by
the card and socket services.
The Card and Socket services handle the PCMCIA slot software interface with your operating system
when a new card is inserted (or removed) or when power is applied (or upon shut-down). Once the
PCMCIA Card and Socket Services recognizes the PIOD24 card it will then appear to your
application software like a card on the internal ISA bus.
Manual MPIOD24.B1a
Page 1-1
PIOD24 Manual
Calibration and Service
No calibration is required for PCMCIA devices and especially for the all-digital PIOD24. The case
may not be opened and there are no parts inside which you can service. There are no socketed
components. Opening the PIOD24 case will void your warranty.
If your unit requires service, please return it to ACCES. Please call ACCES for an RMA number
before returning the card for service, even if under warranty.
Utility Software
We include programs on CD to support the card and to help you develop your application program(s).
The card supports I/O bus addresses from 000 to 3FF (hex) and a program called FINDBASE helps
you find an open base address to use with the card.
The TSR client program has two required command-line parameters (entered in hexadecimal format);
the base I/O address and the interrupt request (IRQ) number. Optionally, a "verbose" switch will turn
on a detailed report of the communication between the TSR and the PCMCIA card for diagnostic
troubleshooting. A value of zero for the IRQ number will configure the card not to use any interrupts.
Syntax:
For example:
PIOD24 [Base Address in Hex] [IRQ number in Hex] (verbose)
PIOD24 300 0A verbose
Would configure the PIOD24 card at a base address of 300 (hex) and IRQ at 10 (decimal). If invalid
values are used with the TSR program then the following error message is displayed:
The command line parameters were incorrect.
syntax:
piod24 <port address> <IRQ>
example: piod24 120 5
example: piod24 300 0A
If no values are used with the TSR program, then the program reads the CIS information from the
PIOD24 and attempts to automatically configure address and IRQ.
Page 1-2
Manual MPIOD24.B1a
Specifications
Features
•
•
•
•
•
•
24 channels of unbuffered digital input/output.
Four and Eight bit groups independently selectable for I/O.
Mode 1 and 2 Bi-directional and strobed I/O data transfers supported.
Interrupt and Interrupt-disable capability.
External and internal interrupt and counter source capacity.
Three 16-bit counter/timers.
Digital Inputs/Outputs
•
•
•
•
•
Logic High:
Logic Low:
Input Load (Hi):
Input Load (Lo):
Max Drive:
2.0 to 7.0 VDC.
-0.3 to 0.8 VDC.
+3.2 microamperes.
-250 microamperes.
5 LSTTL Loads.
Counters
•
•
•
•
•
Number:
Type:
Frequency:
Output High:
Output Low:
Three.
16 bit, 65535 counts.
10 MHz Max, Internal or external source.
2.4 V Min @ -250 mA.
2.0 V Min, 7.3 Max.
Interrupt
•
•
•
Level:
Enable:
Trigger:
2-6, 7, 10-15 set by CFG configuration file.
Programmable.
External or Internal.
Environmental
•
•
•
•
•
Operating Temperature Range:
Storage Temperature Range:
Humidity:
Power Required:
Size
Manual MPIOD24.B1a
0 °C. to +60 °C.
-50 °C. to +120 °C.
5% to 95%, non-condensing.
5 VDC, 47 mA Typical, 65 mA Max
Type II PCMCIA card slot.
Page 1-3
PIOD24 Manual
Regulatory Compliance
•
•
•
FCC Part 15, Level A: Designed to meet.
CE Certification not completed at print time.
Please check with us for certification status.
Figure 1-1: PIOD24 Block Diagram
Page 1-4
Manual MPIOD24.B1a
Chapter 2: Installation
The software provided with this card is contained on either one CD or multiple diskettes and must be
installed onto your hard disk prior to use. To do this, perform the following steps as appropriate for
your software format and operating system. Substitute the appropriate drive letter for your CD-ROM
or disk drive where you see d: or a: respectively in the examples below.
CD Installation
DOS/WIN3.x
1.
2.
3.
4.
Place the CD into your CD-ROM drive.
Type ??? to change the active drive to the CD-ROM drive.
Type ???????? to run the install program.
Follow the on-screen prompts to install the software for this card.
WIN95/98/NT
a.
b.
c.
Place the CD into your CD-ROM drive.
The CD should automatically run the install program after 30 seconds. If the install program
does not run, click START | RUN and type d:install, click OK or press ? .
Follow the on-screen prompts to install the software for this card.
3.5-Inch Diskette Installation
As with any software package, you should make backup copies for everyday use and store your
original master diskettes in a safe location. The easiest way to make a backup copy is to use the DOS
DISKCOPY utility.
In a single-drive system, the command is:
???????????????
You will need to swap disks as requested by the system.
In a two-disk system, the command is:
???????????????
This will copy the contents of the master disk in drive A to the backup disk in drive B.
Manual MPIOD24.B1a
Page 2-1
PIOD24 Manual
To copy the files on the master diskette to your hard disk, perform the following steps.
a.
Place the master diskette into a floppy drive.
b.
Change the active drive to the drive that has the diskette installed. For example, if the diskette
is in drive A, type ??? .
c.
Type ???????? and follow the on-screen prompts.
Directories Created on the Hard Disk
The installation process will create several directories on your hard disk. If you accept the installation
defaults, the following structure will exist.
[CARDNAME]
Root or base directory containing the SETUP.EXE setup program used to help you configure jumpers
and calibrate the card.
DOS\PSAMPLES:
DOS\CSAMPLES:
Win32\language:
A subdirectory of [CARDNAME] that contains Pascal samples.
A subdirectory of [CARDNAME] that contains "C" samples.
Subdirectories containing samples for Win95/98 and NT.
WinRisc.exe
A Windows dumb-terminal type communication program designed for RS422/485 operation.
Used primarily with Remote Data Acquisition Pods and our RS422/485 serial communication
product line. Can be used to say hello to an installed modem.
ACCES32
This directory contains the Windows 95/98/NT driver used to provide access to the hardware registers
when writing 32-bit Windows software. Several samples are provided in a variety of languages to
demonstrate how to use this driver. The DLL provides four functions (InPortB, OutPortB, InPort, and
OutPort) to access the hardware.
This directory also contains the device driver for Windows NT, ACCESNT.SYS. This device driver
provides register-level hardware access in Windows NT. Two methods of using the driver are
available, through ACCES32.DLL (recommended) and through the DeviceIOControl handles provided
by ACCESNT.SYS (slightly faster).
Page 2-2
Manual MPIOD24.B1a
SAMPLES
Samples for using ACCES32.DLL are provided in this directory. Using this DLL not only makes
the hardware programming easier (MUCH easier), but also one source file can be used for both
Windows 95/98 and WindowsNT. One executable can run under both operating systems and still
have full access to the hardware registers. The DLL is used exactly like any other DLL, so it is
compatible with any language capable of using 32-bit DLLs. Consult the manuals provided with
your language's compiler for information on using DLLs in your specific environment.
VBACCES
This directory contains sixteen-bit DLL drivers for use with VisualBASIC 3.0 and Windows 3.1 only.
These drivers provide four functions, similar to the ACCES32.DLL. However, this DLL is only
compatible with 16-bit executables. Migration from 16-bit to 32-bit is simplified because of the
similarity between VBACCES and ACCES32.
PCI
This directory contains PCI-bus specific programs and information. If you are not using a PCI card,
this directory will not be installed.
SOURCE
A utility program is provided with source code you can use to determine allocated resources at
run-time from your own programs in DOS.
PCIFind.exe
A utility for DOS and Windows to determine what base addresses and IRQs are allocated to installed
PCI cards. This program runs two versions, depending on the operating system. Windows 95/98/NT
displays a GUI interface, and modifies the registry. When run from DOS or Windows3.x, a text
interface is used. For information about the format of the registry key, consult the card-specific
samples provided with the hardware. In Windows NT, NTioPCI.SYS runs each time the computer
is booted, thereby refreshing the registry as PCI hardware is added or removed. In Windows 95/98/NT
PCIFind.EXE places itself in the boot-sequence of the OS to refresh the registry on each power-up.
This program also provides some COM configuration when used with PCI COM ports. Specifically,
it will configure compatible COM cards for IRQ sharing and multiple port issues.
WIN32IRQ
This directory provides a generic interface for IRQ handling in Windows 95/98/NT. Source code is
provided for the driver, greatly simplifying the creation of custom drivers for specific needs. Samples
are provided to demonstrate the use of the generic driver. Note that the use of IRQs in near-real-time
data acquisition programs requires multi-threaded application programming techniques and must be
considered an intermediate to advanced programming topic. Delphi, C++ Builder, and Visual C++
samples are provided.
Manual MPIOD24.B1a
Page 2-3
PIOD24 Manual
Findbase.exe
DOS utility to determine an available base address for ISA bus , non-Plug-n-Play cards. Run this
program once, before the hardware is installed in the computer, to determine an available address to
give the card. Once the address has been determined, run the setup program provided with the
hardware to see instructions on setting the address switch and various option selections.
Poly.exe
A generic utility to convert a table of data into an nth order polynomial. Useful for calculating
linearization polynomial coefficients for thermocouples and other non-linear sensors.
Risc.bat
A batch file demonstrating the command line parameters of RISCTerm.exe.
RISCTerm.exe
A dumb-terminal type communication program designed for RS422/485 operation. Used primarily
with Remote Data Acquisition Pods and our RS422/485 serial communication product line. Can be
used to say hello to an installed modem. RISCTerm stands for Really Incredibly Simple
Communications TERMinal.
Installing the Card
The PIOD24 card can be installed in any PCMCIA Type II card slot. There are no switches or jumpers
to set. Everything on the PIOD24 card is programmable including address and interrupt level. If you
have two PCMCIA slots you can plug two PIOD24 in the same Windows based computer.
DOS or Windows 3.x Installation
You must have installed the Card & Socket Services (CSS) software that was provided with your
PCMCIA-capable computer. For complete installation instructions refer to "readme.txt" in your
PIOD24 software directory.
DOS 'Plug N Play' or Superclient Installation
The SuperClient uses the PIOD24 internal CIS (configuration information) to configure the card and
prepare system for use. Consult the SuperClient documentation to determine the installation procedure.
Windows 95 Installation
Windows95 will automatically recognize the installation of the PCMCIA card and provide a list of
options to install the card. Select the option "Driver from disk provided by hardware manufacturer"
and select the CD provided which will install support for the card. Depending on options selected in
the Windows95 PCMCIA drivers, you may hear a "rising" two-note tone upon successful installation
and a new PCMCIA icon in the taskbar tray.
Page 2-4
Manual MPIOD24.B1a
Windows NT 4.0 Installation
Windows NT 4.0 is not a Plug-and-Play operating system, so getting the card to work properly
requires a few extra steps. After physically installing the PIOD24 card into the slot, run the
"Setup.exe" program included in the software package. This program will create an entry in the
PCMCIA Database, allowing Windows NT 4.0 to recognize the PIOD24. After running "Setup.exe,"
the system must be rebooted for the changes to take effect. The device should then show up in the "PC
Card (PCMCIA)" Control Panel where its resource assignments can be found.
Although manual modification of the Registry should not be necessary, the steps necessary to duplicate
the actions performed by "Setup.exe" are documented here for informational purposes. After starting
Regedit, navigate to the following key:
HKEY_LOCAL_MACHINE\System\CurrentControlSet\Services\Pcmcia\Database
Add a new subkey named "ACCES I/O Products," then add a new subkey to the "ACCES I/O
Products" key you just created named "PIOD24." In the "PIOD24" key, add a new string with the
name "Driver" and the value "piod24." This completes the modifications necessary for Windows NT
4.0 to recognize the PIOD24 card. The system must then be rebooted for the changes to take effect.
Caution
The PIOD24 must be oriented with the label side up, or "side A" in PCMCIA terms. The standard
PCMCIA case is "keyed" to prevent improper insertion but may be broken off if excessive force is
used during installation.
Do Not Force the PIOD24 Card into the Slot.
Install the card with the label facing "up" or towards side "A" which is usually towards the keyboard,
but you should check with your systems owners manual. When correctly oriented, the PIOD24 card
should seat in the slot with little pressure. Force the PIOD24 card in upside down and you will
probably burn out components as well as destroy the key slot.
Once the card is inserted, you may then run the SAMPLE1 software to confirm operation of your
PIOD24 card.
Manual MPIOD24.B1a
Page 2-5
PIOD24 Manual
Page 2-6
Manual MPIOD24.B1a
Chapter 3: Cable Connections
The PIOD24 requires our CAB-PIOD24 cable to provide the transition between the microminiature
32 pin PCMCIA connector and a standard 37-pin D subminiature connector to interface to your
project. The 37-pin connector is equipped with 4-40 threaded standoffs (female screw lock) to provide
strain relief. Pins 34-37 of the cable are not connected.
Pin
1.
2.
3.
4.
5.
6.
7.
8.
9.
10.
11.
12.
13.
14.
15.
16.
17.
18.
19.
20.
21.
22.
23.
24.
25.
26.
27.
28.
29.
30.
31.
32.
PIOD24 Connector
CAB-PIOD24 Cable
Description ...................................................................... Pin Standard DB-37 Connector
Digital Port A Bit 0 .......................................................... 1
Digital Port A Bit 1 .......................................................... 2
Digital Port A Bit 2 .......................................................... 3
Digital Port A Bit 3 .......................................................... 4
Digital Port A Bit 4 .......................................................... 5
Digital Port A Bit 5 .......................................................... 6
Digital Port A Bit 6 .......................................................... 7
Digital Port A Bit 7 .......................................................... 8
Digital Port B Bit 0 .......................................................... 9
Digital Port B Bit 1 .......................................................... 10
Digital Port B Bit 2 .......................................................... 11
Digital Port B Bit 3 .......................................................... 12
Digital Port B Bit 4 .......................................................... 13
Digital Port B Bit 5 .......................................................... 14
Digital Port B Bit 6 .......................................................... 15
Digital Port B Bit 7 .......................................................... 16
Digital Port C Bit 0 .......................................................... 17
Digital Port C Bit 1 .......................................................... 18
Digital Port C Bit 2 .......................................................... 19
Digital Port C Bit 3 .......................................................... 20
Digital Port C Bit 4 .......................................................... 21
Digital Port C Bit 5 .......................................................... 22
Digital Port C Bit 6 .......................................................... 23
Digital Port C Bit 7 .......................................................... 24
Ground (Tied to pin 33) ................................................... 25
Counter 0 Output ............................................................. 26
Counter 0 Gate Input ........................................................ 27
Counter 0 External Clock Input ........................................ 28
Counter 2 Output ............................................................. 29
Counter 2 Gate Input ........................................................ 30
Counter 2 External Clock Input ........................................ 31
External Interrupt ............................................................. 32
Ground (Tied to pin 25) ................................................... 33
No Connections ................................................................ 34-37
Manual MPIOD24.B1a
Page 3-1
PIOD24 Manual
Page 3-2
Manual MPIOD24.B1a
Chapter 4: Address Selection
The PIOD24 base address can be selected anywhere within an I/O address range 000-3FF hex,
providing that the addresses do not overlap with other functions. If in doubt, refer to the table below
for a list of standard address assignments or use the base address locator program FINDBASE
provided on CD will assist you to avoid an address conflict. (The primary and secondary binary
synchronous communication ports are supported by the Operating System.)
Hex Range
000-00F
020-021
040-043
060-063
080-083
0AX
0CX
0EX
100-1FF
200-20F
210-217
220-24F
278-27F
2F0-2F7
2F8-2FF
300-31F
320-32F
378-37F
380-38C**
380-389**
3A0-3A9
3B0-3BF
3C0-3CF
3D0-3DF
3E0-3E7
3F0-3F7
3F8-3FF
Usage
DMA Chip 8237A-5
Interrupt 8259A
Timer 8253-5
PPI 8255A-5
DMA Page Register
NMI Mask Register
Reserved
Reserved
Not usable
Game Control
Expansion Unit
Reserved
Reserved
Reserved
Asynchronous Comm’n (secondary)
Prototype Card
Fixed Disk
Printer
SDLC Communications
Binary Synchron’s Comm’n (secondary)
Binary Synchron’s Comm’n (primary)
IBM Monochrome Display/Printer
Reserved
Color/Graphics
Reserved
Diskette
Asynchronous Comm’n (primary)
** These options cannot be used together-addresses overlap
Table 4-1: Standard Address Assignments for PC and PC/XT Computers
Manual MPIOD24.B1a
Page 4-1
PIOD24 Manual
Page 4-2
Manual MPIOD24.B1a
Chapter 5: Software
There are sample programs provided with the PIOD24 Digital I/O Card in C, Pascal, QuickBASIC,
and several Windows languages. DOS samples are located in the DOS directory and Windows
samples are located in the WIN32 directory.
Manual MPIOD24.B1a
Page 5-1
PIOD24 Manual
Page 5-2
Manual MPIOD24.B1a
Chapter 6: Programming
Developing Your Application Software
Once the Card & Socket Services (CSS) and Client Drivers are installed the PIOD24 card may be
controlled by writing to and reading from the control registers.
Port Addresses and Functions
All I/O accesses may be performed as bytes. The registers, in eight-bit format, are presented here:
Address
Write Operation
Read Operation
Base Address
82C55 Port A Set
Read back data
Base Address +1
82C55 Port B Set
Read back data
Base Address +2
82C55 Port C Set
Read back data
Base Address +3
82C55 Control Register
Write Only
Base Address +4
82C54 Counter 0 Load
Counter 0 Read back
Base Address +5
82C54 Counter 1 Load
Counter 1 Read back
Base Address +6
82C54 Counter 2 Load
Counter 2 Read back
Base Address +7
82C54 Counter Control
Write Only
Base Address +8
Interrupt & Clock Source
Write Only
Table 6-1: PIOD24 Register Address Selection
Digital I/O Port
The PIOD24 card supports operating mode 0 of the 82C55 PPI. However, it can be factory modified
to accommodate either mode 1 or 2. Before attempting to use either of those modes, check to assure
that the card was ordered with the appropriate modification included.
Mode 0 is the most frequently used mode of operation wherein:
a.
b.
c.
d.
There are two 8-bit ports (A and B) and two 4-bit ports (C Hi and C Lo).
Any port can be configured as an input or an output.
Outputs are latched.
Inputs are not latched.
Mode 1 is used for strobed input/output. In this mode Port A and Port B use the lines of Port C to
generate and accept control signals associated with data transfer.
Mode 2 is used for bi-directional eight-bit bus applications.
Manual MPIOD24.B1a
Page 6-1
PIOD24 Manual
The control register at base address +3 is a write-only 8-bit register. It is used to set the mode and
direction of the ports. At Power-Up or Reset, all I/O lines are set as inputs. The PPI should be
configured during initializing by writing to the control register even if the ports are only going to be
used as inputs.
Bit assignments in the control register are as follows:
Data Bit
Option Selected
D0
Port C (C0-C3)
1 = Input
0 = Output
D1
Port B
1 = Input
0 = Output
D2
Mode Selection
1 = Mode 1
0 = Mode 0
D3
Port C (C4-C7)
1 = Input
0 = Output
D4
Port A
1 = Input
0 = Output
Mode Selection
00 = Mode 0
D5,D6
01 = Mode 1
1X = Mode 2
D7
Mode Set Flag
1 = Active
Table 6-2: 8255 Control Register Bit Assignments
Note
In Mode 0, do not use the control register byte for the individual bit control feature. The hardware
uses the I/O bits to control buffer direction on this card. The control register should only be used for
setting up input and output of the ports and enabling the buffer.
Programming Example
The following example in BASIC is provided as a guide to assist you in developing your working
software. In this example, the card address is 2D0 hex, operation is in Mode 0 and the I/O lines are
to be set up as follows:
Port A.........Input
Port B.........Output
Page 6-2
Port C Hi..........Input
Port C Lo..........Output
Manual MPIOD24.B1a
Configure bits of the control register as follows:
D7 D6 D5 D4 D3 D2 D1 D0
1
0
0
1
1
0
0
0
|
|
|
|
|
|
|
|
|
|
|
|
|
|
|
|_
|
|
|
|
|
|
| ______
|
|
|
|
|
| ___________
|
|
|
|
| ________________
|
|
|
| _____________________
|
|
| __________________________
|
| _______________________________
| ____________________________________
Port C Lo = Output
Port B = Output
Mode 0
Port C Hi = Input
Port A = Input
}Mode 0
Active Mode Set
This corresponds to 98 hex. If the card address is 2D0 hex, use the BASIC OUT command to write
to the control register as follows:
BASE=0x2C0;
OUTPORTB (BASEA+3,0x98);
To read the inputs at Port A and the upper nybble of Port C:
X=INPORTB(BASE);
Y=INPORTB(BASE+2) & (0xFO);
//Read Port A
//Read Port C Hi
To set outputs high (1) at Port B and the lower nybble of Port C:
OUTPORTB (BASE+1,0xFF);
OUTPORTB (BASE+2, 0xF);
//Turn on all Port B bits
//Turn on all bits of Port C lower nybble
Programmable Interval Timer
The PIOD24 contains a type 82C54 programmable counter/timer which allows you to implement such
functions as a Real-Time Clock, Event Counter, Digital One-Shot, Programmable Rate Generator,
Square-Wave Generator, Binary Rate Multiplier, Complex Wave Generator, and/or a Motor
Controller. The 82C54 is a flexible but powerful device that consists of three independent, 16-bit,
presettable, down counters. Each counter can be programmed to any count as low as 1 or 2, and up
to 65,535 in binary format, depending on the mode chosen.
Manual MPIOD24.B1a
Page 6-3
PIOD24 Manual
Operational Modes
The 82C54 modes of operation are described in the following paragraphs to familiarize you with the
versatility and power of this device. For those interested in more detailed information, a full description
of the 82C54 programmable interval timer can be found in the Intel (or equivalent manufacturers) data
sheets. The following conventions apply for use in describing operation of the 82C54:
Clock:
Trigger:
Counter Loading:
A positive pulse into the counter's clock input.
A rising edge input to the counter's gate input.
Programming of a binary count into the counter.
Mode 0: Pulse on Terminal Count
After the counter is loaded, the output is set low and will remain low until the counter decrements to
zero. The output then goes high and remains high until a new count is loaded into the counter. A trigger
enables the counter to start decrementing.
Mode 1: Retriggerable One-shot
The output goes low on the clock pulse following a trigger to begin the one-shot pulse and goes high
when the counter reaches zero. Additional triggers result in reloading the count and starting the cycle
over. If a trigger occurs before the counter decrements to zero, a new count is loaded. Thus, this forms
a re-triggerable one-shot. In mode 1, a low output pulse is provided with a period equal to the counter
count-down time.
Mode 2: Rate Generator
This mode provides a divide-by-N capability where N is the count loaded into the counter. When
triggered, the counter output goes low for one clock period after N counts, reloads the initial count,
and the cycle starts over. This mode is periodic, the same sequence is repeated indefinitely until the
gate input is brought low. This mode also works well as an alternative to mode 0 for event counting.
Mode 3: Square Wave Generator
This mode operates periodically like mode 2. The output is high for half of the count and low for the
other half. If the count is even, then the output is a symmetrical square wave. If the count is odd, then
the output is high for (N+1)/2 counts and low for (N-1)/2 counts. Periodic triggering or frequency
synthesis are two possible applications for this mode. Note that in this mode, to achieve the square
wave, the counter decrements by two for the total loaded count, then reloads and decrements by two
for the second part of the wave form.
Mode 4: Software Triggered Strobe
This mode sets the output high and, when the count is loaded, the counter begins to count down. When
the counter reaches zero, the output will go low for one input period. The counter must be reloaded
to repeat the cycle. A low gate input will inhibit the counter.
Page 6-4
Manual MPIOD24.B1a
Mode 5: Hardware Triggered Strobe
In this mode, the counter will start counting after the rising edge of the trigger input and will go low
for one clock period when the terminal count is reached. The counter is retriggerable. The output will
not go low until the full count after the rising edge of the trigger.
Counter/Timer Registers
Base + 4 Write/Read: Counter#0
When writing, this register is used to load a counter value into the counter. The transfer is either a
single or double byte transfer, depending on the control byte written to the counter control register at
Base Address + 7. If a double byte transfer is used, then the least-significant byte of the 16 bit value
is written first, followed by the most significant byte. When reading, the current count of the counter
is read. The type of transfer is also set by the control byte.
Base + 5 Write/Read: Counter #1
See description for Base + 4 Write/Read.
Base + 6 Write/Read: Counter#2
See description for Base + 4 Write/Read.
Base + 7 Write: Counter Control Register
The control byte specifies the counter to be programmed, the counter mode, the type of read/write
operation, and the modulus. The control byte format is as follows:
Counter Control Byte
B7
B6
B5
B4
B3
B2
B1
B0
SC1
SC0
RW1
RW0
M2
M1
M0
BCD
SC0-SC1:
These bits select the counter modified by the counter control byte.
Manual MPIOD24.B1a
SC1
SC0
Function
0
0
Program Counter 0
0
1
Program Counter 1
1
0
Program Counter 2
1
1
Read Back Command
Page 6-5
PIOD24 Manual
RW0-RW1:
These bits select the read/write mode of the selected counter.
RW1
M0-M2:
BCD:
RW0
Counter Read/Write Function
0
0
Counter Latch Command
0
1
Read/Write LS Byte
1
0
Read/Write MS Byte
1
1
Read/Write LS Byte, then MS Byte
These bits set the operational mode of the selected counter.
Mode
M2
M1
M0
0
0
0
0
1
0
0
1
2
X
1
0
3
X
1
1
4
1
0
0
5
1
0
1
Set the selected counter to count in Binary Coded Decimal or straight Binary.
(BCD=1 selects BCD mode, BCD=0 selects straight binary coding).
Base + 8 Write: Interrupt and Clock Source Control
Because of the limited number of pins on the 32 pin connector, all signals from all three counters are
not available externally. This is compensated for by the ability to chain counters and control the count
source. Bit 0 and 3 of port C are the outputs of the 82C55 programmed in Mode 1 or Mode 2. These
two modes provide an interrupt control of closely coupled parallel interfaces. To program an 82C55
for Mode 1 or 2 you will need to consult the 82C55 data sheet.
Page 6-6
Manual MPIOD24.B1a
Counter Source Control
The counters on the PIDO24 have quite a bit of programmability. Due to the architecture of the board,
there is additional counter source and chaining flexibility beyond the standard functions of the 82C54.
The diagram shows schematically the programmable options.
Manual MPIOD24.B1a
Page 6-7
PIOD24 Manual
The Interrupt and Clock Source Control byte format is as follows:
B7
B6
B5
B4
B3
B2
B1
B0
INT2
INT1
INT0
CKSEL2
CKSEL1
CKSEL0
CLK1
CLK0
INT0-INT2:
These bits select the Interrupt Source.
INT2
INT1
INT0
Interrupt Source
0
0
0
No interrupts
0
0
1
External Interrupt
0
1
0
Interrupt from Bit 0 of Port C
0
1
1
Counter 0
1
0
0
Counter 1
1
0
1
Counter 2
1
1
0
Interrupt from Bit 3 of Port C
Clock Source Select
These control register bits select the counter clock source for each counter. Selection of counter
cascading other than as three 16-bit counters will override the counter source selection for the linked
counters. The clock source bits may be set as follows:
CKSEL0
0
1
Counter 0 Clock Source
10 MHz clock
External clock - applied at pin 28
CKSEL1
0
1
Counter 1 Clock Source
10 MHz clock
1 MHz clock
CKSEL2
0
1
Counter 2 Clock Source
1 MHz clock
External clock - applied at pin 31
Page 6-8
Manual MPIOD24.B1a
Counter Cascading
Counters may be linked into 32 or 48 bit depth. Counter cascading will override any other counter
source selection for counters 1 and 2.
CLK1
0
0
CLK0
0
1
1
0
1
1
Counter Cascading
3, 16 bit counters
1, 16 bit counter (Counter 0) and1, 32 bit counter (Counter
1 cascaded into Counter 2)
1, 48 bit counter (Counter 0 cascaded into Counter 1 and
Counter 2)
Not Defined
Counter Gates
The counter gates are tied high through a 10K resistor. In this manner the gates are always enabled.
Counters 0 and 2 may be disabled by bringing the gates to ground at pin 27 (Counter Gate 0) and pin
30 (Counter Gate 2). Counter Gate 1 has no external access so counter 1 is always enabled.
Reading and Loading the Counters
If you attempt to read an active counter, you will most likely get erroneous data. This is partly caused
by carries rippling through the counter during the read operation. Also, the low and high bytes are read
sequentially rather than simultaneously and, thus, it is possible that carries will be propagated from
the low to the high byte during the read cycle. To circumvent these problems, you should perform a
counter-latch operation in advance of the read cycle. To do this, load the RW1 and RW2 Counter
Control Bits with zeroes. This instantly latches the count of the selected counter (selected via the SC1
and SC0 bits) in a 16-bit hold register. A subsequent read operation on the selected counter returns
the held value. Latching is the best way to read an active counter without disturbing the counting
process. You can only rely on directly-read counter data if the counting process is suspended while
reading, by bringing the gate low, or by halting the input pulses.
For each counter you must specify in advance the type of read or write operation that you intend to
perform. You have a choice of loading/reading (a) the high byte of the count, or (b) the low byte of the
count, or (c) the low byte followed by the high byte.
Manual MPIOD24.B1a
Page 6-9
PIOD24 Manual
Counter Programming Examples
Using Counter #0 as a Pulse Counter
Note that the counters are "down" counters so, when resetting them, it's better to load them with a full
count value of 65,535. In order to read the number of input pulses that have been applied, read back
the counter as shown in the following paragraph and subtract that reading from the original loaded
value.
outportb(BASEADDRESS + 7,0x30);
outportb(BASEADDRESS + 4,0xff);
outportb(BASEADDRESS + 4,0xff);
/* counter 0, mode 0 */
/* counter 0 low load byte */
/* counter 0 high load byte */
Reading Counter #0
outportb(BASEADDRESS + 7,0x30);/* counter 0, latch command */
/* read in both bytes of the latched value and combine into an integer */
value = inportb(BASEADDRESS + 4) + (inportb(BASEADDRESS + 4) * 256;
Generating Square Waves of Programmed Frequency
Frequency of output is a direct function of the frequency of the clock input and of the count loaded into
the counter. The minimum count (or divisor) is 2 and the maximum is 65535.
Calculating what divisor to use for a specific output frequency is straightforward. If, for example, you
desire a 2000 Hz output and your clock source is 10 MHz, divide it by 2000 and find that the count
loaded into counter #0 should be 5000.
Measuring Frequency and Period
The two previous sections show how to count pulses and generate output frequencies. It is also
possible to measure frequency by raising the gate input of Counter #0 for a known time interval and
counting the number of clock pulses accumulated for that interval. The gating signal can be derived
from Counters #1 and #2 operating in a square wave mode.
Counter #0 can also be used to measure pulse width or half period of a periodic signal. The signal
should be applied to the gate input of Counter #0 and a known frequency applied to the Counter #0
clock input. During the interval when the gate input is low, Counter #0 is loaded with a full count of
65,535. When the gate input goes high, the counter begins decrementing until the gate input goes back
low at the end of the pulse. The counter is then read and the change in counts is a linear function of
the duration of the gate input signal. If Counter #0 receives 10 microsecond duration clock pulses (100
KHz), the maximum pulse duration that can be measured is 65,535*10-5 = 655 milliseconds.
Page 6-10
Manual MPIOD24.B1a
Generating Time Delays
There are four methods of using Counter #0 to generate programmable time delays.
Pulse on Terminal Count
After loading, the counter output goes low. Counting is enabled when the gate goes high. The
counter output will remain low until the count reaches zero, at which time the counter output goes
high. The output will remain high until the counter is reloaded by a programmed command. If the
gate goes low during countdown, counting will be disabled as long as the gate input is low.
Programmable One-shot
The counter need only be loaded once. The time delay is initiated when the gate input goes high.
At this point the counter output goes low. If the gate input goes low, counting continues but a new
cycle will be initiated if the gate input goes high again before the timeout delay has expired; i.e.,
is re-triggerable. At the end of the timeout, the counter reaches zero and the counter output goes
high. That output will remain high until re-triggered by the gate input.
Software Triggered Strobe
This is similar to Pulse-on-Terminal-Count except that, after loading, the output goes high and
only goes low for one clock period upon timeout. Thus, a negative strobe pulse is generated a
programmed duration after the counter is loaded.
Hardware Triggered Strobe
This is similar to Programmable-One-Shot except that when the counter is triggered by the gate
going high, the counter output immediately goes high, then goes low for one clock period at
timeout, producing a negative-going strobe pulse. The timeout is re-triggerable; i.e., a new cycle
will commence if the gate goes high before a current cycle has timed out.
Manual MPIOD24.B1a
Page 6-11
PIOD24 Manual
Page 6-12
Manual MPIOD24.B1a
Customer Comments
If you experience any problems with this manual or just want to give us some feedback, please email
us at: [email protected].. Please detail any errors you find and include your mailing
address so that we can send you any manual updates.
10623 Roselle Street, San Diego CA 92121
Tel. (619)550-9559 FAX (619)550-7322
www.accesioproducts.com