1
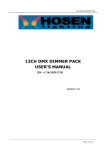
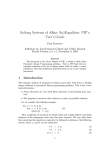
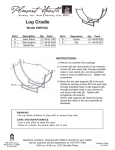
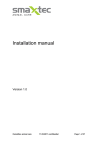
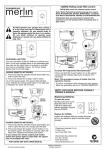
WHITE SOUND MACHINE
USER MANUAL
USER MANUAL
IMPORTANT SAFETY INSTRUCTIONS
Please take the time to carefully follow the instructions in this
ownerʼs guide.It will help you set up and operate your system
properly and enjoy all of its advanced features. Please save this
ownerʼs guide for future reference.
To reduce the risk of fire or electrical shock, do not
expose the product to rain or moisture.
Do not expose the apparatus to dripping or splashing,
and do not place objects filled with liquids, such as
vases, on or near the apparatus. As with any electronic
product, use care not to spill liquids into any part of the
system. Liquids can cause a failure and/or a fire
hazard.
!
"
"
"
power
8. Protect the power cord from being walked on or pinched,
particularly at plugs, convenience receptacles, and the point
where they exit from the apparatus.
9. Only use attachments/accessories specified by the
manufacturer.
10. Refer all servicing to qualified service personnel.
Servicing is required when the apparatus has been damaged in
any way: such as power supply cord or plug is damaged; liquid
has been spilled or objects have fallen into the apparatus; the
apparatus has been exposed to rain or moisture, does not
operate normally, or has been dropped – Do not attempt to
service this product yourself. Opening or removing covers may
expose you to dangerous voltages or other hazards. Please call
TEA to be referred to an authorized service center near you.
11. Use proper power sources – Plug the product into a proper
power source, as described in the operating instructions or as
marked on the product.
Avoid to unplug the power supply if unnecessary
Always switch off the WSM before unplugging the
supply
WARNINGS and CAUTIONS
• Make no modifications to the system or accessories.
Unauthorized alterations may compromise safety, regulatory
compliance, and system performance.
• Do not place any naked flame sources, such as lighted
candles, on or near the apparatus.
NOTE: This product must be used indoors. It is neither designed
nor tested for use outdoors, in recreation vehicles, or on boats.
NOTE: This product is intended to be used only with the power
supply provided.
NOTE: Where the mains plug or appliance coupler is used as
the disconnect device, such disconnect device shall remain
readily operable.
1. Read these instructions – for all components before using
this product.
2. Keep these instructions – for future reference.
3. Heed all warnings – on the product and in the ownerʼs guide.
4. Follow all instructions.
5. Do not use this apparatus near water or moisture – Do not
use this product near a bathtub, washbowl, kitchen sink, laundry
tub, in a wet basement, near a swimming pool, or anywhere else
that water or moisture are present.
6. Clean only with a dry cloth. Unplug this product from the
wall outlet before cleaning.
7. Do not install near any heat sources, such as radiators,
heat registers, stoves or other apparatus (including amplifiers)
that produce heat.
The lightning flash with arrowhead symbol, within an equilateral
triangle, alerts the user to the presence of uninsulated
dangerous voltage within the system enclosure that may be of
sufficient magnitude to constitute a risk of electric shock.
The exclamation point within an equilateral triangle alerts the
user to the presence of important operating and maintenance
instructions in this ownerʼs guide.
Wipe the system using a soft, dry cloth. You can also lightly
vacuum the grille.
• Do not use solvents, chemicals, or sprays.
• Do not allow liquids to spill or objects to drop into any
openings.
This product conforms to all EU Directive requirements
as applicable by law.
USER MANUAL
SIDE PANEL
1. Display: it indicates the source (AUX,SD,USB,FM), the alarm state (ALM), the current time/alarm time/track info
(track number, track time )/volume/frequency band/repeat mode.
2. VOL+: raise up the volume or other functions (see instructions)
3. VOL-: lower the volume or other functions (see instructions)
4. PLAY/PAUSE: activate/deactivate audio reproduction or other functions (see instructions)
5. USB: plug for USB card
6. Cooling slots
7. MODE/OFF: switch between the different modes/turn off the device
8. Remote control sensor: point your remote control towards it in order to optimize reception
9. PREV: previous track or other functions (see instructions)
10. NEXT: next track or other functions (see instructions)
11. SD cover
USER MANUAL
REAR PANEL
12. Masker/sound mixer: use this knob to change the balance between masker and sound in SD (noise masking
model) mode
13. AUX IN: connect here your external audio device (iPod, iPhone or others)
14. Serial number: please refer to this number for any technical assistance request
15. Mains: plug here your power supply
NOTE: the controls are not effective when using AUX mode, except 2,3 and 7.
USER MANUAL
2
1
3
6
4
7
5
8
9
10
11
12
REMOTE CONTROL
1. POWER:(STANDBY)ON/OFF
2. SETUP: Stop the reproduction for setup/mode change.
3. MUTE
4. EQ: Audio Equalization. NORMAL→JAZZ→ROCK→POP→CLASSIC
5. REP : On USB/SD mode: REP 1/ REP ALL (default mode : REP ALL)
6. MODE : Press this bottom to select USB→SD/MMC→AUX→FM.
7. REV:Return to the previous song
8. NEXT:Go to the next song
9. PLAY/PAUSE: play the song, or pause the song
10. VOL+: increases the volume
11. VOL-: decreses the volume
12. 0~9 bottoms : you can select the songs directly via theses 0~9 bottom ,rang from 1~999
NOTE: all these controls are not effective when using AUX mode, except 1,10,11.
USER MANUAL
Unpacking and setting up your WSM
Thank you for your purchase.
Please check the carton for all the parts:
- White sound machine, with front panel
- Power supply
- Remote Control
- 1.5” mini jack
Carefully remove WSM from the package. Connect the power
supply to the mains supply.
Turn on the WSM and set the clock and the alarm
If no device is connected, the WSM will automatically start
reading the internal files (SD mode). Keep pressed the MODE/
OFF button to turn off the WSM and set the clock.
A compromise has to be found between the overall volume
(controlled by the buttons on the SIDE panel), and the balance
between soundscape and masker.
Of course, you want to mask the disturbing noise, but you do not
want the masker or the soundscape be so high to disturb you.
The WSM has been studied to mask providing sound around
20dB SPL higher than the noise.
Act as follow:
1. Turning the knob 12 fully towards the “sound” side and select
the overall volume by acting on buttons 2 and 3 (or 7 -8 of the
remote control. Stop when you feel comfortable with the
sound level.
2. Now start turning the knob 12 counterclockwise until you
reach an optimal masking.
To set the clock, when the WSM is OFF shortly press the
3. You can still act on the volume buttons to reach the optimal
MODE/OFF button. Use the NEXT/PREV to select the hour or
configuration.
the minutes and use the VOL+/VOL- button to set the hours and
the minutes. Press again shortly the MODE/OFF button to exit.
If you want to repeat the same track, activate the “repeat” option
on the remote control.
To set the alarm, when WSM is OFF press the PLAY/PAUSE
button. The message “ALM” will appear and disappear in the
right part of the display. Press the PLAY/PAUSE button to enter
Using WSM as Audio Reproduction system
the setting mode for the alarm; use the NEXT/PREV to select
Using WSM with USB
the hour or the minutes and use the VOL+/VOL- button to set
the hours and the minutes. The alarm will play the internal files When USB is inserted, WSM automatically switch to mode
(USB MODE) and start playing. Suggestion: put all your songs
for around 1:30.
in the root directory of the USB card, as no folder browsing is
NOTE: the clock will reset when unplugging the power
possible.
supply.
NOTE: with some USB cards, there may be a perceivable
NOTE: avoid to unplug the power supply if unnecessary.
background noise.
General
Using WSM as FM Radio
The White Noise Machine can be used in 4 different modes,
controlled by the MODE button:
In FM MODE you can listen to FM radio, selecting the band with
the NEXT/PREV buttons.
SD: this mode is the noise masking system mode, which reads
internal files designed for masking.
Using WSM with an external reader
AUX: this mode is the external audio reproduction system mode
FM: this mode is the radio reproduction mode
USB: this mode is the USB audio reproduction mode
Using WSM as noise masking system mode
The White Noise Machine has been designed as a tool for
masking disturbing sounds/noises (SD mode). It is equipped
with tracks composed as an immersive soundscape and a
masking signal. See “Sound files”.
Use the panning knob situated in the REAR panel: moving the
knob clockwise will increase the volume of the soundscape,
while turning it counterclockwise will increase the volume of the
masker.
You can play another audio by connecting it to the system (AUX
MODE). This requires a cable with a 3.5mm mini plug at one
end.
1. Set the WSM volume to zero, then connect the external
device to the AUX IN connector [13] through the provided 1.5”
mini jack connector.
2. Set the external device volume to the maximum; slowly
increase the WSM volume until you reach a pleasant volume.
3. If the perceived sound should be distorted, then decrease the
volume of the external device, using your external device
control buttons, until you reach a clean sound.
Warranty
The warranty terms are contained in the TEA official warranty
document enclosed in the carton.
USER MANUAL
Sound files
Four soundscapes are integrated into the WSM
1. Neve ad agosto (A.Capra) [1:00:00]
2. Mystery of the sea (S.Fontana) [1:00:00]
3. Giardino di luce (A.Capra) [1:00:00]
4. Mix (Quiet Night) [2:48:36]
The provided soundscapes are protected by copyright.
All soundscapes have been produced at the Factory, via Trieste 7/E, 42122 Parma.
Technical Information
WSM
MASKING AND DOCKING SYSTEM
MAINS
Power supply
15 V DC – 1,6 A
AMPLIFIER
Type
Class D
Output power
30 W@4Ohm
TRANSDUCERS
Type
1 x 4” Full range
Nominal impedance
4 Ohm
Power handling (AES)*
30 W
Sensitivity (1W@1m)
91 dB
ACOUSTICAL
Max Peak SPL@1m **
106 dB
Bandwidth
70 - 16k Hz
PHYSICAL
Aux Input connector
TRS 3,5 mm (Mini jack) stereo
Cabinet
solid beechwood + medium density fibreboard
Dimensions (WxHxD)
252 x 168 x 207 mm
Net weight (kg)
2.98 kg
* Two hours test according to AES2, 1984 rev. 2003
** Measured - half space, ground – music at ampli!er clip limit – SPL Fast (125 ms) unweighted.
USER MANUAL
Technical Drawings
Frequency response
Contact
Tecnologie Elettroniche Avanzate (T.E.A)
Via Libertà 20, Gattatico, 42043
Reggio Emilia, Italy
www.teaelectronic.com
WSM-manual-def_rev01.pdf
INFOLINE:
[email protected]