1
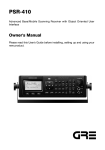
23
ProDoc Software Manual
Step 3 — Tell ProDoc where to save the completed documents.
Normally, you'll want to use the displayed directory, which will be the default settings you chose in your
setup preferences.
·
The Directory field lists the drive and directory where assembled documents will be saved. If
you prefer a different directory for these documents, type it in or click the Browse button to the
right of the box and select the drive and directory from the Directory Browse window.
·
The Documents will be saved as: entry shows the path and confirms whether the actual form
title or another name will be assigned.
NOTE:
The filename will usually end with .doc for Microsoft Word and .wpd for
WordPerfect, depending on your selected word processor. These settings are
discussed in detail in Chapter 3.
Step 4 - Verify other assembly options.
The Default Answer Set field is provided to let you designate optional default answer sets (discussed in
Chapter 3) for this document assembly session.
If you have created any alternate sets, select the default answer set you want to use from this list by
clicking the drop down arrow at the right of this field. Otherwise, ProDoc will use your PRIMARY SET.
Figure 2-9 provides example entries following the completion of the foregoing steps 1-4:
Figure 2-9 shows the completed
assembly session settings.
Now, you’re ready to start
assembling. Click the Start
Assembling button in the lower
right hand corner of the Starting
Document Assembly window to
begin document assembly.
Figure 2-9, Completed Starting Document Assembly Window
Phase 2 - Answer "Assembly" Questions
After clicking the Start Assembling button, you will see a Volume Banner Screen similar to the one in
Figure 2-10.