1
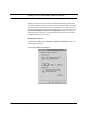
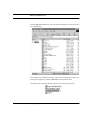
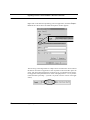
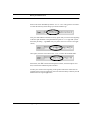
Upgrading to Version 4
of ID Card Maker or
IDentifier for Windows
Thank you for upgrading to “Version 4” of ID Card Maker or IDentifier for Windows. We are positive you will be more than pleased with all the enhancements and
improvements in its program capabilities and “user interface.”
The steps outlined below will allow you to upgrade your existing database to version 4 easily and quickly!
NOTE: If you wish to retain the ability to open and use your database in your original application, please follow the instructions in the section “Before you install
Version 4” at the end of this guide before you actually install the new version.
Installing Version 4
The steps for installation will vary slightly depending on the version of our program
you are currently using. Please follow the instructions below for your version.
Which version are you currently running?
• IDentifier 1000 for Windows can be identified by the words “IDentifier
for Windows” in large text in the center of the opening window after you logon.
Upgrading to Version 4
1
Upgrading to Version 4 of ID Card Maker or IDentifier for Windows
When you pull down the HELP menu and select ABOUT, it will report that it is
“A Microsoft Access 2.0 Application.”
• IDentifier for Windows 2000 can be identified by the words “IDentifier
for Windows 2000” in the opening logon screen. The application shortcut is
named “IFW-2000 App.”
• IDentifier for Windows 750 or 1100 (16-bit version) can be identified by the words “IDentifier for Windows 750” or “IDentifier for Windows
1100” in large text in the center of the opening window after you logon. When
you pull down the HELP menu and select ABOUT, it will report that it is “A
Microsoft Access 2.0 Application.”
• IDentifier for Windows 750 or 1100 (32-bit version, or “Version
3”) can be identified by pulling down the HELP menu and selecting ABOUT.
“Rev 3.xxx” is prominently displayed in this window.
• ID Card Maker I or II (16-bit version) can be identified by the words “ID
Card Maker I” or “ID Card Maker II” in large text in the center of the opening
window after you logon. When you pull down the HELP menu and select
ABOUT, it will report that it is “A Microsoft Access 2.0 Application.”
• ID Card Maker I or II (32-bit version, or “Version 3”) can be identified by pulling down the HELP menu and selecting ABOUT. “Rev 3.xxx” is
prominently displayed in this window.
IDentifier for Windows 1000
1.
Launch your existing IDentifier for Windows 1000 application and export your
database to an ASCII text file using the built-in EXPORT function.
2.
Write down on paper:
a. all your Encoding Expressions (Mag Tracks, Bar Code, Expression 1, 2, & 3)
which appear in the Preferences window of the application
b. the values in any text lists found in the Persons Found window
Exit IDentifier for Windows 1000
2
3.
Verify that the Regional Settings control panel in Windows Control Panel has
the “Short date style” set to MM/dd/yyyy. (From the Start button on Windows’
Task Bar, select Settings > Control Panel > Regional Settings > Date
tab > “MM/dd/yyyy” from the Short date style pick list.)
4.
Install Version 4 of IDentifier for Windows or ID Card Maker. When finished,
launch the application and logon.
Upgrading to Version 4
Installing Version 4
5.
Beginning at the opening Search window, navigate through the application by
clicking the following buttons: Tools > Configuration > Database management > Edit Field Definitions > Generate from text.
NOTE: Only someone with “System Administration” permission may access the
Database Management area of our program. Please refer to the User Manual
for information about the System Administrator.
You are now in the Edit Field Definitions window. Clicking Generate from
text presents an Open Dialog to navigate to your previously exported database
in ASCII text format. The Version 4 ITC Application will read the first line of
your exported database and generate an identical set of database fields which
will immediately display in the Edit Field Definitions window.
Following the instructions in the Version 4 User Manual, edit the individual
database field properties (label, size, field type, visible status, etc.) as desired.
(If your database used pick lists in the Persons Found window, recreate them by
adding the values you wrote down in Step 2b to the Text List property of the
appropriate field(s). When done, click the Back button to return to the Database
Management window.)
6.
Click the Modify the current database and forms according to the
current field definitions button. This builds new tables and windows
required to display your original data that you will soon import.
7.
Click the Back button until you return to the Tools window. Click the
Advanced Import button. Click the Import text button and follow the
Advanced Import Wizard’s prompts.
• Select Compatible IFW text file and navigate to the ASCII text file of your
old database.
• Select “Add only” as the import-type.
• Select IDNumber as the key field.
• Answer NO at the prompt to import ImageID and ImageDate
8.
Click the Merge images button in the Advanced Import window.
• Select Compatible IFW text file and navigate to the ASCII text file of your
old database.
• Select “Add only” as the import-type.
• Select IDNumber as the key field.
9.
From within Windows Explorer, copy all of your badge layout files (files with a
“.bdg” file extension), plus any associated image files used in the badge layouts
(e.g., logos, graphics, etc.) into the Server Data Path of the Version 4 Application. (The Server Data Path, set in IDServer Setup, is a path statement instruct-
Upgrading to Version 4
3
Upgrading to Version 4 of ID Card Maker or IDentifier for Windows
ing our application where to look to retrieve badge layout files and associated
graphics.)
You are done! Please read the User Manual to learn how to set other application
preferences, as well as learn the many new features added toVersion 4.
IDentifier for Windows 750/1100 & ID Card Maker I/II (16-bit
versions )
1.
Launch your existing ITC Application and export your database to an ASCII
text file using the built-in EXPORT function.
2.
Archive your field definitions by clicking the Archive field definitions button in the Database Design window. (ID Card Maker II and IDentifier for Windows 1100 users will be prompted to save the Encoding Formulas to a separate
text file. You will be prompted to navigate to this file (*.FXF) in Step 8.)
3.
IDentifier for Windows 750 and ID Card Maker I only: Manually write down on
paper the encoding formulas (Mag Track, Bar Code, Expression 1, 2, & 3)
found in the Preferences window of your application. (The ID Card Maker II
and IDentifier for Windows 1100 applications automatically archive the encoding formulas when you click the Archive field definitions button in Step 2
above.)
4.
Write down the Report properties for all your reports (query specifications,
fields to output, and sort options).
5.
Exit the old ITC Application.
6.
Verify that the Regional Settings control panel in Windows Control Panel has
the “Short date style” set to MM/dd/yyyy. (From the Start button on Windows’
Task Bar, select Settings > Control Panel > Regional Settings > Date
tab > “MM/dd/yyyy” from the Short date style pick list.)
7.
Install Version 4 of IDentifier for Windows or ID Card Maker. When finished,
launch the Version 4 Application and logon.
8.
Beginning at the opening Search window, navigate through the application by
clicking the following buttons: Tools > Configuration > Database management > Edit Field Definitions > Restore.
NOTE: Only someone with “System Administration” permission may access the
Database Management area of our program. Please refer to the User Manual
for information about the System Administrator.
You are now in the Edit Field Definitions window. Clicking Restore presents
an Open Dialog to navigate to and select your previously saved Field Definition
4
Upgrading to Version 4
Installing Version 4
file (Step 2 above). Your original database field information (fields and field
properties) will immediately display in the Edit Field Definitions window.
9.
Click Back to return to the Database Management window. Click the Modify
the current database and forms according to the current field
definitions button. This builds new tables and windows required to display
your original data that you will import in a moment.
10.
Click the Back button until you return to the Tools window.
11.
Click the Reports button and recreate your Reports using the information you
wrote down in Step 4.
12.
ID Card Maker I and IDentifier for Windows 750 users: Click the Configuration button to go to the Configuration window. Click the Encoding Formulae tab. Manually enter the encoding formulas you wrote down in Step 3.
NOTE: If you used encoding formulas in mag track fields in your old database,
you were required to enter the PVC card printer’s required “Start” and “Stop”
characters at the beginning and end of this text string. The new version of our
software handles magnetic encoding a little differently. The “Start” and “Stop”
characters are now set within IDServer Setup’s Magnetic Encoding dialog.
(Refer to the new User Manual for instructions.) Therefore, when re-entering
the encoding formulas for mag tracks, do not include the “Start” and “Stop”
characters. Only enter the data that your mag track reader is expecting.
13.
Click the Advanced Import button. Click the Import text button and follow the Advanced Import Wizard’s prompts.
• Select Compatible IFW text file and navigate to the ASCII text file of your
old database
• Select “Add only” as the import-type
• Select IDNumber as the key field
• Answer NO at the prompt to import ImageID and ImageDate
14.
Click the Merge images button in the Advanced Import window.
• Select Compatible IFW text file and navigate to the ASCII text file of your
old database
• Select “Add only” as the import-type
• Select IDNumber as the key field
15.
From within Windows Explorer, copy all of your badge layout files (files with a
“.bdg” file extension), plus any associated image files used in the badge layouts
(e.g., logos, graphics, etc.) into the Server Data Path of the Version 4 Application. (The Server Data Path, set in IDServer Setup, is a path statement instruct-
Upgrading to Version 4
5
Upgrading to Version 4 of ID Card Maker or IDentifier for Windows
ing our application where to look to retrieve badge layout files and associated
graphics.)
You are done! Please read the User Manual to learn how to set other application
preferences, as well as learn the many new features added to Version 4.
IDentifier for Windows 750/1100 & ID Card Maker I/II (32-bit
version, or “Version 3”)
1.
Launch your existing ITC Application and archive your Field Definitions.
(Click the Archive field definitions button in the Database Management window.)
2.
Install Version 4 of the ITC Application. When finished, launch Version 4 and
logon.
3.
Click the following series of application buttons to navigate to the Database
Management window, starting at the opening Search window: Tools > Configuration > Database Management > Convert a Rev 3 database.
NOTE: Only someone with “System Administration” permission may access the
Database Management area of our program. Please refer to the User Manual
for information about the System Administrator.
4.
Clicking the Convert button opens a Windows Open dialog to navigate to your
original ITC version 3 database file. If you accepted the default installation, this
should be located in C:\ITC\. The file name is “Itc97DAT.mdb.” (Exercise caution in selecting this file; do not confuse it with the similarly-named file
“Itc97APP.mdb.”)
After selecting your Rev 3 file, a second dialog box appears, asking you to provide a name for the to-be-converted file. Type a meaningful name and click OK.
A user prompt then asks if a Field Definitions file exists for the Rev 3 database.
If you click No at this prompt, the ITC Application will convert your old database but not preserve any user-customized field properties, such as label, fieldtype, size, required status, etc. If you click Yes at this prompt, you are prompted
to the navigate to the Field Definition file you created in Step 1.
6
5.
After the file has been converted, click the Attach to an existing database button in the Database Management window. Navigate to the newly converted database file and click Open. You will be prompted to rebuild the
Search and Personal Data forms. Click OK to rebuild the forms.
6.
A final prompt will alert you to the need to re-set the Server Data Path (the path
to your badge layout and image files). Do this by clicking theIDServer Setup
button in the Configuration window.
Upgrading to Version 4
Before you install Version 4
You are done! Please read the User Manual to learn how to set other application
preferences, as well as learn the many new features added toVersion 4.
Before you installVersion 4
If you wish to retain the ability to open your database in its original ITC application, you may wish to perform a few “house keeping tasks” to keep things neat and
tidy. To avoid confusion over having two similarly-named applications installed on
your computer, we recommend that you rename two things: 1) the folder where
your existing version of the ITC Application exists, and 2) the shortcut that points
to it.
Renaming the Folder
Version 4 installs itself by default to a directory named “ITC” which may be similar
in name, if not identical, to the directory where your old software is located. While
there is nothing necessarily wrong with co-mingling in one directory your older
files with the Version 4 files, and to avoid unnecessary confusion, we suggest that
you rename your old ITC Application directory by appending the word “OLD” to
its name. Thus, “ITC1000” becomes “ITC1000OLD,” and “itc” becomes
“itcOLD.” To rename the directory, simply right-click on the folder in Windows
Explorer and select Rename from the context menu. The folder-name becomes
editable. Append the word “OLD” to the name and mouse-click anywhere outside
the text area to save the new name.
NOTE: Changing the name of the folder also affects the ability to launch the old
application. If you rename the installation directory, you must follow the steps in
“Editing the Shortcut” immediately below!
Editing the Shortcut
In the same way similarly-named folders may be confusing, similarly-named shortcuts can also lead to confusion. “Shortcuts” are the clickable icons appearing on
Upgrading to Version 4
7
Upgrading to Version 4 of ID Card Maker or IDentifier for Windows
Windows’ Start Menu. Version 4 of ID Card Maker and IDentifier for Windows
will create program groups and new shortcuts named “ID Card Maker” and “IDentifier for Windows” which may be similar if not identical to your old shortcuts. If
identically named, the Version 4 Application will overwrite your old shortcuts and
you will lose the ability to launch your old application. Therefore, before you
install the Version 4 software, we recommend that you rename your old shortcuts
by appending the word “old” to them.
Renaming the Shortcuts
Click Windows’ Start button > Settings > Taskbar & Start Menu to open the
Taskbar Properties dialog.
Click the Start Menu Programs tab.
8
Upgrading to Version 4
Before you install Version 4
Click the Advanced button to open an Explorer-like display of the icons on Windows’ Start button.
In the right pane of the Explorer window, right-click on the program group for your
existing ITC Application, and select Rename from the context menu.
The Program name becomes editable. Append “old” to the end of the name.
Upgrading to Version 4
9
Upgrading to Version 4 of ID Card Maker or IDentifier for Windows
Next, double-click on the program group you just renamed. The actual application
shortcuts appear in the right pane. Right-click on the shortcut for your existing ITC
Application, and select Rename from the context menu.
The Program name becomes editable. Append “old” to the end of the name.
Now, after the Version 4 application is installed, you will have separate program
groups (and shortcuts) for each of your applications. (After installing Version 4,
consider renaming its program group to “ID Card Maker new,” “ID Card Maker
Rev4,” or something similar to further distinguish the two groups of shortcuts.)
Editing Shortcut Target
All Windows’ shortcuts act as pointers to the actual files they open. In fact, one of
their primary tasks is to specify a “path” to the file(s) or application it refers to. If
you renamed the directory where your original ITC Application resides, the “path
statement” in the application shortcut is no longer valid. (The shortcut will be looking for the originally-named folder which no longer exists.) Therefore, you must
edit the “path statement” in the shortcut’s properties accordingly.
In the right pane of the Explorer window showing the shortcuts on Windows’ Start
button, double-click the folder icon that you just renamed. The contents of the program group appear. (The names of the shortcuts that subsequently display will be
10
Upgrading to Version 4
Before you install Version 4
your application icons and may be different than what appear in the screenshot
below.)
Upgrading to Version 4
11
Upgrading to Version 4 of ID Card Maker or IDentifier for Windows
Right-click on the shortcut representing your ITC Application, and select Properties from the context menu. The Shortcut Properties window appears.
The text string in the Target field is a complex series of instructions used to instruct
the shortcut to launch our application. Click anywhere in the text field to place the
cursor, then press and hold down the left arrow key on your keyboard until the following portion of the path statement is visible. This path points to “*****sys.mdw”
(where the letters preceding “...sys.mdw” vary from version to version of our application).
12
Upgrading to Version 4
Before you install Version 4
Position the cursor immediately after the “itc” in “c:\itc” and type the word “OLD”
to reflect the directory name-change you made a moment ago.
Now press and hold down the left arrow key again until you scroll to the beginning
of the next path statement. This path statement points to “*****app.mdb” (where
the letters preceding “...app.MDB” may vary from version to version of our application).
Once again, insert the word “OLD” after “c:\itc” to reflect the renamed folder.
When done, click OK in the shortcut Properties window, close the Explorer window, and close the Taskbar Properties window.
You may now return to the beginning of this guide to follow the instructions for
installing Version 4 of our application. You now retain the ability to launch your old
database from its original application.
Upgrading to Version 4
13
Upgrading to Version 4 of ID Card Maker or IDentifier for Windows
14
Upgrading to Version 4