
1
5TH QUARTER PROGRESS REPORT OF ICT R&D FUNDED PROJECT Development of Flaw Diagnosis/ Dimensioning/ Prognostics Algorithms for the Improvement of In-Country Aerospace Non-Destructive Testing (NDT) Capabilities PI: Dr Tariq Mairaj Rasool Khan Co-PI: Dr Faisal Amir Table of Contents Table of Figures .............................................................................................................................. 3 Table of Tables ............................................................................................................................... 4 1 Introduction ............................................................................................................................. 5 2 Recruitment of Workforce for Fifth Quarter .......................................................................... 5 3 2.1 Recruitment of Undergraduate Workforce ....................................................................... 5 2.2 Hiring of Beta-Testers for Beta-testing activity ............................................................... 7 Principal Project Progress ....................................................................................................... 7 3.1 4 Distributed Version Control and Issue Tracking.............................................................. 7 3.1.1 Benefits of DVCS ..................................................................................................... 8 3.1.2 Issue Tracking and its advantages............................................................................. 8 3.1.3 DVCS and issue-tracking setup used ........................................................................ 8 3.2 Beta-testing and the beta-comments generated for ANDT GUI .................................... 10 3.3 Generation of Historical Database ................................................................................. 13 Undergraduate Projects Progress .......................................................................................... 13 4.1 PC Based Eddy Current NDT System............................................................................ 13 4.1.1 Previous Progress .................................................................................................... 13 4.1.2 ET Instrumentation Flowchart ................................................................................ 14 4.1.3 Assembly for mounting Probe ................................................................................ 21 4.1.4 Data Acquisition and Processing on Software ........................................................ 22 4.1.5 Final Product of the PC Based Eddy Current NDT System ................................... 26 4.2 PC-Based Pipeline Inspection Gauge (PIG)................................................................... 27 4.2.1 Overview: ................................................................................................................ 27 4.2.2 Objectives: .............................................................................................................. 28 4.2.3 Working: ................................................................................................................. 28 4.2.4 Design and Implementation .................................................................................... 28 4.3 GWUT over WSNs ........................................................................................................ 30 4.3.1 Hardware design for Instrumentation Amplifier and Envelope Detector ............... 30 A. Appendix A: User Manual for ANDT GUI Software ......................................................... A-1 B. Appendix B: Resumes of hired Beta-testers ....................................................................... B-2 C. Appendix C: Detailed Beta-comments ............................................................................... C-4 2 Table of Figures Figure 1: Distributed Version Control System ............................................................................... 8 Figure 2: Bitbucket Environment showing commits made by developers ................................... 10 Figure 4: ET Instrumentation Flowchart....................................................................................... 14 Figure 3: Eddy Current Probes (Machine Winded) ...................................................................... 14 Figure 5: Phase Shift Oscillator Schematic .................................................................................. 15 Figure 6: Oscillator PCB ............................................................................................................... 15 Figure 7: Oscillator Output Waveform ......................................................................................... 16 Figure 8: Howland Current Pump Schematic ............................................................................... 16 Figure 9: Howland Current Pump PCB ........................................................................................ 17 Figure 10: Howland Current Pump I/O waveform ....................................................................... 17 Figure 11: Eddy Current Probe ..................................................................................................... 18 Figure 12: Signal Preparation & Demodulation Schematic .......................................................... 19 Figure 13: XOR Output ................................................................................................................ 20 Figure 14: RC Filter I/O Waveform.............................................................................................. 20 Figure 15: Impulse on Crack (Filter Output) ................................................................................ 21 Figure 16: Assembly for Mounting Probe .................................................................................... 22 Figure 17: Software Flowchart ..................................................................................................... 22 Figure 18: Real time Plot on LabVIEW ....................................................................................... 23 Figure 19: Position Sensing GUI .................................................................................................. 24 Figure 20: Intensity Plot on LabVIEW ......................................................................................... 25 Figure 21: FYP Final Product ....................................................................................................... 26 Figure 22: Project demo ................................................................................................................ 26 Figure 23: Magnetic flux escaping from a leak in a Tube Wall ................................................... 27 Figure 24: A commercially designed PIG for industrial applications .......................................... 28 Figure 25: Basic Design for an MFL inspection tool with a Driver (optional) and a Recorder Package ......................................................................................................................................... 29 Figure 26: Sensing flowchart for GWUT based SHM over WSN................................................ 30 Figure 27: PZT coupling terminal................................................................................................. 30 Figure 28: Instrumentation amplifier based pre-amplifier for sensing ......................................... 31 Figure 29: Ideal envelope detector circuit .................................................................................... 32 Figure 30: Envelope detector circuit for sensing .......................................................................... 32 Figure 31: Low pass filter for envelope filtering .......................................................................... 33 Figure 32: PCB layout design for signal sensing and envelope detection board .......................... 33 3 Table of Tables Table 1: Issues generated by the Beta-testing team on BitBucket ................................................ 11 4 1 Introduction The ICT R&D funded project, “Development of Flaw Diagnosis/ Dimensioning/ Prognostics Algorithms for the Improvement of In-Country Aerospace Non-Destructive Testing (NDT) Capabilities” started on April 1st, 2013. In this regard, an NDT Centre has been established at Pakistan Navy Engineering College, National University of Sciences and Technology (PNECNUST). This document describes the activities that have been performed at the NDT Centre during the fifth quarter of the project. The activities for this quarter included Hiring of Beta-testers; Guided User Interface (GUI) development for flaw detection software incorporating both ET and UT testing methods; beta testing of the GUI; and generation of historical database. A website is also set up according to the directions of ICT R&D. The web site link is http://ndt.pnec.nust.edu.pk/index.html. The web site contains updated details of different project activities. The details of project activities for fifth quarter are discussed in the subsequent sections. 2 Recruitment of Workforce for Fifth Quarter Competitive and research oriented human resource is highly desirable for performing rapid development activities. In this regard Under-Graduate (UG), Post-Graduate (PG), Research Assistant (RA) and other support staff has been recruited. However, due to lack of funds, UG students were recruited but not paid in this quarter. Fortunately, most of the recruited students worked voluntarily with us to keep the research projects running. However, to complete the technical objectives of this quarter, hiring of beta-testers was necessary. Therefore, two beta-testers were hired after taking interviews from suitable professionals / individuals. 2.1 Recruitment of Undergraduate Workforce Undergraduate recruitment for 06 positions was carried out instead of two positions as approved in the budget. A change of request form was raised giving justification of the change. The change has been approved. According to the new plan 06 positions are filled on quarterly basis. Short listing and selection of UG students depended upon their GPA, technical knowledge, attitude, motivation, commitment for summers and final year project. The selected UG students have been divided into two groups as follows: For Fee Waiver: 1. Salar Bin Javaid 2. Taha Saeed Khan 5 For Stipend: 1. 2. 3. 4. Summaya Abbas Talha Waqar Ahsan Pasha Syed Asim Ahmed All the students listed above give 10+ hrs/ week to the project. Students are categorized into different group-projects based on the various aerospace NDT techniques. The RA acts as the principal supervisor and coordinator for these projects. The students listed above were to be paid for fifth quarter only. However, due to lack of funds, the students worked voluntarily, and were not paid. Students work in group and sub-groups to achieve their research objectives. These groups may also be populated by students not taking any grant from the project, for instance, they may be working for their FYP or involved voluntarily. Current groups or sub-groups involved in different activities are as under: 1. Oscillator and Excitation for Eddy Current Testing (ET) a. Sumayya Abbas b. Salar Bin Javaid (Group Leader / Coordinator for ET) 2. Eddy Current Probe Design a. Shayan Ahmed (FYP) b. Syed Asim Ahmed 3. Data Acquisition and Flaw Profiling for ET a. Uzair Gilani (FYP) b. Iqra Sajid (FYP) 4. Guided Wave Ultrasonic Testing (GWUT) / GWUT on WSN a. Taha Saeed Khan (Group Leader/ Coordinator for UT) b. Umair Asif Shamsi 5. Position Sensor for ET with GUI a. Talha Waqar Khan b. Uzair Gillani 6. Development of ANDT GUI with RA a. Salar bin Javed b. Talha Waqar Khan c. Taha Saeed Khan 7. Magnetic Flux Leakage Testing a. Ahsan Pasha b. Syed Ali Qamber For each group, there is at least one group activity and one group meeting/presentation scheduled every week. The students are assigned aerospace NDT literature review, basic design projects related to aerospace NDT data acquisition and NDT signal interpretation. 6 2.2 Hiring of Beta-Testers for Beta-testing activity After conducting interviews of interested individuals, two individuals were hired as the betatesters for testing ANDT GUI, namely Mr. Awais Javed and Ms. Sumayya Abbas. They were chosen on the following basis: non-participation in the actual software development, moderate software skills, general knowledge about NDT, excellent observation skills and good communication skills. Their resumes are attached at Appendix B. 3 Principal Project Progress Following were the technical milestones achieved in the preceding quarter: 1. 2. 3. 4. GUI development for flaw detection and profiling software Alpha testing of flaw detection and profiling software User manual for flaw detection and profiling software, and its GUI Generation of historical database The technical milestones set for the reporting quarter are as follows: 1. Beta testing of detection and profiling software 2. Incorporation of beta comments in detection and profiling software 3. Generation of historical database Though Alpha testing was conducted in the fourth quarter, the development team continued alpha-testing on its own to include some desired features, and establish coherency in the GUI till the hiring of Beta-testers. Moreover, to make the development and beta-testing more coherent and systematic, the team introduced distributed version control system for its developers, with issue-tracking function for beta-testing. The details are presented in 3.1. Beta-testing was conducted and comments were recorded on the issue-tracker. Details for betatesting and the generated comments are listed in 3.2. 3.1 Distributed Version Control and Issue Tracking Software development is a task which requires coordinated effort by a dedicated team of developers working in conjunction with each other to produce the best possible version of the desired software. This means that there needs to be proper communication between the developers with goals being set and tasks being assigned to each developer. As work proceeds the additions and changes made to the code need to be monitored and a record has to be maintained for future reference. Furthermore, the source code should not only exist on one machine, a centralized code has a disadvantage: As the developers are dependent on a single machine, any malware or malfunction could result in the complete loss of the code. 7 Instead of carrying out manual versioning of a source code on a single machine accessible by one user at a time, the alternate approach of using Distributed Version Control System (DVCS) was implemented. Version control is a system that records changes to a file or set of files over time so that you can recall specific versions later. 3.1.1 Benefits of DVCS In a Distributed Version Control System (such as Git) as opposed to Central Version Control System, clients don’t just check out the latest snapshot of the files: they fully mirror the repository (or repo for short). Thus if any server dies, and these systems were collaborating through it, any of the client repositories can be copied back up to the server to restore it. Every checkout is really a full backup of all the data, as shown in Figure 1. Figure 1: Distributed Version Control System Furthermore, many of these systems deal exceptionally well with having several remote repos which they can work with, so a developer can collaborate with different groups of people in different ways simultaneously within the same project. This allows the developers to set up several types of workflows that aren’t possible in centralized systems, such as hierarchical models. 3.1.2 Issue Tracking and its advantages 3.1.3 DVCS and issue-tracking setup used Due to the benefits detailed in 3.1.1, the team decided to use “Git” as the DVCS for ANDT software development and testing. Since Git is itself a command line tool, it needs a GUI client to work interactively. Therefore, “TortoiseGit” was utilized as the graphical client for Git. Moreover, we needed an online server to make the repository available to developers and beta8 testers round the clock. Therefore, we used “BitBucket” for the said purpose. Bitbucket also provides Issue-tracking capability, which was a much desired feature for Beta-testing. 3.1.3.1 Git Git is a “distributed revision” control and Source Code Management (SCM) system with an emphasis on speed, data integrity, and support for distributed, non-linear workflows. Git has become the most widely adopted VCS for software development. Similar to most other distributed revision control systems, and unlike most client–server systems, every Git working directory is a full-fledged repository in itself, with complete history and full version-tracking capabilities, independent of network access or a central server. 3.1.3.2 TortoiseGit TortoiseGit is a Git revision control client, implemented as a Microsoft Windows shell extension. It is free software released under the GNU General Public License. 3.1.3.3 BitBucket Bitbucket is a web-based hosting service for projects that use either the Git revision control systems. Developers have the ability of being able to create a remote repo from which local repos can be generated and maintained. After changes have been made, the developer can send a pull request to the remote repo and after acceptance the data in the local repo can be copied onto the remote repo. This data can then be merged at a later time, as the administrator sees fit. Branches can also be created, which allow an easier division of tasks between groups of developers, as one developer can focus on one aspect of the software while the other developer can focus on something else. BitBucket also lets the team use an issue-tracker for each repository. This issue tracker enables the team to track project's feature requests, bug reports and other project management tasks. 3.1.3.4 Implementation Initially, the GUI was being developed on a single machine but after realizing the benefits of Git all activities were shifted to the system. The result was an efficient working environment with proper coordination between the team. The ability to access the repos remotely allowed the developers to work on the code from anywhere, be it the lab or home. All developers as well as beta-testers followed following procedure to setup the system on their computers: 1. Install Git: http://git-scm.com/download/win, with "Windows explorer integration" unchecked and "Checkout as-is, commit as-is" checked. 2. Install Windows Installer 4.5: http://www.microsoft.com/enus/download/details.aspx?id=8483 9 3. Install TortoiseGit: https://code.google.com/p/tortoisegit/wiki/Download , with default options 4. Configure ToroiseGit settings -> network for appropriate proxy settings and tortoiseGit > settings -> Git -> Global for proper id and email addresses 5. Create an account on BitBucket: https://bitbucket.org, and join ANDT team. A team named “ASNDT” was created by the lead developer, containing a single repository named “andt-gui”. The repository is kept private for obvious reasons. To access the repo, the developers had to provide the URL: https://[email protected]/asndt/andtgui.git Bitbucket allowed users to add comments to commits made by their counterparts; developers were able to point out mistakes and improvements in the code, early on in the alpha testing phase. The ability to compare codes with past commits was an added advantage. Developers easily isolated the bug, just at its inception, in the code and dealt with it immediately by comparing the working code with the faulty code. A screenshot of the environment is shown below (as seen by a developer) in Figure 2. Figure 2: Bitbucket Environment showing commits made by developers 3.2 Beta-testing and the beta-comments generated for ANDT GUI Software Testing is a critical part of any software development. It usually comprises of Alpha testing (initial testing by the developers) and Beta testing. Beta testing is meant to hunt bugs and other issues in the software which may go unattended by the developers. Therefore, it has to be 10 conducted by professionals / individuals other than the developers and preferably from a class of individuals similar to the end-users of the software. Therefore, beta-testing was conducted with two beta-testers hired for the said purpose. Hiring details for beta-testers are listed in 2.2. For the assistance of beta-testers, and systematic testing, following guidelines were laid down: 1. Log-in to BitBucket (in your browser) using your BitBucket id 2. From Teams (at Top Left) select "ASNDT" 3. Now, click on a single repository named "andt-gui" that appears in the list of ASNDT repositories 4. Now, if not already expanded, expand the navigation toolbar by clicking ">>" icon at bottom left corner 5. Now, "Issues" should be visible in the navigation panel, please select it. A list of issues comes up. You can select "All" in the filters to see all issues created 6. To create an issue click on "+ Create issue" button just below the profile button at top right corner 7. To fill this form, please follow the 7-point guide as follows: a. Choose an appropriate title for the issue/bug b. In the description, first mention the particular commit number (version) for which analysis has been made c. Then, after describing the issue, completely describe the steps to reproduce the issue/bug (to the extent possible) d. Beta-testers should assign the issue to ASNDT team by default, the undersigned will assign it to an appropriate developer afterwards e. Carefully pick the "kind" of issue as bug, enhancement, proposal or task f. Carefully pick the "priority" of the said issue g. Support your description, by attaching any screen shots / support files for convenience 8. Finally, click "Create Issue" button to submit the issue. When the beta-testing was commenced, following issues were generated as shown in Table 1. Table 1: Issues generated by the Beta-testing team on BitBucket Title Type Priority Status Creator #20: Improvement of Report Button and Notepad file (UT) task minor RESOLVED Sumayya Abbas #19: STFT Required task trivial RESOLVED Sumayya Abbas Button Improvement 11 Title Type Priority Status Creator #18: Enhancing Location dropdown menu FFT task trivial RESOLVED Sumayya Abbas #17: Upgrading of Title/Text space in UT enhancement minor RESOLVED Sumayya Abbas #16: Improve Title and Axes Labels in Plots (ET) enhancement trivial RESOLVED Sumayya Abbas #15: Upgrading of Report Notepad file (ET) enhancement trivial RESOLVED Sumayya Abbas task major RESOLVED Sumayya Abbas #12: Improvement of ROI description in ET GUI enhancement minor RESOLVED Sumayya Abbas #13: ASNDT S/W – axis labeling enhancement trivial RESOLVED Awais Javed #11: ASNDT S/W – Spelling mistake enhancement trivial RESOLVED Awais Javed #10: ASNDT S/W – Warning dialog needed enhancement minor RESOLVED Awais Javed #9: ASNDT S/W – ET – method highlight enhancement trivial RESOLVED Awais Javed #8: Some Chinese writing on UT logo may please be erased or picture may be changed enhancement trivial RESOLVED Awais Javed #7: Resolution of fonts needs of improvement in ASNDT-S/W enhancement trivial RESOLVED Awais Javed #6: Requirement of y-axis Label on Histogram Plot (ET) enhancement trivial RESOLVED Sumayya Abbas #5: Correction of NUST Logo & Magnitude Button in ET enhancement trivial RESOLVED Sumayya Abbas #4: Add Error indication on entering wrong inputs in ET GUI proposal trivial RESOLVED Sumayya Abbas #3: Requirement of individual Label/Title on respective screens proposal minor RESOLVED #14: Improvement of Report Button Sumayya Abbas 12 Title Type Priority Status Creator #2: Upgrading of Title/Text space and Logo Resolution enhancement trivial RESOLVED Sumayya Abbas #1: LOGO IMPROVEMENT enhancement trivial RESOLVED Awais Javed Details for each issue can be found in Appendix C: Detailed Beta-comments. 3.3 Generation of Historical Database Through the generation of historical database the remaining useful life (RUL) of aircraft structure can be predicted. This database would be used in damage progression/crack growth studies for different structures/parts of the aircraft. The database would also show the degradation progression in different components/specimens with respect to flight hours. The knowledge of RUL would ensure aircraft safety as well as enable aircraft management agencies to plan repair/replacement accordingly. Thus development of historical database is a long and continuous process, which remained in progress during the 5th quarter. 4 Undergraduate Projects Progress Subsequent sections document the progress on different UG projects in the fifth quarter. 4.1 PC Based Eddy Current NDT System The progress of the FYP ‘PC Based Eddy Current NDT System’ is explained in the successive sections. 4.1.1 Previous Progress The undergrad students started off with designing a constant peak alternating current source. The Howland current pump design was finalized and a current source using OPA564 IC was formulated on PCB and tested. But due to requirement of better heat sinking of the current source, a similar IC namely the OPA548 was ordered from abroad. While the IC was awaited, work on other parts of the system was carried out. The Eddy Current probes were finalized which were machine winded. The pictures of those are shown in Figure 3 for convenience. Alongside the PLL IC HEF4046 was used for demodulation purposes. Once the modulated signal (consisting of both the carrier and crack signal) was demodulated, it was filtered to get the required signal of the crack. 13 Figure 3: Eddy Current Probes (Machine Winded) The final stage was to send the demodulated and filtered signal to the PC by using a DAQ card. To achieve the same, students worked on the LabVIEW software for data acquisition and analysis. 4.1.2 ET Instrumentation Flowchart Figure 4: ET Instrumentation Flowchart The ET Instrumentation Flowchart illustrated in Figure 4 was also improved with respect to specific requirements and problems faced during the hardware testing of the project along the way. The final flowchart is shown above where an oscillator acts as a drive for the Howland Current Pump which in turn is used to excite the Eddy Current Probe. The probe offers a modulated signal to the signal preparation stage. The two signals, the drive frequency signal and the one coming from the probe are both prepared individually and then sent to the demodulator stage for extracting required crack information. Once the signal is demodulated, it is sent to the PC by using a DAQ card and a low pass filter. 4.1.2.1 Oscillator An oscillator is required to provide input to the excitation source. This is a sinusoidal frequency of 30 kHz with 4Vpp. The design chosen can be seen in the Figure 5. It offers a stable frequency and absolutely no noise to drive the source. The better the oscillation provided to the pump, 14 better would be the excitation provided to the probe and better would be the response from the probe. Figure 5: Phase Shift Oscillator Schematic The hardware for oscillator circuit can be seen below in Figure 6. Figure 6: Oscillator PCB The result of using the Phase Shift Oscillator was that a very stable and continuous sinusoidal waveform was achieved. The Oscillator Output Waveform can be seen below in Figure 7. 15 Figure 7: Oscillator Output Waveform 4.1.2.2 Constant Peak Alternating Current Source This was by far the most challenging and time consuming task out of the entire hardware. But the students managed to get the current that was required for exciting the eddy current probe. The design finalized was the Howland Current pump formulated on hardware by using the IC OPA548 that comes in Mosfet packaging and hence can be used with an external heat sink. The Howland Current Pump Schematic can be seen below in Figure 8. Figure 8: Howland Current Pump Schematic 16 This was the design used by the students and required current value and waveform were achieved. The Howland Current Pump PCB using OPA548 and an external heat sink can be seen below in Figure 9. Figure 9: Howland Current Pump PCB The Current source offered a constant current as can be seen in the waveform of Figure 10. The yellow waveform is that of input coming from the oscillator and the blue waveform is the output waveform generated by the probe when excited by the constant current source. And that was the whole idea of using constant current source that the output waveform is irrespective of the nature and impedance of the load (in this case inductive load). Figure 10: Howland Current Pump I/O waveform 17 4.1.2.3 Eddy Current Probe The eddy current probe is designed by using the Analytical Approach which has already been explained in the previous reports. This time the students finalized the probe to use depending upon which one was excited best with the current source designed and one giving better and more accurate results. Figure 11: Eddy Current Probe The Eddy Current Probe finalized is shown above in Figure 11. This was chosen because of its smaller length and so it was excited better. Moreover, the magnetic field produced by it was more concentrated near the test specimen and so better results were achieved and demodulation became possible. The coil radius of this probe is 0.4 inches and coil inductance is 115.75uH. 4.1.2.4 Signal Preparation The signal coming from the probe has a very small magnitude that is not detected by the demodulation circuitry. Also the phase sensitive detector (XOR), is a digital component and can only read voltage level above zero. There are two signals between which phase shift occurs that is the oscillator signal and the signal from the probe. So for signal preparation, there is requirement for • Dc offset to the two signals • Setting amplitude of signal detectable by XOR The two signals were hence prepared by using an adder circuit using appropriate values of resistance and capacitance. After preparation they were sent ahead for demodulation. 4.1.2.5 Signal Demodulation In the next functional step of instrumentation, data about the test specimen has to be extracted from the impedance change of the eddy current probe. This change due to presence of any crack or flaw is followed by a change in phase between the input and output signals of the probe. Detecting this phase change requires a phase sensitive detector. 18 The XOR has been used for this purpose. It is a phase detector which measures the phase difference between the input and output signals in from of a square wave whose width changes when phase between the waveform changes. It is finalized due to the following advantages. • Readily available • Less cost and easy interfacing • No requirement of inductive components Figure 12: Signal Preparation & Demodulation Schematic The Figure 12Figure 12: Signal Preparation & Demodulation Schematic looks simple because only operational amplifiers and a basic XOR were used for signal preparation and demodulation respectively. Moreover, the filtering is also done by using the basic first order RC low pass filter. 19 Figure 13: XOR Output Figure 13 depicts the XOR Output which is a square wave. Demodulation occurred in such a way that when the probe was moved from air to close to the metal specimen and then over the crack, the pulse width of the square wave changed and showed change in magnetic field and impedance. These are also the indicators of presence of crack but this could not be easily understood from the figure. Hence a filtering step was done to change the square wave into dc voltage. The resultant waveform of the filter is shown below in Figure 14. Figure 14: RC Filter I/O Waveform Once the square wave signal is averaged out as DC, presence of crack could be picked when the dc level changed with respect to the movement of the probe. 20 Figure 15: Impulse on Crack (Filter Output) The waveform indicates change in DC voltage level and the impulse is seen due to presence of crack. The signal shown in Figure 15 was then acquired onto the PC by using a DAQ card. Before sending it to the DAQ card, another amplifier stage was used in order to cater for the requirements of the DAQ card in particular so that any damage to the DAQ card could be avoided. 4.1.3 Assembly for mounting Probe The Assembly for Mounting Probe shown in Figure 16 has been developed in such a way that position sensing is also done simultaneously. If it had been done some other way then a different approach for position sensing would have to be incorporated. For this purpose, an optical mouse has been used and it looks something like this. 21 Figure 16: Assembly for Mounting Probe The advantage of doing the mounting this way was that the mouse could still be connected directly to the PC and by using the Mouse Sensor GUI created, the x and y coordinates of the specimen were also available to the user for data analysis. This meant that the position of the crack was also available on software along with the crack signal from the DAQ card. 4.1.4 Data Acquisition and Processing on Software Data acquisition on software refers to acquiring the signal onto the PC, plotting it in real time and incorporating the position sensing data in order to know the exact location of the probe as well as the crack. The steps followed on the software can be seen below in Figure 17. Figure 17: Software Flowchart 4.1.4.1 Acquisition of Filtered Signal through DAQ Card Acquiring the filtered signal onto the PC requires a DAQ Card. We have used the NI USB 6211 for this purpose. The interfacing is done using differential mode configuration. 22 Using LabVIEW software, the signal acquired using the DAQ card can be plotted. The two waveforms seen below. The difference of voltage level occurs when the eddy current probe is moved from air to the metal. And an impulse voltage is seen due to presence of crack as seen on hardware. The DAQ Card acquires the exact signal from hardware and LabVIEW is used to replicate it on software. The running of the hardware and acquisition and plotting is done simultaneously. That is why it is called real time plotting, and illustrated in Figure 18 below. Figure 18: Real time Plot on LabVIEW 4.1.4.2 Position Sensing GUI on MATLAB Position sensing has been incorporated in the project in order to have the 2D coordinates of the location of the eddy current probe and the crack on the metal specimen. It consists of a software program on MATLAB that provides a Graphical User Interface (GUI) showing the movement of the eddy current probe. The program converts the motion of mouse in pixels on the screen into centimeters. This data after conversion is displayed on the screen as x and y coordinates. The Position Sensing GUI can be seen below in Figure 19. 23 Figure 19: Position Sensing GUI The x and y coordinates shown at the bottom left change along with the movement of the mouse. Now the eddy current probe is mounted within the mouse and hence this offers two potential advantages to the system • Provides housing for the eddy current probe which offers it protection against external electromagnetic waves • Returns the two-dimensional data of position in terms of x and y coordinates to the software These coordinates are saved as instantaneous values. The MATLAB performs the write function and returns the x-y locations at all times. 4.1.4.3 Integration of Information from MATLAB & LabVIEW The position sensing information is available on MATLAB software whereas the DAQ assistant acquiring the crack signal is available on LabVIEW. The software are integrated in order to have both the information available at one place and incorporating the crack signal data along with the position sensing data to plot it on software in real time together. For this purpose, MATLAB writes a .csv file that returns the instantaneous value of the x and y coordinates showing the current position of the eddy current probe and the mouse. This file written by MATLAB is simultaneously read through LabVIEW and then combining it with the crack signal data coming in directly to LabVIEW is integrated together and shown on an intensity plot which is explained in the next section of software. 24 4.1.4.4 Intensity Plot The intensity plot is a 2-dimensional plot that shows 3-dimensional data. The x and y coordinates along with the crack information that is the voltage of the crack signal acquired using the DAQ card. This is plotted on LabVIEW in real time by using the two different data being read by the software. It makes use of colors representing voltages from 0-5V. The user sets the voltage range of the signal that corresponds to a particular color and shows the presence of crack or non-crack. The Intensity Plot on LabVIEW can be seen below in Figure 20. The white color shows the healthy part of the specimen whereas the red/orange color indicates presence of crack or discontinuity on the part. Figure 20: Intensity Plot on LabVIEW 4.1.4.5 Data Logging on Software Data Logging is done at the end of the testing. When the program is closed, the software offers the user whether he wants to save the data or not. If chosen yes, the data is automatically saved in an excel spreadsheet or a .tdms format which is accessible by both Notepad and Microsoft Excel. This eliminates the problem of manual recording of the eddy current testing data which may be tedious and prone to human errors. Data is logged digitally in the form of data points that can be accessed later at any time and plotted for representation or even analysis. 25 4.1.5 Final Product of the PC Based Eddy Current NDT System Last but not the least the students finalized the project and fabricated all the hardware PCBs into an acrylic box and harnessed all the wires and switches etc. The harnessing was kept insulated to avoid any shocks or damages. The snapshot of the hardware can be seen below in Figure 21. Figure 21: FYP Final Product The project can also be seen connected with the PC and the DAQ card for a demo in Figure 22. Figure 22: Project demo 26 4.2 PC-Based Pipeline Inspection Gauge (PIG) The undergraduate students undertaking this project aim to design, and subsequently fabricate a Pipeline Inspection Gauge for Non-Destructive Testing (NDT) applications that uses established Magnetic Flux Leakage (MFL) testing methods. 4.2.1 Overview: Magnetism is one of the many inherent properties that we come across in our studies of physics. This property is used in many applications all over the world, with navigation using compasses just one of the many examples. To detect and differentiate strong and weak magnetic fields, many sensors have been developed, which have in turn been used for the remote measurement of other physical quantities such as Voltage, Current, Position or Velocity. With most sensors, the quantity being measured is the Magnetic Flux. The magnetic flux through a given surface is proportional to the number of magnetic field lines that pass through the surface. In general terms, the magnetic flux is a measure of the amount of magnetic field passing through a given surface, such as a conducting coil. When a magnet is placed inside a steel or metal casing, for example a pipe, the magnetic field of that magnet is enclosed by that steel casing. This means that no field escapes out of the casing. However, if there is a hole or corrosion in the pipe, the field may escape the metal casing, thus weakening the magnetic field inside the pipeline, as the flux is now ‘leaking’ through the casing. This phenomenon is shown in Figure 23 below: Figure 23: Magnetic flux escaping from a leak in a Tube Wall 27 4.2.2 Objectives: The objective of this project is to detect and identify the leakage mentioned above. Magnetic Flux Leakage (MFL) testing is a non-destructive testing method that can be used to detect this leakage. Even though such devices already exist (such as the one shown in Figure 24) and are in commercial circulation, they are not produced in Pakistan, and have to be imported from other countries, and so, are decidedly expensive. The aim of this project is to fabricate a PIG indigenously and thus, provide a low-cost alternative to companies and individuals importing pipeline inspection gadgets from companies abroad. Figure 24: A commercially designed PIG for industrial applications 4.2.3 Working: The basic principle involves the use of a powerful magnet to magnetize the steel. In areas where there may be corrosion or a deformity in the metal structure, the magnetic field "leaks" from the steel, and an MFL detection device, which has a magnetic detector placed between the poles of the magnet, detects the leaking field. The data of the leakage field is recorded, and can be later analyzed to identify damaged areas expectantly estimating the depth of metal loss. Any corrosion or pitting in steel or other metal structures, most commonly in pipelines and storage tanks, can be picked out. The software, MATLAB, allows users to log, interpret and visualize collected data in intuitive graphical representations. We hope to present the data from sensors and display them in graphical 2-D or 3-D form to easily be able to identify structural flaws in ferromagnetic pipes or sheets. 4.2.4 Design and Implementation Following sections list the specific goals in detail that we shall strive to achieve in this project: 4.2.4.1 Survey: 1. To find the sensors (Hall Effect, magnetometers, etc.) best suited to our purpose, and most readily available. 2. To ensure that if the aforementioned sensors are not available locally, they can be easily provided for. 28 3. To find out about any and all devices that use similar NDT techniques already existing in the market, their features and their cost. 4.2.4.2 Design: 1. To come up with a feasible design for an NDT device that a. Can detect magnetic flux, leaked or otherwise, with the required sensitivity, b. Is capable of surviving environments in which it is to detect magnetic flux leakage, such as highly acidic, highly basic, highly pressurized or with extreme temperatures. c. Is capable of either transmitting data in real-time or storing data locally in such a way that it can be later recovered and made use of with sufficient reliability. 2. To predict how the device will act (i.e. what kind of data it will log or transmit) in some particular circumstances, such as when it passes over a crack or a rusted part of metal. 3. To design a user interface that can be easily used to interpret all data that the device transmits or logs, i.e. either converts it into charts that can be used to detect anomalies, or points those anomalies out themselves. A typical design is shown in Figure 25 below. Figure 25: Basic Design for an MFL inspection tool with a Driver (optional) and a Recorder Package 4.2.4.3 Implementation: 1. To construct a sub-system that can detect MFL 2. To construct a sub-system that can process detected MFL 3. To construct a sub-system that lets users visualize MFL 4. To construct a sub-system that interprets the detected MFL and shows the kind of structural flaw that caused it 5. To construct the body for the system to protect it from environmental damage. 6. Integrate all sub-systems into the body for the system. 29 4.3 GWUT over WSNs As undergraduate students our goal is to design, develop and test instrumentation system for Guided Wave Ultrasonic Testing (GWUT) based Structural Health Monitoring (SHM) system over Wireless Sensor Networks (WSN). The system shall allow two separate processes to run simultaneously: Sensing and Actuation. In this quarter, we finalized the design for sensing and sampled the envelope signal successfully through wireless motes. The details for sensing circuit are presented in the subsequent sections. 4.3.1 Hardware design for Instrumentation Amplifier and Envelope Detector Different portion of the hardware were prototyped and tested in previous quarters. Finally, the design for sensing is completed. A flow chart for sensing is presented below in Figure 26. PZT Sensor Pre-Amplifier • Receives Guided Ultrasonic Wave • Generates corresponding electrical signal • Rejects commonmode noise • Amplifies extremely low level signals Envelope Detector • Forms the envelope of the signal Low Pass Filter • Filters high frequency content ADC on-board wireless mote • Samples the envelope of the signal Figure 26: Sensing flowchart for GWUT based SHM over WSN The design was captured in ECAD Software, and its PCB layout was designed considering the form factor of the wireless mote. Note that the circuit operates on a dual supply of 9V. Following sections present schematic for each block along with some important detail: 4.3.1.1 PZT Sensor Following Figure 27 shows the terminal block for attaching PZT transducer to the Sensing board designed: PZT_N J1 2 1 PZT_P 2P_ScrewTerminalBlock_5mm Figure 27: PZT coupling terminal For better signal integrity, the signals are marked differential pairs in the schematic. This helps when designing the layout in the software. The software tries to keep the difference between the lengths of the two tracks of a differential pair within a specified margin. Thus, almost no 30 differential impedance is faced by the signal. Because only changes (differential signal) are important when sensing from sensors like PZT, this remarkably increases signal integrity. 4.3.1.2 Pre-amplifier The AD620AN based instrumentation amplifier was designed to meet following requirements: 1. 2. 3. 4. 5. Stable frequency response at 200 kHz with a gain of 10V/V Undistorted output voltage swing of minimum 2V at 200 kHz Common Mode Rejection (CMR) and Power Supply Rejection (PSR) of >80dB at 50Hz Load drive capability of 1 kΩ with full output swing Very high differential and common-mode input impedance of the order of GΩ Figure 28 shows the schematic diagram for pre-amplifier. R2 12K R4 10K VCC C1 Cap Pol1 10uF C3 Cap 100nF VCC U1 AD620AN 1 PZT_N 2 PZT_P 3 7 GND 8 6 GND VSS 5 C4 Cap 100nF R7 R8 1.2K 1.2K 4 C2 Cap Pol1 10uF IAout GND GND VSS GND Figure 28: Instrumentation amplifier based pre-amplifier for sensing The capacitors connected between the supply rails are the decoupling and bypass capacitors, whose values are recommended in the device datasheet for rejecting external RF interference. The Parallel combination of R2 and R4 is used to obtain 5.45 kΩ to set the required gain of Instrumentation Amplifier (IA). The gain is set to 10 V/V using the formula from the datasheet: Ideally, the signal to be sensed should be applied directly to the inputs of IA. However, IA requires a ground return, and can’t work with floating inputs. Therefore, R7 and R8 offer balanced differential impedance to provide a ground return path for input bias current of Instrumentation Amplifier. 31 4.3.1.3 Envelope Detector An envelope detector was designed to extract the envelope from the amplified signals. A basic circuit is shown in Figure 29. Figure 29: Ideal envelope detector circuit However, for extremely small amplitude signals, it is necessary to use op-amps with the diodes in super rectifier configuration. Moreover, since the signal frequency is not very small than the carrier frequency in our case, full-wave rectification has to be employed. Therefore, our finalized circuit is shown in Figure 30. R1 10K R3 10K R9 PRectOut R10 10K 10K R11 10K VCC BAT41 D1 R6 R12 10K 6 5 B 10K 10K 2 A U2A TL082P 1 U2B TL082P 7 EnvDetOut BAT41 D2 PRectOut GND 4 3 8 IAout IAout 8 R5 VCC VSS GND 4 VSS Figure 30: Envelope detector circuit for sensing The circuit employs TL082N, a wide-band operational amplifier and BAT41 small signal schottky diodes. Schottky diodes are used because high frequency switching is desired, as discussed in previous quarters’ report. The 10 kΩ parallel combinations are used to obtain 5 kΩ resistances as per design. All resistances in this circuit should be perfectly matched to let this circuit operate as desired, which is perhaps, the only significant limitation. Though these resistances can be linearly increased to increase input impedance of the circuit, but this has been traded off with desired frequency response of the diodes. The larger the current through schottky diodes, the better frequency response they offer. 32 4.3.1.4 Low pass filter Since the envelope detector circuit discussed above merely acts as a precision full wave rectifier, low pass filtering is required to achieve the desired signal. The filtering should be active; to avoid unnecessary signal loss, and offer low output impedance to the ADC input of wireless mote. Thus, a Sallen-key low-pass filter of 2nd order is designed as shown in Figure 31 below. C5 Cap 5.6nF VCC EnvDetOut R13 1K R14 1K 3 A U3A TL082P 1 ADC_IN 4 C6 Cap 5.6nF 8 2 VSS GND Figure 31: Low pass filter for envelope filtering The filter is designed for a RC time constant of 5.6 us, which was derived by equating the maximum slew rate of the Gaussian signal (which is our primary excitation signal and expected nature of received signal) with the maximum rate of discharge of the capacitor. 4.3.1.5 PCB Design A single layer PCB was designed with similar dimensions, so that it can be stacked on the telosb mote easily. Figure 32 shows the layout design. Figure 32: PCB layout design for signal sensing and envelope detection board 33 A. Appendix A: User Manual for ANDT GUI Software Please see the User manual attached. A-1 Aerospace NDT GUI Manual | PNEC-NUST NDT Centre USER MANUAL AEROSPACE NDT GUI 1 Contents Aerospace NDT GUI Manual | PNEC-NUST NDT Centre Table of Figures…………………………………………………………………………………………………………………………..3 1. GUI Startup ....................................................................................................................................................................... 4 1.1. Eddy Current .......................................................................................................................................................... 5 1.1.1. Magnitude Button ....................................................................................................................................... 8 1.1.3. Adaptive Threshold Button .................................................................................................................... 9 1.1.2. 1.1.4. Histogram Button ....................................................................................................................................... 8 ROI Detection Button .............................................................................................................................. 10 1.1.5. Report Button............................................................................................................................................. 10 1.2.1. A Scan Button ............................................................................................................................................. 14 1.2.3. FFT button ................................................................................................................................................... 16 1.2.5. Report button ............................................................................................................................................. 18 1.2. Ultrasonic .............................................................................................................................................................. 12 1.2.2. 1.2.4. C Scan button .............................................................................................................................................. 16 STFT button ................................................................................................................................................ 17 2 Aerospace NDT GUI Manual | PNEC-NUST NDT Centre TABLE OF FIGURES Figure 1-Aerospace NDT GUI Home Screen .............................................................................................. 4 Figure 2- Target Area of Aerospace Structure .......................................................................................... 4 Figure 3-NDT Techniques ........................................................................................................................... 5 Figure 4-Eddy Current GUI ......................................................................................................................... 5 Figure 5-Select Calibration file (ET) .......................................................................................................... 6 Figure 6-Select Raw Data folder (ET) ........................................................................................................ 7 Figure 7-Activated Eddy Current GUI ........................................................................................................ 7 Figure 8-Magnitude Plot ............................................................................................................................. 8 Figure 9-Histogram Plot ............................................................................................................................. 9 Figure 10-Adaptive Threshold Plot ........................................................................................................... 9 Figure 11-Region of Interest (ROI) Plot .................................................................................................. 10 Figure 12-Save as option for ET Report .................................................................................................. 10 Figure 13-Eddy Current Report ............................................................................................................... 11 Figure 14-Ultrasonic GUI .......................................................................................................................... 12 Figure 15-Select Calibration file (UT) ...................................................................................................... 12 Figure 16-Select Raw Data Folder (UT) ................................................................................................... 13 Figure 17-Input No. of A Scans in vertical/horizontal directions ......................................................... 13 Figure 18-Activated Ultrasonic GUI ......................................................................................................... 14 Figure 19-A Scan Plot at location 1 .......................................................................................................... 14 Figure 20-Dropdown menu for selecting location (A Scan) .................................................................. 15 Figure 21-A Scan Plot at location 20 ........................................................................................................ 15 Figure 22-C Scan Plot ................................................................................................................................ 16 Figure 23-Fast Fourier Transform (FFT) Plot......................................................................................... 16 Figure 24-Dropdown menu for selecting location (FFT) ....................................................................... 17 Figure 25-STFT Plot .................................................................................................................................. 17 Figure 26-Data Cursor on STFT Plot ........................................................................................................ 18 Figure 27-Save as option for UT Report .................................................................................................. 18 Figure 28-Save as option for UT Report .................................................................................................. 19 Figure 29-Ultrasonic Report ..................................................................................................................... 19 3 Aerospace NDT GUI Manual | PNEC-NUST NDT Centre 1. GUI Startup The Aerospace NDT GUI runs on Matlab R2013a. Install the software and follow the steps given below. 1. Run the code on MATLAB. The Aerospace NDT GUI should appear on screen. The first window that will appear is the Figure 1-Aerospace NDT GUI Home Screen: Figure 1-Aerospace NDT GUI Home Screen 2. Click Start to proceed. Clicking start leads to a window which allows the user to select a target area of the aerospace structure, namely, the Fuselage, Wings or Landing Gear. The following Figure 2- Target Area of Aerospace Structure should appear after clicking on the Start button. 4 Figure 2- Target Area of Aerospace Structure Aerospace NDT GUI Manual | PNEC-NUST NDT Centre 3. Upon selection of any target area, the following window pops up, prompting the user to select between the methods of NDT through which the data has been acquired. The available Figure 3-NDT Techniques are shown below. Figure 3-NDT Techniques 4. Clicking either one of the options leads to a unique Graphical User Interface designed and coded for processing particular data. Choose the option you have used to acquire the data from a test specimen. 1.1. Eddy Current Click on eddy current to view the following Figure 4-Eddy Current GUI. Figure 4-Eddy Current GUI 5 Aerospace NDT GUI Manual | PNEC-NUST NDT Centre Initially all of the buttons for the plots would be disabled. So the first thing the user needs to do is load the calibration and data files for further processing and analysis. As evident from the figure shown above, the Calibration file &Raw Data directory buttons are given at the top right of the interface. Clicking on the Select Calibration File button opens up a window of Figure 5-Select Calibration file (ET), showing a list of calibration files in the .dat format. Figure 5-Select Calibration file (ET) One thing to keep in mind here is the order of the files being added. The high frequency files should go first and the low frequency files should follow, as indicated in the text boxes as well. For example, if the user is working on two frequencies namely 100 kHz and 200 kHz, then the first calibration file to be chosen should be that of 200 kHz. The user should select the relevant calibration file which corresponds to the operating frequency of the Eddy Current Test equipment. Select the file and click open. Next click the Select Raw Data Directory button. Another window will appear as shown in Figure 6-Select Raw Data folder (ET) from which the user can select the folder to which the data will be directed. Choose the relevant raw data file corresponding to the operating frequency. Then click Select Folder. 6 Aerospace NDT GUI Manual | PNEC-NUST NDT Centre Figure 6-Select Raw Data folder (ET) Then click on the Load button to load the selected data and to enable the other buttons. The user can now see the Figure 7-Activated Eddy Current GUI and can access the various buttons present. Figure 7-Activated Eddy Current GUI As you can see that there is a back button available on every screen that allows the user to return to previous screen or home screen whenever desired. 7 Aerospace NDT GUI Manual | PNEC-NUST NDT Centre The buttons and their functions are as stated: 1.1.1. Magnitude Button Click on the magnitude button to view the Figure 8-Magnitude Plot. The magnitude button shows the image of calibrated impedance magnitude. It is basically the mod of the resistive and inductive components of the crack signal which is plotted with indices or locations on the x-axis and number of rows on the y-axis. Figure 8-Magnitude Plot The image comprises of various colors, ranged from blue to red. Red means maximum deflection in the area from the probe and blue indicates no deflection. Deflection occurs due to the cracks, land marks and noise in the signal. The colors in between blue and red indicates the strengths of different deflected signals. 1.1.2. Histogram Button Click on the histogram button to view the Figure 9-Histogram Plot. The histogram button displays the probability distribution function of pixel values in an image in the form of a bar plot. It has voltage on the x-axis and frequency on the y-axis. It bins the elements of image into 100 equally spaced containers and returns the number of elements in each container and displays them. The height of each rectangle indicates the number of elements in the bin. For finding the region of interest, it’s essential to have an idea of the different data present. 8 Aerospace NDT GUI Manual | PNEC-NUST NDT Centre Figure 9-Histogram Plot 1.1.3. Adaptive Threshold Button Click on the Adaptive Threshold button to see the Figure 10-Adaptive Threshold Plot. Figure 10-Adaptive Threshold Plot It basically shows the processed image of the particular area in an aerospace structure. Adaptive threshold is used to remove the ill influence which typically takes a grayscale or color image as input andoutputs a binary image representing the segmentation. This means that two colors are used to represent the intensity values. The area in red is the possible effected region in an aircraft. 9 Aerospace NDT GUI Manual | PNEC-NUST NDT Centre 1.1.4. ROI Detection Button Click on the ROI detection button to view the Figure 11-Region of Interest (ROI) Plot. Figure 11-Region of Interest (ROI) Plot The ROI detection button shows the potential interested regions in the image. To find potential ROI, a morphological operation has to be performed. It uses the concepts of merging and eroding. Any two values close to one another may be merged together to form one common intensity value. Similarly any low intensity value may be eroded which may not be that significant. 1.1.5. Report Button Click on the report button to view the Figure 12-Save as option for ET Report which allows the user to save the report with desired name and at desired location. 10 Figure 12-Save as option for ET Report Aerospace NDT GUI Manual | PNEC-NUST NDT Centre Choose a name and location for your ET Report and click on save. It would then pop up Figure 13-Eddy Current Report based on the data analyzed. Figure 13-Eddy Current Report The report button displays the final report which gives adequate detail about the effected regions. It includes various parameters such as frequency, phase, magnitude etc. and classifies each region of interest as ‘defect’ or ‘non defect’. This information is represented in three different columns. The first column represents the location of potential regions in terms of rows and columns. The features such as maximum reactance, maximum magnitude, phase at 200 kHz and phase at 100 kHz are extracted from defined location. The values of the extracted features are placed in third column. Classification of the ROI is done using heuristically defined rulesand conditions and result is shown in the last column. At the end of the report, there is also an option of saving the file. On clicking save, a save as window appears that allows the user to save the report in text format with desired name and location. Another feature available is that on pressing any of the buttons, the user can not only see the plot but there is also a side panel that shows the description of each plot. 11 1.2. Aerospace NDT GUI Manual | PNEC-NUST NDT Centre Ultrasonic The same GUI allows the user to analyze the Ultrasonic data as well. Click on Ultrasonic from the home window to view the following Figure 14-Ultrasonic GUI: Figure 14-Ultrasonic GUI As evident from the figure shown above the calibration file &raw data directory need to be loaded in order to activate the Ultrasonic GUI. Click on the Select Calibration File button to open up the Figure 15-Select Calibration file (UT) as follows. This allows the user to select a “.dat” file. It has been named as Calib.dat. Select the file and click open. Figure 15-Select Calibration file (UT) 12 Aerospace NDT GUI Manual | PNEC-NUST NDT Centre Next click the Select Raw Data Directory button. Another window like the Figure 16-Select Raw Data Folder (UT) will appear from which the user can select the folder to which the data will be directed.It gives you the option of choosing a 5 by 5 data matrix or a 1 by 4 data matrix. The user should select the data matrix according to the grid division on the test specimen. For example the user clicks on 5 by 5 then the following window will appear. Then click on select folder. Figure 16-Select Raw Data Folder (UT) But before the calibration and data files can be loaded, the user needs to view Figure 17- Input No. of A Scans in vertical/horizontal directions Figure 17-Input No. of A Scans in vertical/horizontal directions 13 Aerospace NDT GUI Manual | PNEC-NUST NDT Centre These should correspond to the data files added earlier. Assume that the user used the 5 by 5 data matrix then type 5 in the rows and 5 in the column text boxes respectively, which can be seen before the load button on top right. This is shown in figure above. Once typing in the rows and columns in the respective text boxes, click on the load button to view Figure 18-Activated Ultrasonic GUI. Figure 18-Activated Ultrasonic GUI The buttons and their functions are as stated. 1.2.1. A Scan Button Click on the A Scan button to view the Figure 19-A Scan Plot at location 1: Figure 19-A Scan Plot at location 1 14 Aerospace NDT GUI Manual | PNEC-NUST NDT Centre The first plotted A scan would be that of location 1 by default. To view the A Scan at any other location, the user may simply use the dropdown menu given in the panel at the right side of the GUI. Click on the dropdown menu to view a list of all possible locations as shown in Figure 20Dropdown menu for selecting location (A Scan) Figure 20-Dropdown menu for selecting location (A Scan) An important point to note here is that once the user selects any new location from the dropdown menu, clicking on the A Scan button again is necessary. So let’s say the user wants to view the A scan of location 20. For this, first click on location 20 from the dropdown menu and then click on A Scan button to view the Figure 21-A Scan Plot at location 20 15 Figure 21-A Scan Plot at location 20 Aerospace NDT GUI Manual | PNEC-NUST NDT Centre The Amplitude Scan button gives the plot between time and amplitude. This is exactly the same plot which can be seen at the equipment screen at the time of inspection. A-Scan is the basis for all other processing of ultrasonic signals. 1.2.2. C Scan button Click on the C Scan button to view the Figure 22-C Scan Plot. Figure 22-C Scan Plot The C Scan button gives the top view of the test specimen and it is top view thickness mapping of the material which is obtained with the help of A Scans. With the help of C-Scan the user can estimate the sub surface issues which are not easily visible. 1.2.3. FFT button Click on the FFT button to view the Figure 23-Fast Fourier Transform (FFT) Plot of the loaded data. 16 Figure 23-Fast Fourier Transform (FFT) Plot Aerospace NDT GUI Manual | PNEC-NUST NDT Centre It gives the fast Fourier transform of the A scans. It is a plot between frequency and amplitude (both normalized). This also comes with a panel on the right side of the interface showing description of plot as well as the same Figure 24-Dropdown menu for selecting location (FFT) number desired. Figure 24-Dropdown menu for selecting location (FFT) Select the desired location and click on the FFT button again to view its FFT plot. 1.2.4. STFT button Click on the STFT button to view the Figure 25-STFT Plot. Figure 25-STFT Plot 17 Aerospace NDT GUI Manual | PNEC-NUST NDT Centre STFT button gives three plots which comprise of Spectrogram, A-Scan and FFT at a particular time / distance. Spectrogram is plot obtained using fixed size rectangular window. It is a plot between time (x-axis), normalized frequency values (y-axis) and amplitude of spectrogram (z-axis). Each of the plots is labeled and there is a data cursor button which allows the user to go to a specific location where frequency contents needs to be observed. Click on the data cursor button and then go to any location on the spectrogram and click there to view the changed STFT plot. Any specific location can be analyzed by using this Figure 26-Data Cursor on STFT Plot. Figure 26-Data Cursor on STFT Plot User selected location on the spectrogram is mentioned with red color circle on A-Scan plot. The frequency contents at selected position are shown in third plot which is at right bottom of the screen. In short, with the help of STFT plots we can obtain the behavior of frequency at particular time or location. 1.2.5. Report button Click on the report button to view the report. On clicking the report button, first of all the user is prompted with Figure 27-Save as option for UT Report. This allows the user to select a filename and file location of choice. It will look like this. 18 Aerospace NDT GUI Manual | PNEC-NUST NDT Centre Figure 28-Save as option for UT Report Assume a name ‘UT_Report_55’ and then click save. It would then automatically pop up the Figure 29-Ultrasonic Report. Figure 29-Ultrasonic Report 19 Aerospace NDT GUI Manual | PNEC-NUST NDT Centre The report button function basically compares the depths obtained from the calibration file and each of the data files. It shows all of the A Scans sequentially and then displays the information of defect/no defect in the next column. The last column indicates the depth of the crack on the specific A Scan. Same as in Eddy Current GUI, the Ultrasonic GUI also comes with a back button on every screen as well as a side panel showing concise description of each of the plots. 20 B. Appendix B: Resumes of hired Beta-testers SUMAYYA ABBAS [email protected] | 0333-3169426 | EDUCATION B.E. Electrical Engineering| Pakistan Navy Engineering College|3.46/4.0 F.Sc. Pre-Engineering| Bahria College Islamabad| 84.9% RESEARCH INTEREST Interested in the on-going research project ‘Development of Flaw Diagnosis & Dimensioning for the Improvement of In-country Aerospace NDT Capabilities’ as Beta Tester. INTERNSHIP EXPERIENCE PIA Engineering-Pakistan International Airlines, Karachi| Jul 22-Jul 29, 2014 Grand Sino System Integration Company Ltd. Jin Jiang, China| Jul 22-Aug 25, 2011 Hudong Zhonghua Shipbuilding (Group) Co. Ltd. Shanghai, China| Jun 20-Jul 18, 2011 TECHNICAL SKILLS NI LabVIEW v13, MATLAB Schematic & PCB Designing in Proteus Software v8.1 AutoCAD C language programming Microsft Office EXTRACURRICULAR ACTIVITIES Organized the first TED-x PNEC Organizer and host in 26th IEEE-P All Pakistan Student Research Seminar Organizer and host in NUST Discover Entrepreneurship Plan Manager and host in Career Counseling III-IV at PNEC-NUST Organized and participated in Tech-Fest PNEC B-2 M AWAIS JAVED LT CDR PAKISTAN NAVY ELECTRICAL ENGINEERING STUDENT from National University of Sciences and Technology (NUST-PNEC), Pakistan. House No.E-88/2,NORE-IV KARSAZ,Karachi. Cell: 03222659004Email:[email protected] CAREER OBJECTIVE: I am an engineer by passion and wants to live a goal oriented life.I am a keen learner with revolutionary research mind.I want to be a research engineer who will lead and gear up dreams into reality...Hopeful and ready to faceand accept engineering challenges. EDUCATIONAL QUALIFICATIONS: NUST-PNEC MS-COMM BE-Electronics NUST – PNEC CADET COLLEGE KOHAT (CCK) Currently engaged 2003 3.5 (CGPA) 2.47(CGPA) HSSC 1998 66% (Pre Engineering ) SSC 1996 80% (SCIENCE) PROFESSIONAL EXPERIENCE: Affiliated with NDT RESEARCH CENTER since last 1 year . 10 years of experience at Naval Ship electronic warfare system. 10 years of experience at Naval Ship electronic communication system. Experience and proficiency in MATLAB,SIMULINK and Agilent ADS softwares . Have preliminary Experience with zigbee motes. Proeffiecient developer of prototype of any software defined radio(opensource GNUradio ) Proefficient programmer of C++ and PYTHON. Familiar with linux enviorment. Familiar and conversent with Cognitive Radio. Course on CUDA for NVIDIA GPUs. Profficent in technical writing. Semester projects: Designing of microstrip circuit and Power Amplifier on Agilent ADS. Pattern Recognition and Classification of different communication signals Cognitive radio optimization (currently in progress) INTERESTS: Interested in Software Defined Radio design and implemenation. In playing all indoor games,going on adventures. B-3 C. Appendix C: Detailed Beta-comments 1. Issue: LOGO IMPROVEMENT Creator: Awais Javed Assignee: ASNDT Type: Enhancement Priority: Trivial Status: Resolved / Closed commit 05634b2 It is observed that subject gui has 04 logos at 04 corners of the the gui screen. it is squeezing the workspace and gives a shrinked display to settle all these logos. further making it more commercial kind of look like we have a free app from android. image quality of all logos are low and has poor resolution and making the projection of the whole software degraded. it is recommended that all logos be combined in a animated Gif to save the space in the display. submitted to development team for further evaluation. 2. Issue: Upgrading of Title/Text space and Logo Resolution Creator: Sumayya Abbas Assignee: ASNDT Type: Enhancement Priority: Trivial Status: Resolved / Closed Problem It is observed that in the top panel of the home screen, there is not enough space for the text ‘Flaw Diagnosis software’ as well as ‘2014 NDT Center, PNEC, NUST’ at the bottom and so the text looks clipped. And it gives a very blurry look to it. Moreover, the logos on the home screen seem stretched out. Remedial Action It is suggested that more space be allocated for the title and other texts on the home screen. Also check resolution of all four logos. C-4 3. Issue: Requirement of individual Label/Title on respective screens Creator: Sumayya Abbas Assignee: ASNDT Type: Minor Priority: Proposal Status: Resolved / Closed Problem No heading on the "Target Area Selection' or 'Method Select' screens. As soon as the screen appears, the user gets no immediate idea about what it is. Remedial Action It is suggested that headings be used on respective screens to make them easier to understand. There should be clear labels on each screen indicating the title of that particular screen. C-5 4. Issue: Add Error indication on entering wrong inputs in ET GUI Creator: Sumayya Abbas C-6 Assignee: ASNDT Type: Trivial Priority: Proposal Status: Resolved / Closed Problem The ET GUI initially asks for the calibration and data files in particular sequence of frequency, Low frequency follows the high frequency and then plots are generated those of high frequency. On entering wrong inputs, like changing the sequence of high and low frequency files, the plots are generated those of low frequency instead of generating an error. Remedial Action Although this thing is mentioned in the user manual that frequency order should be followed but it is suggested that an error window should appear as soon the files are added in the wrong order. 5. Issue: Correction of NUST Logo & Magnitude Button in ET Creator: Sumayya Abbas Assignee: ASNDT Type: Trivial Priority: Enhancement Status: Resolved / Closed Problem When user clicks on the magnitude button in Eddy Current GUI, the response is slow and the NUST logo shown initially turns upside down before the magnitude plot appears. Remedial Action On pressing magnitude button, the NUST logo should remain still and the magnitude plot should appear immediately like in UT GUI. C-7 6. Issue: Requirement of y-axis Label on Histogram Plot (ET) Creator: Sumayya Abbas Assignee: ASNDT Type: Trivial Priority: Enhancement Status: Resolved / Closed Problem The y-axis of the histogram plot is not labeled. Remedial Action All axes should be clearly labelled. C-8 7. Issue: Resolution of fonts needs of improvement in ASNDT-S/W Creator: Awais Javed Assignee: ASNDT Type: Trivial Priority: Enhancement Status: Resolved / Closed Resolution of fonts needs improvement in ASNDT-S/W C-9 8. Issue: Some Chinese writing on UT logo may please be erased or picture may be changed Creator: Awais Javed Assignee: ASNDT Type: Trivial Priority: Enhancement Status: Resolved / Closed Ultrasound device shown in the picture has some Chinese writings which is giving a copy paste look to the developed software. C-10 9. Issue: ASNDT S/W - ET Creator: Awais Javed Assignee: ASNDT Type: Trivial Priority: Enhancement Status: Resolved / Closed This screen shot does not give clear and conspicuous information that ET test is conducted and of either fuselage / wings / landing gear. Please add some description of the same details. Though same is encircled, but needs a little more improvement. C-11 10. Issue: ASNDT S/W -Warning Creator: Awais Javed Assignee: ASNDT Type: Minor Priority: Enhancement Status: Resolved / Closed Wrong feed of input flip out the nust logo rather generating a warning for wrong inputs C-12 11. Issue: ASNDT S/W Creator: Awais Javed Assignee: ASNDT Type: Trivial Priority: Enhancement Status: Resolved / Closed Spelling mistake may please be corrected. C-13 12. Issue: Improvement of ROI description in ET GUI Creator: Sumayya Abbas Assignee: ASNDT Type: Minor Priority: Enhancement Status: Resolved / Closed Problem The ROI Detection description, there is no information about the color codes. Since the plot is not self-explanatory, there should be concise and easy to understand description. Remedial Action Kindly incorporate clear information about what the red areas and their sizes represent. It is suggested that the description may be improved as per said problem. C-14 13. Issue: ASNDT S/W Creator: Awais Javed Assignee: ASNDT Type: Trivial Priority: Enhancement Status: Resolved / Closed A-scan description tells about amplitude and time while in graghical display it is showing depth in mm. so it may be length vs amplitude..?? C-15 14. Issue: Improvement of Report Button Creator: Sumayya Abbas Assignee: ASNDT Type: Major Priority: Task Status: Resolved / Closed Problem On pressing the report button, magnitude plot is displayed whereas on the right hand side panel, the description is that of report. Moreover, once this button is pressed, all other buttons are disabled except that of magnitude button. Remedial Action It is suggested that once the report button is pressed, there should either be no image or the image used should be relevant. C-16 15. Issue: Upgrading of Report Notepad file (ET) Creator: Sumayya Abbas Assignee: ASNDT Type: Trivial Priority: Enhancement Status: Resolved / Closed Problem In the report notepad file, misalignment of text is there. Moreover, the features are named as ‘MaxVert’ and ‘MaxMag’ etc. which are not understandable. Remedial Action Kindly give suitable and complete names. Also correct alignment of columns. C-17 16. Issue: Improve Title and Axes Labels in Plots (ET) Creator: Sumayya Abbas Assignee: ASNDT Type: Trivial Priority: Enhancement Status: Resolved / Closed Problem In general, the title and labels of axes on all plots have a small font. And so are not clear and visible. Also in magnitude plot, the x-label 'indices' is too close to the axis numbering itself. Remedial Action It is suggested that the font size of titles and labels be increased, use bold or capital letters for the title and the axis labels should be slightly far from the axis numbering. C-18 17. Issue: Upgrading of Title/Text space in UT Creator: Sumayya Abbas Assignee: ASNDT Type: Minor Priority: Enhancement Status: Resolved / Closed Problem Same issue is there as in the home screen and ET GUI. The text at the bottom '2014 NDT Center, PNEC, NUST' clips because of less space and looks blurry. Remedial Action Please allocate more space to the text so that resolution of text is improved. C-19 18. Issue: Enhancing Location dropdown menu FFT Creator: Sumayya Abbas Assignee: ASNDT Type: Trivial Priority: Task Status: Resolved / Closed Problem It is observed that if for example the user selects A Scan of location 3, then the next FFT button also indicates FFT at location 3. Remedial Action It is suggested that by default all buttons should represent plots of location 1 if possible. C-20 19. Issue: STFT Button Improvement Required Creator: Sumayya Abbas Assignee: ASNDT Type: Trivial Priority: Task Status: Resolved / Closed Problem On pressing the STFT Button, not enough description is available for each of the individual plots. Moreover, the distance indicator on the 'A Scan' and frequency content graph below it is not understandable. Remedial Action It is suggested that all plots should have a title as well as a description in the right hand side panel to make the GUI user friendly. Also incorporate something about the distance indicators. C-21 20. Issue: Improvement of Report Button and Notepad file (UT) Creator: Sumayya Abbas Assignee: ASNDT C-22 Type: Minor Priority: Task Status: Resolved / Closed Problem On pressing the report button, the image and description hangs at STFT. Also, there is misalignment of text in the UT Report file. Remedial Action As suggested for ET Report button, the UT Report button should also have a relevant image and description. And the alignment of columns in the notepad file could also be improved. C-23 C-24


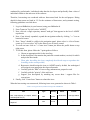
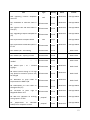

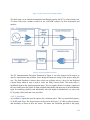


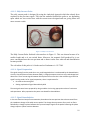
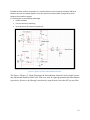


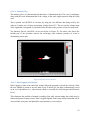
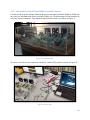

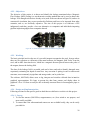


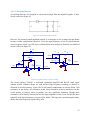
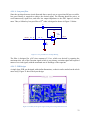


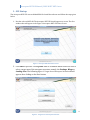
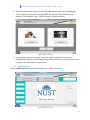


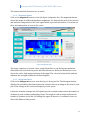


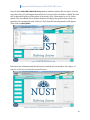


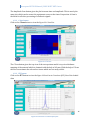

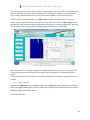
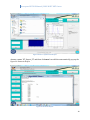


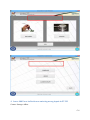


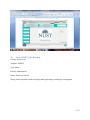


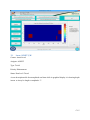


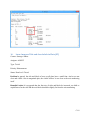

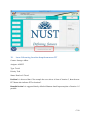


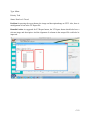


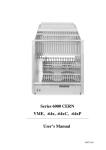
![P.[4-16] Magazine](http://vs1.manualzilla.com/store/data/006395568_1-4c967f7907004060167a4e51f9aa22d7-150x150.png)