1
AD3700
UsertsManual
ffi
RearTimeDevices,rnc
"AccessingtheAnalog World'k
ISO9001 and AS9100 Certified
AD3700
User'sManual
ffi
REALTIMEDEVICES,INC.
Drive
820 NorthUniversity
PostCIficeBox906
Pennsylvania
16804USA
StateCollege,
Phone:(814)234-8087
FAX:(814)234-5218
Publishedby
RealTime Devices,Inc.
820N. UniversityDr.
P.O.Box 906
StateCollege,PA 16804USA
Copyright@ 1991by RealTime Devices,Inc.
All righb reserved
Printedin U.S.A.
Rev.C 9239
Thbleof Contents
INTRODUCTrON.....
..............t-1
WhatComes
Application Software
cHAprER 1 -BOARD S8TTINGS.............
..........1-1
Factory-Configwed
...............1-3
SwitchandJumperSettings
P3- InputVoltageRange(FactorySetting:10V)............
...............1-3
P4 - FIFO Fulfllalf-Full Flag (FactorySetting:FIFO Full)
...........1-3
P5 - Unipolar/BipolarAnalogInput (FactorySetting:Bipolar)
......1-5
P6 - Timer/Counter2 SourceandOUT Select(FactorySettings:XTAL (!op),+5V, OUm) ......................1-5
P7 -Pacer Clock SourceSelect(FactorySetting:XTAL)
.............1-6
P8 - TCl, Counter2 Sources(Facory Settings:+5V, XTAL)
.......1-6
P9 - ExternalTrigger/ExernalGateMonitor (FactorySening:ExternalTrigger)
...................1-6
P10- BoardCompatibilitySelect(FactorySetting:Jumperon B) ...........
............1-6
Pl I - Simultaneous
Sample-and-Hold
Select(FactorySecing:NOR) ..........
.......1-7
..............1-7
Sl - BaseAddress(FactorySetting:200hex(512decimal) .................
CIIAPTER 2 -
BOARD INSTALLATION
Connecting
Boards....
Connecting
ttreTriggerIn andTriggerOut Pins,Cascading
andDigitalVO ...............
Connecting
ttreTimevCounters
Program
Runningthe3700DIAGDiagnostics
CHAPTER 3 - HARDWARE DESCRIPTION
CHAPTER 4 - BOARD OPERATION AND PROGRAMN4ING
DefiningtheI/O lvlap............
BA + 0: Digial VO (Read/lMrite)
...............
ModeSelect(ReadflVrite)................
BA + l: ChanneVConversion
RangeSelect@eadlWrite)..............
BA+2: ScanChannel
FIFO (Read/TVrite)
BA + 3: ReadStatus/Clear
(ReadAMrite)
BA + 4: ReadFIFOData/SartConversion
............2.I
...................24
..................2-5
...................2-5
3-1
...................4t
..................4-3
.......................4-4
..............4-4
............4-4
.................4-5
BA + 5: ClearDMA DoneBit (WriteOnly)...........
BA + 6: IRQ/DMA Select@eadlWrite)................
BA + 7: Clear(Reset)Board(Writeonly) ...........
BA+ 8: TCI Counter0 (Readfllyrite)
BA + 9: TCI Counter1 (Read/'tMrite)
B
_ A+
BA+
BA+
BA+
BA + 14: TC2 Counter2 (Read/Write)
...................
BA + 15: TC2 ControlWord (WriteOnly)...........
.......4-5
.......4-6
.........4-6
......4-6
......4-6
......4-7
........4-7
ClearingandSettingBits in a Port..........
ModesandChannelSelectOptions...................
Conversion
Mode$Triggering............
Conversion
ChannelSelectOptions/Scans
Timing
Startingan AID Conversion
MonitoringConversionStatus@F Flag or End-of-Convert)
........4-IL
................4-11
........4-12
................4-15
.......4-15
ReadingtheConverted
Data............
hogrammingthePacerClock ..........
...4-15
.......................4-16
WhatIs an Intemrpt?
Lines....
IntemrptRequest
IntemrptController
8259Programmable
IntemrptMaskRegister(IlvR) ..........
(EOI)Command...
End-of-Intemrpt
WhatExactlyHappensWhenan IntemrptOccurs?
UsingIntemrptsin YourPrograms...........
Writingan IntemrptServiceRoutine0SR)............
SavingtheStartupIntemrptMaskRegister(IMR) andInterruptVector.........
RestoringtheStartupIMR andIntemrptVector
CommonIntemrptMisakes
DataTransfers
UsingDMA ...........
DMA
Chmsinga
Channel.......
Allocatinga DMA Buffer
CalculatingthePageandOffsetof a Buffer
SettingtheDMA PageRegister
TheDMA Controller
DMA SingleMaskRegister
DMA ModeRegister
Programming
theDMA Controller....
Programming
theAD3700for DMA.....
Monitoringfor DMA Done...........
CommonDMA Problems
...............
......................4-18
...............4-18
............4-18
..................4-18
....................4-18
.................4-19
...........4-19
..................4-19
..................4-20
......................4-2I
...........4-2L
.....4-21
.......4-ZI
...............4-22
........4-22
......4-23
......................4-24
............4-24
......,...............4-25
..................4-25
..............4-25
......................4-26
.....................4-26
ExampleProgramsandFlow Diagrams
......4-29
tl
C andPascal
SingleConvertFlow Diagram(Figure4-I2) ............
FIFOFlow Diagram@gure4-13)
DMA Flow Diagram(Figure4-14)............
ScanFlow Diagram(Figure4-15)...........
IntemptsFlow Diagram(Figure4-16) ...........
....................4-30
.....4-31
..............4-32
................4-32
........4-32
CHAPTER 5 - CALIBRATION ........
-5 to +5 Vo1ts............
Adjustrnen8:
BipolarRange
-10to +10Vo1ts............
BipolarRangeAdjusftnents:
APPENDIX A -
AD37OOSPECIFICATIONS
........................5-6
....................5-6
.......A.1
APPENDIX B _P2 CONNECTOR PIN ASSIGNMENTS
APPENDIX C _ COMPONENT DATA SHEETS
APPBNDIX D _ CONFIGIJRING THE AD37OO
FOR SIGNAL*MATH..........
APPENDIXE - CONFIGTruNGTHE AD37OO
FORATLANTIS.......
APPENDIXF-WARRANTY
B-l
c-r
..........D-1
E-l
..............F.1
ut
lv
LIST OF ILLUSTRATIONS
1-1
t-2
1-3
r-4
1-5
r-6
t-7
1-8
r-9
l-10
1 - 1I
T.T2
2-r
2-2
2-3
3-1
3-2
4-l
4-2
4-3
44
4-5
4-6
4-7
4-8
4-9
4-10
4-tr
4-12
4-r3
4-14
4-r5
4-16
5-1
BoardLayoutShowingFactory4onfigured
Settings
InputVolage RangeJumper,P3 ................
FIFOFullf{alf-Full FlagJumper,P4 ...............
AnalogInputPolarityJumper,P5................
TC2 SourceandOUT SelectJumper,P6...............
PacerClockSourceSelectJumper,H ..............
TCl, Counter2 Sources
Jumper,P8
ExternalTrigger/ExtemalGateMonitorJumper,P9.........
BoardCompatibilitySelectJumper,P10............
Simultaneous
Sample-and-HoldAlormal
Operation
Jumper,Pl1 ..............
BaseAddress
Switch,Sl ................
GainCircuiry andFormulasfor Calculating
Gx andf ..................
n"VO ConnectorPin
Assignments
.................
AnalogInputConnections
............
Two Boardsfor Simultaneous
Cascading
Sampling
AD3700BlockDiagram
8254Programmable
IntervalTimerCircuia BlockDiagram......
Timing Diagram,SingleConvert,IntemalTrigger/DirectChannel
TimingDiagram,SingleConvert,Intemal
Trigger/Scan
Channel
TimingDiagram,Multi-Convert,Internal
Gate/Direct
Channel
TimingDiagram,Multi-Convert,Internal
Gate/Scan
Channel.......
Timing Diagram,SingleConvert,ExternalTrigger/DirectChannel
Timing Diagram,SingleConvert,ExternalTrigger/Scan
Channel
TimingDiagram,Multi-Convert,
ExternalGate/Direct
Channel
TimingDiagram,Multi-Convert,
ExternalGate/Scan
8 Channels
PacerClockBlockDiagram
8254Programmable
IntervalTimerCircuitsBlockDiagram
DigitalInputPull-upResistors......
SingleConvertFlow Diagram
FIFOFlow Diagram
DMAFlow Diagram
ScanFlow Diagram
Intemrpts
FlowDiagram.................
BoardLayoutShowingCalibration
Trimpots......
................1-4
..........1-3
.........................1-5
.........1-5
....................
1-5
........................1-6
.....................
l-6
........1-6
.......................
1-6
.........................1-7
......................1-8
................1-8
.....2-3
........................24
.................2-5
..................3-3
...................3-5
.............4-13
...............4-13
..................4-13
..............4-13
............4-14
..............4-L4
.................4-14
...............4-14
...........4-lT
.......................4-27
......................4-28
.......4-30
.......................4-31
......................4-32
...4-33
....................4-34
......................54
vt
INTRODUCTION
i-1
i-2
The AD3700 DataMasterruboardnrns your IBM PC XT/AT or compatiblecomputerinto a high-speed,highperformancedataacquisitionand control system.Insalled within a singleexpansionslot in the computer,the
AD3700 features:
.
.
.
.
.
.
.
.
.
Eight single-ended
analoginput channels,
12-bit,5 microsecond
analog-to-digital
converterwith 200kHz ttrroughput,
15, 110, or 0 o +10 volt inputrange,
Resistor-configurable
input gain,
Four conversionmodesandprogrammablechannelscanoption,
On-boardFIFO interfaceand DMA transfer,
Trigger in and trigger out for externaltriggeringor cascadingboards,
Eight digrtal input and eight digital outputlines,
Four user-configurable16-bit timer/counterswhich canbe usedto generateinterrupts,or as an eventcounfer,
a frequencycounter,a programmableone-shot,a rate generaror,or for other specialfunctions,
. BASIC, Turbo Pascal,andTurbo C sourcecode;diagnosticsprogram.
The following paragraphsbriefly describethe major functionsof the board.A moredetaileddiscussionof board
functionsis includedin Chapter3, Hardware Operatian,andChapter4, Board Operationand Progrananing.The
boardsetupis describedin Chapterl,Board Settings.
Analog-to-DigitalConversion
The analog-todigital (A/D) circuitry receivesup to eight single-endedanaloginputs andconvertstheseinputs
into l2-bit digital datawords which can thenbe readand/orransferredto PC memory.
for bipolarrangesof -5 to +5 volts or -10 to +10 volts,or a
The input volage rangeis jumper-selecable
unipolarrangeof 0 to +10 volts. It is not necessaryto recalibrateafter changingthe input rangeor polarity. The
boardis factory set for -5 to +5 volts. Overvoltageprotectionto +35 volls is providedat the inputs.
A user-configurablegain, Gx, is providedso that you cancustomizea gain for a specificapplication.Gx is set
asdescribedin Chapter1
A/D conversionsareperformedin 5 microseconds,with a maximumthroughputrate of 200 kIIz. Conversions
arecontrolledthroughsoftware,by an on-boardpacerclock, or by an externaltrigger broughtonto the board
throughthe VO connector.A first in, first out (FIFO) interfacehelpsyour computermanagethe high throughputrate
of the A/D converterby acting as an elasticstoragebin for the converteddata.Even if the computerdoesnot read
the daa asfast asconversionsare performed,conversionscancontinueuntil theFIFO is full.
The converteddatacanbe transferredto PC memoryin oneof two ways: by using the microprocessoror by
usingdirect memoryaccess(DMA). The modeof transferandDMA channelarechosenthroughsoftware.The PC
databus is usedto readand,/ortransferda[a,onebyt€ at a time, !o PC memory.In the DMA transfermode,you can
transfera selectedblock of datain a singledatadump, or you canmakecontinuoustransfersdirectly to PC memory
without going throughthe processor.
8254Timer/Counters
Two 8254programmableinterval timers,TCl and TC2, eachcontaintfuee 16-bit, 8-MlIz timer/countersto
supporta wide rangeof timing and countingfunctions.Two of ttretimer/countersin TCI are cascadedand used
internally for the pacerclock. The third is availablefor countingapplications.The threetimer/countenin TC2 are
for timing applications.
cascaded
Digital VO
The AD3700haseightinput andeightoutputTTL/CMOS-compatible
digilal lineswhich canbe directly
interfacedwittr externaldevicesor signalsto senseswitchclosures,triggerdigital events,or activatesolid-state
relays.The input lineshaveon-boardpull-upresistors.
i-3
What ComesWith Your Board
You receivethe following itemsin your AD3700 package:
. AD3700interfaceboard
. Softwareanddiagnosticsdiskettewith exampleprogramsin BASIC, TurboPascal,andTurboC; sourcecode
. IJser'smanual
If any item is missingor damaged,pleasecall Real Time Devices' CustomerServiceDepartmentat
(814)234-8087.If you requireserviceoutsidetheU.S.,coniactyour local distributor.
Board Accessories
In addition to the items includedin your AD3700 package,Real Time Devicesoffers a full line of softwareand
hardwareaccessories.
Call your local distributoror our main office for moreinformationabouttheseaccessories
and
for help in choosingthe bestitemsto supportyour board'sapplication.
Application Softwareand Drivers
Our cuslomapplicationsoftwarepackagesprovide excellentdaa acquisitionand analysissupport.Use
SIGNAL*MATH for integrateddataacquisitionand sophisticateddigital signalprocessingand analysis,or
ATLANTIS for real-timemonitoring anddataacquisition.rtdLINX and labLINX driversprovide full-featuredhigh
level interfacesbetweenthe AD3700 and customor third party sofuare, including LABTECH NOTEBOOK,
NOTEBOOI(DG, and LTICONTROL. rtdLINX sourcecodeis availablefor a one-timefee. Our PascalandC
Programmer'sToolkit providesroutineswith documentedsourcecodefor customprogamming.
Hardware Accessories
Hardwareaccessories
for the AD3700 includethe ND(32analoginput expansionboardwhich canexpanda
singleinput channelon your AD3700to 16differennalar 32 single-ended
input channels,SSH4/SSH8four- and
eight-channelsimultaneoussample-and-hold
boards,MR seriesmechanicalrelay outputboards,OP series
opbisolated digital input boards,the OR16mechanicalrelay/optoisolateddigital I/O board,the TS16 thermocouple
sensorboard,the TB50 terminalboardandXB50 prototype/terminalboardfor prototypedevelopmentand easy
signalaccess,EX-XT andEX-AT extenderboardsfor simplified testinganddebuggingof prototypecircuitry, and
the XT50 twisted pair flat ribbon cableassemblyfor externalinterfacing.
UsingThis Manual
This manualis intendedto help you install your new boardandget it running quickly, while alsoproviding
enoughdetail aboutthe boardandits functionsso that you canenjoy maximumuseof its featuresevenin the most
complexapplications.We assumethat you alreadyhavean understandingof dataacquisitionprinciplesand that you
cancustomizethe examplesoftwareor write your own applicationsprogams.
When You NeedHelp
This manualand the exampleprogramsin the softwarepackageincludedwith your boardprovide enough
informationto properly useall of the board'sfeatures.If you haveany problemsinstalling or using ttris board,
contactour TechnicalSupportDeparfinent,(814)234-8087,duringregularbusinesshours,easternstandardtime or
easterndaylighttime,or senda FAX requestingassistance
to (814)234-5218.Whensendinga FAX request,please
includeyour company'snameandaddress,your name,your telephonenumber,anda brief descriptionof the
problem.
i-4
CHAPTER 1
BOARD SETTINGS
The AD3700boardhasjumperandswitchsettingsyou can
changeif necessary
for your application.The boardis factoryconfiguredwith themostoftenusedsettings.The factorysettings
arelistedandshownon a diagramin the beginningof this chapter.
Shouldyou needto changethesesettings,usetheseeasy-to-follow
instructionsbeforeyou installthe boardin your computer.
Also notethatby installingtwo resistorsanda trimpoton the
board,you candefinethe user-configurable
gain,Gx, to be whatevervalueyour applicationmayrequire.A padfor installinga
capacitor,C51,is alsoincludedin the gaincircuitry for creatinga
low-passfilter. The procedurefor customizingGx is includedat
the endof this chapter.
1-1
Factory-ConfiguredSwitch and Jumper Settings
jumpersand swircheson the AD3700 board.
Table 1-1 lists the factory settingsof the user-configurable
Figure1-1,on thenextpage,showstheboardlayoutandthelocationsof the factory-setjumpers.The following
paragraphsexplainhow to changettrefactory settings.Pay specialattentionto the settingof Sl, ttrebaseaddress
switch,to avoidaddresscontentionwhenyou first useyour boardin your system.
Table1-l - Factorysettlngs
Swltch/
Jumper
FunctionConlrollsd
Factorys8illng
P3
Setsthe A/D inputvoltagerange
P4
Setsthe FIFOfull/FIFOhalf-fullflag
to hahA'lDconversions
whenfullorhalf-full
FIFOfull
P5
Setsthe analoginputfor unipolar
or bipolar
P6
XTAL(top),+5V,and
Sets8254TC2'sclockandgatesourcesandTIMERoutput OUTO
P7
Sets the pacer clock source
XTAL
P8
Sets8254TC1,Counter2's clockandgatesources
+5V,OUT1
P9
Selectsthe externaltriggerin or externalgatesignalto be
for monitoring
available
TRIGIN
P10
with Jumperinstalled
on
JumpersettingA setsthe3700to be fullycompatible
jumpersetting GroupB (notcompatible
earlier3700boards(scanfunctionslimited);
withearlierboards)
B providesfullboardcapability
P11
Configures
the3700for normaluseor for usewithRTD's
boards
SSHseriessimultaneous
sample-and-hold
NOR
S1
Setsthe baseaddress
300 hex(768decimal)
10volts
Bipolar
P3 - Input VoltageRange(Factory Setting: 10V)
This headerconnector,locatedin the upperright areaof the board,setsthe input voltagerangeat 10 or 20 vols.
The 10V settingis for thet5 volts and0 to +10 voltsranges;the20V settingis for the+10 volt range.Figurel-2
showsP3 with thejumper installedat 10V. You do not haveto recalibratethe board whenyou changevoltage
ranges.
P3
o
o
(\l
Fig. 1-2 -
lnput Voltage Range Jumper, P3
P4 - FIFO FulUHalf-Full Flag (Factory Setting: FIFO Full)
This headerconnector,locatedabovethe FIFO at the top of the board,is usedto halt A/D conversionswhenthe
FIFO is full (FF) or half-full (I{F). The advantageof settingtheFIFO to stopconversionswhen it is half-full is fte
assurancethat thereis room in the FIFO to storeboth bytesof the currentconversionbefore shut-off. It is possibleto
losetheLSB of a conversionwhenthejumperis setto FIFO full, sincetheFF flag signalsthatonly one8-bit slot
remainsin theFIFO to be filled andeach12-bitconversionrequirestwo 8-bit slots,onefor the MSB andonefor the
LSB. Figure1-3showsP4 with thejumperinstalledso thatconversions
arehaltedwhenthe FIFO is full.
1-3
o
o)
E
(D
U'
o
o)
f
.9)
g
o
o
I
o
t5
(U
l!
o)
.s
=
o
a
=
o
-c
(5
J
T'
(!
o
c0
I
I
.d,
LL
t4
FF HF
P4
Fig. 1-3 -
E
FIFO Full/Half-Full
FlagJumpet,P4
P5 - UnipolarlBipolar Analog Input (Factory Setting: Bipolar)
This headerconnector,shownin Figure 14, configuresthe analoginput for unipolar (0 to +10 volts) or bipolar
(t5 or t10 volts) operation.You do not haveto recalibratethe boardwhen you changepolarity.
+l+
H
P5
Fig. 1-4 - Analoglnput PolarityJumper,P5
P6 -Timer/Counter
2 Sourceand OUT Select(Factory Settings: XTAL (top), +5V, OUT0)
2's clock andgatesourcesandthe
This headerconnector,shownin Figure1-5,configurestimer/counter
selectedTIMER output to the I/O conn@torFZ42). The top two pairs of pins, XTAL andEXTCK, set the clock
sourcefor the threecascadedcountersin TC2. XTAL connectsthe countersto tle on-boards-lvfrIz clock, and
EXTCK connectsthemto an externalclock sourcebroughtonto the boardthroughthe VO connector.The +5V and
EXTGT pins connectthe counters'gateinput to +5 volts or !o an externalgatebroughtonto the boardthroughthe
I/O connector.The bottom four pins, OUT0, OUTI, OUT2, andXTAL,let you selectany one of the threecounter
outputsor the on-board5-MHz clock to be availableat the TIMER outputon the I/O connector.The timer/counters
arefurther describedin Chapters3 and4.
XTAL
EXTCK
+5V
EXTGT
ouT0
OUTl
OUT2
XTAL
Fig.1-5-TCz SourceandOUTSelectJumper,P6
1-5
P7 - PacerClock SourceSelect(Factory Setting: XTAL)
This headerconnec[or,shownin Figure 1-6,connectsthe pacerclock's clock sourceto the on-board5 MIIz
(XTAL) clock or to an externalclock appliedthroughVO connectorP2.
P7
XTAL
EXTPCK
Fig. 1-6 -
PacerClock Source SelectJumper, P7
P8 - TCl, Counter 2 Sources(Factory Settings: +5V, XTAL)
This headerconnector,shownin Figure 1-7,configuresthe clock and gatesourcesfor Counter2 in TCl. The
top two pin of pins set the gateinput for +5 volts or the externalgatesource.The botromthreepairs of pins setthe
clock sourcefor the on-boards-MHz clock (XTAL), the externalclock source(EXTCK), or the output of the pacer
clock (OUTI). Note that the externalgateandclock sourcesare the s:rmeonesconnectedto K for TC2.
P8
+5V
EXTGT
E
XTAL
EXTCK
OUTl
Fig.1-7- TC1,Counter
P8
2 Sources
Jumper,
P9 - External Trigger/External GateMonitor (Factory Setting: External Trigger)
This headerconnector,shownin Figure 1-8,lets you selecteither the externaltrigger input (P2-39)or the
externalgateinput V246) to be availablefor monitoringat bit 4 of the statusword (BA +3).
P9
TRIGIN
EXTGT
Fig. 1-8 -
ExternalTrigger/ExternalGate MonitorJumper, P9
P10- Board Compatibility Select(Factory Setting:Jumper on B)
This headerconnector,shownin Figure 1-9,allows you to maintainsoftwareand hardwarecompatibility with
earlier AD3700 boards(boardserial numbers64XXXX). By installing a jumperson the A pins (top) your new
AD3700 will be fully compatiblein dataacquisitionandcontrol systemsusing the earlierboard.However,the new
AD3700'sexpandedfeaturessuchasprogrammable
channelscancannotbe used.Whenthejumperis installed
across*re B pins (factorysetting),all new AD3700functionsareactivated,but compatibilitywith previousboardsis
lost.
A
-l;;l
Ft
*lHl
l
B
Fig.1-9- BoardCompatibility
SelectJumper,Pl0
1-6
Pll - SimultaneousSarrple-and-HoldSelect(Factory Setting:NOR)
This headerconnector,shownin Figure 1-10,configuresthe AD3700 to operatenormally, or with Real Time
board.The SSHsettingadaptsthetriggeringfor optimaluse
Devices'SSH4or SSH8simulaneoussample-and-hold
on the SSHboards.
ssH
.l
=1.
*l- |
NOR
Fig. 1-10 - SimultaneousSample-and-Hold/Normal
OperationJumper, P11
Sl - BaseAddress(Factory Setting:300 hex (768decimal))
Oneof the most commoncausesof failure whenyou arefirst trying your boardis addresscontention.Someof
your computer'sI/O spaceis alreadyoccupiedby internal VO and otherperipherals.When the AD3700 board
attemptsto useVO addrcsslocationsalreadyusedby anotherdevice,contentionresultsand the boarddoesnot work.
DIP switch,S1,which letsyou selectanyoneof 32
To avoidthisproblem,ttreAD3700hasan easilyaccessible
in the computer'sVO. Shouldthe facory seuingof 300 hex (768 decimal)be unsuitablefor your
startingaddresses
system,you can selecta different baseaddresssimply by settingthe switchesto any value shownin Table l-2.The
values.Note that
tableshowsthe switch settingsand their correspondingdecimalandhexadecimal(in parentheses)
switch 5 is the leftmost swirchand swirch I is ttrerighrnost swirchwhen looking at the componentsideof ttre
board.When the swirchesarepulled forward, they areOPEN,or setto logic l, as labeledon the DIP switch
Tabfe1-2- BaseAddressSwltchSettings,51
BaseAddres$
Declmal/(Hex)
Switch Setting
54321
BaseAddress
Declmal/(Hex)
Swltch Settlng
54321
512| (2oo)
00000
768/ (300)
10000
528| (21O)
00001
784| (3101
10001
544 | (22o)
00010
800/ (320)
10010
560/ (230)
00011
816/ (330)
10011
576| (24o)
00100
832/ (340)
10100
592| (250)
00101
848/ (350)
10101
608 / (260)
00110
10110
624| (270)
00111
s64/ (360)
e80/ (370)
01000
896/ (380)
11000
01001
912 / (390)
1 1001
01010
11010
01011
928/ (3A0)
944/ (380)
01100
960/ (3Co)
11100
720t(2Do)
01101
11101
736/(zEo)
01110
e76/ (sDo)
9e2/ (3Eo)
752| (zFo)
01111
1008/ (3F0)
11111
640| (2801
656 / (290)
672| (2AO)
688/ (2Bo)
704| (2C0)
0 = c l o s e d ,1 = o p e l l
t-7
10111
1101
11110
1
package.When you set the baseaddressfor your board,recordthe valuein the table inside the backcover.
Figure1-11showstheDIP swirchsetfor a baseaddressof 300 (decimal768) (swirch5 OPEI$.
Fig.1-11- BaseAddress
51
Switch,
Gx, User-ConfigurableGain
Gx is providedso that you can easilyconfigurea specialgain settingfor a specificapplication.Note that when
you usethis featureand set up the boardfor a gain of ottrerthan 1, all of the input channelswill operateonly at your
customgain setting.Gx is derivedby addingresistorsR2 andR3, trimpot TR4, and capacitorC5l, all locatedin the
upperright areaof the board.The resistorsand trimpot combineto set the gain, as shownin the formula in Figure 1-12.CapacitorC5l is providedso thatyou canaddlow-passfiltering in thegain circuit.If your input signalis a
slowly changingoneand you do not needto measureit at a higherrate,you may want to add a capacitorat C51 in
orderto reducethe input frequencyrangeand in turn reducethe noiseon your input signal.The formula for setring
the frequencyis given in the diagrambelow. If you install a customgain circuit, a small traceon the bottom (noncomponent)sideof theboardmustbe cut to activatethecircuit.Figure1-12showshow theGx circuitry is configured.
(cuttrace)
To calculateGx:
Gx =[(TR4+ R2)/R3]+ 1
To calculatefrequency:
f=1/[2nC51(R2+TRa)]
Fig.1-12- GainCircuitry
andFormulas
for Calculating
Gx andf
1-8
CHAPTER2
BOARD INSTALLATION
The AD3700boardis easyto installin your IBM PCIKT/AT or
compatiblecomputer.It canbeplacedin anyfull-sizedslot.This
how to installandconnectthe board.
chaptertells you step-by-step
After you haveinstalledthe boardandmadeall of your connections,you canturn your systemon andrun the 3700DIAG
boarddiagnosticsprogramincludedon your examplesoftwaredisk
to verify that your boardis working.
2-1
2-2
Board Installation
Keep the boardin its antistaticbag until you arereadyto insall it in your computer.When removingit from ttre
bag, hold the boardat the edgesand do not touchthe componentsor connectors.
Beforeinstalling the boardin your computer,checkthejumper and swirch settings.Chapter1 reviewsthe
factory settingsand how to changethem.If you needto changeany settings,refer to the appropriateinsructions in
Chapter1. Note that incompatiblejumper settingscanresultin unpredictableboardoperationand erraticresponse.
To install the board:
1. Turn OFF the power 0oyour computer.
2. Removethe top cover of the computerhousing(refer to your owner's manualif you do not alreadyknow
how to do this).
3. Selectany unusedfull-size expansionslot andremovethe slot bracket.
4. Touch the metal housingof the computerto dischargeany staticbuildup and thenremovettreboardfrom its
antistaricbag.
5. Holding the boardby its edges,orient it so that its cardedge(bus)connectorlines up with the expansionslot
connectorin the bottom of the selectedexpansionsloL
6. After carefully positioningtheboardin the expansionslot so that the card edgeconnectoris restingon the
computer'sbus connector,gently andevenlypressdown on the bard until it is securedin the slot
NOTE: Do not force the boardinto the slot. If the boarddoesnot slide into place,removeit and ry again.
Wiggling the boardor exerting[oo muchpressurecanresult in damageto the boardor to the computer.
7. After the boardis installed,securethe slot bracketback into placeandput the coverback on your computer.
The boardis now readyto be connectedvia the externalVO connectorat the rear panelof your computer.Be
sureto observethe keying whenconnectingyour externalcableto the I/O conneclor.
External VO Connections
Figure2-1 showstheAD3700'sP2 VO connectorpinout.Referto this diagramasyou makeyour I/O connections.
AIN1
ANALOGGND
AIN2
A N A L O GG N D
AIN3
A N A L O GG N D
AIN4
ANALOG GND
AI N 5
ANALOGGND
AIN6
ANALOGGND
AINT
ANALOGGND
AINs
A N A L O GG N D
ANALOGGND
A N A L O GG N D
ANALOGGND
A N A L O GG N D
ANALOGGND
ANALOG GND
otNT
DOUTT
DI N 6
DOUT6
0tNs
DOUT5
D lN,l
DOUT4
DINS
DOUT3
DIN2
DOUTz
DI N l
DOUTl
otN0
DOUTO
T R I G G E RI N
DIGITALGND
: X T P A C E RC L K
T I M E RO U T
T R I G G E RO U T
COUNTEROU'I
EXTCLK
EXT GATE
+t2 VOLTS
.r2 VOLTS
+5 VOLTS
D I G I T A LG N D
Fig.2-1- P2 VOConnector
PinAssignments
2-3
Connectingthe Analog Inputs
Connectthe high sideof the analoginput to oneof the analoginput channels,AIN1 throughAIN8, andconnect
the low sideto the selectedchannel'sdedicatedANALOG GND. Figure 2-2 showshow theseconnectionsare made.
NOTE: It is goodpracticeto connectall unusedchannelsto ground,as shownwith channel8 in the following
diagrams.Failure to do so may affect tle accuracyof your results.
3700
I/O CONNECTOR
P2
SIGNAL I
SOURCE|
+
1 ourl
(GN
a
.
MUX
a
Fig.2-2 - Analog Input Connections
Connectingthe Trigger In and Trigger Out Pins, CascadingBoards
The AD3700 boardhasan extemalrigger input (P2-39)and output e2-43) so that conversionscanbe started
basedon externalevents,or so that two or moreboardscanbe cascadedand run synchronouslyin a "master/slave"
configuration.By cascadingtwo (or more)boardsas shownin Figure2-3, they canbe triggeredto startan A/D
conversionat the sametime (samplinguncertaintyis lessthan50 nanoseconds).
When you cascadeboards,be sure
to seteachboardfor a different baseaddress(seeChapterl), or systemcontentionwill result.
NOTE: Theonly delayyou musttakeinto accountwhencascading
boardsis the time it takesfor the trigger
signalto propagatethroughthe boards.Becausethe samplinguncertaintyis lessthan 50 nanoseconds,
this should
not affect boardsoperatingat lower conversionrates.However,it may causetiming problemswhenyou operateat
higher speeds.If you want to makesureof precise,simultaneousriggering at higherspeeds,thenconnectthe trigger
signalto thetriggerinput of eachboard,or useRTD's SSH4or SSH8four- or eight-channel
simultaneous
sampleand-holdboard.
Ifyou applyan externaltriggerto theboard'striggerin pin, notethattheboardis triggeredon thepositiveedge
of thepulse.Thepulsedurationshouldbe at least50 nanoseconds.
2-4
3700
I/O CONNECTOR
P2
I
I
I
B O A R OI I
(MASTER)
T R I G G E RO U T
B O A R D1 2
(sLAvE)
! ptrugg
TRIGGER IN
Fig. 2-3 - CascadingTwo Boardsfor SimultaneousSampling
Connectingthe Timer/Countersand Digital VO
For all ofthese connections,the high sideofan externalsignalsourceor destinationdeviceis connectedto the
appropriatesignalpin on the VO connector,and the low sideis connectedto any DIGITAL GND.
Running the 3700DIAGDiagnosticsProgram
Now that your boardis readyo use,you will want to try it out. An easy-to-use,menu-drivendiagnostics
program,3700DIAG, is includedwith your examplesoftwareto help you verify your board'soperation.You can
also usethis programto makesurethat your currentbaseaddresssettingdoesnot contendwith anotherdevica.
2-5
2-6
CHAPTER 3
HARDWAREDESCRIPTION
This chapterdescribesthefeaturesof the AD37m hardware.
The major circuits arethe A/D, the timer/counters,andthe digital
VO lines.
3-r
3-2
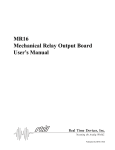
The AD3700 boardhasthreemajor circuits, the A/D, the timer/counters,and the digial VO lines. Figure 3-l
showsttreblock diagramof the board.This chapterdescribesthe hardwarewhich makesup the major circuits.
8 AAIALOOINPUTS
-5V TO asv
0 TO +10V
-10VTO +10V
I 6.E.
Fig.3-1- AD3700
BlockDiagram
A/D ConversionCircuitry
performs
TheAD3700
analog-to-digital
board
conversions
input
onuptoeightsoftrvare-selectable
analog
channels.The following paragaphsdescribetle A/D circuitry.
Analog Inputs
for -5 to +5 volts,-10 to +10 volts,or 0 to +10 volts.A userTheinput voltagerangeis jumper-selectable
configurablegain,Gx, letsyou amplify lower level signalsto morecloselymatchtheboard'sinputranges.When
3-3
you increasethe gain, the effective input rangedecreases
by the input rangedivided by the gain. You can customize
this gain settingby following the instructionsat the endof Chapterl. Overvoltageprotectionto +35 volts is
providedat the inputs.
A,/DConverter
The AD678 l2-bit successiveapproximationA/D converteraccuratelydigitizesdynamicinput voltagesin
5 microseconds,for a maximumthroughputrate of 200 kHz. The AD678 concainsa sample-and-holdamplifier, a
I2-bit AID converter,a 5-volt reference,a clock, and a digital interfaceto provide a completeA,/Dconversion
function on a singlechip. Its low-powerCMOS logic combinedwith a high-precision,low-noisedesigngive you
accurateresults.
Conversionsarecontrolledthroughsoftware(intemally triggered)or by an externalrigger broughtonto the
boardthroughthe VO conneclor.An on-boardpacerclock canbe usedto contrcl the conversionrate.Conversion
modesand channelselectoptionsaredescribedin Chapter4, Board Operatbn and Progranvning.
FIFO Interface
A first in, first out (FIFO) interfacehelps your computermanagethe high throughputrate of the A/D converter
providing
by
an elasticstoragebin for the converteddata.Even if the computerdoesnot readthe dataasfast as
conversionsareperformed,conversionswill continueuntil a FIFO full flag (or half-full flag, dependingon the
settingof thejumper at P4) is sentto stop ttreconverter.The sizeof the FIFO wasspecifiedas2K, 4K, or 8K when
you placedyow boardorder.
The FIFO doesnot need[o be addressedwhenyou are writing to or readingfrom iq internal addressingmakes
surethaf the datais properly storedandretrieved.All dataaccumulatedin the FIFO is storedinact until the PC is
ableto completethe datatransfer.Its asynchronousoperationmeansthat daa canbe wriuen to or readfrom it at any
time, at any rate.When a transferdoesbegin, the daa first placedin theFIFO is the frst dataout.
The converteddatacanbe nansfenedto PC memoryin one of two ways: throughthe PC daa bus or by using
direct memoryaccess(DMA). Databus Eansferstakemoreprocessortime to execute.They usepolling and
intemrps to determinewhen datahasbeenacquiredand is readyfor transfer.DMA placesdatadirectly into the
PC's memory,onebyteat a time,with minimaluseof processortime.DMA transfersaremanagedby theDMA
controlleras a backgroundfunction of the PC, letting you operateat higher throughputrates.
Timer/Counters
Two 8254programmable
intervaltimers,TCI andTC2,providesix 16-bit,8-MFIZtimer/counters
to supporta
wide rangeof timing andcounting functions.Two of the timer/countersin TCI arecascadedand usedfor the pacer
clock. The pacerclock is describedin Chapter4. You canusethe remainingfour timer/counters- one from TCI for
countingapplicationsandthreecascadedon TC2 for timing applications.Figure 3-2 showsthe timer/counter
circuitry.
Eachtimer/counterhastwo inputs,CLK in andGATE in, and oneoutput, timer/counterOUT. They canbe
programmedasbinary or BCD down counten by writing the appropriatodatatothe commandword, asdescribedin
Chapter4. The commandword also les you setup the modeof operation.The six programmablemodesare:
Mode0
Mode I
Mode 2
Mode 3
Mode4
Mode 5
Event Counter(Intenupt on Terminal Count)
Ilardware-RetriggerableOne-Shot
RateGenerator
SquareWave Mode
Software-TriggeredSnobe
I{ardwareTriggeredSrobe (Reriggerable)
Thesemodesaredetailedin the 8254Data Sheet,reprintedfrom Intel in AppendixC.
3-4
s MHz(XTAL)
TIIIER/COUNTER1
EXTEBNAL
PACERCL@K
PACERCLOCK
s MHz(XT L)
EXTERNAL
CLOCK
+5 VOLTS
EXTERNAL
GATE
COUNTEROUT
TIf,ER/COUNTER2
s MHr (XTAL)
+5 VOLTS
TIMEROUT
5 MHr (XTAL)
Fig.3-2- 8254Programmable
Interval
TimerCircuils
BlockDiagram
Digitat VO
Eight digital input andeight digital outputlines canbe usedto transferdatabetrveenthe computerand extemal
devices.DataEansfersthroughtle digital VO lines areindependentof otherboardfunctions.The input lines have
pull-upresistors.All 16linesareavailableat theexternalVO connector.
3-5
3-6
CHAPTER4
BOARD OPERATIONAND PROGRAMMING
This chaptershowsyou how to programanduseyour AD3700
board.It providesa completedescriptionof the VO map,a detailed
descriptionof programmingoperationsandoperatingmodes,and
flow diagramsto aid you in programming.The exampleprograms
includedon the disk in your boardpackagearelistedat theendof
this chapter.Theseprograms,writtenin TurboC, TurboPascal,
andBASIC, includesourcecodeto simplify your applications
programming.
4-l
Aa
Definingthe VO Map
The VO mapfor the AD3700is shownin Table4-l below.As shown,theboad occupies16consecutive
VO
port locations.The baseaddress(designatedas BA) canbe selectedusingDIP switch S1, locatedon the top edgeat
the rear of the board(furthestfrom VO connectorP2), asdescribedin Chapterl, Board Settings.This switch canbe
accessedwittrout removingthe boardfrom the computer.The following sectionsdescribethe registercontentsof
eachaddressusedin the VO map.
Tablert-l - AD3700l/O Map
RegisterDescription
ReadFunction
WrlteFunction
Address'
(Decimal)
Channel/Conversion
Mode Read A/D channel&
Seba
conversionmode senings
Program8 digitaloutpullines
ProgramA,/Dchannel&
conversionmode
Scan ChannelRange
Select
Fleadnumberof channelsto
be active
Programnumberof channels
in scancycle
BA+2
StatuVClear
FIFO
Readstatusword
Clear FIFO
BA+3
Read Data/Start Convert
REAdFIFO dAtA,MSB & LSB SlartA/Dconversion
ClearDMADone
Reserved
ClearDMAdonebit
BA+5
IRQ/DMASelect
Readinterrupt
& DMA
settings
Programinlerruptsource&
channelselect:DMAselect
BA+6
Clear Board
Reserved
Clear (reset)board
BA+7
TC1Counter0
(Usedfor pacerclock)
Readcount value
Load counl register
BA+8
Loadcountregister
BA+9
Loadcountregister
BA+10
Digitall/O
Read 8 digitalinput lines
TC1Counter1
(Usedfor pacerclock)
Read count value
TC1Counter2
(Available
lor externaluse) Read count value
BA+0
BA+1
BA+4
TC1 ControlWord
Reserved
Programcountermode
BA+11
TC2Counter0
Readcount value
Loadcountregister
BA+12
TC2Counter1
Readcount value
Loadcountregister
BA+13
TC2Counter2
Readcount value
Loadcountregister
BA+14
TC2ControlWord
* BA - BaseAddress
Rsserved
Programcountermode
BA+15
BA + 0: Digital VO (Read/IVrite)
Transfersthe 8-bit digital input and digial outputdatabetweenthe boardand an externaldevice.A read
transfersdatafrom the extemaldevicethroughP2 onto the boardwhereit canbe placedin usermemory;a write
transfersdatafrom the board to an externaldevice.
ln7
ln6
ln5
In4
ln3
ln2
lnl
lnO
D7
D6
D5
D4
D3
D2
D1
DO
OutT
Out6
Out5
Out4
Out3
Out2
Outl
Out0
4-3
BA + 1: ChanneUConversion
Mode Select(ReadAilrite)
Programsthe analoginput channel,A/D conversionmode,and ttrechannelselectoption. The conversionmodes
andchannelselectoptionsaredeailed later in this chapterunderProgrammingtheAD3700.D6 and D7 arenot
used.Readingthis registershowsyou thecurrentsettings.
ChannelSelectOptlon
0 = DirectChannel
1 = ScanChannel
Channel
000-1
0 0 1= 2
010=3
011=4
100=5
1 0 1= 6
=7
11O
111=8
Converslonilode
00 - SingleConvert,lnternalTrigger
01 = Multi-Convert,
InternalGate
10 = g;nn1"Convert,External
Trigger
11 = Yu[l-grnvert,External
Gate
BA+ 2t ScanChannelRangeSelect(Read/Write)
Programsthe numberof channelsto be activatedfor a scancycle. This number,coupledwith the analoginput
channelselectprogrammedat BA + 1, esfablishesthe sequencefor the channelscan.For example,if you want to do
a scanof threechannelsstartingwith channel3 (analoginput channelselecf),onecycle will convertthe input
voltagesat channels3, 4, and5.
Numberof
Channels
0000= invalid
0001= 1
0 0 1 0- 2
0 0 1 1= 3
0 1 0 0= 4
0 1 0 1= 5
0 1 1 0= 6
0 1 1 1= 7
1000= I
BA + 3: Read Status/ClearFIFO (Read/Write)
A readprovidestheeight-bitstatusword definedbelow.TheAID converterHALT Urt,D2,is setto 1, stopping
A,/Dconversionswheneverthe FIFO is full or half-full, dependingon the settingof thejumper on P4. This is ttre
only way conversionscanbe stoppedin ttreMulti-Convert modes.Dl is the FIFO full flag. This flag is setto 0
wheneverthe FIFO is full. Dt showsthe statusof eitherthe externaluigger in signal(P2-39)or the externalgate
signal(P2-46),dependingon the settingofjumper P6.
4-4
A write clearsthe FIFO (datawritten is irrelevant).When theFIFO is clearedusing BA + 3, the FIFO empties
out all data,setsthe FIFO empty flag, EF, low, and setsthe FIFO full flag high. Clearingthe FIFO also setsthe
LSBMSB flag to I so that the next byte of datareadis the MSB, and clearsthe HALT bit, enablingAID conversions.
D7
D6
D5
D4
D3
D2
D1
DMA ]D o n e l l l l l e r l n
0 = DMAnotdone
1 = DMAdone
|
(activein DMAmode
;onrv) |
|
|
|
|
|
|
I
|
|
|
I
|
|
I
|r
LSB/MSBF|ag
0 = Nextbyte
4e readis LSB
1 = Nextbyte
te readis MSB
I
I
|
|
EOCStatus
o=converting
1 = notconverting
DO
(FIFOEmptyFlag)
|
o=rr
FIFOempty
l = FFIFO
r l notempty
|
F F ( F t F o F ulFlag)
ilF
|
o=FtFofutl
I
1 = FIFOnotfull
ful
|
|
Halt
0=A,/Denabled
1=47gdisabled
(clearedwhenever
clearFIFOsent)
|
|
|
|
|
ExternalTrigger/External
Gate
Monitors
TRIGGER
lN or
EXTGATE
status,depending
on
P9jumpersetting
BA + 4: Read FIFO Data/Start Conversion(ReadAMrite)
Two successivereadsprovide the MSB andLSB of the A/D conversion,asdefinedbelow. A write startsa
conversion(datawritten is irrelevant).Note that the MSB line andLSB line toggle with eachread.Bit 6 in the
Statusword (BA + 3) showswhichbyte is nexl
MSB
LSB
D7
D6
D5
D3
D2
D1
DO
Bir11
Bir10
BitI
BitI
D4
D7
D6
D5
D4
D3
D2
D1
DO
Bir7
Bir6
Birs
Bit 4
Bit3
Bir2
Bir1
Bit 0
BA + 5: ClearDMA DoneBit (Write Only)
Writing to this addressclearstheDMA donebit at BA + 3, bit D7 (datawrittenis inelevant).This command
letsyou performcontinuousDMA dumpsof 64K from theFIFO into PC memorywittroutlosingany da[awhile
conversions
arein progress.
4-5
BA + 6: IRQ/DMA Select(Read/Write)
Programsthe intemrpt sourceandchannel,andthe DMA cransfermode.Readingthis registershowsyou the
currentsettings.
D7
D6
DMASelect
00 = disabled
01 = DRQ1(DMAChannel1)
10= DRQ3(DMAChannel3)
11= notdefined
D5
D4
D3
D2
InterruptChannelSelect
000= intsruPldisabled
001= tRQ2
010= |RQS
011* lRQ4
100= lRQs
101= lRQ6
1 1 0= | R O T
111* interrupt
disabled
D1
DO
lnterruptSource
000= haltconverter(high= A/Ddisabled)
001= HF (high= FIFOhalffull)
010= DMAdone(high- transfer
done)
011= TC2-OUT1
gate
100= externaltriggerinlexternal
101= EOC
110= TC1counlerout
111= TC2timerIRQ
BA + 7: Clear (Reset)Board (Write only)
A write to this location clears,or resets,the board(datawritten is irrelevant).This commandresetsall of the onboardregistersto 0. It also initializes the AID converterafter power-up.
BA + 8: TCl Counter 0 (Read/Write)
A readshowsthe count in the counter,anda write loadsthe counterwith a new value.Countingbeginsas soon
astlrecountis loaded.This counteris partof the32-biton-boardpacerclock (TCl counters0 and l).
BA + 9: TCl Counter1(Read/Write)
A readshowsthecountin thecounbr,anda write loadsthecounterwith a new value.Countingbeginsassoon
asthecountis loaded.This counteris partofthe 32-biton-boardpacerclock (TCl counters0 and l).
BA + 10: TCl Counter 2 (Read/Write)
A readshowsthe count in the counter,anda write loadsthe counterwith a new value.Countingbeginsas soon
as the count is loaded.This counteris user-configurablefor counterapplications.
BA + 11: TCl Control Word (Write Only)
Accessesthe TCI control registerto directly control ttrethreeTCI counters.
D7
D6
D5
D4
D3
D2
D1
DO
BCD/Binary
0 = binary
1=BCD
CounterSelect
Selec
00 = Counter0
01 = Csunlsl1
10= Counter
2
11 = readbacksetting
Read/Load
00 = latchingoperation
01 = read/loadLSB only
10 = read/loadMSB only
11 = Read/loadLSB,then MSB
CounterModeSelect
000= Mode0, eventcount
001= Mode1, programmable
1-shot
010= Mode2, rategenerator
011 = Mode3, squarewaverategenerator
100= Mode4, software-lriggered
strobe
101= Mode5, hardware-triggered
strobe
BA + 12: TC2 Counter 0 (ReadAMrite)
A readshowsthe count in the counter,anda write loadsthe counterwith a new value. Countingbeginsas soon
as the countis loaded.This counteris usedfor timer operations.
BA + 13: TC2 Counter1(Read/Write)
A readshowsthe countin the counter,anda write loadsthecounterwiti a newvalue.Countingbeginsassoon
asthecountis loaded.This counteris usedfor timer operations.
BA + 14: TC2 Counter 2 (Read/VYrite)
A readshowsthe countin the counter,and a write loadsthe counterwith a new value.Countingbeginsas soon
as the countis loaded.This counteris usedfor timer operations.
BA + 15: TC2 Control Word (Write Only)
Accessesthe TC2 control registerto directly conEol0re threeTC2 counters.
D7
D6
D5
D4
D3
D2
D1
DO
BCD/Binary
0 = binaU
1=BCD
CounterSelect
Selec
00 = Counter0
01 = Counter1
10= Counter
2
11 = readbacksetting
Read/Load
00 = latchingoperation
01 = read/load
LSBonly
10 = read/load
MSBonly
11= Read/load
LSB,thenMSB
4-7
CounterMode Select
Counter
000= Mode0, eventcount
001= Mode1, programmable
1-shot
010= Mode2, rategenerator
011 = Mode3, squarewaverategenerator
100= Mode4, software-triggered
strobe
101= Mode5, hardware-triggered
strobe
Programming the AD3700
This sectiongives you somegeneralinformationaboutprogrammingand the AD3700 board,and thenwalks
you throughthe majorAD3700programmingfunctions.Thesedescriptionswill helpyou asyou usetheexample
programsincludedwith the boardandthe programmingflow diagramsat the endof this chapter.All of the progam
descriptionsin ttris sectionusedecimalvaluesunlessotherwisespecified.
The AD3700 is programmedby writing to andreadingfrom the correctI/O port locationson the board.These
suchasBASIC,Pascal,C, and C++, and
VO portsweredefinedin theprevioussection.Most high-levellanguages
of courseassemblylanguage,makeit very easyto read/writetheseports. The tablebelow showsyou how to read
from and write to I/O ports using somepopularprogramminglanguages.
Language
BASIC
TurboC
TurboPascal
Assembly
Read
Data= INP(Address)
Write
OUTAddress,Data
Data= inportb(Address) outportb(Add
ress,Data)
Data:= Port[Address]
Port[Address]
:= Data
movdx, Address
in al,dx
movdx, Address
moval, Data
outdx,al
In additionto being able to read/writeth" VO ports on the AD3700, you mustbe able to perform a variety of
operationsthat you might not normally usein your programming.The tablebelow showsyou someof the operators
in this section,with an exampleof how eachis usedwith Pascal,C, andBASIC. Note that the modulus
discussed
operatoris usedto retrievethe leastsignificantbyte (LSB) of a two-byteword, and the integerdivision operatoris
usedto retrievethe mostsignificantbyte (MSB).
Language
Modulus
c
A=bo/oC
IntegerDivision
I
a=blc
AND
OR
&
a=b&c
a=blc
I
Pascal
MOD
a : = b M O Dc
DIV
a:=bDlVc
AND
a:=bANDc
OR
a:=bORc
BASIC
MOD
a=bMODc
\ (backslash)
a=b\c
AND
a=bANDc
OR
a=bORc
Manycompilershavefunctionsthatcanread/writeeither8 or 16bis from/toanI/O port.Forexample,
Turbo
PascalusesPort for 8-bitportoperations
andPortW for 16bits,TurboC usesinportb for an8-bitreadof a port
andinportfor a 16-bitread.Besureto useonly 8-bitoperations
with theAD3700!
Clearing and SettingBits in a Port
When you clearor set one or morebits in a port, you mustbe careful that you do not changethe statusof the
otherbits. You canpreservethe statusof all bits you do not wish to changeby properuseof the AND andOR
binary operators.Using AND and OR, singleor multiple bits canbe easilyclearedin one operation.
To clear a singlebit in a port, AND the currentvalueof the port with the valueb, whereb = 255 - 2a,.
Example: Clearbit 5 in a port.Readin tle currentvalueof theport, AND itwith223
(223 = 255 - X), and thenwrite the resultingvalue to the port. In BASIC, this is programmedas:
V = INP (PortAddress)
V:VAND223
OUT PortAddress, V
To set a singlebit in a port, OR the cunent value of the port with the valueb, whereb = 2u'.
Example: Setbit 3 in a port. Readin the currentvalueof the port, OR it with 8 (8 = 23),and then
write the resultingvalue !o theport. In Pascal,ttris is programmedas:
V := Port lPortAddress];
V := V OR 8,'
PortlPortAddressl := V;
Seaingor clearingmorethanonebit at a time is accomplishedjust aseasily.To clear multiple bits in a port,
AND the cwrent value of the port with the valueb, whereb = 255 - (the sum of the valuesof the bits to be cleared).
Note that the bits do not haveto be consecutive.
Example: Clearbits 2 ,4, and6 in a port.Readin thecurrentvalueof theport, AND it with 171
(171= 255 - 22- 2n- 2'), andthenwrite theresultingvalueto ttreport. In C, this is programmed
zts:
v : inportb (port_address) ,'
v : v & t7 I;
outportb(port_address,
v) ;
To set multiple bits in a port, OR the currentvalueof the port with the valueb, whereb = the sumof the
individual bits to be set.Note that thebits to be setdo not haveto be consecutive.
Example: Setbits 3, 5, and7 in a port.Readin thecurrentvalueof ttreport, OR it with 168
(168 = T + T + T), andthenwrite the resultingvalueback !o the port. In assemblylanguage,this
is programmedas:
mov dx,
in al-,
or aI,
out dx,
PortAddress
dx
L68
al-
Often, assigninga rangeof bits is a mixture of settingand clearingoperations.You can set or clear eachbit
individually or usea fastermettrodof first clearingall ttrebits in the rangethensettingonly thosebis ttrat mustbe
setusingthe methodshownabovefor settingmultiple bits in a port. The following exampleshowshow this twostepoperationis done.
Example: Assignbits 3, 4, and5 in a port to 101(bits 3 and5 set,bit 4 cleared).First,readin the
port andclearbits 3, 4, and5 by ANDing themwith 199. Thensetbits 3 and5 by ORingthem
with 40, and finally write the resultingvalueback to the port. In C, this is programmedas:
4-9
v : inportb (port_address) ;
v=vC199;
v=v
| 40;
outportb (port_address, v) ;
A final note: Don't be intimidatedby the binary operatorsAND and OR andtry to useoperatorsfor which you
havea betterintuition. For instance,if you are temptedto useaddidonand subraction 0osetand clearbits in place
of the methodsshownabove,DON'T! Addition and subEactionmay seemlogical, but they will not work if you try
to clear a bit that is alreadyclear or seta bit that is alreadyset.For example,you might think that to setbit 5 of a
port, you simply needto readin the port, add32 (25)to ttratvalue,and thenwrite the resultingvalue back to the port.
This works fine if bit 5 is not alreadyset.But, what happenswhenbit 5 is alreadyset?Bits 0 to 4 will be unaffected
and we can't sayfor surewhat happensto bits 6 arrd,T,butwe cansayfor surethat bit 5 endsup clearedinsteadof
being set A similar problemhappenswhen you usesubtractionto clear a bit in placeof the methodshownabove.
Now that you know how to clear and setbits, we arereadyfo look at the programmingstepsfor the AD3700
boardfunctions.
A"/DConversions
The following paragraphswalk you throughthe programmingstepsfor performingA/D conversions.Detailed
informationaboutthe conversionmodesand channelselectoptionsis presentedin this section.You can follow these
stepson the flow diagramsat ttreendof this chapterand in our exampleprogams includedwith ttrebomd. In this
BA refersto thebaseaddress.
discussion,
. Clearing the Board
It is goodpracticeto startyour programby resettingthe AD3700 board.You cando this by writing !o the
CLEAR BOARD port locatedat BA + 7. The actualvalue you write o this port is irrelevant.After writing to this
port, you shouldpauseseveralmillisecondsand thenclearthe FIFO to remove any dataplacedthereby tlre reset
process.
. Clearing the FIFO
To clearthe FIFO, write any value to the CLEAR FIFO port, locatedat BA + 3. Any datain ttreFIFO whenthis
port is wdttento is lost.
. Selectinga Channel
To selecta conversionchannelor a startingchannelfor a scanof channels,you mustassignvaluesto bits 0
tkough 2 in the CHANNEL/CONVERSIONMODE SELECTport at BA + 1. The able below showsyou how to
determinethebit settings.Notethatif you do not wantto changeothersettingsalsoprogrammedthroughBA + 1,
you mustpreservethemwhenyou setthechannel.
x
x
x
x
x
cH2 cH1 cH0
Channel
cH2
cH1
cH0
1
0
0
0
2
0
0
I
3
0
I
0
4
0
1
1
5
1
0
0
o
1
0
1
7
1
I
0
I
1
1
4-r0
BA+1
. ConversionModes and ChannelSelectOptions
The AD3700 providesseveralriggering (conversion)modesand scan(channelselect)options.Four conversion
modesand two channelselectoptionsgive you a variety of combinationsof triggering and channelselectionto meet
just aboutany samplingrequirement.This sectiondescribesthe modesandoptionsand includesa seriesof timing
diagramsat the end so that you can seehow they areimplemented.The conversionmodeand channelselectoption
aresetatportBA+1.
- ConversionModes/Triggering
Internal vs. external triggering. With internaltriggering (alsocalledsoftwareriggering), conversionsare
initiated by writing a valueto the START COI{VERT port at BA + 4 on the board.With extemaltriggering,
convenionsare initiated by applyinga high TTL signalto the externalTRIGGERIN pin V2-39). Any TTL signal
canbe usedasa nigger source.In fact, you canusethe TIMER OUt @,42) or COUNTER OUT (2-44) u a
nigger source.
Singleconverf internal trigger.In this mode,a singlespecifiedchannelis sampledwhenevera valueis
written to the START COI'il/ERT port, BA + 4. The activechannelis the one specifiedin the CIIANNEL/CONVERSION MODE SELECTport.
x
x
0
x
0
x
x
x
BA+1
This is the easiestof all riggering modes. It canbe usedin a wide variety of applications,suchas sampleevery
time a key is pressedon the keyboard,samplewith eachiterationof a loop, or watchtle systemclock and sample
everyfive seconds.Seethe SOFTIRIG sampleprogramin C andPascaland the SINGLE sampleprogramin
BASIC.
Multi-convert, internal gate.In this mode,conversions
arecontinuouslyperformedat thepacerclockrate.
Samplingis initiated from software.To usethis mode,you mustprogramthe pacerclock to run at the desiredrate
(seethe pacerclock discussionlater in this chapter).
x
x
0
x
1
x
x
x
BA+1
This is the ideal modefor filling an anay with data.Triggering is automatic,so your programis sparedthe
choreof monitoring the pacerclock to determinewhento sample.Seethe MULTI samplepro$am in C andPascal.
Single convert' external fuigger. In this mode,a singleconversionis initiated by the rising edgeof an external
rigger pulse.
x
x
1
x
0
x
x
x
BA+1
This modeis implementedwhenan externaldeviceis usedto determinewhento sample.SeettreEXTTRIG
sampleprogramin C andPascal.
4-11
Multi-convert, external gate. In this mode,channelsare sampledat thepacerclock rate. The pacerclock is
gatedon andoff by the externaltrigger line. When the externaltrigger line is held high, samplingoccursat ttle pacer
clock rate.When the line is low, samplingis halted.
x
x
1
x
1
x
x
x
BA+1
This is an ideal modewhen you want to acquiredatafor only aslong asan externaldeviceholds the trigger
high. Seethe MULTGATE sampleprogramin C andPascal.
- ChannelSelectOptiondScans
Direct channel. In this option, the channelspecifiedin the CHANNEL/COI{fERSION MODE SELECTport
is sampledeachtime a trigger is applied.
x
x
x
0
x
x
x
x
BA+1
Use the direct channeloption whenyou only needto samplefrom onechannelor if the orderof channelsto be
sampledis unknownor not consecutive.
Scanchannel. In ttris option, the channelfrom which o sampleis automaticallyincrementedafter aconversion
is complete.The scanstaflsat the channelspecifiedin the CHANNEL/COI\I/ERSION MODE SELECTport. Afrer
convertingchannel8, the AD3700returnsm channel1.
x
x
x
x
I
x
x
x
BA+1
Usethe scanchanneloptionwhenyou wantto samplefrom all eightchannelsin consecutive
order.Sincethe
channelcounteris automaticallyincremented,it is faster(andeasier)than using the direct scanoption and setting
the channelfor eachconversionfrom software.
- Timing Diagrams
Thefollowing timing diagramsshowhow eachof theeightpossibleconversionmode/channel
selectoption
combinationsareimplementedby the A,/Dconverterandassociatedcircuitry. Figures 4-l and,4-2showyou the
SingleConvert,Internal Triggermodetiming;Figures4-3 and4-4 show yotthe Multi-Convert,InternalGate mode
timing; Figures4-5 and4-6showyou theSingleConvert,ExternalTriggermodetiming; andFigures4-7 and4-8
showyou theMulti-Convert,External Gste modetiming.
4-r2
InternalTrigger
A/DTrigger
Sampled
Channel
1
1
1
1
1
1...
Fig.4-1 - TimingDiagram,SingleConvert,InternalTrigger/Direct
Channel
InternalTrigger
A/D Trigger
Sampled0hannel 1
2
3
4
5
6...
Fig.4-2- TimingDiagram,SingleConvert,InternalTrigger/Scan
Channel
InternalTrigger
PacerClock
A/DTrigger
SampledOhannel
1
1
1
1
1
1
1...
Fig.4-3- TimingDiagram,Multi-Convert,
lntemalGate/Direct
Channel
InternalTrigger
PacerClock
A/DTrigger
SampledChannel
1
7
8
Fig.4-4- TimingDiagram,Multi-Convert,
lnternalGate/Scan
Channel
4-13
1...
InternalTrigger
rrisser]n
l-l
f-l
l-'l
f''l
l--l
1
1
1
1
1
l-'l
A/DTrigger
SampledGhannel
1...
Fig.4-5 - TimingDiagram,SingleConvert,ExternalTrigger/Direct
Channel
InternalTrigger
Triggertn
A/Drrisser
SampledGhannel
n
fl
12
n
n
341
n
n
n
n
23
4
Fig.4-6 - TimingDiagram,SingleConvert,ExternalTrigger/Scan
Channel
lnternalTrigger
TriggerIn
Pacerclock
m
fl-f-1-f1-fl-fl
A/Drrisser
ffi
f]-fl-fl-flfl
Sampled
Channel
111111
11111
Fig.4-7- TimingDiagram,Mutti-Convert,
ExternalGate/Direct
Channel
lnternalTrigger
Trigger In
Pacer Clock
ffi
TLJ'LTLTLJ-I
A/D Trigger
ffi
rl-fl-fl-rl-fi
SampledChannel
1234s6
7
812
3
Fig.4-8 - TimingDiagram,Multi-Convert,
ExtemalGate/Scan
8 Channels
4-t4
FL
1...
. Starting an A/D Conversion
Whetheryou are using internaltriggers,externaltriggers,singleconvertor multi-convert,you must startthe
conversionprocessby writing to the START COI{\{ERT port at BA + 4. The value you write is irrelevant.For
singleconversionscanoptions,you must write fo this port to initiate every conversion.In the multi-conversion
modes,you needto write to ttris port only onceto startthe conversioncycle.
. Monitoring ConversionStatus(EF Flag or End-of-Convert)
The A/D conversionstatuscanbe monitoredthroughtheFIFO empty (ED flag or throughthe end-of-convert
(EOC)bit in the STATUS port at BA + 3. Typically, you will want to monitor the EF flag for a transitionfrom low
to high. This tells you that a conversionis completeand datahasbeenplacedin the FIFO. The EOC line is available
for monitoring conversionstatusin specialapplications.
. Halting Conversions
In the singleconvertmodes,a singleconversionis performedand the boardwaits for anotherSTART CONVERT command.In the multi-convertmdes, conversionsarehaltedwhenthe FIFO is full. The HALT bit, bit 2 of
the Statusword (BA + 3), is setwhen theFIFO is full, disablingthe A,/D converter.If you want to stop executionin
themiddleof a run, you cansenda CLEAR BOARD commandby writing to BA + 7. However,if you do ttris,note
that the contentsof the FIFO will be lost.
. Readingthe ConvertedData
Two successive
readsof port BA + 4 providethe MSB andLSB of the 12-bitAID conversionin theformat
definedin the VO map sectionat thebeginningof this chapter.The MSB line andLSB line toggle with eachread.
TheMSB mustalwaysbe readfint, followedby theLSB. Bit 6 of the Statusword (BA + 3) showswhich byteis
next. This bit is setwhenevera FIFO CLEAR commandis issuedso that the first byte read is the MSB.
The outputcodeand the resolutionof the conversionvary, dependingon the input voltagerangeselected.
Bipolar conversionsarein twos complementform, and unipolarconversionsarc sftaightbinary. When a bipolar
value is read,you must first converttheresult to straightbinary andthencalculatethe voltage.The conversion
formulais simple:for valuesgreaterthan2H7, you mustsubtract4096from thevalueto get thesignof the voltage.
For example,if your outputis 2048,you subtract4096: 2048- 4096= -2M8. This resultcorresponds
to -5 volts or
-10 volts,dependingon your binaryrange.For valuesof2047 or less,you simplyconverttheresult.The key digltal
codesand their input voltagevaluesaregiven for eachrangein the following threetables.
A/D BipolarCodeTable
(+5V;twoscomplement)
InputVoltage
OutputCode
+4.998vofts
M S B 0 1 1 11 1 1 1 1 1 1 1 L S B
+2.500volts
0100 0000 0000
0 volts
0000 0000 0000
-.00244volts
1 1 1 11 1 1 1 1 1 1 1
-5.000volts
1000 0000 0000
1 LSB= 2.44millivolts
4-15
A/D BlpolarCodeTable
(110v;twos complement)
InputVoltage
OutputCode
+9.995vohs
M S B 0 1 1 11 1 1 1 1 1 1 1 L S B
+5.000volts
0100 0000 0000
0 volts
0000 0000 0000
-.00488volts
1 1 1 11 1 1 1 1 ' r 1 1
-10.000
volts
1000 0000 0000
1 LSB= 4.88millivolts
A/D UnlpolarCodeTable
(0 to +10V;straightbinary)
Input Voltage
OutputCode
+9.99756
volts
M S B1 1 1 1 1 1 1 1 1 1 1 1L S B
volts
+5.00000
1000 0000 0000
0 volts
0000 0000 0000
1 LSB= 2.44millivolts
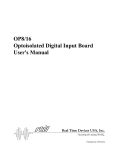
. Programmingthe PacerClock
Two 16bit timer/countersin ttre S2S4TimerlCounterTCI are cascadedto form ttreon-boardpacerclock,
shownin Figure4-9. Whenyou want!o usethepacerclockfor continuousA/D conversions,
you mustprogramthe
clock rate.To find the value you must load into the clock to producethe desiredrate, you first haveto calculatethe
value of Divider I (TCl Counter0) and Divider 2 (TCl Counter1) shownin the diagram.The formulasfor making
this calculationare asfollows:
= ClockSourcsFrequency/(Divider
Pacerclockfrequency
1 x Divider2)
Divider1 x Divider2 = ClockSourceFrequency/Pacer
ClockFrequency
To setthe pacerclock frequencyatZ0OkJIzusing the on-board5-MHz clock source,this equationbecomes:
Divider1 x Divider
2=5MHzl200kHz --> 25=5y1171200
kHz
After you det€rminethe valueof Divider I x Divider 2, you thendivide the resultby the leastcommondenominator.The leastcommondenominatoris the value that is loadedinto Divider 1, and the result of the division, the
quotient,is loadedinto Divider 2. In our exampleabove,theleastcommondenominatoris 5, so Divider I equals5,
andDivider 2 equals2515,or5 also.The able with thediagramlists somecommonpacerclock frequencies
andthe
countersettings(usingtheon-board5-MHz clock source).
After you calculatethe decimalvalue of eachdivider, you canconvertthe result to a hex value if it is easierfor
you whenloadingtle countinto ttre 16-bitcounter.
4-16
To setup the pacerclock on the AD3700, follow thesesteps:
1. Selecta clock sowce (the 5-MIIz on-boardclock or andexternalclock source).
2. ProgramTCl, Counter0 for Mode 2 operation.
3. ProgramTCl, Counter1 for Mode2 operation.
4.1-oadDivider1LSB.
5. LoadDivider 1 MSB.
6. Ioad Divider 2 LSB.
7. LnadDivider 2 MSB.
Dependingon your conversionmode,the countersstrrt their countdownand the pacerclock startsrunning
when a tigger occurs.
TC1Counter1
Divider
2
Fig.4-9- PacerClockBlockDiagram
PacerClock
Divider1
decimal/(hex)
Divider2
decimal/ (hex)
2OOkHz
s / (0005)
5 / (000s)
100 kHz
2 | (OOO2)
25 / (001e)
50 kHz
2 / (0002)
50 / (0032)
1 0k H z
2 | (0002)
2s0/ (00F4)
1 kHz
2 | (OOO2)
2500/ (09c4)
100Hz
2 | (0002)
2s000/ (61A8)
4-r7
PacerClock
. Interrupts
- What Is an Interrupt?
An intemrpt is an eventthat causesthe processorin your computerto temporarilyhalt its currentprocessand
executeanotherroutine.Upon completionof the new routine,control is retumedto the original routine at thepoint
whereits executionwas intemrpted.
Intemrptsare very handyfor dealingwith asynchronousevents(eventsthat occurat lessthanregularintervals).
Keyboardactivity is a good example;your computercannotpredict when you might pressa key and it would be a
wasteof processortime for it to do nothing while waiting for a keystroketo @cur.Thus,the intemrpt schemeis
usedandthe processorproceedswith othertasks. Then,when a keystrokedoesoccur,the keyboard'intemrpts' the
processor,and the processorgetsthe keyboarddata,placesit in memory,and thenreturnsto what it was doing
beforeit was intemrpted.Other commondevicesthat useintemrptsare modems,disk drives,and mice.
Your AD3700 boardcan intemrpt the processorwhen a variety of conditionsaremet, suchasFIFO not empty,
timer countdownfinished,and others.By using theseintemrpts,you can write softwarethat effectively dealswith
real world events.
- Interrupt RequestLines
To allow different peripheraldevicesto generateintemrptson tle samecomputer,the PC bus haseight different
interupt request(IRQ) lines. A tansition from low to high on one of theselines generatesan intemrpt request
which is handledby the PC's intemrpt confroller.The intemrpt controllerchecksto seeif intemrptsare to be
acknowledgedfrom that IRQ and,if anotherintemrpt is alreadyin progress,it decidesif the new requestshould
supersedethe one in progressor if it hasto wait until the onein progressis done.This prioritizing allows an
intemrpt to be interruptedif the secondrequesthasa higherpriority. The priority level is basedon the numberof the
IRQ; IRQ0 hasthehighestpriority, IRQI is second-highest,
andso on throughIRQ7,which hasthelowest.Many of
the IRQs are usedby the standardsystemresources.IRQOis usedby the systemtimer, IRQ1 is usedby the keyboard,IRQ3by COM2,IRQ4 by COMI, andIRQ6 by thedisk drives.Therefore,it is importantfor you to know
which IRQ lines areavailablein your systemfor useby the AD3700 board.
- 8259ProgrammableInterrupt Controller
The chip responsiblefor handlinginterruptrequestsin the PC is the 8259ProgrammableIntemrpt Controller.
To useinterrup8, you will needto know how to readand setthe 8259's intemrpt maskregister(IMR) and how to
sendtheend-of-intemrpt(EODcommandto the 8259.
- Interrupt Mask Register(IMR)
Eachbit in the intemrpt maskregister(IMR) containsthe maskstatusof an IRQ line; bit 0 is for IRQ0, bit 1 is
for IRQI, andsoon. If a bit is set (equalto 1),thenthecorresponding
IRQ is maskedandil will not generatean
intemrpL If a bit is clear (equalto 0), then the correspondingIRQ is unmaskedand cangenerateintemrps. The
IMR is programmedthroughport 21H.
IRQT tR06 IRQ5 IRQ4 IRQ3 IRQ2 IRQl
IRQO
l/OPort21H
For all bits:
(enabled)
0 = IRQunmasked
1 = IRQmasked(disabled)
- End-of-Interrupt (EOI) Command
After an intenuptserviceroutineis completed,the 8259intemrptconroller mustbe notified.This is doneby
writing the value 20H to I/O port 20H.
4-18
- What Exactly HappensWhen an Interrupt Occurs?
Understandingthe sequenceof eventswhen an intemrpt is triggeredis necessaryto proper$ write software
intemrpt handlers.Whenan intemrpt requestline is driven high by a peripheraldevice(suchas the AD3700), the
intemrpt controller checksto seeif intemrptsareenabledfor that IRQ, and thenchecksto seeif other intemrptsare
activeorrequestedand determineswhich intemrpt haspriority. The intemrpt conftoller then intemrptsthe processor. The currentcodesegment(CS), instructionpointer (IP), and flags arepushedon the stackfor storage,and a new
CS and IP are loadedfrom a able that existsin the lowest 1024bytesof memory.This table is referredto asthe
intemrpt vector table andeachentry is calledan intemrpt vector.Oncethe new CS and IP areloadedfrom the
interruptvectortable,the processorbeginsexecutingthe codelocatedat CS:IP.When the interruptroutine is
completed,the CS, IP, and flags that werepushedon the stackwhenthe intemrpt occurredarenow poppedfrom the
stackand executionresumesfrom the point whereit wasintemrpted.
- Using fnterrupts in Your Programs
Adding intemrptsto your softwareis not asdifficult asit may seem,and what they add in termsof performance
is often worth the effort. Note, however,that althoughit is not that hard to useinterrupts,the smallestmistakewill
often leadto a systomhangthat requiresa reboot.This canbe both frusrating and time-consuming.But, after a few
tries, you'll get the bugsworked out and enjoy the benefis of properly executedintemrpts.In addition to readingthe
following paragraphs,study the INTRPTS sourcecodeincludedon your AD3700 programdisk for a betterunderstandingof intemrpt programdevelopmenl
- Writing an Interrupt ServiceRoutine QSR)
The first stepin addingintemrptsto your sofhvareis to write the intemrpt serviceroutine (ISR). This is the
routine that will automaticallybe executedeachtime an intenupt rcquestoccurson the specifiedIR'Q.An ISR is
different thanstandardroutinesthat you write. First, on enFance,theprocessorregistersshouldbe pushedonto the
stackBEFORE you do anythingelse.Second,just beforeexiting your ISR, you mustwrite an end-of-interrupt
@OI) commandto the 8259intemrpt controller.Finally, whenexiting the ISR, in addition to poppingall the
registersyou pushedon enEance,you mustusethe IRET insnuctionandnot a plain RET. TheIRET automatically
popstheflags,CS,andIP tlat werepushedwhentheinlerruptwascalled.
If you find yourselfintimidatedby intemrpt programming,take heart.Most Pascaland C compilersallow you
to identify a procedure(function) asan intemrpt type andwill auomatically addtheseinstructionsto your ISR, with
one importantexception:most compilersdo not automaticallyadd the end-of-intemrptcommandto the procedure;
you mustdo this yourself.Other thanthis andthe few exceptionsdiscussedbelow, you canwrite your ISR just like
any otherroutine.It can call otherfunctionsandproceduresin yotu progftlm andit canaccessglobal data.If you are
writing your first ISR, we recommendthatyou stick to thebasics;justsomethingthatwill convinceyou thatit
works, suchas incrementinga global variable.
NOTE: If you are miting an ISR usingassmbly lang'rags,you areresponsiblefor pushingandpopping
registersandusing IRET insteadof RBT.
Thereare a few cautionsyou mustconsiderwhen writing your ISR. The most importantis, do not useany
DOS functionsor routines that call DOS functionsfrom within an ISR. DOS is not reenfrant;thatis, a DOS
function cannotcall itself. In typical programming,this will not happenbecauseof the way DOS is written. But
whataboutwhenusingintemrpts?Then,you couldhavea situationsuchasthisin your program.If DOS functionX
is beingexecutedwhenan intemrptoccursandtheintemrptroutinemakesa call to DOSfunctionX, thenfunction
X is essentiallybeing calledwhile it is alreadyactive.Sucha reentrancyattemptspellsdisasterbecauseDOS
functionsare not written to supportit. This is a complexconceptandyou do not needto understandiL Justmake
surethat you do not call any DOS functionsfrom within your ISR. The onewrinkle is that, unfortunately,it is not
obviouswhich library routinesincludedwith your compiler useDOS functions.A rule of thumbis that routines
which write to the screen,or checkthe statusof or readthe keyboard,andany disk I/O routinesuseDOS and should
be avoidedin your ISR.
The sameproblemof reenftancyexistsfor manyfloating point emulatorsaswell, meaningyou may haveto
avoid floating point (real) math in your ISR.
4-19
Note that the problemof reenftancyexists,no matterwhat programminglang"ageyou areusing.Even if you
arewriting your ISR in assemblylanguage,DOS and manyfloating point emulatorsarenot reentrant.Of course,
thereare waysaroundthis problem,suchas thosewhich involve checkingto seeif any DOS functionsare currently
activewhenyour ISR is called,but suchsolutionsarewell beyondthe scopeofthis discussion.
The secondmajor concemwhen writing your ISR is to makeit as short aspossiblein termsof executiontime.
Spendinglong periodsof time in your tSR may meanthat otherimportantintenupts arebeing ignored.Also, if you
spendtoo long in your ISR, it may be calledagainbeforeyou havecompletedhandlingthe first run. This often leads
to a hangthat requiresa reboot.
Your ISR shouldhavethis structure:
. Pushany processorregistersusedin your ISR. Most C andPascalintemrpt routinesautomaticallydo this for
you.
. Put the body of your routine here.
. Issuethe EOI commandto the 8259intemrpt controllerby writing ?f,Hw port 20H.
. Pop all registerspushedon entrance.Most C and Pascalintemrpt rcutinesautomaticallydo ttris for you.
The following C andPascalexamplesshow what the shell of your ISR shouldbe like:
In C:
void interrupt
ISR(void)
{
/* Your code goes here.
outportb(0x20,
0x201;
)
Do not
use any DOS functions ! * /
/* Send EOf corunand to 8259 */
In Pascal:
Procedure ISR; Interrupt;
begin
i Your code goes here.
Port[$20]
:: $20;
Do not
use any DOS functions ! )
{ Send EOI command to 8259 }
end,'
- Savingthe Startup Interrupt Mask Register{IMR) and Interrupt Vector
The next stepafter writing the ISR is to savettre startupstateof ttreintemrpt maskregisterand the intemrpt
vector that you will be using.The IMR is locatedatllOpo*2tH. The intemrpt vector you will be using is located
in the intemrpt veclor table which is simply an aray of 256-bit (a-byte)pointersand is locatedin the first 1024
bytesof memory(Segment= 0, Offset = 0). You canreadthis valuedirectly, but it is a betterpracticeto useDOS
function 35H (get intemrpt vector).Most C andPascalcompilersprovide a library routine for readingthe value of a
vector.The vectorsfor the hardwareintemrp6 arevectors8 through 15,whereIRQ0 usesveclor 8, IRQI uses
vector9, andsoon. Thus,if ttreAD3700will be usingIRQ3,you shouldsavethevalueof intemrptvector11.
Beforeyou install your ISR, temporarilymaskout the IRQ you will be using.This preventsthe IRQ from
requestingan interrupt while you areinsalling and initializing your ISR. To maskttreIRQ, read in the currentIMR
atVO port 2lH and set the bit that correspondsto your IRQ (remember,settinga bit disablesintemrptson that IRQ
while clearinga bit enablesthem).The IMR is anangedso that bit 0 is for IRQ0, bit 1 is for IRQI, and so on. See
the paragraphentttJedlnterruptMaskRegister(IMR) earlier in this chapterfor help in determiningyour IRQ's bit.
After settingthe bit, write the new value to I/O port 21H.
With the startupIMR savedand the intemrptson your IRQ temporarilydisabled,you can assignthe intemrpt
vector to point to your ISR. Again, you can overwrite the appropriateentry in the vector table with a direct memory
wrife, but this is a badpractice.Instead,useeither DOS function 25H (setintemrpt vector) or, if your compiler
providesit, the library routine for settingan intemrpt vector.Rememberthat vector 8 is for IRQ0, vector 9 is for
IRQI, andsoon.
4-20
If you needto programthe sourceof your interrupts,do ttratnext.For example,if you are using the programmableinterval timer to generateintemrpts,you mustprogramit to run in the propermodeand at the properrate.
Finally, clearthe bit in the IMR for the IRQ you areusing.This enablesinterruptson the IRQ.
- Restoringthe Startup IMR and Interrupt Vector
Beforeexiting your proglam, you mustreslorethe intemrpt maskregisterandintemrpt vectorsto the statethey
werein when your pro$am started.To restorethe IMR, write the value that was savedwhen your programstarted
to I/O port 21H. Restorettreintemrpt vectorthat was savedat sartup with eitherDOS function 35H (get intemrpt
vector),or usethe library routine suppliedwith your compiler.Performingthesetwo stepswill guarant€ethat ttre
interrupt statusof your computeris the sameafter runningyour progmmasit wasbeforeyour programstafted
running.
- CommonInterrupt Mistakes
. Rememberttrat hardwareinterruptsarenumbered8 tlnough 15,eventhoughthe correspondingIRQs are
numbered0 through7.
. One of the most commonmistakeswhen writing an ISR is forgetting to issuethe EOI commandto the 8259
intemrpt controllerbeforeexiting the ISR.
. Data TransfersUsing DMA
Direct Memory Access(DMA) transfersdatabetweena peripheraldeviceandPC memorywittrout usingthe
processorasan intermediate.Bypassingthe processorin this way allows very fast transferrates.All PCscontainthe
necessaryhardwarecomponentsfor accomplishingDMA. However,sofhparesupportfor DMA is not includedas
part of the BIOS or DOS, leavingyou with ttretaskof programmingthe DMA controller yourself.With a little care,
suchprogrammingcanbe successfullyand efficiently achieved.
The following discussionis basedon using the DMA controllerto get datafrom a peripheraldeviceand write it
to memory.The oppositecan alsobe done;the DMA controllercanreaddatafrom memoryand passit lo a peripheral device.Therearea few minor differences,mostly concerningprogrammingthe DMA controller,but in general
theprocessis tle same.
The following stepsarerequiredwhen usingDMA:
1.
2.
3.
4.
5.
6.
7.
8.
Choosea DMA channel.
Allocate a buffer.
Calculatethepageandoffsetof thebuffer.
Setthe DMA pageregister.
Programthe DMA controller.
Programthe devicegeneratingdata(AD3700).
Waituntil DMA is complete.
DisableDMA.
Eachstepis deailed in the following paragraphs.
- Choosinga DMA Channel
Therearea numberof DMA channelsavailableon the PC for useby peripheraldevices.The AD3700 can use
eitherDMA channelI or DMA channel3. You canarbitarily chooseone or the other; in mostcaseseither choiceis
fine. Occasionallythough,you will haveanotherperipheraldevice(for example,a iapebackupor Bernoulli drive)
that also usesthe DMA channelyou haveselected.This will certainly causeerraticresultsandcanbe hard to detect.
The bestapproachto pinpoint this problemis to readthe documen&ation
for the otherperipheraldevicesin your
computerandtry to determinewhich DMA channeleachuses.
4.21
- Allocating a DMA Buffer
When using DMA, you musthavea location in memorywherethe DMA controller will placedatafrom the
AD3700 board.This buffer can be either staticor dynamicallyallocated.Justbe surettratits location will not change
while DMA is in progress.The following codeexamplesshowhow to allocatebuffers for usewith DMA.
In Pascal:
Var Buffer
: Array[1..10000]
of
-or: ^Byte;
Var Buffer
Buffer
::
{ static
al-location
}
{dynamic
allocation
}
G e t M e m ( 1 0 0 0 0 );
In C:
char Buffer [10000] ;
-or-
char
*Bufferi
Buffer
allocation
/*
static
/*
dynamic
all-ocation
*/
*/
= call-oc (10000, 0) ;
In BASIC:
D r r " l B U F F E R S( 5 0 0 0 )
- Calculatingthe Pageand Offset of a Buffer
Onceyou havea buffer into which to placeyour data,you mustinform the DMA controller of the location of
this buffer. This is a little morecomplexthanit soundsbecausethe DMA conholler usesa page:offsetmemory
scheme,while you areprobablyusedto thinking aboutyour computer'smemoryin termsof a segment:offset
scheme.Pagedmemoryis simplymemorythatoccupiescontiguous,
non-overlappingblocksof memory,with each
block being 64K (onepage)in length.The first page(page0) startsat the first byte of memory,the secondpage
(page1) startsat byt€ 65536,the third page(page2) atbyte 131072,and so on. A computerwith 640K of memory
hasl0pages of memory.
The DMA controller can write to (or readfrom) only onepagewittrout beingreprogrammed.This meansthat
the DMA controller hasaccessto only 64K of memoryat a time. If you programit to usepage3, it cannotuseany
otherpageuntil you reprogxamit to do so.
When DMA is started,the DMA confrolleris programmedto place datAata specifiedoffset into a specified
page(for example,startwriting at byte 5I2 of pge 3). Eachtime a byte of datais written by the conftoller, the
offset is automaticallyincrementedso the next byte will be placedin the next memorylocation.The problemfor
you whenprogrammingthesevaluesis figuring out what the correspondingpageandoffset arefor your buffer.
Most compilerscontainmacrosor functionsthat allow you !o directly determinethe segmentand offset of a data
slructure,but not the pageand offset. Therefore,you mustcalculatethepagenumberandoffset yourself.Probably
the most intuitive way of doing this is to convertthe segmenroffsetaddressof your buffer to a linear addressand
thenconvertthat linear addressto a page:offsetaddress.The tablebelow showsfunctions/macrosfor determining
the segmentand offset of a buffer.
Language
c
Pascal
BASIC
Segment
FP_SEG
s = FP_SEG(&Buffer)
seg
S :=Seg(Buffer)
Olfset
FP_OFF
o = FP_OFF(&Buffer)
Ofs
O :=Ofs(Bufte0
VARSEG
VARPTR
s = VARSEG(BUFFER) o = VARPTR(BUFFER)
Aaa
Onceyou've determinedthe segmentand offset, multiply the segmentby 16 andadd the offset to give you the
linear address.(Make sureyou storethis result in a long integer,or DWORD, or the resultswill be meaningless.)
The pagenumberis the quotientof the division of the linear addressby 65536and the offset into the pageis the
remainderof thatdivision. Below aresomeprogrammingexamplesforPascal,C, andBASIC.
In Pascal:
Segment := SEG(Buffer),'
Offset := OFS(Buffer),'
Li-near Address := Segrnent * 15 + Offset,'
Page := LinearAddress
DIV 65536,'
PageOffset
::
LinearAddress
MOD 65536;
get segment of buffer
)
get offset
of buffer
}
calculate
a linear
address }
deterrnine page corresponding
to this
address )
offset
into the page }
{ determine
i
{
{
{
In C:
segrnent : FP_SEG(&Buffer),'
- FP_OFS(&Buffer) ;
offset
= segnpnt * 16 + offset;
linear_address
page = linear
address ,/ 65536;
page_offset
:
linear_address
% 65536;
/*
/*
/*
/*
/*
*,/
ge|. seqr€nt of buffer
*/
geL offset
of buffer
calculate
a li-near address */
page corresponding
to this
determine
address */
deterrnine offset
into the page */
linear
In BASIC:
s = VARSEG(BUEEER)
O = VARPTR(BUFT'ER)
LA=S*15+O
PAGE=INT(LA/6s5361
POFF : LA - (PAGE 't 55536)
The DMA controller cannotwrite properly to
Beware! Thereis onebig catchwhen usingpage-based
addresses.
a buffer that 'straddles'a pageboundary.A buffer sEaddlesa pageboundaryif onepart of the buffer residesin one
pageof memory\ilhile anotherpart residesin the following page.The DMA controller cannotproperly write to such
a buffer becausethe DMA controller canonly write to onepagewithout reprogamming.When it reachesthe end of
the currentpage,it doesnot staft writing to the next page.Instead,it startswriting back at the first byte of the
currentpage.This can be disastous if the beginningof thepagedoesnot correspondto your buffer. More often than
not, this locationis being usedby the codeportion of your pro$am or the operatingsystem,and writing da0ato it
almostalwayscausesbizane behaviorand an eventualsystemcrash.
You mustcheckto seeif your buffer sraddlesa pageboundaryand,if it does,takeaction to preventthe DMA
controllerfrom trying to wdte to the portion that continueson the next pageYou canreducethe sizeof the buffer or
try to repositionthe buffer. However,this canbe difficult when using large staticdatastructures,andoften, the only
solutionis to usedynamicallyallocatedmemory.
- Settingthe DMA PageRegister
Oddly enough,you do not inform the DMA controllerdirectly of the pageto be used.Instead,you put the page
to be usedinto the DMA pageregisterwhich is separatefrom the DMA connoller, as shownin the tablebelow. The
location of this registerdependson the DMA channelbeing used.
DMAChannel
Locationof PageRegister
1
83(131
)
3
82(130)
4-23
- The DMA Controller
The DMA controlleris a complexchip thatoccupiesthefirst 16bytesof thePC's t/O port space.A complete
discussionon how it operatesis beyondthe scopeof this manual;only relevantinformationis includedhere.The
DMA connolleris programmedby writing to the DMA registersin your PC.The tablebelowlists theseregisters.
Notethatwhenyou write 16-bitvaluesto anyof theseregisters(suchasto theCountregisters),you mustwrite the
LSB frst, followedby the MSB.
RegisterDescriptlon
Addresshex/(decimal)
02/(02)
Channel1 PageOffset(write2 bytes,LSBfirst)
o3(03)
Channel1 Count(write2 bytes,LSBfirst)
o6(06)
Channel3 PageOffset(write2 bytes,LSBfirst)
07t(07')
Channel3Count(write2 bytes,LSBlirst)
otu(10)
SingleMaskRegister
oB(11)
(writeonly)
ModeRegister
oct(12)
(writeonly)
ClearBytePointerFlip-Flop
If you areusingDMA channell, write your pageoffsetandcountto ports02H and03H; if you areusing
channel3, write yourpageoffsetandcountto ports06H and07H.The pageoffsetis simply theoffsetthatyou
calculatedfor your buffer (seediscussionabove).Countindicatesthenumberof bytesthatyou want theDMA
controllerto transfer.Rememberthateachdigitizedsamplefrom the AD3700consistsof 2 bytes,so thecountthat
you write to theDMA controllershouldbe equalto (thenumberof samplesx 2) - 1. The singlemaskregisterand
moderegisteraredescribedbelow.The clearbytepointersetsan internalflip-flop on the DMA controllerthatkeeps
trackof whethertheLSB or MSB will be sentnextto registersthatacceptbothLSB andMSB. Ordinarily,you
neverneedto write to this port,but it is a goodhabitto do so beforeprogrammingtheDMA controller.Writing any
valueto thisport clearsthe flip-flop.
- DMA SingleMask Register
The DMA singlemaskregisteris usedto enableor disableDMA on a specifiedDMA channel.You should
mask(disable)DMA on the DMA channelyou will be usingwhile programmingtheDMA controller.After the
andtheAD3700hasbeenprogrammedto sampleda[a,you canenableDMA
DMA connollerhasbeenprogrammed
by clearingthemaskbit for theDMA channelyou areusing.You shouldmanuallydisableDMA by settingthe
maskbit beforeexitingyour programor, if for somereason,samplingis haltedbeforetheDMA controllerhas
transfenedall thedatr it wasprogrammedto transfer.If you leaveDMA enabledandit hasnot transfenedall the
datait wasprogrammedto transfer,it will resumetransfersthenexttime dataappearsin theAD3700FIFO.This
canspelldisasterif your programhasendedandttrebuffer hasbeenreallocatedto anotherapplication.
l/O PortOAH
Channel Selecl
MaskBit
00 = Channel0
0 = unmask 01 = Channel1
1 = mask
10= Channel
2
1 1= C h a n n e l 3
A aA
a-La
- DMA Mode Register
The DMA moderegisteris usedto setparametersfor the DMA channelyou will be using.The read/writBbits
are self explanatory;the readmodecannotbe usedwith the AD3700. Auoinitialization allows the DMA controller
to automaticallystartover onceit hastransferredthe requestednumberof bytes.Decrementmeansthe DMA
controller shoulddecrementits offset counterafter eachtransfer;the default is increment.We recommendthat you
useeither the demandor single transfermodewhentransferringdaa. The demandmodetransfersdatato ttrePC on
demand.The singletransfermodeforcesthe DMA controller to relinquisheveryother cycle so ttr,atttreprocessor
can takecareof other tasks.We recommendthat you do not usethe block modesinceit can tie up the processorand
interferewith systemoperation.
1/OPortOBH
TransferMode
Autoinltlallzatlon
00 = demand
=
01 - singletransfer 0 disable
= enable
1
10 = block
11 = cascade
Offset Counter
0 = increment
1 = decrement
ChannelS€lect
00 = Ghannel0
01 - Channel1
10= Channel
2
11= Channel
3
ReadA/l/rite
01 - write
10 = read(notusedwithAD3700)
- Programming the DMA Controller
To programthe DMA controller,follow thasesteps:
1. Clear the byte pointer flip-flop.
2. DisableDMA on thechannelyou areusing.
3. Write the DMA moderegisterto choosethe DMA parameters.
4. Write the LSB of the pageoffset of your buffer.
5. Write the MSB of the pageoffset of your buffer.
6. Write the LSB of the numberof bytesto transfer.
7. Write the MSB of the numberof bytesto fransfer.
8. EnableDMA on the channelyou areusing.
- Programming the AD3700for DMA
Onceyou haveset up the DMA controller,you mustprogam the AD3700 for DMA. The following stepslist
this procedure:
1. Setthe DMA channelbits in the IRQ DMA register.
2. Setthe channelscanmode.
3. Setthe riggering mode.
4. Programthe pacerclock (if appropriate).
5. Startconversions.
6. Monitor theDMA donebit.
NOTE: If the DMA is set up in the singletransfermode,eachDMA ransfer will take two readcyclesto
complete.Therefore,whenyou run the AD3700 at200kJlz in thismode,theDMA transferratecannotkeepup with
the board'sconversionrate. Singletransferswill run with theboardup to about 120kl{z. Above l20l<Ilz, theFIFO
canbe usedas a storagebin for the converteddatauntil the DMA can uansferit to PC memoryor the demandmode
canbe used.
4-25
- Monitoring for DMA Done
Thereare two waysto monitor for DMA done.The easiestis to poll the DMA donebit in the AD3700 status
register(BA + 3). While DMA is in progress,thebit is clear(0). WhenDMA is complete,thebit is set(1). The
secondway to checkis to usethe DMA donesignalto generat€an intemrpt. An intemrpt can immediatelynotify
your progam that DMA is doneandany actionscanbe takenasneeded.Both methodsaredemonstratedin the
sampleC andPascalprogfirms,the polling methodin the programnamedDMA and the intemrpt methodin
DMASTR.
- CommonDMA Problems
. ldake surethat your buffer is largeenoughto hold all of the daa you prognm the DMA controller to transfer.
. Checkto be surethat your buffer doesnot sfraddlea pageboundary.
. Rememberthat the numberof bytesfonttreDMA controllerto transferis equalto twice the numberof
samples.This is becauseeachsampleis npo bytesin size.
. If you terminatesamplingbeforethe DMA controllerhasransferred the numberof bytesit wasprogrammed
for, be sureto disableDMA by settingthe maskbit in the singlemaskregister.
Timer/Counters
Two 8254programmableinterval timers,TCl andTC2, eachprovide three 16-bit,8-MI{z timer/countenfor
timing and countingfunctionssuchas frequencymeasurement,
eventcounting,andinterrupts.Two of the timer/
countersin TCl arecascadedand usedfor the pacerclock, discussedearlier in this chapter.The remainingfour
timer/counters,
Counter2inTCl andCounters0, l, and2,casc&edon TC2, areavailablefor your use.Figure4-10
showsthe timer/countercircuitry.
Eachtimer/counterhasnvo inputs,CLK in andGATE in, and oneoutput, timer/counterOUT. They canbe
programmedasbinary or BCD down countersby writing the appropriatedatato the commandword, asdescribedin
the VO mapsectionat the beginningof this chapter.
Oneof two clock sources,the on-board5-MIIz crystal or the extemalclock (P245), canbe jumperedasthe
clock input to TCl, Counter2 andlorTC2's timer/counters.
The clock sourcefor thepacerclock is jumper-selectpacer
(P2-41).
The diagramshowshow theseclock sourcesareconnectedto
able for 5 MlIz or the external
clock
the timer/counters.
Two gatesourcesareavailablefor enablingthe timer/counters:a +5 volt soruceand an externalgatesource
V246). The sameexternalgatesourceis connectedto TCl, Counter2 and the timerrcountersin TC2.
The ouput from TCl, Counter2 is availableat the COUNTEROUT pin @.44) on the VO connectorwhereit
canbe usedfor inlemrpt generation,as an A,/Dtrigger, or for countingfunctions.Any oneof ttre threeTCZ timerl
counteroutputsor the 5-MlIz clock canbe connectedto the TIMER OUT pin (V242) on the VO connectorwhereit
canbe usedfor intemrpt generation,as an A/D trigger, or for timing functions.Theseconnectionsarejumperselectable.
The timer/count€rscanbe programmedto operatein one of six modes,dependingon your application.For
example,when measuringfrequencies,the timer/countersin TC2 are setup for Mode 3 andTCl, Counter2 is set up
for Mode0; whenusingit asan eventcounter,it is setup for Mode0; andthepacerclock is setup for Mode2.The
following paragraphsbriefly describeeachmode.
Mode 0, Event Counter (Interrupt on Terminal Count). This modeis typicallyusedfor eventcounting.
While the timer/countercountsdown,theoutputis low, andwhenthecountis complete,it goeshigh.The output
says high until a new Mode 0 conEolword is written to ttretimer/counter.
Mode 1, Hardware-RetriggerableOne-Shot.The outputis initially high andgoeslow on theclock pulse
followinga triggerto begintheone-shotpulse.Theoutputremainslow until thecountreaches0, andttrengoeshigh
andremainshigh until theclockpulseafterthe nextftigger.
4-26
Mode 2' Rate Generator. This modefunctionslike a divide-by-N counterand is typically usedto generatea
real-timeclock intemrpt. The ouput is initially high, and whenthe count decrementsto 1, the outputgoeslow for
one clock pulse.The output thengoeshigh again,the timer/counterreloadsttreinitial count,and the processis
repeated.
This sequence
continuesindefinitely.
Mode 3, Square Wave Mode. Similar to Mode 2 exczptfor the duty cycle output,this modeis typically used
for baudrate generation.The ouput is initially high, and whenthe countdecrementsto one-halfits initial count,the
output goeslow for theremainderof the count.The timer/counterreloadsand the output goeshigh again.This
processrepeatsindefinitely.
Mode 4, Software-TriggeredStrobe.The outputis initially high.Whentheinitial countexpires,theoutput
goeslow for one clock pulseand thengoeshigh again.Countingis "triggered" by writing the initial count.
Mode 5, Hardware Triggered Strobe (Retriggerable). The output is initially high. Countingis riggered by
the rising edgeof the gateinput. Whenthe initial counthasexpired,the outputgoeslow for one clock pulseand
thengoeshigh again.
5 Mtl! (XTAL)
EXTERNAL PACER CLOCK
PAOER CLOCK
5 MHz (xT Ll
EXTERNAL CLOCK
+5 VOLTS
EXTEFNAL GATE
COUNTEB OUT
couilTEa
o
5 MHr (XTAL)
CLK
GATE
ouT
+5 VoLTS
couitTEi
I
couNTER
CLK
GATE
OUT
CLK
GATE
OUT
TIMEB OUT
I
t
t5 MHz(XTAL)
Fig.4-10- 8254Programmable
lntervalTimerCircuitsBlockDiagram
4-27
DigitalVO
The eight digital input and eight digital outputlines canbe usedto Eansferdaa betweenthe computerand
externaldevices.The digital input lines havepull-up resistorsas shownin Figure4-11 so ttrat they will be pulled
high when the input sourceis disconnected.This is ideal to supportswirchingapplications.
The digital input datacanbe readat I/O port BA + 0 andfiansferredinto PC memory.To output data,the
desiredvalueis written to I/O port BA + 0 and sentout to the externaldeviceconnectedto the digial outputpins on
externalVO connectorP2.
L--____
_____J__
Fig.4-11- Digital
lnputPull-up
Resistors
4-28
ExampleProgramsand Flow Diagrams
Includedwittr the AD3700 is a setof exampleprogramsthat demonsfratethe useof manyof ttreboard's
features.Theseexamplesarein writtenin C, Pascal,andBASIC. Also includedis an easy-to-use
menu-driven
diagnosticsprogram,3700DIAG, which is especiallyhelpful when you are fint checkingout yoru boardafter
installationand when calibratingthe board(Chapter5).
Before using the softwareincludedwith your board,makea backupcopy of the disk. You may makeasmany
backupsasyou need.
C and PascalPrograms
Theseprogramsare sourcecodefiles so that you caneasily developyoru own customsoftwarefor your
AD3700 board.In the C direcory, AD3700.H and AD3700.INCcontainall the functionsneededto implementthe
main C programs.H definesthe addresses
andINC containsthe routinescalledby the main progmms.In the Pascal
directory,AD3700.PNCcontainsall of the proceduresneededto implementthe main Pascalprograms.
Analog-to-Digital:
SOFITRIG
EXTTRIG
MULTI
MULTGATE
SCANN
Demonstrateshow to usethe softwaretrigger modefor acquiringdata.
Similar to SOFTTRIGexceptthat an extemalrigger is used.
Showshow to fill an anay with datausinga softwaretrigger.
Showshow to usethe externaltrigger to gatemultiple conversions.
Demonstrateschannelscanningof five channels
Timer/Counters:
TIMER
A shortprogramdemonstratinghow to prograrnthe 8254for useasa timer.
DigitalVO:
DIGITAL
Simpleprogramthat showshow to readfrom and wite to the digital VO lines.
Interrupts:
INTRPTS
INTSTR
Showsthe bareessentialsrequiredfor using intemrpts.
A completeprograrnshowingintemrpt-basedstreamingto disk.
DMA:
DMA
DMASTR
Demonsftateshow to useDMA to acquiredatato a memorybuffer. Buffer canbe written
to disk andviewed with the includedVIEWDAT progmm.
Demonstrates
how to useDMA for disk streaming.Very high continuousacquisition
ratescanbe obtained.
BASIC Programs
Theseprogramsaresourcecodefiles so that you caneasily developyour own customsoftwarefor your
AD3700 board.
Analog-to-Digital:
SINGLE
SCAN
Demonstrateshow !o usethe singleconvert,internal trigger modefor acquiringdata.
Showshow !o scanchannels.
FIFO:
FIFO
Showshow to run thepacerclock andusetheon-boardFIFO.
DMA:
DMA
Showshow to takesamplesandtransferthemto PC memoryusingDMA.
4-29
FIow Diagrams
The following paragraphsprovide descriptionsand flow diagramsfor someof the AD3700's A/D conversion
functions.Thesediagramswill help you to build your own customapplicationsprcgmms.
. SingleConvert FIow Diagram (Figure 4-12)
This flow diagramshowsyou fte stepsfor taking a singlesampleon a selectedchannel.A sampleis takeneach
time you sendthe StartConvertcommand.All of the sampleswill be takenon the samechanneluntil you change
the valuein the CHANNEL/CONVERSIONMODE SELECTregister(BA + 1). Changingthis valuebeforeeach
StartConvertcommandis issuedlets you takethe next readingfrom a different channel.
By changingthe valuein the CHANNEL/COII/ERSION MODE SELECTregister,you can changeyour
programso that a sampleis takeneachtime an extemaltrigger occurs.
Fig.4-12- SingteConvertFlowDiagram
4-30
. FIFO Flow Diagram (Figure 4-13)
This flow diagramshowsyou how to run ttreAD3700 from the pacerclock and usethe on-boardFIFO interface
to storethe converteddata.You prograrnthe clock rate and take samplesuntil the FIFO is full (FIFO full flag = S).
The samplesarethenreadfrom the FIFO anddisplayed.A sampleis takeneachtime the pacerclock generatesa
pulse.By using the pacerclock, ttretime interval betweensamplescanbe preciselyset The total numberof samples
takendependson the sizeof the FIFO on your board.Eachsampleis sentto the FIFO in two 8-bit words,the MSB
and the LSB. A 2K FIFO can hold 1024samples,a 4K FIFO canhold 2M8 samples,and an 8K FIFO canhold 4096
samples.The samplesaretakenon tlre channelspecifiedin the bottom threebits of the CHANNEL/CONVERSION
MODE SELECTregister(BA + 1). By settingthechannelselectoptionbit in thisregisterta ScanChannel,the
converterwill incrementallyscanthroughall eight channelsand storethe daa.
- FIFOFlowDiagram
Fig.4-13
4-3r
. DMA Flow Diagram (Figure 4-14)
This flow diagramshowsyou how to take samplesand fransferthe datadirectly into the computer'smemory.
You canuseDMA channelI or 3 to transfer1024samples(20a8bytes)to thecomputer'smemory.
ReportError:
FIFOfullbefore
DMAwasdone.
StopProgram
Fig.4-14-
DMA Flow Diagram
4-32
. ScanFlow Diagram (Figure 4-15)
This flow diagramshowsyou how to take samplesfrom a sequenceof channelswithout selectingthe channel
eachtime a convenionis sared.
By settingthe channelselectoption bit in the CHANNEL/COI.WERSIONMODE SELECTregister(BA + l)
to ScanChannelandsettingthe numberof channelsto be scannedat BA + 2, the converterwill automatically
incrementthe channeleachtime the StartConvertcommandis sent.The first channelsampledis the channelthat is
specifiedin the bottom threebits of the CHANNEL/CONVERSIONMODE SELECTregister.When the board
incrementsthroughthe numberof channelsprogrammedat BA + 2, it automaticallystartsover at the first channelin
the sequence.
By changingthe value in the CHANNEL/COI,IVERSIONMODE SELECTregister,you can changeyour
programso ttnt a sampleis takeneachtime an extemaltrigger occurs.
SelectChannel
Scan Mode,
Numberof
Channelsto Scan
Fig.4-15- ScanFlowDiagram
4-33
. fnterrupts FIow Diagram (Figure 4-16)
This flow diagramshowsyou how Joprograman intemrpt routine for your AD3700. The diagramparallelsthe
intemrps discussionincludedin ttrechapter.You canusethis diagramin conjunctionwith the detailedtext in ttris
chapterto developan intemrpt programfor your AD3700.
Set intenupt
disabled
bit in
IRQ/Dl/Aregister
Fig.4-16- Interrupts
FlowDiagram
4-34
CHAPTER 5
CALIBRATION
This chaptertells you how to calibratethe AD3700usingthe
3700DIAG calibrationprcgramincludedin theexamplesoftware
packageand the four trimpots (IRl throughTR3 andTR5) on the
board.Thesetrimpotscalibratethe A/D convertergain andoffset.
5-1
This chaptertells you how to calibratethe A/D convertergain andoffset The offset and full-scaleperformance
of the board's A,/Dconverteris frctory-calibrated.Any time you suspectinaccuratereadings,you can checkthe
accuracyof your conversionsusing ttreprocedurebelow, and makeadjustsasnecesmry.Using the 3700DIAG
diagnosticsprognm is a convenientway to monitor conversionswhile you calibratethe board.
Calibrationis donewith the boardinstalledin your PC. You canaccessthe trimpots with the computer'scover
removed.Powerup the computerand let the boardcircuitry stabilizefor 15 minutesbeforeyou startcalibrating.
RequiredEquipment
The following equipmentis requiredfor calibration:
. PrecisionVoltageSource:-10 to +10 volts
. Digital Voltmeter:5-1/2digis
. Small Screwdriver(for trimpot adjustment)
While not required,the 3700DIAG diagnosticsprogram(includedwith examplesoftware)is helpful when
performingcalibrations.Figure 5-1 showsthe boardlayout. The four trimpots usedfor calibrationarelocatedin the
upperleft areaofthe board.
A/D Calibration
Two proceduresare usedto calibratethe A/D converterfor all input voltageranges.The first procedurecalibratesthe converterfor the unipolarrange(0 to +10 volts), andthe secondprocedurecalibratesthe bipolar ranges
(15, t10 volts). Table 5-1 showsthe ideal input volage for eachbit weight for ttreunipolar,straightbinary range,
andTable 5-2 showsthe ideal voltagefor eachbit weight for the bipolar, twos complementranges.
Table5-1- A/D ConverterBtt Wetghts,
Unlpolar,StralghtBlnary
ldealInputVoltage(millivolts)
A/D Blt Weight
0 to +10Volts
1 1 1 1 1 1 1 11 1 1 1
+9997.6
1000 0000 0000
+5000.0
0100 0000 0000
+2500.0
0010 0000 0000
+1250.0
0001 0000 0000
+625.00
0000 1000 0000
+312.50
0000 0100 0000
+156.250
0000 0010 0000
+78j25
0000 0001 0000
+39.063
0000 0000 1000
+19.5313
0000 0000 0100
+9.7656
0000 0000 0010
+4.8828
0000 0000 0001
+2.4414
0000 0000 0000
+0.0000
5-3
i
E@
i@&b,
D
E(r6E6EddoT6.'
@3
roo oooooooo or--lo or--lo o-o
@
lr !l
@r5;"""
13 3l
13 3l
13*L
ol lo lol
roo 500000000
0l lo
ol lo
tuto
Sl lS 3l lS 31"139
=lwHgtr=glill,ffi=d
6d- o=ooooooooooooo
@ r -?,
E-g--
ono
orl
m'l!)
*'oo
(i !l lS 3l 13 3l 13"t
u-i I
88@slg|3slElEil,lg
oEo
H; ts;; lliji,
ry';E:
uqrnfll3sl li frs
oboooooooooooo,
@lfQ
SnS
ut
Sn3
(J,
@'
c
o
U)
F"#ilEli
fl$l!
flElt
=
'
3lAJ3;
3Li.J3
3HB
et.0000000.6p-ooo.ooo.
I=JH#UH#ffi;m'ffi'
"|--lg SnS
EE
Iq
ryEoEooo6lgEoooooo ol--lo
eeee3lulg
3l-lgshls
@t
@o
f
.9)
c
()o
:
E
s|jli,
Etili,
=
QffiQR# slijs,
A6oooooo b6oooooo @:
E
(l)
H
b
o
6(5
IL
O)
q
Um:m3ft 3ruEnEp
'o
G
qm:fuffi'
ffi;ffi'E
U,
f
o
(!
J
83
ti
P
G
Qffi'*ffiiUinilg
:
iEli
8ffi8gffiEH'|gpiHll=ffi:;
H
CIMp"w,m'ffi'alsli
H:
:'srcili :l-lisl*|g
o
ct
I
6t
s@
I
lo
.8,
tt
,ru
iliji=El3;s
fllliilEligRlg'
uHtBffi"ffiffh=ffiffi$
:8999999.s @N
.E q9:Eeee-sEsEs
;'
Ek - t l
oooooooooooo t =oooooooooooo
61m'l-::------:goN
Tabfe5-2- A/DConverter
Blt Welghts,
Blpolar,TwosComplement
ldealInputVoltago(mllllvolts)
A/DBlrWeighr
1 1 1 1 1 1 1 11 1 1 1
-5 to +5 Volts
-2.44
-10to +10Volts
-4.88
1000 0000 0000
-s000.00
-10000.00
0100 0000 0000
+2500.00
+5000.00
0010 0000 0000
+1250.00
+2500.00
0001 0000 0000
+625.00
+1250.00
0000 1000 0000
+312.50
+625.00
0000 0100 0000
+156.25
+312.50
0000 0010 0000
+78.13
+156.25
0000 0001 0000
+39.06
+78.13
0000 0000 1000
+19.53
+39.06
0000 0000 0100
+9.77
+19.53
0000 0000 0010
+4.88
+9.77
0000 0000 0001
+2.M
+4.88
0000 0000 0000
0.00
0.00
Unipolar Calibration
Two adjusunentsare madeto calibratethe AID converterfor the unipotarrangeof 0 to +10 volts. One is the
offset adjustment,and the ottreris the full scale,or gain, adjustmenLTrimpot TR5 is usedto makethe offset
adjustment,andtrimpot TRl is usedfor gain adjustment.This calibrationprocedureis performedwittr theboardset
up for a 0 to + 10 volt input range.Before making theseadjusrnents,makesuretlnt thejumper on P3 is setfor 10V
and thejumper on P5 is set for +.
Use analoginput channel1 while calibratingtheboard.Connectyour precisionvoltagesourceto channel1. Set
the voltagesourceta +1.22070millivolts, starta conversion,andreadthe resultingdata.Adjust trimpot TR5 until it
flickers betrveentle valueslisted in the able below. Next, set the voltagen +9.49829volts, andrepeatthe procedure,this time adjustingTRl until the dataflicken betweenthe valuesin the table.Note that the value usedto adjust
the full scalevoltageis not the ideal full scalevalue for a 0 to +10 volt input range.This value is usedbecauseit is
the maximumvalueat which the A/D converteris guaranteedo be linear, and ensuresaccuratecalibrationresults.
DataValuesfor CalibratingUnipolari0 Vott Range(0 to +10volts)
Olfset (TR5)
ConvertsrGaln(TR1)
InputVoltage= +1.22070
mV Input Voltage= +9.49829V
A/D ConvertedData
0000 0000 0000
0000 0000 0001
)-)
1 1 1 10 0 1 1 0 0 1 0
1 1 1 10 0 1 1 0 0 1 1
Bipolar Calibration
. Bipolar RangeAdjustments:-5 to +5 Volts
Two adjustrnentsare madeto calibratethe A/D converterfor the bipolar rangeof -5 to +5 volts. One is the
offset adjustment,and the otheris the full scale,or gain, adjustnenl Trimpot TR2 is usedto makethe offset
adjustment,andtrimpot TRI is usedfor gain adjustment.Beforemakingtheseadjustments,makesurethat the
jumper on P3 is set for lOV and thejumper on P5 is setfor +/-.
Use analoginput channel1 and setit for a gain of I while calibratingthe boad. Connectyour precisionvoltage
sourceto channell. Setthe voltagesourceto 4.99878 volts, sart a conversion,and readttreresultingdatr. Adjust
trimpot TR2 until it flickers betweenthe valueslisted in the tablebelow. Next, setthe voltageto +4.99634volts, and
repeatthe procedure,this time adjustingTRI until the dataflickers betweenthe valuesin the table.
DataValuesfor CalibratlngBlpolar10 Volt Range(-5to +5 volte)
Olfset (TR2)
ConverterGaln(TRl)
Input Voltage= -4.99878V Input Vottage= +4.99634V
A/D ConvertedData
1000 0000 0000
1000 0000 0001
0 1 1 1 1 1 1 11 1 1 0
0 1 1 1 1 1 1 11 1 1 ' l
. Bipolar RangeAdjustments:-10 to +10 Volts
To adjustthebipolar20-voltrange(10 to +10 volts),changethejumperon P3 sothat it is insalled acrossthe
20V pins.Leave the P5jumper at +/-. Then, setthe input voltageto +5.0000volts andadjustTR3 until the output
matchesthe datain the table below.
DataValuefor CalibratingBipolar20 Volt Range(-10to +10votts)
TR3
InputVoltage= +5.0000V
A/D ConvertedData
0100 0000 0000
5-6
APPENDIX A
AD37OO
SPECIFICATIONS
2s"c
AD3700Characteristics rypical@
Interface
compatible
IBMPC/XT/AT
baseaddress,l/O mapped
Switch-selectable
interrupts
Jumper-selectable
Software-selectable
DMAchannel
Analog Input
inputs
8 single-ended
eachchannel........
Inputimpedance,
lnputranges
Overvoltageprotection
Settling
time.............
.............>10
megohms
+10,or 0 to +10volts
.............+5,
..t35 Vdc
psec,max
....................5
A/D Convefter...............
Type............
Resolution
Linearity
Conversion
speed..........
Throughput
..AD678
...........Successive
approximation
12 bits(2.214
mVi4.88mV)
...................11
LSB,typ
psec,typ
................5
....................200
kHz
PacerClock
Range(usingon-boardclock)
F1FO..........
lDT7203
1DI/2O4....'.
lDT7205
14 minutesto 5 psec
............2K,4K,
or 8K
.................2048
bytes,1024samples
..........4096
bytss,2048samples
bytes,4096
.................8192
samples
Digltal l/O
Number
of 1ines.........
.............8
input,
8 output
Timer/Counters
...........
...........CMOS
82C54
(OptlonalNMOS8254)
Six 16-bitdowncounters(3 per lC)
Binaryor BCDcounting
Programmable
operating
modes(6) ...........
Interrupt
on terminal
count;programmable
one-shot;ratsgenerator;
squarewaverategen€rator;
software-triggered
strobe;hardware-triggered
strobe
Counter
inputsource
...........Exiernal
clock(8 MHz,max)or
on-board5-MHzclock
Counteroutputs
Available
usedas PC interrupts
externally;
gatesource..
Counter
gateor alwaysenabled
........
External
(PCbus-sourced)
Miscellaneous
Inputs/Outputs
t5 volts
t12 volts
Ground
CurrentRequlrements
+5 volts
+12volts
-12 vohs
........80
mA
......36
mA
......34
mA
Connector
50-pin,rightangle,shroudedbox header
Slze
3.875'Hx 8.7"W(99mm
x221mm)
A-3
A-4
APPENDIXB
P2 CONNECTORPIN ASSIGNMENTS
B-1
B-2
AINl
ANALOG GNO
AIN2
ANALOG GND
AIN3
A N A L O GG N D
AIN4
ANALOG GND
AIN5
ANALOG GND
AINs
ANALOG GND
AINT
ANALOG GND
AIN8
ANALOG GND
ANALOG GND
ANALOG GND
ANALOG GND
ANALOG GND
ANALOG GND
ANALOG GND
DINT
DOUTT
DIN6
DOUT6
DIN5
DOUTs
DIN4
DOUT4
DIN3
DOUT3
DIN2
DOUT2
DINl
DOUTl
DOUTO
DINO
DIGITALGND
T R I G G E RI N
:XT PACERCLK
TIMEROUT
COUNTER
OUI
T R I G G E RO U T
+12 VOLTS
EXT GATE
+5 VOLTS
-12 VOLTS
DIGITALGND
EXT CLK
B-3
APPENDIXC
COMPONENT DATA SHEETS
IntervalTimer
Intel82C54Programmable
DataSheetReprint
intel'
82C54
TIMER
INTERVAL
CHMOSPROGRAMMABLE
I Gompatlblewith all Intel and most
other microprocessors
r Hlgh Speed,"Zero Walt State"
Operationwlth 8 MHz8086/88and
8 0 1 8 6 /1 8 8
I HandlesInputefrom DC to I MHz
- 10 MHz for 82C54-2
r AvallableIn EXPRESS
- StandardTemperatureRange
- ExtendedTemperatureRange
I ThreeIndependent16-bltcounters
I LowPowerCHMOS
- lcc : 10 mA @I MHzCount
frequency
I CompletelyTTL Gompatlble
I Six ProgrammableCounterlt/lodes
r Binaryor BCDcounting
I StatusReadBack Command
r AvallableIn 24-PlnDIPand 28.PlnPLCC
whichis
CHMOSversionof the industrystandard8254counter/timer
The lntel 82C54is a high-performance,
syslemdesign.lt providesthree
commonin microcomputer
designedto solvethe timingcontrolproblems
eachcapableof handlingclockinputsup to 10 MHz.All modesare sottware
16-bitcounters,
independent
ol the 8253.
programmable.
withthe HMOS8254,andis a superset
The82C54is pincompatible
timermodesallowthe 82C54to be usedas an eventcounter,elapsedtime indicator,
Six programmable
programmable
andin manyotherapplications.
one-shot,
whichprovideslow powerconsumption
The 82C54is fabricatedon lntel'sadvancedCHMOSlll technology
HMOSproduct.The82C54is availablein 24-pinDIP
withperformance
equalto or greaterthanthe equivalent
and 28-pinplasticleadedchipcarrier(PLCC)packages.
Oa
5
o3
6
Oz
f
D!
t
DO
9
clx0
t0
xc
t'l
ra'15*fti
ouro GAIEocLo tac ouflG^Elcltl
2312M-3
PLASTICLEAT'EDCHIPCARRIER
vc€
*-e
i-o
6
Dr
Oa
q
Dr
alt
O!
520
D2
Dt
t
|.cg
tl
Oo
,CLTO
231244-1
Flgure1.82C54BlockDlagram
OUTO
OATEO
t0
!6
It
ta
cxD
12
r3
Ar
lo
cLr 2
ottt ?
olrE 2
clr'l
grrE r
o{n r
ae$-2
Diagramsare for pin r6f€r6nc€only
Packagesizesare not to scal€.
Ffgure2.82C54Pinout
3-83
fficr
ScptGmbc.te89
l{umber:23124{d5
intef
82C54
Table1.PlnDescrlption
Symbol
Dz-Do
PlnNumber
DIP
PLCC
1-8
2-9
CLK O
s
OUTO
10
GATE O
GND
Functlon
Type
llo
tri-statedatabuslines,
Data:Bidirectional
connected
to systemdatabus.
10
12
o
Output0: Outputof Counter0.
11
12
13
I
OUT1
13
o
GATE1
CLK 1
20
21
o
CLK 2
14
15
16
17
18
16
17
18
19
Gate0: Gateinoutof Counter0.
Ground:Powersuoolvconnection.
Out 1: Outputof Counter1
Ar' Ao
20-19
23-22
6
21
24
ChipSeleclA lowon thisinputenablesthe82C54
to respondto FiDandWFIsignals.FiDandWFIare
ignoredotherwise.
RD
22
26
WF
23
27
Vce
24
28
ReadControl:Thisinputis low duringCPUread
operations.
WriteControl:This input is low duringCPUwrite
operations.
Power:* 5V powersupplyconnection.
No Connect
GATE2
OUT2
NC
I
Clock0: Clockinputof Counter0.
14
Gate1:Gateinputof Counter1
Cfock1: Clockinputof Counter1.
Gate2: Gateinputof Counter2.
Out2:Outputof Counter
2.
Clock2: Clockinputof Counter2.
Address:Usedto sefectone of the three Counters
orthe ControlWordRegisterfor read or write
operations.Normallyconnectedto the system
addressbus.
Ar
As
Selects
0
0
Counter0
1
0
CounterI
1
0
Counter2
1
1
ControlWord
Reoister
1 11,15,25
sired delay.After the desireddelay,the 82C54 will
interruptthe CPU.Softwareoverheadis minimaland
variablelengthdelayscan easilybe accommodated.
FUNCTIONAL
DESCRIPTION
General
The 82C54is a programmable
intervaltimer/counter
designedfor use with Intel microcomputer
systems.
It is a generalpurpose,multitimingelementthat can
be treated as an anay of llO ports in the system
software.
The 82C54 solves one ol the most comrnon problems in any microcomputer
system,the generation
of accurate time delays under software control. lnstead of setling up timing loops in software,the programmerconfiguresthe 82C54to matchhis requirements and programsone of the countersfor the de-
Someof the other counter/timerfunctionscommon
to microcomputers
which can be implementedwith
the 82C54 are:
o
o
o
o
o
r
r
.
3-84
Realtimeclock
Even counter
Digitalone-shot
Programmablerate generator
Squarewave generator
Binaryrate multiplier
Complexwaveformgenerator
Complexmotorcontroller
82C54
CONTROLWORDREGISTER
Bloek Dlagram
The ControlWordRegister(seeFigure4) is selected
by the Read/WriteLogicwhen Ar, A0 : 11. lf the
CPU then does a write operationto the 82C54,the
data is storedin the ControlWord Registerand is
interpretedas a ControlWord used to define the
operationof the Counters.
DATABUSBUFFER
8-bitbufferis usedto inThis3-state,bi-directional,
terfacethe 82C54to the systembus(seeFigure3).
The Control Word Registercan only be written to;
status inlormationis availablewith the Read-Back
Command.
Cr( o
6At€ 0
our 0
eClt0
clx t
CAIET
o0l r
RO.+
&+
231244-4
Flgure3. BlockDlagramShowlngData8us
Bufferand Read/WrlteLoglcFunctions
231241-5
LOGIC
READ/WRITE
The Read/WriteLogicacc€ptsinputsfromthe system bus and generatescontrolsignalsfor the other
functionalblocksof the 82C54.A1 and Aq s€lect
oneof the threecountersor theControlWordReE
ter to be readfrom/writteninto.A "low" on the RD
inputtellsthe 82C54thatthe CPgjg readingone of
the counters.A "low" on the WR input tells the
82C54that the CPUis lt4llngeithera ControlWord
BothRDandWRarequalified
by
or an initialcount.
G; FD and WFIare ignoredunlessthe 82C54has
beenselectedby holdingCSlow.
ShowingControlWord
Flgure4.BlockDiagram
andCounter
Functions
Register
2
couNTER0, couNTER1,COUNTER
Thesethreefunctionalblocksare identicalin operation, so only a singleCounterwill be described.The
internalblock diagramof a singlecounteris shown
in Figure5.
The Countersare fully independent.Each Counter
may operate in a differentMode.
Tfre Control Word Registeris shown in the figure;it
is not part of the Counteritself, but its contentsdeterminehow the Counteroperates.
3-85
intef
82C54
storedin theCRandlatertransfenedto the CE.The
ControlLogicallowsone registerat a time to be
loadedfromthe internalbus.Bothbytesare transCRMand CRgare
ferredto the CE simultaneously.
ln this
clearedwhen the Counteris programmed.
for one
way,if the Counterhas beenprogrammed
byteonlyor least
$[e counts(eithermostsignilicant
significantbyte only) the other byte will be zero.
Notethatthe CEcannotbe writteninto;whenevera
countis written,it is writtenintothe CR.
CLK
TheControlLogicis alsoshownin thediagram.
n, GATEn, andOUTn areallconnected
to the outsideworfdthroughthe ControlLogic.
82C54SYSTEMINTERFACE
231244-6
Flgure5. Internal Block Dlagramof a Counter
The status register, shown in the Figure, when
latched,containsthe cunent contents of the Control
Word Register and status of the output and null
count flag. (See detailed explanationof the ReadBack command.)
The actualcounterls labelledCE (for "CountingElemenf'). lt is a 16-bit presettablesynchronousdown
counter.
OLy and OL1 are two 8-bit latches. OL stands for
"Output Latch"; the subscriptsM and L stand for
"Mosl significantbyte" and "Least significantbyte"
respectively.Both are normally refened to as on€
unit and calledjust OL. These latchesnormally"follow" the CE, but if a suitable Counter Latch Commandis sent to the 82C54.the latches"latch" the
presentcountuntilread by the CPU and then return
to "following"the CE. One latch at a time is enabled
by the counter's Control Logic to drive the internal
bus. This is how the 16-bitGountercommunicates
over the 8-bit internal bus. Note that the CE itself
cannot be read; whenever you read the count, it is
the OL that is beingread.
Similady,there are two 8-bit registerscalled CRi,l
and CRs (for "Count Register").Both are normally
refenedto as one unit and caltedjust CR. When a
new count is written to the Counter, the count is
3€6
The82C54is treatedby the systemssoftwareas an
anayof peripheral
l/O ports;threearecountersand
the fourthis a controlregisterfor MODEprogramming.
Basically,
the selectinputsA6,A1connectto the A9,
A1addressbussignalsof theCPU.TheCS can be
deriveddirectlyfromthe addressbus usinga linear
selectmethod.Or it canbe connectedto the output
of a decoder,suchas an lntel 8205for largersystems.
rr &
Cf
couxttt
ot2
OUt OAIC CLi'
DrOr
Itcta
coutt:t
'OUr
Clt:
CLx'
FU FI
coutr[t
'OUl
OAIE CLx'
231244-7
Flgure6.82C54SystemInterface
intet
82C54
DESCRIPTION
OPERATIONAL
Programmingthe 82C54
General
Countersare programmedby writinga ControlWord
and then an initial count. The controlword format is
shownin Figure7.
After power-up,the state of the 82C54is undefined.
The Mode, count value,and outputof all Counters
are undefined.
How each Counteroperatesis determinedwhenit is
programmed.Each Countermust be programmed
beforeit can be used.Unusedcountersneednot be
programmed.
All ControlWords are written into the ControlWord
whichis selecledwhenA1,Ao : 11.The
Register,
itself specifieswhich Counieris being
Word
Control
programmed.
By contrast,initialcountsare writteninto the Counters, not the ControlWord Register.The A1, Aq inputs are used to select the Counter to be written
into. The format of the initialcount is determinedby
the ControlWordused.
Control Word Format
41,46:11
6:0
FD:t
D7
WF:O
D5
sc1 sc0
D5
RWl
Da
D3
RWO M2 M1
SC - Select Counter:
sco
0
0
SelectCounter0
0
1
1
1
De
MO BCD
ttl
MO
0
0
0
Mode0
SelectCounter1
0
0
1
Mode1
0
SelectCounter2
X
1
0
Mode2
1
Bead-BackCommand
(SeeReadOperations)
X
1
1
Mode3
1
0
0
Mode4
1
0
1
Mode5
RW- Read/Wrlte:
FWl RWo
0
D1
M - IIODE:
il2
scl
0
D2
BCD:
CounterLatchCommand(see Read
Operations)
0
1
Read/Writeleastsignificantbyteonly.
1
0
Read/Writemost significantbyte only.
1
1
Read/Writeleastsignificantbytefirst,
then most significantbyte.
0
BinaryCounter16-bits
1
BinaryCoded Decimal(BCD)Counter
(4 Decades)
NOTE:Don't care bils (X) shouldbe 0 to insure
compatibilitywith future Intel products.
Flgure7.ControlWordFormat
3-87
intel
82C54
structionssquencsis required.Any programming
aboveis acsequencethatfollowsthe conventions
ceptable.
WriteOperations
proceduretor the 82C54is very
The programming
flexible.Onlytwo conventionsneedto be remembered:
1) For each Counter,the ControlWord must be
writtenbeforethe initialcountis written.
2) The initialcountmustfollowthe countformat
specifiedin the ControlWord (leastsignificant
byteonly,mostsignificant
byteonly,or leastsignificantbyteandthenmostsignificantbyte).
A new initialcountmaybe writtento a Counterat
any time without affecting th€ Counter's programmed
Modein anyway.Countingwill be atfected
in theModedefinitions.
The newcount
as described
mustfollowtheprogrammed
countformat.
to readlwritetwo-byte
lf a Counteris programmed
precaution
counts,thefollowing
applies:A program
mustnot transfercontrolbetweenwritingthe first
andsecondbyteto anotherroutinewhichalsowrites
intothatsameCounter.
Othenryise,
the Counterwill
be loadedwithan incorrectcount.
Since the ControlWord Registerand the three
(selectedby the
Gounlershaveseparateaddresses
At, Aoinputs),andeachControlWordspecifies
the
Counterit appliesto (SC0,SC1bits),no specialinControlWord
LSBof countMSBof countControlWord
LSBof countMSBof countControlWord
LSBof countMSBof count-
A1
1'l
00
00
11
01
01
11
10
10
Ao
Counter
0
Counter
0
Counter
0
Gounter1
Counter1
Counter1
Counter2
Counter2
Counter2
ControlWord
CounterWordControlWord
LSBof countLSBof countLSBof countMSBof countMSBof countMSBof count-
A1
11
11
11
10
01
00
00
01
10
Ag
Counter0
Counter1
Counter2
Gounter2
Counter1
Counter
0
Counter
0
Counter1
Counter
2
ControlWordControlWordControlWord
LSBof count
MSBof countLSBol countMSBof countLSBof countMSBof count-
Counter2
Counter1
Counter
0
Counler2
Counter
2
Counter1
Counter1
Counter0
Counter
O
ControlWord- Counter1
ControlWord- Counter0
LSBof count- Counter1
ControfWord- Counter
2
LSBof countCounter
0
MSBof count- Counter1
LSBof countCounter
2
MSBof count- Counter0
MSBof count- Counter
2
A1
11
11
11
10
10
01
01
00
00
Ao
A1
't1
Aq
11
01
11
00
01
10
00
10
NOTE:
In all four examples,all countersar€ programmedto readlwritetwo-by{ecounts.
Theseare only four of manypossibleprogrammingsequences.
Figure8. A FewPossibleProgrammlngSequences
ReadOperations
It is often desirableto read the value of a Gounter
withoutdisturbingthe countin progress.This is easily done in the 82C54.
There are three possible methods for reading the
counters: a simple read operation, the Counter
Latch Command,and the Read-BackCommand.
Eachis explainedbelow.The first methodis to perform a simpleread operation.To read the Counter,
which is selectedwith the 41, A0 inputs, the CLK
input of the selectedCountermust be inhibitedby
usingeitherthe GATEinputor externallogic.Otherwise, the count may be in the processof changing
when it is read,givingan undefinedresult.
3-88
intet
82C54
grammingoperationsof other Countersmay be inserted betweenthem.
COUNTERLATCH COMMAND
The second methoduses the "CounterLatchCommand''. Likea ControlWord,thiscommandis written
to the Control Word Register,which is selected
when 41, A0 : 11. Also like a ControlWord,the
SCO,SC1 bits selectone of the threeCounters,but
two other bits, D5 and D4, distinguishthis command
from a ControlWord.
A r , A o : 1 1 ;Q $ : 0 ; R D : t ; W R : 0
D7
D5
D5
Da
D3
D2
D1
De
0
0
X
X
X
X
sc1 sc0
ll a Counter is programmedto read/write two-byte
counts,the followingprecautionapplies;A program
must not transfer control between reading the first
and secondbyteto anotherroutinewhichalso reads
from that same Counter.Othenrvise,an incorrect
countwill be read.
SC1, SCO- specifycounterto be latched
SCI
SCO
Counter
0t0t
0
0l1l
1
1t0t
2
1
|
1
Another feature of the 82C54 is that reads and
writes of the same Counter may be interleaved;for
example,if the Counteris programmedfor two byte
counts, the followingsequenceis valid.
'1.
Read leastsignificantbyte.
2. Writenew least significantbyte.
3. Read most significantbyte.
4. Write new most significantbyte.
READ.BACKCOMMAND
The third method uses the Read-Backcommand.
This commandallowsthe user to check the count
value,programmedMode,and cunent state of the
OUT pin and Null Count flag of the selected counte(s).
| Read-BackCommand
D5,D4- 00 designatesCounterLatchCommand
X - don'l care
NOTE:
Don'tcare blts (X) shouldbe 0 to insurecompatibility
withfutureIntelproducts.
The commandis writteninto the ControlWordRegister and has the format shown in Figure 10. The
command applies to the counters selected by setting their corresponding
bits D3,D2,D1- 1.
Figure 9. Counter Latching CommandFormat
A0,Ar:11 e5:O
The selectedCounter'soutputlatch(OL)latchesthe
count at the time the Counter Latch Commandis
received.This count is held in the latch until it is read
by the CPU (or until the Counteris reprogrammed).
The count is then unlatchedautomaticallyand the
OL returnsto "following"the countingelement(CE).
This allows reading the contents of the Counters
"on the fly" without affecting counting in progress.
MultipleCounterLatch Commandsmay be used to
latch more than one Counter.Each latchedCounter's OL holds its count untilit is read.CounterLatch
Commands do not affect the programmedMode of
the Counterin any way.
lf a Counter is latched and then, some lime later,
latched again before the count is read, the second
Counter Latch Commandis ignored.The count read
will be the count at the time the first CounterLatch
Commandwas issued.
With either method, the count must be read according to the programmed format; specifically,if the
Counter is programmed for two byte counts, two
bytes must be read.The two bytes do not haveto be
read one right atler the other; read or write or pro-
D5
1
t
Da
HD:r
WF:O
D3
doumSTFTUSCNT 2
Dq
CNT 1 CNTO 0
D5:0 : Latch count of selectedcounter(s)
Da:0 : Latchstatusol selectedcounter(s)
D3: 1 : Selectcounter2
D2:1 = Selectcounler1
Dr: 1 : Selectcounter0
Dg: Reservedfor luture expansion;must be 0
Figure 10.Read-BackCommandFormat
The read-backcommandmay be used to latch multiple counter output latches (OL) by setting the
COUNT bit D5:0 and selectingthe desiredcounler(s). This single command is functionallyequivalent to several counter latch commands, one for
each counter latched.Each counter's lalched count
is held until it is read (or the counter is reprogrammed).That counter is automaticallyunlatched
when read, but other counlers remain latched until
they are read.lf multiplecountread-backcommands
are issued to the same counter without readingthe
3-89
inbf
82C54
count,all but the first are ignored;i.e.,ths count
whichwill be readis the countat the timethe first
read-back
commandwasissued.
THISACTION:
A. Writeto th6 control
*orJ registerirt
B. WritEtoth€ counl
register(cn);izl
C. Newcountis loaded
intoCE (CR-.r CE);
Theread-backcommandmayalsobe usedto latch
statusinformation
of selectedcounte(s)by setting
ffifUS bit D4:0. Statusmustbe latchedto be
read;statusof a counteris accessedby a readtrom
thatcounter.
Nullcount:1
Nullcount:1
Nullcount: 0
tll Onrythe counterspecifiedby the control word will
have its null count sot to 1. Null count bits of other
countersare unaffected.
I2l 1166 counter is programmedtor two-byte countg
(least significantbyte thsn most significantbyte) null
count goes to 1 when ths s€condbyte is writt€n.
Thecounterstatusformatis shownin Figure1'1.Bits
D5 throughD0 containthe counter'sprogrammed
Modeexactlyas writtenin the last ModeControl
Word.OUTPUTbif D7 containsthe currentstateof
the OUTpin. This allowsthe userto monitorthe
counter'soutputvia software,possiblyeliminating
somehardwarefroma system.
Flgure12.NullCountOperatlon
lf multiplestatuslatchoperations
of the counter(s)
withoutreadingthe status,all butthe
areperformed
firstare ignored;i.e.,the statusthat will be readis
the statusof the counterat the timethe firststatus
read-back
command
wasissued.
D
NULL
Ftwl RWO M2 M1 MO BCD
COUNT
OUTPUT
D7'l : Out Pinis'l
0:OutPinis0
D6 1 : Nullcount
0 : Countavaitablefor reading
Ds-Do CounterProgrammedMode (See Figure7)
Flgure 11.Status Byte
NULLCOUNTbit DOindicateswhen the last count
writtento the count€rregister(CR)has been loaded
into the countingelement(CE).The exact time this
happensdependson the Modeof the counterand is
describedin the ModeDefinitions,
but untilthe count
is loadedinto the countingelement(CE),it can't be
readfrom the counter.lf the countis latchedor read
beforethis time, the count value will not reflectthe
new count just written.The operationof Null Count
is shownin Figure12.
Command
D7 D6 D5 Da D3 D2 D1 Ds
CAUSES:
Both countand statusof the selectedcounter(s)
may be latchedsimultaneously
by setting both
COUNTandSTATUS
bitsD5,D4=0.Thisis functionallythe sameas issuingtwo separateread-back
commands
at once,andthe abovediscussions
apply herealso.Specifically,
if multiplecountand/or
statusread-back
commands
areissuedto thesam6
counter(s)
withoutanyintervening
reads,all butthe
firstareignored.
Thisis illustrated
in Figure13.
lf bothcountandstatusof a counterarelatched,the
firstreadoperation
of thatcounterwillreturnlatched
status,regardlessof whichwas latchedfirst. The
nextone or two reads(depending
on whetherthe
counteris programmed
for one or two typecounts)
returnlatchedcount.Subsequent
readsreturnunlatchedcount.
Results
Descrlptlon
1
1
0
0
0
0
1
0
Readbackcountand statusof
Counter0
1
1
1
0
0
1
0
0
Readbackstatusof Counter1
1
1
1
0
I
1
0
0
Countandstatuslatched
forCounter
0
Statuslatchedfor Counter1
Read back statusof Counters2, 1 Statuslatchedfor Counter
2, butnotCounter1
1
1
0
1
1
0
0
0
1
1
0
0
0
I
0
1
1
1
0
0
0
1
Countlatchedfor Counter2
0
Readbackcountof Counter2
Readbackcountand statusof
Counter1
0
Read back statusof Counter1
Commandignored,status
alreadylatched for Counter 1
fuunt latchedfor Counter1,
but not status
Figure 13.Head-BackCommandExample
3-90
inbr
cs
m
0
1
0
1
0
1
0
1
0
0
0
0
0
0
0
X
0
0
1
82C54
WR Ar Ao
0
0 0 Writeinto Counter0
0
0 1 WriteintoCounter1
0
1
0 WriteintoCounter2
't
0
1 WriteControlWord
0 0 Readfrom Counter0
1
0
1 ReadfromCounter
1
1
1
0 ReadfromCounter
2
(3-State)
1
1
1 No-Operation
(3-State)
X
X X No-Operation
(3-State)
1
X X No-Operation
I
This allowsthe countingsequenceto be synchronized by sottware.Again,OUT does not go highuntilN
+ 1 CLK pulsesafterthe new count of N is written.
lf an initial count is writien while GATE : O, it will
still be loadedon the next CLK pulse.WhenGATE
goes high,OUT will go high N CLK pulseslater;no
CLK pulseis neededto load the Counteras this has
alreadybeen done.
Flgure14.Read/WriteOperationsSummary
ltlode Definitions
l,l" l- i.l: ll I I li il lffltrl
CUrl0
LSlrt
The followingare definedfor use in describingthe
operationof the 82C54.
CLK PULSE:a risingedge,then a fallingedge,in
that order,of a Counter'sCLK input.
TRIGGER:a risingedge of a Counter'sGATE input.
COUNTERLOADING:the transferof a countfrom
the CR to the CE (referto
the "Functional Description")
l* l,.l,l- lt lt l! ll l? lt lffl
Cw. t0
Lll. I
ttl r 2
MODE0: INTERRUPTON TERMINALCOUNT
Mode 0 is typicallyusedfor eventcounting.Afterthe
ControlWord is writlen,OUT is initiallylow, and will
remainlow untilthe Counterreacheszero.OUTthen
goes high and remainshigh until a new count or a
new Mode 0 ControlWord is writteninto the Counter.
GATE : 1 enablescounting;GATE : 0 disables
counting.GATE has no effect on OUT.
After the ControlWordand initialcountare writtento
a Counter,the initialcountwill be loadedon the next
CLK pulse.This CLK pulsedoes not decrementthe
count, so for an initialcount of N, OUT does nol go
high until N + 1 CLK pulsesafterthe initialcountis
written.
lf a new count is written to the Counter,it will be
loadedon the next CLK pulseand countingwill continue from the new count.lf a two-bytecountis written, the followinghappens:
1) Writingthe firstbytedisablescounting.OUTis set
low immedialely(no clock pulserequired).
2) Writing the second byte allows the new count to
be loadedon the next CLK pulse.
3-91
l- l* i- l- li l: I I lt lt l3 lIl
z.31244-8
IOTE:
The FollowingConventions
ApplyTo All ModeTiming
Diagrams:
1. Counters are pfogramrnedfor binary (not BCD)
countingand for Reading/Writingleast significantbyte
(LSB)only.
2. The counteris alwaysselected(eS alwayslow).
3. CW stands for "ControlWord"; CW = 10 meansa
controlword ol 10, hex is writtento the counter.
4. LSB standsfor "Least SignificantByte" of count.
5. Numbersbelowdiagramsare count values.
The lower numberis the least signilicantbyte.
The upper numberis the mosl significantbyte. Since
the counler is programmedto Read/Write LSB only,
the mosl significantbyte cannotbe read.
N standsfor an undefinedcount.
Verticallines show transitionsbetweencount values.
Figure 15.Mode 0
intet
82C54
ttlODE1: HARDWARERETRIGGERABLE
ONE-SHOT
OUTwill be initiallyhigh.OUTwill go low on the CLK
pulsefollowinga triggerto begin th€ one-shotpulse,
and will remain low until the Counter reaches zero.
OUT willthen go high and remainhigh untilthe CLK
pulse atter the next trigger.
After writing the Control Word and initial count, the
Counteris armed. A trigger results in loadingthe
Counterand settingOUT low on the next GLK pulse,
thusstartingthe one-shotpulse.An initialcountof N
wilf result in a one-shot pulse N CLK cycles in durahence OUT will
tion. The one-shotis retriggerable,
remainlow for N CLK pulsesafter any trigger.The
one-shotpulsecan be repeatedwithoutrewritingthe
sarnecount into the counter.GATE has no etfect on
OUT.
lf a new countis writtento the Counterduringa oneshot pulse, the current one-shot is not atfected unless the Counter is retriggered.In that case, the
Counteris loaded with the new count and the oneshot pulse continuesuntil the new count expires.
MODE2: RATE GENERATOR
This Modefunctionslike a divide-by-Ncounter.lt is
typiciallyused to generate a Real Time Clock inter'
rupt.OUTwill initiallybe high.When th€ initialcount
has decrementedto 1, OUT goes low for one CLK
pulse.OUT then goes high again, the Counterreloads the initialcount and the processis repeated.
Mode2 is periodic;the same sequenceis repeated
For an initialcount of N, the sequence
indefinitefy.
repeatsevery N CLK cycles.
GATE : 1 enablescounting;GATE : 0 disables
counting.lf GATE goes low duringan output pulse,
OUT is s€t high immediately.A trigger reloadsthe
Counterwith the initialcount on the next CLK pulse;
OUT goes low N CLK pulsesatter the trigger.Thus
the GATE input can be used to synchronizethe
Counter.
After writinga Control Word and initial count, the
Counterwill be loadedon the next CLK pulse.OUT
goes low N CLK Pulsesafter the initialcount is written. This allowsthe Counterto be synchronizedby
softwarealso.
m
FI
cLx
ctt
crrE
oltc
oul
ou?
ffi
*t
cLl(
ctr
GAtE
cliE
our
l"l,l*l*
oul
CW. ra
tS8'.
| l:ltl:l:
jil:l
tSA -t
-Ft
WT
cLx
GATE
cLx
oul
clrl
l" l- l" l" [l llll ll l: l: ll I
231244-10
our
x r n 1 *i : I I l l i f : l : : l l ! l I
NOTE:
A GATEtransitionshould not occur one clock prior to
terminalcount.
231244-9
Figure 17. Mode 2
Figure16.Mode 1
3-92
inbf
82C54
Writinga new countwhilecountingdoesnot affect
the curent countingsequence.lf a triggeris receivedafterwritinga newcountbut beforethe end
of the currentperiod,theCounterwillbe loadedwith
the newcounton the nextCLKpulseandcounting
will continuefrom the new count.Othenvise,
the
new countwill be loadedat the endof the cunent
countingcycle.In mode2, a COUNTof 'l is illegal.
OUT will be high for (N + 1)/2 countsand low tor
(N -1)/2 counts.
m
ctr
Glt!
sl
MODE3: SQUAREWAVEMODE
Mode3 is typicallyusedfor Baudrategeneration.
Mode3 is similarto Mode2 exceptforthedutycycte
of OUT.OUTwillinitially
be high.Whenhatfthe initialcounthasexpired,
OUTgoeslowfortheremainder of the count.Mode3 is periodic;
the sequence
aboveis repeatedindefinitely.
An initialcountof N
resultsin a squarewavewith a periodof N CLK
cycles.
llr
ctr
oltt
@t
GATE: 1 enablescounting;
GATE: 0 disables
counting.
lf GATEgoeslowwhileOUTis low,OUTis
set high immediately;
no CLK pulseis required.
A
triggerreloadsthe Counterwiththe initialcounton
the next CLK pulse.Thusthe GATEinputcan be
usedto synchronize
the Counter.
wt
ett
oltt
oul
Atter writinga ControlWord and initialcount,the
Counterwill be loadedon th€ nextCLKpulse.This
allowsthe Counterto be synchronized
by sottware
also.
lrlil'l.l:l!l:l:l
231244-11
NOTE:
A GATElransitionshouldnot occur one clock prior to
lerminalcount.
Writinga new countwhilecountingdoesnot atfect
the currentcountingsequence.lf a triggeris receivedafterwritinga newcountbut beforethe end
of the currenthalf-cycleof the squarewave,the
Counterwill be loadedwiththe new counton the
next CLK pulseand countingwill continuefromthe
newcount.Othenrise,
thenewcountwillbe loaded
at the end of the cunenthaltcycle.
Figure 18.Mode 3
MODE 4: SOFTWARETRIGGEREOSTROBE
OUT will be initiallyhigh.When the initialcountexpires,OUT will go low for one CLK pulse and then
go highagain.The countingsequenceis "triggered"
by writingthe initialcount.
Mode3 is implemented
as follows:
Evencounts:OUTis initialfyhigh.Theinitialcountis
loadedon one CLKpulseandthenis decremented
by two on succeeding
CLKpulses.Whenthe count
expiresOUTchangesvalueand the Counteris reloadedwith the initialcount.The aboveprocessis
repeatedindefinitely.
Odd counts:OUT is initiallyhigh.The initiatcount
minusone (anevennumber)is loadedon oneCLK
pulseand then is decremented
by two on succeeding CLK pulses.OneCLK pulseafterthe countexpires,OUT goes low and the Counteris reloaded
with the initialcountminusone. Succeeding
CLK
pulsesdecrementthe countby two.Whenthecount
expires,OUT goes highagainand the Counteris
reloadedwiththe initialcount
minusone.Theabove
processis repeatedindefinitely.
So for odd counts,
!1il:1il:itl
GATE : 1 enablescounting;GATE = 0 disables
counting.GATEhas no etfect on OUT.
After writing a Control Word and initial count, the
Counterwill be loadedon the next CLK pulse.This
CLK pulse does not decrementthe count, so for an
initial count of N, OUT does not strobe low until
N + 1 CLK pulses after the initial count is written.
lf a new count is writtenduringcounting,it will be
loadedon the next CLK pulseanclcountingwill continue from the new count. ft a two-bytecount is written, the followinghappens:
3,93
inbr
82C54
1)Writingthe firstbytehas no effecton counting.
2) Writingthe secondbyteallowsthe newcountto
be loadedon tha nextCLKPulse.
This allowsthe sequenceto be "retriggered"by
OUTstrobeslow N*l CLKpulsesafter
software.
the newcountof N is written.
WT
After writingthe Control Word and initial count, the
counterwill not be loadeduntil the CLK pulse after a
trigger. This CLK pulse does not decrement the
count, so for an initial count of N, OUT does not
strobe low until N + 1 CLK pulses atter a trigger.
A triggerresullsin the Counterbeing loaded with the
initialcount on the next CLK pulse. The counting
OUT will not strobe low
ssquenceis retriggerable.
for N * 1 CLK pulsesafter any trigger.GATE has
no effect on OUT.
lf a new countis writtenduringcounting,the current
countingsequencewill not be atfected. lf a trigger
occurs atter the new count is written but belore the
current count expires,the Counter will be loaded
with the new count on the next CLK pulse and
countingwill continuefrom there.
ctr
G 'E
oul
ololFFlFFlFFl
I I o IFFIFEIF0I
r|
cLx
olrl
oul
ou'
---[-*---------l
/--
l- i.l * I " I 3| :l 3l I | ?lSli:l
Cl.lt
LSltS
LSI'z
CW- ll
P't
w--l
l---J
t
t
cLl(
oAl€
oul
ow
mf
Cw:ll
lsl'3
Figure 19.Mode 4
aa"
MODE5: HARDWARETRIGGEREDSTROBE
(RETRIGGERABLE)
OUT will initiallybe high.Countingis triggeredby a
risingedge of GATE.When the initialcount has expired,OUT will go low for one CLK pulse and then
go highagain.
3-94
231244-13
82C54
Slgnel
Stetu!
llodes
Low
OrGolng
Low
0
Disables
countinq
OperatlonCommonto All Modes
Rlshg
Programming
Enables
countino
3
4
When a Control Word is written to a Counter, all
Control Logic is immediatelyreset and OUT go€s to
a known initial state; no CLK pulses are requiredfor
this.
1) lnitiates
counting
2) Resetsoutput
atter next
clock
1
2
Hlgh
1) Disables
counting
2) Sels output
immediately
hiqh
1) Disables
couhting
2) Sets output
immediately
hioh
GATE
Initiates
counting
Enables
counting
Initiates
counting
Enables
counting
Disables
counting
The GATE input is always sampled on the rising
edgeof CLK.ln Modes0, 2, 3, and 4 the GATEinput
is level sensitive,and the logic level is sampledon
the risingedge of CLK. In Modes 1, 2, 3, and 5 the
GATEinputis rising-edge
sensitive.In theseModes,
a rising edge of GATE (trigger)sets an odge-s€nsitive flip-flopin the Counter.This flip-flopis then sampled on the next rising edge of CLK; the flip-flop is
reset immediatelyafter it is sampled.In this wdy, a
triggerwill be detectedno matter when it occure-a
high logic level does not have to be maintaineduntil
the next rising edge of CLK. Note that in Modes 2
and 3, the GATErnputis both edge-and level-sensitive. In Modes 2 and 3, if a CLK source other than
the system clock is used, GATE should be pulsed
immediatelyfollowingWR of a new count value.
Enables
countino
5
Initiates
countino
Flgure21.GatePlnOperations
Summary
COUNTER
ilAX
ttllN
MODE
COUNT COUNT
0
1
0
1
1
0
2
2
0
3
2
4
1
0
0
New counts are loaded and Counters are degementedon the fallingedge of CLK.
The largestpossibleinitialcount is 0; this is equivalent to 216 tor binary counting and 104 for BCD
counting.
NOTE:
0 is equivalentto 216 for binarycountingand 10a for
BCDcounting
Figure22.llinlmumandllaxlmumInitlalCounts
The Counterdoes not stop when it reacheszero. In
Modes0, 1, 4, and 5 the Counter"wrapsaround"to
the highestcount, either FFFF hex for binarycounting or 9999 for BCDcounting,and continuescounting.Modes2 and 3 are periodic;theCounterreloads
itself with the initialcount and continuescounting
from there.
3-9s
inbf
82C54
'Notice: Sfressesabavethosalisted under "Abso'
lute MaximumRatings"maycausepermanentdamage to tha device. Thisis a stressrating only and
functionaloperationof the deviceat these or any
otherconditionsabovethoseindicatedin the apera'
tionalsectionsot thisspecilicationis not implied.Ex'
posure to absolutemaximumrating conditionstor
ertendedperiodsmayaffect devicereliability.
ABSOLUTEMAXIMUMRATINGS*
UnderBias... . . . '0"Cto 70'C
AmbientTemperature
-65" to + 150'C
Temperature
Storage
. -0,5 to +8.0V
SupplyVoltage
...... +4Vto f 7V
OperatingVoltage
. .GND- 2Vto + 6.5V
on anylnput..
Voltage
Voltage
onanyOutput. .GND-O.SVto V66 + 0'5V
. '. '..1Watt
PowerDissipation
D.C.CHARACTERISTICS
Temperature)
(Tn:0"Cto 70"C,Vcc:5Vt 10%,GND=0V)(Tl : -40"C to *85'G for Extended
Vu
Parameter
InputLowVoltage
Vrr.r
InputHighVoltag€
Vor
OutputLowVoltage
OutputHighVoltage
Symbol
Vox
Max
0.8
Vcc + 0.5
0.4
Mln
-0.5
2.0
V
V
v
V
V
3.0
Vcn - 0.4
r 2.0
pA
i10
166
InoutLoadCurrent.
OutputFloatLeakageCurrent
V66 SupplyCunent
20
pA
mA
lccse
V66SupplyCurrent-Standby
10
pA
ltr
Inrr
Test Condltlons
Unltg
lor : 2.5mA
lon : -2.5 ml
lor+: -100pA
Vrr.r:Vccto 0V
Vour:Vcc to 0.0V
crkFreq: ,r^i$i;rt""Tl
CLKFreq : P6
e3: Vcc.
BusVcc
Alllnputs/Data
AllOutputsFloating
lccsgr
Vg6 SupplyCurrent-Standby
150
p.A
CLKFreq: 96
eE : Vcc.AlfOtherInputs,
OPen
Outputs
l/O Pins: VGND,
lnputCapacitance
10
20
20
PF
fc: 1MHz
pF
pins
Unmeasured
returned
to GND(s)
Crru
Cvo
cour
l/O Capacitance
OutputCapacitance
A.C.CHARACTERISTICS
(T4 : 0'C to 70'C, Vcc : 5V + 10o/o,GND :0V) (Tg :
pF
-40"G to *85"C for ExtendedTemperature)
(Note1)
BUSPARAMETERS
REAOCYCLE
Symbol
taR
tsR
tna
hn
tRo
tRo
tor
tRv
Parameter
AddressStableBeforeFD J
C-SStabteBeforeFiDJ,
AddressHoldTimeAfterFiD1
FiDPutseWidth
DataDelayfromFD J
Data Delavfrom Address
Ho- f to Data Floating
Recovery
Time
Command
82C54
Mln
Mar
45
0
0
95
150
3
200
NOTE:
1. AC tirningsmeasuredat V6p : 2.OY,Vol : 0.8V.
3-96
82C54-2
Max
Mln
30
0
0
120
220
90
5
165
Unite
ns
ns
ns
ns
85
ns
185
ns
ns
ns
65
inbr
82C54
(continued)
A.C. CHARACTERISTICS
WRITE CYCLE
Symbol
Parameter
tew
AddressStableBeforeWF J
tsw
WFiJ
eS staoteBefore
twe
tww
Address
HoldTimeAfterWFI
T
tow
twD
tRv
WR PulseWidth
DataSetupTimeBeforeWF f
DataHoldTimeAtterWFIf
Time
Recovery
Command
82C54
Mln
ilax
0
0
0
150
120
0
200
82C54-2
Max
Min
Units
0
ns
0
0
95
95
0
165
ns
ns
ns
ns
ns
ns
CLOCKAND GATE
Symbol
tcr-x
tpwH
tpwl
Tn
tp
tcw
tcrtes
tcn
Too
tooo
twc
twc
two
br-
Parameter
ClockPeriod
HighPulseWidth
Low PulseWidth
ClockRiseTime
ClockFallTime
GateWidthHigh
Gate WidthLow
GateSetupTimeto CLKT
GateHoldTimeAfterCLKT
OutputDelayfromCLKJ
OuiputDelayfrom GateJ
CLK Delayfor Loading(a)
GateDelayfor Sampling(a)
OUT Delayfrom ModeWrite
CLK Set Up for CountLatch
82C54
liin
liax
125
DC
60(3)
60(3)
82C54-2
llax
llin
DC
100
30(3)
50{3}
25
25
25
ns
ns
ns
ns
25
ns
50
50.
50
50
50
40
50(2)
50(2)
100
150
120
0
-5
-40
55
50
260
45
0
-5
-40
100
55
40
240
40
Units
ns
ns
ns
ns
ns
ns
ns
ns
ns
ns
NOTES:
2. In Modes 1 and 5 iriggersare sampledon each risingclock edge.A secondtriggerwithin 120 ns (70 ns for the 82C5+21
ol the rising clock edge may not be detected.
3. Low-goingglitchesthat violatetpWn,tpWUmay causeerrorsrequiringcounterreprogramming.
below.
4. Exceptlor ExtendedTemp.,See ExtendedTemp.A.C.Characteristics
5. Samplednol 1000/"tested.T4 : 25"C.
6. It CLK present at Try6 min then CountequalsN + 2 CLK pulses,T616max equalsCountN + 1 CLK pulse.Tyy6min to
Tryg max,countwill be eitherN + 1 or N + 2 CLKpulses.
min Counterwill not be triggered,at Tyy6
7. In Modes 1 and 5, if GATEis presentwhen writinga new Countvalue,at T1116
max Counterwill be triggered.
8. lf CLK present when writinga CounterLatch or ReadBackCommand,at T61 min CLK will be reflecled in count value
latched,at Tg1 max CLK will not be reflectedin the count value latched.Writinga CounterLatch or ReadBackCommand
betweenT61-min and Tyyl max will r€sultin a latchedcount valluewhichis + one leastsignificantbit.
EXTENDED
TET'PERATURE
O : -40'Cto *85'C for ExtendedT
3-97
int€t
231244-14
231241-15
231244-16
intet
82C54
CLOCK AND GATE
?3121/4.-17
' Lrst byt6 ot connt bdry written
A,C.TESTINGINPUT,OUTPUTWAVEFORI/I
AC. TESTINGLOADCIBCUIT
INPUT/OUTPUT
,.0
\-t
> ?tlr for|rt <
I
I
e.0
r\
0.4
o:v,cr
uxocr
Itttrtl
I
0.0
231211-18
A.C.Testing:Inputsar€ drivenet 2.4Vtor e logic"1" and 0.45V
tor a logic "0." Timingm€asurementsaro macleat 2.0Vfo a logic
"1" and0.8Vfor a logic"0."
I
|
3Gr'tltr
I
J-
Cu - 150PF
C1 ircddee lh clpacJtano.
3-99
?31211-19
APPENDIX D
CONFIGURING THE AD37OO
FOR SIGNAL*MATH
Jumper and Switch Settings
WhenrunningSIGNAL*MATH, you may haveto changesomeof the AD3700'son-boardjumpersfrom their
currentpositions.All jumpen mustbe setto the factory positionsasdescribedin Chapter1, exceptfor P3 andP5,
which canbe configuredfor any of the threepossibleinput ranges.
51- BaseAddress
SIGNAL*MATH assumesthat the baseaddressof your AD3700 is the factory settingof 300 hex (768 decimal). If you changethis setting,you must run the ADAINST programandresetthe baseaddress.
NOTE: When using the ADAINST program,you can enterthe baseaddressin decimalor hexadecimal
notation.When enteringa hex value,you mustprecedethe numberby a dollar sign (for example,$300).
RunningADAINST
After thejumpersand swirchare setand the AD3700 boardis installedin the computer,you arereadyto
configureSIGNAL*MATH so that it is compatiblewith your board'ssettings.This is doneby running the
ADAINST driver installationprogram.After running theprogram,openAD3700.DG from the Opena File ment.
You will seea screensimilar to the screenshownin Figure D-l below. The factory default settingsare shownin the
illusnation.Your settingsmay or may not matchthedefaultsettings,dependingon whetheryou havemadechanges
to tlese decimalor hexadecimalvalue (hex valuesmustbe precededby a dollar sign (for example,$300). Refer to
your board'smanualif you needhelp in determiningthe conect valueto enter.
EOC IT (End-of-ConvertInterrupt). In thisblock,entertheIRQ channelnumberto be usedby theend-ofconvertintemrpt(seeBA + 6 descriptionin Chapter4).
End-ol-Convert
Interrupt
Channel
Timer/Counter
lnterrupt
Channel
BaseAddress
Software
Interrupt
Address
A/D DMA
Channel
Select;
External
Gain
& Loss
D/A DMA
Channel
Select;
ExternalGain
& Loss
A/D Unipolar/
Bipolar
Select
D/AUnipolar/
Bipolar
Select
Fig.D-l - ADAINST.EXE
Screen
D-3
Timer IT (Timer/CounterInterrupt). This block is not usedon theAD3700,andshouldbe left blank.
LabTech SW IT (LABTECH NOTEBOOK SoftwareInterrupt). This setsthe softwareintemrptaddress
whereLABTECH NOIEBOOK's labLINX driver is installed.The factory settingis $60. This settingcanbe
ignoredwhenrunning SIGNAL*MATH.
A./DParameters. Six A/D boardparamet€rs
arelisted:resolution,numberof channels,activeDMA channel,
gain,loss,andinput voltagepolarity.
Resolutionand numberofchannels arefixed by the programfor your board.
If you are using DMA transfer,you mustenterthe channelnumberyou are usingin the DMA channelblock.
Valid channelsnumben are I and 3.
The next two blocks, gain and loss,areprovidedso that you can makeadjustmentsfor external gain or loss,
including resistorconfigurablegain circuitry you addedto the board.For example,if you havea gain circuit
installed,thenyou must tell SIGNAL*MATH ttris gain. If your input signalis externallyaffenuated,then you can
adjustfor this by settinga value otherthan 1 for loss.Numbersmustbe enteredas whole decimalvalues.The
factory default settingfor gain and lossis 1.
For a bipolar input range,an X shouldbe placedbeforeBipolar on tle screen(default setting).For unipolar
operation,removethe X.
D/A Parameters. Thesesettingsare not applicableto the AD3700.
D-4
l
APPENDIX E
CONFIGURING THE AD37OOFOR ATLANTIS
If you havepurchasedATLANTIS dataacquisitionandreal time monitoringapplicationsoftwarefor your
AD3700,pleasenote that the ATLANTIS drivers for your board mustbe loadedfrom your driver disk into the same
directory asthe ATLANTIS.EXE program.All jumpersmustbe setto the factory positionsasdescribedin Chapter
l, exceptfor P3 andP5, which canbe configuredfor anyof the threepossibleinput ranges.Whenrunning
ATLANTIS, makesurethe baseaddresssettingin the programandon the boardmatch.
51- BaseAddress
thatthebaseaddressof your AD3700is thefactorysettingof 300 hex (seeChapter1). If
ATLANTIS assumes
you changedthis setting,you must run the ATINST progam andresetthebaseaddress.
NOTE: The ATINST programrequiresthebaseaddress[o be enteredin decimalnotation.
E-3
APPENDIX F
WARRANTY
LIMITED WARRANTY
Real Time Devices,Inc. warrantsthe hardwareand softwareproductsit manufacturesandproduces!o be free
from defectsin materialsand workmanshipfor oneyearfollowing ttredateof shipmentfrom REAL TIME DEVICES. This warrantyis limited to the original purchaserof productand is not Eansferable.
During tle oneyear warrantyperiod,REAL TIME DEVICES will repair or replace,at its option, any defective
productsor partsat no additionalcharge,providedttratthe productis returned,shippingprepaid,to REAL TIME
DEVICES. All replacedpartsand productsbecomethe propertyof REAL TIME DEVICES. Before returning any
product for repair, customersare required to contactthe factory for an RMA nunber.
THIS LIMITED WARRANTY DOESNOT EXTEND TO AI.IY PRODUCTSWHICH HAVE BEEN DAMAGED AS A RESULT OF ACCIDENT, MISUSE, ABUSE (suchas: useof incorrectinput voltages,improperor
insufficient ventilation,failure to follow the operuing instructionsthat areprovidedby REAL TIME DEVICES,
"acts of God" or othercontingenciesbeyondthe control of REAL TIME DEVICES), OR AS A RESULT OF
SERVICEOR MODIFICATION BY ANIYONEOTIIER THAN REAL TIME DEVICES. EXCEPT AS EXPRESSLYSETFORTH ABOVE, NO OTIIER WARRANTIES ARE E)GRESSEDOR IMPLIED, INCLUDING,
BUTNOTLIMITED TO, ANIYIMPLIED WARRANTIESOFMERCHANTABILITY AND FITNESSFOR A
PARTICULAR PURPOSE,AND REAL TIME DEVICES E)PRESSLY DISCLAIMS ALL WARRANTIES NOT
STATED IIEREIN. ALL IMPLIED WARRANTIES,INCLUDING IMPLIED WARRANTIES FOR
MECHANTABILITY AND FITNESSFOR A PARTICULAR PURPOSE,ARE LIMITED TO TI{E DURATION
OF THIS WARRANTY. IN T}IE EVENT TIIE PRODUCTIS NOT FREEFROM DEFECTSAS WARRANTED
ABOVE, T}IE PURCHASER'SSOLEREMEDY SHALL BE REPAIR OR REPLACEMENT AS PROVIDED
ABOVE. UNDER NO CIRCUMSTANCESWILL REAL TIME DEVICES BE LIABLE TO TIIE PURCHASER
OR ANY USER FOR AI.ry DAMAGES,INCLUDING A}.IY INCIDENTAL OR CONSEQIJENTIALDAM.
AGES,E)GENSES,LOST PROFITS,LOST SAVINGS,OR OTHERDAMAGES ARISING OUT OF TIIE USE
OR INABILITY TOUSE TIIE PRODUCT.
SOME STATESDO NOT ALLOW T}IE EXCLUSION OR LIMITATION OF INCIDENTAL OR CONSEQUEI.IflAL DAMAGES FOR CONSUMERPRODUCTS,AND SOME STATESDO NOT ALLOW LIMITATIONS ON HOW LONG AN IMPLMD WARRANTY LASTS, SO T}M ABOVE LIMITATIONS OR EXCLUSIONSMAYNOTAPPLY TO YOU.
THIS WARRANTY GIVES YOU SPECIFICLEGAL RIGTilS, AND YOU MAY ALSO HAVE OTI{ER
RIGIITS WHICH VARY FROM STATE TO STATE.
F-3
Settings
3700BoardUser-Selected
Basel/OAddress:
(hex)
(decimal)