1
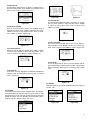
4.2.4 Test Mode
Change the mode of operation between the four modes.
Press “ZERO” or “MODE” keys to select. Press “LOG” to cancel or “MENU” to confirm and exit. This adjustment can also
be changed at the home screen display by simply pressing
“MODE” (Figure 4-2f). First Peak Mode will display a drop ratio menu (Figure 4-2g). This drop ratio actives the first peak
recording.
Load a standard force on the gauge. Wait a moment for the
force to stabilize. The current value (2) should equal the standard force applied.
If the values do not match, press “ZERO” and “MODE” keys to
correct the standard input value (3).
Press “MENU” to enter the next calibration point. After any of
the calibration points have been completed, touch “LOG” to
exit the calibration mode. Then save the calibration or discard
by pressing “Yes” or “No”.
After completing the calibration of the 5th point, the confirmation window will automatically ask to “Save and Exit” by selecting “Yes” or “No”. (Figure 4-7c)
Figure 4-2f
Figure 4-2g
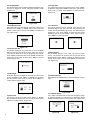
4.2.5 Tolerance
In the Preset menu, program high and low limit values to enable ok/ov testing. The lower limit value cannot be greater than
the upper limit value, and neither limit value can be greater
than 110% of the rated capacity. Press “ZERO” to adjust the
value, touch “MODE” to shift to the next position. Press “LOG”
to cancel; touch “MENU” to confirm and exit.
(Figure 4-2h)
Figure 4-7c
Press “ZERO” or “MODE” to select, then press “MENU”. If
“Yes” is selected, “Calibration Complete!” is displayed.
NOTE:
1. Ensure that the tare of attachment has been cleared before
calibration.
Figure 4-2h
4.2.6 Alarm
The alarm function can be turned on or off to activate or deactivate the user programmed tolerances set in the Tolerance
Menu. Touch “ZERO” or “MODE” keys to shift to the next position. Press “LOG” to cancel, touch “MENU” to confirm and
exit. (Figure 4-2i)
2. For higher measuring precision throughout the test range,
calibrating a point with a force at full scale is recommended.
3. Compression and tension calibrations are saved separately.
The force gauge can identify the direction of the force, but each
must be completed in a separate procedure.
4.3 Memory
In the Memory menu, the user can browse, delete, or print the
data. (Figure 4-3a)
Figure 4-2i
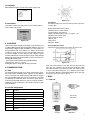
4.2.7 Calibration
Users can field-calibrate the gauge. First, enter the system password (Default is 123) by pressing the “ZERO” and
“MODE” keys. Then press “MENU” to confirm. (Figure 4-7a)
1
2
3
Figure 4-7a
jCalibration Point
kCurrent Value
lStandard Input Value
4
Figure 4-7b
Figure 4-3a