1
Cypher Instruments Ltd
Page 1 of 17
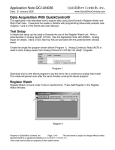
AN023 - C60 Application Note
Custom Control of the C60
The CypherGraph software uses an ActiveX control (ZapUsb.ocx) to control the C60. The methods exposed
by the ActiveX control allow ASCII commands to be sent to and received from the instrument. The
commands used are those used by the script language described in Appendix C of the user manual. To use
the ActiveX control the CypherGraph software must be installed.
There are eight methods and three events that are required to control the C60. Only these methods and
events should be used. The following gives a brief outline of the ActiveX control interface.
ActiveX Methods
1. BOOL Open(void)
This method opens the communications link to the C60. The return value is True if the device was found.
The function will return False if there is a communications link to the C60 already open.
2. void Close(void)
This method closes the communications link to the C60.
3. long Available(void)
This method returns the number of characters that are available to be read from the C60.
4. long ReadString(BSTR FAR* pszDestinationString, long lMaxLength)
This method reads a string from the device.
OUT pszDestinationString - Pointer to the destination wide string memory
IN lMaxLength - The length of the destination wide string memory
Returns the number of wide characters delivered to the destination memory
5. BOOL WriteString(LPCTSTR pszString)
This method writes a string to the C60.
IN pszString - Pointer to the destination zero terminated wide character string
Returns True if the write to the C60 was successful
6. BOOL IsOpen(void)
This method returns True if the communication link to the C60 is open.
7. void DisableDataReceived(void)
This method disables DataReceived events.
8. void EnableDataReceived(void)
AN023
www.cypherinstruments.co.uk
Custom Control Rev.A 15/8/2007
Cypher Instruments Ltd
Page 2 of 17
This method enables DataReceived events.
ActiveX Events
1. void Connect(void)
This event is fired when the communications link to the C60 is opened.
2. void Disconnect(void)
This event is fired when the communication link to the C60 is closed. Because the C60 is a PNP device, this
event will be fired when the USB cable is disconnected (surprise remove). It is expected that if the device is
open when this event is fired, then the Close method will be called.
3. void DataReceived(void)
This event is fired when data has been received from the C60. If message processing is performed in this
event, then it is expected that further DataReceived events will be suppressed until the exit of the event
handler by calling the DisableDataReceived method. The ActiveX control will fire this event again when the
EnableDataReceived method is called, if there are messages still waiting to be read.
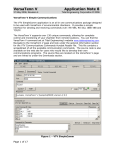
C60 Command list
CypherGraph contains a terminal window which provides a console style control interface to the C60. The
command console can be used to see how the C60 responds to commands. The C60 has many more
commands available than those listed in appendix C of the user manual. The command list supported by
your device can be seen with the “?” command. To open the control console, connect a C60 to the computer
and open CypherGraph. Then press Ctrl+D to open the About Device dialog box, then click the console
button.
AN023
www.cypherinstruments.co.uk
Custom Control Rev.A 15/8/2007
Cypher Instruments Ltd
Page 3 of 17
To enable the help facilities, type enablehelp 1<CR>.
AN023
www.cypherinstruments.co.uk
Custom Control Rev.A 15/8/2007
Cypher Instruments Ltd
Page 4 of 17
Type ?<CR> for a list of control commands.
NOTE:
The commands available and command syntax will vary with different versions of firmware.
Do not use calibration or other configuration commands such as “setfreqcomp”, “setserial”,
“setvdut”, “setvref”, “savecal”, “pretestcal” and “phasecal”. Incorrect use of these commands
could result in loss of calibration information.
AN023
www.cypherinstruments.co.uk
Custom Control Rev.A 15/8/2007
Cypher Instruments Ltd
Page 5 of 17
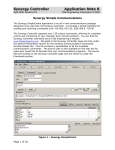
Sample control using Excel
The ActiveX control can be used in an Excel spread sheet to acquire data directly into a Worksheet. This can
be customised for any application specific network analysis. The spread sheet (ExcelSample.xls) is supplied
with this application note. For this sample to work you require a Windows PC with both Microsoft Excel and
CypherGraph installed.
Enabling Macros in Excel
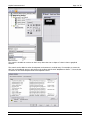
Before the sample spread sheet can be opened, Excel must have the macro facility enabled. This can be
found in the Tools->Macro->Security dialog.
The security level should be set to Medium.
AN023
www.cypherinstruments.co.uk
Custom Control Rev.A 15/8/2007
Cypher Instruments Ltd
Page 6 of 17
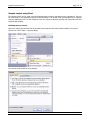
When the spread sheet is opened you will be prompted to enable macros, then click the “Enable Macros”
button.
Click OK to the ActiveX control warning dialog.
The spread sheet contains the test settings. Adjust these as required, then click the connect button. Refer to
appendix C of the user manual for sweep mode, phase and idle output frequency parameters.
NOTE: The maximum number of columns supported by Excel is 65536 and the zero based point
index returned with an amplitude or impedance result has a limit of 65536 (0 to 65535). Care
should be taken when setting the number of points to a value greater than 65536, since it will
exceed the limits of Excel and the point index will wrap from 65535 to 0. With this sample code
the number of points should be less than 65518.
AN023
www.cypherinstruments.co.uk
Custom Control Rev.A 15/8/2007
Cypher Instruments Ltd
Page 7 of 17
If a C60 is connected then the following dialog will show. Click Start to begin the test.
Progress is shown on the dialog as the C60 performs the test.
The data is displayed in the spread sheet as it is sent from the C60.
Adding ZapUsb control to an Excel worksheet
If you want to control the C60 from an existing spread sheet you will need to add the ZapUsb ActiveX
control to it. Open Excel and the Visual Basic Editor (Alt+F11). Right click on the VBAProject in the project
browser window. Left click Insert->User Form. Right click on the toolbox and left click “Additional
Controls…”.
AN023
www.cypherinstruments.co.uk
Custom Control Rev.A 15/8/2007
Cypher Instruments Ltd
Page 8 of 17
Select ZapUsb Control from the list and click OK.
This will add the ZapUsb control to the Excel tool box.
To add the control to the form click the ZapUsb icon, then draw a rectangle on the user form like you were
adding a button. So you can cut and paste the Excel Visual Basic macro listing into the form’s code, change
the name from ZapUsb1 to Device.
AN023
www.cypherinstruments.co.uk
Custom Control Rev.A 15/8/2007
Cypher Instruments Ltd
Page 9 of 17
The control is invisible at run-time so don’t worry about the size or shape of it since it has no graphical
function.
The control can be added to other development environments in a similar way. For example, to access the
C60 from a VisualStudio project, right click on the toolbox and left click “Add/Remove Items…”. From the list
of controls on the COM component tab select ZapUsb Control.
AN023
www.cypherinstruments.co.uk
Custom Control Rev.A 15/8/2007
Cypher Instruments Ltd
Page 10 of 17
The C60 Message Format
The machine readable messages returned by the device are in the format shown below. Each message is an
ASCII character string with a fixed length of 67 bytes. The message contains seven fields delimited by white
space (ASCII code 0x20).
ASCII Field
Field
Index
Length
Character Range
Function
Type
Field 1
1
1
0..9, A..Z, a..z
Message Type
Character
“:”
2
1
Field delimiter 1
Constant
Field 2
3
1
Message Flag
Hexadecimal
character
“SPACE”
4
1
Field delimiter 2
Constant
Field 3
5
2
“.”
7
1
Floating point data
field 1
Signed numeric
data
8
6
14
1
15
3
“SPACE”
18
1
Field delimiter 3
Constant
Field 4
19
2
“.”
21
1
Floating point data
field 2
Signed numeric
data
22
6
28
1
29
3
“SPACE”
32
1
Field delimiter 4
Constant
Field 5
33
2
“.”
35
1
Floating point data
field 3
Signed numeric
data
36
6
42
1
43
3
“SPACE”
46
1
Field delimiter 5
Constant
Field 6
47
2
“.”
49
1
Floating point data
field 4
Signed numeric
data
50
6
56
1
57
3
“SPACE”
60
1
Field delimiter 6
Constant
Field 7
61
5
Fixed point data
Unsigned numeric
data
“\r”
66
1
End of message marker
Constant
“\n”
67
1
“e”
“e”
“e”
“e”
0..9,A..F
-9..+9
000000..999999
-99..+99
-9..+9
000000..999999
-99..+99
-9..+9
000000..999999
-99..+99
-9..+9
000000..999999
-99..+99
000000..065535
Figure 1 Machine readable message format
AN023
www.cypherinstruments.co.uk
Custom Control Rev.A 15/8/2007
Cypher Instruments Ltd
Page 11 of 17
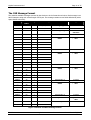
The first character of each message defines the message type. The message type defines the
meaning of all the other fields in the message. However, there are three messages which don’t use
fields 3 to 7. Instead, the remaining fields are translated as one single ASCII character string. Figure 2
shows the character code and the field meanings for the most important messages. The C60 can
return many more field character codes but these are reserved for use by CypherGraph.
Field
2
1
“A”
Attenuator
support
1 = TRUE
“B”
Internal loopback relay
state
Command
3
4
5
6
7
Minimum
attenuation
in dB
Maximum
attenuation
in dB
Attenuation
step size in
dB
Current
attenuation
setting
Number of
attenuation
steps for use
by user
“atten”
Calibration
frequency
in Hz
Upper test
point
attenuation
setting in
dB
Lower test
point
attenuation
setting in
dB
Calibration
slope in
ADC counts
/ dB
Use graph
extents to
define start
and stop
frequencies
“zerocal”
ON = 1
/ comment
OFF = 0
“C”
N/A
Calibration
frequency
in Hz
Upper test
point
attenuation
setting in
dB
Lower test
point
attenuation
setting in
dB
VREF
setting
VDUT setting
“phasecal”
“D”
Repeat
Calibrate
Before
each test
Oscillator
start
frequency
in Hz
Oscillator
end
frequency
in Hz
Sweep
direction
Linear test
points
Start of test
marker
1=
Reverse
1 = linear
1 = ON
0 = OFF
1 = ON
“E”
Repeat
1 = ON
0 = OFF
Oscillator
start
frequency
in Hz
Calibrate
Before
each test
1 = ON
Oscillator
end
frequency
in Hz
0 = OFF
“F”
Redraw graph
1 = Redraw
0 = Log
0=
Forward
0 = OFF
Sweep
direction
Linear test
points
1=
Reverse
1 = linear
End of test
marker
0 = Log
0=
Forward
Frequency
in Hz
Impedance
in Ohms
Phase in
degrees
Phase sign
Zero based
test point
index
“imptest”
0 = Don’t
“G”
N/A
Frequency
in Hz
Impedance
in Ohms
Phase in
degrees
Phase sign
Zero based
test count
“impspot”
“H”
Redraw graph
Frequency
in Hz
Amplitude
in dB
Phase in
degrees
Phase sign
Zero based
test point
index
“amptest”
1 = Redraw
0 = Don’t
“I”
N/A
Frequency
in Hz
Amplitude
in dB
Phase in
degrees
Phase sign
Zero based
test count
“ampspot”
“J”
Internal
calibration
relay state
Input
disable
relay state
Impedance
test relay
state
Calibrate
DUT signal
state
Repeat
“loopback”
1 = ON
1 = ON
Current
Select
switch
state
1 = ON
1 = ON
0 = OFF
0 = OFF
0 = OFF
0 = OFF
1 = ON
1 = ON
0 = OFF
0 = OFF
AN023
www.cypherinstruments.co.uk
Custom Control Rev.A 15/8/2007
Cypher Instruments Ltd
“K”
Sweep
direction
1 = Reverse
0 = Forward
“L”
Amplitude
support
1 = ON
Page 12 of 17
Oscillator
idle
frequency
in Hz
Oscillator
start
frequency
in Hz
Oscillator
end
frequency
in Hz
Oscillator
spot
frequency
in Hz
Linear test
points
“oscillator”
1 = linear
0 = Log
-1 = start
frequency
Minimum
oscillator
frequency
in Hz
Maximum
oscillator
frequency
in Hz
Minimum
amplitude
in dB
Maximum
amplitude
in dB
N/A
“limits”
Minimum
oscillator
frequency
in Hz
Maximum
oscillator
frequency
in Hz
Minimum
phase shift
in degrees
Maximum
phase shift
in degrees
N/A
“limits”
Minimum
oscillator
frequency
in Hz
Maximum
oscillator
frequency
in Hz
Minimum
impedance
in Ohms
Maximum
impedance
in Ohms
N/A
“limits”
Version
Release
Build
Hardware
revision
number
N/A
“mver”
Number of
test points
Number of
samples
per point
Number of
voltage
cycles per
point
Number of
current
cycles per
point
Number of
cycles
required for
phase
calibration
test point
information
2 = OFF
“M”
Phase support
1 = ON
2 = OFF
“N”
Impedance
support
1 = ON
2 = OFF
“O”
Debug Build
1 = Debug
0 = Release
“P”
Calibrate
Before each
test
1 = ON
0 = OFF
“Q”
N/A
Test start
settling
time
Test point
settling
time
(Period)
Zero
calibration
settling
time
Sweep
speed
setting
Number of
sweep
speeds
settling time
information
“R”
Apply
Calibration
Curve
Phase
calibration
start
settling
time
Phase
calibration
settling
time
System
Calibrated
N/A
N/A
Phase
calibration
settling time
information
“S”
N/A
Number of
test points
Test point
settling
time
(Period)
Number of
voltage
cycles per
point
Number of
current
cycles per
point
Zero based
test point
index
“retrace”
“T”
Message type
The remainder of the fields are all translated as one single fixed length string
1 = Error
0=
Information
“U”
Document
action
3
2
1
0
=
=
=
=
New document name – Load / Create a new document with this title and get ready to
accept data
Imp Vs T
Amp Vs T
Imp Vs F
Amp Vs F
Figure 2 Message field definitions
AN023
www.cypherinstruments.co.uk
Custom Control Rev.A 15/8/2007
Cypher Instruments Ltd
Page 13 of 17
Excel Visual Basic macro listing
' Sample communications code with a C60 for impedance
' data acquisition directly into an excel spread sheet
' By Adam Fullerton
'
' Global constants
'~~~~~~~~~~~~~~~~~
'
'
Private Const DEV_RX_BUFFER_SIZE = 31200
Private Const DEV_RX_MESSAGE_SIZE = 67
'
' The position of the fields in the message string
'~~~~~~~~~~~~~~~~~~~~~~~~~~~~~~~~~~~~~~~~~~~~~~~~~
'
'
Private
Private
Private
Private
Private
Private
Private
Private
Private
Private
Const
Const
Const
Const
Const
Const
Const
Const
Const
Const
DEV_FIELD2_INDEX = 3
DEV_FIELD2_SIZE = 1
DEV_FIELD3_INDEX = 5
DEV_FIELD4_INDEX = 19
DEV_FIELD5_INDEX = 33
DEV_FIELD6_INDEX = 47
DEV_FIELD7_INDEX = 61
DEV_FIELD7_SIZE = 5
DEV_STRING_FIELD_START = 4
DEV_STRING_FIELD_END = 65
'
' The position of the fields in the work sheet
'~~~~~~~~~~~~~~~~~~~~~~~~~~~~~~~~~~~~~~~~~~~~~~~~~
'
'
' These are the cell addresses of the settings
Private Const WKS_START_FREQ_CELL = "B2"
Private Const WKS_END_FREQ_CELL = "B3"
Private Const WKS_POINTS_CELL = "B4"
Private Const WKS_STEPS_CELL = "B5"
Private Const WKS_PHASE_ACQ_CELL = "B6"
Private Const WKS_SWEEP_MODE_CELL = "B7"
Private Const WKS_ATTEN_CELL = "B8"
Private Const WKS_REST_PERIOD_CELL = "B9"
Private Const WKS_IDLE_FREQ_CELL = "B10"
' These are the destination cell addresses of the device info
Private Const WKS_FIRMWARE_VERSION = "B13"
Private Const WKS_SERIAL_NUMBER = "B14"
' These are the column addresses for the acquired data
Private Const WKS_POINT_COLUMN = "A"
Private Const WKS_FREQUENCY_COLUMN = "B"
Private Const WKS_IMPEDANCE_COLUMN = "C"
Private Const WKS_PHASE_COLUMN = "D"
Private Const WKS_PHASE_SIGN_COLUMN = "E"
' This is where the acquired data starts
Private Const WKS_FIRST_DATA_ROW = 17
'
' Private variables
'~~~~~~~~~~~~~~~~~~
'
Private g_sRxBuffer As String * DEV_RX_BUFFER_SIZE
' The test start button click
Private Sub cmdStart_Click()
' Check that the test has not already been started
If cmdStart.Caption = "Start" Then
With Device
' Ask the device for its version, serial number and other information
.WriteString("enquire" + vbCr)
' With firmware V1.19.327 or higher 1/16th Hz frequency resolution is possible.
' The enquire command sets communications compatibility mode, if you are using
' firmware V1.19 or higher the following will enable the higher frequency resolution.
'.WriteString "enquire 1.19" + vbCr
' Send the repeat setting 0 = off, 1 = repeat
AN023
www.cypherinstruments.co.uk
Custom Control Rev.A 15/8/2007
Cypher Instruments Ltd
Page 14 of 17
.WriteString("repeat " + Str(0) + vbCr)
' Send the start frequency
.WriteString("startfreq " + Str(Worksheets(1).Range(WKS_START_FREQ_CELL)) + vbCr)
' Send the end frequency
.WriteString("endfreq " + Str(Worksheets(1).Range(WKS_END_FREQ_CELL)) + vbCr)
' Send the number of points
.WriteString("points " + Str(Worksheets(1).Range(WKS_POINTS_CELL)) + vbCr)
' Send the frequency steps
.WriteString("linear " + Str(Worksheets(1).Range(WKS_STEPS_CELL)) + vbCr)
' Send the phase setting 1 = on 0 = 0ff
.WriteString("phase " + Str(Worksheets(1).Range(WKS_PHASE_ACQ_CELL)) + vbCr)
' Send the sweep direction setting
.WriteString("sweepmode " + Str(Worksheets(1).Range(WKS_SWEEP_MODE_CELL)) + vbCr)
' Send the attenuation
.WriteString("atten " + Str(Worksheets(1).Range(WKS_ATTEN_CELL)) + vbCr)
' Send the rest period
.WriteString("period " + Str(Worksheets(1).Range(WKS_REST_PERIOD_CELL)) + vbCr)
' Send the idle frequency -1 = start, 0 = off
.WriteString("idlefreq " + Str(Worksheets(1).Range(WKS_IDLE_FREQ_CELL)) + vbCr)
' Start an impedance test
.WriteString("imptest " + vbCr)
End With
ElseIf cmdStart.Caption = "Stop" Then
' Write the command to exit the test
Device.WriteString("x" + vbCr)
End If
End Sub
' The Data Received event
Private Sub Device_DataReceived()
Dim l_lAvailable As Long
Dim l_lCrPos As Long
' Using the device
With Device
' Disable further DataReceived events
.DisableDataReceived()
' While there is data available
Do While .Available > DEV_RX_MESSAGE_SIZE - 1
' Get the length ready to read
l_lAvailable = .Available
' Initialise the buffer
g_sRxBuffer = String(DEV_RX_BUFFER_SIZE, 0)
' make sure that we don't read over
' the end of our string buffer
If l_lAvailable < g_BufferSize - 1 Then
l_lAvailable = g_BufferSize - 1
End If
' Read the data
.ReadString(g_sRxBuffer, l_lAvailable)
Do
' look for <CR>
l_lCrPos = InStr(1, g_sRxBuffer, vbCr, vbTextCompare)
If l_lCrPos = 0 Then
' exit if <CR> not found
Exit Do
Else
l_lCrPos = l_lCrPos + 1
' Show the responses from the device
Debug.Print(Left(g_sRxBuffer, l_lCrPos))
' Pars the data line
ParsMessage(l_lCrPos)
End If
' Chop off what we have parsed
g_sRxBuffer = Right(g_sRxBuffer, (DEV_RX_BUFFER_SIZE - l_lCrPos))
l_lAvailable = l_lAvailable - l_lCrPos
Loop
Loop
' Enable more DataReceived events
.EnableDataReceived()
End With
End Sub
' Subroutine to check for a machine readable message from the C60
Private Sub ParsMessage(ByVal lCrPos As Long)
' Machine readable commands are always
' DEV_RX_MESSAGE_SIZE chars long
' All other messages are human readable
If lCrPos = DEV_RX_MESSAGE_SIZE Then
' Look for : as the second char as
' the sign of a machine readable message
If InStr(1, g_sRxBuffer, ":", vbTextCompare) = 2 Then
AN023
www.cypherinstruments.co.uk
Custom Control Rev.A 15/8/2007
Cypher Instruments Ltd
Page 15 of 17
' Pars the message
ParsMessageType(Left(g_sRxBuffer, 1))
End If
End If
End Sub
' Subroutine to pars the message type
Private Sub ParsMessageType(ByVal sType As String)
Select Case sType
Case Is = "A"
' Attenuation setting
Case Is = "B"
' Zero calibration results
Case Is = "C"
' Phase calibration results
Case Is = "D"
cmdStart.Caption = "Stop"
Case Is = "E"
cmdStart.Caption = "Start"
lblStatus.Caption = ""
Case Is = "F"
' Swept impedance results
ParsSweepZResult()
Case Is = "G"
' Spot impedance results
Case Is = "H"
' Swept amplitude results
ParsSweepAResult()
Case Is = "I"
' Spot amplitude results
Case Is = "K"
' Oscillator settings
Case Is = "L"
' Device characteristic limits 1
Case Is = "M"
' Device characteristic limits 2
Case Is = "N"
' Device characteristic limits 1
Case Is = "O"
' Device version information
ParsVersion()
Case Is = "P"
' Point information
Case Is = "T"
' String message from the device
Case Is = "V"
' Serial number string of the device connected
ParsSerialNumber()
Case Is = "r"
ParsProgress()
End Select
End Sub
'~~~~~~~~~~~~~~~~~~~~~~~~~~~~~~~~~~~~~~~~~~~~~~~~~~~~~~~~~~~~~~~~~~~
' Description: Sub to get an integer field
'
' Parameters :
'
IN iLeft - The left offset
'
IN iLength - The length
'
OUT lField - The data field value
'
'~~~~~~~~~~~~~~~~~~~~~~~~~~~~~~~~~~~~~~~~~~~~~~~~~~~~~~~~~~~~~~~~~~~
Private Sub GetLongField(ByVal iLeft As Integer, ByVal iLength As Integer, ByVal lField As Long)
Dim l_sTemp As String
l_sTemp = Left(g_sRxBuffer, (iLeft + iLength - 1))
l_sTemp = Right(l_sTemp, iLength)
lField = CLng(l_sTemp)
End Sub
'~~~~~~~~~~~~~~~~~~~~~~~~~~~~~~~~~~~~~~~~~~~~~~~~~~~~~~~~~~~~~~~~~~~
' Description: Sub to get a double precision field
'
' Parameters :
'
IN iStartIndex - The index where the double starts
'
OUT dblField - The data field value
'
'~~~~~~~~~~~~~~~~~~~~~~~~~~~~~~~~~~~~~~~~~~~~~~~~~~~~~~~~~~~~~~~~~~~
Private Sub GetDoubleField(ByVal iStartIndex As Integer, ByVal dblField As Double)
Dim l_sTemp As String
l_sTemp = Left(g_sRxBuffer, (iStartIndex + 12))
l_sTemp = Right(l_sTemp, 13)
dblField = Val(l_sTemp)
AN023
www.cypherinstruments.co.uk
Custom Control Rev.A 15/8/2007
Cypher Instruments Ltd
Page 16 of 17
End Sub
'~~~~~~~~~~~~~~~~~~~~~~~~~~~~~~~~~~~~~~~~~~~~~~~~~~~~~~~~~~~~~~~~~~~
' Description: Subroutine to extract a string
'
' Parameters :
'
OUT sMessage - The string
'
'~~~~~~~~~~~~~~~~~~~~~~~~~~~~~~~~~~~~~~~~~~~~~~~~~~~~~~~~~~~~~~~~~~~
Private Sub GetStringField(ByVal sMessage As String)
sMessage = Left(g_sRxBuffer, DEV_STRING_FIELD_END)
sMessage = Right(sMessage, DEV_STRING_FIELD_END - DEV_STRING_FIELD_START)
' Eat leading white space
sMessage = Trim(sMessage)
End Sub
' Sub to pars the device version information
Private Sub ParsVersion()
Dim l_dblValue As Double
Dim l_lValue As Long
Dim l_iVersion As Integer
Dim l_iRelease As Integer
Dim l_lBuild As Long
Dim l_iHardware As Integer
' Device Version
GetDoubleField(DEV_FIELD3_INDEX, l_dblValue)
l_iVersion = CInt(l_dblValue)
' Device Release
GetDoubleField(DEV_FIELD4_INDEX, l_dblValue)
l_iRelease = CInt(l_dblValue)
' Device Build
GetDoubleField(DEV_FIELD5_INDEX, l_dblValue)
l_lBuild = CLng(l_dblValue)
' The hardware code
GetDoubleField(DEV_FIELD6_INDEX, l_dblValue)
l_iHardware = CInt(l_dblValue)
' Update the device information cell
Worksheets(1).Range(WKS_FIRMWARE_VERSION) = "V" & l_iVersion & "." & l_iRelease & " Build " &
l_lBuild & " Hardware V" & l_iHardware
End Sub
' Subroutine to pars the serial number
Private Sub ParsSerialNumber()
Dim l_sTemp As String
' Get the serial number
GetStringField(l_sTemp)
' Update the serial number information cell
Worksheets(1).Range(WKS_SERIAL_NUMBER) = l_sTemp
End Sub
' Subroutine to pars the progress messages
Private Sub ParsProgress()
Dim l_sTemp As String
' Get the message string
GetStringField(l_sTemp)
' Show the status string
lblStatus.Caption = l_sTemp
End Sub
' Subroutine to pars the swept impedance result
Private Sub ParsSweepZResult()
Dim l_lPointIndex As Long
Dim l_dblPointFrequency As Double
Dim l_dblImpedance As Double
Dim l_dblPhase As Double
Dim l_dblPhaseSign As Double
' Point frequency in Hz
GetDoubleField(DEV_FIELD3_INDEX, l_dblPointFrequency)
' Impedance in Ohms
GetDoubleField(DEV_FIELD4_INDEX, l_dblImpedance)
' Phase in degrees
GetDoubleField(DEV_FIELD5_INDEX, l_dblPhase)
' Phase sign
GetDoubleField(DEV_FIELD6_INDEX, l_dblPhaseSign)
' The zero based index of this point
GetLongField(DEV_FIELD7_INDEX, DEV_FIELD7_SIZE, l_lPointIndex)
' Enter the point index
Worksheets(1).Range(WKS_POINT_COLUMN & (l_lPointIndex + WKS_FIRST_DATA_ROW)) = l_lPointIndex
' Enter the frequency
Worksheets(1).Range(WKS_FREQUENCY_COLUMN & (l_lPointIndex + WKS_FIRST_DATA_ROW)) =
l_dblPointFrequency
' Enter the impedance
Worksheets(1).Range(WKS_IMPEDANCE_COLUMN & (l_lPointIndex + WKS_FIRST_DATA_ROW)) =
l_dblImpedance
AN023
www.cypherinstruments.co.uk
Custom Control Rev.A 15/8/2007
Cypher Instruments Ltd
Page 17 of 17
' Enter the phase
Worksheets(1).Range(WKS_PHASE_COLUMN & (l_lPointIndex + WKS_FIRST_DATA_ROW)) = l_dblPhase
' Enter the phase sign
Worksheets(1).Range(WKS_PHASE_SIGN_COLUMN & (l_lPointIndex + WKS_FIRST_DATA_ROW)) =
l_dblPhaseSign
End Sub
' Subroutuine to pars the swept amplitude result
Private Sub ParsSweepAResult()
Dim l_lPointIndex As Long
Dim l_dblPointFrequency As Double
Dim l_dblAmplitude As Double
Dim l_dblPhase As Double
Dim l_dblPhaseSign As Double
Dim l_lValue As Long
' Point frequency in Hz
GetDoubleField(DEV_FIELD3_INDEX, l_dblPointFrequency)
' Amplitude in dB
GetDoubleField(DEV_FIELD4_INDEX, l_dblAmplitude)
' Phase in degrees
GetDoubleField(DEV_FIELD5_INDEX, l_dblPhase)
' Phase sign
GetDoubleField(DEV_FIELD6_INDEX, l_dblPhaseSign)
' The zero based index of this point
GetLongField(DEV_FIELD7_INDEX, DEV_FIELD7_SIZE, l_lPointIndex)
' TODO: What you want with amplitude results
End Sub
' The surprise remove event
Private Sub Device_Disconnect()
' End the program
UserForm_Terminate()
End Sub
' Form initialisation
Private Sub UserForm_Initialize()
' Activate the first worksheet
Worksheets(1).Activate()
' Try to connect to the device
If Device.Open() = False Then
' If it fais to open then show an error message
MsgBox("No C60 connected", vbOKOnly, "Error opening the device")
' We can't get data without a C60 so end the program
End
End If
End Sub
' Form termination event
Private Sub UserForm_Terminate()
On Error Resume Next
' Close the device
Device.Close()
' End the program
End
End Sub
[End of document]
AN023
www.cypherinstruments.co.uk
Custom Control Rev.A 15/8/2007