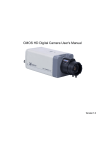
1
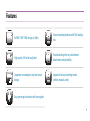
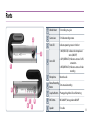
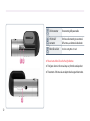
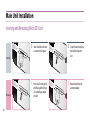
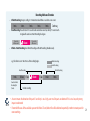
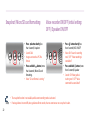
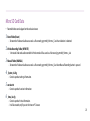
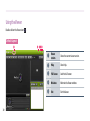
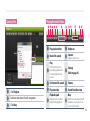
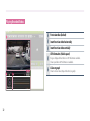
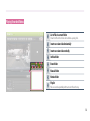
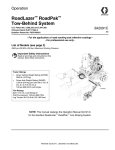
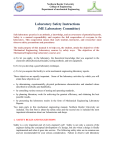
Table of Contents
10 What’s in the Box
11Parts
13 Cautions for Installation and Use
14 Main Unit Installation
18 Assembling/Disassembling Main Unit and Mount
19 Features and Instructions
27Viewer
39 Product Specifications
Safety Warnings and Cautions
The following contains important information for ensuring safety of the user and preventing potential damage or inconvenience due to
improper use. Please read the following warnings and cautions thoroughly before using the product.
* The safety warnings and cautions are categorized as below, depending on the level of
potential risks and damages that may result from improper use.
Failure to follow safety warnings may lead to serious injury or death.
Warnings
Failure to follow cautions may lead to injury or property damages.
Cautions
3
Warnings
Do not disassemble, or modify the product on your own or
install the product in a way other than intended.
Improper installation, disassembly, or modification of the product
may cause product to malfunction. Such malfunctions are not
covered under product warranty.
Do not operate the product while driving.
Operating the product while you driving may cause an accident. If
you need to operate the product, do so after coming to a full stop
in a safe location.
Do not operate the product if it malfunctions.
If any foreign matters or water has entered the product or if the
product releases smoke, stop using the product immediately and
contact Customer Support.
Do not drop the product in water or store it in a humid
environment for an extended period of time.
If the product is damaged by water or humidity, contact your
retailer or Customer Support.
4
Before installing the product, make sure that the vehicle's
ignition is turned off.
Installing the product while the ignition is on may result in electric
shock or accident.
Do not install the product on where it may obstruct the
driver's view or cause any kind of disturbance to driver.
Installing the product in such positions may lead to an accident.
Do not use this product when it is not functioning properly.
Continuing use of the product may lead to an accident.
Maintain the appropriate temperature (0°C to 60°C)
during use.
Operating the product beyond this temperature range may
lower the product’s performance and/or damage the hardware.
Warnings
Do not place water, beverages, chemicals, or other
potentially harmful items near the product.
It may damage the product or cause malfunctions.
When installing the product, make sure it does not
interfere with the operation of other onboard devices,
such as airbags.
Failure to do so may interrupt proper operation of such devices
and cause injuries.
Do not apply heat to the product using a furnace,
microwave, or hair drier.
Use the product only with recommended voltage.
It may lead to a product malfunction or a fire.
It may cause explosions, deformations, or defects.
Do not expose the product to direct sunlight for an
extended period of time during summer.
It may lead to a product malfunction or a fire.
Firmly install the product on a proper position.
If it is not attached firmly, the product may fall while driving, and
may cause traffic accidents.
Always use genuine parts and accessories from manufacturer.
Using non-genuine parts or accessories may lead to malfunctions or defects.
(Except external accessories ; GPS, SD card)
*We recommend that you should use MLC TYPE CLASS 10(UHS-Ⅰ) SD card in your country.
5
Cautions
Avoid strong impact to the product.
It may damage the product or cause malfunctions.
Be careful when you touch this product while in use. The
heat generated from the product may cause burn injuries.
Keep the camera lens clean at all times.
Failure to keep the camera lens clean may lower quality of
recordings.
Using the product in a vehicle with a tinted windshield
may alter the video recording.
Prolonged continuous use of this product may generate heat and
cause burn injuries.
Dramatic changes in the surroundings such as brightness
or backlight may degrade video recording quality.
Video recording quality may be affected in situations where
brightness changes quickly, such as entering and exiting tunnels,
or when facing strong backlight.
Do not touch this product with greasy or wet hands.
It may damage the product or cause malfunctions.
Event Recording may not be initiated if external impact is
not strong enough.
In such case, you can use the Manual Recording button to record
the event.
Do not operate the product with a sharp objects such as
nails or awls.
It may damage the product or cause malfunctions.
6
Cautions
Do not place the product near a magnet or areas with
strong magnetic fields.
It may damage the product or cause malfunctions.
Check the condition of the product and recording quality
on regular basis.
Make sure that the Micro SD card inserted in the product is
working properly. If any problems are found, stop using the
product and contact Customer Support.
This product supports Micro SDHC cards (8 to 32 GB, class
10 or higher).
Always backup important data to an external storage
medium.
If the data must be preserved for a long period of time, always
backup the data to an additional storage medium.
Manufacturer is not responsible for product damage and loss of data due to potential product malfunction brought on by an
accident or any other event.
7
Micro SD card is an essential part. Please read the following instructions carefully. The manufacturer will not take any liability concerning loss of data or
damage to Micro SD card.
Please use only genuine Micro SD card provided by the
manufacturer.
Use of third-party Micro SD cards may cause data loss or damage
the product.
When removing the Micro SD card from the product, turn
off the power and make sure that Power LED is turned off.
Removing the Micro SD card while power is on, may cause data
loss, data corruption or product malfunction.
Your Micro SD card is a consumable product with a limited
lifespan. After a certain period of time, the memory card
may be too damaged to recording videos properly.
Frequently check the recordings and format the Micro SD card at
least once a week (File System: FAT32). If the memory card cannot
function properly, please replace it with new one.
If you do not format the SD card for a long time “SD card must be
formatted” can be guided by the sound.
8
When purchasing or using a new Micro SD cards, make sure
that the Micro SD card size is supported by the product.
This product supports Micro SD cards up to 32 GB and Class 10
or higher.
Always check the correct side of the Micro SD card when
inserting, and insert it all the way.
If the Micro SD card is not inserted correctly, it may cause the
product to malfunction.
Do not disassemble or modify Micro SD card.
Such actions may cause data loss or damage the product.
You should always backup important data to another
storage medium.
If the data must be preserved for a long period of time, always
backup the data to an additional storage medium.
Features
Full HD (1920*1080) images at 30fps
Various recording functions with 180° rotating
lens
High quality 140° wide-angle lens
Functional design for easy attachment,
detachment and portability
Low power consumption, Low-heat circuit
design
Support of various recording modes
(infinite, manual, event)
Easy operating instructions with voice guide
9
What’s in the Box
The parts included in your package may not look identical with the following figures.
And some parts can be changed without notice.
Main Unit
User’s manual
USB car cigarette jack
Micro USB cable
Cable clips
10
•• User’s Manual can also be downloaded from the manufacturer’s web site.
www.sdsystem.com
Sold separately
GPS module
Parts
2
1
Vehicle Mount
For installing on a glass
2
3
Camera Lens
For Video recording camera
Front LED
Indicates operating status in the front
4
Status LED
1. MIC(RED LED): I ndicates the microphone’s
status (ON/OFF)
2. GPS(GREEN LED): Indicates a status of a GPS
connection
3. REC(GREEN LED): I ndicates a status of video
recording
5
Microphone
Records audio
6
Manual Recording
Turns manual recording
Button
7
Snapshot Button
Photographing, Micro SD card formatting
8
MIC Button
MIC ON/OFF, Voice guidance ON/OFF
9
Speaker
For audio
3
1
4
5
6
7
8
9
11
1 2
1
DC-IN connector
For connecting USB power cable
2
GPS/AV OUT
connector
For the use of connecting to an external
GPS antenna, and external video device
3
Micro SD card slot
Slot for inserting Micro SD card
※ Please insert a Micro SD card to the right direction.
※ The figures shown in this manual may vary from the actual product.
※ The contents of this manual are subject to be change without notice.
3
12
Cautions for Installation and Use
Installation
Please read the followings before you install the product.
••
••
••
••
••
••
Please read the User’s Manual carefully before installing the product.
Before installing, turn off the ignition of your vehicle and remove the keys.
Always keep your windshield glass clean to obtain high quality video recordings.
If the product is equipped with a GPS module, keep it distant from other electronic devices (such as Hi-Pass or satellite navigation systems) to prevent radio interference.
The quality of video recordings may varies depending on location and brightness.
Dark tinting or metallic coating on the windshield may lower GPS reception and darken the video recordings
If the product falls off while driving, it may lead to accidents or serious injuries. Before installing the product, be sure to
remove all foreign substances or dust from the windshield surface.
Micro SD Card
Before using your Micro SD card, please check the following.
••
••
Make sure that the Micro SD card is genuine. Use of non-genuine Micro SD cards may result in data loss.
When inserting and removing the Micro SD card from the product, turn the ignition off and wait until Operation LED is off. If the Micro SD card is removed while the product is powered on,
warning will be sounded. When the Micro SD card is removed, the product cannot complete the video recording. The video recording may be deleted partially. In some cases, the Micro SD card
will no longer be usable.
13
Main Unit Installation
Inserting and Removing Micro SD Card
1
Insert the Micro SD card
as shown in the figure.
2
Inserting
1
Removing
14
Press the SD card gently,
and the tip of the Micro
SD card will pop out of
the slot.
2
Insert the card until you
feel a click inside the
slot.
Remove the Micro SD
card completely.
Recommended Installation Method
To position the lens in the optimal position, it is recommended that you assemble the Main Unit and the Mount before installing
the product.
Recommended
Installation Position
If the product cannot be installed as described above, it can be installed at left or
right from the mirror thanks to the product’s wide viewing angle (140 degrees).
When installed off center, the recorded videos may not be aimed at the center of
the road.
To obtain the optimal video recording,
install this product in front of rear-view
mirror at the center of windshield.
Methods of connecting to the power
1. Connect the USB car cigarette jack to your car.
2. Connect the USB power cable of the black box to the
cigarette jack.
•• The USB car cigarette jack can be fallen out, due to car shaking.
•• Please make sure the cable is firmly connected, before turn on
the power.
15
1
3
Clean the surface of the
windshield where the
product will be mounted
using a dry fabric.
Attach mount to the
windshield firmly.
Do not install the product on
where it may obstruct the
driver’s view or cause any kind of
disturbance to driver.
16
2
4
*
Remove protective film from
the double-sided tape on the
Mount.
Connect GPS to the exclusive
socket
GPS is sold separately. Before
connecting and disconnecting,
please make sure that the power
is shut off.
5
*
After connect to the USB
power cable, check the
operating status.
6
Change a direction of lens on
the main unit as you want.
It should be connected to the
DC-IN socket, and DC 5V power is
used.
Quality of video recordings may differ depending on the installed position and angle.
17
Assembling/Disassembling Main Unit and Mount
The Main Unit and the Mount can be disassembled as shown below.
Assembling
Disassembling
18
Features and Instructions
lease read the followings before using the product.
P
•• Do not operate the product while you are driving.
•• Micro SD card must be inserted in the product to record videos.
•• A warning will sound if SD card is removed while recording, and the video recording may be partially deleted.
Power On/Off
This product does not have a power button. Once it is connected to a constant power source, LED indicator will be turned on and
start recording.
Power On
•• Rec LED: Green Light Flickers
•• Security LED: On
•• Voice: “Please drive safely today.” / “Image is recording now.”
Power Off
•• REC LED: Off
•• Security LED: Off
•• Voice: “Image recording has concluded.”
19
Video Recording
Manual Recording
Recording will start once the product is connected to a power
source and Micro SD card is inserted.
Used to record videos manually.
•• Front LED: Blue Light flickers
•• Status LED: REC(Green) flickers
Status
•• Press button shortly to start
manual recording. An audio
notification will be played.
•• It records 15 seconds before
and after the button is pressed,
to a total 30 seconds.
•• Sound: Ding-dong Ding-dong~
•• LED : Front LED, REC LED flikers
quickly.
Front
•• This feature will not operate while Event Recording is in
progress.
•• The name of manual recording file will contain “B”.
20
Recording Mode and Duration
• Infinite Recording: Keeps recording in 1 minute intervals whether an accident occurs or not.
1 min.
1 min.
1 min.
1 min.
1 min.
Continue_
• Event Recording: R
ecords total of 30 seconds before and after an event (accident), 15 seconds each.
A signal will sound once Event Recording has begun.
15 seconds
before event
Event
15 seconds
after event
• Infinite + Event Recording: U
ses Infinite Recording and Event Recording simultaneously.
e.g.) If accident occurs 1 min. 45sec. after recording begins.
Infinite Recording
Event Recording
Event Recording
1 min.
Saved as Infinite
Recording file
(1 min).
30 sec.
15 sec.
Infinite Recording
Event
15 sec.
1 min.
1 min.
Infinite recording
•• A
n event means the detection of impact. If sensitivity is set as high, even small impacts are detected. If it is set as low, only strong
impact are detected.
•• If recorded file uses all the available space on the Micro SD card, oldest files will be deleted sequentially in order to create space for
new recordings.
21
Snapshot / Micro SD card formatting
•• Press
button shortly (less
than 1second): Snapshot
•• Sound: Click
•• Images are stored as JPG file
format.
•• Press and hold
button (more
than 3seconds): Micro SD card
formatting.
•• Voice: “SD card format is starting.”
Voice recorder ON/OFF (initial setting:
OFF) / Speaker ON/OFF
•• Press
button shortly (less
than 1second): MIC. ON/OFF
•• Voice: ON “Sound is recording
now.”/ OFF “Voice recording is
concluded.”
•• Press and hold button (more
than 3 seconds): Speaker
•• Sound: ON “Voice guide is
starting now” / OFF “Voice
command has concluded”
•• The snapshot function is not available, while event recording mode is activated.
•• If voice guidance is turned off, voice guidance will not sound, when an event occurs or a snapshot is taken.
22
Checking GPS Reception
Settings
Once you connect GPS module and connect power to the product,
the product will GPS signal will be detected. If GPS signal is
received, GPS LED will turn on.
User’s settings can be configured on the setting menu of the viewer.
Settings that you can configure consist of Time setting, Video
quality, Recording mode, 3G sensor and etc.
* Download the viewer from the website.(www.sdsystem.com)
This device records the vehicle’s
Location, speed, and time using
GPS signals.
GPS LED: Green
* GPS module sold separately.
23
Updating Firmware
•• Firmware can be updated using Micro SD card.
1
2
3
4
5
Copy new firmware file on the Micro SD card.
Insert the Micro SD card into Main Unit and connect power.
Device will automatically be updated while GPS LED(Green) is flickering.
Do not disconnect power while update is in progress. Disconnecting power while update is in progress may cause the product to
malfunction. In such case, contact customer service center .
The device will automatically reboot once update is completed.
•• New firmware updates are announced through the manufacturer’s web site, where the new firmware files can be downloaded.
•• The current firmware version can be checked under Setting menu of the Viewer.
24
Micro SD Card Data
•• Recorded videos can be played on the exclusive viewer.
1 Event Folder (Event)
-- 30 seconds of video and audio are saved as a file named yyyymmdd_hhmmss_E.avi when vibration is detected.
2 Infinite Recording Folder (INFINITE)
-- 1 minute of video and audio recorded in Infinite mode will be saved as a file named yyyymmdd_hhmmss_I.avi
3 Manual Folder (MANUAL)
-- 30 seconds of video and audio are saved as a file named yyyymmdd_hhmmss_B.avi when Manual Recording button is pressed.
4 _System_ini.cfg
-- Contains product settings information.
5 version.txt
-- Contains product’s version information.
6 _time_ini.cfg
-- Contains product’s time information.
-- It will be created, only if you set the time on PC viewer.
25
Check real-time videos
You can check a real-time video, which is being recorded, if you connect AV-OUT cable to your car monitor. (Video: O / Audio: X)
Car monitor video input terminal
AV-OUT cable
VIDEO
GND
<AV-OUT signal specifications>
* Connect it to the video input socket on a
car monitor
(The monitor is not included in the package)
•• The terminal may not fit into some types of monitors. In this case, you should separately purchase an adaptor compatible with your
car monitor.
26
Viewer
Setting the Viewer
Video from the black box can only be played back using the PC viewer.
Download the viewer from the website or find it on the Micro SD card (RV-500F_Viewer_Vx.x.x.zip). See below for instructions on installing
the viewer.
Viewer Installation
1
2
3
4
Uncompress the installation file (RV-500F_Viewer_Vx.x.x.zip).
Double-click on setup.exe.
You will be prompted to install the ffdshow codec. Click Next to install the codec to finalize the viewer installation process.
Once the installation is complete, a RoadView shortcut will appear on the desktop.
27
28
1
2
3
4
5
6
7
8
9
10
11
12
13
14
15
16
29
Using the Viewer
Double-click on the Viewer icon (
).
Default Layout
1
30
2 345
1
Viewer
version
Shows the current viewer version.
2
Help
Show Help.
3
Full Screen
Switch to full screen.
4
Minimize
Minimize the Viewer window.
5
Exit
Exit the Viewer.
Opening Files
Playing Recorded Videos
1 2 3 4 5
1
Play previous video
7
2
Rewind 10 seconds
8
8 9
0
! @
Brightness
Capture
Capture current screen.
Play
3
3
Click File Open.
Select the drive where SD card is recognized.
Click Okay.
7
1
2
1
2
3
6
4
5
Press the button once to
pause during playback and
to resume playback when
paused.
Fast forward 10 seconds
Play next video
9
0
!
Playback speed
6
Playback speed can only be
adjusted during playback.
Settings
(Refer to page 35)
Volume
Switch Front/Rear-view
Map
@
Button is not activated, when GPS
information is not valid or is not
connect to the internet.
31
Playing Recorded Videos
#
$
%
#
^
^
32
&
$ %
&
Front-view video (Default)
Invert front-view video horizontally
Invert front-view video vertically
GPS information (Vehicle speed)
A logo is displayed when there is no GPS information available.
Shows speed when GPS information is available.
G-Sensor graph
Shows G-Sensor values (impact detection) in a graph.
Playing Recorded Videos
*
( )
*
a
e
b
c
d
(
)
a
b
c
d
e
List of files in current folder
Show list of files in the folder selected when opening a file.
Invert rear-view video horizontally
Invert rear-view video vertically
Infinite folder
Event folder
Manual folder
Motion folder
Playlist
Files are sorted sequentially with most recent files at the top.
33
Viewing GPS (location, speed) Information
Brings up GPS Map window.
Shows speed.
34
Settings
1
1
Time Setting
Adjust the device’s time settings.
2
Video
Resolution
Select the quality of recorded videos.
3
Recording
Mode
Infinite: Infinite Mode
Infinite + Event: Infinite + Event recording
4
3G Sensor
Higher sensitivity results in recording
small impacts as an event.
5
Select the quality of recorded videos.
Video Quality Lower video quality results in storing more
videos.
6
Brightness
Select the brightness of recorded videos.
7
Version
Show the current firmware version.
8
Format
Format the selected disk.
2
3
4
5
6
7
8
35
Recording Capacity by Space Allocation
Channel
Memory
Capacity
8G
1CH
16G
36
Category
Infinite(60%)
(INFINITE)
Event(20%)
(EVENT)
Manual(10%)
(MANUAL)
Snapshot(1%)
(SNAPSHOT)
Available
Space
Approx. 4.5GB
Approx. 1.5G
Approx. 0.75G
Approx. 0.75G
Recording
Files
Max. 80 files
Max.65 files
Max.32 files
Max.150 files
Recording
minutes
Max. 80
minutes
Max.32
minutes
Max.15
minutes
Available
Space
Approx. 9GB
Approx. 3G
Approx. 1.5G
Approx. 0.15G
Recording
Files
Max. 160 files
Max. 130 files
Max. 65 files
Max. 300 files
Recording
minutes
Max. 160
minutes
Max. 65
minutes
Max. 32
minutes
Recording Capacity by Space Allocation
Channel
1CH
Memory
Capacity
32G
Category
Infinite(60%)
(INFINITE)
Event(20%)
(EVENT)
Manual(10%)
(MANUAL)
Snapshot(1%)
(SNAPSHOT)
Available
Space
Approx. 18GB
Approx. 6G
Approx. 3G
Approx. 0.3G
Recording
Files
Max.320 files
Max. 260 files
Max. 130 files
Max. 600 files
Recording
minutes
Max. 320
minutes
Max. 130
minutes
Max. 65
minutes
37
Resolutions by Recording Method
Mode
Infinite Mode
Manual Recording
38
Condition
Recording Status
Destination Folder
Infinite
Infinite Recording
INFINITE
G-Sensor impact
detection
Event Recording
EVENT
Press Snapshot button
Snapshot Recording
SNAPSHOT
Press Manual
Recording button
Event Recording
MANUAL
Main Camera
FHD
(1920x1080)
Product Specifications
Category
Model
Front
(Main Unit)
Camera
Viewing Angle
Resolution &
Frame Rate
Front (1CH)
Encoding
File Format
Power
Dimensions & Weight
Specifications
RV-500F
2.0M Pixel, 1/2.7” Full Size CMOS
Sensor
Approx. 140°(diagonal)
Front Camera (Main Unit): 1920 x 1080
(Max. 30 fps)
H.264 (Video), AAC (Audio)
Company name /
Certification number
Name of the Device
(Model)
Manufactured date
Manufacturer / Country
of Origin:
SD System Co., Ltd./
Video Recording Device for
Automobiles (RV-500F)
Marked on the device
SD System Co., Ltd. / Republic of
Korea
[Certification Symbol and Number]
AVI
Model Number: RV-500F
DC 5V
Tested To Comply
With FCC Standards
117 x 31 x 31(mm) / 90g
Operating Temperature
-20˚C ~ +60˚C
Storage Temperature
-30˚C ~ +70˚C
FOR HOME OR OFFICE USE
No. E11 10R-048364
39
•• This device complies with part 15 of the FCC Rules. Operation is subject to the following two conditions:
•• (1) This device may not cause harmful interference, and (2) this device must accept any interference received, including interference that
may cause undesired operation
•• Caution : Any changes or modifications in construction of this device which are not expressly approved by the party responsible for
compliance could void the user’s authority to operate the equipment.
•• Notice •• Note : This equipment has been tested and found to comply with the limits for a Class B digital device, pursuant to part 15 of the FCC
Rules. These limits are designed to provide reasonable protection against harmful interference in a residential installation This equipment
generates, uses and can radiate radio frequency energy and, if not installed and used in accordance with the instructions, may cause
harmful interference to radio communications, However, there is no guarantee that interference will not occur in a particular installation.
If this equipment does cause harmful interference to radio or television reception, which can be determined by turning the equipment off
and on, the user is encouraged to try to correct the interference by one or more of the following measures:
•• - Reorient or relocate the receiving antenna.
•• - Increase the separation between the equipment and receiver.
•• - Connect the equipment into an outlet on a circuit different from that to which the receiver is connected.
•• - Consult the dealer or an experienced radio/TV technician for help.
The Roadview Lineup
includes various models designed
to meet the needs of today's consumers.
DESIGN
TREND
LIFE
STYLE
HIGH
TECHNOLOGY
NEEDS
41
42
STYLISH
shape
AWESOME
color
EASY
user system
Modern and
functional shape
A joy to behold!
Multiple colors to choose from
An intuitive interface
and numerous convenience features
Warranty Card
Regarding Services
••
••
Warranty
is valid
for 1 year.
SD System guarantees the quality of this product as the following according to Customer Dispute Resolution Standards (declared by Fair Trade Commission).
Customers are eligible to receive services from SD System or affiliated partners.
Covered by Warranty
Charged Service
Customers are eligible to receive repair services at free of charge within one year period from the date of
purchase if defects are caused under normal use of the product.
(Issues related to marketing mistakes and fully-working functions excluded)
1) Non-malfunctions
If this product is used for commercial purposes, warranty coverage is reduced to 6 months.
2) Malfunctions due to consumer negligence
Customer Complaints
Defects in the
performance of function
occurred during normal
use within warranty
period
When a major repair is required within 10 days from
date of purchase
When a major repair is required within a month from the
date of purchase
If defects are caused in shipment or installation
If a major repair is required within 1 month of replacement
If the product can not be replaced
If a malfunction from identical cause
occurs less than three times
Repairing
If a malfunction from identical cause
possible
occurs for the third time
If a malfunction from different cause
occurs for the fifth time
If the product was lost after sent in for repair
If the parts are not available and product cannot be
repaired during mandatory part stocking period
Warranty
During Warranty Period
After Warranty Period
Replacement or refund
Replace or repair at free
of charge
Replacement
Refund
Repaired by warranty
If product cannot be repaired
If product can be repaired
Refund: Full amount of purchase (Purchase receipt must be submitted)
Charged repair
Charged repair
Charged repair
Replacement or refund
If the parts are available, but product cannot be repaired
If defects are caused by
customer's actions
Not applicable
Replacement will be
provided after repair
charges are paid.
Charged repair
Full price refunded with
additional 10% of the
depreciated amount
Depreciated amount
refunded
Replacement will be
provided after repair
charges are paid and
depreciation is applied.
Charged repair
Service requests for non-malfunctions will be charged. Please read User's Manual carefully.
(Additional policies apply if the product is not repairable.)
•• If the defect is caused by unauthorized disassembly, modification, or improper use (water
penetration, damage, breaking)
•• If repair was conducted by non-expert other than SD System or its affiliates' technicians
•• If the defect is caused by using non-genuine parts
•• If the malfunction was caused by customer's failure to follow "Safety Warnings and Cautions" in the
User's Manual
3) Other circumstances
•• Malfunctions caused by a force majeure event
•• If consumable part has completed its lifespan (batteries, etc.)
•• If the product was used with unstable power source
Product
Date of Purchase
Serial No.
Model
Retailer
Amount Paid
43
SD System Co., Ltd.
Customer Service Center: +82-70-8299-5989
613, Hyundai I Valley, 31, 244, Beon-Gil,
Galmachi-Ro, Jungwon-Gu, Seongnam-Si, Gyeonggi-Do, Korea
www.sdsystem.com