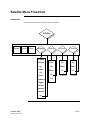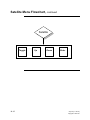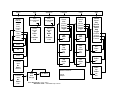
1
™
Simplicity II
(Owner’s Manual)
1934 Lakeview Avenue, Dracut, MA 01826, USA
Phone (978) 957-4ECU Fax (978) 957-8366
http://www.qtiusa.com
Trademarks, Version, Printing, and Copyright
Trademarks
Simplicity™ All-In-One™, Simplicity™ Voice, Simplicity™ Switch, Smart Switch™,
QSP™, QVR™, VMK™ , QIC™ , and QIRC™ are registered trademarks of Quartet
Technology, Inc.
X-10™ is a registered trademark of X-10 (USA), Inc.
Insteon™ is a registered trademark of SmartLabs, Inc.
Version
July, 2013
Version 11.0
North American Edition
Printing
Printed in the USA.
Quartet Technology, Inc. (QTI) is concerned about the environment. To reduce waste
and complete the recycling circle, we printed this manual and cover on stock that is
recyclable. QTI has made every effort to look at environmental implications when
deciding on packaging.
Copyright
Copyright © 2013 Quartet Technology, Inc. (QTI P/N 5084)
This manual is copyrighted and all rights are reserved. This manual may not, in
whole or in part, be copied, photocopied, translated, or reduced to any electronic
medium or machine-readable form without prior consent, in writing, from Quartet
Technology, Inc.
The information in this manual is subject to change without notice and Quartet
Technology, Inc. assumes no responsibility for any errors that may appear in this
document.
ii
Simplicity™ Family
Copyright© 2013 QTI
Warranty Information
Warranty
In connection with Products sold and Software licensed by Quartet to the Buyer
hereunder, Quartet makes the following warranties, and no others:
(1) Quartet warrants that the Products (excluding, where applicable, any batteries,
microphones, therein contained, or any portion thereof comprised of Software, which
is specifically warranted below) will be free of defects in materials and workmanship
for a period of two years from the date of delivery to the Buyer. Quartet's sole
responsibility under the aforesaid warranty shall be, at its election, the repair or
replacement of defective materials and/or workmanship during the aforesaid period,
provided that the Buyer has promptly reported such defect to Quartet and Quartet has
found, upon inspection, that such Products are defective. The Buyer must obtain
shipping instructions from Quartet prior to returning any Products under warranty. It
is the Buyer's responsibility to return the defective Products to Quartet at the Buyer's
expense. Ordinary transportation charges back to the Buyer shall be the
responsibility of the Buyer, exclusive of duties, tariffs and transportation insurance.
All replaced hardware or parts shall become Quartet's property.
(2) Quartet warrants that all unmodified Software will substantially conform, for a
period of one year from the date of delivery to the Buyer, to Quartet's published
specifications prevailing at the time of shipment. Receipt by Quartet of a written
claim under this warranty and the return of the Software must occur within said
period. Quartet does not warrant that the Software will be error free or that all errors
will be remedied. Quartet's entire liability under this warranty shall be for Quartet to
make reasonable efforts to remedy, in a manner deemed suitable to Quartet, any
nonconformance reported in writing during the warranty period.
(3) EXCEPT FOR THE WARRANTIES SET FORTH IN THIS
SUBSECTION, QUARTET HEREBY DISCLAIMS, TO THE MAXIMUM
EXTENT ALLOWED BY LAW, ALL OTHER EXPRESS OR IMPLIED
WARRANTIES IN RESPECT OF THE PRODUCTS OR THE SOFTWARE,
INCLUDING, WITHOUT LIMITATION, ANY IMPLIED WARRANTIES OF
MERCHANTABILITY AND/OR FITNESS FOR A PARTICULAR PURPOSE.
THE EXPRESS WARRANTIES STATED ABOVE ARE IN LIEU OF ALL
OBLIGATIONS AND LIABILITIES OF QUARTET FOR DAMAGES,
INCLUDING, WITHOUT LIMITATION, INCIDENTAL CONSEQUENTIAL
(INCLUDING, WITHOUT LIMITATION, LOSS OF PROFITS OR LOSS OR
DESTRUCTION OF DATA), INDIRECT, SPECIAL OR EXEMPLARY
DAMAGES THAT ARISE IN ANY WAY OUT OF ANY DEFECTS IN THE
PRODUCTS OR SOFTWARE OR IN THEIR MATERIALS OR
WORKMANSHIP
Preface
Copyright © 2013 QTI
iii
Manual Description
Audience
This manual is intended for owners of Simplicity™ Switch and Simplicity™ All-inOne Environmental Control Units (ECU’s), and/or others wishing to operate the
device.
Purpose
The purpose of this manual is to provide:
•
An introduction to the ECU
•
Instruction for voice training your ECU
•
Instruction for using a switch to control your ECU
•
Instruction for customizing switch options
•
Detail and examples of each command available to you
•
Information about ECU messages
Intended Use
The intended function of this equipment is to provide those with motor impairments
increased control of electrical devices in a home, work, school, hospital, or leisure
environment via voice or switch commands.
Prerequisites
Before reading the User Manual, you should read the Simplicity™ Installation
Manual (QTI P/N 5121) for detail in setting up and configuring your ECU.
The ECU should be installed and configured by an authorized Quartet Technology,
Inc. distributor.
Conventions
You’ll see the following conventions used in this manual:
•
•
iv
Bold font represents commands you issue the ECU
Bold italic font represents audio you hear from the ECU
Simplicity™ Family
Copyright© 2013 QTI
Table of Contents
Trademarks, Version, Printing, and Copyright....................................................................................................ii
WARRANTY INFORMATION ....................................................................................................................................... III
MANUAL DESCRIPTION .............................................................................................................................................IV
CHAPTER 1: INTRODUCTION ............................................................................................................................... 1
OVERVIEW ..............................................................................................................................................................1-2
ECU COMPONENTS .................................................................................................................................................1-3
SYSTEM UNIT COMPONENTS ...................................................................................................................................1-5
SAFETY SYMBOLS ...................................................................................................................................................1-9
REGULATORY APPROVALS ....................................................................................................................................1-10
SPECIFICATIONS ....................................................................................................................................................1-11
CLEANING AND MAINTENANCE .............................................................................................................................1-12
ACCESSORIES........................................................................................................................................................1-13
CHAPTER 2: QUARTET VOICE RECOGNITION (QVR) .................................................................................. 2
OVERVIEW ..............................................................................................................................................................2-2
VOICE TRAINING CONSIDERATIONS .........................................................................................................................2-3
TRAINING THE ECU TO RECOGNIZE YOUR VOICE ....................................................................................................2-4
COMMAND WORDS LIST .........................................................................................................................................2-5
VOICE TRAINING HINTS ...........................................................................................................................................2-6
TRAINING THE ECU TO RECOGNIZE COMMAND WORDS .........................................................................................2-7
VOICE TRAINING OPTIONS .......................................................................................................................................2-9
Start over .........................................................................................................................................................2-10
Substituting Command Words .........................................................................................................................2-11
Complete a Temporary Short Train ................................................................................................................2-12
Complete a Temporary Long Train .................................................................................................................2-14
Restore the original voice profile ....................................................................................................................2-16
RETRAINING WORDS.............................................................................................................................................2-17
USING COMMAND WORDS ....................................................................................................................................2-20
CHAPTER 3: SWITCH COMMANDS ..................................................................................................................... 3
OVERVIEW ..............................................................................................................................................................3-2
SWITCHES ...............................................................................................................................................................3-3
SWITCH TYPES ........................................................................................................................................................3-4
SETTING SWITCH-ONLY MODE .................................................................................................................................3-5
CUSTOMIZING SWITCH CONTROL PARAMETERS .......................................................................................................3-6
Customizing Menu Scanning Speed ..................................................................................................................3-7
Customizing Switch Speed...............................................................................................................................3-10
Customizing Menu Selection ...........................................................................................................................3-13
Customizing Menu Command Selection ..........................................................................................................3-16
Customizing Smart Switch...............................................................................................................................3-18
CHAPTER 4: THE PHONE MENU .......................................................................................................................... 4
OVERVIEW ..............................................................................................................................................................4-2
THE PHONE MENU COMMANDS ..............................................................................................................................4-3
Answer, and Hangup Commands ......................................................................................................................4-4
The Mute, Dial Operator, and Retry Commands ..............................................................................................4-5
The Privacy Command ......................................................................................................................................4-6
The Dial Command ...........................................................................................................................................4-7
The Record Command .....................................................................................................................................4-11
The Play Command .........................................................................................................................................4-16
Preface
Copyright © 2013 QTI
v
Table of Contents (cont)
The Volume Command ....................................................................................................................................4-19
The Utility Command ......................................................................................................................................4-20
PHONE MENU FLOWCHART ..................................................................................................................................4-21
PHONE MENU FLOWCHART ..................................................................................................................................4-22
CHAPTER 5: THE LIGHT MENU ........................................................................................................................... 5
OVERVIEW ............................................................................................................................................................... 52
MODULES ...............................................................................................................................................................5-3
THE LIGHT MENU COMMANDS ...............................................................................................................................5-4
Allon and Everythingoff Commands .................................................................................................................5-5
Commands 1 through 16 ...................................................................................................................................5-6
Turnon and Shutoff Commands.........................................................................................................................5-7
Up and Down Commands .................................................................................................................................5-8
No Command ....................................................................................................................................................5-9
Function Command .........................................................................................................................................5-10
LIGHT MENU FLOWCHART ....................................................................................................................................5-11
CHAPTER 6: THE APPLIANCE MENU ................................................................................................................. 6
OVERVIEW ..............................................................................................................................................................6-2
MODULES ...............................................................................................................................................................6-3
THE APPLIANCE MENU COMMANDS .......................................................................................................................6-4
Allon and Everythingoff Commands .................................................................................................................6-5
1-16 Commands ................................................................................................................................................6-6
Turnon and Shutoff Commands.........................................................................................................................6-7
Up and Down Commands .................................................................................................................................6-8
No Command ....................................................................................................................................................6-9
Function Command .........................................................................................................................................6-10
APPLIANCE MENU FLOWCHART ............................................................................................................................6-11
CHAPTER 7: TELEVISION MENU......................................................................................................................... 7
OVERVIEW ..............................................................................................................................................................7-2
THE TELEVISION MENU COMMANDS ......................................................................................................................7-3
Turnon, Shutoff, and Mute Commands .............................................................................................................7-4
The Volume Command ......................................................................................................................................7-5
The Channel Command .....................................................................................................................................7-6
The Function Command ....................................................................................................................................7-8
The Toggle Command .....................................................................................................................................7-10
TELEVISION MENU FLOWCHART ...........................................................................................................................7-11
CHAPTER 8: CABLE MENU.................................................................................................................................... 8
OVERVIEW ..............................................................................................................................................................8-2
THE CABLE MENU COMMANDS ..............................................................................................................................8-3
Turnon, Shutoff, and Mute Commands .............................................................................................................8-4
The Volume Command ......................................................................................................................................8-5
The Channel Command .....................................................................................................................................8-6
The Function Command ....................................................................................................................................8-8
The Toggle Command .....................................................................................................................................8-10
CABLE MENU FLOWCHART ...................................................................................................................................8-11
vi
Simplicity™ Family
Copyright© 2013 QTI
Table of Contents (cont)
CHAPTER 9: THE VCR MENU ............................................................................................................................... 9
OVERVIEW ..............................................................................................................................................................9-2
THE VCR MENU COMMANDS .................................................................................................................................9-3
Turnon, and Shutoff Commands........................................................................................................................9-4
Play, Pause, and Stop Commands ....................................................................................................................9-5
Forward and Reverse Commands .....................................................................................................................9-6
Toggle and Record Commands .........................................................................................................................9-7
The Volume Command ......................................................................................................................................9-8
The Channel Command .....................................................................................................................................9-9
The Function Command ..................................................................................................................................9-11
VCR MENU FLOWCHART .....................................................................................................................................9-13
CHAPTER 10: THE BED MENU ............................................................................................................................ 10
OVERVIEW ............................................................................................................................................................10-2
THE BED MENU COMMANDS ................................................................................................................................10-3
Head Command ..............................................................................................................................................10-4
Mattress Command .........................................................................................................................................10-5
Foot Command................................................................................................................................................10-6
BED MENU FLOWCHART.......................................................................................................................................10-7
CHAPTER 11: THE ACCESSORY MENU ........................................................................................................... 11
OVERVIEW ............................................................................................................................................................11-2
THE ACCESSORY MENU COMMANDS....................................................................................................................11-3
One and Two Commands ................................................................................................................................11-4
ACCESSORY MENU FLOWCHART ..........................................................................................................................11-5
CHAPTER 12: UTILITY FUNCTIONS ................................................................................................................. 12
OVERVIEW ............................................................................................................................................................12-2
THE UTILITY FUNCTIONS ......................................................................................................................................12-3
Echo Mode ......................................................................................................................................................12-4
Tone Mode ......................................................................................................................................................12-5
VOICE/MOUSE KEYBOARD RESET ........................................................................................................................12-7
System Status ...................................................................................................................................................12-8
Breakout Mode ................................................................................................................................................12-9
Telephone Ringer Mode ................................................................................................................................12-10
Power Fail Warning......................................................................................................................................12-11
Menu Privacy Mode ......................................................................................................................................12-12
Light Shutoff Function ..................................................................................................................................12-13
Nurse Call Light ............................................................................................................................................12-14
UTILITY FLOWCHART..........................................................................................................................................12-15
UTILITY FLOWCHART, CONTINUED ......................................................................................................................12-16
CHAPTER 13: THE COMPUTER MENU ............................................................................................................. 13
OVERVIEW ............................................................................................................................................................13-2
THE COMPUTER MENU COMMANDS .....................................................................................................................13-3
Turnon, and Shutoff Commands......................................................................................................................13-4
COMPUTER MENU FLOWCHART ............................................................................................................................13-5
Preface
Copyright © 2013 QTI
vii
Table of Contents (cont)
CHAPTER 14: THE SATELLITE MENU.............................................................................................................. 14
OVERVIEW ............................................................................................................................................................14-2
THE SATELLITE MENU COMMANDS ......................................................................................................................14-3
Turnon, Shutoff, Mute Commands ..................................................................................................................14-5
The Keyboard Command ................................................................................................................................14-6
The Channel Command ...................................................................................................................................14-8
The Volume Command ..................................................................................................................................14-10
The Function Command ................................................................................................................................14-11
The Up, Down and Toggle Commands .........................................................................................................14-13
Enter Command ............................................................................................................................................14-14
SATELLITE MENU FLOWCHART ...........................................................................................................................14-15
CHAPTER 15: STEREO MENU ............................................................................................................................. 15
OVERVIEW ............................................................................................................................................................15-2
THE STEREO MENU COMMANDS ..........................................................................................................................15-3
Turnon, Shutoff, and Mute Commands ...........................................................................................................15-4
The Volume Command ....................................................................................................................................15-5
The Channel Command ...................................................................................................................................15-6
The Function Command ..................................................................................................................................15-8
STEREO MENU FLOWCHART ...............................................................................................................................15-10
CHAPTER 16: CD MENU ....................................................................................................................................... 16
OVERVIEW ............................................................................................................................................................16-2
THE CD MENU COMMANDS .................................................................................................................................16-3
Turnon, and Shutoff Commands......................................................................................................................16-4
Play, Stop, and Pause Commands ..................................................................................................................16-5
The Channel Command ...................................................................................................................................16-6
The Function Command ..................................................................................................................................16-7
CD MENU FLOWCHART ........................................................................................................................................16-9
CHAPTER 17: TAPE MENU................................................................................................................................... 17
OVERVIEW ............................................................................................................................................................17-2
THE TAPE MENU COMMANDS ..............................................................................................................................17-3
Turnon, and Shutoff Commands......................................................................................................................17-4
Forward and Reverse Commands ...................................................................................................................17-5
Play, Pause, and Stop Commands ..................................................................................................................17-6
Record Command ............................................................................................................................................17-7
The Function Command ..................................................................................................................................17-8
TAPE MENU FLOWCHART ...................................................................................................................................17-10
CHAPTER 18: THE GENERIC MENU ................................................................................................................. 18
OVERVIEW ............................................................................................................................................................18-2
THE GENERIC MENU COMMANDS.........................................................................................................................18-3
Turnon, and Shutoff Commands......................................................................................................................18-4
The Stop Command .........................................................................................................................................18-5
The Up and Down Commands ........................................................................................................................18-6
The Function Command ..................................................................................................................................18-7
GENERIC MENU FLOWCHART ...............................................................................................................................18-9
viii
Simplicity™ Family
Copyright© 2013 QTI
Table of Contents (cont)
APPENDIX A: ECU MESSAGES ............................................................................................................................ A
OVERVIEW ............................................................................................................................................................. A-2
OPERATING MESSAGES .......................................................................................................................................... A-3
INTERNAL MESSAGES ............................................................................................................................................ A-4
APPENDIX B: RECORDED PHONE NUMBERS ................................................................................................. B
RECORDED PHONE NUMBERS ................................................................................................................................ B-2
RECORDED PHONE NUMBERS ................................................................................................................................ B-3
RECORDED PHONE NUMBERS ................................................................................................................................ B-4
RECORDED PHONE NUMBERS ................................................................................................................................ B-5
APPENDIX C: FLOWCHARTS ............................................................................................................................... C
APPENDIX D: NURSE CALL OPTION ................................................................................................................. D
OVERVIEW ............................................................................................................................................................. D-2
Preface
Copyright © 2013 QTI
ix
(This page left blank intentionally)
x
Simplicity™ Family
Copyright© 2013 QTI
Chapter 1: Introduction
Overview
Introduction
Before you learn how to use your Simplicity™ Environmental Control Unit (ECU),
take a moment to review its components. This chapter describes each component
and its function.
Cleaning procedures and maintenance requirements are also described. Also
provided is a partial listing of the many accessories available from Quartet.
Objectives
In this chapter you learn about:
1-2
•
ECU components
•
System Unit components
•
Safety Symbols
•
Regulatory Approvals
•
Specifications
•
Cleaning and maintenance
•
Accessories
Simplicity™ Family
Copyright© 2013QTI
ECU components
Components
The following components comprise the Simplicity™ :
Descriptions
Each component is described below:
Letter
Component
Function
A
Installation Manual
Provides instruction on how to install and
configure the Simplicity ECU
B
User Manual
Provides instruction on how to use the
Simplicity ECU
C
Warranty Card
Details manufacture warranty
D
Microphone
Used to issue commands to the ECU, or to
talk on the telephone
E
Phone Splitter
When connected, allows additional
telephones to be plugged in
F
Phone Cord
Connects to the ECU, allowing the use of
the telephone
G
Power Supply Unit
When connected, establishes power; use
only a harmonized mains cable, (Quartet
P/N 4162) or equivalent
continued on next page
Introduction
Copyright © 2013QTI
1-3
ECU components, continued
Descriptions, continued
Letter
1-4
Component
Function
H
Mains Cable
Connects the Power Supply Unit to the AC
mains; use only a harmonized mains cable,
(Quartet P/N 4162) or equivalent
I
System Unit
Also referenced as the ECU, this machine
allows you to control your environment
Simplicity™ Family
Copyright© 2013QTI
System Unit components
System Unit front view
Below is a diagram of the front panel of the Simplicity™:
System Unit front view components
The following components are on the front of the Simplicity™ ECU:
Letter
Component
Function
A
Infrared Light
Produces an invisible (infrared) beam
of light that travels in a straight line,
like the beam of a flashlight. This
beam controls infrared devices, like a
television, cable box, or VCR.
B
Infrared Receiver
This electronic eye “learns” other
infrared remote controls.
C
Off-Hook and IR
Alignment Indicator
An amber light that illuminates behind
the infrared receiver when the
telephone is off hook or a IR signal is
present.
D
Main Speaker
The ECU audibly responds to spoken
commands through this speaker.
continued on next page
Introduction
Copyright © 2013QTI
1-5
System Unit components, continued
System Unit rear view
Below is a diagram of the rear of the Simplicity™ ECU:
Note: Depending on model, some components called out may not be available.
continued on next page
1-6
Simplicity™ Family
Copyright© 2013QTI
System Unit components, continued
System Unit rear view components
The following components are on the rear of the Simplicity™:
Letter
Component
Function
A
Reset Button (Red)
Allows the owner to reset and retrain
the unit.
B
Microphone Jack
Where the microphone attaches to the
ECU
C
Remote Microphone
Jack
Where the wireless remote package
plugs into the ECU
D
Dip Switches
Configures the House Code, pulse or
rotary telephone dialing, switch
operation, etc.
E
Accessory Connector 1
and 2
Attaches optional devices, such as
page-turners or door openers. The top
two terminals are for Accessory
Connector 1, and the bottom two
terminals are for Accessory Connector
2.
F
Modular Phone Jack
Where the phone line plugs into the
ECU
G
Power Jack
Where the power supply plugs into the
ECU
H
Battery Switch
Activates and deactivates the battery
backup
I
Ventilation Holes
Ventilates the ECU.
DO NOT block these openings.
J
External Speaker Jack
Where optional pillow or remote
speakers plug into the ECU
K
External Infrared Jack
Optional cable that repositions infrared
line-of-sight around objects
L
Volume Knob
Adjusts the ECU output volume
M
Bed Connector
Connects the optional bed cable to the
ECU
N
RS232 Serial Port
For use with optional Quartet Insteon
Controller
O
Attendant Switch
Used to advance and select menus and
select menu commands
continued on next page
Introduction
Copyright © 2013QTI
1-7
System Unit components, continued
System Unit rear view components, continued
1-8
Letter
Component
Function
P
Audio Output Connector
Connects optional computers,
intercoms, or other devices requiring
audio line level input
Q
Switch Input
Connect any Single or Dual ability
switch here to the ECU. The
Simplicity™ comes with a stereo plug
inserted in the Switch Input. This plug
can be used to solder any Single or
Dual switch to if needed.
Simplicity™ Family
Copyright© 2013QTI
Safety Symbols
Safety Symbols
The following symbols are on the ECU and/or Power Supply Unit:
Symbol
Definition
Caution, refer to documentation
Caution risk of electrical shock
This unit complies with requirements of a Class I device under the
Medical Device Directive of 93/42/EEC.
Class II equipment; the ECU is not earthed.
Type B applied part
This ECU complies with the requirements of UL2601-1, 2nd Edition
(1997) “Medical Electrical Equipment, Part 1: General Requirements
for Safety 2nd Edition Including Amendments 1 and 2”.
This ECU complies with the requirements of CAN/CSA C22.2 No.
601.1-M90, “Medical Electrical Equipment – Part 1: General
Requirements for Safety, including C22.2 No. 601.1S1-94 (IEC6011, Amendment 1:1991) Supplement No. 1-94 to CAN/CSA 22.2 No.
601.1-M90”
FDA listed as a Class II Medical Device. (Since 1988)
Meets Code of Federal Regulations Title 21
Introduction
Copyright © 2013QTI
1-9
Regulatory Approvals
Safety approvals
This ECU complies with the requirements of UL2601-1, 2nd Edition (1997) “Medical
Electrical Equipment, Part 1: General Requirements for Safety 2nd Edition Including
Amendments 1 and 2”.
This ECU complies with the requirements of CAN/CSA C22.2 No. 601.1-M90,
“Medical Electrical Equipment – Part 1: General Requirements for Safety, including
C22.2 No. 601.1S1-94 (IEC601-1, Amendment 1:1991) Supplement No. 1-94 to
CAN/CSA 22.2 No. 601.1-M90”
This ECU complies with the requirements of EN60601-1:1990, including
Amendments A13:1996.
Emissions approval
This ECU complies with the requirements of EMC Directive, number 89/336/EEC,
including EN60601-1-2:1993 and EN50065-1.
Telephone approval
This ECU complies with the conditions specified in NTR-3 Issue 2 Annex A.1.2.
In addition, this ECU complies with the requirements of EN60950:1992,
Amendment 1 & 2:1993 & Amendment 3:1995, (clause 6; connection to
telecommunication networks).
BABT approval
This ECU is approved for connection to telecommunications systems specified in the
instructions for use subject to the conditions set out in them.
BABT approval number: 504117
FDA listed
This ECU meets the requirements for a Class II Medical Device as outlined in Part
890, Section 3725 of the Code of Federal Regulations Title 21.
501(K) number: K881634
1-10
Simplicity™ Family
Copyright© 2013QTI
Specifications
Acceptable Input
Voltage
110-120VAC, 60Hz, Single Phase
Current
500mA
Input Over Current
Protection
Thermal Cutoffs on all legs of primary
Battery Type
Spill proof, maintenance free, sealed lead-acid
Typical Battery Life
Typical Recharge Time
1 to 3 years, depending on number of discharge cycles and
ambient temperature
24 hours from total discharge
Operating Temperature
32°F to 104°F (0 to 40°C)
Storage Temperature
5°F to 113°F (-15°C to 45°C)
Operating and Storage
Relative Humidity
0 to 95%, non-condensing
Operating Elevation
0 to +10,000ft (0 to +3,000m)
Storage Elevation
0 to +50,000ft (0 to +15,000m)
Size (H x W x D)
5.2” x 7.9” x 10.7” (13.20 x 20.06 x 27.17 cm)
Weight
ECU 11.5lb (5.2kg), PSU 5lb (2.2kg)
Notes:
This equipment is not suitable for use in the presence of a flammable anaesthic
mixture with air or with oxygen or nitrous oxide.
This equipment should be protected against ordinary ingress of water
This equipment is intended for continuous use.
Introduction
Copyright © 2013QTI
1-11
Cleaning and maintenance
Cleaning
You can clean the outside of the ECU with a slightly damp cloth, when necessary.
Use water only.
Maintenance
The Simplicity™ unit requires no special cleaning or daily maintenance, other than
the recommended two-year battery replacement. Contact your authorized Quartet
distributor for battery replacement and disposal.
You should annually check microphones, switches, and other accessories for safety
and integrity. Contact your authorized Quartet distributor for necessary repairs or
replacements.
1-12
Simplicity™ Family
Copyright© 2013QTI
Accessories
Accessories
A complete line of optional accessories complements the Simplicity™, including:
Accessory
QTI P/N
Description
Pillow speaker
8009
Allows for private telephone
conversations
Infrared extender
8066
Cable that repositions infrared lineof-sight around objects
Pneumatic sip and puff
switch
9249
Allows you to control the ECU by
switch activation
Lamp module
8013
Allows you to control incandescent
lamps
Appliance module
8039
Allows you to control devices (fans,
computers)
Radio remote package
9231
Allows you to remotely operate the
ECU with voice or switch commands
Radio remote speaker
package
9250
Allows you to hear the ECU remotely
from your wheelchair.
Quartet Insteon Controller
9149
Allows you to use Insteon technology
to control lights and appliance
Contact Quartet Technology or your authorized distributor for more information.
Introduction
Copyright © 2013QTI
1-13
(This page left blank intentionally)
1-14
Simplicity™ Family
Copyright© 2013QTI
Chapter 2: Quartet Voice Recognition (QVR)
Overview
Introduction
The Simplicity™ Environmental Control Unit (ECU) now uses the new Quartet Voice
Recognition (QVR) system that responds to a sequence of spoken words, or
commands. Before the ECU can respond to your commands, you must “train” the
system to recognize your voice.
You train the ECU by simply speaking specific words. The ECU digitally records
these words. When you speak to the ECU, it associates a command with each word
it “hears," and completes a task.
Objectives
In this chapter, you learn how to:
•
Identify voice training considerations
•
Train the ECU to recognize your voice
•
Identify Command Words
•
Use voice training hints
•
Train the ECU to recognize Command Words
•
Complete Voice Training Options
•
Use Command Words
Important Note
Before training the ECU, be sure the ECU is properly configured for your type of
voice. Refer to the Installation Manual, Appendix G: Configuring the QVR.
2-2
Simplicity™ Family
Copyright © 2013QTI
Voice training considerations
Important Considerations
There are three very important factors to keep in mind as you train the ECU to
recognize your voice:
•
•
•
Consistency
Pacing
Tone
Consistency
Speaking consistently is the most important factor to remember. Your voice volume
and word pronunciation should always be the same.
The ECU expects you to speak words the same way every time.
As you train the ECU, be aware of how you are speaking, remembering that the ECU
expects you to repeat words in the same way whenever you issue a command.
Pacing
As you train the ECU, remember to take your time. When the ECU prompts you to
say a word, repeat the word to yourself before speaking into the microphone.
Think about each word as you speak it, and focus on what it sounds like. There is no
pressure to rush through the training process. You are in control, so take as much
time as you like.
Tone
Speak in a clear, flat voice. Try to leave emotion out of your voice.
For example, when you speak the word “Yes," do not say, “Yes?” as if you were
asking a question. Be firm and decisive.
Voice Training
Copyright © 2013QTI
2-3
Training the ECU to recognize your voice
Training the ECU to recognize your voice
Remembering the importance of speaking consistently and carefully, complete the
following to train the ECU to recognize your voice:
1. Press the red Reset button once, located on the rear of the System Unit.
2. The ECU responds Please wait. Then, if you are using the available voicecontrolled mouse/keyboard (VMK) option (QTI P/N 9230), the ECU responds
Mouse, Keyboard, Up.
Without the VMK option installed, the ECU prompts you to say the first word
Cancel. This is the first time you speak into the microphone.
3. The ECU will prompt you to say each word three times. Begin speaking in your
natural tone, and do not change the volume of your voice. Consistently and
carefully say the word Cancel as prompted.
4. Continue saying each of the words when prompted. Take your time!
2-4
Simplicity™ Family
Copyright © 2013QTI
Command Words list
Introduction
You train the ECU to recognize command words that will be used to complete tasks.
Each task has an assigned Command Word.
The ECU prompts you to say a word that identifies each command. The ECU
digitally records these Command Words in your voice. When you speak to the ECU,
it associates a command to each word it “hears", and completes the assigned task.
Command Words list
The Command Words you can train are listed below. Take a moment to familiarize
yourself with the words on the list. Since there are many, it may be helpful to have a
glass of water nearby. It takes about ten minutes to go through the list and train the
ECU to recognize the Command Words.
Command Words
1. Cancel
2. Helpme
3. The Name**
4. Yes
5. No
6. Retrain
7. Phone
8. Television
9. Cable
10. VCR
11. Light
12. Bed
13. Accessory
14. Allon
15. Everythingoff
16. Turnon
17. Shutoff
18. Dial
19. Answer
20. Hangup
21. Retry
23.
24.
25.
26.
27.
28.
29.
30.
31.
32.
33.
34.
35.
36.
37.
38.
39.
40.
41.
42.
43.
Volume
Up
Down
Mute
Head
Mattress
Foot
Play
Record
Reverse
Stop
Toggle
Enter
Computer
Function
Utility
Remote1
Remote2
Remote3
Privacy
Appliance
22. Channel
44. Forward
45.
46.
47.
48.
49.
50.
51.
52.
53.
54.
55.
56.
57.
58.
59.
60.
61.
62.
63.
64.
Pause
Mouse
Keyboard
Zero
One
Two
Three
Four
Five
Six
Seven
Eight
Nine
Ten
Eleven
Twelve
Thirteen
Fourteen
Fifteen
Sixteen
** Notice the third Command Word is “The Name”. This is the name you assign to
your ECU.
Voice Training
Copyright © 2013QTI
2-5
Voice training hints
The First Six Command Words
The ECU evaluates your voice for the first six words on the Command Word List
(the bold words listed on the previous page). After you speak the first six words, the
ECU goes back to the beginning of the Command Word list and prompts you to
repeat them; one at a time to make sure the ECU can recognize them.
•
If the ECU can recognize a word, it continues to the next word on the Command
Word list.
•
If the ECU cannot recognize a word, the ECU prompts you to say the word
again. The ECU then asks you to say the word again to make sure it can
recognize the word. This process continues until the word is successfully
recognized.
Hints
The following hints may help as you train the ECU to recognize your Command
Words:
•
Some Command Words are a combination of two words. For example, Helpme.
When you train the ECU to recognize Helpme, do not pause between Help and
Me; treat these two words as one.
•
If you want to stop to take a break, feel free to do so. The ECU waits until you
are ready to continue. When prompted to say a Command Word, do not speak
into the microphone immediately; remember you must pause briefly before
repeating the word into the microphone. Pull away from the microphone, and
take a break.
When you are ready, speak directly into the front of the microphone, with your
mouth no more than one half-inch away from the microphone. Pause, and then
firmly say the last Command Word that the ECU prompted you to say.
2-6
Simplicity™ Family
Copyright © 2013QTI
Training the ECU to recognize Command Words
Procedure
Complete the following to train the ECU to recognize the Command Words:
1. The ECU prompts you to say the word Cancel.
Speaking directly into the front of the microphone, with your mouth no more
than one-half inch away from the microphone, pause, and then firmly say
Cancel. (You will be asked to repeat the word three times).
2. The ECU prompts you to say the word Helpme.
Speaking directly into the front of the microphone, with your mouth no more
than one-half inch away from the microphone, pause, and then firmly say
Helpme. (You will be asked to repeat the word three times).
3. The ECU prompts you to say the word The Name.
You can personalize the ECU. Though you may choose any name you like,
avoid names that sound like words used in conversation, or long, complicated
names. Hard, guttural words, with two syllables work best. Examples include
Egbert, Calvin, or Victor.
Speaking directly into the front of the microphone, with your mouth no more
than one-half inch away from the microphone, pause, and then firmly say the
name you choose for your ECU. (You will be asked to repeat the word three
times).
4. The ECU prompts you to say the word Yes.
Speaking directly into the front of the microphone, with your mouth no more than
one-half inch away from the microphone, pause, and then firmly say Yes. (You will
be asked to repeat the word three times).
5. The ECU prompts you to say the word No.
Speaking directly into the front of the microphone, with your mouth no more than
one-inch away from the microphone, pause, and then firmly say No. (You will be
asked to repeat the word three times).
6. The ECU prompts you to say the word Retrain.
Speaking directly into the front of the microphone, with your mouth no more than
one-inch away from the microphone, pause, and then firmly say Retrain. (You
will be asked to repeat the word three times).
continued on next page
Voice Training
Copyright © 2013QTI
2-7
Training the ECU to recognize Command Words,
continued
After you finish the Command Words list
After saying each word three times, there will be a short pause, and then you will
hear three clicks. These clicks confirm that you have successfully trained the ECU
to recognize each Command Word.
2-8
Simplicity™ Family
Copyright © 2013QTI
Voice training options
Introduction
The Simplicity™ ECU provides you with the following voice training options:
•
Start over
–
–
Voice Training
Copyright © 2013QTI
Cancel and start over
Erase and start over
•
Substitute Command Words
•
Complete a Temporary Short Train
•
Complete a Temporary Long Train
•
Restore the original voice profile
•
Retrain a Command Word
2-9
Start over
Cancel and start over
Complete the following if you have recorded only some of the Command Words and
decide you want to cancel what you’ve said and start over:
1. Press the red Reset button.
The ECU responds, “Please wait”.
If you are using the available voice-controlled mouse/keyboard (VMK) option
(QTI P/N 9230), the ECU responds “Mouse, Keyboard, Up”.
If you are not using VMK, the ECU identifies the switch type (single or dual),
then prompts you to say the first word “Cancel”.
2. Say Cancel directly into the front of the microphone, with your mouth no more
than one-half inch away from the microphone.
Then the ECU starts you at the beginning of the Command List again.
3. Complete the procedure for training the ECU to recognize Command Words.
Erase and start over
Complete the following if you have recorded the entire Command Words list, and
decide you want to erase what you’ve recorded and start over:
1. Press the red Reset button.
The ECU responds, “Please wait”.
2. When you hear one click, immediately press the red Reset button again.
The ECU responds, “Please wait”.
If you are using the available voice-controlled mouse/keyboard (VMK) option
(QTI P/N 9230), the ECU responds “Mouse, Keyboard, Up”.
If you are not using VMK, the ECU identifies the switch type (single or dual),
then prompts you to say the first word “Cancel”.
3. Say Cancel directly into the front of the microphone, with your mouth no more
than one-half inch away from the microphone.
Then the ECU starts you at the beginning of the Command List again.
4. Complete the procedure for training the ECU to recognize Command Words.
2-10
Simplicity™ Family
Copyright © 2013QTI
Substituting Command Words
Introduction
Use the original Command Words provided. If you are having difficulty, you can
substitute your own Command Words.
For example, if you want to use the word BackUp instead of Reverse, say BackUp
when the ECU prompts you to say Reverse.
Caution
Use caution when substituting Command Words.
Voice Training
Copyright © 2013QTI
•
You must remember the Command Word(s) you substituted when using the
ECU.
•
The ECU does not replace the original Command Word with your substitution
when you say HelpMe to hear your available options.
2-11
Complete a Temporary Short Train
Introduction
You can complete a Temporary Short Train to allow an interim user to train and use
the ECU without losing the currently trained voice. This temporarily allows another
voice to control the ECU.
Available Command Words
Only the Command Words associated with the Light Menu are available during a
Temporary Short Train:
Command Words
Cancel
Retrain
Shutoff
HelpMe
Lights
Up
TheName **
Allon
Down
Yes
Everythingoff
One
No
Turnon
Two
** “The Name” is the name you assign to your ECU.
Procedure
Follow these steps to complete a Temporary Short Train:
1. Move Dip Switch 8 to the off position.
continued on next page
2-12
Simplicity™ Family
Copyright © 2013QTI
Complete a Temporary Short Train, continued
2. Press the red Reset button once.
The ECU responds Please wait, and starts diagnostic testing. When the
diagnostic testing completes, the ECU prompts you to Turn on Switch 8, say
Cancel.
3. Move Dip Switch 8 to the On position.
4. Speaking directly into the front of the microphone, with your mouth no more
than one-half inch away from the microphone, pause, then firmly say Cancel.
5. The ECU prompts you to say the following Short Train Command Words:
Cancel, Helpme, The Name, Yes, No, Retrain, Lights, Allon, Everythingoff,
Turnon, Shutoff, Up, Down, One, Two. (You will be asked to repeat each word
three times).
Speaking directly into the front of the microphone, with your mouth no more
than one-half inch away from the microphone, pause, then firmly say each word
as prompted.
After you train the Short Train Command Word list, you hear three clicks,
indicating the ECU is ready. The ECU can now perform (using voice) only tasks
associated with the Light Menu.
Voice Training
Copyright © 2013QTI
2-13
Complete a Temporary Long Train
Introduction
You can complete a Temporary Long Train to train and use the unit without losing
the currently trained voice.
The Command Words for every menu are available after you complete a Temporary
Long Train.
Procedure
Follow these steps to complete a Temporary Long Train:
1. Move Dip Switch 8 to the off position.
continued on next page
2-14
Simplicity™ Family
Copyright © 2013QTI
Complete a Temporary Long Train, continued
2. Press the red Reset button once.
3. When you hear one click, immediately press the red Reset button again.
The ECU responds Please wait.
When the diagnostic testing completes, the ECU prompts you to Turn on Switch
8, say Cancel.
4. Move dipswitch 8 to the On position.
5. Speaking directly into the front of the microphone, with your mouth no more
than one-half inch away from the microphone, pause, then firmly say Cancel.
6. The ECU prompts you to say each of the Command Words. (See Chapter 2,
Command Words List)
Speaking directly into the front of the microphone, with your mouth no more
than one-half inch away from the microphone, pause, then firmly say each word
as prompted. (You will be asked to repeat each word three times).
After you train the Command Word list, you hear three clicks, indicating the
ECU is ready. The ECU still responds to all menu commands.
Voice Training
Copyright © 2013QTI
2-15
Restore the original voice profile
Procedure
Complete the following to restore the original voice profile after you complete a
Temporary Long or Short Train:
1. Make sure dipswitch 8 is in the On position.
2. Press the red Reset button once. The ECU will respond with either Dual Switch
or Single Switch.
3. The ECU will now respond to all menu commands.
2-16
Simplicity™ Family
Copyright © 2013QTI
Retraining Words
Introduction
The Simplicity™ contains a "Retrain" utility that allows for correction of mistrained
words.
Let's say you're going through the words during the training session. The ECU just
said, "Please say the word Down". You start to repeat "Down" but someone
interrupts you and you say "what?” The ECU will now accept this as your
pronunciation of the word "Down", and move on to the next word. Now you're
stuck—the ECU has a bad word trained.
Or, what if the ECU is already trained, and every time you say a word to the ECU
during command sequences, it keeps saying, "Excuse me?” Maybe during training
you said the word with a particular pronunciation or a different tone of voice than
you usually use. No problem!
As you will see, any word(s) can be retrained at any time.
Objective
In this chapter you will about:
•
Voice Training
Copyright © 2013QTI
Retraining selected words
2-17
Retraining Words, continued
Retraining
To start the retraining process, simply call the ECUs name, wait for the ECU to
respond "Yes?" and then say "Retrain". The ECU will go through the first six
words, one at a time, and ask if you want that particular word retrained. If the word
to be retrained is not one of the first six words, the ECU will ask you which group
the word is in to be retrained.
The ECU expects a "Yes" or "No" as a response. If you say "No", the ECU will
move on to the next word. If you respond with "Yes", the ECU will start the retrain
sequence for that particular word.
When you are finished retraining a word, simply say Cancel. The new word will be
updated and stored away for future use.
Example
"Egbert" is having trouble recognizing the word "Light". The following sequence
will rectify this situation.
Note: The following procedure assumes the ECU has been named “Egbert”.
Tasks:
Retrain
Say:
ECU Response:
Egbert
Yes
Retrain
Do you want to retrain the word “Cancel”?
No
Do you want to retrain the word “Help-me”?
No
Do you want to retrain “The Name”
No
Retrain “Yes”?
No
Retrain “No”?
No
Do you want to retrain the word “Retrain”?
No
Do you want to retrain a number?
No
Do you want to retrain a word from the menu group
“Lights”?
Yes
Retrain “Light”?
Yes
Say “Light”
Light
Say “Light”
Light
Say “Light”
Light
Retrain “Allon”?
Cancel
continued on next page
2-18
Simplicity™ Family
Copyright © 2013QTI
Retraining Words, continued
The ECU will ask you to say the word "Light" three times. Take your time! The
new word(s) will be saved. The ECU will continue on, asking if you wish to train
the next word. Respond with "Cancel" if there are no more words to be retrained.
Voice Training
Copyright © 2013QTI
2-19
Using Command Words
Using Command Words
Using Command Words to control your environment is easy. You simply:
1. Activate the system by saying its name.
2. Select a menu.
3. Select a menu command.
Try a command
Complete the following to use a Command Word to turn on a lamp (make sure that
the light is connected to the ECU; refer to the Installation Guide for detail on this
process):
1. Activate the ECU by saying its name. Let’s say you named the ECU “Egbert.”
Say Egbert.
Egbert responds Yes.
2. Say Light to choose the Light Menu.
Egbert responds Light.
3. Say Allon to select a menu command.
Egbert responds Allon.
The light connected to the lamp module turns on.
continued on the next page
2-20
Simplicity™ Family
Copyright © 2013QTI
Using Command Words, continued
Hints
Using Command Words to control your environment becomes easier as you practice
pronouncing words the same way, and as you memorize the necessary sequence of
commands.
Here are some other hints:
•
If you forget a command, say Helpme. Egbert responds with a list of Command
Words from which to choose.
•
If the ECU keeps saying Excuse me, try pronouncing the word again, being
consistent with your pronunciation used during Voice Training.
•
If the ECU prompts you with Excuse me four consecutive times, the fifth prompt
causes the ECU to end the session. Say Egbert again to reactivate the ECU.
•
Say Cancel at any time to stop to process. Say Egbert again to reactivate the
ECU.
What to do next
To learn how to use Switch Commands, see Chapter 3, Switch Commands.
Voice Training
Copyright © 2013QTI
2-21
(This page left blank intentionally)
2-22
Simplicity™ Family
Copyright © 2013QTI
Chapter 3: Switch Commands
Overview
Introduction
The Simplicity™ All-in-One and the Simplicity™ Switch ECU’s accommodate any
ability switch type, single or dual. You learn about each type in this section.
The ECU automatically detects the switch type, and configures itself accordingly.
Objectives
In this chapter, you learn how to:
3-2
•
Define a switch
•
Identify different switch types
•
Set the ECU to “switch-only” mode
•
Customize switch control parameters
–
Customize menu scanning speed
–
Customize switch speed
–
Customize menu selections
–
Customize menu command selections
–
Customize the Smart Switch Mode
Simplicity™ Family
Copyright © 2013 QTI
Switches
Definition
A switch is a mechanical device that closes an electrical circuit, which turns devices
on or off.
Switches are available in a variety of forms, allowing a wide range of people with
varying abilities to use them.
Function
The Simplicity™ ECU allows you to use a single switch or dual switch to complete
tasks like:
•
Dim or brighten lights
•
Record programs with a VCR
•
Make a telephone call
•
Control a cable box
•
Change the radio volume
•
Shut down a computer
•
Lower an electric bed
Switch Commands
Copyright © 2013 QTI
3-3
Switch types
Single switch
A single switch contains a single set of contacts. When activated, the ECU starts
audibly scanning menus. Activating the switch again selects the current menu. A
third activation selects the appropriate menu command.
Dual switch
A dual switch contains two sets of independent contacts:
3-4
•
The advance contact starts the ECU audibly scanning menus. The advance
contact also overrides the Menu Scanning Speed, which you learn about in this
chapter.
•
The select contact selects a menu or menu command.
Simplicity™ Family
Copyright © 2013 QTI
Setting switch-only mode
Definition
You can use the Simplicity™ All-in-One with either voice or switch commands (AllIn-One mode), or you can set the ECU to respond to switch commands only (switchonly mode).
Procedure
Complete the following to set the ECU to respond to switch commands only:
1. Move dipswitch 9 to the On position.
2. Press the red Reset button.
The ECU responds Please wait, identifies the switch type (single or dual), then
clicks three times.
The ECU now responds to switch commands only.
Note
If you set the ECU to switch-only mode, you do not lose any previously trained
Command Words.
You must set the ECU back to All-In-One mode in order to use both voice and
switch commands.
Switch Commands
Copyright © 2013 QTI
3-5
Customizing switch control parameters
Introduction
The Simplicity™ allows you to customize the following control parameters:
3-6
•
Menu Scanning Speed
•
Switch Speed, also know as the Acceptance Rate
•
Menu Selection
•
Menu Command Selection
•
Smart Switch™ Selection
Simplicity™ Family
Copyright © 2013 QTI
Customizing Menu Scanning Speed
Definition
Menu Scanning Speed is the rate at which the ECU audibly scans through menu
selections.
You can configure the ECU to scan at speeds from 0 to 15 seconds, in .5 second
increments. The default Menu Scanning Speed is 0.
Procedure
Complete the following to change the Menu Scanning Speed, for example, to 1.5
seconds:
1. Set Dip Switch number 8 to the Off position.
continued on next page
Switch Commands
Copyright © 2013 QTI
3-7
Customizing Menu Scanning Speed, continued
2. Push the toggle switch down.
The ECU responds with Speed Selection, Menu Speed Selection, indicating that
you are in Speed Selection Mode and the current selection is Menu Speed.
3. Push the toggle switch down again.
The ECU responds with Switch Speed Selection, indicating that the current
selection is Switch Speed.
Note
Pushing the toggle switch down toggles between selecting Menu Speed and Switch
Speed.
4. Push the toggle switch down again.
The ECU responds with Menu Speed Selection, indicating that the current
selection is Menu Speed.
continued on next page
3-8
Simplicity™ Family
Copyright © 2013 QTI
Customizing Menu Scanning Speed, continued
5. Push the toggle switch up and the ECU responds 1 (.05 second). Push the toggle
switch up again and the ECU responds 2 (1 second).
Pushing the toggle switch up increases the time available to scan menu
selections. Pushing the toggle switch down decreases the time available to scan
menu selections.
6. Let’s set the Menu Selection Speed at 1.5 seconds.
Push the toggle switch up until the ECU responds 3.
7. When you set the Menu Scanning Speed at the desired time, set
Dip Switch number 8 to the On position.
The ECU clicks three times to acknowledge the customized setting.
Switch Commands
Copyright © 2013 QTI
3-9
Customizing Switch Speed
Definition
Switch Speed is available for users who experience spasticity when operating a
switch. Switch Speed, also known as the Switch Acceptance Rate, is the amount of
time available for activating the Switch.
You can set the Switch Speed from 0 to 15 seconds, in .5 second increments. The
default Switch Speed is 0.
Procedure
Complete the following to change the Switch Speed, for example, to 1 second:
1. Set Dip Switch number 8 to the Off position.
continued on next page
3-10
Simplicity™ Family
Copyright © 2013 QTI
Customizing Switch Speed, continued
2. Push the toggle switch down.
The ECU responds with Speed Selection, Menu Speed Selection, indicating that
you are in Speed Selection Mode and the current selection is Menu Speed.
3. Push the toggle switch down again.
The ECU responds with Switch Speed Selection, indicating that the current
selection is Switch Speed.
Note
Pushing the toggle switch down toggles between selecting Menu Speed and Switch
Speed.
continued on next page
Switch Commands
Copyright © 2013 QTI
3-11
Customizing Switch Speed, continued
4. Push the toggle switch up and the ECU responds 1 (.05 second). Push the toggle
switch up again and the ECU responds 2 (1 second).
Pushing the toggle switch up increases the time available to activate the switch.
Pushing the toggle switch down decreases the time available to activate the
switch.
5. Let’s set the Switch Speed at 1 second.
Push the toggle switch up until the ECU responds 2.
Note
The ECU will not allow you to set a Switch Speed greater than the Menu Scanning
Speed. For example, if the Menu Scanning Speed is set at 1.5 seconds, the fastest
Switch Speed available is 1.5 seconds.
6. When you have set the Switch Speed at the desired time, set
Dip Switch number 8 to the On position.
The ECU clicks three times to acknowledge the customized setting.
3-12
Simplicity™ Family
Copyright © 2013 QTI
Customizing Menu Selection
Definition
You can configure the Simplicity™ to enable or delete each menu, and their
associated menu commands.
Menu
Function
Phone
Controls a telephone
Light
Controls incandescent lighting
Appliance
Controls appliances, like ceiling fans
Television
Controls a television
Cable
Controls a cable box
VCR
Controls a VCR
Remote 1
User defined
Remote 2
User defined
Remote 3
User defined
Bed
Accessory
Controls an electric bed
Utility
Computer
Controls standard accessories, such as page turners, door openers, or
nurse pagers
Controls special functions defined by the owner, such as infrared
learning, looping options, and accessory hold times
Controls access to PC voice recognition software
Enabled vs. Deleted
You enable or delete each menu:
•
•
Enable means to activate the menu.
Delete means to deactivate the menu; it does not mean that the menu is
permanently removed. You can enable any deleted menu at any time.
Note: By default, all menus, except for Computer, are enabled. This feature does not
effect voice recognition menus.
continued on next page
Switch Commands
Copyright © 2013 QTI
3-13
Customizing Menu Selection, continued
Procedure
Complete the following to enable or delete each menu:
1. Set Dip Switch number 7 to the Off position.
continued on next page
3-14
Simplicity™ Family
Copyright © 2013 QTI
Customizing Menu Selection, continued
2. Push the toggle switch down.
The ECU responds with Menu Selection, and starts scanning through the menus,
one at a time, stating if the menu is enabled or deleted.
For example, Phone is enabled, or Television is deleted.
3. As the ECU scans through each menu, you can:
• Do nothing, if you do not want to change the menu setting; the ECU moves
on to the next menu.
•
Push the toggle switch down to enable a deleted menu. The ECU replies that
the menu is enabled.
•
Push the toggle switch down to delete an enabled menu. The ECU replies
that the menu is deleted.
4. When the menu settings are defined, set Dip Switch number 7 to the On position.
The ECU clicks three times to acknowledge the customized setting.
Switch Commands
Copyright © 2013 QTI
3-15
Customizing Menu Command Selection
Definition
You can customize each enabled menu by deleting menu commands that are not
relevant to your environment. Remember, you can enable any deleted menu
commands at any time.
Procedure
Complete the following to enable or delete menu commands for each enabled menu:
1. Set Dip Switch number 7 to the Off position.
continued on next page
3-16
Simplicity™ Family
Copyright © 2013 QTI
Customizing Menu Command Selection, continued
2. Push the toggle switch down.
The ECU responds with “Menu Selection”, and starts scanning through the
menus, one at a time, stating if the menu is enabled or deleted.
3. For each enabled menu, push the toggle switch up. This starts the ECU scanning
through every menu command, one at a time, stating if the menu command is
enabled or deleted.
Note
The ECU lists every command, although the device controlled by the unit may not
use every command. For example, you hear options “Forward” and “Reverse”, even
though these options are not used within the Television Menu.
4. As the ECU scans through each menu command, you can:
•
•
•
Do nothing, if you do not want to change the menu command setting; the
ECU moves on to the next menu command.
Push the toggle switch down to enable a deleted menu command. The ECU
replies that the menu command is enabled.
Push the toggle switch down to delete an enabled menu command. The ECU
replies that the menu command is deleted.
5. When the menu command settings are defined, set Dip Switch number 7 to the
On position.
The ECU clicks three times to acknowledge the customized setting.
Switch Commands
Copyright © 2013 QTI
3-17
Customizing Smart Switch
Definition
The Smart Switch feature allows you to customize how the ability switch controls
the ECU. There are two modes:
•
Mode A: Used by those who do not experience motor impairment when
operating a single or dual switch. Selected menus or menu commands execute
upon switch activation.
•
Mode B: Used by those who experience motor impairment when operating a
switch. The scanning process suspends when the switch activates, and does not
continue until the user deactivates the switch.
Procedure
Complete the following to set the Simplicity™ to Smart Switch Mode A or B:
1. To set the Smart Switch to Mode A, set Dip Switch number 6 to the On position.
Or,
2. To set the Smart Switch to Mode B, set Dip Switch number 6 to the Off position.
3-18
Simplicity™ Family
Copyright © 2013 QTI
Chapter 4: The Phone Menu
Overview
Introduction
The Simplicity™ integrates a built-in, full-featured telephone with a ringer. With the
optional remote radio package, you can use the phone from anywhere in your
environment with Switch or Voice commands.
While you are on the telephone, all other ECU functions are still available to you.
For example, you could turn a light on or off, or mute a television.
Objectives
In this chapter, you learn how to use the Phone Menu to:
4-2
•
Answer or hang-up the phone
•
Answer a “call waiting”
•
Dial any specified phone number
•
Automatically redial the last phone number dialed
•
Put a caller on hold
•
Conduct a private conversation
•
Store and speed dial up to 100 phone numbers
•
Enter up to 35 digits per speed dial location
•
Review and change the phone numbers you store for speed dial
•
Adjust the phone listening volume
•
Turn the phone ringer on or off
•
Conduct off-hook dialing, (available with Voice commands only)
Simplicity™ Family
Copyright © 2013QTI
The Phone Menu Commands
Phone Menu Commands
Once the phone is connected, you use Voice or Switch commands to control the
phone with the Phone Menu commands:
Phone Menu Commands
Answer
Dial Operator
Hangup
Function
Takes the telephone off-hook to answer an
incoming call
Speed dials the phone number programmed into
location 99, (factory default is 0).
Note: This command is available in Switch mode
only.
Places the telephone on-hook to end a call
Mute
Toggles a caller on and off hold
Retry
Redials the last digits entered
Privacy
Dial
Record
Play
Toggles a caller between the main speaker and an
optional external speaker
Dials any specified digits
Stores a phone number for speed dialing
Dials a stored speed dial number
Volume
Increases or decreases the incoming caller’s
speaking volume
Utility
Verbally plays back the number stored in a
specified speed dial location
Note
Depending upon the phone service to which you subscribe, set the ECU to tone-dial
or rotary-dial mode. Refer to the Installation Guide for detail on this process.
Phone Menu
Copyright © 2013QTI
4-3
Answer, and Hangup Commands
Answer
The Answer command allows you to answer an incoming phone call.
The Simplicity™ supports call waiting (if you subscribe to this feature from your
telephone company.) If you answer a call and a second call comes in, the Answer
command puts the first call on hold, and accesses the second call. You also use the
Answer command to toggle between the two phone calls.
Tasks:
Answer a phone call:
Say:
Select:
Egbert
Answer call waiting (put the first call on hold and
answer the second call):
Toggle back to the first phone call (put the second
call on hold and return to the first call):
Phone
Phone
Answer
Answer
Egbert
Phone
Phone
Answer
Answer
Egbert
Phone
Phone
Answer
Answer
Note
The ECU can be configured to automatically turn on a module when the phone is
answered and shut off the module when the phone is hung up. This feature is useful
to let others know when you are on the phone. Refer to the “Installation Manual” for
details on how to use this feature.
Hangup
The Hangup command ends a phone call.
Task:
End a phone call:
4-4
Say:
Select:
Egbert
Phone
Phone
Hangup
Hangup
Simplicity™ Family
Copyright © 2013QTI
The Mute, Dial Operator, and Retry Commands
Mute
The Mute command toggles a caller on and off hold.
Tasks:
Place a caller on hold:
Say:
Select:
Egbert
Phone
Phone
Mute
Mute
The ECU responds Mute Enabled, indicating that a
caller is on hold.
Take a caller off hold:
Egbert
Phone
Phone
Mute
Mute
The ECU responds Mute Deleted, indicating that a
caller is off hold.
Dial Operator
Accessible in Switch mode only, the Dial Operator command speed dials the
telephone operator’s phone number, which is automatically programmed into
location 99.
Task:
Speed dial the operator:
Say:
Select:
Not available
Phone
Dial Operator
The Dial Operator command speed dials any phone number stored in location 99.
Use the Record command to change the phone number stored in location 99.
Retry
The Retry command redials the last number specified.
Task:
Redials the last number specified when the phone
was on-hook:
Phone Menu
Copyright © 2013QTI
Say:
Select:
Egbert
Phone
Phone
Retry
Retry
4-5
The Privacy Command
Definition
The Privacy command toggles a caller between the main speaker and an optional
external speaker (QTI P/N 8009).
Whether or not you use the Privacy command, the ECU always responds to
commands through the main speaker if enabled. See Chapter 12, “Utility Functions”.
Caution
You should connect the external speaker jack to a “pillow” type speaker only with a
rating of 8-ohms, ½ watt.
If you are not certain of the speaker size, or need to purchase a speaker, please call
your local distributor and ask for QTI P/N 8009.
Examples
Task:
Say:
Listen to a caller on an optional external speaker:
Egbert
Select:
Phone
Phone
Privacy
Privacy
The ECU responds Privacy Enabled, indicating that
the Privacy mode is active.
When you use the Answer, Dial Operator, Retry, Dial, or Play commands, the
ECU responds Privacy Enabled. This reminds you that the caller will be heard only
through the optional external speaker.
Task:
Toggle a caller back to the main speaker:
Say:
Select:
Egbert
Phone
Phone
Privacy
Privacy
The ECU responds Privacy Deleted, indicating that
the Privacy mode is inactive and that the caller will
be heard through the main speaker, if enabled. See
Chapter 12, “Utility Functions”.
4-6
Simplicity™ Family
Copyright © 2013QTI
The Dial Command
Definition
The Dial command provides options for dialing phone numbers. You can:
•
Specify and dial numbers
•
Access special features offered by your local phone company, i.e., call
forwarding
•
Voice command users can specify a number and remain in dial mode. This is
helpful when navigating voice mail systems, on-line banking, pager signaling, or
other phone operations that require off-hook dialing. This feature is not
available to Switch users.
Sub-Commands
The Dial command provides additional sub-commands:
Dial Sub-Commands
Function
Forward
Used in some countries where special phone services are
offered; only active when a Timed Loop Break (TLB) is
set to a value other than zero; see the Installation Manual
for detail on setting the TLB value.
Factory default is TLB set to zero.
Function
0 - 11
Available in voice mode only, this command allows you
to specify and dial digits on demand while off-hook.
The numbers to be dialed (phone number, credit card
number, PIN number, etc.)
10 dials the star key (*)
11 dials the pound key (#)
No
Cancels the last digit specified; you can repeat the No
command to cancel as many digits as you have entered
Pause
Inserts a one-second delay in the dialing sequence. The
Pause command can be inserted any number of times.
Dial
Phone Menu
Copyright © 2013QTI
Dials the specified digits
4-7
The Dial Command, continued
Examples
Task:
Say:
Select:
Specify and dial a phone number:
Call the ECU
Egbert
Specify the Phone Menu
Phone
Phone
Dial command
Dial
Dial
Specify the digits to be dialed
5554432
5554432
Dial the digits
Dial
Dial
Say:
Select:
Task:
Activate a special phone service via the Recall**
button on the telephone (available to users outside
the USA and Canada)
Call the ECU
Egbert
Specify the Phone Menu
Phone
Phone
Specify the Dial command
Dial
Dial
Specify the Forward command*
Forward*
Forward*
Specify the two-digit code for a special phone
service, plus any required digits
21
21
Activate the special phone service
Dial
Dial
* Used in some countries where special phone services are offered; only active when
a Timed Loop Break (TLB) is set to a value other than zero; see the Installation
Manual for detail on setting the TLB value. Factory default is TLB set to zero.
** The Recall feature is available on some telephones. Check with your local
Telephone Company.
continued on next page
4-8
Simplicity™ Family
Copyright © 2013QTI
The Dial Command, continued
Examples
Task:
Say:
Select:
Call the ECU
Egbert
Not available
Specify the Phone Menu
Phone
Specify the Dial command
Dial
Specify phone number
5551234
The ECU dials the number and remains in off-hook
dialing mode.
Function
Dials the number 1 (Example; such as when using
voice mail, etc.)
1
Suspends off-hook dialing
Mute
Resumes off-hook dial mode
Egbert
Dial number (555-1234) and remain in off-hook
dialing mode (voice mode only)
Task:
Say:
Select:
Dial a number, followed by the star key:
Call the ECU
Egbert
Specify the Phone Menu
Phone
Phone
Specify the Dial command
Dial
Dial
Specify the digits to be dialed, followed by a star key
(Use the No command to cancel an incorrect number)
1 2 3 4 11 No 10
1 2 3 4 11 No
10
Dial the digits
Dial
Dial
continued on next page
Phone Menu
Copyright © 2013QTI
4-9
The Dial Command, continued
Examples
Task:
Say:
Select:
Specify and dial a phone number:
Call the ECU
Egbert
Specify the Phone Menu
Phone
Phone
Specify the Dial command
Dial
Dial
Specify the digits to be dialed
5554432
5554432
Dial the digits
Dial
Dial
Say:
Select:
Task:
Pause one second before dialing a phone number:
4-10
Call the ECU
Egbert
Specify the Phone Menu
Phone
Phone
Take the phone off hook
Dial
Dial
Dial the number 9
Nine
Nine
Pause for one second
Pause
Pause
Specify a number
5554432
5554432
Dial the number
Dial
Dial
Simplicity™ Family
Copyright © 2013QTI
The Record Command
Definition
The Record command allows you to:
•
Record up to 100 phone numbers in memory
•
Enter up to 35 digits per memory location
•
Delete and re-record a number in any location
Note
You must remember the number stored in each location. Appendix B provides you a
form that helps you keep track of:
•
Your recorded location numbers
•
The numbers stored in each location
•
The item associated with the recorded number (phone number, credit card
number, PIN number, etc.)
Record Sub-Commands
The Record command provides additional sub-commands:
Record SubCommands
0-9
Function
The numbers that identify each speed-dial location; you must
specify two digits for each location number.
Once you specify a two-digit location, the ECU responds Record.
You then select or say the numbers to be recorded.
Phone Menu
Copyright © 2013QTI
4-11
The Record Command, continued
0-9 Sub-Commands
The Record command provides additional sub-commands:
0-9 Sub-Commands
Function
Function
Stores the specified digits.
Note that both the Function and Record commands
will store the digits to be dialed.
However, during Play, only those digits stored with
the Function command will cause the ECU to dial
the number and remain in off-hook dialing mode.
Note that off-hook dialing is available in Voice mode
only.
0-11
The numbers to be recorded (phone number, credit
card number, PIN number, etc.)
10 records the star key (*)
11 records the pound key (#)
No
Cancels the last digit specified; you can repeat the
No command to cancel as many digits as you have
entered
Pause
Inserts a one-second delay in the dialing sequence
Stores the specified digits.
Record
Examples
Task:
Say:
Select:
Record a number (555-1234) in location 01:
4-12
Call the ECU
Egbert
Specify the Phone Menu
Phone
Phone
Specify the Record command
Record
Record
Specify two digits for the location you wish to store
the number
Zero
Zero
One
One
Specify phone number
5551234
5551234
Record the location
Record
Record
Simplicity™ Family
Copyright © 2013QTI
The Record Command, continued
Examples
Task:
Say:
Select:
Record a phone number (555-1234) in location 01
and remain in off-hook dialing mode during play
(Voice mode only)
Call the ECU
Egbert
Specify the Phone Menu
Phone
Phone
Specify the Record command
Record
Record
Specify two digits for each location
Zero
Zero
One
One
Specify phone number
5551234
5551234
When Voice-users specify the Play command, the
ECU dials the number and remains in off-hook
dialing mode
Function
Because off-hook dialing is not available in Switch
mode, Switch-users must end the command sequence
with the Record command
Record
Note
Specifying the Function command in the above example keeps the ECU in off-hook
dialing mode when you use the Play command. This is available to Voice users
only.
Phone Menu
Copyright © 2013QTI
4-13
The Record Command, continued
Examples
Task:
Say:
Select:
Record a bank password (9876 #) in location 02
4-14
Call the ECU
Egbert
Specify the Phone Menu
Phone
Phone
Specify the Record command
Record
Record
Specify two digits for each location
Zero
Two
Zero
Two
Specify bank password (Use the No command to
cancel an incorrect number)
9 8 7 5 No 6
9 8 7 5 No 6
Specify the pound sign at the end of the password
11
11
Record location
Record
Record
Simplicity™ Family
Copyright © 2013QTI
The Record Command, continued
Examples
Task:
Say:
Select:
Record a phone number (555-6789) in location 03.
You specify 9 to access an outside line. The Pause
command inserts a one-second delay.
Phone Menu
Copyright © 2013QTI
Call the ECU
Egbert
Specify the Phone Menu
Phone
Phone
Specify the Record command
Record
Record
Specify two digits for each location
Zero
Three
Zero
Three
Dial 9 to access an outside line
9
9
Pause one second while the outside line is accessed
Pause
Pause
Specify phone number
5556789
5556789
Record
Record
Record
4-15
The Play Command
Definition
The Play command allows you to dial the numbers you recorded in each location.
If you specify a location that does not have stored numbers, the ECU prompts Not
Programmed.
Examples
Tasks:
Say:
Select:
Play the phone number recorded in location 02:
Call the ECU
Egbert
Specify the Phone Menu
Phone
Phone
Specify the Play command
Play
Play
Specify a two-digit location
Zero
Two
Zero
Two
Play the phone number recorded in location 04:
Call the ECU
Specify the Phone Menu
Specify the Play command
Specify a two-digit location
Egbert
Phone
Phone
Play
Play
Zero
Four
Zero
Four
Note: If you specified a location without recorded
numbers, the ECU responds Not programmed.
continued on next page
4-16
Simplicity™ Family
Copyright © 2013QTI
The Play Command, continued
Play Sub-Commands
If you specified the Function command when you recorded numbers, the ECU dials
the numbers and remains in off-hook dialing mode. This allows you to dial specific
digits on demand while off-hook.
For example, if a company you call has voice-mail, you can specify an extension.
Play SubCommands
Function
Mute
Suspends off-hook dialing allowing you to have your phone
conversation; calling the ECU’s name prompts the ECU to say
Dial and resumes off-hook dialing mode.
0-11
The digits to be dialed (voice-mail extensions, credit card number,
PIN number, etc.)
10 dials the star key (*)
11 dials the pound key (#)
Hangup
Phone Menu
Copyright © 2013QTI
Places the telephone on-hook to end a call
4-17
The Play Command, continued
Examples
Task:
Say:
Select:
Call the ECU
Egbert
Not available
Specify the Phone Menu
Phone
Specify the Play command
Play
Specify a two-digit location
Four
Seven
Play the number recorded in location 47. You
specified Function when you recorded the
number, so the ECU remains in off-hook dialing
mode after play. Then you can specify an
extension.
The ECU dials the number
4-18
Since Voice users are still in off-hook dialing mode,
you can specify a phone extension
4
Suspend the ECU while you talk on the phone
Mute
Call the ECU by name to resume off-hook dialing
mode
Egbert
End the phone call
Hangup
Simplicity™ Family
Copyright © 2013QTI
The Volume Command
Definition
The Volume command allows you to control the volume of the person on the phone
with whom you are speaking.
You adjust the listening volume by specifying a number from zero (minimum
volume) to nine (maximum volume). The default listening volume is five.
Sub-Commands
The Volume command provides additional sub-commands:
Volume SubCommands
Function
Zero specifies minimum listening volume; nine indicates
maximum listening volume
0-9
Examples
Task:
Say:
Select:
Turn up the listening volume from the default
setting of 5 to 8:
Phone Menu
Copyright © 2013QTI
Call the ECU
Egbert
Specify the Phone Menu
Phone
Phone
Specify the Volume command.
Volume
Volume
The ECU tells you the current volume setting; default
value is five
Five
Five
Turn up the listening volume
Eight
Eight
4-19
The Utility Command
Definition
The Utility command allows you to review the numbers you have recorded in each
location. You specify a location from 00 - 99, and the ECU verbally announces the
numbers stored in that location.
If the location does not contain recorded numbers, the ECU responds Not
Programmed.
Sub-Commands
The Utility command provides additional sub-commands:
Utility SubCommands
Function
Specify a location number and the ECU announces the
numbers recorded in that location
00 - 99
Examples
Task:
Say:
Select:
Review the phone number recorded in location
75:
4-20
Call the ECU
Egbert
Specify the Phone Menu
Phone
Phone
Specify the Utility command
Utility
Utility
Specify a two-digit location
Seven
Five
Seven
Five
The ECU announces the numbers recorded in that
location
5551234
5551234
Simplicity™ Family
Copyright © 2013QTI
Phone Menu Flowchart
Introduction
This flowchart outlines the Phone Menu commands:
Phone
Answer
Dial
Op.
Hangup
Mute
Retry
Privacy
Dial
Mute
Forward
0-11
Function
Hangup
0-11
No
The Name
Pause
Dial
continued on next page
Phone Menu
Copyright © 2013QTI
4-21
Phone Menu Flowchart
Introduction
This flowchart outlines the Phone Menu commands:
Phone
Record
0-9
Play
Volume
Utility
0-9
0-9
0-9
Function
0-11
No
Pause
Record
4-22
Simplicity™ Family
Copyright © 2013QTI
Chapter 5: The Light Menu
Overview
Introduction
Lamp modules turn on, shut off, brighten, and dim lamps. Lamp modules operate
incandescent lamps, not florescent lamps. The incandescent lamp must have a rating
of between 40W and 300W. Lamps rated below 40W may flicker or operate
erratically.
You can control a total of 16 modules with the Light Menu, identifying each module
by a unit number from 1- 16. You can control multiple lamps by setting each lamp
module to same unit number.
Caution
Appliances (for example florescent lights, fans, toasters, electric heaters) should
never be plugged into a lamp module.
If you are unsure about what to plug into the lamp module, contact your authorized
distributor.
Objectives
In this chapter, you learn how to use the Light Menu to:
•
Turn on one, or all lamp modules
•
Shut off one, or all lamp modules
•
Brighten or dim a lamp
•
Turn on a lamp module for a specified period of time, then shut it off
Note
If you are using Insteon modules instead of X-10, please refer to the “Quartet
Insteon Controller Operation Manual” for complete details on setting up and
installing Insteon modules. (QTI P/N: 5154)
5-2
Simplicity™ Family
Copyright © 2013 QTI
Modules
Definition
A module is a small component, which receives electronic signals from the ECU,
allowing you to control devices, such as lights, or appliances.
Modules are available for various devices. Consult your authorized distributor for
details.
Lamp module
A lamp module (QTI P/N: 8013):
•
Turns on, shuts off, brightens, and dims lamps
•
Operates incandescent lamps, not florescent lamps
•
Responds to the Turnon, Shutoff, Allon, Everythingoff, Up and Down
commands
Appliance module
An appliance module (QTI P/N: 8039):
Light Menu
Copyright © 2013QTI
•
Turns on, and shuts off appliances, like a fan or florescent light
•
Responds to the Turnon, Shutoff, and Everythingoff commands only
5-3
The Light Menu Commands
Light Menu
You can control a total of 16 modules with the Light Menu, identifying each module
by a unit number from 1- 16.
Light Menu Commands
You can control any type of module (appliance, lamp, chime, universal, etc.) with the
Light Menu commands.
For example, you connected an incandescent light to a lamp module. You can use
Voice or Switch commands to control the lamp with the Light Menu commands:
Light Menu Commands
Allon
Everythingoff
1-16
Turns on all lamp modules
Turns off all modules
Specifies a module
Turnon
Turns on a specific module
Shutoff
Shuts off a specific module
Up
Down
No
Function
5-4
Function
Brightens a lamp (lamp module only)
Dims a lamp (lamp module only)
Cancels the last module number specified
Turns on and then shuts off a specific
module
Simplicity™ Family
Copyright © 2013 QTI
Allon and Everythingoff Commands
Allon
You can use Light Menu or Appliance Menu commands to control any type of
module. See Chapter 6 for detail on the Appliance Menu.
For example, you can use the Allon command in the Light Menu to turn on all lamp
modules at the same time.
Task:
Turn on all lamp modules:
Say:
Select:
Egbert
Light
Light
Allon
Allon
Everythingoff
The Everythingoff command shuts off all modules (lamp and appliance) at the same
time.
Task:
Shut off all modules:
Light Menu
Copyright © 2013QTI
Say:
Select:
Egbert
Light
Light
Everythingoff
Everythingoff
5-5
Commands 1 through 16
Definition
You identify each light in your environment with the number that corresponds to a
unit code (1 through 16) on a module.
For example, if your reading light is defined as unit code one, you control this light
by first specifying One, then using the following sub-commands.
Sub-Commands
After you specify a number from 1 through 16, use the following sub-commands:
1 - 16 Sub-Commands
Function
Turnon
Turns on one or several lamps in the sequence in which
the module numbers are specified
Shutoff
Shuts off one or several lamps in the sequence in which
the module numbers are specified
Up
Repeating the Up command gradually brightens one or
several lamps in the sequence in which the module
numbers are specified
Down
Repeating the Down command gradually dims one or
several lamps in the sequence in which the module
numbers are specified
No
Function
5-6
Cancels the last module number specified
Turns on a specified module for a pre-defined
period of 1 to 16 seconds, then shuts off
Simplicity™ Family
Copyright © 2013 QTI
Turnon and Shutoff Commands
Turnon
The Turnon command turns on one or several lamps in the sequence in which the
module numbers are specified.
Task:
Turn on, in order, modules one, two, and three:
Say:
Select:
Egbert
Light
Light
One
One
Two
Two
Three
Three
Turnon
Turnon
Shutoff
The Shutoff command shuts off one or several lamps in the sequence in which the
module numbers are specified.
Task:
Shut off module six:
Light Menu
Copyright © 2013QTI
Say:
Select:
Egbert
Light
Light
Six
Six
Shutoff
Shutoff
5-7
Up and Down Commands
Up
Repeating the Up command gradually brightens one or several lamps in the sequence
in which the module numbers are specified. The ECU issues a soft tone after it
brightens the lamp one increment. You must wait for this tone before you repeat the
Up command.
You must select or say Cancel when you reach the desired brightness.
Task:
Increase the brightness of lamp module one by two
increments:
Say:
Select:
Egbert
Light
Light
One
One
Up
Up
Up
Up
Cancel
Cancel
Down
Repeating the Down command gradually dims one or several lamps in the sequence
in which the module numbers are specified. The ECU issues a soft tone after it dims
the lamp one increment. You must wait for this tone before you repeat the Down
command.
You must select or say Cancel when you reach the desired lighting.
Task:
Decrease the brightness of lamp module two by one
increment:
Say:
Select:
Egbert
Light
Light
Two
Two
Down
Down
Cancel
Cancel
Hint
If the light you want to control is off, you can use the Up and Down commands to
turn on the light, and then brighten or dim it. You do not need to issue the Turnon
command first.
5-8
Simplicity™ Family
Copyright © 2013 QTI
No Command
No
The No command cancels the last module number specified.
You can repeat the No command to cancel as many modules numbers as you have
entered.
Task:
Turn on lamp module three:
Light Menu
Copyright © 2013QTI
Say:
Select:
Egbert
Light
Light
Five
Five
No
No
Three
Three
Turnon
Turnon
5-9
Function Command
Function
The Function command turns on a specified module for a period of 1 to 16 seconds,
and then shuts off.
See the Installation Guide for detail on specifying how long the module is on before
it shuts off.
Task:
Turn on module four for a pre-configured period of
time, then shut off the module:
Say:
Select:
Egbert
Light
Light
Four
Four
Function
Function
Note
Additional modules (up to 32) can be added by enabling the Lights and Appliance
menus under the Accessory Menu. These menus behave exactly like the Lights and
Appliance menus discussed in Chapters 5 and 6 respectively. Refer to the
“Installation Manual”, Chapter 4 for more details.
5-10
Simplicity™ Family
Copyright © 2013 QTI
Light Menu Flowchart
Introduction
This flowchart outlines the Light Menu commands:
Light
Allon
Everythingoff
1-16
Turnon
Shuttoff
Up
Down
No
Function
1-16
Light Menu
Copyright © 2013QTI
5-11
(This page left blank intentionally)
5-12
Simplicity™ Family
Copyright © 2013 QTI
Chapter 6: The Appliance Menu
Overview
Introduction
Appliance modules turn on and shut off an appliance, like a fan or florescent light.
Caution
Appliance modules control loads with the following ratings:
•
•
•
Resistive load: 15A
Motor load: 1/3 HP
Incandescent load: 500W
If you are unsure about what to plug into the appliance module, contact your
authorized distributor.
Objectives
In this chapter, you learn how to use the Appliance Menu to:
•
Turn on specific appliance modules
•
Shut off one, or all appliance modules
•
Turn on an appliance module for a specified period of time, then shut it off
Note
If you are using Insteon modules instead of X-10, please refer to the “Quartet
Insteon Controller Operation Manual” for complete details on setting up and
installing Insteon modules. (QTI P/N: 5154)
6-2
Simplicity™ Family
Copyright © 2013 QTI
Modules
Definition
A module is a small component that receives electronic signals from the ECU,
allowing you to control devices, such as lights or appliances.
Modules are available for various devices. Consult your authorized distributor for
details.
Lamp module
A lamp module (QTI P/N: 8013):
•
Turns on, shuts off, brightens, and dims lamps
•
Operates incandescent lamps, not fluorescent lamps
•
Responds to the Turnon, Shutoff, Allon, Everythingoff, Up and Down
commands
Appliance module
An appliance module (QTI P/N: 8039):
Appliance Menu
Copyright © 2013 QTI
•
Turns on, and shuts off appliances, like a fan or florescent light
•
Responds to the Turnon, Shutoff, and Everythingoff commands only
6-3
The Appliance Menu Commands
Appliance Menu
You can control a total of 16 modules with the Appliance Menu, identifying each
module by a unit number from 1- 16.
Appliance Menu Commands
You can control any type of module (appliance, lamp, chime, universal, etc.) with the
Appliance Menu commands.
For example, you connected a fan to an appliance module. You use Voice or Switch
commands to control the fan with the Appliance Menu commands:
Appliance Menu Commands
Allon
Everythingoff
1-16
Function
Turns on lamp modules only
Turns off all modules
Specifies a module
Turnon
Turns on a specific module
Shutoff
Shuts off a specific module
Up
Down
No
Function
Brightens a light (lamp module only)
Dims a light (lamp module only)
Cancels the last module number specified
Turns on and then shuts off a specific
module
Reminder
Appliance modules respond to the Turnon, Shutoff, Everythingoff, 1-16, No, and
Function commands only.
Appliance modules do not respond to the Allon, Up, or Down commands.
6-4
Simplicity™ Family
Copyright © 2013 QTI
Allon and Everythingoff Commands
Allon
You can use Light Menu or Appliance Menu commands to control any type of
module. See Chapter 5 for detail on the Light Menu.
For example, you can use the Allon command in the Appliance Menu to turn on all
lamp modules at the same time. (Remember that appliance modules do not respond
to the Allon command.)
Task:
Turn on all lamps plugged into lamp modules:
Say:
Select:
Egbert
Appliance
Appliance
Allon
Allon
Everythingoff
The Everythingoff command shuts off all modules at the same time.
Task:
Shut off all modules:
Appliance Menu
Copyright © 2013 QTI
Say:
Select:
Egbert
Appliance
Appliance
Everythingoff
Everythingoff
6-5
1-16 Commands
Definition
Specifying a module number from 1-16 allows you to control a specific appliance.
Sub-Commands
The 1-16 command provides additional sub-commands:
1 -16 Sub-Commands
Turnon
Turns on one or several appliances in the
sequence in which the module numbers are
specified
Shutoff
Shuts off one or several appliances
Up
Repeating the Up command gradually brightens a
light (lamp modules only)
Down
Repeating the Down command gradually dims a
light (lamp modules only)
No
Function
6-6
Function
Cancels the last module number specified
Turns on a specified module for a period of 1 to
16 seconds, then shuts off
Simplicity™ Family
Copyright © 2013 QTI
Turnon and Shutoff Commands
Turnon
The Turnon command turns on one or several modules in the sequence in which the
numbers are specified.
Task:
Turn on modules one, two, three, in order:
Say:
Select:
Egbert
Appliance
Appliance
One
One
Two
Two
Three
Three
Turnon
Turnon
Shutoff
The Shutoff command shuts off one or several modules in the sequence in which the
numbers are specified.
Task:
Shut off module six, and then two:
Appliance Menu
Copyright © 2013 QTI
Say:
Select:
Egbert
Appliance
Appliance
Six
Six
Two
Two
Shutoff
Shutoff
6-7
Up and Down Commands
Up
The Up command applies only to lamp modules; appliance modules do not respond
to this command.
Repeating the Up command gradually brightens a light. When you reach the desired
brightness, select or say Cancel.
Task:
Increase the brightness of lamp module six by two
increments:
Say:
Select:
Egbert
Appliance
Appliance
Six
Six
Up
Up
Up
Up
Cancel
Cancel
Down
The Down command applies only to lamp modules; appliance modules do not
respond to this command.
Repeating the Down command gradually dims a light. When you reach the desired
lighting, select or say Cancel.
6-8
Task:
Say:
Decrease the brightness of lamp module four by one
increment:
Egbert
Select:
Appliance
Appliance
Four
Four
Down
Down
Cancel
Cancel
Simplicity™ Family
Copyright © 2013 QTI
No Command
No
The No command cancels the last module number specified.
Task:
Turn on module three:
Say:
Select:
Egbert
Appliance
Appliance
Five
Five
No
No
Three
Three
Turnon
Turnon
Note
Additional modules (up to 32) can be added by enabling the Lights and Appliance
menus under the Accessory Menu. These menus behave exactly like the Lights and
Appliance menus discussed in Chapters 5 and 6 respectively. Refer to the
“Installation Manual”, Chapter 4 for more details.
Appliance Menu
Copyright © 2013 QTI
6-9
Function Command
Function
The Function command turns on a specified module for a period of 1 to 16 seconds,
and then shuts it off.
See the Installation Guide for detail on specifying how long the module is on before
it shuts off.
Task:
Turn on module four for a pre-configured period of
time, then shut the module off:
6-10
Say:
Select:
Egbert
Appliance
Appliance
Four
Four
Function
Function
Simplicity™ Family
Copyright © 2013 QTI
Appliance Menu Flowchart
Introduction
This flowchart outlines the Appliance Menu commands:
Appliance
Allon
Everythingoff
1-16
Turnon
Shuttoff
Up
Down
No
Function
1-16
Appliance Menu
Copyright © 2013 QTI
6-11
(This page left blank intentionally)
6-12
Simplicity™ Family
Copyright © 2013 QTI
Chapter 7: Television Menu
Overview
Introduction
The Simplicity™ allows you to control most televisions that use a remote control. As
part of the setup process, you train the ECU to recognize the remote control your
television uses. See the Installation Manual for detail on this process.
Once the ECU recognizes your television remote control, you use Voice or Switch
commands to control the TV via the Television Menu.
Objectives
In this chapter, you learn how to use the Television Menu to:
7-2
•
Turn a television on or off
•
Mute the volume
•
Increase or decrease the volume
•
Change the channel
•
Operate specially programmed keys
•
Toggle between two channels
Simplicity™ Family
Copyright © 2013 QTI
The Television Menu Commands
Television Menu Commands
Once the ECU successfully recognizes your television remote control, you control
the television with Voice or Switch Television Menu commands:
Television Menu
Commands
Function
Turnon
Turns on a television
Shutoff
Turns off television
Mute
Toggles between removing and restoring television
audio
Volume
Increases or decreases the listening volume
Channel
Changes the channel
Function
Activates one of three preprogrammed keys
Toggle
Toggles between the current channel and the
previous channel
Hint
By default, the Simplicity™ allows you to issue a command (Turnon) and stay within
the Television Menu. This allows you to issue other commands (i.e. Channel,
Volume, etc.) without exiting the Television Menu.
You can set the Turnon and Function commands to exit to the Main Menu after
issuing a command. Refer to the Installation Guide for detail.
Television Menu
Copyright © 2013 QTI
7-3
Turnon, Shutoff, and Mute Commands
Turnon
The Turnon command turns on the television.
Task:
Turn on the TV:
Say:
Select:
Egbert
Television
Television
Turnon
Turnon
Say:
Select:
Shutoff
The Shutoff command shuts off the television.
Task:
Shut off the TV:
Egbert
Television
Television
Shutoff
Shutoff
Mute
The Mute command toggles the television sound on and off.
Tasks:
Turn the television sound off:
Turn the television sound back on:
7-4
Say:
Select:
Egbert
Television
Television
Mute
Mute
Egbert
Television
Television
Mute
Mute
Simplicity™ Family
Copyright © 2013 QTI
The Volume Command
Definition
The Volume command increases or decreases the listening volume.
Sub-Commands
The Volume command provides additional sub-commands:
Volume Sub-Commands
Function
Up
Increases the volume one increment
Down
Decreases the volume one increment
Returns to the Television Menu
No
You can select or say Up or Down to gradually increase or decrease the volume.
Select or say No to return to the Television Menu and choose other Television Menu
commands. Or, select or say Cancel to exit.
Examples
Tasks:
Say:
Turn the volume up two increments and return to the
Television Menu:
Egbert
Turn the volume down one increment and exit:
Television Menu
Copyright © 2013 QTI
Select:
Television
Television
Volume
Volume
Up
Up
Up
Up
No
No
Egbert
Television
Television
Volume
Volume
Down
Down
Cancel
Cancel
7-5
The Channel Command
Definition
The Channel command allows you to change the television channel.
The number of digits you must specify is configurable. The default is two digits.
Refer to the Installation Guide to learn how to change the number of required digits.
Sub-Commands
The Channel command provides additional sub-commands:
Channel SubCommands
Function
Used by TVs that require an “enter” code after
selecting a channel
Enter
Up
Increments the channel number by one
Down
Decrements the channel number by one
Returns to the Television Menu
No
0 through 9
Specifies the digits of a channel number; the number
of digits you must enter is customized during
installation
You can repeatedly select or say each of these sub-commands to select a channel.
Select or say No to return to the Television Menu and choose other Television Menu
commands. Or, select or say Cancel to exit.
Examples
Task:
Say:
Select:
Change to channel 5, send an Enter code, and remain
in the Channel sub-command:
Egbert
Television
Television
Note: Assumes this TV requires an enter key after the
two digits
Channel
Channel
Zero
Zero
Five
Five
Enter
Enter
continued on next page
7-6
Simplicity™ Family
Copyright © 2013 QTI
The Channel Command, continued
Examples, continued
Tasks:
Change from channel 5 to channel 6, and return to
the Television Menu:
Change from channel 6 to channel 5, and exit:
Television Menu
Copyright © 2013 QTI
Say:
Select:
Egbert
Television
Television
Channel
Channel
Up
Up
No
No
Egbert
Television
Television
Channel
Channel
Down
Down
Cancel
Cancel
7-7
The Function Command
Definition
You can customize the ECU to control up to three special features of your television
remote control.
For example, your remote control might have a button that controls the TV’s
brightness. You can train the ECU to “learn” this button, then darken or lighten the
picture using the Function command.
“Learning” Remote Control Buttons
See the Installation Manual for detail on how the ECU “learns” features of your
TV’s remote control.
Sub-Commands
The Function command provides additional sub-commands:
Function SubCommands
Function
0
Controls the feature learned as function zero
1
Controls the feature learned as function one
2
Controls the feature learned as function two
Enter
No
Used by TVs that require an “enter” code after specifying
a function number
Returns to the Television Menu
continued on next page
7-8
Simplicity™ Family
Copyright © 2013 QTI
The Function Command, continued
Examples
Tasks:
Your television has a remote control with a button
that controls the picture-in-picture feature. You
trained the ECU to recognize this as function zero.
To control this feature:
Your television has a remote control with a button
that controls the tint. You trained the ECU to
recognize this as function one. To control the tint
and send an Enter code required for some TVs:
Your television has a remote control with a button
that controls contrast. You trained the ECU to
recognize this as function two. To control the
contrast and return to the Television Menu:
Television Menu
Copyright © 2013 QTI
Say:
Select:
Egbert
Television
Television
Function
Function
Zero
Zero
Egbert
Television
Television
Function
Function
One
One
Enter
Enter
Egbert
Television
Television
Function
Function
Two
Two
No
No
7-9
The Toggle Command
Definition
The Toggle command toggles between the channel you are currently viewing and the
channel previously viewed.
You can perform other TV menu commands or specify Cancel to exit the TV menu.
Example
Task:
Toggle to channel six, (the channel previously
viewed), then exit:
7-10
Say:
Select:
Egbert
Television
Television
Toggle
Toggle
Cancel
Cancel
Simplicity™ Family
Copyright © 2013 QTI
Television Menu Flowchart
Introduction
This flowchart outlines the Television Menu commands:
Television
Turnon
Shutoff
Mute
Volume
Channel
Function
Up
Enter
0-2
Down
Up
Enter
No
Down
No
Toggle
No
0-9
Television Menu
Copyright © 2013 QTI
7-11
(This page left blank intentionally)
7-12
Simplicity™ Family
Copyright © 2013 QTI
Chapter 8: Cable Menu
Overview
Introduction
The Simplicity™ allows you to control most cable boxes that use a remote control.
As part of the setup process, you train the ECU to recognize the remote control your
cable box uses. See the Installation Manual for detail on this process.
Once the ECU recognizes your cable box remote control, you use Voice or Switch
commands to control the cable box via the Cable Menu.
Objectives
In this chapter, you learn how to use the Cable Menu to:
8-2
•
Turn a cable box on or off
•
Mute the volume
•
Increase or decrease the volume
•
Change the channel
•
Operate specially programmed keys
•
Toggle between two channels
Simplicity™ Family
Copyright © 2013 QTI
The Cable Menu Commands
Cable Menu Commands
Once the ECU successfully recognizes your cable box remote control, you control
the cable box with Voice or Switch Cable Menu commands:
Cable Menu Commands
Function
Turnon
Turns on the cable box
Shutoff
Turns off the cable box
Mute
Toggles between removing and restoring audio
Volume
Increases or decreases the listening volume
Channel
Changes the channel
Function
Activates one of three preprogrammed keys
Toggle
Toggles between the current channel and the
previous channel
Hint
By default, the Simplicity™ allows you to issue a command (Turnon) and stay within
the Cable Menu. This allows you to issue other commands (i.e. Channel, Volume,
etc.) without exiting the Cable Menu.
You can set the Turnon and Function commands to exit to the Main Menu after
issuing a command. Refer to the Installation Guide for detail.
Cable Menu
Copyright © 2013 QTI
8-3
Turnon, Shutoff, and Mute Commands
Turnon
The Turnon command turns on the cable box.
Task:
Turn on the cable box:
Say:
Select:
Egbert
Cable
Cable
Turnon
Turnon
Say:
Select:
Shutoff
The Shutoff command shuts off the cable box.
Task:
Shut off the cable box:
Egbert
Cable
Cable
Shutoff
Shutoff
Say:
Select:
Mute
The Mute command toggles the sound on and off.
Tasks:
Turn the sound off:
Turn the sound back on:
8-4
Egbert
Cable
Cable
Mute
Mute
Egbert
Cable
Cable
Mute
Mute
Simplicity™ Family
Copyright © 2013 QTI
The Volume Command
Definition
The Volume command increases or decreases the listening volume.
Sub-Commands
The Volume command provides additional sub-commands:
Volume Sub-Commands
Function
Up
Increases the volume one increment
Down
Decreases the volume one increment
Returns to the Cable Menu
No
You can select or say Up or Down to gradually increase or decrease the volume.
Select or say No to return to the Cable Menu and choose other Cable Menu
commands. Or, select or say Cancel to exit.
Examples
Tasks:
Say:
Turn the volume up two increments and return to the
Cable Menu:
Egbert
Turn the volume down one increment and exit:
Cable Menu
Copyright © 2013 QTI
Select:
Cable
Cable
Volume
Volume
Up
Up
Up
Up
No
No
Egbert
Cable
Cable
Volume
Volume
Down
Down
Cancel
Cancel
8-5
The Channel Command
Definition
The Channel command allows you to change the cable channel.
The number of digits you must specify is configurable. The default is two digits.
Refer to the Installation Guide to learn how to change the number of required digits.
Sub-Commands
The Channel command provides additional sub-commands:
Channel SubCommands
Function
Used by cable boxes that require an “enter” code
after selecting a channel
Enter
Up
Increments the channel number by one
Down
Decrements the channel number by one
Returns to the Cable Menu
No
0 through 9
Specifies the digits of a channel number; the number
of digits you must enter is customized during
installation
You can repeatedly select or say each of these sub-commands to select a channel.
Select or say No to return to the Cable Menu and choose other Cable Menu
commands. Or, select or say Cancel to exit.
Examples
Tasks:
Say:
Change to channel 5, send an Enter code, and remain
in the Channel sub-command:
Egbert
Select:
Cable
Cable
Channel
Channel
Zero
Zero
Five
Five
Enter
Enter
continued on next page
8-6
Simplicity™ Family
Copyright © 2013 QTI
The Channel Command, continued
Examples, continued
Tasks:
Change from channel 5 to channel 6, and return to
the Cable Menu:
Change from channel 6 to channel 5, and exit:
Cable Menu
Copyright © 2013 QTI
Say:
Select:
Egbert
Cable
Cable
Channel
Channel
Up
Up
No
No
Egbert
Cable
Cable
Channel
Channel
Down
Down
Cancel
Cancel
8-7
The Function Command
Definition
You can customize the ECU to control up to three special features of your cable box
remote control.
For example, your remote control might have a button that displays the time on the
cable box. You can train the ECU to “learn” this button, then display the time using
the Function command.
“Learning” Remote Control Buttons
See the Installation Manual for detail on how the ECU “learns” features of your
cable box remote control.
Sub-Commands
The Function command provides additional sub-commands:
Function SubCommands
Function
0
Controls the feature learned as function zero
1
Controls the feature learned as function one
2
Controls the feature learned as function two
Enter
No
Used by cable boxes that require an “enter” code after
specifying a function number
Returns to the Cable Menu
continued on next page
8-8
Simplicity™ Family
Copyright © 2013 QTI
The Function Command, continued
Examples
Tasks:
Your cable box has a remote control with a button
that displays the time. You trained the ECU to
recognize this as function zero. To control this
feature:
Your cable box has a remote control with a button
that controls a timer. You trained the ECU to
recognize this as function one. To control this
feature and send an Enter code required for some
cable boxes:
Your cable box has a remote control with a button
that controls preset channels. You trained the ECU
to recognize this as function two. To control this
feature and return to the Cable Menu:
Cable Menu
Copyright © 2013 QTI
Say:
Select:
Egbert
Cable
Cable
Function
Function
Zero
Zero
Egbert
Cable
Cable
Function
Function
One
One
Enter
Enter
Egbert
Cable
Cable
Function
Function
Two
Two
No
No
8-9
The Toggle Command
Definition
The Toggle command toggles between the channel you are currently viewing and the
channel previously viewed.
You can perform other cable menu commands or specify Cancel to exit the cable
menu.
Example
Task:
Toggle to channel six, (the channel previously
viewed), then exit:
8-10
Say:
Select:
Egbert
Cable
Cable
Toggle
Toggle
Cancel
Cancel
Simplicity™ Family
Copyright © 2013 QTI
Cable Menu Flowchart
Introduction
This flowchart outlines the Cable Menu commands:
Cable
Turnon
Shutoff
Mute
Volume
Channel
Function
Up
Enter
0-2
Down
Up
Enter
No
Down
No
Toggle
No
0-9
Cable Menu
Copyright © 2013 QTI
8-11
(This page left blank intentionally)
8-12
Simplicity™ Family
Copyright © 2013 QTI
Chapter 9: The VCR Menu
Overview
Introduction
The Simplicity™ allows you to control most VCRs that use a remote control. As part
of the setup process, you train the ECU to recognize the remote control your VCR
uses. See the Installation Manual for detail on this process.
Once the ECU recognizes your VCR remote control, you use Voice or Switch
commands to control the VCR via the VCR Menu.
Objectives
In this chapter, you learn how to use the VCR Menu to:
9-2
•
Turn a VCR on or off
•
Play a video tape
•
Record a video tape
•
Rewind a video tape
•
Pause a video tape
•
Stop a video tape
•
Toggle between TV and VCR modes
•
Change the channel
•
Increase or decrease the volume
•
Fast forward a video tape
•
Operate specially programmed keys
Simplicity™ Family
Copyright © 2013 QTI
The VCR Menu Commands
VCR Menu Commands
Once the ECU successfully recognizes the VCR remote control, you use Voice or
Switch commands to control the VCR with the VCR Menu commands:
VCR Menu Commands
Function
Turnon
Turns the VCR on
Shutoff
Turns the VCR off
Play
Starts playing a tape
Record
Starts recording a tape
Reverse
Rewinds a tape
Pause
Stop
Toggle
Pauses a tape during play
Stops a tape
Toggles between the TV and the VCR
Channel
Changes the channel
Volume
Increases or decreases the listening volume
Forward
Fast forwards a tape
Function
Activates one of three preprogrammed keys
Hint
By default, the Simplicity™ allows you to issue a command (Turnon) and stay within
the VCR Menu. This allows you to issue other commands (i.e. Play, Record, etc.)
without exiting the VCR Menu.
You can set the Turnon, Play, Record, Reverse, Pause, Stop, Toggle, Forward,
and Function commands to exit the VCR Menu after issuing a command. Refer to
the Installation Guide for detail.
VCR Menu
Copyright © 2013 QTI
9-3
Turnon, and Shutoff Commands
Turnon
The Turnon command turns on the VCR.
Task:
Turn on the VCR:
Say:
Select:
Egbert
VCR
VCR
Turnon
Turnon
Say:
Select:
Shutoff
The Shutoff command shuts off the VCR.
Task:
Shut off the VCR:
9-4
Egbert
VCR
VCR
Shutoff
Shutoff
Simplicity™ Family
Copyright © 2013 QTI
Play, Pause, and Stop Commands
Play
The Play command plays the tape loaded in the VCR.
Task:
Play the tape:
Say:
Select:
Egbert
VCR
VCR
Play
Play
Pause
The Pause command pauses the tape playing in the VCR.
Task:
Pause the tape:
Say:
Select:
Egbert
VCR
VCR
Pause
Pause
Stop
The Stop command stops the tape playing in the VCR.
Task:
Stop the tape:
VCR Menu
Copyright © 2013 QTI
Say:
Select:
Egbert
VCR
VCR
Stop
Stop
9-5
Forward and Reverse Commands
Forward
The Forward command:
•
Fast forwards if a tape is loaded but not playing in the VCR
•
Forward searches if a tape is playing in the VCR
Task:
Fast forward through a tape playing in the VCR:
Say:
Select:
Egbert
VCR
VCR
Forward
Forward
Reverse
The Reverse command:
•
Rewinds if a tape is loaded but not playing in the VCR
•
Backward searches if a tape is playing in the VCR
Task:
Rewind a tape playing in the VCR:
9-6
Say:
Select:
Egbert
VCR
VCR
Reverse
Reverse
Simplicity™ Family
Copyright © 2013 QTI
Toggle and Record Commands
Toggle
The Toggle command allows you to switch between viewing a VCR and a TV.
Task:
Say:
Toggle between watching TV and watching a tape in
the VCR:
Egbert
Toggle between watching a tape in the VCR and
watching TV:
Select:
VCR
VCR
Toggle
Toggle
Egbert
VCR
VCR
Toggle
Toggle
Record
The Record command records a television program.
Task:
Record a television program:
VCR Menu
Copyright © 2013 QTI
Say:
Select:
Egbert
VCR
VCR
Record
Record
9-7
The Volume Command
Definition
The Volume command increases or decreases the listening volume.
Sub-Commands
The Volume command provides additional sub-commands:
Volume Sub-Commands
Function
Up
Increases the volume one increment
Down
Decreases the volume one increment
Returns to the beginning of the VCR Menu
No
You can select or say Up or Down to gradually increase or decrease the volume.
Select or say No to return to the VCR Menu and choose other VCR Menu
commands. Or, select or say Cancel to exit.
Examples
Tasks:
Turn the volume down one increment and return to
the VCR Menu:
Turn the volume up two increments and exit
9-8
Say:
Select:
Egbert
VCR
VCR
Volume
Volume
Down
Down
No
No
Egbert
VCR
VCR
Volume
Volume
Up
Up
Up
Up
Cancel
Cancel
Simplicity™ Family
Copyright © 2013 QTI
The Channel Command
Definition
The Channel command allows you to change the VCR channel.
The number of digits you must specify is configurable. The default is two digits.
Refer to the Installation Guide to learn how to change the number of required digits.
Sub-Commands
The Channel command provides additional sub-commands:
Channel SubCommands
Enter
Function
Used by VCRs that require an “enter” code after
selecting a channel
Up
Increments the channel number by one
Down
Decrements the channel number by one
No
0 through 9
Returns to the VCR Menu
Specifies the digits of a channel number; the number
of digits you must enter is customized during
installation
You can repeatedly select or say each of these sub-commands to select a channel.
Select or say No to return to the VCR Menu and choose other VCR Menu
commands. Or, select or say Cancel to exit.
continued on next page
VCR Menu
Copyright © 2013 QTI
9-9
The Channel Command, continued
Examples
Tasks:
Change to channel 7, and send an Enter code
required for some VCRs:
Change from channel 7 to channel 8:
Change from channel 8 to channel 7and return to the
VCR Menu:
9-10
Say:
Select:
Egbert
VCR
VCR
Channel
Channel
Zero
Zero
Seven
Seven
Enter
Enter
Egbert
VCR
VCR
Channel
Channel
Up
Up
Egbert
VCR
VCR
Channel
Channel
Down
Down
No
No
Simplicity™ Family
Copyright © 2013 QTI
The Function Command
Definition
You can customize the ECU to control up to three special features of your VCR
remote control.
For example, your remote control might have a button that mutes the VCR audio.
You can train the ECU to “learn” this button, and toggle using the Function
command.
“Learning” Remote Control Buttons
See the Installation Manual for detail on how the ECU “learns” features of your
VCR remote control.
Sub-Commands
The Function command provides additional sub-commands:
Function SubCommands
Function
0
Controls the feature learned as function zero
1
Controls the feature learned as function one
2
Controls the feature learned as function two
Enter
No
Used by VCRs that require an “enter” code after
specifying a function number
Returns to the VCR Menu
continued on next page
VCR Menu
Copyright © 2013 QTI
9-11
The Function Command continued
Examples
Tasks:
Your VCR has a remote control with a button that
controls a timer. You trained the ECU to recognize
this as function zero. To use the timer:
Your VCR has a remote control with a button that
pauses a tape. You trained the ECU to recognize this
as function one. To pause the tape and send an Enter
code required for some VCRs:
Your VCR has a remote control with a button that
plays the tape in slow motion. You trained the ECU
to recognize this as function two. To play a tape in
slow motion and return to the VCR Menu:
9-12
Say:
Select:
Egbert
VCR
VCR
Function
Function
Zero
Zero
Egbert
VCR
VCR
Function
Function
One
One
Enter
Enter
Egbert
VCR
VCR
Function
Function
Two
Two
No
No
Simplicity™ Family
Copyright © 2013 QTI
VCR Menu Flowchart
Introduction
This flowchart outlines the VCR Menu commands:
VCR
Turnon
Shutoff
Play
Record
Reverse
Pause
Stop
continued on next page
VCR Menu
Copyright © 2013 QTI
9-13
VCR Menu Flowchart, continued
VCR
Toggle
Forward
Channel
Volume
Enter
Up
0-2
Up
Down
Enter
Down
No
No
Function
No
0-9
9-14
Simplicity™ Family
Copyright © 2013 QTI
Chapter 10: The Bed Menu
Overview
Introduction
The Simplicity™ contains a built-in electric bed controller. Once the optional bed
cable is connected, you use Voice or Switch commands to control the beds position.
Contact Quartet or your authorized distributor for information about available bed
cables.
Objectives
In this chapter, you learn how to use the Bed Menu to:
•
Raise or lower the bed
•
Raise or lower the foot of the bed
•
Raise or lower the head of the bed
Note
The Simplicity™ operates low voltage beds whose hand pendants support any of the
above features. It cannot control the bed if the bed manufacturer does not offer the
function.
10-2
Simplicity™ Family
Copyright © 2013 QTI
The Bed Menu Commands
Bed Menu Commands
Once the bed cable is connected, you use Voice or Switch commands to control the
bed with the Bed Menu commands:
Bed Menu Commands
Head
Mattress
Foot
Bed Menu
Copyright © 2013 QTI
Function
Adjusts the head of the bed
Adjusts the bed height
Adjusts the foot (knee) of the bed
10-3
Head Command
Definition
The Head command adjusts the head of the bed up and down.
You can select or say Up or Down to gradually increase or decrease the head height.
When you reach the desired height, select or say Cancel.
To choose other Bed Menu commands, select or say No to return to the beginning of
the Bed Menu.
Switch users
As a precaution, switch users can issue the Up and Down commands one to four
times (factory default is two) in either direction. Then the ECU exits the Bed Menu.
Repeat the command sequence until you position the bed as desired. (Refer to the
Installation Manual, Chapter 15, Configuration Utility for changing this setting.)
Examples
Tasks:
Raise the head of the bed three increments:
Say:
Select:
Egbert
Bed
Bed
Head
Head
Up
Up
Up
Up
Up
[The ECU
exits the Bed
Menu]
Cancel
Note that Switch users have to issue the command
sequence twice.
Bed
Head
Up
Cancel
Lower the head of the bed one increment and return
to the beginning of the Bed Menu:
10-4
Egbert
Bed
Bed
Head
Head
Down
Down
No
No
Simplicity™ Family
Copyright © 2013 QTI
Mattress Command
Definition
The Mattress command adjusts the bed height.
You can select or say Up or Down to gradually increase or decrease the bed height.
When you reach the desired height, select or say Cancel.
To choose other Bed Menu commands, select or say No to return to the beginning of
the Bed Menu.
Switch Users
As a precaution, switch users can issue the Up and Down commands one to four
times (factory default is two) in either direction. Then the ECU exits the Bed Menu.
Repeat the command sequence until you position the bed as desired. (Refer to the
Installation Manual, Chapter 15, Configuration Utility for changing this setting.)
Examples
Tasks:
Raise the bed height three increments:
Say:
Select:
Egbert
Bed
Bed
Mattress
Mattress
Up
Up
Up
Up
Up
[The ECU
exits the Bed
Menu]
Cancel
Note that Switch users have to issue the command
sequence twice.
Bed
Mattress
Up
Cancel
Lower the bed height one increment and return to the
beginning of the Bed Menu:
Bed Menu
Copyright © 2013 QTI
Egbert
Bed
Bed
Mattress
Mattress
Down
Down
No
No
10-5
Foot Command
Definition
The Foot command adjusts the foot (knee) of the bed.
You can select or say Up or Down to gradually increase or decrease the foot of the
bed. When you reach the desired height, select or say Cancel.
To choose other Bed Menu commands, select or say No to return to the beginning of
the Bed Menu.
Switch Users
As a precaution, switch users can issue the Up and Down commands one to four
times (factory default is two) in either direction. Then the ECU exits the Bed Menu.
Repeat the command sequence until you position the bed as desired. (Refer to the
Installation Manual, Chapter 15, Configuration Utility for changing this setting.)
Commands
Tasks:
Raise the foot of the bed three increments:
Say:
Select:
Egbert
Bed
Bed
Foot
Foot
Up
Up
Up
Up
Up
[The ECU
exits the Bed
Menu]
Cancel
Note that Switch users have to issue the command
sequence twice.
Bed
Foot
Up
Cancel
Lower the bed foot one increment and return to the
beginning of the Bed Menu:
10-6
Egbert
Bed
Bed
Foot
Foot
Down
Down
No
No
Simplicity™ Family
Copyright © 2013 QTI
Bed Menu Flowchart
Introduction
This flowchart outlines the Bed Menu commands:
Bed
Bed Menu
Copyright © 2013 QTI
Head
Mattress
Foot
Up
Up
Up
Down
Down
Down
No
No
No
10-7
(This page left blank intentionally)
10-8
Simplicity™ Family
Copyright © 2013 QTI
Chapter 11: The Accessory Menu
Overview
Introduction
The Simplicity™ provides control of standard accessories, such as door openers,
page-turners, drapery controls, or attendant calls.
During a power failure, the ECU accessory ports are still active. You can control
devices connected to these ports only if the accessories themselves have battery
backup.
Once connected, you use Voice or Switch commands to control the use of the ECU’s
accessory ports.
Objectives
In this chapter, you learn how to use the Accessory Menu to:
•
•
Activate an accessory port
Access additional Light and Appliance Menus
Caution
Only low voltage, low current devices should be connected to the Accessory switch
terminals. Do not switch AC line voltages. The maximum rating for the accessory
port switches is 30 VDC, or 30 VAC at a maximum current of .5 Amps.
Note
You can configure the ECU to activate independently Accessory Port 1 and/or 2
from 1 to 8 seconds, in half second increments.
See the Installation Manual for detail on connecting a device to your ECU, and for
configuring the activation delay.
11-2
Simplicity™ Family
Copyright © 2013 QTI
The Accessory Menu Commands
Accessory Menu Commands
Once a device is connected to the ECU, you use Voice or Switch commands to
control it with Accessory Menu commands:
Accessory Menu
Commands
Function
1
Activates accessory 1, then exits the Accessory Menu
2
Allows you to continually activate accessory 2; you
must specify Cancel to exit. This is helpful for
repetitive functions, like using a page-turner.
You can control a total of 16 modules with the Light
Menu, identifying each module by a unit number
from 1- 16.
You can control a total of 16 modules with the
Appliance Menu, identifying each module by a unit
number from 1- 16.
Light
Appliance
Note
By default, Accessory Port 1 exits the Accessory Menu after being activated and
Accessory Port 2 does not. See the Installation Manual for details on changing this
setup configuration.
Note
By default, the Light and Appliance menu options are disabled. See the Installation
Manual for detail on changing this setup configuration.
Accessory Menu
Copyright © 2013 QTI
11-3
One and Two Commands
One
The One command activates Accessory Port 1, for example, an attendant call.
Task:
Call the attendant once, then exit the Accessory
Menu:
Say:
Select:
Egbert
Accessory
Accessory
One
One
Two
The Two command activates Accessory Port 2, for example, a page turner. You can
continuously activate Accessory Port 2 until you specify Cancel.
Task:
Say:
Use a page turner to forward through three pages of a
magazine:
Egbert
Select:
Accessory
Accessory
Two
Two
Two
Two
Two
Two
Cancel
Cancel
Light
The Light command behaves exactly as the Light menu commands do described
earlier in Chapter 5. By default, the Light command is set for House Code C. Refer to
the Installation Guide, Chapter 10, “Accessory Control” for details on changing this
configuration.
Please refer to Chapter 5 for a complete description of available commands after
choosing Light from the Accessory menu.
Appliance
The Appliance command behaves exactly as the Appliance menu commands do
described earlier in Chapter 6. By default, the Appliance command is set for House
Code D. Refer to the Installation Guide, Chapter 10, “Accessory Control”, for
details on changing this configuration.
Please refer to Chapter 6 for a complete description of available commands after
choosing Appliance from the Accessory menu.
11-4
Simplicity™ Family
Copyright © 2013 QTI
Accessory Menu Flowchart
Introduction
This flowchart outlines the Accessory Menu commands:
Accessory
1
Allon
2
Everythingoff
Accessory Menu
Copyright © 2013 QTI
Light
1-16
Appliance
Allon
Everythingoff
1-16
Turnon
Turnon
Shuttoff
Shuttoff
Up
Up
Down
Down
No
No
Function
Function
1-16
1-16
11-5
(This page left blank intentionally)
11-6
Simplicity™ Family
Copyright © 2013 QTI
Chapter 12: Utility Functions
Overview
Introduction
There are several functions included to enhance the use of the Simplicity™ ECU.
You can optionally do things like toggle the power failure announcement on and off,
or reset the optional VMK feature.
Objectives
In this chapter, you learn how to use each Utility Function, including:
12-2
•
Echo Mode
•
Tone Mode
•
Voice/Mouse Keyboard Reset
•
System Status
•
Breakout Mode
•
Telephone Ringer Mode
•
Power Fail Warning
•
Menu Privacy Mode
•
Light Shutoff
•
Nurse Call Light
Simplicity™ Family
Copyright © 2013 QTI
The Utility Functions
Utility Functions
To use any of the Utility functions, you first access the Utility Menu. Then you use
Voice or Switch commands to access each Utility Function by number:
Function
Number
Utility Functions
Copyright © 2013 QTI
Mode
Function
1
Echo Mode
Repeats all recognized words
2
Tone Mode
3
4
Voice/Mouse Keyboard
Reset
System Status Mode
5
Breakout Mode
6
Telephone Ringer Mode
7
Power Fail Warning
8
Menu Privacy Mode
Produces a “soft” tone in the Computer
Menu
Resets the optional VMK feature (if
installed)
Reports system status; used by Quartet
Technology Inc.
In voice Automatically exits the system
after the ECU prompts Excuse Me five
consecutive times
Turns on or shuts off the telephone
ringer
Turns on or shuts off the power fail
announcement
Turns on or shuts off the main speaker
9
Light Shutoff
Sends a P-16 shutoff command
10
Nurse Call Light
Sends a P-15 shutoff command
12-3
Echo Mode
Definition
When enabled, Echo Mode repeats all recognized words. Echo Mode is only
available in voice mode.
Enable Echo Mode
Complete the following to enable the Echo Mode:
Task
Enable Echo Mode
Say:
Select:
Egbert
Utility
Function
One
Utility
Function
One
Turnon
Turnon
ECU Response
Say Deleted
Note: Selecting this utility for the first time prompts the ECU to respond Say
Enable.
Echo Mode is enabled and the ECU will repeat each recognized word.
Delete Echo Mode
You may want to delete the Echo Mode after you feel comfortable using the ECU,
and do not want to have each command you speak repeated back to you. When Echo
Mode is deleted, the ECU only repeats Yes, Excuse Me, and any numbers you speak
while using the Phone, Light, or Appliance Menus.
Complete the following to delete the Echo Mode:
Task
Delete Echo Mode
Say:
Select:
Egbert
Utility
Function
One
Utility
Function
One
Shutoff
Shutoff
ECU Response
Say Enabled
Echo Mode is turned off. You can enable Echo Mode at any time.
12-4
Simplicity™ Family
Copyright © 2013 QTI
Tone Mode
Definition
If you have the optional Voice/Mouse Keyboard (VMK™) product installed, this
mode produces a “soft” tone in the Computer Menu. All recognized words in the
Computer Menu generate a “soft” tone to verify that a word was recognized.
Note
If the Echo Mode is enabled, the Tone Mode is suppressed. To enable the Tone
Mode, you must first delete the Echo Mode. See the prior page for detail on this
process.
Enable Tone Mode
Complete the following to enable the Tone Mode:
Task
Enable Tone Mode
Say:
Select:
Egbert
Utility
Function
Two
Utility
Function
Two
Turnon
Turnon
ECU Response
Deleted
Note: Selecting this mode for the first time prompts the ECU to respond
Enabled.
The Tone Mode is enabled and the ECU generates a “soft” tone for each
recognized Command Word in the Computer Menu.
Delete Tone Mode
Complete the following to delete the Tone Mode:
Task
Say:
Select:
Delete Tone Mode
Egbert
Utility
Function
Two
Utility
Function
Two
Shutoff
Shutoff
ECU Response
Enabled
The Tone Mode utility is turned off. You can enable the Tone Mode utility at any time.
continued on next page
Utility Functions
Copyright © 2013 QTI
12-5
Tone Mode, continued
The Tone Mode is turned off. You can enable the Tone Mode at any time.
Note
To run the ECU silently while in the VMK menus:
12-6
•
Delete Echo Mode
•
Delete Tone Mode
Simplicity™ Family
Copyright © 2013 QTI
Voice/Mouse Keyboard Reset
Definition
The optional VMK feature (QTI P/N: 9230) provides a complete voice interface
allowing full control of both keyboard and mouse functions of any IBM-compatible
personal computer. If you have this feature installed, you can reset it with the VMK
reset utility.
Note
A VMK reset may be necessary if your desktop keyboard and VMK are not working
together properly. Resetting the VMK feature does not reset the ECU.
Reset VMK
Complete the following to reset the VMK:
Task
Reset VMK
Say:
Egbert
Utility
Function
Three
Select:
Utility
Function
Three
ECU Response
Mouse, Keyboard, Up
If the reset was not successful, the ECU responds with a status message. Refer
to Appendix A, ECU Messages, for detailed explanation of each status message
the ECU may issue.
Utility Functions
Copyright © 2013 QTI
12-7
System Status
Definition
The System Status mode is used by Quartet Technology or your authorized
distributor to evaluate the ECU’s status.
Check System Status
Complete the following to check the system status:
Task
Check System status
12-8
Say:
Egbert
Utility
Function
Four
Select:
Utility
Function
Four
ECU Response
(ECU responds with a
list of status codes)
Simplicity™ Family
Copyright © 2013 QTI
Breakout Mode
Definition
When enabled, the Breakout Mode automatically exits the system after the ECU
prompts, “Excuse Me?” five consecutive times.
By default, the Breakout Mode is enabled.
Delete Breakout Mode
You may want to delete this mode after you are very comfortable using the ECU.
Complete the following to delete the Breakout Mode:
Task
Delete Breakout Mode
Say:
Select:
Egbert
Utility
Function
Five
Utility
Function
Five
Shutoff
Shutoff
ECU Response
Excuse Me Enabled
The Breakout Mode is turned off. You can enable this mode at any time.
Enable Breakout Mode
Complete the following to enable the Breakout Mode:
Task
Enable Breakout Mode
Say:
Select:
Egbert
Utility
Function
Five
Utility
Function
Five
Turnon
Turnon
ECU Response
Excuse Me Deleted
The Breakout Mode is enabled.
Utility Functions
Copyright © 2013 QTI
12-9
Telephone Ringer Mode
Definition
When enabled, the Telephone Ringer Mode turns on the telephone ringer. By
default, Telephone Ringer Mode is deleted.
Enable Telephone Ringer Mode
Complete the following to enable the Telephone Ringer Mode:
Task
Enable Telephone
Ringer Mode
Say:
Select:
Egbert
Utility
Function
Six
Utility
Function
Six
Turnon
Turnon
ECU Response
(Ring) Deleted
The Telephone Ringer Mode is enabled and the telephone ringer is turned on.
Delete Telephone Ringer Mode
You may want to delete this mode if you do not wish to hear the phone ring.
Complete the following to delete the Telephone Ringer Mode:
Task
Enable Telephone
Ringer Mode
Say:
Select:
Egbert
Utility
Function
Six
Utility
Function
Six
Shutoff
Shutoff
ECU Response
(Ring) Enabled
The Telephone Ringer Mode is deleted and the telephone ringer is turned off.
You can enable the Telephone Ringer Mode at any time.
12-10
Simplicity™ Family
Copyright © 2013 QTI
Power Fail Warning
Definition
When enabled, the Power Fail Warning mode turns on or shuts off the power fail
announcement. By default, the Power Fail Warning is enabled.
Note
You may want to delete this mode if the AC power goes off for an extended period
of time and you do not wish to hear the power fail warning repeated every minute.
Delete Power Fail Warning
Complete the following to delete the Power Fail Warning:
Task
Delete Power Fail
Warning Mode
Say:
Select:
Egbert
Utility
Function
Seven
Utility
Function
Seven
Shutoff
Shutoff
ECU Response
Power Failure
Enabled
The Power Fail Warning is turned off, and you will not hear an announcement if
the power fails.
Note: Once the power comes back on and you access a module in the Light or
Appliance group, the ECU automatically re-enables the Power Fail Warning.
Enable Power Fail Warning
Complete the following to enable the Power Fail Warning mode:
Task
Delete Power Fail
Warning Mode
Say:
Select:
Egbert
Utility
Function
Seven
Utility
Function
Seven
Turnon
Turnon
ECU Response
Power Failure
Deleted
The Power Fail Warning is turned on, and you will hear an announcement if the
power fails.
continued on next page
Utility Functions
Copyright © 2013 QTI
12-11
Menu Privacy Mode
Definition
When enabled, Menu Privacy Mode shuts off the main speaker.
Enable Menu Privacy Mode
Complete the following to enable the Menu Privacy Mode:
Task
Enable Menu Privacy
Mode
Say:
Select:
Egbert
Utility
Function
Eight
Utility
Function
Eight
Turnon
Turnon
ECU Response
Menu Privacy Deleted
Note: Selecting this utility for the first time prompts the ECU to respond Menu
Privacy Deleted.
Menu Privacy Mode is enabled and the main speaker is shutoff. All audio output,
except telephone, is only available from the pillow speaker jack. Refer to Chapter 4,
“Privacy Command” for information on enabling phone privacy.
Delete Menu Privacy Mode
Complete the following to delete the Menu Privacy Mode:
Task
Delete Menu Privacy
Mode
Say:
Select:
Egbert
Utility
Function
Eight
Utility
Function
Eight
Shutoff
Shutoff
ECU Response
Menu Privacy
Enabled
Menu Privacy Mode is deleted. You can enable Menu Privacy Mode at any time.
Note
Menu privacy will be deleted automatically under the following conditions: (1) a
“power failure” announcement occurs, (2) the ECU says “excuse me” five
consecutive times, (3) the ECU scans twice through the menus without a switch
activation, or (4) the attendant switch on the back of the ECU is operated.
12-12
Simplicity™ Family
Copyright © 2013 QTI
Light Shutoff Function
Definition
When activated, the ECU transmits a “shutoff” command on House Code P, Unit
Code 16.
Activate Light Shutoff
Complete the following to activate the Light Shutoff function:
Task
Activate Light Shutoff
function
Utility Functions
Copyright © 2013 QTI
Say:
Select:
Egbert
Utility
Function
Nine
Utility
Function
Nine
Yes
Yes
ECU Response
Light shutoff
12-13
Nurse Call Light
Definition
When activated, the ECU transmits a “shutoff” command on House Code P, Unit
Code 15.
Activate Nurse Call Light Shutoff
Complete the following to activate the Light Shutoff function:
Task
Activate Nurse Call
Light function
12-14
Say:
Select:
Egbert
Utility
Function
Ten
Utility
Function
Ten
Yes
Yes
ECU Response
Nurse Call Shutoff
Simplicity™ Family
Copyright © 2013 QTI
Utility Flowchart
Introduction
This flowchart outlines the Utility functions:
Utility
Television
Cable
VCR
Remote1
Remote2
Remote3
See
Installation
Manual
See
Installation
Manual
See
Installation
Manual
See
Installation
Manual
See
Installation
Manual
See
Installation
Manual
continued on next page
Utility Functions
Copyright © 2013 QTI
12-15
Utility Flowchart, continued
Utility
Function
Keyboard
See Installation
Manual
1
2
3
4
5
6
7
Echo
Mode
Soft
Tone
Mode
VMK
Reset
System
Status
Breakout
Mode
Phone
Ringer
Mode
Power
Failure
Warning
Turnon
Turnon
Turnon
Turnon
Turnon
Shutoff
Shutoff
Shutoff
Shutoff
Shutoff
12-16
8
9
10
Menu
Privacy
Light
Shutoff
Nurse
Call
Shutoff
Turnon
Yes
Yes
Shutoff
No
No
Simplicity™ Family
Copyright © 2013 QTI
Chapter 13: The Computer Menu
Overview
Introduction
The Simplicity™ allows you to use the ECU microphone to access computer-based
voice recognition software. Note that while you are using one of these software
packages, your ECU is still ready and able to complete other commands, such as
answer your phone or turn on a light.
As part of the setup process, you must connect your personal computer (PC) to your
ECU. See the Installation Manual for detail on this process.
The examples in this chapter assume that your PC is already turned on.
Objectives
In this chapter, you learn how to:
•
Use the ECU microphone to access your PC’s voice-recognition software
What the Computer Menu Can Do:
13-2
•
Access your PC’s voice-recognition software
•
Disconnect the ECU microphone from the PC’s voice-recognition software
Simplicity™ Family
Copyright © 2013 QTI
The Computer Menu Commands
Computer Menu Commands
Once your personal computer is connected to the ECU and turned on, you use Voice
or Switch commands to access the PC’s voice-recognition software with the
Computer Menu commands:
Computer Menu Commands
Computer Menu
Copyright © 2013 QTI
Function
Turnon
Allows you to use the ECU microphone to
access the PC’s voice-recognition software
Shutoff
Disconnects the ECU microphone from the
computer’s voice-recognition software
13-3
Turnon, and Shutoff Commands
Turnon
The Turnon command allows you to use the ECU microphone to access the PC’s
voice-recognition software.
Task
Use the ECU microphone to
access PC based voice
recognition software
Voice Commands
Say:
Egbert
Computer
Turnon
Switch Commands
Select:
Computer
Turnon
Remember that as you work with the PC software, you can still issue other Voice or
Switch commands to the ECU.
Shutoff
The Shutoff command disconnects the ECU microphone from the computer’s voicerecognition software.
Task
Disconnect the ECU
microphone from PC based
voice recognition software
13-4
Voice Commands
Say:
Egbert
Computer
Shutoff
Switch Commands
Select:
Computer
Shutoff
Simplicity™ Family
Copyright © 2013 QTI
Computer Menu Flowchart
Introduction
This flowchart outlines the Computer Menu commands:
Computer
Turnon
Computer Menu
Copyright © 2013 QTI
Shutoff
13-5
(This page left blank intentionally)
13-6
Simplicity™ Family
Copyright © 2013 QTI
Chapter 14: The Satellite Menu
Overview
Introduction
The Simplicity™ allows you to control most satellites that use a remote control.
As part of the setup process, you learn the ECU to recognize the remote control your
satellite uses. You could train the ECU to recognize your satellite under menu Remote
1, Remote 2, or Remote 3. This chapter assumes you trained the ECU to recognize
your satellite under Menu Remote 1. See the Installation Manual for detail on this
process.
Once the ECU recognizes your satellite remote control, you use Voice or Switch
commands to control the satellite via the Satellite Menu.
Example Satellite
The examples in the chapter are based on the RCA DSS Satellite dish.
Objectives
In this chapter, you learn how to use the Satellite Menu to:
14-2
•
Turn a satellite on or off
•
Change the channel
•
Reposition the satellite dish
•
Change or mute the volume
•
Operate specially programmed keys
Simplicity™ Family
Copyright © 2013 QTI
The Satellite Menu Commands
Satellite Menu Commands
Once the ECU successfully recognizes the satellite remote control, you use Voice or
Switch commands to control the satellite with the Satellite Menu commands:
Satellite Menu
Commands
Function
Turnon
Turns on the satellite box
Shutoff
Turns off the satellite box
Mute
Keyboard
Mutes the volume
Navigates on screen satellite menus
Channel
Changes the channel
Volume
Increases or decreases the listening volume
Function
Activates one of three special function keys
Toggle
Toggles between the current channel and the
previous channel
Up
Depending upon your satellite, the Up command
either increments the satellite position or increments
the channel
Down
Depending upon your satellite, the Down command
either decrements the satellite position or decrements
the channel
Enter
Your satellite may require an enter code after
specifying a command
continued on next page
Satellite Menu
Copyright © 2013 QTI
14-3
Turnon, Shutoff, Mute Commands, continued
Hint
By default, the Simplicity™ allows you to issue a command (Turnon) and stay within
the Main Menu. This allows you to issue other commands (i.e. Up, Down, etc.)
without exiting the Main Menu.
You can set the Turnon, Toggle, Up, Down, Function, and Enter commands to exit
the Main Menu after issuing a command. Refer to the Installation Guide for detail.
14-4
Simplicity™ Family
Copyright © 2013 QTI
Turnon, Shutoff, Mute Commands
Turnon
The Turnon command turns on the satellite.
Task:
Turn on the satellite:
Say:
Select:
Egbert
Remote 1
Remote 1
Turnon
Turnon
Say:
Select:
Shutoff
The Shutoff command shuts off the satellite.
Task:
Shut off the satellite:
Egbert
Remote 1
Remote 1
Shutoff
Shutoff
Say:
Select:
Mute
The Mute command mutes the volume.
Task:
Mute the volume:
Satellite Menu
Copyright © 2013 QTI
Egbert
Remote 1
Remote 1
Mute
Mute
14-5
The Keyboard Command
Definition
The Keyboard command provides sub-commands that access options specific to
your satellite. These options vary from satellite to satellite.
Sub-Commands
The Keyboard command provides additional sub-commands:
Keyboard SubCommands
Forward
Moves the on-screen cursor to the right
Reverse
Moves the on-screen cursor to the left
Up
Down
0-9
Enter
Keyboard
Moves the on-screen cursor up
Moves the on-screen cursor down
Enters digits 0 through 9
Used if your satellite requires an enter code after
specifying a command
Displays the menu of options available for your satellite
Toggle
User-defined key
Remote 1
User-defined key
Remote 2
User-defined key
Remote 3
User-defined key
No
14-6
Function
Returns to the Satellite Menu
Simplicity™ Family
Copyright © 2013 QTI
The Keyboard Command, continued
Examples
Tasks:
Move the on-screen cursor right:
Move the on-screen cursor left:
Move the on-screen cursor up:
Move the on-screen cursor down:
Access the DSS menu of options:
Specify option two from the DSS menu:
Specify option two from the DSS menu, then specify
the DSS Select button:
Satellite Menu
Copyright © 2013 QTI
Say:
Select:
Egbert
Remote 1
Remote 1
Keyboard
Keyboard
Forward
Forward
Egbert
Remote 1
Remote 1
Keyboard
Keyboard
Reverse
Reverse
Egbert
Remote 1
Remote 1
Keyboard
Keyboard
Up
Up
Egbert
Remote 1
Remote 1
Keyboard
Keyboard
Down
Down
Egbert
Remote 1
Remote 1
Keyboard
Keyboard
Keyboard
Keyboard
Egbert
Remote 1
Remote 1
Keyboard
Keyboard
Two
Two
Egbert
Remote 1
Remote 1
Keyboard
Keyboard
Two
Two
(You must setup the ECU to recognize Select as
Enter.)
Enter
Enter
Return to the Satellite Menu:
Egbert
Remote 1
Remote 1
Keyboard
Keyboard
No
No
14-7
The Channel Command
Definition
The Channel command allows you to change the satellite channel.
The number of digits you must specify is configurable. The default is two digits.
Refer to the Installation Manual for more detail.
Sub-Commands
The Channel command provides additional sub-commands:
Channel Sub-Commands
Enter
Function
Used by satellites that require an “enter” code
after selecting a channel
Up
Increments the channel number by one
Down
Decrements the channel number by one
Returns to the beginning of the Satellite Menu
No
0 through 9
Specifies the digits of a channel number
You can repeatedly select or say each of these sub-commands to select a channel.
Select or say No to return to the Satellite Menu and choose other Satellite Menu
commands. Or, select or say Cancel to exit.
Examples
Tasks:
Change to channel 225, and send an Enter code
required for some satellites:
Say:
Select:
Egbert
Remote 1
Remote 1
Channel
Channel
Two
Two
Two
Two
Five
Five
Enter
Enter
continued on next page
14-8
Simplicity™ Family
Copyright © 2013 QTI
The Channel Command, continued
Examples, continued
Tasks:
Change from channel 225 to channel 226:
Change from channel 226 to channel 225:
Return to the beginning of the Satellite Menu:
Say:
Select:
Egbert
Remote 1
Remote 1
Channel
Channel
Up
Up
Egbert
Remote 1
Remote 1
Channel
Channel
Down
Down
Egbert
Remote 1
Remote 1
Channel
Channel
No
No
continued on next page
Satellite Menu
Copyright © 2013 QTI
14-9
The Volume Command
Definition
The Volume command increases or decreases the listening volume.
Examples
Tasks:
Turn the volume down one increment:
Turn the volume up two increments and return to the
beginning of the Satellite Menu:
Say:
Select:
Egbert
Remote 1
Remote 1
Volume
Volume
Down
Down
Cancel
Cancel
Egbert
Remote 1
Remote 1
Volume
Volume
Up
Up
Up
Up
No
No
You can select or say Up or Down to gradually increase or decrease the volume.
Select or say No to return to the beginning of the Satellite Menu and choose other
Satellite Menu commands. Or, select or say Cancel to exit.
14-10
Simplicity™ Family
Copyright © 2013 QTI
The Function Command
Definition
You can customize the ECU to control up to three special features of your satellite
remote control.
For example, your remote control might have a button that toggles between the
satellite dish and the television. You can train the ECU to “learn” this button, and
toggle using the Function command.
“Learning” Remote Control Buttons
See the Installation Manual for detail on how the ECU “learns” features of your
satellite remote control.
Sub-Commands
The Function command provides additional sub-commands:
Function SubCommands
Function
0
Controls the feature learned as function zero
1
Controls the feature learned as function one
2
Controls the feature learned as function two
Enter
No
Used by satellites that require an “enter” code after
specifying a function number
Returns to the Satellite Menu
continued on next page
Satellite Menu
Copyright © 2013 QTI
14-11
The Function Command, continued
Examples
Tasks:
Say:
Your satellite has a remote control with a button that
returns to the last channel viewed. You trained the
ECU to recognize this as function zero. To return to
the last channel viewed:
Egbert
Your satellite has a remote control with a button that
purchases a program. You trained the ECU to
recognize this as function one. To purchase a
program and send an Enter code required for some
satellites:
Your satellite has a remote control with a button that
displays program information. You trained the ECU
to recognize this as function two. To view program
information and return to the beginning of the
Satellite Menu:
14-12
Select:
Remote 1
Remote 1
Function
Function
Zero
Zero
Egbert
Remote 1
Remote 1
Function
Function
One
One
Enter
Enter
Egbert
Remote 1
Remote 1
Function
Function
Two
Two
No
No
Simplicity™ Family
Copyright © 2013 QTI
The Up, Down and Toggle Commands
Up
Depending upon your satellite, the Up command increments the satellite position or
increments the channel.
Task:
Increment the channel on a DSS satellite:
Say:
Select:
Egbert
Remote 1
Remote 1
Up
Up
Down
Depending upon your satellite, the Down command decrements the satellite position
or decrements the channel.
Task:
Decrement the channel on a DSS satellite:
Say:
Select:
Egbert
Remote 1
Remote 1
Down
Down
Toggle
The Toggle command toggles between the channel you are currently watching and
the channel previously viewed.
Task:
Toggle the satellite to channel 255, the channel
previously viewed:
Satellite Menu
Copyright © 2013 QTI
Say:
Select:
Egbert
Remote 1
Remote 1
Toggle
Toggle
14-13
Enter Command
Enter
Some satellites may require the Enter command after a command is issued.
Hint
DSS users should configure the ECU to “learn” the Select button as Enter. See the
Installation Guide for detail.
Example
Tasks:
If you not using a DSS Satellite, you can specify a
channel number and send the Enter code:
DSS users may navigate through the on-screen
program guide and select a channel to view:
Note you must have learned the Select button as
Enter.
14-14
Say:
Select:
Egbert
Remote 1
Remote 1
Two
Two
Two
Two
Five
Five
Enter
Enter
Egbert
Remote 1
Remote 1
Up
Up
Up
Up
Up
Up
Enter
Enter
Simplicity™ Family
Copyright © 2013 QTI
Satellite Menu Flowchart
Introduction
This flowchart outlines the Satellite Menu commands:
Satellite
Turnon
Shutoff
Mute
Channel
Volume
Function
Reverse
Enter
Up
0-2
Up
Up
Down
Enter
Down
No
No
Keyboard
Forward
Down
0-9
Enter
Keyboard
No
0-9
Toggle
Remote1
Remote2
Remote3
No
continued on next page
Satellite Menu
Copyright © 2013 QTI
14-15
Satellite Menu Flowchart, continued
Satellite
Toggle
14-16
Up
Down
Enter
Simplicity™ Family
Copyright © 2013 QTI
Chapter 15: Stereo Menu
Overview
Introduction
The Simplicity™ allows you to control most stereos that use a remote control.
As part of the setup process, you train the ECU to recognize the remote control your
stereo uses. You could train the ECU to recognize your stereo under menu Remote 1,
Remote 2, or Remote 3. This chapter assumes you trained the ECU to recognize your
stereo under Menu Remote 1. See the Installation Manual for detail on this process.
Once the ECU recognizes your stereo remote control, you use Voice or Switch
commands to control the stereo via the Stereo Menu.
Objectives
In this chapter, you learn how to use the Stereo Menu to:
15-2
•
Turn a stereo on or off
•
Mute the volume
•
Increase or decrease the volume
•
Change the station
•
Operate specially programmed keys
Simplicity™ Family
Copyright © 2013 QTI
The Stereo Menu Commands
Stereo Menu Commands
Once the ECU successfully recognizes your stereo remote control, you control the
stereo with Voice or Switch Stereo Menu commands:
Stereo Menu Commands
Function
Turnon
Turns on the stereo
Shutoff
Turns off the stereo
Mute
Toggles between removing and restoring audio
Volume
Increases or decreases the listening volume
Channel
Changes the station
Function
Activates one of three preprogrammed keys
Hint
By default, the Simplicity™ allows you to issue a command (Turnon) and stay within
the Stereo Menu. This allows you to issue other commands (i.e. Channel, Volume,
etc.) without exiting the Stereo Menu.
You can set the Turnon and Function commands to exit to the Main Menu after
issuing a Stereo Menu command. Refer to the Installation Guide for detail.
Stereo Menu
Copyright © 2013 QTI
15-3
Turnon, Shutoff, and Mute Commands
Turnon
The Turnon command turns on the stereo.
Task:
Turn on the stereo:
Say:
Select:
Egbert
Remote 1
Remote 1
Turnon
Turnon
Say:
Select:
Shutoff
The Shutoff command shuts off the stereo.
Task:
Shut off the stereo:
Egbert
Remote 1
Remote 1
Shutoff
Shutoff
Say:
Select:
Mute
The Mute command toggles the sound on and off.
Tasks:
Turn the sound off:
Turn the sound back on:
15-4
Egbert
Remote 1
Remote 1
Mute
Mute
Egbert
Remote 1
Remote 1
Mute
Mute
Simplicity™ Family
Copyright © 2013 QTI
The Volume Command
Definition
The Volume command increases or decreases the listening volume.
Sub-Commands
The Volume command provides additional sub-commands:
Volume Sub-Commands
Function
Up
Increases the volume one increment
Down
Decreases the volume one increment
Returns to the Stereo Menu
No
You can select or say Up or Down to gradually increase or decrease the volume.
Select or say No to return to the Stereo Menu and choose other Stereo Menu
commands. Or, select or say Cancel to exit.
Examples
Tasks:
Say:
Turn the volume up two increments and return to the
Stereo Menu:
Egbert
Turn the volume down one increment and exit:
Stereo Menu
Copyright © 2013 QTI
Select:
Remote 1
Remote 1
Volume
Volume
Up
Up
Up
Up
No
No
Egbert
Remote 1
Remote 1
Volume
Volume
Down
Down
Cancel
Cancel
15-5
The Channel Command
Definition
The Channel command allows you to change the station.
You identify which station you want to listen to by specifying its station number
(98.5 FM). Since most radio stations require three (98.5 FM) or four (104.5 FM)
digits, you customize the ECU to accept the appropriate number of digits. The ECU
will not change the station until you specify the appropriate number of digits.
Refer to the Installation Guide to learn how to change the number of required digits.
The examples below assume you changed the number of digits to four.
Sub-Commands
The Channel command provides additional sub-commands:
Channel SubCommands
Enter
Function
Used by stereos that require an “enter” code after
selecting a station
Up
Increments the station number by one
Down
Decrements the station number by one
No
0 through 9
Returns to the Stereo Menu
Specifies the digits of a station number; the number
of digits you must enter is customized during
installation
You can repeatedly select or say each of these sub-commands to select a station.
Select or say No to return to the Stereo Menu and choose other Stereo Menu
commands. Or, select or say Cancel to exit.
15-6
Simplicity™ Family
Copyright © 2013 QTI
The Channel Command, continued
Examples
Tasks:
Change to station 98.5 FM, send an Enter code, and
remain in the Channel sub-command:
Since you configured the ECU to expect four digits,
specify zero before the three digits of the radio
station.
Change from 98.5 FM to 101 FM, and return to the
Stereo Menu:
Change from 101 FM to 98.5 FM, and exit:
Stereo Menu
Copyright © 2013 QTI
Say:
Select:
Egbert
Remote 1
Remote 1
Channel
Channel
Zero
Zero
Nine
Nine
Eight
Eight
Five
Five
Enter
Enter
Egbert
Remote 1
Remote 1
Channel
Channel
Up
Up
No
No
Egbert
Remote 1
Remote 1
Channel
Channel
Down
Down
Cancel
Cancel
15-7
The Function Command
Definition
You can customize the ECU to control up to three special features of your stereo
remote control.
For example, your remote control might have a button that toggles to AM radio. You
can train the ECU to “learn” this button, and toggle using the Function command.
“Learning” Remote Control Buttons
See the Installation Manual for detail on how the ECU “learns” features of your
stereo remote control.
Sub-Commands
The Function command provides additional sub-commands:
Function SubCommands
Function
0
Controls the feature learned as function zero
1
Controls the feature learned as function one
2
Controls the feature learned as function two
Enter
No
Used by stereos that require an “enter” code after
specifying a function number
Returns to the Stereo Menu
continued on next page
15-8
Simplicity™ Family
Copyright © 2013 QTI
The Function Command, continued
Examples
Tasks:
Your stereo has a remote control with a button that
toggles to AM radio. You trained the ECU to
recognize this as function zero. To control this
feature:
Your stereo has a remote control with a button that
toggles to FM radio. You trained the ECU to
recognize this as function one. To control this
feature and send an Enter code required for some
stereos:
Your stereo has a remote control with a button that
activates “surround sound”. You trained the ECU to
recognize this as function two. To control this
feature and return to the Stereo Menu:
Stereo Menu
Copyright © 2013 QTI
Say:
Select:
Egbert
Remote 1
Remote 1
Function
Function
Zero
Zero
Egbert
Remote 1
Remote 1
Function
Function
One
One
Enter
Enter
Egbert
Remote 1
Remote 1
Function
Function
Two
Two
No
No
15-9
Stereo Menu Flowchart
Introduction
This flowchart outlines the Stereo Menu commands:
Stereo
Turnon
Shutoff
Mute
Volume
Channel
Function
Up
Enter
0-2
Down
Up
Enter
No
Down
No
No
0-9
15-10
Simplicity™ Family
Copyright © 2013 QTI
Chapter 16: CD Menu
Overview
Introduction
The Simplicity™ allows you to control most CD players that use a remote control.
You could train the ECU to recognize your CD player under menu Remote 1, Remote
2, or Remote 3. This chapter assumes you trained the ECU to recognize your CD
player under Menu Remote 1. See the Installation Manual for detail on this process.
Once the ECU recognizes your CD player remote control, you use Voice or Switch
commands to control the CD player via the CD Menu.
Objectives
In this chapter, you learn how to use the CD Menu to:
16-2
•
Turn a CD player on or off
•
Play, stop, or pause a CD
•
Change to a specific track
•
Operate specially programmed keys
Simplicity™ Family
Copyright © 2013 QTI
The CD Menu Commands
CD Menu Commands
Once the ECU successfully recognizes your CD player remote control, you control
the CD player with Voice or Switch CD Menu commands:
CD Menu Commands
Function
Turnon
Turns on the CD player
Shutoff
Turns off the CD player
Play
Starts playing a CD
Stop
Stops playing a CD
Pause
Pauses a CD during play
Channel
Changes the CD track up or down, or allows you to
choose a specific track
Function
Activates one of three preprogrammed keys
Hint
By default, the Simplicity™ allows you to issue a command (Turnon) and stay
within the CD Menu. This allows you to issue other commands (i.e. Play, Stop,
etc.) without exiting the CD Menu.
You can set the Turnon, Function, Play, Stop, and Pause commands to exit the CD
Menu after issuing a command. Refer to the Installation Guide for detail.
Stereo Menu
Copyright © 2013 QTI
16-3
Turnon, and Shutoff Commands
Turnon
The Turnon command turns on the CD player.
Task:
Turn on the CD player:
Say:
Select:
Egbert
Remote 1
Remote 1
Turnon
Turnon
Shutoff
The Shutoff command shuts off the CD player.
Task:
Shut off the CD player:
16-4
Say:
Select:
Egbert
Remote 1
Remote 1
Shutoff
Shutoff
Simplicity™ Family
Copyright © 2013 QTI
Play, Stop, and Pause Commands
Play
The Play command plays the CD in the CD player.
Task:
Play the CD:
Say:
Select:
Egbert
Remote 1
Remote 1
Play
Play
Stop
The Stop command stops playing the CD in the CD player.
Task:
Stop the CD:
Say:
Select:
Egbert
Remote 1
Remote 1
Stop
Stop
Pause
The Pause command pauses the CD in the CD player.
Task:
Pause the CD:
Stereo Menu
Copyright © 2013 QTI
Say:
Select:
Egbert
Remote 1
Remote 1
Pause
Pause
16-5
The Channel Command
Definition
The Channel command allows you to change the CD track.
Sub-Commands
The Channel command provides additional sub-commands:
Channel Sub-Commands
Enter
Function
Used by CD players that require an “enter” code
after selecting a track
Up
Increments the track number by one
Down
Decrements the track number by one
Returns to the beginning of the CD Menu
No
0 through 9
Specifies the digits of a track
Examples
Tasks:
Change to track 7, and send an Enter code required
for some CD players:
Change from track 7 to track 8, and return to the CD
Menu:
Change from track 8 to track 7, and exit:
16-6
Say:
Select:
Egbert
Remote 1
Remote 1
Channel
Channel
Zero
Zero
Seven
Seven
Enter
Enter
Egbert
Remote 1
Remote 1
Channel
Channel
Up
Up
No
No
Egbert
Remote 1
Remote 1
Channel
Channel
Down
Down
Cancel
Cancel
Simplicity™ Family
Copyright © 2013 QTI
The Function Command
Definition
You can customize the ECU to control up to three special features of your CD player
remote control.
For example, your remote control might have a button that allows you to select from
multiple CDs. You can train the ECU to “learn” this button, and toggle using the
Function command.
“Learning” Remote Control Buttons
See the Installation Manual for detail on how the ECU “learns” features of your CD
player remote control.
Sub-Commands
The Function command provides additional sub-commands:
Function SubCommands
Function
0
Controls the feature learned as function zero
1
Controls the feature learned as function one
2
Controls the feature learned as function two
Enter
No
Used by CD players that require an “enter” code after
specifying a function number
Returns to the CD Menu
continued on next page
Stereo Menu
Copyright © 2013 QTI
16-7
The Function Command, continued
Examples
Tasks:
Your CD player has a remote control with a button
that mutes the CD audio. You trained the ECU to
recognize this as function zero. To control this
feature:
Your CD player has a remote control with a button
that skips a track. You trained the ECU to recognize
this as function one. To control this feature and send
an Enter code required for some CD players:
Your CD player has a remote control with a button
that displays the remaining play time. You trained
the ECU to recognize this as function two. To
control this feature and return to the CD Menu:
16-8
Say:
Select:
Egbert
Remote 1
Remote 1
Function
Function
Zero
Zero
Egbert
Remote 1
Remote 1
Function
Function
One
One
Enter
Enter
Egbert
Remote 1
Remote 1
Function
Function
Two
Two
No
No
Simplicity™ Family
Copyright © 2013 QTI
CD Menu Flowchart
Introduction
This flowchart outlines the CD Menu commands:
CD
Turnon
Shutoff
Play
Stop
Pause
Channel
Function
Enter
0-2
Up
Enter
Down
No
No
0-9
Stereo Menu
Copyright © 2013 QTI
16-9
(This page left blank intentionally)
16-10
Simplicity™ Family
Copyright © 2013 QTI
Chapter 17: Tape Menu
Overview
Introduction
The Simplicity™ allows you to control most tape players that use a remote control.
You could train the ECU to recognize your tape player under menu Remote 1, Remote
2, or Remote 3. This chapter assumes you trained the ECU to recognize your tape
player under Menu Remote 1. See the Installation Manual for detail on this process.
Once the ECU recognizes your tape player remote control, you use Voice or Switch
commands to control the tape player via the Tape Menu.
Objectives
In this chapter, you learn how to use the Tape Menu to:
17-2
•
Turn a tape player on or off
•
Fast forward a tape
•
Rewind a tape
•
Play, pause, or stop a tape
•
Record a tape
•
Operate specially programmed keys
Simplicity™ Family
Copyright © 2013 QTI
The Tape Menu Commands
Tape Menu Commands
Once the ECU successfully recognizes your tape player remote control, you control
the tape player with Voice or Switch Tape Menu commands:
Tape Menu Commands
Function
Turnon
Turns on the tape player
Shutoff
Turns off the tape player
Forward
Fast forwards a tape
Reverse
Rewinds a tape
Play
Pause
Stop
Record
Function
Starts playing a tape
Pauses a tape during play
Stops a tape
Starts recording a tape
Activates one of three special function keys
Hint
By default, the Simplicity™ allows you to issue a command (Turnon) and stay within
the Tape Menu. This allows you to issue other commands (i.e. Play, Stop, etc.)
without exiting the Tape Menu.
You can set the Turnon, Forward, Reverse, Play, Pause, and Stop commands to
exit the Tape Menu after issuing a command. Refer to the Installation Guide for
detail.
Stereo Menu
Copyright © 2013 QTI
17-3
Turnon, and Shutoff Commands
Turnon
The Turnon command turns on the tape player.
Task:
Turn on the tape player:
Say:
Egbert
Remote 1
Turnon
Select:
Remote 1
Turnon
Shutoff
The Shutoff command shuts off the tape player.
Task:
Shut off the tape player:
17-4
Say:
Egbert
Remote 1
Shutoff
Select:
Remote 1
Shutoff
Simplicity™ Family
Copyright © 2013 QTI
Forward and Reverse Commands
Forward
The Forward command searches through the tape playing in the tape player.
Task:
Fast forward through the tape playing in the tape
player:
Say:
Egbert
Remote 1
Forward
Select:
Remote 1
Forward
Reverse
The Reverse command rewinds the tape loaded in the tape player.
Task:
Rewind a tape loaded in the tape player:
Stereo Menu
Copyright © 2013 QTI
Say:
Egbert
Remote 1
Rewind
Select:
Remote 1
Rewind
17-5
Play, Pause, and Stop Commands
Play
The Play command plays the tape in the tape player.
Task:
Play the tape:
Say:
Egbert
Remote 1
Play
Select:
Remote 1
Play
Pause
The Pause command pauses the tape in the tape player.
Task:
Pause the tape:
Say:
Select:
Egbert
Remote 1
Tape
Pause
Pause
Stop
The Stop command stops playing the tape in the tape player.
Task:
Stop the tape:
17-6
Say:
Egbert
Remote 1
Stop
Select:
Remote 1
Stop
Simplicity™ Family
Copyright © 2013 QTI
Record Command
Record
The Record command starts recording a tape.
Task:
Record a tape:
Stereo Menu
Copyright © 2013 QTI
Say:
Select:
Egbert
Remote 1
Remote 1
Record
Record
17-7
The Function Command
Definition
You can customize the ECU to control up to three special features of your tape
player remote control.
For example, your remote control might have a button that allows you to switch
between dual tape decks. You can train the ECU to “learn” this button, and toggle
between deck one and deck two using the Function command.
“Learning” Remote Control Buttons
See the Installation Manual for detail on how the ECU “learns” features of your tape
player remote control.
Sub-Commands
The Function command provides additional sub-commands:
Function SubCommands
Function
0
Controls the feature learned as function zero
1
Controls the feature learned as function one
2
Controls the feature learned as function two
Enter
No
Used by tape players that require an “enter” code after
specifying a function number
Returns to the Tape Menu
continued on next page
17-8
Simplicity™ Family
Copyright © 2013 QTI
The Function Command, continued
Examples
Tasks:
Your tape player has dual tape decks with a button
that activates deck two. You trained the ECU to
recognize this as function zero. To control this
feature:
Your tape player has a Play button on deck two. You
trained the ECU to recognize this as function one.
To control this feature and send an Enter code
required for some tape players:
Your tape player has a Stop button for deck two.
You trained the ECU to recognize this as function
two. To control this feature and return to the Tape
Menu:
Stereo Menu
Copyright © 2013 QTI
Say:
Select:
Egbert
Remote 1
Remote 1
Function
Function
Zero
Zero
Egbert
Remote 1
Remote 1
Function
Function
One
One
Enter
Enter
Egbert
Remote 1
Remote 1
Function
Function
Two
Two
No
No
17-9
Tape Menu Flowchart
Introduction
This flowchart outlines the Tape Menu commands:
Tape
Turnon
Shutoff
Forward
Reverse
Play
Pause
Stop
continued on next page
17-10
Simplicity™ Family
Copyright © 2013 QTI
Tape Menu Flowchart, continued
Tape
Record
Function
0-2
Enter
No
Stereo Menu
Copyright © 2013 QTI
17-11
(This page left blank intentionally)
17-12
Simplicity™ Family
Copyright © 2013 QTI
Chapter 18: The Generic Menu
Overview
Introduction
The Simplicity™ allows you to control most generic devices that use a remote
control, such as drapery pulls or ceiling fans.
You could train the ECU to recognize your generic device under menu Remote 1,
Remote 2, or Remote 3. This chapter assumes you trained the ECU to recognize your
generic device under Menu Remote 1. See the Installation Manual for detail on this
process.
Once the ECU recognizes your generic device remote control, you use Voice or
Switch commands to control the generic device under one of the above menus.
Objectives
In this chapter, you learn how to:
18-2
•
Turn a generic device on
•
Turn a generic device off
•
Stop a generic device
•
Depending upon the device, issue an increment (i.e., gradually turn up a
thermostat)
•
Depending upon the device, issue a decrement (i.e. gradually turn down a
thermostat)
Simplicity™ Family
Copyright © 2013 QTI
The Generic Menu Commands
Generic Menu Commands
Once the ECU successfully recognizes the generic device remote control, you use
Voice or Switch commands to control the generic device with the Generic Menu
commands:
Generic Menu
Commands
Function
Turnon
Turns on a device
Shutoff
Turns off a device
Stop
Stops a device
Up
Issues an increment (Channel, Volume, etc.)
Down
Issues a decrement (Channel, Volume, etc.)
Function
Activates one of three special function keys
Hint
By default, the Simplicity™ allows you to issue a command (Turnon) and stay within
the Generic Menu. This allows you to issue other commands (i.e. Up, Down, etc.)
without exiting the Generic Menu.
You can set the Turnon, Stop, Up, Down, and Function commands to exit the
Generic Menu after issuing a command. Refer to the Installation Guide for detail.
Generic Menu
Copyright © 2013 QTI
18-3
Turnon, and Shutoff Commands
Turnon
The Turnon command turns on a device.
Task:
Turn on a thermostat:
Say:
Select:
Egbert
Remote 1
Remote 1
Turnon
Turnon
Say:
Select:
Shutoff
The Shutoff command shuts off a device.
Task:
Shut off a thermostat:
18-4
Egbert
Remote 1
Remote 1
Shutoff
Shutoff
Simplicity™ Family
Copyright © 2013 QTI
The Stop Command
Stop
The Stop command stops a device.
Task:
Stop a ceiling fan:
Generic Menu
Copyright © 2013 QTI
Say:
Select:
Egbert
Remote 1
Remote 1
Stop
Stop
18-5
The Up and Down Commands
Up
The Up command makes a device go up.
Task:
Increment the temperature using a thermostat:
Say:
Select:
Egbert
Remote 1
Remote 1
Up
Up
Say:
Select:
Down
The Down command makes a device go down.
Task:
Decrease the temperature using a thermostat:
18-6
Egbert
Remote 1
Remote 1
Down
Down
Simplicity™ Family
Copyright © 2013 QTI
The Function Command
Definition
You can customize the ECU to control up to three special features of a device remote
control. For example, a remote-controlled thermostat might have buttons that control
different zones in your home. You can train the ECU to “learn” a button to control
the heat in each zone.
“Learning” Remote Control Buttons
See the Installation Manual for detail on how the ECU “learns” features of your
device remote control.
Sub-Commands
The Function command provides additional sub-commands:
Function SubCommands
Function
0
Controls the feature learned as function zero
1
Controls the feature learned as function one
2
Controls the feature learned as function two
Enter
No
Used by devices that require an “enter” code after
specifying a function number
Returns to the Generic Menu
continued on next page
Generic Menu
Copyright © 2013 QTI
18-7
The Function Command, continued
Tasks:
Your remote-controlled thermostat can control the
basement temperature. You trained the ECU to
recognize this as function zero. To control this
feature and exit:
You have a remote-controlled fan. You trained the
ECU to recognize this as function one. To control
this device, and send an Enter code:
Your remote-controlled thermostat can control the
second floor temperature. You trained the ECU to
recognize this as function two. To control this
feature and return to the Generic Menu
18-8
Say:
Select:
Egbert
Remote 1
Remote 1
Function
Function
Zero
Zero
Cancel
Cancel
Egbert
Remote 1
Remote 1
Function
Function
One
One
Enter
Enter
Egbert
Remote 1
Remote 1
Function
Function
Two
Two
No
No
Simplicity™ Family
Copyright © 2013 QTI
Generic Menu Flowchart
Introduction
This flowchart outlines the Generic Menu commands:
Generic
Turnon
Shutoff
Stop
Up
Down
0-9
Function
0-2
Enter
No
Generic Menu
Copyright © 2013 QTI
18-9
(This page left blank intentionally)
18-10
Simplicity™ Family
Copyright © 2013 QTI
Appendix A: ECU Messages
Overview
Introduction
The Simplicity™ contains extensive built-in self-diagnostics.
Objectives
In this chapter, you learn about each ECU message, including:
A-2
•
Operating Messages
•
Status Messages
Simplicity™ Family
Copyright © 2013 QTI
Operating Messages
Operating Messages
Operating messages provide system information. Operating Messages include the
following:
Message
ECU Messages
Copyright © 2013 QTI
Meaning
Stop
Defective switch is detected or the
microphone is plugged into the
switch jack
Retry
No switch is detected
Single Switch
¼” mono plug detected
Dual Switch
¼” stereo plug detected
Phone, Answer, Phone, Answer,……
Switch has been unplugged
Power Failure
A.C. power has been lost or
disconnected
A-3
Internal Messages
Internal Messages
Internal messages provide possible error codes. These messages do not necessarily
indicate a system malfunction, but you should call your local distributor if any of
these messages are heard. Operating Messages include the following:
Message
A-4
Meaning
Function 00
Watchdog time out
Function 01
Stack error
Function 02
Watchdog test failed
Function 10
Failed third attempt to read infrared
Function 21
Parity, or overrun error (voice
up/down load)
Function 30
Incorrect first digit for three-digit
entry for remotes
Simplicity™ Family
Copyright © 2013 QTI
Appendix B: Recorded Phone Numbers
Recorded Phone Numbers
Location #
Digits Stored
Person/Location
00
01
02
03
04
05
06
07
08
09
10
11
12
13
14
15
16
17
18
19
20
21
22
23
24
25
26
27
28
29
30
31
B-2
Simplicity™ Family
Copyright © 2013 QTI
Recorded Phone Numbers
Location #
Digits Stored
Person/Location
32
33
34
35
36
37
38
39
40
41
42
43
44
45
46
47
48
49
50
51
52
53
54
55
56
57
58
59
60
61
62
63
Recorded Phone Numbers
Copyright © 2013 QTI
B-3
Recorded Phone Numbers
Location #
Digits Stored
Person/Location
64
65
66
67
68
69
70
71
72
73
74
75
76
77
78
79
80
81
82
83
84
85
86
87
88
89
90
91
92
93
94
95
B-4
Simplicity™ Family
Copyright © 2013 QTI
Recorded Phone Numbers
Location #
Digits Stored
Person/Location
96
97
98
99*
*Note: Digits stored in location 99 will automatically be dialed when the “Dial
Operator” command is invoked (switch mode only)
Recorded Phone Numbers
Copyright © 2013 QTI
B-5
(This page left blank intentionally)
B-6
Simplicity™ Family
Copyright © 2013 QTI
Appendix C: Flowcharts
Phone
Light
Appliance
Television
Cable
Answer
Dial OP
Hangup
Mute
Retry
Privacy
Dial
Record
Play
Volume
Utility
Allon
Everythingoff
1-16
Allon
Everythingoff
1-16
Turnon
Shutoff
Up
Down
No
Function
1-16
Turnon
Shutoff
Up
Down
No
Function
1-16
Turnon
Shutoff
Mute
Volume
Channel
Function
Toggle
Turnon
Shutoff
Mute
Volume
Channel
Function
Toggle
0-2
Enter
No
0-2
Enter
No
Enter
Up
Down
No
0-9
Enter
Up
Down
No
0-9
VCR
Turnon
Shutoff
Play
Record
Reverse
Pause
Stop
Toggle
Channel
Volume
Forward
Function
00-99
0-9
0-2
Enter
No
00-99
Up
Down
No
Function
0-11
No
Pause
Record
Global Commands:
Function
0-11
No
Pause
Dial
Mute
0-11
Hangup
The Name
Cancel
Helpme
Notes: Bold words - loop in menu
Bold italic words - "selectable loop" in menu
Up
Down
No
Up
Down
No
Enter
Up
Down
No
0-9
Remote1
Remote2
Remote3
Bed
Accessory
Retrain
Utility
Computer
Select
Infrared
Menu
Select
Infrared
Menu
Select
Infrared
Menu
Head
Mattress
Foot
1
2
Yes
No
Television
Cable
VCR
Remote1
Remote2
Remote3
Function
Keyboard
Turnon
Shutoff
Refer
To
Manual
1 - Echo
2 - Tone
3 - VMK Reset
4 - Version
5 - Breakout
6 - Ring
7 - Power Failure
Satellite
Stereo
CD
Tape
Generic
Turnon
Shutoff
Mute
Keyboard
Channel
Volume
Function
Toggle
Up
Down
Enter
Turnon
Shutoff
Mute
Volume
Channel
Function
Turnon
Shutoff
Play
Stop
Pause
Channel
Function
Turnon
Shutoff
Forward
Reverse
Pause
Stop
Record
Function
Turnon
Shutoff
Stop
Up
Down
0-9
Function
0-2
Enter
No
0-2
Enter
No
0-2
Enter
No
0-2
Enter
No
Enter
Up
Down
No
0-9
Enter
Up
Down
No
0-9
0-2
Enter
No
Up
Down
No
Enter
Up
Down
No
0-9
Forward
Reverse
Up
Down
0-9
Enter
Keyboard
Toggle
Remote1
Remote2
Remote3
No
Up
Down
No
Appendix D: Nurse Call Option
Overview
Introduction
A “Nurse Call” option is available for Simplicity™ All-in-One and Simplicity™
Switch ECU’s. This feature allows for quick access to an attendant signaling device.
Signaling devices can be as simple as an X-10 or Insteon module, or a device
connected to a module, or any device connected to Accessory Port 1 that requires a
momentary low voltage contact.
Objectives
In this section, you learn how to:
•
Activate “Nurse Call”
Note
You can configure the ECU to activate Accessory Port 1 and/or an X-10 module
when “Nurse Call” is selected.
See the Installation Manual for detail on configuring the above activation options.
Example
The Nurse Call command turns on the satellite.
Task:
Activate a chime connected to Accessory Port 1
Say:
Select:
Egbert
NurseCall
Nurse Call
Note
If the Nurse Call feature is installed, the Appliance menu will not be available.
D-2
Simplicity™ Family
Copyright © 2013 QTI