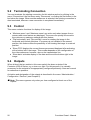
1
Convision Guard Version 1.0 english Convision Guard User manual Version 1.0 May 2001 © Convision Technology GmbH All rights reserved No part of this manual may be reproduced or transmitted in any form without the prior written permission of Convision Technology GmbH. All information and descriptions have been compiled with great care on the basis of thorough research. However, we cannot provide a complete guarantee that there are no errors or changes to applications which may result in different operational sequences or other consequences. Convision Technology GmbH can accept neither responsibility nor legal liability for any consequences arising from this or from unintentional errors. Convision and Convision V6xx A are trademarks of Convision Technology GmbH. Microsoft, MS Windows NT, MS Windows 95, MS Windows 98, MS Internet Explorerare trademarks or registered trademarks of Microsoft Corporation. Netscape and Netscape Navigator are registered trademarks of Netscape Communications Corporation. All other trade names and product names are the trademarks or registered trademarks of the respective owners. Convision Technology GmbH cannot accept liability for increased telephone costs, including costs arising from accidental telephone connections. Convision Technology GmbH has developed this manual to the best of its ability, but can provide no assurance that the programs / systems will fulfil the purpose anticipated by the user. Convision Technology GmbH reserves the right to modify the content of the User Manual without accepting responsibility for informing third parties. We reserve the right to make technical modifications. Convision Guard - Manual 1 Contents: 1 Introduction ................................................................. 4 2 System Prerequisites.................................................... 6 2.1 2.2 Hardware ........................................................................................6 Software .........................................................................................6 3 Summary ...................................................................... 7 3.1 Connection to Convision Video Webservers..........................................8 4 Program Start............................................................... 9 5 Entering Video Webservers ........................................ 10 5.1 5.2 5.3 Editing entries ...............................................................................12 Deleting a device entry ...................................................................12 Configuration of devices ..................................................................12 6 User management ...................................................... 13 6.1 6.2 6.3 6.4 Entering a new user........................................................................13 Permissions ...................................................................................13 Changing the user data ...................................................................14 Deleting a user .............................................................................14 7 Options – General settings ......................................... 15 7.1 7.2 7.3 Browser ........................................................................................15 Serial GPS connection .....................................................................16 User surface ..................................................................................17 8 Alarm processing........................................................ 20 8.1 8.2 8.3 8.3.1 8.3.2 8.3.3 8.3.4 8.3.5 Alarm reception .............................................................................20 Alarm message ..............................................................................21 Alarm databases ............................................................................22 Moving and deleting alarm messages................................................22 Creating new alarm databases .........................................................23 Deleting alarm databases ................................................................23 Importing and exporting .................................................................23 Alarm reports ................................................................................24 9 Live Connections ........................................................ 25 9.1 9.2 9.3 9.4 9.5 Completing connection....................................................................25 Terminating connection...................................................................26 Control .........................................................................................26 Outputs.........................................................................................26 Symbol bars ..................................................................................27 10 Log 2 ........................................................................ 28 Convision Guard - Manual Appendix A Installation and Program Start under Windows 95/98/NT ...................................................................30 abcd- Installation of JRE (JVM) .................................................................30 Installation of Java Communications API ...........................................30 Convision Guard Installation ............................................................30 Convision Guard Program Start ........................................................31 Appendix B Installation and Program Start under Unix/Linux32 abcd- Installation of JRE ..........................................................................32 Installation of Java Communications API ...........................................32 Convision Guard Installation ............................................................32 Convision Guard Program Start ........................................................33 Appendix C List of Figures .....................................................34 Appendix D Index..................................................................35 Convision Guard - Manual 3 1 Introduction Convision Guard is video alarm software developed especially for professional, intelligent remote video surveillance. Together with Convision V100/V200 and Convision V600 A Series, Convision Guard provides a comprehensive surveillance system fulfilling all requirements of digital remote video surveillance. Convision Guard receives alarm messages from the Convision Video Webservers with individual images and pre and post-alarm images. An uncomplicated live video connection to the sending device allows the situation to be checked visually immediately. In the event of a false alarm, this eliminates unnecessary costs because it is not necessary to send guard personnel to the locations. Convision V100/V200 Convision V600 A Series The Convision video webservers have up to 6 alarm/message inputs. If an alarm is signaled, messages can be sent by e-mail or SMS message or as an alarm message according to VdS 2465. E-mails and VdS messages may contain pre and post-alarm images. Convision Guard receives e-mails as alarm messages, whose receipt is indicated visually and acoustically. Clear management of the video systems and users as well as automatic logging of all connections and occurrences also distinguish the program. An incoming alarm message is confirmed by the guard, then it is archived automatically or manually. Storage is accomplished in data basis which can be created simply and quickly with Convision Guard. Moreover, Condition Guard can create alarm reports as HTML pages at any time which can be displayed with any browser. A GPS receiver can be connected to the Convision V600 A Series. The video webserver can integrate the position data into an alarm e-mail. Convision Guard passes this data to a routing program so that the location of the sending device can be found at any time. 4 Convision Guard - Manual General You can download the current version of the Convision Guard Manual as a pdf file from the Convision Homepage www.convision.de. The appearance of the Convision Guard window can be changed. The screen shots contained in this manual shows the “Metal“ image and may therefore differ from the appearance set by you (see Chapter 7.3). To receive alarm messages Convision Guard must be started! Alarm messages received at other times are not stored! ☛ Note: Convision Guard ceases the computer SMTP port when started. Although the program can be started multiply, alarm messages are received only by the program started first, because the SMTP port is no longer available for additional programs. Convision Guard - Manual 5 2 System Prerequisites 2.1 Hardware Convision Guard requires a computer with at least 128 MB of RAM and 50 MB storage space for the alarm database. For use with external video webservers (not in same network – LAN) a router is required. 2.2 Software Operating System Convision Safe1 is a program made up in the programming language Java and therefore runs independent of any specific platform, i.e. it can be used with various operating systems such as Windows 95/98/NT, Unix, Linux etc. JAVA Environment It requires a JRE 1.3 (Java Runtime Environment), a software environment which allows Java programs to be executed. The primary constituent of the JRE is the JVM (Java Virtual Machine). The JRE from Sun Microsystems can be downloaded at no cost from their web site. For Linux operating systems presently under: http://java.sun.com/products/jdk/1.2/jre/download-linux.html For Windows 95/98/NT presently under: http://java.sun.com/products/jdk/1.2/jre/download-windows.html Integration of the Java Communication API is required for transmission of GPS data via the serial interface. Browser A JAVA compatible browser such as Netscape Communicator (min. 4.x) or Microsoft Internet Explorer (min. 4.x) is required to view the alarm reports and for the configuration of the video webservers. 6 Convision Guard - Manual 3 Summary Application Windows 4 tab pages with the following menus are located in the menu list at the top margin ♦ Alarms ♦ Live connections ♦ Administration ♦ Log You can switch back and forth between the individual tab pages by clicking the tab with the mouse. Context Menus Activation and control of the functions is possible with the mouse. In many cases, there are context menus which can be viewed after activation of an element and clicking with the right mouse key. Context menus are matched precisely to an element and contain all important processing commands. These commands can be called by clicking with the left mouse key. Alarm Regardless of the index in which you are presently located, when an alarm is received, the program jumps to the "Alarms" menu. A flashing attention sign and warning sound signal that a new message is present. Live Connections You can create a connection to any video webserver by clicking with the mouse and check the situation directly on site. Up to four connections with four cameras each are possible simultaneously. Administration In the "Administration“ index, you can handle the entire management of the program, the alarm databases, the user administration including setting passwords and authorizations, equipment management as well as setting options. Log Finally the “Log“ keeps track of processes in alarm processing such as alarms received, confirmation or cancellations and logs errors, e.g. unsuccessful attempt to connect to a Convision Video Webserver. All procedures are described in detail in the following chapters. Convision Guard - Manual 7 3.1 Connection to Convision Video Webservers Connection in LAN Convision Guard creates the connection to the video webservers via TCP/IP. Each device with a static IP address in the same LAN can be reached. Connection over Router If devices are incorporated outside of the LAN, a router is required. This is used in the same LAN as the computer with Convision Guard and statically converts the IP addresses entered in Convision Guard to ISDN numbers. Connection is not possible if only dynamic IP addresses can be assigned by the router. Configuration of Video Webserver ♦ Enter the IP address of the computer on which Convision Guard is running as the address of the SMTP server in the video webserver under Configuration/Connections/Mail Server. ♦ The alarm e-mail address may contain any desired entry, however must not be empty. Further configurations required for creating and sending e-mails are described in the manual for the Convision V600 A Series or Convision V100/V200. 8 Convision Guard - Manual 4 Program Start After installation of the program (see Appendix A or Appendix B ) is completed, the login window appears first (Login). Figure 1: Login window for Convision Guard First log in as administrator , no password is entered in the delivery state. The program application window then appears. After logging in, the window with the alarms is always in the foreground. You should first set all equipment and user configurations so that Convision Guard can now receive the first alarm. Figure 2: Convision Guard application window All configurations can be performed in the "Administration“ menu. Convision Guard - Manual 9 5 Entering Video Webservers Enter all Convision Video Webservers from which alarms are to be received in the menu Administration / Databases / Devices. For this purpose, select the third tab page “Administration“. All administration directories are displayed in tree structure in the left section of the window. You can open or close the directories by clicking on the symbol at the left next to the directory symbols or double clicking on the directory symbols. Select “Databases / Devices“. Clicking with the right mouse key opens the context menu. Select “New Entry“. A window appears for entering new devices with the tab pages Device, LAN, Cameras and Outputs. Figure 3: "New video unit" entry window 1. Type - Select the first tab page (Device) and enter the type of device. 2. Name - Assign a name which you can later select the device for Administration or Live Connections. 3. Identification – This is the serial number. (located on the configuration pages of the Webservers under “Info“ or below the device). It can entered manually or determined automatically by clicking the button “Query“ when the IP address (2nd tab page) has already been entered, user and password are entered (depending on device configuration) and the device is accessible. 4. Connectivity - If user name (“user“) and password are required for access (depending on device configuration), enter these. 5. Comment - If required, enter the exact location, owner, etc. as comments for the device. 6. Then select the 2nd tab page (LAN) and enter the IP address according to the connection. 7. Then select the 3rd tab page (Cameras). Fill out the applicable fields for each input to which a camera is connected. The device is shown as a directory in the directory tree only when at least one camera has been entered. 10 Convision Guard - Manual Figure 4: Entry of cameras 8. Select the type of camera. You can see a selection list with different types by clicking the corresponding table field. Select as required by clicking. ☛ Note: The CC2 entry is for all controllable cameras. If you have attached any other controllable camera, which is supported by our Video Webservers, then please also select the CC2 entry. 9. Enter a name for the camera. With this name, you can later select the camera for a live connection. Conclude the entry with “Enter“ to store the name in the system. 10. Repeat the steps for each camera connected. 11. If the video webserver to be entered has alarm outputs (Convision V600 A Series) , now select the last tab page (Outputs). Enter the type and a name for the alarm outputs for the devices here. These outputs can be switched with “Live Connections / Outputs“. Figure 5: Entry of outputs 12. After concluding, confirm with "OK“. Convision Guard - Manual 11 An entry with the name of the device then appears in the directory tree. Clicking this entry opens a list of cameras. All configuration data is shown in the right part of the window. After you have entered all Convision Video Webservers, Convision Guard receives alarms coming from each of these as long as the program is open. 5.1 Editing entries Except for the IP addresses, you can also make or change the entries for the devices later. For this purpose, select a device, click “Edit“ or open the context menu by clicking with the right mouse key. Call the menu point “Edit“. A window then opens for device configuration. Complete the changes by clicking "OK". ☛ Note: If the password is changed in the webserver, it is also necessary to change it in the device entry, otherwise neither an alarm nor live connection is possible. 5.2 Deleting a Device Entry Remove a device from the list by selecting the entry “Delete“ in the context menu. A confirmation request prevents deleting unintentionally. 5.3 Configuration of Devices You can gain direct access to the configuration pages of the video webserver by calling the entry “Configure“. Convision Guard completes a connection to the device and opens a browser window with which you can complete the setting. For selection of the browser, see Chapter 7, for configuration of the video webserver, read the applicable manuals. If configuration of the video webserver is protected by a corresponding safety setting, you are requested to enter the administrator password after opening the browser. 12 Convision Guard - Manual 6 User Management A user management feature is located in the menu "Administration" under “Configuration / User database” . In the delivery state, the only user is the “Administrator“, with all rights. You cannot limit this by editing. 6.1 Entering a new User After activating the user database, call the context menu by clicking with the right mouse key. Then select the entry “New“. A window then opens with an entry display for the new user. Figure 6: "New User" entry window 1. Enter the name of the user. 2. Enter a password and repeat the entry in the next line to avoid typing errors. A password must consist of at least five characters. If no password is entered, any entry of a password is ignored during the login procedure. 3. Then select the authorizations which you want to assign to the new user. 4. Confirm with “OK“. 6.2 Permissions As Administrator, you have all of the following permissions. Each new user can be assigned different permissions which can be combined as required. ♦ Database administration – A user who is entitled to delete database entries can irrevocably delete every alarm message whether processed or not. ♦ Device administration – When granted, the user can enter new devices, delete a device and change the data. Moreover, he can reconfigure the devices with a browser. ♦ Log administration – This authorization allows the user to store or delete the log. ♦ Password – The user is authorized to change his password as frequently as desired. Convision Guard - Manual 13 ♦ Quit – Convision Guard receives incoming alarm messages only when the program is started. By prohibiting termination, you ensure continuous receipt of alarms. – The program can then be terminated only by entering the administrator password. ♦ User administration – If the user is granted authorization for user administration, he can enter new users and delete existing users. Exception: The administrator can not be deleted or his permissions limited. ♦ Program configuration – allows all settings regarding operation of Convision Guard to be changed (Administration / Options). ♦ Log in – A user can temporarily be refused the right to log in and therefore use the program without having to delete him completely from the database. 6.3 Changing the User Data Activate the entry for the user whose data you want to change by double clicking. The right section of the window shows the time this user logged in last and the permissions granted at that time. Click the “Edit“ button at the bottom right or call the context menu by clicking the user name with the right mouse key and select the entry “Edit“. A window opens similar to that for entering a new user, however the name cannot be changed. ☛ Note: Only the administrator or a user authorized for user management can change the data. 6.4 Deleting a User Activate the entry for the user whose data you want to delete. Then call the context menu by clicking with the right mouse key and select the entry “Delete“. 14 Convision Guard - Manual 7 Options – General Settings The option settings in the menu Administration / Configuration / Options adapt the program to the system present and the preferences of the user. 7.1 Browser You require a browser to display the alarm reports and configure the Convision Video Webserver . Calling either of these functions automatically opens a browser window for display of the pages. For this purpose, it is necessary for the program to be able to call a browser directly. Figure 7: Selection of a browser 1. Activate the entry “Browser“. In the right part of the window, the setting "System browser“ opens in the delivery state. 2. Click “Edit“. A window opens up with the function “Automatic system browser detection“. 3. Click “Test“. The browser should then be activated. If the browser is found, and the window cannot be moved to the foreground, a success message appears. 4. If it was not possible to find a browser or you want to use a different browser, deactivate the system browser and click “Select“, to find an executable file for the desired browser in the system. As an alternative, you can enter the path directly. 5. Store the settings with “OK“. You can check by clicking “Test“ again. Convision Guard - Manual 15 7.2 Serial GPS Connection The Convision Video Webservers can transfer data from a connected GPS receiver to Convision Guard in the alarm message. In the case of application on mobile objects, like autos or ships, the location can be checked at any time. GPS (Global Positioning System) is a satellite navigation system. 24 satellites circle the earth at 20.000 km in height and transmit in short intermittent signals with time and position. Signals from 3 satellites at the same time can be used by a GPS receiver to define their own position in a range of approximately 10 meters. This system works world-wide and independent of weather, the contact from the Satellite with GPS antenna may not connect e.g. in a dense forest or under a gas station roof. On a computer, the route planning program (route planner) displays the location on a map. Normally, this program receives data from the GPS receiver at regular intervals over the serial interface. Install such a program on a second computer and connect this computer to the computer on which Convision Guard is running via a serial interface. Convision Guard then transfers the location data to the program at regular intervals as long as the alarm message is active. This shows the location of the webserver at the time the alarm message was transmitted on a map. Figure 8: Setting GPS parameters ☛ Note: It is necessary to install the Java Communications API “JAVA.COMM“ (see Appendix A or Appendix B ) so that Convision Guard can activate the serial interface. 16 Convision Guard - Manual 1. Activate the entry “Serial GPS Interface“ and click the “Edit“ button at the bottom of the display. 2. Select the serial interface over which you want to transfer the GPS data. 3. You can set the data repetition rate which your route planning program expects by pulling the sliding control with mouse key depressed or activating the sliding control by clicking with the mouse and then setting with the cursor keys on the keyboard. 7.3 User Interface Here you can change the system settings as well as the language and the basic appearance of Convision Guard. These settings are the same for all users. For this purpose, click “Edit“ and activate the check box for the desired feature. These entries can be changed by all users authorized for program configuration (see Chapter 6.2). Figure 9: Setting user parameters ♦ Acoustic alarm until all alarms have been confirmed – The acoustic alarm continues until confirmation, can be combined with system sound or sound card. ♦ Automatically archive – Automatically moves an alarm message marked as “confirmed" to the database “Processed alarms“. ♦ Fullscreen mode – Convision Guard starts as a full screen rather than as a window. ♦ Popup – Moves the Convision Guard window with the tab page "Alarms“ to the foreground on the monitor when an alarm message is received even when the opened program is present only in the form of an icon in the task bar. Convision Guard - Manual 17 ♦ Scroll automatically to newest alarm – The program will always scroll to the end in the alarm list when a new alarm is received. ♦ Video source as ToolTip – Shows the camera name during a live connection when the mouse is moved across the current image. ♦ System beep – Every incoming alarm message is indicated by a system beep sound. ♦ Sound on alarm (Sound card) – Every incoming alarm message is indicated by an acoustic signal. ♦ Sound on error - Any error occurring is indicated by a system beep. In addition to this list, there are two other menus for language selection and general display: ♦ Language – Select between German and English. If this setting is changed, Convision Guard starts in the other language the next time. ♦ Look & Feel – Here, you can set the basic appearance of Convision Guard to meet your desires. Select the settings “Metal“, “Motif“ and “System“. Figure 10: Metal 18 Convision Guard - Manual Figure 11: Motif Figure 12: System Convision Guard - Manual 19 8 Alarm Processing The Convision Video Webservers can send e-mails or alarm messages according to VdS 2465 after activation of an integrated alarm input . 6 images from different cameras or all images contained in one image memory can be attached to an e-mail. Convision Guard receives the e-mails as alarm messages. Configuration of Video Webserver ♦ Enter the IP address of the computer on which Convision Guard is running as the address of the SMTP server on the video webserver under Configuration / Connections / Mail Server. ♦ The address for the alarm e-mail can contain any desired entry, however, cannot be empty. The configurations required for other settings and sending e-mails are described in the Convision V600 A Series or Convision V100/V200. manuals. Convision Guard receives the e-mails, displays the alarm text and images and you can take the measured required depending on the contents. 8.1 Alarm Reception Every incoming alarm activates the window “Alarms“ as a default. Even when Convision Guard is present only as an icon in the menu bar, the window automatically appears in the foreground. You can also deactivate this feature. In addition, an acoustic messages is given as an alarm tone or system beep when configured accordingly (see Chapter 7 for configuration). For receipt of alarm messages, Convision Guard must be started! Alarm messages received at other times are not stored! A flashing “Caution sign“ indicates when an unprocessed alarm is present. The alarm appears as a new entry in the alarm list in the upper section of the window. Confirm receipt of the alarm by clicking on the button “Confirm alarm" to the right of the flashing caution sign and the flashing stops. The counter at the top left in the frame shows the total number and number of unprocessed alarms in the list. 20 Convision Guard - Manual Figure 13: Alarms The message “No active alarms“ indicates that all alarm messages received have been confirmed. 8.2 Alarm Message The alarm message selected in the list above is displayed together with text and attached images in the bottom section of the window. Clicking one of the small images with the mouse causes it to be displayed larger on the right. You can call the other available images with the aid of the cursor keys. The middle button “Show live video“ completes a connection to the device transmitting the message and shows live images from the camera in question. If only pre and post-alarm images are attached to an alarm message, a live connection to the device with “Live connections“ is required. ☛ Note: Convision Guard cannot recognize the camera input the video webserver to which the cameras are connected. If the cameras are not connected continuously starting with connection 1, the association between the alarm images and the live connections created using these are not correct. Convision Guard - Manual 21 Figure 14: Alarm message with pre and post-alarm images 8.3 Alarm Databases Each incoming alarm is automatically entered in the “Active alarms“ database displayed in the upper section of the “Alarm“ window. The alarm database consists of the fields: ♦ Status (only in “Alarms“ window) active -> red cross or processed -> green check mark ♦ Time Date and time alarm was received ♦ Source Transmitting device ♦ Subject From e-mail reference line ♦ Confirmed Person logged in at time of confirmation as well as date and time of confirmation, before confirmation of entry “not confirmed“ In the menu Administration / Configuration / Options / User interface, you can determine whether an alarm is to be automatically moved to the “Processed alarms“ database when confirmed or if it is to remain in the “Active alarms“ database and archiving is to be accomplished manually. You can sort and archive the alarm messages in the “Administration“ menu. For this purpose, call Configuration / Data bases / Alarm databases. Initially, in the delivery state there are two system databases “Active alarms“ and “Processed alarms“. Select a database by clicking, and a list of alarm entries (data records) contained in the list is displayed in the right section of the window. 8.3.1 Moving and deleting Alarm Messages Select the database in which you want to shift or delete entries. Activate an alarm message by clicking and then call the context menu with the right mouse key. When the entry “Move“ is activated, a list appears with all available databases. Select the database to which the alarm message is to be moved by clicking. 22 Convision Guard - Manual ☛ Note: It takes approx. 1 minute before a database just created appears in the selection list. Select “Delete“ to irrevocably remove the alarm message from the database. The administrator can assign authorization for each individual user to delete entries under Administration / Databases / User database. 8.3.2 Creating new Alarm Databases Call the context menu by clicking with the right mouse key and select the menu point “Create new alarm database“. Enter the name and maximum number of entries (“0“ for unbounded) in the window which then appears and confirm with “OK“. The database appears sorted alphabetically as an entry under alarm databases. Figure 15: Creating new alarm database 8.3.3 Deleting Alarm Databases All of the databases which you have created can also be deleted. For this purpose, activate the database. Then call the context menu by clicking the right mouse key and select the entry “Delete database“. The two system database cannot be deleted. The entry “Delete database“ is deactivated in their context menu. 8.3.4 Importing and Exporting Every database can be exported for storage on another computer, etc. For this purpose, call the context menu by clicking with the right mouse key and select the entry “Export database“. Select the directory in which the file is to be stored in the window which then appears, enter the file name with the suffix “.zip“ and click “Save“. Convision Guard - Manual 23 When the entry “Import database“ is called in the context menu, you can load a previously exported database back into Convision Guard. For this purpose, click the context menu with the right mouse key and activate the entry “Import database“. Enter the directory path and file name in the window which then appears and select the directory and file by clicking “Select“. Enter the name under which you want the database to be visible in Convision Guard and then click “Save“. 8.3.5 Alarm Reports An alarm report is a list of all alarm messages in a database including the images edited for display in the browser. You can create an alarm report by activating an alarm database, calling the context menu with the right mouse key and selecting one of the entries “Show alarm report“ or “Save alarm report“. A browser window is opened for display and the alarm report called. Figure 16: Display of alarm report in browser The alarm report can be stored as a zip file in any desired directory. To display, it is first necessary to unzip the file, store the expanded files and then call the file “report.html“. 24 Convision Guard - Manual 9 Live Connections After clicking the second tab page, a window appears for completing connections to any of the entered webservers and display of live streams from each camera. The window is divided into four sections as a default setting so that you can watch four video webservers simultaneously. Each section can be controlled separately with the menus at the upper margin and the symbol bar at the bottom. Figure 17: Live connections 9.1 Completing Connection Each of the four window sections has its own menu bar. When the first menu “Connections“ is clicked, a list opens containing all entered video webservers. When the mouse pointer is positioned on one of the entries, an additional menu opens, containing the connected cameras. Clicking one of these cameras completes the connection and the current image stream is displayed. An M-JPEG stream with up to 25 images/second is transmitted as a default setting. An additional entry “Outputs“ is added to the menu bar where the outputs were activated when the video webserver was entered (see Chapter 5). Convision Guard - Manual 25 9.2 Terminating Connection You can terminate the existing connection for this window section by clicking in the menu “Connections“ the first menu entry “Disconnect“ or clicking the first button in the bar below the image. When another webserver is selected, the existing connection is also terminated, however a new connection is completed immediately. 9.3 Control This menu contains functions for display of the image. ♦ “Minimum zoom“ and “Maximum zoom“ are active only when images from a camera with zoom feature are displayed. The zoom can quickly be moved to the minimum or maximum settings with this feature. ♦ “Flip horizontally“ and “Flip vertically“ serve for rotating the image in the horizontal and vertical directions. If a camera is not installed in the normal position, this feature offers the possibility of still viewing the image in a natural position. ♦ “Show FPS“ displays the current frames per second displayed after activating at the bottom left in the image. This number depends on the configuration of the video webserver, however, also on the transmission line. ♦ “Show date“ activates display of the date and time at the bottom right in the image. 9.4 Outputs When clicked, the two entries in this menu switch the alarm outputs of the Convision V600 A Series, e.g. a siren or a light. For this purpose, it is naturally necessary for the outputs to be appropriately configured previously. Also see manual for webserver in question. Activation and designation of the outputs is described in the menu “Administration / Configuration / Devices“ (see Chapter 5). ☛ Note: This menu appears only when you have configured at least one of the outputs. 26 Convision Guard - Manual 9.5 Symbol Bars A symbol bar is located at the bottom margin of each window section. With this help, you can change the image display. Separate connection Single image - stops stream Starts stream again Only active when camera with zoom feature is connected Increases zooms Only active when camera with zoom feature is connected Decreases zoom Switch over to quadruple view in sectional window Switch over to single view in sectional window Switch over to quadruple view in entire window Switch over to single view in entire window Snapshot, the current image is stored under “snapshot_<current number>“ "JPEG in the directory “Convision Guard / data“. Controllable Cameras If controllable cameras are connected, you can change the position of the camera by clicking the image. For example, clicking at the upper margin of the image moves the camera up. Convision Guard - Manual 27 10 Log The 4th tab page contains the log. A process runs in the background of Convision Guard which logs all occurrences associated with alarm processing. This include: ♦ Incoming alarm messages ♦ Confirmation of alarm messages ♦ Moving an alarm message to another database ♦ Deleting alarm messages As well as system messages such as: ♦ Proper program start ♦ Entry of new users or video devices Figure 18: Log Moreover, any errors occurring in the program are recorded, e.g. erroneous connection to a video webserver as well as an attempt by a user to configure something for which he is not authorized. You can assign authorization for log administration separately for each user (see Chapter 6.2). ♦ Logging – In the delivery state, logging is activated. You can stop it by deactivating the function “Enable logging“ at the bottom left edge of the window. 28 Convision Guard - Manual ♦ Save – The current list of entries can be stored in a freely selectable directory as a text file. For this purpose, click the “Save“ button at the bottom edge of the window. ♦ Delete – Deletes the current list of log entries, immediately writes a new entry when and from whom the log was deleted. For this purpose, click the "Delete" button at the bottom edge of the window. ☛ Note: When Convision Guard is closed, the log is deleted. Convision Guard - Manual 29 Appendix A Installation and Program Start under Windows 95/98/NT a - Installation of JRE (JVM) Before installing Convision Guard it is necessary to install a JRE (Java Runtime Environment, or JVM – Java Virtual Machine). To execute Convision Guard you require Java 1.3 (JRE 1.3) or higher. The Convision Guard CD also contains a copy of JRE 1.3. You can also download the current version from the Sun web site under http://java.sun.com/ . Start installation by double-clicking the file “j2re1_3_0-win.exe“. JRE is installed in the directory “C:\Programs\JavaSoft\JRE\1.3" as a default. b - Installation of Java Communications API You require this API, to relay GPS data to a routing program over the serial interface of your computer with Convision Guard. The Java Communications API for actuating the serial interfaces is available for free downloading on the Sun web site. Presently under: http://java.sun.com/products/javacomm/index.html This contains a Zip file with all the required files. Expand it after downloading in a temporary directory on your computer. Copy the individual files into the appropriate subdirectories in the Java directory according to the instructions in the Readme file (commapi/Readme.html). Convision Guard can then set the serial interface on your computer. c - Convision Guard Installation Start the installation by double-clicking the file ConvisionGuardInstall.exe. Select the language for the installation program. Click the “Next” button. Select the folder in which the files are to be stored. Default is C:\Programs\ConvisionGuard. Click the “Next” button. Select whether and where a link symbol is to be created on your computer. Default is Start menu/Programs/ConvisionGuard. Click “Continue". 30 Convision Guard - Manual If there is more than one virtual machine on your computer (VM or JRE), you can now choose one of them. Convision Guard requires Sun VM 1.3. If VM is not located in the search path, you can search for it manually. If VM is not found you will not be able to continue the installation. Click "Install“ to carry out the installation. Complete the installation process by clicking the “Done” button. d - Convision Guard Program Start The entry ConvisionGuard is now located at “start / program”, click to start the program. As an alternative, you can start ConvisionGuard by double-clicking the file “ConvisionGuard.exe” in the ConvisionGuard directory. Included with the CD is your personal Convision Guard registration number. When the program is started for the first time, enter this number in the entry display. If a version with this number is already present in your local network, you can obtain additional licenses from Convision Technology. Convision Guard - Manual 31 Appendix B Installation and Program Start under Unix/Linux a - Installation of JRE To run Convision Guard you require Java 1.3 or higher. The Convision Guard CD also contains a copy of JRE 1.3. A JRE is already contained in the JDK package (Java Development Kit) from various Linux distributors. If you do not already have this on your computer, you can re-install the appropriate package from your installation CD. If a JRE is not present here either, you can download it from the Sun web Site. b - Installation of Java Communications API Sun does not provide its own version of the Java Communications API for Linux, however, in the Communications FAQ, refers to a web site where an additional required driver (gnu.io.RXTXCommDriver.class) is available. All steps required for installation are described in detail here. http://www.interstice.com/kevinh/linuxcomm.html c - Convision Guard Installation To install ConvisionGuard, start your system's graphical interface. Open a terminal window and the directory in which you copied the installation file. Execute the file with “./ConvisionGuardinstall.bin”. If more than one JVM is present on your computer, you will be requested to select one, ensure that the version is 1.3 or higher, enter the number of your choice, and press "Enter." This starts the installation program. Select the language for the installation program. Click "OK“. Select a directory in which the ConvisionGuard files are to be stored. Click the "Next" button. Select the directory in which you would like to create a link to ConvisionGuard. Click "Install". ConvisionGuard will now be installed. Click "Done“ to complete the installation. Convision Guard requires Root rights for communication with the computer’s SMTP port. 32 Convision Guard - Manual d - Convision Guard Program Start To start Convision Guard call the graphical interface of your system. Open a terminal window, change to the ConvisionGuard directory and enter: java ConvisionGuard or ./ConvisionGuard or start Convision Guard from the set link. It is necessary to quit other programs such as a "mailer demon" which cease the SMTP port, before starting Convision Guard. Included with the CD is your personal Convision Guard registration number. When the program is started for the first time, enter this number in the entry display. If a version with this number is already present in your local network, you can obtain additional licenses from Convision Technology. Convision Guard - Manual 33 Appendix C List of Figures Login window for Convision Guard ...................................................... 9 Convision Guard application window ................................................... 9 "New video unit" entry window ......................................................... 10 Entry of cameras ............................................................................ 11 Entry of outputs ............................................................................. 11 "New User" entry window ................................................................ 13 Selection of a browser..................................................................... 15 Setting GPS parameters .................................................................. 16 Setting user parameters .................................................................. 17 Metal ............................................................................................ 18 Motif ............................................................................................. 19 System ......................................................................................... 19 Alarms .......................................................................................... 21 Alarm message with pre and post-alarm images................................. 22 Creating new alarm database ........................................................... 23 Display of alarm report in browser .................................................... 24 Live connections ............................................................................. 25 Log ............................................................................................... 28 34 Convision Guard - Manual Appendix D Index A Administration Administrator Alarm database Alarm e-mail Alarm message Alarm outputs Alarm report Alarms Archiving L 10 9 22 8, 20 21 11 24 20 17 LAN Language Live stream Log Login Look & Feel 10 18 25 28 9 18 M M-JPEG stream 25 B Browser O 15, 24 Options Outputs C Camera Controllable Connections Convision V100/V200 Convision V600 A Series Convision Video Webserver Configuration 10 27 25 4 4, 11 10 8, 20 P Password Change in webserver User Permissions D Database Delete Export Import User Date display Delete Alarm messages Database Log User Video source 15 26 13 10 13 13, 28 R Route planner 23 23 23 13 26 23 23 29 14 12 S Serial interface Serial number SMTP-Port Snapshot Sound card Starting the program Status System database E Error message Termination G J Convision Guard - Manual 14 V 16 JAVA.COMM JRE JVM 16 10 5 27 18 33 22 22 T 28 GPS 16 16, 30, 32 6 6 View Quadruple Single 27 27 Z Zoom 26, 27 35