1
WEIVER 2.0 - RF Capture and Playback System
Updated 2014/07/13
manual
Weiver 2.0
1 / INTRODUCTION
1.1
1.2
1.3
1.4
1.5
1.6
1.7
7
WEIVER 2.0 System 7
User System Requirement
Optional Upgrade 9
Data Flow 10
Schematic Diagram 10
Control Configuration 11
System Specification 12
P
3 / SYSTEM OPERATION
8
2 / SYSTEM DESCRIPTION 13
2.1 WEIVER 2.0 Components 13
2.2 WEIVER 2.0 Product Configuration 14
2.3 Installation Precautions 15
16
3.1
3.2
3.3
3.4
3.5
3.6
WEIVER 2.0 Operation 16
WeiverEX Installation 16
WeiverEX Upgrade 18
WeiverCom Installation 20
WeiverCom Upgrade 22
Internet (Ethernet Connection) 0
Connection Method 24
3.7 Internet (Cross cable Connection) 0
Connection Method 25
3.8 WeiverEX Operation 26
* WEIVER Signal Tracer / Converting Util
/ fileUtil 39/60/61
3.9 WeiverEX Program Introduction 62
3.10 WEIVER Power Button 72
3.11 WEIVER LED Signal 72
3.11 WEIVER Syncer Operation (option) 73
3.12 WEIVER Bias-Tee Operation 80
4 / API OPERATION
81
4.1 API Description 82
4.2 WEIVER API Performance property 82
4.3 Data Packet structure 84
4.4 Command List 93
4.5 WEIVERRemoteAPI source 101
APPENDIX A. B. C.D 105.109.118.122
Weiver 2.0 / Operations Manual
WEIVER 2.0 Manual
TRADEMARKS & COPYRIGHT
This document contains information that is proprietary to
LUMANTEK Attn: Product Support Department, A-11F, BYC
LUMANTEK. No part of this publication may be reproduced,
Highcity-A, 131 Gasan Digital 1 Rd., Gasan-dong, Gumchon-
stored in a retrieval system, or transmitted, in any form, or by
Gu, Seoul, KOREA, +82 2 6947 7400, Fax: +82 2 6947 7440
any means, electronically, mechanically, by photocopying, or
otherwise, without the prior written permission of LUMANTEK.
Environmental Issues
Nationally and internationally recognized trademarks and
Thank you for buying a product which contributes to
trade names are the property of their respective holders and
a reduction in pollution and thereby helps save the
are hereby acknowledged.
environment.
Our products reduce the need for travel and transport and
Portions of this software are © 1996-2011 LUMANTEK Ltd. All
thereby reduce pollution. Our products have either no or few
intellectual property rights in such portions of the Software
consumable parts (chemicals, toner, gas, paper). Our products
and documentation are owned by LUMANTEK and are
are low energy consuming products.
protected by United States copyright laws, other applicable
copyright laws and international treaty provisions. LUMANTEK
Waste handling:
and its suppliers retain all rights not expressly granted.
There is need to send material back to LUMANTEK. Please
contact your local dealerfor information on recycling the
product by sending the main parts of the product for
Disclaimer
disassembly at local electronic waste stations.
The information in this document is furnished for
informational purposes only, is subject to change without
Production of products:
prior notice, and should not be construed as a commitment
Our factories employ the most efficient environmental
by LUMANTEK. The information in this document is believed
methods for reducing waste and pollution by ensuring that
to be accurate and reliable; however LUMANTEK assumes
the products are recyclable.
no responsibility or liability for any errors or inaccuracies that
may appear in this document, nor for any infringements of
patents or other rights of third parties resulting from its use.
No license is granted under any patents or patent rights of
LUMANTEK.
This document was written by the Technical Support
Department of LUMANTEK, Korea. We are committed to
maintaining a high level of quality in all our documentation.
Towards this effort, we welcome your comments and
suggestions regarding the content and structure of this
document. Please fax or mail your comments and suggestions
to the attention of:
2
Weiver 2.0 / Operations Manual
WEIVER 2.0 Manual
OPERATOR SAFETY SUMMARY
For your protection, please read these safety instructions
prong.
completely before operating the equipment and keep this
The wide blade or third prong is provided for your safety. If
manual for future reference. The information in this summary
the provided plug does not fit into your outlet, consult an
is intended for operators. Carefully observe all warnings,
electrician. Power-Cord Protection - Route the power cord so as
precautions and instructions both on the apparatus and in the
to avoid it being walked on or pinched by items placed upon or
operating instructions.
against it, paying particular attention to the plugs, receptacles,
at the point where the cord exits form the apparatus.
Equipment Markings
The lighting flash symbol within an equilateral triangle is
Attachments :
intended to alert the user to the presence of un insulated
Only use attachments as recommended by the manufacture.
“dangerous voltages” within the product’s enclosure that may
be of sufficient magnitude to constitute a risk of electrical
Accessories :
shock. The exclamation mark within an equilateral triangle
Use only with a cart, stand, tripod, bracket, or table specified by
is intended to alert the user to the presence of important
the manufacturer, or sold with the
operating and maintenance (servicing) instructions within
apparatus. When a cart is used, use caution when moving the
literature accompanying the equipment.
cart/apparatus combination to avoid injury from tip-over.
Warnings
Lighting :
Unplug this apparatus during lightning storms or when unused
Water and Moisture :
for long periods of time.
Do not operate the equipment under or near water - for
example near a bathtub, kitchen sink, or laundry tub, in a
ISDN cables :
wet basement, near a swimming poor or in areas with high
CAUTION - to reduce the risk of fire, use only No. 26 AWG or
humidity. Cleaning - Unplug the apparatus from the wall outlet
larger telecommunication line cord.
before cleaning or polishing. Do not use liquid cleaners or
aerosol cleaners. Use a lint-free cloth lightly moistened with
Servicing :
water for cleaning the exterior of the apparatus.
Do not attempt to service the apparatus yourself as opening
or removing covers may expose you to dangerous voltages or
Ventilation :
other hazards, and will void the warranty. Refer all servicing to
Do not block any of the ventilation openings of the apparatus.
qualified service personnel.
Install in accordance with the installation instructions. Never
cover the slots and openings with a cloth or other material.
Damaged Equipment :
Never install the apparatus near heat sources such as radiator,
Unplug the apparatus from the outlet and refer servicing to
heat registers, stoves, or other apparatus (including amplifiers)
qualified personnel under the following conditions - When the
that produce heat.Grounding or Polarization - Do not defeat
power cord or plug is damaged or frayed If liquid has been
the safety purpose of the polarized or grounding-type plug. A
spilled or objects have fallen into the apparatus If the apparatus
polarized plug has two blades with one wider than the other.
has been exposed to rain or moisture If the apparatus has
A grounding type plus has two blades and a third grounding
3
Weiver 2.0 / Operations Manual
WEIVER 2.0 Manual
been subjected to excessive shock by being dropped, or the
under its limited warranty will be manufactured from new and
cabinet has been damaged If the apparatus fails to operate in
serviceable used parts. Lumantek’s warranty applies to repaired
accordance with the operating instruction
or replaced products for the balance of the applicable period of
the original warranty or ninety days from the date of shipment
of a repaired or replaced product, whichever is longer.
Warranty Period
Lumantek Test & Measurement and Broadcasting products
normally carry a 1-year limited warranty (including labor and
Limitation of Damages
parts) Unless noted, Lumantek Digital Media products normally
Lumantek’s entire liability for any defective product shall in no
carry a 1-year limited warranty (including labor and parts).
event exceed the purchase price for the defective product. This
limitation applies even if Lumantek cannot or does not repair or
replace any defective product and your exclusive remedy fails
Return Material Authorization Policy
of its essential purpose.
No product may be returned directly to Lumantek without first
contacting Lumantek for a Return Material Authorization (“RMA”)
Code. If it is determined that the product is defective, you will
No Consequential or Other Damages
be given an RMA Code and instructions for product return for
Notwithstanding anything else in this policy or otherwise,
servicing or replacement. An unauthorized return such as where
Lumantek will not be liable with respect to the products
an RMA Code has not been issued, the product will be returned
under any contract, negligence, strict liability or other legal
to you at your expense. Authorized returns are to be shipped
or equitable theory (i) for any amount in excess of the
prepaid and insured to the address on the RMA in an approved
purchase price for the defective product or (ii) for any general,
shipping container (original box and packaging materials or
consequential, punitive, incidental or special damages. These
similar). To request an RMA Code, please visit on http://www.
include loss of recorded data, interruption of use, the cost of
lumantek.com/support/rma_services_instruction.html
recovery of lost data, lost profits and the cost of the installation
or removal of any products, the installation of replacement
products, and any inspection, testing, or redesign caused by
Warranty Limitations
any defect or by the repair or replacement of products arising
Lumantek’s limited warranty provides that, subject to the
from a defect in any product. This section does not limit liability
following limitations, each product will be free from defects
for bodily injury of a person.
in material and workmanship and will conform to Lumantek’s
specification for the particular product.
Your Use of the Product
Lumantek will have no liability for any product returned if
Limitation of Remedies
Lumantek determines that:
Your exclusive remedy for any defective product is limited to the
The product was stolen from Lumantek.
repair or replacement of the defective product.
Lumantek may elect which remedy or combination of remedies
The asserted defect:
to provide in its sole discretion. Lumantek shall have a reasonable
- Is not present,
time after determining that a defective product exists to repair
- Cannot reasonably be fixed because of damage occurring
or replace a defective product. Lumantek’s replacement product
when the product is in the possession of someone other than
4
Weiver 2.0 / Operations Manual
WEIVER 2.0 Manual
Lumantek, or
- Is attributable to misuse, improper installation, alteration
(including removing or obliterating labels and opening or
removing external covers (unless authorized to do so by
Lumantek), accident or mishandling while in the possession of
someone other than Lumantek.
The product was not sold to you as new.
The product was not used in accordance with Lumantek
specifications and instructions.
The product was not used for its intended function.
Additional Limitations on Warranty
Lumantek’s warranty does not cover products which have been
received improperly packaged, altered, or physically damaged.
5
Weiver 2.0
RF Capture & Playback System ( Frequency from 0.1MHz to 2.7GHz )
Weiver 2.0 / Operations Manual
WEIVER 2.0 Manual
1. WEIVER 2.0 / INTRODUCTION
1.1 / WEIVER 2.0 SYSTEM
WEIVER captures and playsback RF signals with center frequencies between 100KHz ~ 2.7GHz RF signal and stores
the file in its internal SSD or optional external SSD.
The major components in the WEIVER system include WEIVER Board (ADC, DAC and Upconverter), Downconverter,
and RF Attenuator. The system is powered by an industrial-grade Windows Embedded 7. The RF Downconverter
is capable of covering 100KHz to 2.7GHz RF Signals and downconverts to 150MHz IF. The WEIVER Board consists
of the ADC, DAC and Upconverter. The RF Attenuator adjusts the power of the signal. The saved data files are
in 16 Bit I, Q are the bandwidth around the center frequency of 8M, 24M, 48M and 56M Max. Depending on the
captured bandwidth, the SSD is capable of writing 40MB/s for a bandwidth of 8M and 120MB/s for 24M, 240MB/s
for 48M.
The WEIVER is capable of capturing all terrestrial RF signals including following signals [ DRM / FM / AM / DVB-T/T2
/ DVB-S/S2 / DVB-C/C2 / DAB / DAB+ / ATSC / ATSC-MDTV / NTSC / CMMB / QAM-B / ATV / ISDB-T / DTMB / T-DMB
CDMA / CAL / UMTS / Wifi / WiMax / PMR / GPS / Galileo / Glonass / Bluetooth / LTE ]. WEIVER is equipped with
Gigabit LAN ports. For the captured RF signals the built-in GPS module provides pinpoint locative context every
1 second. For precise location, the external active antenna is recommended. The GPS information is stored in the
NMEA protocol with the GPRMC information stored in a log file.
The Trigger function can be activated and deactivated. WEIVER can get
the capture started or stopped after receiving trigger signals. The trigger
signals from outside is a positive or negative edge of TTL or CMOS.
When the primary internal SSD is not full, the WEIVER’s eSATA interface
supports for lightning-fast 320MB/s write and 520MB/s read speeds to
an external SSD. The WEIVER has 10MHz Reference Clock input port to
enable for external synchronization.
7
Weiver 2.0 / Operations Manual
WEIVER 2.0 Manual
1.2 / USER SYSTEM REQUIREMENT
Your PC(System) must meet the following specification.
Computer / Processor
- Intel Pentium 4 2.33GHz
- Athlon 64 2800 or the faster processor
Operating System
- Windows xp 32/64 bit service pack(sp2)
- Windows Vista 32/64 bit service pack(sp2)
- Windows 7 32/64bit
- Windows 8 32/64 bit
Memory
Hard Disk Space
- 2GB RAM
- 100 MB available hard disk space
Screen
- 1024x768, “32-bit True Color”
– DirectX 9.0c or higher
Graphics Card
DirectX 9.0c supported
Network
-10/100 Mbps network card, 10/100/1000Mbps network card(Recommend)
- 802.11 b/g Wireless network card, 802.11b/g/n Wireless network card(Recommend)
8
Weiver 2.0 / Operations Manual
WEIVER 2.0 Manual
1.3 / OPTIONAL UPGRADE
Bandwidth
- 8M Bandwidth(Default) : User can capture 8M Band Width.
- 24M / 48M / 56M Band Width(Optional) : User can capture Wide 24M /48M /56M Band Width.
8M
24M
48M
56M
External SSD Hard disk (Optional)
- Size : 512 GB / 1TB
- Read Speed : 538MB / Sec(Max.)
- Write Speed : 408 MB / Sec(Max.)
- TRIM : Yes
* SSD option is good for real time capture or backup for captured Date.
9
Weiver 2.0 / Operations Manual
WEIVER 2.0 Manual
1.4 / DATA FLOW
PCI - Express Interface
I (16-bit)
Q(16-bit)
I (16-bit)
Q(16-bit)
I (16-bit)
Q(16-bit)
Hard Disk
(SSD)
DSP
DSP
DAC (16-bit)
ADC(16-bit)
Upconverter
Downconverter
Attenuator
RF IN
RF OUT
1.5 / SCHEMATIC DIAGRAM
LAN(Ethernet), eSATA
SATA
Windows
Embedded 7
CFast/OS
SATA-lll
SSD/DATA
PCI Express
RF
Input
Down - Converter
Up Converter
WEIVER DSP Board
Ref 10MHz Input/Output
GPS Input
Attenuator
Trigger Input/Output
IQ data type stored in SSD
• I : signed 16-bit integers
• Q : signed 16-bit integers
10
• I0, Q0, I1, Q1, …, In, Qn
RF
Output
Weiver 2.0 / Operations Manual
WEIVER 2.0 Manual
1.6 / CONTROL CONFIGURATION (RECOMMENDED)
Control Unit
Cross Cable
Direct Connection
WEIVER
WEIVER
Wireless LAN
Wireless AP
Ethernet router, hub, switch
LAN(Local Area Network)
WEIVER
Ad-hoc Wireless Network
Ad-hoc(WiFi)
WEIVER
11
Weiver 2.0 / Operations Manual
WEIVER 2.0 Manual
1.7 / WEIVER 2.0 SPEC
Capture Mode
RF Input
Frequency
RF input port
HF
Frequency band
HF
HF_Low Noise
LF
Real time bandwidth
48MHz to 2.7GHz
Max. DC input
Resolution bandwidth
Warm-up time
3 KHz, 5 KHz, 10 KHz,
20 KHz
30 minutes (typ.)
Freq. Stability vs. Temp.
±20 ppb max.
Aging per day
±1 ppb max.
Aging per Year
±50 ppb max.
50ohm, BNC female, DC-cpl
±25 VDC max.
Operating temperature
0 to +50 ϸ
Relative humidity
90%
Storage temperature
-20 to +70 ϸ
Power Consumption
70W
Play Mode
Frequency
Frequency band
0.1 to 2700 MHz
Real time bandwidth
56MHz max. (Arbitrary variable BW, 1Hz step)
Frequency resolution
1Hz min.
≤ -100 dBc/Hz (30 MHz)
Warm-up time
30 minutes (typ.)
≤ -95 dBc/Hz (1 GHz)
Freq. Stability vs. Temp.
±20 ppb max.
≤ -90 dBc/Hz (2.7 GHz)
Daily Aging
±1 ppb max.
Aging (PER year)
±50 ppb max.
Phase Noise@1 KHz offset
HF
LF
Environment & Power
Spectral Purity
LF
50ohm, N type female,
DC-cpl
0.1MHz to 48MHz
56 MHz max.
(Arbitrary variable BW, 1Hz step)
1Hz min.
Frequency resolution
HF_Low Noise
Phase Noise@10 KHz offset
LF
≤ -105 dBc/Hz (30 MHz)
HF
≤ -100 dBc/Hz (1 GHz)
≤ -95 dBc/Hz (2.7 GHz)
Spectral Purity
Phase Noise@1 KHz offset
≤ -100 dBc/Hz (30 MHz)
≤ -95 dBc/Hz (1 GHz)
Noise Figure
≤ -90 dBc/Hz (2.7 GHz)
Noise Figure(1GHz)
HF
< 7 dB (Gain 50 dB)
HF_Low Noise
< 3 dB (Gain 50 dB)
< 7 dB (Gain 50 dB)
LF
Phase Noise@10 KHz offset
≤ -100 dBc/Hz (1 GHz)
≤ -95 dBc/Hz (2.7 GHz)
Spurious Responses
Amplitude
Input Dynamic
Range(CW tone)
(RBW 3KHz)
≤ -105 dBc/Hz (30 MHz)
HF
+10 ~ -135 dBm
HF_Low Noise
-30 ~ -139 dBm
+10 ~ -120 dBm
LF
Input level Resolution
0.1dB
Input Level Accuracy
±1 dB max.
Gain Range
HF
-15 ~ +50 dB (min. 1 dB step)
HF_Low Noise
+25 ~ +50 dB (min. 1 dB step)
-20 ~ +35 dB (min. 1 dB step)
LF
2nd Harmonic
3rd Harmonic
other
RF Output Characteristics
Gain range
Amplitude resolution
Amplitude accuracy
Power
IF band
ADC Resolution
Sampling rate
16 bits
200 MS/s
IF Frequency
150 MHz
512 GB
180 minutes
Storage time ( BW 24 MHz )
Storage time ( BW 48 MHz )
-30 ~ +30dB (Input Level Basis)
0.1dB step (Min.)
±1dB
+3 dBm max.(48 to 2700 MHz)
+10 dBm max.(0.1 to 48 MHz)
RF Output
Storage
Storage(default)
Storage time ( BW 8 MHz )
≤ -50dBc
≤ -60dBc
≤ -60dBc
RF output port
50ohm, N type female, DC-cpl
Max. DC input
±25 VDC max.
Max. reverse RF power
1 W (Max.)
Environment
Operating temperature
0 to +50 ϸ
60 minutes
Relative humidity
90%
30 minutes
Storage temperature
12
-20 to +70 ϸ
Weiver 2.0 / Operations Manual
WEIVER 2.0 Manual
2. WEIVER 2.0 / Product Description
2.1 / WEIVER 2.0 COMPONENT
FRONT
REAR
Protective Bumper
RF In(HF Normal)
Cooling Fan (Out)
e-SATA Port(hot swap)
RF In(HF Low Noise)
RF In(LF Normal
/ LF AM)
Gigabit LAN Port
RF Out
Gigabit LAN Port
(Ethernet Connection)
(Direct Connection)
GPS In
VGA Port
Trigger In/out
REF In/out (10 MHz)
USB 3.0 Ports (x4)
Multi-color LED Status
DC Power Jack
Reset Button
Sleek but sturdy
Aluminum
construction
Power Button
100 mm
305 mm
406 mm
13
Weiver 2.0 / Operations Manual
WEIVER 2.0 Manual
2.2 / WEIVER 2.0 Product Configuration
Basic Component
WEIVER UTP Cross Cable
WEIVER 2.0 Body
WEIVER Backpack
WEIVER AC Cord
WEIVER AC-DC Adapter
WEIVER Car DC-DC Adapter
WEIVER GPS Active Antenna
WEIVER Manual USB
WeiverEX Program
WEIVER Operation Manual
WEIVER Test Report
Optional Component
WEIVER External SSD USB Power
& e-SATA Cable
WEIVER External SSD
14
WEIVER Syncer
WEIVER Bias-Tee
Weiver 2.0 / Operations Manual
WEIVER 2.0 Manual
2.3 / Installation precautions
This section describes safety precautions that users shall be aware of during the system installation and
operation. Not complying such precautions may result in serious harm or personal injuries. . For that reason,
please keep all details here in mind before installing or using the WEIVER 2.0.
Please carefully read the followings for safe use of Weiver 2.0
General Precautions
- Must be operated and maintained free of dust or dirt.
- The cover should be securely fastened.
- Securely stow all the cables, external antennas, external SSD or any other tools away in a safe place after its use.
- Avoid wearing loose, draping clothing, and dangling jewelry when using WEIVER 2.0.
- Do not open the WEIVER 2.0 case. Doing so may void the warranty and LUMANTEK takes no responsibility for the
damages caused by such action. Should you be experiencing performance issues, please contact your local dealer for
assistance.
Power Precautions
- Make sure if it may cause overload in wiring when you connect the power source.
- Avoid wearing necklaces or watches when connecting the system to power source. These may cause
electronic shocks to the system.
- Avoid operating on a wet floor out in the open (e.g., raining). Make sure the power extension cable is in a
good condition (e.g., not worn out).
- Disconnect the system from power source before hardware installation, rub or contact on
the metal surface of the system to discharge statics from your body.
- Note: Manufacturer is not responsible for damages caused by using or replacing
inappropriate components or not authorized services.
- Supplying power during installation may cause serious damages to the system and personal
injuries.
AC Power
- This unit comes with the AC power cord, grounding connection is necessary.
- In the event of a fire, please disconnect the system from power source.
15
Weiver 2.0 / Operations Manual
WEIVER 2.0 Manual
3. WEIVER 2.0 / SYSTEM OPERATION
3.1 / WEIVER Operation
The WEIVER must be powered on, connected to a laptop or desktop PC that is installed with both Microsoft Windows
OS and the WeiverEX program. No need to install an additional program since WEIVER already has been installed by
itself. In case of updating a program, set a monitor, a keyboard and a mouse on WEIVER before starting update. If you
have no those equipments, use remote control desktop connection of Window OS in your laptop or desktop.
3.2 / Weiver_EX Program Installation
Please visit LUMANTEK online Download Center at http://www.lumantek.com/support/download.html to download
‘Weiver_EX’ program. Double-click on the program icon will initiate the installation. Click on ‘Next’ to proceed the
‘Weiver_EX’ installation process.
Click the Next button to proceed with the WeiverEX installation process.
16
Weiver 2.0 / Operations Manual
WEIVER 2.0 Manual
Click ‘Install’ to begin installation.
The ‘Weiver_EX’ program installation status will be show as pictures below with a progress bar.
17
Weiver 2.0 / Operations Manual
WEIVER 2.0 Manual
The ‘Weiver_EX’ installation is now completed; click ‘Finish’ to exit the program.
3.3 / Weiver_EX Program Upgrade
Please visit us at http://www.lumantek.com/support/download.html to download ‘Weiver_EX’ program. Once
downloaded, double-click to upgrade and select ‘Yes’ to uninstall previous version of ‘Weiver_EX’.
Once uninstallation is finished, double-click
WeiverEX_Setup.exe to install the program.
18
Weiver 2.0 / Operations Manual
WEIVER 2.0 Manual
Click the Next button to proceed with the WeiverEX installation process.
Click the Install button to begin the installation.
The WeiverEX program is being installed as shown with the status progress bar.
19
Weiver 2.0 / Operations Manual
WEIVER 2.0 Manual
The WeiverEX installation is now complete. Click the Finish button to close the Installation window.
3.4 / WeiverCom Installation
Go to the LUMANTEK homepage Download Center (http://www.lumantek.com/support/download.html) to
download the WeiverCom program. Once downloaded, double-click to initiate installation.
20
Weiver 2.0 / Operations Manual
WEIVER 2.0 Manual
Click the Next button to proceed with the WeiverCom installation process.
Click ‘Install’ to begin installation.
21
Weiver 2.0 / Operations Manual
WEIVER 2.0 Manual
The ‘Weiver_EX’ installation is now completed; click ‘Finish’ to exit the program.
3.5 / WeiverCom Upgrade
Please visit us at http://www.lumantek.com/support/download.html to download ‘Weiver_COM' program. Once
downloaded, double-click to upgrade and select ‘Yes’ to uninstall previous version of ‘Weiver_COM’.
Once uninstallation is finished, double-click WeiverCom_Setup.exe to install the program.
* The WeiverCom Program is initially installed. When you first use this product, no need to install the program
additionaly.
22
Weiver 2.0 / Operations Manual
WEIVER 2.0 Manual
Click the Next button to proceed with the WeiverCom installation process.
Click the Install button to begin the installation.
23
Weiver 2.0 / Operations Manual
WEIVER 2.0 Manual
The WeiverCom installation is now complete; click the Finish button to close the Installation window.
3.6 / EtherNet Connection Method
- DHCP is default settings for the WEIVER 2.0’s LAN connection. The WEIVER 2.0 automatically receives the IP address from the
Network immediately.
- Please access to the ‘Internet Protocol (TCP/IP) Properties’ menu in both PC and the player, make sure ‘Obtain an IP address
automatically’ has been selected
Laptop and Desktop PC: TCP/IP Configuration
WEIVER TCP/IP Configurations
24
Weiver 2.0 / Operations Manual
WEIVER 2.0 Manual
3.7 / Cross Cable Connection Method( use GIgabit LAN port : see page17-no.
)
This section is to show cross cable connection between PC and the Player by using static IP address. Please note that
the first three columns of the static IP address for both PC and the player must be identical. To control WEIVER Player 2.0
using fixed IP, move to the WEIVER Player 2.0 network setting menu and set IP address manually.
Laptop and Desktop PC Configuration
WEIVER Configuration
Now, the WeiverEX program can be initiated to access and monitor the WEIVER operations
25
Weiver 2.0 / Operations Manual
WEIVER 2.0 Manual
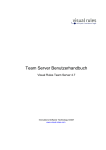
3.8 / WeiverEX Operation
To use the latest version of the ‘Weiver_EX program’, please visit our S/W Download page at http://www.lumantek.
com. You can find detailed features and functionalities of the ‘Weiver_EX’ program.
WeiverEX Program
IP Select
Mode Slelct
Analyzer Icon
View Icon
Function Icon
Control
Menu
*
IQ View
GPS View
Power View
Mouse
Popup Menu
Map View
*
Spectrum View
The WeiverEX control menu and menu sub-structure is shown below
26
Weiver 2.0 / Operations Manual
WEIVER 2.0 Manual
Front – RF Port / Ext Port
1) RF IN : HF Normal, Full Band
Frequency : 48MHz ~ 2.7GHz
Range : +10dBm ~ -55dBm
=> High Frequency
=> High Power
2) RF IN : HF Low Noise
Frequency : 48MHz ~ 2.7GHz
Range : -30dBm ~ -55dBm
=> High Frequency
=> Low Power
3) RF IN : LF Normal
Frequency : 100KHz ~ 48MHz
Range : +10dBm ~ -45dBmv
=> Low Frequency
4) RF IN : LF AM
Frequency : 100KHz ~ 2MHz
Range : +10dBm ~ -45dBm
=> Low Frequency, 2MHz Under
5) RF Out : Frequency : 100KHz ~ 2.7GHz
100KHz ~ 48MHz : Max Power(+10dBm)
48MHz ~ 2.7GHz : Max Power(+3dBm)
GPS In : GPS Antena
Trg IN : Low(0V) or High(3.3V)
Trg OUT : Low(0V) or High(3.3V)
Ref IN : 10MHz
Ref OUT : 10MHz
27
Weiver 2.0 / Operations Manual
WEIVER 2.0 Manual
Setting
Within the Setting menu there are 4 unique tabs to choose from.
The first tab, Capture includes Frequency, Range, Bandwidth, Simultaneous Playback, AGC.
- Frequency : In the Preview or Capture Modes, the frequency can be controlled
- Range ( appendix.) : Range features associated with the Capture Mode, the Auto Power
be activated to automatically adjust for optimal RF signal (weak or strong).
Adjustment feature can
-Band Width : In the Preview or Capture modes, the bandwidth can be selected at either 8M, 24M, 48M. 56M and arbitrary
bandwidth.
- Simultaneous Playback ( Simultaneous Capture and Playback )
When you run the capture status or the preview status, RF OUT port provides the function to make simultaneousness
output so you can measure the actual quality of the signal. What you're seeing is what you're recording.
- AGC [Automatic Gain Control]
In cases of Fields the input signal power can not be predicted or Drive tests the signal power is irregular, AGC will find the
signal power automatically and capture a reliable signal by operation of the attenuator.
-AGC Speed : AGC interval can be set to 10ms ~ 500ms.
- Recording Stop : Two options, Manual and Auto, are available. In Manual, a user needs to push 'Start', 'Stop' button.
In Auto, automatically stopped at user's pre-set time.
28
Weiver 2.0 / Operations Manual
WEIVER 2.0 Manual
The second tab, Play includes Frequency, Gain, Spectrum INV and Repeat.
- Frequency: Support to Play the signal the user wants optionally by controlling RF Signal Center Frequency.
- Gain : When Playback is initiated, the RF signal can be amplified less than the captured RF signal or it can be increased
more than the captured RF signal (Input RF signal power of -30dB to +30dB). Also during Playback, Gain 0 dB means that
signals(Capture and Playback) power are equal. The maximum output signal can not exceed +10dBm.
- Spectral INV : Provide the function of inverting I/Q of the signal output.
- Repeat : Provide the function of output a specific section repeatedly on files captured.
29
Weiver 2.0 / Operations Manual
WEIVER 2.0 Manual
* Record/Play BW(=IQ Rate*0.8), IQ Rate, Frequency
< Record/Play Bandwidth >
< Record/Play Frequency Range >
* Sample Clock
30
Weiver 2.0 / Operations Manual
WEIVER 2.0 Manual
The third tab, Viewer includes ResBW, Average, Unit dB and Marker.
- ResBW : The ResBW can be adjusted in the Spectrum View’s Resolution. [3KHz, 5KHz, 10KHz, 20KHz]
31
Weiver 2.0 / Operations Manual
WEIVER 2.0 Manual
* Weiver IQ windowing (WeiverEx)
* Weiver FFT (WeiverEx), Capture Mode - BandWidth : 24M(Sampling Clock 30M)
ResBW
Complex FFT Point
Sampling Clock(IQ Rate)
3KHz
10K Point
30MHz(= 3KHz X 10K Point )
5KHz
6K Point
30MHz(= 5KHz X 6K Point )
10KHz
3K Point
30MHz(= 10KHz X 3K Point )
20KHz
1.5K Point
30MHz(= 20KHz X 1.5K Point )
BandWidth : 1~56M
I Signaling
Q Signaling
* Weiver FFT (WeiverEx), Capture Mode
BandWidth : 8M(Sampling Clock 10M)
ResBW
Complex FFT Point
Sampling Clock(IQ Rate)
3KHz
3.3K Point
10MHz(= 3KHz X 3.3K Point )
5KHz
2K Point
10MHz(= 5KHz X 2K Point )
10KHz
1K Point
10MHz(= 10KHz X 1K Point )
20KHz
0.5K Point
10MHz(= 20KHz X 0.5K Point )
* Weiver FFT (WeiverEx), Play Mode
BandWidth : Same as ‘ Capture Mode “ in both of 8M, 24M, 48M and 56M.
In Play Mode, IQ Rate is variable value in 1MHz to 60MHz, and FFT Point is also variable value.
- Average : The Average function has Exponential features in the Spectrum View.
- Unit dB : The RF Power of the unit can be changed in dBm, dBmV, dBuV individually by user's difference.
- Marker : Provides the function of measuring a signal power of marker point simultaneously up to 4 Makers.
- Spectrum Update : Five options, Fastest, Faster, Normal, Slower, Slowest are available and decide the screen update
speed.
32
Weiver 2.0 / Operations Manual
WEIVER 2.0 Manual
The forth tab, System includes Ref(10MHz), Trigger, Storage.
- Ref(10MHz) : Select the EXT external Clock for synchronizing with the PLL Clock by external clock signal input.
33
Weiver 2.0 / Operations Manual
WEIVER 2.0 Manual
* Trigger Operation
In WEIVERex setting, user can choose to use an external trigger.
Trigger On
Trigger Off
If user equips an external trigger and choose to turn trigger
on(in previous page),
0V
When you do not push trigger : Low Level(0V) – In
capture & play mode, WEIVER doesn’t work.
3.3V
When you push trigger : High Level(3.3V)– In
capture & play mode, WEIVER starts to work.
In Capture Mode (WEIVERex)
In Play Mode (WEIVERex)
Record Start Button
Record Stop Button
Play Start Button
Play Stop Button
34
Weiver 2.0 / Operations Manual
WEIVER 2.0 Manual
Capture Mode Scenario with trigger
1. Insert a trigger in ‘trigger port’ : Low Level(0V)
Stopping
2. Trigger’s power On
3. In WEIVERex, Record Start Button Click
4. Activate(push) Trigger : High Level(3.3V)
Updating
5. Recording…. Saving file(iqw, wpj)
Recording... Recording...
6. Deactivate(stop pushing) Trigger : Low Level(0V)
7. In WEIVERex, Record Stop Button Click
Stopping
8. Trigger’s power Off
Play Mode Scenario with trigger
1. Insert a trigger in ‘trigger port’ : Low Level(0V)
Updating->
Stopping
2. Trigger’s power On
3. In WEIVERex, Play File Select, Play Start Button Click
4. Activate(push) Trigger : High Level(3.3V)
5. Playing file(iqw, wpj)
Updating
Playing... Playing
6. Deactivate(stop pushing) Trigger : Low Level(0V)
7. In WEIVERex, Record Stop Button Click
Stopping
8. Trigger’s power Off
- Storage
In Capture Mode, the WEIVER can record to either the internal (default) SSD or the external e-SATA (optional) SSD directly. The recording
data is written in real-time in the two way, internal and external storages.
While on recording, the data overflow can be occured. When this overflow occurs, the captured data may not be written properly. The
read and write speeds for the e-SATA SSD is more than 240MB/s.
The primary storage destination is D:\ (“D Drive”), all Captured data files can be found in D:\WeiverData\Record. The external SSD’s
location will be E:\ (“E Drive”) and Captured data files can be found in E:\WeiverData\Record.
35
Weiver 2.0 / Operations Manual
WEIVER 2.0 Manual
Analyzer
mouse control in perspective
-3D Spectrum
Within Spectrum View, the spectrum can be displayed in a simulated 3D style. 3D graph can be controled with mouse
control in a perspective way.
-2D Spectrum
By default, the spectrum is displayed as 2D style. The Complex FFT Spectrum will display captured 8M bandwidth and
captured 24M, 48M and 56M bandwidth.
-Zoom Mode
In the Spectrum View, the Zoom In feature can be used. To return to the initial non-zoomed state use Undo
the key, Ctrl +Z.
-Marker Mode
The Marker feature can be used to measure power of the RF signal.
-Band Power Mode
In the Spectrum View, drag your mouse to the desired Band Power Range to see the respective measurement.
36
, or press
Weiver 2.0 / Operations Manual
WEIVER 2.0 Manual
View
IQ Power @ 30MHz BW
-Spectrum
By adjusting the frequency in spectrum window, user can observe in-band RF signal (within range of 8M, 24M
bandwidth) and by adjusting the Range Input Capture mode, the RF IN signal power can optimized by controlling
range in a capture mode.
-Power
The power of RF IN signals from the Antenna or RF Cable can be observed.
-GPS
In the Preview Mode, the current GPS coordinates is displayed. In the Capture Mode, the actual GPS coordinates of
the captured data is shown and recorded.
-IQ
The RF input signal I (In-Phase) / Q (Quad-Phase) signal is separated into the display.
37
Weiver 2.0 / Operations Manual
WEIVER 2.0 Manual
Util
* Backup
Captured data is by default stored in the D: \ (D Drive). When
the default internal storage reaches a remaining capacity
of 2GB or less, the Capture function will automatically stop.
To ensure continuous uninterrupted data capture, a backup
external storage device (e-SATA SSD) must be enabled/
connected.
* Log to Excel
Provides the functions of extracting information such as File Names, File Sizes, BW, Sample Clock, Frequency, Time, Time
Based Signal power, Time Based GPS Location, and saving them in form of excel files.
All raw data gained during field testing can be harvested for documentation and reporting.
[.xls format]
weak
signal
Week
Signal
strongStrong
signal
Signal
38
Weiver 2.0 / Operations Manual
WEIVER 2.0 Manual
Weiver Signal Tracer
Introduction
‘Weiver Signal Tracer’ provides a user information regarding location, power of RF signal, velocity when analyzing the
data captured by WEIVER. In many cases, many circumstantial variables, except for RF signal, makes user have problem
to analyze after user captured the data with RF capture equipment. Using map and captured data, Weiver Signal Tracer
allows user to analyze the geographical peculiarity such as skyscrapers and tunnels and vehicle’s velocity when user
was capturing the data. Checking a virtual drive route before a drive test and Searching the geography with address or
longitude and altitude is able to do.
Weiver Signal Tracer is based on Google Map API V3 and required the Internet connection. Microsoft Internet Explorer (IE)
7.0 or later version should be installed at user’s PC. Loading time for map is varies depending on the network and PC’s
specification and control name in Graphic User Interface, copyrights notice, navigation, and label in map is followed by
the language setting for PC’s browsers. Supported language list can be found at the appendix.
Specification
Control Menu
Map Window
Search Menu
Chart Window
Satellite Window
Information Window
39
Weiver 2.0 / Operations Manual
WEIVER 2.0 Manual
Control Menu
1
2
3
4
5
6
7
8
9
10
11
12
14
1. File Window
Displaying the file’s name after choosing a file.
2. Open button
Opening Windows to select
*.wpj file.
3. Sample Interval
wpj-typed file stores information in one second however,
for displaying all information at the map and chart spends
plenty of time. Therefore user can choose time interval
from 5 to 30 seconds to selectively extract information.
ex) 10 Sec Sample Interval
Time interval between two points in the picture above is
10 seconds (6h 13m 23s ~ 6h 13m 33s)
40
13
Weiver 2.0 / Operations Manual
WEIVER 2.0 Manual
4. Analyze button
Displaying information of wpj file on map and chart, using the sample’s time interval. Double-click a marker on the map
shows information and click it then information disappear.
5. Repeat button
Selecting play mode: one time or repeat .
6. Play Time Interval
Play mode basically support in one second. However,
increasing sample interval results of various changes
since an interval between two points gets away. Play
time interval can be controlled at each point by ‘play
time interval’ function.
1 sec
41
Weiver 2.0 / Operations Manual
WEIVER 2.0 Manual
7. Play button
Being based on an analyzed data, user can follow the actual driving route and check information.
8. Pause button
9. Stop button
If stop button clicks, a map moves to start point.
10. Ruler button
User can find out the length with ruler. After
estimating the length, if user clicks this
button, label about length remains and ruler
is disappear. This measurement can be used in
multiple times.
42
Weiver 2.0 / Operations Manual
WEIVER 2.0 Manual
11. Print button
User can print out a result through a designated printer.
12. Excel button
This function supports user to extract an analyzed data as an Excel format file(*.csv) and open and store the file on user’s
demand.
43
Weiver 2.0 / Operations Manual
WEIVER 2.0 Manual
13. Lumantek Webpage
Moving to Lumantek’s webpage when user clicks the logo.
14. Play Bar
Displaying the current condition during playing. User can use ‘drag and play’ function.
13. Lumantek Webpage
Moving to Lumantek’s webpage when user clicks the logo.
4
Map Window
Map Type Control
1
Navigation Control
2
Street View
3
Scale Control
44
Weiver 2.0 / Operations Manual
WEIVER 2.0 Manual
1. Navigation Control
User can control left and right or top and bottom of map by clicking navigation control and the movement of map is
possible with mouse’s drag.
2. Street View
to the location a user wants. Roads
To view street-level imagery for a specific location, click and drag [man icon]
with available street-level imagery appear with a blue border. Navigate to the location you want. Zoom in all the way. If
street-level imagery is available, it appears when you zoom in all the way. To navigate along a street, a user needs to click
one of the white arrows overlaid on the street to move in that direction, or use the arrow keys and to close the view, click
[x] button
appendix
. The situation of ‘Street View service’ is varied over the world so please check Google map service at the
45
Weiver 2.0 / Operations Manual
WEIVER 2.0 Manual
3. Scale Control
To expand or reduce the size of map, it can be controlled by clicking a mouse left-button and the other way is a mouse
pointer with scroll function; pointing at the location where a user wants can change the size of the map. Double-clicking
of mouse left-button at the location on the map makes it expand and doing of mouse right-button makes it reduce.
Another way is to push ‘shift’ key on the map window.
4. Map Type Control
Weiver Signal Tracer’s default map type is a normal-typed map; however, a user is able to select a satellite map, locating
at the right above. A 45° slop satellite map is provided depending on country and region. A map can be rotated 360
degrees at the location where a 45° slop satellite map is provided.
46
Weiver 2.0 / Operations Manual
WEIVER 2.0 Manual
Search Menu
1
2
3
1. Virtual Drive Searcher
This function supports to search a driving test route before user has. At the route input window, 1) inputting a departure
point and an arrival point and then 2) pushing enter or clicking ‘Search button.’ activates ‘Virtual Drive searcher.’ When
it performs, a scroll bar appears on the right and, if each driving route is clicked, detailed driving routes between the
departure point and the arrival point show up. If each driving point is clicked, it leads to being moved to the corresponding
location. ‘Virtual Drive Searcher’ service is varied on each country so please refer to the appendix, ‘Google map Service.’
47
Weiver 2.0 / Operations Manual
WEIVER 2.0 Manual
2. Adress Searcher
After inputting information regarding the location a user likes to see, pushing ‘enter’ or clicking
‘Address button’ activates ‘Address searcher’ and the searched result displays on the map with
a marker. Address searcher service is varied for each country so please refer to the appendix,
‘Google map Service.’
3. Coordinate Searcher
After inputting a coordinates which user wants to see at input window, pushing ‘enter’ or clicking ‘coordinate button’
activates ‘Coordinate Searcher’ and the searched result displays on the map with a marker. Entering a coordinates should
follow ‘WGS-84 Decimal Number Format.’
48
Weiver 2.0 / Operations Manual
WEIVER 2.0 Manual
Chart Window
Chart window displays after analyze. The blue-colored graph is for a velocity of the vehicle and the red-colored graph is
for RF signal’s power. According to the chart in the above, the signal sharply dropped in two times, approaching mouse
pointer to these points makes information of each point indicate at the note. Clicking the note allows it to move the
corresponding location in the map (In the tunnel, GPS coordinates cannot be received, therefore clicking any points of
tunnel leads to display the latest GPS coordinates).
49
Weiver 2.0 / Operations Manual
WEIVER 2.0 Manual
Satellite Window
It is difficult for user to analyze geographical features only with map, in this case, ‘Satellite Window’ helps user analyze,
providing satellite map which shares same center with a map. ‘Satellite window’ is automatically controlled by map
window and, depending on user’s needs, can be controlled by mouse drag or wheel (Satellite Window can perform
when zoom level of map window is above the certain level).
Information Window
1
2
3
1. Location Informer Window
2. Play & File Information Window
3. Progress Bar
50
Weiver 2.0 / Operations Manual
WEIVER 2.0 Manual
1. Location Informer Window
If a user wants to know address and coordinates of the certain location, clicking ‘Location informer button’ makes a
maker appear in the center of a map. It indicates the coordinates for the nearest address and the altitude based on
the average 0 sea level. The marker can be moved by drag & drop of mouse and whenever it moves, it displays new
information.
2. Play & File Information Window
During analyzing, this part shows information (Center Frequency, Sample Rate, Band Width, and AGC) of captured file
and, during playing, indicates coordinates, time, velocity, and RF signal power of each point.
3. Progress Bar
During analyzing, progress displays at the ‘progress bar’
51
Weiver 2.0 / Operations Manual
WEIVER 2.0 Manual
Real-Time Traffic Information
The Weiver Signal Tracer allows you to see real-time traffic information (where supported) to your maps using the Traffic
Function of Weiver signal Tracer. Traffic information is provided for the time at which the request is made. Consult this
spreadsheet to determine traffic coverage support.
Traffic tracer on
52
Traffic tracer off
Weiver 2.0 / Operations Manual
WEIVER 2.0 Manual
* Appendix. Google Map Service
country/region
Afghanistan
Albania
map tiles
Yes (Major Roads Only)
geocoding
Yes (same as tiles)
street
No
driving directions
No
Yes (MapMaker Only)
Yes (same as tiles)
No
Yes (Major Cities Only)
Algeria
Yes
Yes (same as tiles)
No
Yes
American Samoa
Yes (MapMaker Only)
Yes (same as tiles)
No
Yes
Andorra
Yes
Yes (same as tiles)
No
Yes (Major Cities Only)
Anguilla
Yes (MapMaker Only)
Yes (same as tiles)
No
No
Angola
Yes (Major Roads Only)
Yes (same as tiles)
No
Yes
Antigua and Barbuda
Yes
Yes (same as tiles)
No
Yes
Argentina
Yes
Yes (same as tiles)
No
Yes
Armenia
Yes (MapMaker Only)
Yes (same as tiles)
No
Yes
Aruba
Yes (MapMaker Only)
Yes (same as tiles)
No
Yes
Australia
Yes
Yes (same as tiles)
Yes
Yes
Austria
Yes
Yes (same as tiles)
No
Yes
Azerbaijan
Yes (MapMaker Only)
Yes (same as tiles)
No
Yes
Bahamas
Yes (MapMaker Only)
Yes (same as tiles)
No
Yes
Bahrain
Yes (Major Roads, MapMaker
Additions)
Yes (same as tiles)
No
Yes
Bangladesh
Yes (Major Roads Only)
Yes (same as tiles)
No
No
Barbados
Yes (Lacks street names)
Yes (same as tiles)
No
Yes
Belarus
Yes (MapMaker Only)
Yes (same as tiles)
No
No
Belgium
Yes
Yes (same as tiles)
No
Yes
Belize
Yes (Major Roads, MapMaker
Additions)
Yes (same as tiles)
No
Yes
Benin
Yes (Major Roads, MapMaker
Additions)
Yes (same as tiles)
No
Yes
Bermuda
Yes (MapMaker Only)
Yes (same as tiles)
No
Yes
Bhutan
Yes (Major Roads, MapMaker
Additions)
Yes (same as tiles)
No
Yes
Bolivia
Yes (Major Roads, MapMaker
Additions)
Yes (same as tiles)
No
Yes
Bosnia and
Herzegovina
Botswana
Yes (MapMaker Only)
Yes (same as tiles)
No
No
Yes (Major Roads, MapMaker
Additions)
Yes (same as tiles)
No
Yes
Brazil
Yes
Yes (same as tiles)
No
Yes
British Indian Ocean
Territory
Brunei
Yes (MapMaker Only)
Yes (same as tiles)
No
No
Yes (Major Roads Only)
Yes (same as tiles)
No
No
Bulgaria
Yes (Major Roads Only)
Yes (same as tiles)
No
Yes (Major Cities Only)
53
Weiver 2.0 / Operations Manual
WEIVER 2.0 Manual
Burkina Faso
Yes (Major Roads, MapMaker
Additions)
Yes (Major Roads, MapMaker
Additions)
Yes (Major Roads, MapMaker
Additions)
Yes (Major Roads, MapMaker
Additions)
Yes
Yes (same as tiles)
No
Yes
Yes (same as tiles)
No
Yes
Yes (same as tiles)
No
No
Yes (same as tiles)
No
Yes
Yes (same as tiles)
Yes
Yes
Yes (Major Roads, MapMaker
Additions)
Yes (Major Roads, MapMaker
Additions)
Yes (Major Roads, MapMaker
Additions)
Yes (Major Roads, MapMaker
Additions)
Yes (same as tiles)
No
Yes
Yes (same as tiles)
No
Yes
Yes (same as tiles)
No
Yes
Yes (same as tiles)
No
Yes
Chile
Yes
Yes (same as tiles)
No
Yes
China
Yes
Yes (same as tiles)
No
Yes (Domain-restricted)
Christmas Island
Yes (MapMaker Only)
Yes (same as tiles)
No
No
Cocos Islands
Yes (MapMaker Only)
Yes (same as tiles)
No
No
Colombia
Yes
Yes (same as tiles)
No
No
Comoros
Yes (Major Roads, MapMaker
Additions
Yes (MapMaker Only)
Yes (same as tiles)
No
Yes
Yes (same as tiles)
No
Yes
Yes (same as tiles)
No
Yes
Costa Rica
Yes (Major Roads, MapMaker
Additions)
Yes (MapMaker Only)
Yes (same as tiles)
No
Yes
Côte d'Ivoire
Yes (Major Roads Only)
Yes (same as tiles)
No
Yes
Croatia
Yes
Yes (same as tiles)
No
No
Cuba
Yes
Yes (same as tiles)
No
No
Cyprus
No
No
No
No
Czech Republic
Yes
Yes (same as tiles)
Yes
Yes
Denmark
Yes
Yes (same as tiles)
Yes
Yes
Djibouti
Yes (same as tiles)
No
Yes
Yes (same as tiles)
No
Yes
Yes (same as tiles)
No
Yes
Yes (same as tiles)
No
Yes
Ecuador
Yes (Major Roads, MapMaker
Additions)
Yes (Major Roads, MapMaker
Additions)
Yes (Major Roads, MapMaker
Additions)
Yes (Major Roads, MapMaker
Additions)
Yes
Yes (same as tiles)
No
No
Egypt
Yes
Yes (same as tiles)
No
Yes
El Salvador
Yes (MapMaker Only)
Yes (same as tiles)
No
Yes
Burundi
Cambodia
Cameroon
Canada
Cape Verde
Cayman Islands
Central African
Republic
Chad
Cook Islands
Congo
DRC
Dominica
Dominican Republic
54
Weiver 2.0 / Operations Manual
WEIVER 2.0 Manual
Equatorial Guinea
Yes (Major Roads Only)
Yes (same as tiles)
No
Yes
Eritrea
Yes (Major Roads, MapMaker
Additions)
Yes
Yes (same as tiles)
No
Yes
Yes (same as tiles)
No
Yes (Major Cities Only)
Yes (same as tiles)
No
Yes
Yes (same as tiles)
No
Yes
Finland
Yes (Major Roads, MapMaker
Additions)
Yes (Major Roads, MapMaker
Additions)
Yes
Yes (same as tiles)
Yes
Yes
France
Yes
Yes (same as tiles)
Yes
Yes
French Guiana
Yes (Major Roads Only)
Yes (same as tiles)
No
Yes
Gabon
Yes (Major Roads, MapMaker
Additions)
Yes (Major Roads, MapMaker
Additions)
Yes
Yes (same as tiles)
No
Yes
Yes (same as tiles)
No
Yes
Yes (same as tiles)
No
Yes
Yes (same as tiles)
No
Yes
Greenland
Yes (Major Roads, MapMaker
Additions)
Yes (MapMaker Only)
Yes (same as tiles)
Yes
Yes
Greece
Yes
Yes (same as tiles)
No
Yes (Major Cities Only)
Grenada
Yes (Lacks street names)
Yes (same as tiles)
No
Yes
Guam
Yes (same as tiles)
No
No
Guadeloupe
Yes (Major Roads, MapMaker
Additions)
Yes (MapMaker Only)
Yes (same as tiles)
No
Yes
Guatemala
Yes
Yes (same as tiles)
No
No
Guinea
Yes (same as tiles)
No
Yes
Guinea-Bissau
Yes (Major Roads, MapMaker
Additions)
Yes (Major Roads Only)
Yes (same as tiles)
No
Yes
Guyana
No
No
No
Yes
Haiti
Yes
Yes (same as tiles)
No
Yes
Honduras
Yes
Yes (same as tiles)
No
No
Hong Kong
Yes
Yes (same as tiles)
No
Yes
Hungary
Yes
Yes (same as tiles)
No
Yes
Iceland
Yes (same as tiles)
Yes
Yes
India
Yes (Major Roads, MapMaker
Additions)
Yes
Yes (same as tiles)
No
No
Indonesia
Yes
Yes (same as tiles)
No
Yes
Iran
Yes (same as tiles)
No
Yes
Iraq
Yes (Major Roads, MapMaker
Additions)
Yes (Major Roads Only)
Yes (same as tiles)
No
No
Ireland
Yes
Yes (same as tiles)
No
Yes
Israel
No
No
No
No
Italy
Yes
Yes (same as tiles)
Yes
Yes
Estonia
Ethiopia
Fiji
Gambia
Germany
Ghana
55
Weiver 2.0 / Operations Manual
WEIVER 2.0 Manual
Ivory Coast
Yes (MapMaker Only)
Yes (same as tiles)
No
No
Jamaica
Japan
Yes
Yes
Yes (same as tiles)
Yes (same as tiles)
No
Yes
Yes
No
Jordan
Yes (Lacks street names)
Yes (same as tiles)
No
Yes
Kazakhstan
Yes (Major Roads Only)
Yes (same as tiles)
No
No
Kenya
Yes (Major Roads Only)
Yes (same as tiles)
No
No
Kiribati
No
No
No
No
Kuwait
Yes (Major cities only)
Yes (same as tiles)
No
No
Kyrgyzstan
Yes (same as tiles)
No
Yes
Laos
Yes (Major Roads, MapMaker
Additions)
Yes (MapMaker Only)
Yes (same as tiles)
No
Yes
Latvia
Yes
Yes (same as tiles)
No
Yes (Major Cities Only)
Lebanon
Yes
Yes (Lacks street
numbers/some towns)
No
Yes
Lesotho
Yes (Major Roads Only)
Yes (same as tiles)
No
No
Liberia
Yes (Major Roads Only)
Yes (same as tiles)
No
Yes
Libya
Yes
Yes (same as tiles)
No
Yes
Liechtenstein
Yes
Yes (same as tiles)
No
Yes
Lithuania
Yes
Yes (same as tiles)
No
Yes (Major Cities Only)
Luxembourg
Yes
Yes (same as tiles)
No
Yes
Macau
Yes
Yes (same as tiles)
No
No
Macedonia
Yes (MapMaker Only)
Yes (same as tiles)
No
Yes (Major Cities Only)
Madagascar
Yes (same as tiles)
No
Yes
Yes (same as tiles)
No
Yes
Malaysia
Yes (Major Roads, MapMaker
Additions)
Yes (Major Roads, MapMaker
Additions)
Yes
Yes (same as tiles)
No
Yes
Maldives
No
No
No
Yes
Mali
Yes (MapMaker Only)
Yes (same as tiles)
No
Yes
Malta
No
No
No
Yes
Marshall Islands
Yes (MapMaker Only)
Yes (same as tiles)
No
Yes
Martinique
Yes (MapMaker Additions)
Yes (same as tiles)
No
Yes
Mauritania
Yes (same as tiles)
No
Yes
Yes (same as tiles)
No
Yes
Mexico
Yes (Major Roads, MapMaker
Additions)
Yes (Major Roads, MapMaker
Additions)
Yes
Yes (same as tiles)
Yes
No
Micronesia
Yes (MapMaker Only)
Yes (same as tiles)
No
No
Moldova
Yes (MapMaker Only)
Yes (same as tiles)
No
Yes (Major Cities Only)
Monaco
Yes
Yes (same as tiles)
No
Yes (Major Cities Only)
Malawi
Mauritius
56
Weiver 2.0 / Operations Manual
WEIVER 2.0 Manual
Mongolia
Yes (same as tiles)
No
No
Montenegro
Yes (Major Roads, MapMaker
Additions)
Yes (MapMaker Only)
Yes (same as tiles)
No
Yes (Major Cities Only)
Montserrat
Yes (MapMaker Only)
Yes (same as tiles)
No
Yes
Morocco
Yes (Lacks street names)
Yes (same as tiles)
No
Yes
Mozambique
Yes (same as tiles)
No
Yes
Myanmar
Yes (Major Roads, MapMaker
Additions)
Yes (MapMaker Only)
Yes (same as tiles)
No
No
Namibia
Yes (Major Roads Only)
Yes (same as tiles)
No
Yes
Nauru
Yes (MapMaker Only)
Yes (same as tiles)
No
No
Nepal
Yes (Major Roads Only)
Yes (same as tiles)
No
No
Netherlands
Yes
Yes (same as tiles)
Yes
Yes
Netherlands Antilles
Yes (MapMaker Only)
Yes (same as tiles)
No
Yes
New Zealand
Yes
Yes (same as tiles)
Yes
Yes
Nicaragua
Yes
Yes (same as tiles)
No
No
Niger
Yes (Major Roads, MapMaker
Additions)
Yes (Major Roads, MapMaker
Additions)
Yes (MapMaker Only)
Yes (same as tiles)
No
Yes
Yes (same as tiles)
No
Yes
Yes (same as tiles)
No
Yes
Northern Mariana
Islands
North Korea
Yes (MapMaker Only)
Yes (same as tiles)
No
Yes
No
No
No
No
Norway
Yes
Yes (same as tiles)
Yes
Yes
Oman
Yes (Major cities only)
Yes (same as tiles)
No
No
Pakistan
Yes (same as tiles)
No
No
Palau
Yes (Major Roads, MapMaker
Additions)
No
No
No
Yes
Panama
Yes
Yes (same as tiles)
No
No
Papua New Guinea
Yes (Major Roads Only)
Yes (same as tiles)
No
Yes
Paraguay
Yes (same as tiles)
No
Yes
Yes (same as tiles)
No
Yes
Yes (same as tiles)
No
No
Pitcairn Islands
Yes (Major Roads, MapMaker
Additions)
Yes (Major Roads, MapMaker
Additions)
Yes (Major Roads, MapMaker
Additions)
Yes (MapMaker Only)
Yes (same as tiles)
No
No
Poland
Yes
Yes (same as tiles)
No
Yes
Portugal
Yes
Yes (same as tiles)
Yes
Yes
Qatar
Yes (Major cities only)
Yes (same as tiles)
No
Yes
Reunion
Yes (MapMaker Only)
Yes (same as tiles)
No
Yes
Romania
Yes (MapMaker Only)
Yes (same as tiles)
No
No
Nigeria
Niue
Peru
Philippines
57
Weiver 2.0 / Operations Manual
WEIVER 2.0 Manual
Russia
Yes
Yes (In local character
set only)
Yes (same as tiles)
Yes
No
Yes (Moscow + Suburbs
Only)
Yes
Rwanda
Saint Helena
Yes (Major Roads, MapMaker
Additions)
Yes (MapMaker Only)
Yes (same as tiles)
No
No
Saint Kitts and Nevis
Yes
Yes (same as tiles)
No
No
Saint Vincent and the
Grenadines
Saint Lucia
Yes (MapMaker Only)
Yes (same as tiles)
No
Yes
Yes
Yes (same as tiles)
No
Yes
Samoa
Yes (MapMaker Only)
Yes (same as tiles)
No
Yes
San Marino
Yes
Yes (same as tiles)
No
Yes (Major Cities Only)
São Tomé and Príncipe
Yes (Major Roads, MapMaker
Additions)
Yes (Major cities only)
Yes (same as tiles)
No
Yes
Yes (same as tiles)
No
No
Yes (Major Roads, MapMaker
Additions)
Yes (MapMaker Only)
Yes (same as tiles)
No
Yes
Yes (same as tiles)
No
Yes (Major Cities Only)
Yes (same as tiles)
No
Yes
Yes (same as tiles)
No
Yes
Singapore
Yes (Major Roads, MapMaker
Additions)
Yes (Major Roads, MapMaker
Additions)
Yes
Yes (same as tiles)
Yes
Yes
Slovakia
Yes
Yes (same as tiles)
No
Yes (Major Cities Only)
Slovenia
Yes
Yes (same as tiles)
No
No
Solomon Islands
Yes (MapMaker Only)
Yes (same as tiles)
No
Yes
Somalia
Yes (same as tiles)
No
Yes
South Africa
Yes (Major Roads, MapMaker
Additions)
Yes
Yes (same as tiles)
No
Yes
South Korea
Yes (Domain-restricted)
Yes (same as tiles)
No
No
Spain
Yes
Yes (same as tiles)
Yes
Yes
Sri Lanka
Yes (same as tiles)
No
No
Sudan
Yes (Major Roads, MapMaker
Additions)
Yes (Major Roads Only)
Yes (same as tiles)
No
Yes
Suriname
No
No
No
Yes
Swaziland
Yes (Major Roads Only)
Yes (same as tiles)
No
Yes
Sweden
Yes
Yes (same as tiles)
Yes
Yes
Switzerland
Yes
Yes (same as tiles)
Yes
Yes
Syria
Yes (Major Roads Only)
Yes (same as tiles)
No
No
Taiwan
Yes
Yes
Yes
Tajikistan
Yes (Major Roads, MapMaker
Additions)
Yes (Major Roads, MapMaker
Additions)
Yes
Yes (In local character
set only)
Yes (same as tiles)
No
Yes
Yes (same as tiles)
No
Yes
Yes (same as tiles)
No
Yes
Saudi Arabia
Senegal
Serbia
Seychelles
Sierra Leone
Tanzania
Thailand
58
Weiver 2.0 / Operations Manual
WEIVER 2.0 Manual
* Appendix. Google Map Language Service
language code
language name
v3
ar
ARABIC
Yes
pt-BR
PORTUGUESE (BRAZIL)
Yes
eu
BASQUE
Yes
pt-PT
PORTUGUESE (PORTUGAL)
Yes
bg
BULGARIAN
Yes
rm
ROMANSCH
No
bn
BENGALI
Yes
ro
ROMANIAN
Yes
ca
CATALAN
Yes
ru
RUSSIAN
Yes
cs
CZECH
Yes
sk
SLOVAK
Yes
da
DANISH
Yes
sl
SLOVENIAN
Yes
de
GERMAN
Yes
sr
SERBIAN
Yes
el
GREEK
Yes
sv
SWEDISH
Yes
en
ENGLISH
Yes
tl
TAGALOG
Yes
en-AU
ENGLISH (AUSTRALIAN)
Yes
ta
TAMIL
Yes
en-GB
ENGLISH (GREAT BRITAIN)
Yes
te
TELUGU
Yes
es
SPANISH
Yes
th
THAI
Yes
eu
BASQUE
Yes
tr
TURKISH
Yes
fa
FARSI
Yes
uk
UKRAINIAN
Yes
fi
FINNISH
Yes
vi
VIETNAMESE
Yes
fil
FILIPINO
Yes
zh-CN
CHINESE (SIMPLIFIED)
Yes
fr
FRENCH
Yes
zh-TW
CHINESE (TRADITIONAL)
Yes
gl
GALICIAN
Yes
gu
GUJARATI
Yes
hi
HINDI
Yes
hr
CROATIAN
Yes
hu
HUNGARIAN
Yes
id
INDONESIAN
Yes
it
ITALIAN
Yes
iw
HEBREW
Yes
ja
JAPANESE
Yes
kn
KANNADA
Yes
ko
KOREAN
Yes
lt
LITHUANIAN
Yes
lv
LATVIAN
Yes
ml
MALAYALAM
Yes
mr
MARATHI
Yes
nl
DUTCH
Yes
nn
NORWEGIAN NYNORSK
No
no
NORWEGIAN
Yes
or
ORIYA
No
pl
POLISH
Yes
pt
PORTUGUESE
Yes
59
Weiver 2.0 / Operations Manual
WEIVER 2.0 Manual
Play File Converting Util
Click the start button on your OS and select WeiverFIleConverterUtil
inside WeiverEX Program.
Once you get the window for converting, ‘Complex type’ files can be
played on WEIVER.
For Real type file, WeiverFileConverterUtil converts it into Complex type
one and generates Log data.
For Complex type file, Log data is generated.
When Real type file is converted, two files generate with *.iqw and *.wpj
extensions.
In case of converting Complex type file, Log data will be generated and
one file with wpj extension.
60
Weiver 2.0 / Operations Manual
WEIVER 2.0 Manual
WEIVER File Util
Run WEIVER file util, and select the original stream to extract part you want.
61
Weiver 2.0 / Operations Manual
WEIVER 2.0 Manual
3.9 / WeiverEX Program Introduction
When the WeiverEx program is initiated, the WEIVER unit is not yet connected. To proceed with connecting the
WEIVER, follow the following sequence:
Select Main Menu -> Control-> Connect the device and search WEIVER
To connect with WEIVER, a separate WEIVER IP List sub-window will appear.
There are various methods of connecting the WEIVER. For most of the methods during IP Search, the subnet of the
WEIVER unit and control PC must be matched to connect for security purposes properly.
Once the WEIVER has successfully connected another window will
display “Connected!”
62
Weiver 2.0 / Operations Manual
WEIVER 2.0 Manual
Once the WEIVER has successfully connected, the WEIVER will respond according to the selected mode (Capture or
Playback).
For the Capture mode, the WeiverEX program will display the incoming RF as a spectrum. Further, the Play mode will
playback captured data and transmit.
Analyzer Menu
The Analyzer Menu has five kinds of features in measuring or observing the
Spectrum from Zoom to Undo. (3D Spectrum Analyzer, 2D Spectrum Analyzer,
1
Spectrum Zoom in Analyzer, Spectrum Power Marker, Band Power Analyzer, State
Undo)
1 3D Spectrum Analyzer
63
Weiver 2.0 / Operations Manual
WEIVER 2.0 Manual
2D Spectrum Analyzer
Spectrum Zoom in Analyzer
Zoom on the area by clicking first on the left mouse button and dragging to the preferred point and then clicking on
the left mouse button. The area the user has selected will be highlighted.
64
Weiver 2.0 / Operations Manual
WEIVER 2.0 Manual
If you want to zoom back to the previous screen, or to the original state, click on
or simultaneously press Ctrl
and Z.
Spectrum Power Marker
Band Power Analyzer
The Band Power can be measured by clicking the left mouse button and dragging. Once the area has been
selected, clicking the left mouse button will disengage and the results will be shown.
65
Weiver 2.0 / Operations Manual
WEIVER 2.0 Manual
View Menu
WeiverEX has four sub-windows (with dedicated functions) in the main window.
Each sub-window can be repositioned and resized. Further, the Auto Window Position
1
function will automatically resize and reposition the four windows by Auto Window
Position.
( Spectrum Window, Power Window, GPS Window, I/Q Window, Auto
Window Position )
Power Graph
I,Q data power values and the down converter’s actual gain value will be calculated in second by second and displayed.
Values in the power graph are the actual coming RF IN power.
66
Weiver 2.0 / Operations Manual
WEIVER 2.0 Manual
GPS Graph
Displays current location (latitude, longitude) coordinates updated every second.
The sizes of the Spectrum Graph
same time.
, IQ Graph
, Power Graph
, GPS Graph
can be adjusted at the
IQ Graph ( I:16bits, Q:16bits )
In the capture mode, there is an advantage to capture while the user’s looking at I, Q graphs. I, Q is asigned 16bit
integer value (maximum value 32,767, the minimum -32,768) and when transmitting arbitrary I, Q files created by
users, WEIVER will produce the most excellent RF signal when I/Q 16 bit signal has full swing.
67
Weiver 2.0 / Operations Manual
WEIVER 2.0 Manual
Capture Mode
In the Capture Mode, WEIVER will not capture the RF signal automatically but stay in Preview state. To capture the RF
signal, press the record button. The center frequency of the spectrum will be displayed in the center of the spectrum
window.
IQ Power @ 30MHz BW
- Before starting RF capture the data file name should be entered, RF capture will be operating by pressing the Record
Button.
- To stop the RF Capture click on the Stop button
.
- Users can type the file names. Without input from the record button pressed, the name will be saved automatically.
- The Frequency and record
BW can be changed by
moving the mouse wheel or
by entering in the numbers.
68
Weiver 2.0 / Operations Manual
WEIVER 2.0 Manual
The input range for optimizing the RF signal power can be adjusted by clicking on the mouse wheel.
Optimize or select Auto Power Adjustment
to optimize the power of the RF signal. The range must be higher than
the actual RF IN power for getting a optimal RF signal. (ex. Range> RF IN Power)
IQ Power @ 30MHz BW
If the signal is less than or equal to the power, change the Range.
* Relation between RF IN Power and Range
- Source RF Power -20 dBm / Range 0.0 dBm
- Source RF Power -20 dBm / Range -10.0 dBm
69
Weiver 2.0 / Operations Manual
WEIVER 2.0 Manual
Play Mode
The data files stored in a capture mode are generated in two types(File Name.iqw, File Name.log).
File Name.iqw is stored in the order of [I : 2Bytes, Q 2Bytes], File Name.log includes the records of Name.iqw file additional
information. If File Name.log doesn’t exist, Band Width is represented by the ARB, you can play the file by typing IQ rate
and the Center Frequency .
To play back the captured RF data files. Please go to Playmode and open the list of captured data files.
Click on the File Open button
To delete a saved file, check the box next to the file name and click the Delete
button.
To backup or to copy the files, check the boxes adjacent to the file name and
click the Copy button. Select the save path (e.g., E:\)
To play, check the relevant box adjacent to the file and click the play button .
To stop play, click on the Stop button.
70
Weiver 2.0 / Operations Manual
WEIVER 2.0 Manual
The frequency can be changed with the mouse wheel or by double-clicking and entering in the figures.
Gain 30
Gain 0
Gain -30
The transmission power can be changed with the mouse wheel or by double-clicking and entering the figures.
71
Weiver 2.0 / Operations Manual
WEIVER 2.0 Manual
3.10 / WEIVER Power Button
Press the button to power on
Press again to power off
Press the Reset button to reset
WEIVER
REAR
3.11 / WEIVER LED Signal
RF IN(HF Normal, HF Low Noise, HF Normal)
RF Capture function is operating properly with
steady blinking
RF OUT
Playback function is operating properly with
steady blinking
GPS
The LED will remain on when the GPS is
operating properly. Steady blinking will mean it
is not operating properly.
POWER
When WEIVER is operating, the power LED will
be on
TRIGGER IN / OUT
FRONT
72
Weiver 2.0 / Operations Manual
WEIVER 2.0 Manual
3.12 / WEIVER Syncer Operation(Optional)
WEIVER Syncer Specification
10MHz OCXO Specification
values
Freq. Stability vs. Temp
±50 ppb max.
Aging per Year
±500 ppb max.
Warm-Up @ 25 ºC
±500 ppb max. (In ≤ 3-Minutes)
REF 10MHz Output PWR.
+7dBm ±1dB
POWER Specification
values
Supply Voltage
+5.0 VDC
Power Consumption
Max. 2 Watts
Trigger TTL Specification
values
TRIG Button “RUN”
Output Voltage +3.3VDC
TRIG Button “STOP”
Output Voltage 0 VDC
Syncer Description
External trigger for running multiple WEIVERs
Out : Ref 10MHz OCXO
Out : Ref 10MHz OCXO
Out : Trigger TTL 3.3V
Out : Trigger TTL 3.3V
In : USB Power
Syncer Sideview
LED
Button
OUT
Ref 10MHz
Green
Trigger Level
Push
3.3 V
Red
Push
0V
73
Weiver 2.0 / Operations Manual
WEIVER 2.0 Manual
CASE 1
There are 3 cases for WEIVER Syncer option.
REF 10MHz
REF 10MHz
Trigger
Trigger
An Line sharer Or network
Laptop (two ‘WeiverEx’ are running)
CASE 2
REF 10MHz
REF 10MHz
Trigger
Trigger
Laptop (WeiverEx is running)
Laptop (WeiverEx is running)
74
Weiver 2.0 / Operations Manual
WEIVER 2.0 Manual
CASE 3
REF 10MHz
REF 10MHz
Trigger
Trigger
Connecting with display and Keyboad
(WeiverEx is running at the WEIVER)
Connecting with display and Keyboad
(WeiverEx is running at the WEIVER)
75
Weiver 2.0 / Operations Manual
WEIVER 2.0 Manual
Prep for the trigger function (S/W)
Record - Preview Mode
LED
Button
Green
Push
OUT
Ref 10MHz
Trigger Level
Refresh
3.3 V
Red
Push
No Refresh
0V
76
Weiver 2.0 / Operations Manual
WEIVER 2.0 Manual
Record – Record Mode
LED
Button
OUT
Ref 10MHz
Red
Trigger Level
Refresh
Push
1
0V
Green
After a file name inputs,
click record button ( circle marked)
Push
Refresh
2
3.3 V
Red
Push
No Refresh
3
0V
After some pauses,
click record stop button(circle marked)
Play – RF Play Mode
LED
Button
OUT
Ref 10MHz
Red
Trigger Level
Push
1
2
0V
After opening file,
click play start button ( circle marked)
77
Weiver 2.0 / Operations Manual
WEIVER 2.0 Manual
LED
Button
3
OUT
Ref 10MHz
Green
Trigger Level
Push
3.3 V
Not fully refreshed
4
5
Refreshing then emitting RF output
Play Stop
Record Mode
REF 10MHz
REF 10MHz
Trigger
Trigger
BW:24MHz or 8MHz
Center Frequency : xxx MHz
BW:24MHz or 8MHz
Center Frequency : xxx MHz
Recording
[ File1.wpj ]
Recording
File Size is the same.
78
[ File2.wpj ]
Weiver 2.0 / Operations Manual
WEIVER 2.0 Manual
Play Mode
REF 10MHz
REF 10MHz
Trigger
Trigger
BW:24MHz or 8MHz
Center Frequency : xxx MHz
BW:24MHz or 8MHz
Center Frequency : xxx MHz
Play
Play
[ File1.wpj ]
Play Mode - Test result
Phase Error ??
Ideal Case
79
[ File2.wpj ]
Weiver 2.0 / Operations Manual
WEIVER 2.0 Manual
3.13 / WEIVER Bias-Tee Operation(Optional)
1) What is BIAS-TEE?
A T-shaped component attached to the signal cable to supply power to the antennas
2) Purpose?
Amplifier (LNA, TR, FET and etc) circuits are configured in close proximity to the antennas to improve
receive sensitivity, and a separate DC power supply (DC) is required to activate these active elements.
3) Specification
FQ. Range 48MHz to 2700MHz
Insertion Loss Max. 1dB
Output Current Max. 200mA
DC Output Voltage +5V, +6V, +8V, 12V
4) Installation instructions
Please refer to the picture below.
80
API
WEIVER 1.0 / WEIVER 2.0 (playmode only)
WEIVER Player 1.0 / WEIVER Player 2.0
By LUMANTEK
Weiver 2.0 / Operations Manual
WEIVER 2.0 Manual
4. WEIVER API / INTRODUTION
4.1 / Description
There are three ways to control the Weiver
1. Using the buttons at the front panel (WEIVER Player only)
2. Using an operating software, the WeiverEx
3. Using API
The first and second method is supported all previous versions of the WEIVER software, however, the third
method can be supported from the WeiverPlayer1.0 software version 2.1.2.0. / WEIVER player 2.0 SW 2.2.0.0 /
WEIVER 1.0/2.0 SW 2.2.1.1 Hence, if previous version is installed in the WeiverPlayer, API function is not able to
use.
[ WEIVER 2.0 Player ]
[ WEIVER Player Software ]
4.2 / WEIVER API Performance property
The WeiverEx software connects the Weiver software as IP and send UDP packets to run the WEIVER. We have
opened the Weiver API example program and packet information because the purpose of the WEIVER API is to
control the WEIVER without the WeiverEx software. You can download reference sources at Lumantek website. (
http://www.lumantek.com/support/download.html )
82
Weiver 2.0 / Operations Manual
WEIVER 2.0 Manual
The contents in the below are the structure of API packets (ref.:WvPlayerRemoteAPI.h).
#define
WEIVER_PLAYER_ID0x057b50b7
#define WEIVER_PLAYER_API_RX_PORT
50504
#define
REMOTE_STRING_SUCCESS _T("Received")
#define
REMOTE_STRING_INVALIDE_PARAM _T("Invalid Param")
typedef enum _WvPlayerRemoteCMD_e
{
WV_PLAYER_REMOTE_CMD_SET_STRING,
WV_PLAYER_REMOTE_CMD_MAX
}WvPlayerRemoteCMD_t;
typedef struct _WvPlayerRemotePacket_t
{
unsigned int u4_ID;// WEIVER_PLAYER_ID
unsigned int u4_Reserved;//WV_PLAYER_REMOTE_CMD_SET_STRING
unsigned int u4_DataSize;
unsigned char u1a_Data[1000];
}WvPlayerRemotePacket_t, *WvPlayerRemotePacket_tp;
For controlling the WEIVER via API, an UDP Port (50504) has been opened. Hence, if data is added to
‘WvPlayerRemotePacket’ structure, the WEIVER program is running with these packet data.
These open sources are for Windows but can be applied to other OSs.
Before explaining the command list, we have five conditions of the program (WEIVERRemoteAPI.exe).
1. IP address of the WEIVER is 192.168.100.1.
2. An opened port number for API control is 50504 (fixed).
3. After sending packet to the WEIVER 1.0, a receiving port nuber is 50000 (variable).
4. One letter accounts for 2 byte respectively.
5. After sending the packet, ‘Time out’ occurs if there is no response.
83
Weiver 2.0 / Operations Manual
WEIVER 2.0 Manual
4.3 / Data Packet structure
[ connect 50000 ]
Type
ID
Reserved
Data Size
Data
Data
0x057b50b7
0
26
L”connect 50000”
Size(Byte)
4
4
4
13x2
Type
ID
Reserved
Data Size
Data
Data
0x057b50b7
0
10x2
L“disconnect”
Size(Byte)
4
4
4
10x2
Type
ID
Reserved
Data Size
Data
Data
0x057b50b7
0
20
L“rescandisk”
Size(Byte)
4
4
4
10x2
[ disconnect ]
[ rescandisk ]
[ openfile test.wpj ]
Type
ID
Reserved
Data Size
Data
Data
0x057b50b7
0
34
L“openfile test.wpj”
Size(Byte)
4
4
4
17x2
Type
ID
Reserved
Data Size
Data
Data
0x057b50b7
0
24
L“get openfile”
Size(Byte)
4
4
4
12x2
Type
ID
Reserved
Data Size
Data
Data
0x057b50b7
0
24
L“get openfile”
Size(Byte)
4
4
4
12x2
[ get openfile ]
[ play start ]
84
Weiver 2.0 / Operations Manual
WEIVER 2.0 Manual
[ play stop ]
Type
ID
Reserved
Data Size
Data
Data
0x057b50b7
0
18
L“play stop”
Size(Byte)
4
4
4
9x2
Type
ID
Reserved
Data Size
Data
Data
0x057b50b7
0
20
L“play pause”
Size(Byte)
4
4
4
10x2
Type
ID
Reserved
Data Size
Data
Data
0x057b50b7
0
22
L” play resume”
Size(Byte)
4
4
4
11x2
[ play pause ]
[ play resume ]
[ get play_status ]
Type
ID
Reserved
Data Size
Data
Data
0x057b50b7
0
30
L“get play_status”
Size(Byte)
4
4
4
15x2
[ set freq 400000000 ]
Type
ID
Reserved
Data Size
Data
Data
0x057b50b7
0
36
L“set freq 400000000”
Size(Byte)
4
4
4
18x2
[ set freq 400000000 hz ]
Type
ID
Reserved
Data Size
Data
Data
0x057b50b7
0
42
L“set freq 400000000 hz”
Size(Byte)
4
4
4
21x2
85
Weiver 2.0 / Operations Manual
WEIVER 2.0 Manual
[ set freq 400 mhz ]
Type
ID
Reserved
Data Size
Data
Data
0x057b50b7
0
38
L“set freq 400000 khz”
Size(Byte)
4
4
4
19x2
[ set freq 400000 khz ]
Type
ID
Reserved
Data Size
Data
Data
0x057b50b7
0
38
L“set freq 400000 khz”
Size(Byte)
4
4
4
19x2
Type
ID
Reserved
Data Size
Data
Data
0x057b50b7
0
16
L“get freq”
Size(Byte)
4
4
4
8x2
[ get freq ]
[ get gain_min ]
Type
ID
Reserved
Data Size
Data
Data
0x057b50b7
0
24
L“get gain_max”
Size(Byte)
4
4
4
12x2
Type
ID
Reserved
Data Size
Data
Data
0x057b50b7
0
16
L“get gain”
Size(Byte)
4
4
4
8x2
[ get gain ]
[ get rf_out_level 1 ]
Type
ID
Reserved
Data Size
Data
Data
0x057b50b7
0
36
L“get rf_out_level 1”
Size(Byte)
4
4
4
18x2
86
Weiver 2.0 / Operations Manual
WEIVER 2.0 Manual
[ set gain 100 ]
Type
ID
Reserved
Data Size
Data
Data
0x057b50b7
0
24
L“set gain 100”
Size(Byte)
4
4
4
12x2
[ set gain -100 ]
Type
ID
Reserved
Data Size
Data
Data
0x057b50b7
0
26
L“set gain -100”
Size(Byte)
4
4
4
13x2
[ get play_time_total ]
Type
ID
Reserved
Data Size
Data
Data
0x057b50b7
0
38
L“get play_time_total”
Size(Byte)
4
4
4
19x2
[ get play_time_current ]
Type
ID
Reserved
Data Size
Data
Data
0x057b50b7
0
42
L“get play_time_current”
Size(Byte)
4
4
4
21x2
[ set play_time_current 5 ]
Type
ID
Reserved
Data Size
Data
Data
0x057b50b7
0
46
L“set play_time_current 5”
Size(Byte)
4
4
4
23x2
[ get play_section ]
Type
ID
Reserved
Data Size
Data
Data
0x057b50b7
0
32
L“get play_section”
Size(Byte)
4
4
4
16x2
87
Weiver 2.0 / Operations Manual
WEIVER 2.0 Manual
[ get play_section ]
Type
ID
Reserved
Data Size
Data
Data
0x057b50b7
0
32
L“get play_section”
Size(Byte)
4
4
4
16x2
[ set play_section 10 20 ]
Type
ID
Reserved
Data Size
Data
Data
0x057b50b7
0
44
L“set play_section 10 20”
Size(Byte)
4
4
4
22x2
[ get spec_inv ]
Type
ID
Reserved
Data Size
Data
Data
0x057b50b7
0
24
L“get spec_inv”
Size(Byte)
4
4
4
12x2
[ set spec_inv off ]
Type
ID
Reserved
Data Size
Data
Data
0x057b50b7
0
32
L“set spec_inv off”
Size(Byte)
4
4
4
16x2
[ set spec_inv on ]
Type
ID
Reserved
Data Size
Data
Data
0x057b50b7
0
30
L“set spec_inv on”
Size(Byte)
4
4
4
15x2
[ get sample_rate ]
Type
ID
Reserved
Data Size
Data
Data
0x057b50b7
0
30
L“get sample_rate”
Size(Byte)
4
4
4
15x2
88
Weiver 2.0 / Operations Manual
WEIVER 2.0 Manual
[ set sample_rate 10000000 ]
Type
ID
Reserved
Data Size
Data
Data
0x057b50b7
0
48
L“set sample_rate 10000000”
Size(Byte)
4
4
4
24x2
[ set sample_rate 10000000 hz ]
Type
ID
Reserved
Data Size
Data
Data
0x057b50b7
0
54
L“set sample_rate 10000000 hz”
Size(Byte)
4
4
4
27x2
[ set sample_rate 10 mhz ]
Type
ID
Reserved
Data Size
Data
Data
0x057b50b7
0
44
L“set sample_rate 10 mhz”
Size(Byte)
4
4
4
22x2
[ set sample_rate 10000 khz ]
Type
ID
Reserved
Data Size
Data
Data
0x057b50b7
0
54
L“set sample_rate 10000 khz”
Size(Byte)
4
4
4
27x2
[ set trigger_out_level low ]
Type
ID
Reserved
Data Size
Data
Data
0x057b50b7
0
50
L“set trigger_out_level low”
Size(Byte)
4
4
4
25x2
[ set trigger_out_level high ]
Type
ID
Reserved
Data Size
Data
Data
0x057b50b7
0
52
L“set trigger_out_level low”
Size(Byte)
4
4
4
26x2
89
Weiver 2.0 / Operations Manual
WEIVER 2.0 Manual
[ get trigger_out_level ]
Type
ID
Reserved
Data Size
Data
Data
0x057b50b7
0
42
L“get trigger_out_level”
Size(Byte)
4
4
4
21x2
[ set extclk off ]
Type
ID
Reserved
Data Size
Data
Data
0x057b50b7
0
28
L“set extclk off”
Size(Byte)
4
4
4
14x2
[ set extclk on ]
Type
ID
Reserved
Data Size
Data
Data
0x057b50b7
0
26
L“set extclk on”
Size(Byte)
4
4
4
13x2
Type
ID
Reserved
Data Size
Data
Data
0x057b50b7
0
20
L“get extclk”
Size(Byte)
4
4
4
10x2
[ get extclk ]
[ get trigger_in ]
Type
ID
Reserved
Data Size
Data
Data
0x057b50b7
0
28
L“get trigger_in”
Size(Byte)
4
4
4
14x2
[ set trigger_in off ]
Type
ID
Reserved
Data Size
Data
Data
0x057b50b7
0
36
L“set trigger_in off”
Size(Byte)
4
4
4
18x2
90
Weiver 2.0 / Operations Manual
WEIVER 2.0 Manual
[ set trigger_in on ]
Type
ID
Reserved
Data Size
Data
Data
0x057b50b7
0
34
L“set trigger_in on”
Size(Byte)
4
4
4
17x2
[ set current_directory d:\ ]
Type
ID
Reserved
Data Size
Data
Data
0x057b50b7
0
50
L“set current_directory d:\”
Size(Byte)
4
4
4
25x2
[ set current_directory d:\WeiverData ]
Type
ID
Reserved
Data Size
Data
Data
0x057b50b7
0
70
L“set current_directory d:\WeiverData”
Size(Byte)
4
4
4
35x2
[ get current_directory ]
Type
ID
Reserved
Data Size
Data
Data
0x057b50b7
0
42
L“get current_directory”
Size(Byte)
4
4
4
21x2
[ get file_count ]
Type
ID
Reserved
Data Size
Data
Data
0x057b50b7
0
28
L“get file_count”
Size(Byte)
4
4
4
14x2
[ get filename 0 ]
Type
ID
Reserved
Data Size
Data
Data
0x057b50b7
0
28
L“get filename 0”
Size(Byte)
4
4
4
14x2
91
Weiver 2.0 / Operations Manual
WEIVER 2.0 Manual
[ get folder_count ]
Type
ID
Reserved
Data Size
Data
Data
0x057b50b7
0
32
L“get folder_count”
Size(Byte)
4
4
4
16x2
[ get foldername 0 ]
Type
ID
Reserved
Data Size
Data
Data
0x057b50b7
0
32
L“get foldername 0”
Size(Byte)
4
4
4
16x2
92
Weiver 2.0 / Operations Manual
WEIVER 2.0 Manual
4.4 / Command List
Connect, disconnect command,
Example) 1. connect 50000,
2. disconnect
rescandisk command,
Example) 1. rescandisk
93
Weiver 2.0 / Operations Manual
WEIVER 2.0 Manual
set current_directory, get current_directory command
get file_count, get filename, get folder_count, get foldername command
openfile, get openfile command
Example) 1. set current_directory f:\
2. get current_directory
3. get file_count
4. get filename 0
5. get filename 1
6. get folder_count
7. get foldername 0
8. get foldername 1
9. openfile testrecordtest.wpj
10. get openfile
94
Weiver 2.0 / Operations Manual
WEIVER 2.0 Manual
play start, play stop, play pause, play resume, get play_status command
Example) 1. play start
2. get play_status
3. play pause
4. play resume
5. play stop
95
Weiver 2.0 / Operations Manual
WEIVER 2.0 Manual
set freq, get freq command
Example) 1. set freq 400000000 (400MHz setting)
2. get freq
3. set freq 400 MHz (400MHz setting)
4. set freq 400000 KHz (400MHz setting)
5. set freq 400000000 Hz (400MHz setting)
96
Weiver 2.0 / Operations Manual
WEIVER 2.0 Manual
get gain_min, get gain_max, get rf_out_level 0, get gain, set gain command
Example) 1. get gain_min
2. get gain_max
3. get rf_out_level 0
4. set gain 100
5. get rf_out_level 0
6. get gain
97
Weiver 2.0 / Operations Manual
WEIVER 2.0 Manual
get play_time_total, get play_time_current, set play_time_current, get play_section, set play_section command
Example) 1. get play_time_total
2. get play_time_current
3. set play_time_current 5
4. set play_section 6 10
5. get play_section
set spec_inv off/on, get spec_inv command
Example) 1. set spec_inv off
2. set spec_inv on
98
Weiver 2.0 / Operations Manual
WEIVER 2.0 Manual
set sample_rate, get sample_rate command
Example) 1. set sample_rate 12000000, set sample_rate 12 mhz, set sample_rate 12000 khz
2. get sample_rate
set trigger_out_level, get trigger_out_level command
Example) 1. set trigger_out_level low
2. set trigger_out_level high
99
Weiver 2.0 / Operations Manual
WEIVER 2.0 Manual
set extclk, get extclk command
Example) 1. set extclk off
2. set extclk on
3. get extclk
set trigger_in, get trigger_in command
Example) 1. set trigger_in off
2. set trigger_in on
3. get trigger_in
100
Weiver 2.0 / Operations Manual
WEIVER 2.0 Manual
1.5 / WeiverPlayerRemoteAPI source
CWinApp theApp;
using namespace std;
const unsigned short u2_WeiverPlayerPort = WEIVER_PLAYER_API_RX_PORT;
const unsigned short u2_RecvPortFromWeiverPlayer = 50000;
const char s1a_WeiverPlayerIP[] = "192.168.100.1";
//const char s1a_WeiverPlayerIP[] = "127.0.0.1";
//const char s1a_WeiverPlayerIP[] = "192.168.10.15";
int _tmain(int argc, TCHAR* argv[], TCHAR* envp[])
{
int nRetCode = 0;
if (!AfxWinInit(::GetModuleHandle(NULL), NULL, ::GetCommandLine(), 0))
{
_tprintf(_T("AfxWinInit failed.\n"));
nRetCode = 1;
}
else
{
wchar_t wCmdLine[1000];
wchar_t wSendCmd[1000];
WSADATA wsaData;
WSAStartup(MAKEWORD(2,2), &wsaData);
while(nRetCode == 0)
{
memset(wCmdLine, 0, 1000);
memset(wSendCmd, 0, 1000);
wprintf(_T("\nCMD>"));
_getws_s(wCmdLine, 1000);
101
Weiver 2.0 / Operations Manual
WEIVER 2.0 Manual
if(wcsncmp(wCmdLine, _T("exit"), wcslen(_T("exit"))) == 0)
{
nRetCode = 1;
}
else
{
SendToStringCMD((char*)wCmdLine, 2*wcslen(wCmdLine));
}
wprintf(_T("\n"));
}
WSACleanup();
}
return nRetCode;
}
void SendToStringCMD(char *s1p_Data, unsigned int u4_Size)
{
SOCKET h_Socket;
SOCKADDR_IN Addr;
int SentBytes;
WvPlayerRemotePacket_t t_Packet;
WvPlayerRemotePacket_tp tp_Packet;
char *pSendData = (char *)&t_Packet;
char message[2000];
memset(message, 0, 2000);
int clntAddrSize = sizeof(Addr);
102
Weiver 2.0 / Operations Manual
WEIVER 2.0 Manual
h_Socket = socket(PF_INET, SOCK_DGRAM, IPPROTO_UDP);
memset(&Addr, 0, sizeof(Addr));
Addr.sin_family = AF_INET;
Addr.sin_port = htons(u2_RecvPortFromWeiverPlayer);
Addr.sin_addr.s_addr = htonl(INADDR_ANY);
struct timeval timeout;
timeout.tv_sec = 2;//2 seconds
timeout.tv_usec = 0;
int optlen = sizeof(timeout);
setsockopt(h_Socket, SOL_SOCKET, SO_RCVTIMEO, (const char *)&timeout, optlen);
if(bind(h_Socket, (SOCKADDR*)&Addr, sizeof(Addr)) == SOCKET_ERROR)
{
wprintf(_T("bind() Error"));
closesocket(h_Socket);
return;
}
t_Packet.u4_ID = WEIVER_PLAYER_ID;
t_Packet.u4_Reserved = WV_PLAYER_REMOTE_CMD_SET_STRING;
t_Packet.u4_DataSize = u4_Size;
memset(t_Packet.u1a_Data, 0, 1000);
memcpy(t_Packet.u1a_Data, s1p_Data, u4_Size);
memset(&Addr, 0, sizeof(Addr));
Addr.sin_family = AF_INET;
Addr.sin_port = htons(u2_WeiverPlayerPort);
Addr.sin_addr.s_addr = inet_addr(s1a_WeiverPlayerIP);
103
Weiver 2.0 / Operations Manual
WEIVER 2.0 Manual
SentBytes = sendto(h_Socket
,pSendData
,4/*sizeof(t_Packet.u4_ID)*/
+ 4/*sizeof(t_Packet.u4_Reserved)*/
+ 4/*sizeof(t_Packet.u4_DataSize)*/ + u4_Size
,0, (SOCKADDR*)&Addr, sizeof(SOCKADDR_IN));
if(SentBytes == SOCKET_ERROR)
{
wprintf(_T("\nSend Fail"));
}
else
{
memset(&Addr, 0, sizeof(Addr));
int length = recvfrom(h_Socket
, message, 2000, 0, (SOCKADDR*)&Addr, &clntAddrSize);
if(length == -1)
{
wprintf(_T("Time Out"));
}
else
{
tp_Packet = (WvPlayerRemotePacket_tp)(message);
wprintf(_T("%s"), tp_Packet->u1a_Data);
}
}
closesocket(h_Socket);
}
104
Weiver 2.0 / Operations Manual
WEIVER 2.0 Manual
Appendix. A
A-1. Recorded Output File [FileName.iqw, FileName.log]
FileName.iqw
FileName.wpj
Line 1: $Ver,1,IQ FileName,Cap_20110510_090927.iqw,IQ Rate,30000000,Center,474000000,Tracking, 1,AGC,0
Line 2: $GAIN,22.3,POWER,-42.1,,,TIME,1
Line 3: $GPRMC,214614.036,V,,,,,0.00,0.00,060180,,,N*43
Line 4: $GAIN,22.3,POWER,-42.1,,,TIME,2 Line 5: $GPRMC,214615.036,V,,,,,0.00,0.00,060180,,,N*42
Line 1: File Info.
Ver: 1
IQ FileName:Cap_20110510_090927.iqw
IQ Rate:30000000(30MHz : BW 24M)
Center:474000000(474MHz)
Tracking:1(0:Disable, 1:Enable)
AGC:0(0:Off, 1:On)
Line 2: Gain Info.
Ling 3: GPS Info.
Line 1: $Ver,1,IQ FileName,Cap_20110510_090924.iqw,IQ Rate,10000000,Center,474000000,Tracking,
1,AGC,0
Line 2: $GAIN,22.3,POWER,-52.2,,,TIME,1
Line 3: $GPRMC,214605.036,V,,,,,0.00,0.00,060180,,,N*43
Line 4: $GAIN,22.3,POWER,-52.2,,,TIME,2 Line 5: $GPRMC,214606.036,V,,,,,0.00,0.00,060180,,,N*40
…
Line 1: File Info. Ver: 1
IQ FileName: Cap_20110510_090924.iqw
IQ Rate:10000000(10MHz : BW 8M)
Center:474000000(474MHz)
Tracking:1(0:Disable, 1:Enable)
AGC:0(0:Off, 1:On)
Line 2: Gain Info.
Ling 3: GPS Info.
105
Weiver 2.0 / Operations Manual
WEIVER 2.0 Manual
A-2. Weiver MER Range Relation
RF IN Power : -60dBm
RF IN Power : -30dBm
106
Weiver 2.0 / Operations Manual
WEIVER 2.0 Manual
A-3. Simultaneous Capture and Playback
Real-time Capture & Playback
A-4. Arbitrary I/Q Rate Play
107
Weiver 2.0 / Operations Manual
WEIVER 2.0 Manual
A-5. Configurable Repeat Play
108
Weiver 2.0 / Operations Manual
WEIVER 2.0 Manual
Appendix. B Ghost 15.0 Restore
- Please insert the USB Recovery Disk into USB port of Weiver system. Before the Recovery process, Weiver
system must be set to use Boot from CD-ROM at BIOS configuration.
- When the License Agreement screen coming, Please click the Accept button.
109
Weiver 2.0 / Operations Manual
WEIVER 2.0 Manual
- Please click the Recover My Computer button on Home tap
- Please click the Next button.
110
Weiver 2.0 / Operations Manual
WEIVER 2.0 Manual
- Please click the OK button.
- Please click the Browse button.
111
Weiver 2.0 / Operations Manual
WEIVER 2.0 Manual
- Please select the Weiver_C.V2I file in CD (USB-CD) Drive.
- Please click the Next button.
112
Weiver 2.0 / Operations Manual
WEIVER 2.0 Manual
- Please click the Edit button.
- Please select target to C drive.
113
Weiver 2.0 / Operations Manual
WEIVER 2.0 Manual
- Please click the Next button.
- Please click the Finish button.
114
Weiver 2.0 / Operations Manual
WEIVER 2.0 Manual
- When you click the Yes button, recovery process will be start.
115
Weiver 2.0 / Operations Manual
WEIVER 2.0 Manual
- When recovery process finished, please click the Close button.
- Please click the Exit button.
116
Weiver 2.0 / Operations Manual
WEIVER 2.0 Manual
- Please click the Yes button. After this process, Weiver system must be reboot.
117
Weiver 2.0 / Operations Manual
WEIVER 2.0 Manual
Appendix. C
C-1. Weiver External SSD Connection Method
118
Weiver 2.0 / Operations Manual
WEIVER 2.0 Manual
C-2. Remote Desktop Connection method
Factory Default Value for Remote Desktop Connection
(ID : Weiver
Password : Lumantek)
* Case Sensitive
119
Weiver 2.0 / Operations Manual
WEIVER 2.0 Manual
C-3. Weiver EWF (Enhanced Write Filter) Control[Disable/Enable/State]
Please run ewf_off file on Weiver’s desktop for the EWF disablement.
* Note : Before the WeiverCom installation or upgrade, EWF must be a disable state. Also,
ewf_off
EWF Function must be Working on Weiver’s desktop screen
After the WeiverCom Installation or Upgrade, Please run ewf_on file on Weiver’s
desktop for the EWF enablement.
ewf_on
Please reboot the Weiver’s system for applying EWF enablement.
120
Weiver 2.0 / Operations Manual
WEIVER 2.0 Manual
Please run ewf_state file on Weiver’s desktop for the EWF state.
ewf_state
Weiver Spectrum, ResBW
121
Weiver 2.0 / Operations Manual
WEIVER 2.0 Manual
D. Troubleshooting Guide
D-1. Unable to Detect Weiver 2.0 Device
Update the CMOS through USB memory booting. Please follow next steps.
D-2. Unable to find contents of D: \ after completing the booting process
Please check the SSD drive. Visit http://www.samsung.com/sec/support/model/MZ-7PD128B/KR-downloads
and download Magician Software ver. 4.0.
Please run ‘SSD firmware checks’ (Backup required) or ‘Performance Optimization’ to optimize the SSD.
* Step by step Guide for Wiever 2.0 Mainboard Bios update
1. Making a Booting USB for DOS and Install Program
2. Insert a (blank) USB on PC and run installed the program.
122
Weiver 2.0 / Operations Manual
WEIVER 2.0 Manual
3. Tick. “make a booting Disk” ” input location of “System Files” .
Caution: this operation result in formatting the USB.
4. Copy W0065A10 folder on to the USB
123
Weiver 2.0 / Operations Manual
WEIVER 2.0 Manual
5. Booting USB is ready.
* USB booting for Weiver 2.0
1. Insert the booting USB and enter CMOS . Select booting configuration as USB.
2. Save configurations and boot Weiver 2.0
124
Weiver 2.0 / Operations Manual
WEIVER 2.0 Manual
3. After booting go to w0065a10 directory and Type “go.bat” and CMOS will be updated.
c:\cd w0065a10(enter)
c:\go(enter)
4. Done.
125
END
LUMANTEK Co., Ltd
A-11F, BYC Highcity-A, 131 Gasan Digital 1 Rd., Gasan-dong, Gumchon-Gu, Seoul, KOREA
T.Rep (+82) 2-6947-7400 | F (+82) 2-6947-7440
WWW.LUMANTEK.COM
Printed in KOREA
Lumantek Co., Ltd. CopyRight
© 2014