1
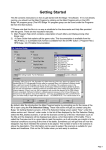
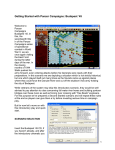
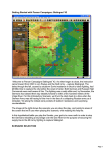
Getting Started
This file contains instructions on how to get started with the Bulge ’44 software. If it is not
already running, you should run the Main Program by clicking on the Main Program entry in the
JTS Bulge ’44 program group (The JTS Bulge ’44 program group can be found under the All
Programs list from the Start button).
*** Please note that this file is in no way a substitute for the documents and Help files provided
with the game. There are two important manuals;
1) Main Program Help which contains a description of each Menu and Dialog among other
things; and
2) A User Manual that explains all the game rules. This documentation is available from the
HELP Menu.
By default, after the introduction the Main Program begins by prompting you for the name of the
file to open using the File Selection Dialog. These instructions will get you started using the
Bulge ’44 Getting Started scenario. At the File Selection Dialog screen select “New” under the
status section and “Normal” under mode. In the list of files displayed by the File Selection
Dialog; select the #00_Started.scenario, it will be the Scenario at the top of the list. Information
such as the title and the designers will be displayed just above a short description of the battle.
This is called the Overview and it is a good idea to read this section, as it will provide you insight
in to the historical conditions occurring at the time of the battle. Sometimes you will get hints on
how the designers may have intended the scenario to be played. The number of turns in the
scenario is above the description. This information can be used to judge if the scenario is
suitable for your tastes and timeframe. Click on the OK button when you are ready to continue.
1
Next, the A/I Selection Dialog will appear. Since we are going
to play as the German forces you should select “Automatic
with FOW” in the Allied A/I on the left-hand side of the dialog.
This will cause the computer to play as the American Player.
If we want to give the computer an advantage we could move
the Advantage slider towards the Allied, but leave it in the
middle for now. This dialog screen can also be used to select
the Optional Rules by clicking the “Rules” button at the
bottom. Do so now to bring up the Optional Rules Dialog.
By default, several Optional Rules are
selected and you can experiment with
these later. However, we strongly
recommend that you use the
DEFAULT FIRE Rules – that is, not to
use the Alternative and Optional Fire
Rules as the results will be out of sync
with the Scenario victory results. Most
veteran players use Recon Spotting.
Once you check any box to select a
rule, that rule will remain in effect for
all games until you enter this dialog
again and unselect the rule. Also
note, the Explicit Supply rule is only of
use with certain scenarios. Click OK
to exit the Dialog when you are ready
and then OK on the A/I Selection Dialog.
The battlefield map will be drawn and the
Command Dialog will appear on the screen. This
dialog will appear at the beginning of each turn and
tell you important information that has happened.
As the game progresses, this Command Report
provides useful information. It is well worth your
time to look at it carefully at the start of each turn.
Click on the OK button to close this dialog so you
can examine the map and game interface. You can
change the map scale and play the game in any of
the four different Map Views by pressing the ZoomIn and Zoom-Out buttons: the “+” and “–“ buttons on the tool bar. You can also use the scroll
bars on the outside of the map to scroll the map view.
2
The battle begins with you in command of the 18th Volksgrenadier
Division to be specific. Your forces are on the East side of the
map. You must advance westward past the Schnee Eifel and
make contact with the Allied units. Your mission is to capture as
many objectives as possible while destroying the other sides units.
The German units are blue (with some SS units in Black) while the
Allied units are all green in this scenario. The weather at the start
of this battle was not good, so you can’t see exactly where the
opposition is just yet. In fact you can only see a couple of the
Allied units. The area depicted with a grey mask is unplayable
ground for this scenario.
You can view the map labels by pressing the Shift key. This will
show you the place names for the towns and other terrain
features. You will find the Allied positions extending from the
single hex where you see troops (the village of Roth), south into
the hex with two Allied units in the woods and then from there,
southwest toward the other Objective hex, the village of Bleialf. If
you click on the Map a red square will blink showing you the
current hex. The hex coordinates can be read in the lower right
corner of the screen. Roth for example is hex (19,5).
Continuing to look over the map we see green ovals with different values in them. These are
Objective Hexes and the number in them is the point value. You can see a number of
Objectives on the map, but the largest one is the 150 point objective - Schonberg. If you click on
that hex now, you can see the hex location of Schonberg is hex (9,7). While playing the
scenario, we will make reference to hex locations and you will need to understand this to follow
the Tutorial further. During the course of play we will move our units towards the various
Objective Hexes and attempt to cause damage to the opposition.
Before we go too far, let’s look over the Game Interface. Along the top of the screen you will see
menus, and a toolbar. All of the game functions, such as firing Artillery, changing a unit into
Travel mode from Deployed mode, or advancing to the next turn is done from here. A detailed
description of each menu item and button on the toolbar can be found in the Main Program
Help File. As with any standard Windows program, if your place your cursor over a button and
wait for a moment, a "Tool Tip" is revealed. You will find the Tool Tips handy to learn the
function of the buttons.
As you explore the Menus and Buttons, you will find many useful functions to
help you customize the game. For example, many veteran players enable
“Settings | Auto Scroll” to remove the Windows Scroll bars so as to freely
scroll around a large map using the mouse. With this setting, you only have
to move the mouse to the edge of the screen to scroll the map in that
direction.
3
Another useful feature is to activate the Divisional Markings from the toolbar.
This toggles the display of colored symbols on each counter to indicate the
Division or other higher-level organization the unit is associated with
Along the bottom of the screen you can see the Status Bar, which contains several pieces of
information including Date, Game Turn and Game Length. In the lower right you can see visual
display of the time of day where the black at either end depicts night and the yellow in the center
is daylight. Each turn in the game represents 2 hours during the day and 4 hours at night. As
time passes in each day the red current turn indicator moves from left to right. A full day in
Bulge ’44 lasts 9 turns, 6 in daylight and 3 at night.
The Status Bar is also used to display game messages, such as those you will see if you
attempt to perform a function that is not allowed. For example, in the game you are not
permitted to move a tank though a water hex. And if you try, nothing will be indicated on the
map. But if you look on the status bar, you will see a message “Unit is blocked by Terrain”.
Left click on the German unit in hex 20,15. On the left of the screen, in the
Unit Window, you will see the unit is the Pio. Btl. 1818. You can also tell at
a glance that the unit has a strength of 540 men. Units in the game are
measured in Men, Vehicles or Guns. This unit has taken no losses and is
at 100% strength. You can also see its Quality is C, where A is very good
Quality and E is quite poor. So, while this unit is in good shape strengthwise, it is not what you would call an elite formation. In fact this is the
quality of your entire formation at start. Combat, Fatigue and losses will
affect unit Morale and the quality will drop. In longer scenarios, when you
rest your units (no movement or fighting), the Fatigue will be reduced and the Morale will
improve. You can also see the unit is in a Forest Hex of 450m elevation. The current visibility is
2km (or 2 hexes)
If you place your cursor over the Unit Picture or Hex Area Info and right
mouse click, even more information about the unit is revealed. You will
see the formation hierarchy from the highest parent organization of the
unit at the bottom, the Army Group B, up to the description of the unit
itself, a Pioneer Battalion. In the same display to the right is a number of
game factors about the unit. You can also see in the Hex Area Info box
below the unit that there is a Primary Road passing through the hex. The
value in the center is the total strength stacked in this hex. Release the
right mouse button when you are finished examining the unit details.
We won’t discuss all the details of this information in this Getting Started
help file because it is covered thoroughly in the main program help. Understanding this
information will enhance your enjoyment as you learn and play the game so this brief
4
instructions are not intended as a substitution for reading the complete User Manual and Main
Program Help File.
Left click on your German tank unit (actually an Assault
Gun) in hex 23,18 and look at the Terrain box that appears
below the unit picture. You can get confirmation on the
type of terrain in the hex. In this case it is Clear. You can
also see that Clear provides 0% additional protection for
the defenders. Another important piece of information in this display is the Visibility, in this case
2 kilometers. Each hex in the game represents 1 kilometer, so in this scenario, at this time, you
can see enemy units within 2 hexes. Visibility will be only 1 hex at night and the daytime visibility
can even change increasing or decreasing from turn to turn with variations in the weather.
Next, click on the Infantry unit in hex (21,5). Press the Visible Hexes button to see what
hexes are visible and how far you can see from this position.
Most of the map will now be darkened and the lit up hexes will reveal
what places you can see. This is governed by the visibility in hexes as
well as the line-of-sight. Notice that the 50-point Objective Hex with the
US Armored Car unit is lit up so the unit is spotted. If you click on the
enemy unit you can see some information about it, however, as this
game is being played with Fog-of-War (FOW) ON, details such as exact
Strength and Morale are hidden. Press the Visible Hexes button a
second time to toggle this setting OFF and return the map to the normal
state.
There are many ways to proceed with your Mission. At this point, it is best to stop and consider
your overall plan in light of your situation. The Game is a little like Chess in that it is one thing to
know HOW to move the pieces (or Units in this case) but it is quite another thing to use them in
an integrated fashion to attain your goal. Here too, it is the side with the initiative that dictates
the course of the play. As such, a good player will keep his opponent off balance. The best way
to do this is to try and think ahead and to plan your move.
No plan is perfect, nor is it likely to be executed
exactly as it is envisioned. The essence of a good
sound battle plan is flexibility. Examine the Map for
a moment. To the East of the Schnee Eifel are
your forces, the 18th Volksgrenadier Division. The
Schnee Eifel is a forested hill with 100 meter relief
that dominates this sector of the front. There is
little passage through the center. The more
obvious routes to channel your advance are along
the major roads that follow the valleys toward the
towns with Objective Point markers. If you are not
sure of the locations just press the Shift key and
the map labels will be displayed. North is always
UP on a Panzer Campaign Map, but a compass
rose is also provided with the labels. When you
5
release the key the labels and compass will disappear. Note, the map image to the right shows
the Alternative Map Label style which you can turn on from the “Settings | Alt Label Style” menu.
Further to the Northwest you can see two more Objective Hexes, the larger value of which is the
main focus of your attack. We can also safely assume that there are more Allied units present
but not visible to us, yet! Before we can get that far we need to concentrate on getting to the
other side of the Schnee Eifel.
Now let’s begin to move starting with the unit in hex (21,5). Looking at the Unit Window, we can
see that the unit in this hex is a 642 Men strength foot unit and we will be moving the unit
forward, up and left to hex (20,4) adjacent to the village of Roth (the occupied 25-point Objective
Hex). Most actions in the game, whether movement or combat require that units be selected.
Clicking on the map with the left mouse button causes that hex to become the current Hot Spot,
and the units are displayed in the Unit Window. Double-clicking on the map selects all units in
that hex. If there is more than one unit in the hex and you only wish to select one of them, left
click on the pictures in the Unit Window. Notice that by clicking on the unit picture, you can
Select (highlight) or Deselect (normal color) the unit.
To move, just select the 642 Man Infantry unit and right click on the hex you
desire to move to, the hex at 20,4. You now have a few options depending
upon what has happened. The enemy, a unit of unknown strength in Roth
may fire at your unit. If so, you may suffer some losses and even a bit of
Battle Fatigue. Battle Fatigue in Panzer Campaigns is very important and
while the bit of Fatigue you received in this first shot, may not be much,
eventually it may build up and make your unit combat ineffective.
You have a few options with regards to capturing this objective. As
you can see in the Unit Window, the unit you moved forward still
has 17 MPs or Movement Points. As the value of the MPs
remaining is shown in green, at least 2/3 of the movement
allocation remains. If the MP value is yellow, you know you have
between 1/3 and 2/3 of your movement remaining. Units with less
than 1/3 MPs have the value in red. This green value indicates that
there is enough MPs remaining that the unit could fire at the enemy
in the next hex – in fact, as this units expends 1/3 their MPs to fire, you could actually fire it
twice. This action might be a bit hasty however!
Instead of using direct fire (twice) from you unit, you may wish to consider an Assault. Assault is
a special type of combined movement combat which costs 2/3 of the movement allowance. If
successful, an assault may cause the enemy unit to vacate the hex. As your infantry unit has a
green MP value, then you can tell is has the 2/3 of its movement allowance available for an
assault. Before you attempt to Assault, try softening up the enemy position with artillery fire.
Press the Artillery Dialog button on the toolbar – the one to the left of the Airplane button to apply Indirect Fire.
6
This will reveal that you have three Artillery units
available. Double click any artillery unit in the dialog and
the map will scroll to that unit. You will see that valid
targets are highlighted with a red border. You can see
this effect by selecting the last unit in the dialog. All of
these Arty units could fire on the stack of two Allied Units
in hex 21,8, but the third Artillery unit in the list is out of
range of the unit in Roth.
If you double click on the top unit in the list, the hot spot
will scroll to this location. Then, if you select the artillery unit by clicking on it in the Unit Window
and then press the “W” Hotkey, it will show which units spot for that particular piece of Artillery.
This may not seem like much here, but in a larger scenario, it is very useful to see just who can
spot for which artillery unit.
You can fire your Artillery at this time by right clicking on a target hex. Right click now on the
Allied units in the Objective hex – the village of Roth. When you do, you will see a Fire Report.
You may kill; inflict Fatigue and/or Disrupt enemy units. You can normally fire twice with each
piece of Artillery and you will usually want to use up all your artillery before the end of your turn,
but for now, fire the top two units twice each at Roth. When a unit has fired as many times as it
can, it is removed from the list. Close the Artillery Dialog box when you are finished with this.
Firing other non-artillery combat units is done with the right click too, but before you fire or
move, the unit in question must be selected. As you have already seen by your first action –
moving your unit forward, the game is in Move mode by default. To fire you must first put the
game in Fire Mode. Most veterans of the series do this by remaining in Move Mode and
pressing the Control <Ctrl> Key. Notice when you press the Control <Ctrl> Key, the cursor
changes. When the Control <Ctrl> Key is down, the game is in Fire Mode and the cursor is a
Cross Hair with a circle, just like the cursor when you fired your artillery.
Try this now – press and hold the Control <Ctrl> Key and notice how the cursor changes. All
you would have to do in order to fire is select your unit in hex 20,4, hold the control key and right
click on the enemy in the adjacent hex to fire. BUT DON’T do that now – we want to save those
Movement points and assault the village.
The purpose of firing your two Artillery units was to
soften up and hopefully disrupt the Allied
defenders so that you can storm the village with
your infantry. Assaults are a special type of
combined movement and attack together. Select
your unit in 20,4, ensure you are NOT in Fire Mode
(IE – hand off the Control <Ctrl> Key) and attempt
to move into the objective hex. Two things will happen. An Assault Status box will appear saying
that the odds are not known due to Fog-of-War effects and an explosion graphic will appear in
the hex you clicked on. Press OK on the Assault Status box.
This action may prompt enemy fire – you just never know. In fact, it is possible that the enemy
action may even Disrupt your unit, in which case the unit couldn’t continue with the assault.
Normally you will be able to proceed. Now press the Resolve Assault button on the toolbar.
7
You may have now captured the first Objective Hex and gained 50 points in the process.
Alternatively, the Allied unit may have won this round and still hold the town. You never know. If
your artillery caused the defender to be Disrupted before you assaulted, your chances of
success were greatly improved.
Next, lets move the rest of your units forward. Click on the unit in 23,6. Press the
Reachable Hexes button again (remember, a Tooltip is revealed if you place your cursor
over a button and hold it there for a second).
With Reachable hexes ON, you will now see a very different picture of
where you can now move to in this turn. If nothing happens when you
pressed the button, you didn’t re-select your unit. You will see this Infantry
unit can move two hexes eastward to a position along the road at the
edge of the woods (hex 21,6).
With the reachable button still pressed, select the
infantry unit immediately below this one (the one
in hex 23,7) and notice the reachable hexes highlight only extends one
hex. Why the difference you might ask?
To see the answer, select the item under the VIEW Menu, called Map
Contours (the seventh item from the top of the list). Now you will see a
brown contour line on the map between hexes of different height. Turning the Contours ON,
especially when the ground conditions are snow, will help show you the lay of the land a little
easier. The second unit is actually going up hill and thus the movement costs a bit more.
Next lets examine a unit that moves a bit further than these foot Infantry units so that we can
illustrate a very important game principle.
Did you notice the white bar across the bottom of the German Anti-tank unit
in hex 23,13? This shows that the unit is in Travel Mode. In fact, this
particular unit, being a towed gun, can only move while in Travel Mode.
Other units, such as Infantry and tanks can move in both Travel Mode and
Deployed (non-Travel) Mode but can only take advantage of Road
movement and crossing bridges while in Travel Mode.
Road movement will be very critical here in this game, especially where the
terrain is restricted by forest. To illustrate this point, double click to select the
Armored unit in hex 25,10. Next, with this unit selected locate and press the Reachable Hexes
Button on the toolbar. The Map will darken and the hexes lit up will be those that this unit is
capable of reaching in this turn while it Deployed Mode. Also note, that the unit can cross the
stream even while it is in deployed mode, but it pays a penalty to do so.
Now, with the unit still selected, press the Change Travel Mode button. The white bar
indicating Travel Mode appears on the bottom of the icon, and you will see a great change
in the lit up hexes, as this unit is capable of moving much farther on the road using Travel
Mode. However, be careful – using Travel Mode has a detrimental effect on the defense
strength of the unit in combat. Consult the User Manual for more details.
8
Next, select the other armored unit in hex 23,18. This unit is also in Deployed mode and as such
its movement would be greatly restricted. However, the difference here, in comparison to the
armored unit in hex 25,10, is that the water barrier is a river (dark blue) vice a stream (light
blue). In order to cross a river you must be in travel mode and you must us a bridge of sufficient
size for the unit.
Bridge weight is a very important factor you must keep in mind, especially in larger scenarios.
Bridges in the game come in three weights: a) Heavy, b) Medium and c) Light, as seen by the
color of the bridge on the map as well as by right clicking on the Hex Area info.
All units can cross Heavy bridges, however this is the only type tanks
can cross. Medium bridges can handle motorized and lighter units
while the only units a light bridge is capable of supporting are foot
units. The image at the left shows an area on the east side of the
map, around Hex 39,15, where all three weight classes of bridges
can be seen. Bridge weight as you can see on your game map will be
a factor near the main objective at Schonberg.
Finally, there is a road limit in place as defined in the Parameter Data under the Help menu.
When two or more units enter a hex, if the total strength exceeds the road limit, then the road
movement rate will be lost due to the traffic congestion on the roads. The combined effect of
Road movement, Road Stacking limits and bridges of different weight will at times create
frustration due to traffic congestions which is a feature we have built into the game to simulate
this historical aspect of the battle.
At this point in your turn, move the remainder of your units forward. Don’t forget to move forward
the four Einheit Steilau units. These are SPECIAL Deception Units and new rules for their use
and effect are covered in the User Manual in the last section Additional Features.
When you have finished moving all your units, and firing your artillery, click on the on Next Turn
button. Good luck and once you get the hang of the game, move on to larger and more complex
scenarios or even the complete campaign scenario. Don’t forget to consult the User Manual.
You can access this while you play from the HELP | User Manual. Also note, that each Menu,
Dialog and hot key is described in the HELP | General Help.
We sure hope you enjoy this 5th installment of the Panzer Campaign Series and keep a lookout
for other exciting titles of this series that are already under development.
9