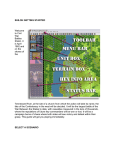
1
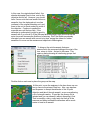
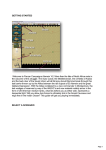
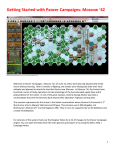
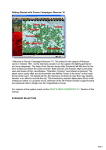
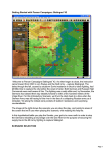
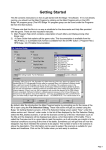
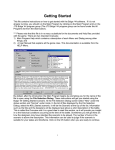
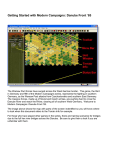
Getting Started with Panzer Campaigns: Sealion ‘40
Welcome to Panzer Campaigns Sealion '40. In this, the eighteenth title in the Panzer
Campaigns series of operational combat in World War II, the series takes a look at
the hypothetical Operation Sealion in 1940, the planned German invasion of the
British Isles. After the sudden, surprise fall of France in the late spring of 1940, the
Germans dominated the continent of Europe and was faced with just a single foe, the
British and their Commonwealth. To conquer their foe would require a daring sea and
airborne invasion of the British Isles before the British could bring allies to join them in
battle, and rearm their ground troops left with few heavy weapons after Dunkirk. This
getting started scenario represents one of the planned invasion areas using both air
and sea landings.
While veterans of the system may skip this introductory scenario, there are some new
rules to be aware of. The proposed Sealion operation, if it had been carried out, was
faced with unique obstacles compared to what the Allied invasion of France faced in
Normandy. Unlike the situation in Normandy, where the Allies dominated on the
ground, in the air, and at sea, the Germans in a theoretical Sealion would be faced
with the British Royal Navy with very limited opposition by the Kriegsmarine, and the
Luftwaffe had only a minor superiority in the air. Thus, there is a new rule that causes
amphibious landings to suffer extra attrition, due to the ability of the British naval
forces to intercept many of the German transports on their way across the Channel.
These losses, as reflected in the start of the Started scenario, vary but can be very
significant.
SCENARIO SELECTION
Insert the Sealion '40 CD, if you haven‟t
already, and after the introductory
cinematic you will be taken to the File
Selection Dialog. Click the scenario
#%00_Started.scn and then OK. The
Started scenario begins after the first
turn German reinforcements have been
brought on the map, but before any
further action occurs, so some units on
both sides have expended movement
points for the current turn already.
This takes you to the AI Selection Dialog where you
choose the side you wish to play. For the purposes of
this tutorial select Axis AI “Manual” for yourself and
“Automatic with FOW” (Fog of War) for the Allies. Click
OK to get the game underway, you are now the German
commander. The Rules button can be used to choose
optional rules, or reset the optional rule selections to the
default state, but for now leave the rules set to the
default set.
Your first Command Report will appear
with information relevant to the first turn.
Note its contents and click OK to close
it. Note that the units that already
landed this turn are considered isolated
in many cases, that there are air units
available, and some units will be
recovering from disruption already.
OBJECTIVE OF THE GAME
Click the Info Menu item and then select Victory
from this menu. This shows how many points the
first side must earn for each level of victory. As
you can see, to obtain a major victory in this battle
you must earn 150 Victory Points by the scenario‟s
end. Click OK to close the Victory Dialog.
Victory points are earned by a combination of
points for losses, for each side, and objective
points for the first side.
If you look at the map, you‟ll see some oval
shapes with numbers inside them. These are your
objectives. To win a major victory, you will need to
hold objectives and inflict enemy casualty points
equal to 150 points less your losses. As you incur
losses, points are taken away from your total.
Click Info and then
Objectives on the Menu
Bar to see a list of the
objectives in the scenario.
As you can see, there are
5 objectives worth a total
of 175 points to side one,
all currently controlled by
the Allied side. Click OK to close the Objectives Dialog.
TURN 1
In this scenario the Germans move first. Click on
the unit indicated by the red box. It is a German
engineer unit known as a pioneer company.
To check any units‟ statistics, chain of command,
and special unit abilities, right click the Hex Info
Area with the desired hex with the unit(s)
selected. Right click in the Hex Info Area now to
review the pioneer unit
stats. You will see the chain of command for the unit on
the left; on the right appear its various combat factors,
speed, and abilities, which include mine clearing, which
can also be used to remove obstacles. The pioneer is
currently located in a minefield,
set to “Clearing Mines”. As there
are more units arriving in the next turn, it is a good idea to
allow this Pioneer unit to continue removing mines to limit
casualties in the follow on forces, so don„t do anything with
this unit.
Now select the engineer unit located 3 hexes northwest along the diagonal from the
pioneer unit. Double click to select this unit on the map, so that the Unit Box lights
up. It is now “selected” and ready for orders. We want to
move it toward the coast to assist in taking the beach
objectives. The enemy units adjacent to the pioneer unit
are located in Bunkers, which are tough points to take
without strong units with high hard attack values, we will
aim to take the 25 point objective to the south first, as the
defender there is located in a Trench.
Let‟s move it one hex at a time. To do so, right click an
adjacent hex, the one directly south, or below, the
selected unit. If able to move, the unit will obey. Should a unit ever not follow the
order, look to the Status Bar to see a message telling you why the movement can‟t be
performed. Right click on the next hex to the southeast, below-right from the current
hex. This move may draw fire from the enemy units.
Try right clicking on the next hex southeast, between the enemy units. This final
movement will not be allowed – the Status Bar will state “Cannot move units from
enemy ZOC to enemy ZOC”.
The unit shows movement points of 8 left (unless it disrupted from enemy fire), and it
shows in yellow. This means the unit can still fire one time - white means the unit
hasn‟t expended any movement points and can normally fire 3 times, green means it
still has at least 2/3 of its movement and can thus fire twice for most units, and red
means it has expended more than 2/3 of its movement and can no longer fire.
Let‟s fire this unit at the enemy unit in the objective hex to its south. The unit should
still be selected, if not, select your unit exactly as you did for movement. Now with the
Control (<ctrl>) Button pressed, place the mouse over the adjacent enemy unit to the
south. A crosshairs will appear. Right click to Fire. The results of
your fire will be shown on screen – either there will be no effect,
or you‟ll cause a loss, or possibly disrupt the enemy (the results
will be yellow), or cause it to be broken (the results will be red).
Most direct fire occurs against adjacent hexes. The direct fire
could again draw enemy return fire, which will also be shown on
the screen, as shown here.
This unit can no longer move or fire, it has expended all of its movement points,
showing 0 movement points left.
(Tip: Enemy unit information, with fog of war active, will be hidden from you and
summarized as X = less than 10 men, XX= 10 to 99 men and XXX = 100 to 999 men.
With both direct and indirect fire, if more than one enemy unit exists in a hex, you are
given the option to select a target should your weapons be appropriate).
Now select another unit – the fallschirmjaeger unit
highlighted in red in this image.
Clicking the Reachable Hexes Button on
the Toolbar will highlight where a unit
may still potentially move in a turn. Turn
this on to show where the unit can reach.
Let‟s move it several hexes at once toward the objective to the southwest. To do so,
with the left mouse button down, drag it to the destination 3 hexes southwest, as
indicated by the arrow, then release the button. The system will determine the path it
follows, so it‟s wise to drag smallish distances to keep control, as with fog of war
(FOW) selected, movement cannot be undone.
Now try moving the nearby unit indicated here onto the
objective.
As you are playing with FOW, there could be, and is in this
case, an enemy unit defending the objective. This unit will
automatically stop when it tries to move into the hex occupied
by the enemy unit. In this case, unless the enemy unit, an armored car unit, fires and
disrupts your unit, you can try to fire. However, because the enemy unit is armored,
and the fallschirmjaeger unit doesn‟t have a ranged hard attack, your unit is unable to
fire upon the defender. It must call in air support, or assault next turn, to be able to
push the defender out of the objective hex.
You may be able to soften the enemy armored car unit with
airpower. The Command Report at the beginning of your turn
advised that you have Airpower available. Click on the objective hex
occupied by the enemy AC unit, now click the Call Air Mission
Button on the Toolbar.
A dialog will appear
showing any air units
available. You will see 2
air units available, both
Me110d equipped units
with 12 planes each. Click
one of the air unit lines in
the dialog and then OK.
An air mission will be
conducted against the
selected hex and its
combat results will be displayed on screen, or an air unit interception message will
appear. If the air unit gets through, all Anti-Aircraft fire against your air unit will occur
first, with the result of each AA fire displayed, then you will be shown the result of the
bombing. Results shown in yellow letters are disruptions of the target unit.
Let‟s give travel mode movement a try now. With the
undisrupted fallschirmjaeger unit in the red box selected,
and the reachable hexes ON, click the
Change Travel Mode button on the
Toolbar.
If the unit is on top of the stack you‟ll see a white line appear at the
bottom of the unit and a “T” next to its movement points in its Unit
Box. It is now in Travel Mode (T mode), which gives some units a
larger movement allowance, particularly when using roads. In this
case, the unit can move along the arrow shown above using the secondary road,
reaching the point just south of the objective. However, there is a “trade off”. Units in
travel mode are more vulnerable to enemy fire. There are times when you will need to
take risks and move in enemy territory this way, but there are other times when you
will need to use caution. This is something you will get the feel for with play
experience. In this case, time is short, the invasion is on, and there is no time to
waste. And we can only hope that the air attack called in previously made it through
and disrupted the defenders of the objective.
(Tip: Some units, such as Artillery and Anti-tank Guns, cannot move unless they are
in T mode, if you try and move such a unit the status bar will give you the reason, in
this case it will likely say “Unit must be in Travel Mode to move”)
There are more units that
have not yet moved. Move
them to match the positions
shown here. This should
isolate the enemy defenders
along the beach area,
dropping their morale in the
next turn and so making them
more vulnerable to disruption.
Go ahead and fire any
infantry units adjacent to the
Allied units that have enough
movement left, to soften them
up for the next turn. You will
find that you have no units
able to fire on the enemy units in the bunkers.
This is not without risks, as the defenders may return fire. This can weaken, or even
disrupt the German units, but with the advantage of strength, the odds are against the
defender here.
While you cannot predict what the enemy will do in their phase of the turn, your forces
have the initiative and must continue to advance if you are going to win. To achieve a
victory, the German forces must clear the beaches and move inland to link up with the
paratroops that landed in the enemy rear. Fire is used to weaken and disrupt the
defenders, while assaults are used to push them out of a hex.
The German forces are limited but follow on forces are on the
way. To view the reinforcement list, click on Units in the top
menu, then Scheduled.
This brings
up the
Scheduled
dialog, which
shows that
the Germans will get a number of
reinforcements. The dialog shows
the time they are scheduled, then
the chance of arrival which shows
as ?? due to FOW, the hex location
and the units. A double click on any line will move to the hex location and open a
window showing all units that make up that group of reinforcements. These units will
be critical to capturing the objectives within the 7 turn limit. Close this dialog by
clicking okay when you are done.
When you‟ve finished moving and firing all your units, click the Next Turn
Button on the Toolbar and click OK if prompted. The enemy will move
and fire its forces. Your units may fire automatically in reply using
Opportunity Fire. Some enemy movement may be spotted. You may use
the F7 and F8 keys to speed up the AI play, F6 to set to normal speed, and F5 to
slow it down if needed. Your next turn will be announced once the German
Command Report appears.
TURN 2
The Command Report
contains information, such
as the availability of air units,
HQs out of command,
artillery unavailable, and a
host of other details. Your
command report will vary
from this one, depending on
the specifics of your game.
There should be
reinforcements that arrive,
along with mines or
obstacles being cleared by
the engineer units unless they were disrupted by enemy fire. Click OK to remove the
dialog.
(Tip: You can recall the Last Command Report during your turn by selecting the item
under the Info menu, as long as you have not exited the game since starting the turn.)
(Tip: Clicking the Divisional Markings Button on the Toolbar will add
color to your forces based on the organizations to which they belong.)
At this point, you should
have 2 objectives ready to
be attacked, as shown here:
The western objective, with
just the remaining armored
cars, can be safely
assaulted by any
undisrupted infantry next to
it. If the assault doesn‟t work this turn, it should soon. Or you can call in an air strike
if desired, but there are better targets. The 25 point objective next to the beach
should have all available firepower thrown at it until the defender disrupts. Then you
can assault it. We will discuss assaults below. But first, let‟s soften up targets.
Now let‟s fire artillery. You should have one artillery unit in
the highlighted hex, ready to fire, unless it fired opportunity
fire in the enemy‟s turn. Artillery can fire at any unit within
its range, as long as an eligible spotter can see it. Select
the artillery unit in this hex as discussed earlier.
To check any unit‟s range,
right click its Unit Box, or
select the “H” hot key, with the unit selected, to
highlight all hexes in its range. In this case you will see
your artillery unit‟s range is 10 hexes. To fire artillery
do exactly as you did with direct fire, place your mouse
over an enemy unit, then right click the enemy‟s hex.
In this case fire at the enemy unit in the 25 point
objective 2 hexes to its north. You can fire twice at the hex or, if the defender is
already disrupted, try other targets nearby to see what you can do.
(Tip: Units normally have enough MPs to fire two or three times per turn. This artillery
unit can fire twice at the enemy in the target.)
Let‟s now order an assault on the British armored cars
defending the western objective, as shown here. To enter an
enemy occupied hex, you must assault it, using only
undisrupted units. Select the infantry unit highlighted here and
right click the enemy‟s hex. A dialog will appear announcing the
initiating of an assault. The initiation of an assault can trigger
defensive
fire.
To resolve your
assault, click the
Resolve Assault
Button on the
Toolbar.
Results will appear showing both sides‟ losses. If you‟ve won,
and any remaining enemy retreat, you will capture its hex. If
you win and the enemy does not, or is unable to, retreat, you
will capture some of its forces, but not enter its hex.
(Remember, do not worry if your outcome does not match the
one illustrated, as play will differ.)
In this case, the original attack failed - the
attacker disrupted from its loss, and so the
objective did not fall. However, you should
have 2 more units that can launch follow on
assaults, from the deployed unit one hex
northeast of the original attacking unit, and
there is the unit in travel mode just south of
the objective. Continue to assault the
armored cars until the hex falls. If the
defender is undisrupted it might be good to
assault with 2 or even all 3 of the German fallschirmjaeger units at the start as the
extra forces will increase the likelihood of winning. But if the British are already
disrupted you can assault with one unit at a time, saving the others for further
assaults or to move on the westernmost objective in Manningtree.
To bring on the reinforcements that were
announced in the command dialog at the start of the
turn, return to Units – Arrived in this case. This
opens a dialog showing all reinforcing groups that
arrived this turn.
Double click on each one to place the group on the map.
At this point, move the engineer in the hex shown up one
hex to remove the mines in that hex. Also, use airpower
and firepower to disrupt the defender of the 25 point
objective and take it through assault, as you are gathering
a lot of strength nearby. If need be, the enemy unit is
isolated and you can assault it without disrupting it first.
That is normally a risky, costly tactic but time is of the
essence and being isolated the defenders will be much
easier to beat in an assault.
FINISH THE GAME
You now know how to move your units, fire, and assault with your forces. After taking
the 25 point objectives already discussed, you should be ready to throw everything
you have at the 50 point objective near Harwich. There is also an objective to the
north that the fallschirmjaeger can push toward although they don‟t have any support
the defensive force is fairly weak also. With the victory conditions in mind, keep
maneuvering your forces in the manner you see fit. The end of the game will be
announced at the conclusion of the enemy‟s final turn, at which time, final Victory
Points will be shown. Be sure to create a plan and follow it, either the one outlined at
the end of turn 1, or one that you develop yourself.
(Tip: If you capture an objective hex you will earn its Victory Points, but objectives can
be recaptured an endless number of times in a game. Only the side owning it at a
scenario‟s end receives its points. To take an objective hex simply enter it. You do not
need to remain there but be sure to protect it from enemy units moving up to retake
it.)
To restart the scenario, click File,then Selection in the Menu Bar. A list of scenarios
will appear and you may select any by double clicking on its entry.
FURTHER INFORMATION
This Guide is designed to make you feel comfortable with what‟s going on in Panzer
Campaigns, but it is no substitute for reading the Game Help files. You can access
Help from the Game Help Menu. The Game rules are really in two parts:
Part 1 in the User Manual, which is the series rulebook. You can see this while
playing by pressing F2.
The Main Program Manual discusses the various elements of the interface in helpful
detail such as each Menu or Dialog. There is even a list of HOT KEYS Show in the
Other Features section of this manual. You can view this program guide while playing
by pressing F1
Pressing F4 invokes a feature called the Parameter Data Table. It provides a host of
information including movement costs, terrain benefits, and stacking limits amongst
other things.
Lastly, documentation for the game‟s editors may be found in help files accessed
from the Help Menu when you open each editor.