1
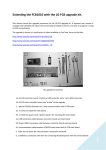
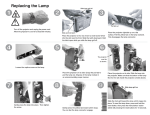
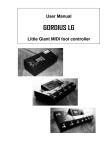
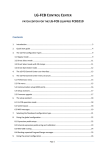
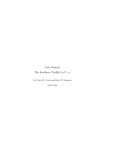
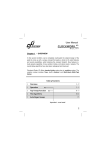
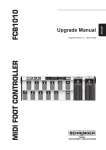
THE “UNO FOR KEMPER” FIRMWARE UPGRADE
Contents
Introduction............................................................................................................................................. 2
1.
Overview.......................................................................................................................................... 3
2.
Installing the UnO for KEMPER EPROM ........................................................................................... 3
3.
Configuring the floorboard.............................................................................................................. 4
3.1 Configuring upper/lower switch row ............................................................................................ 4
3.2 Configuring left/right expression pedal......................................................................................... 5
3.3 Configuring the expression pedal sweep curves ........................................................................... 6
3.4 Configuring the stomp switches .................................................................................................... 8
4.
Connecting the floorboard to the Kemper Profiler ....................................................................... 10
5.
Using the floorboard ..................................................................................................................... 11
5.1 Selecting rigs: browser mode vs. performance mode................................................................. 12
5.2 Activating stomps and effects ..................................................................................................... 13
5.3 Taptempo .................................................................................................................................... 13
5.4 Tuner ........................................................................................................................................... 13
5.5 Expression pedals ........................................................................................................................ 14
6.
Troubleshooting ............................................................................................................................ 15
6.1
Interconnections ................................................................................................................... 15
6.2
Factory reset .......................................................................................................................... 16
Page 1
Introduction
Congratulations with your excellent choice! Today the “UnO for KEMPER” firmware EPROM is by far
the most cost effective way to get hold of a dedicated foot controller for your Kemper Profiling Amp.
Indeed, this firmware EPROM, which was designed in full cooperation with the Kemper R&D team,
turns your Behringer FCB1010 floorboard into a dedicated controller for the Kemper Profiler. The
advantages of such dedicated controller, compared to the regular FCB1010, are:
-
No programming required! Power on and get started. It’s as simple as that.
-
Full 2-way communication with the Profiler. This allows you to have the current stomp states
synchronized on the floorboard at all time, even after activating stomps through the Profiler
front panel buttons. Thanks to this tight link between both devices, it is even possible to
show the Profiler tuner on the FCB1010 display!
-
Even without complex programming, the floorboard is still highly configurable. You can
choose which stomps or effects you want to directly control with a footswitch. You specify
this with just 2 foot clicks. In a similar easy way, you can specify if you want your 5 stomp
switches on the lower switch row or the upper switch row.
Disclaimer: The “UnO for KEMPER” firmware is developed from scratch by an independent
programmer, who is not affiliated nor associated with Behringer, the MUSIC group, or Kemper
GmbH. Behringer, Kemper, FCB1010, Kemper Profiler, may all be registered company names, brand
names or trademarks of each respective holders.
Page 2
1. Overview
Your UnO for KEMPER floorboard at a glance:
2. Installing the UnO for KEMPER EPROM
The UnO for KEMPER EPROM replaces the original firmware EPROM inside your FCB1010. In order to
do the upgrade, the unit needs to be opened, and firmware EPROMs need to be swapped, in an
identical way as a regular Behringer firmware upgrade would be done. Therefore, you can use the
Behringer upgrade instructions as a guide line. Those instructions can be found here:
http://ossandust.be/files/Upgrade_Manual_FCB1010_Rev_A.pdf
Page 3
3. Configuring the floorboard
3.1 Configuring upper/lower switch row
The UnO for KEMPER floorboard has 2 rows of 5 switches. One row is used for rig selection, the other
row for effect activation, and (optionally) for taptempo or tuner activation.
You can choose which of both switch rows will be used for rig selection. The default (and most
common) layout is having rig selection on switches 1 – 5, while activating stomps is done with
switches 6 – 10. However, some may prefer to have the stomp switches and “tap” switch close by, at
the front row.
You can toggle between both layout options by keeping footswitch 1 and 10 pressed during startup
of the FCB1010. Once toggled, the new setting is stored in non-volatile memory.
Page 4
3.2 Configuring left/right expression pedal
By default, the right side expression pedal can be used as a volume pedal (it sends ControlChange
number 7 for that) while the left side expression pedal can be used for Wah (it sends ControlChange
number 1).
Remark : the Wah pedal can also be configured to adjust other parameters besides wah, but that
configuration is done at the Kemper side, not at the floorboard side.
You can easily swap the placement of both expression pedals (volume left, wah right) by keeping
footswitch 1 and 9 pressed during startup of the FCB1010. Again, this change is stored in non-volatile
memory, so this configuration is memorized until you decide to swap the pedals again, using the
same key combination at startup.
Page 5
3.3 Configuring the expression pedal sweep curves
As mentioned in the previous chapter, the two built in expression pedals of the FCB1010 allow you to
adjust both volume and wah of your KPA. However, an “expression pedal”, a “volume pedal” and a
“wah pedal” are actually 3 different things. When you look at the real stuff (the standalone analog
pedals) you will notice that these 3 types of pedals internally use a different type of taper. A volume
pedal uses what’s called an “audio taper”, a potentiometer which gives an exponential response to
the pedal movement. This is important, because this compensates for the logarithmic response of
the human ear towards sound level changes. An expression pedal, which can be used to modify any
of the parameters of a sound module (like pitch shift for instance), typically has a linear taper. Wah
pedals in most cases use yet another taper type, which has a response somewhat between audio
taper and linear taper.
When using the FCB1010 expression pedals for volume or wah, the (more or less) linear behavior of
the sensor system is a drawback. In order to get a more suitable behavior, a number of “sweep
curves” have been programmed into the UnO4Kemper firmware, moving gradually from linear
behavior (curve 1) to “audio taper” behavior (curve 5). With an easy setup step, you can choose one
of those 5 available curves for each of the 2 expression pedals independently.
1
2
3
4
5
In order to find the optimal setting for both pedals, connect your FCB1010 with your KPA, and dial in
a few different tones in order to test volume and wah adjustment. Choose the two curves which give
you the best overall feeling. Be aware that this will always be a compromise – the FCB1010
expression pedals are not particularly sought-after for their optimal full-range behavior…
To enter curve setup mode, reboot your FCB1010 while keeping switches 1 and 4 pressed. The
leftside digit of the display shows the selected curve (1 to 5) for the leftside pedal. The rightside digit
shows the curve number for the rightside pedal. Press any footswitch of the lower switch row to
modify the sweep curve of the leftside pedal, or any footswitch of the upper switch row to modify
the sweep curve of the rightside pedal. The change is applied and saved immediately, so you can
check the influence on your tone adjustment right away. Be aware that in this setup mode, the
FCB1010 doesn’t send any MIDI commands. So you will need to browse through your rigs by using
the Profiler front panel buttons.
Once you have found the best compromise, you can switch off your FCB1010 (the last used curves
will be stored), or you can go to normal operation mode by keeping the “Down” switch pressed for 3
seconds.
Page 6
Expression curve setup mode
Page 7
3.4 Configuring the stomp switches
The 5 footswitches of the “stomp switch row” can be configured individually to control each of the
functions mentioned in the second column of table 1.
PROG. SWITCH
FUNCTION
1
Stomp A
2
Stomp B
3
Stomp C
4
Stomp D
5
Stomp X
6
Mod
7
Delay
8
Reverb
9
Rotary Slow/Fast
10
Tap tempo
Up or Down
Tuner
Table 1: configuration possibilities
The factory default is the following:
STOMP SWITCH FUNCTION
6
Stomp A
7
Stomp B
8
Stomp C
9
Stomp X
10
Tap tempo
Table 2: default FCB stomp switch configuration
Page 8
Configuring each switch is very easy:
1. Put the FCB1010 in stomp configuration mode. This is done by keeping switches 1 and 2
pressed during startup.
2. Keep the stomp switch pressed for 3 seconds. The switch LED starts blinking.
3. To assign a certain function to a switch, press the FCB1010 programming switch with
corresponding digit, mentioned in table 1.
4. Repeat steps 2 & 3 for each stomp switch you want to configure differently than the default
behavior (see table 2 for the default stomp assignments)
Once configured with this simple 2-click procedure, the configured switch function is stored in nonvolatile memory.
Example:
Enter stomp config mode :
Program stomp switch 9 to control Delay:
Remark 1: the KPA introduces a very intuitive way of activating its tuner: when you move the volume
pedal completely down, tuner will be activated automatically. As soon as you move the volume up
again, tuner will be deactivated. This way, a separate tuner switch is no longer required, unless you
still prefer the use of a footswitch.
Remark 2: by default, the “beat scanner” functionality of the KPA is activated while keeping the
tempo stomp switch pressed. This type of activation is conflicting with the easy-config mode for
stomp switches. In stomp config mode, keeping the tempo switch pressed will bring it in editing
mode after 3 seconds. Therefore, don’t forget to reboot your FCB1010 after configuring the stomp
switches. This will allow you to keep the tempo switch pressed for beat scanner activation, without
activating its editing mode.
Page 9
4. Connecting the floorboard to the Kemper Profiler
The UnO for KEMPER floorboard takes full advantage of two-way communication to keep its stomp
states synchronized with the Kemper Profiler, to display tuner info, etc. Therefore, two MIDI cables
are required to get things fully functional. Connect one MIDI cable from FCB MIDI OUT/THRU to
Kemper MIDI IN, and a second MIDI cable from Kemper MIDI OUT to FCB MIDI IN (do not use the
Kemper MIDI THRU connector). As long as both cables aren’t connected, communication with the
Kemper Profiler cannot be initiated and the FCB1010 display will show “---“.
Attention : make sure that your Kemper Profiler is configured to receive MIDI on MIDI Channel 1 or
preferably on all channels (= OMNI mode): click the System button, go to the MIDI settings page, and
set the MIDI Global Channel setting to “Omni”.
Remark : there is a possibility to use the UnO for KEMPER floorboard with only 1 MIDI cable running
from FCB1010 MIDI OUT to Kemper MIDI IN. However, in this mode you will lose some of the
essential advantages of this dedicated Kemper floorboard. Therefore you should consider this as just
an exceptional fallback scenario not to get completely blocked when a cable would turn out to be
defective at the start of a gig for instance. See chapter 6.1 for more info on this exception scenario.
Page 10
5. Using the floorboard
After making the necessary connections, start up the Kemper Profiler and the floorboard. The order
in which you do this is not important. If you turn on the floorboard while the Profiler is already up
and running, the Profiler display will notify you once it detects the connected floorboard:
Similarly, when you power off the floorboard or pull out the MIDI cable from floorboard to Kemper
Profiler this will be detected after a few seconds, and it will be notified on the Profiler screen:
Page 11
5.1 Selecting rigs: browser mode vs. performance mode
The UnO for KEMPER floorboard can be used in 2 modes: Browser mode and Performance mode.
When you switch between both modes on the Kemper Profiler using the big knob, the floorboard will
detect this, and adapt itself. The currently active mode is indicated with the 2 rectangular LEDs on
the FCB1010, marked “SWITCH 1” and “SWITCH 2”.
“SWITCH 1” LED ON = Browser mode
“SWITCH 2” LED ON = Performance mode
The floorboard works very similar in both modes:
- In browser mode, all available rigs (up to 125) are organized in 26 banks of 5 rigs. You can use the
Up and Down switches to browse through the banks, and click the switches 1 - 5 to select a rig
within the current bank.
- In performance mode, the rigs are organized in “performances” (or songs, if you like). Up to 125
performances are available. You can browse through them using the Up and Down switches. With
switches 1 – 5 you can select each of the 5 “slots” within the current performance.
The FCB1010 7-segment display always shows the current bank or performance index. When keeping
the Up or Down switch pressed for some time, the auto-scroll function will kick in. It allows you to
browse quickly through all banks or performances.
up to 125 performances are available
Remark: as mentioned in chapter 3.1, you can choose which switch row is used for rig selection.
Although we mention rig switches 1 – 5 above, this can as well be switches 6 – 10 instead, depending
on your personal configuration.
Page 12
5.2 Activating stomps and effects
Using the stomp switches is very straightforward: when clicking a switch, the corresponding stomp
(A,B,C,D,X,MOD) or effect (Reverb,Delay) will be activated or deactivated, or the rotary speed will
toggle between fast and slow.
Thanks to the two-way communication, the stomp switch LEDs will always indicate the correct stomp
state, even when using the Profiler front panel buttons: click the “A” button on the Profiler, and the
LED of the “stomp A” switch on the floorboard will toggle. Also after selecting a different rig, the
effect LEDs will immediately indicate the correct effect states, this is another very important
advantage of the two-way communication.
5.3 Taptempo
When you have configured one of the stomp switches as “taptempo” switch, tapping that switch will
modify the Profiler tempo. This tempo is displayed on the floorboard by blinking the 3 small dots of
the 7-segment display
.
5.4 Tuner
The Kemper Profiler tuner can be activated in several different ways: by turning the big knob on the
Profiler front panel, by moving the volume pedal to 0, or by using a dedicated Tuner switch on the
floorboard. As soon as the tuner is activated, the floorboard will show tuner info on its display. At the
left hand side of the 7-segment display, a pattern shows whether you are in tune or not:
too low
in tune
Page 13
too high
The rightmost 7-segment digit indicates the current note. Two surrounding dots indicate a “sharp”
note :
5.5 Expression pedals
The only configuration regarding the expression pedals is the possibility to decide which of both
pedals acts as the volume pedal. We covered this configuration in chapter 3.2
As mentioned in that chapter too, the Profiler allows further rig specific configuration of the wah
expression pedal. While the UnO for Kemper floorboard will always send MIDI message CC01 when
using the wah pedal, the Profiler can optionally use this message to control a different parameter in
specific rigs (whammy pitch for instance). Please refer to the Kemper user manual for more details.
Another cool feature of the Kemper Profiler is that its tuner is automatically activated when moving
the volume pedal to 0. As a result, a dedicated tuner switch is no longer necessary, unless you really
prefer the use of a switch instead of moving the volume pedal.
Be aware that the FCB1010 expression pedals require calibration prior to use. Especially this tuner
auto-activation will not work correctly if the range of your volume pedal doesn’t go all the way down
to 0. Since the UnO for Kemper firmware retained the original calibration procedure of the Behringer
FCB1010, you can simply follow the steps described on page 12 of the FCB1010 manual (*). Both the
full self-test procedure (1+3) and the dedicated calibration procedure (1+5) are available.
(*) http://www.behringer.com/assets/FCB1010_P0089_M_EN.pdf
Well, that’s it! Have fun with your UnO for Kemper floorboard and your Kemper Profiling Amp !!
Page 14
6. Troubleshooting
6.1 Interconnections
For correct operation, the FCB1010 needs to be connected with the Kemper Profiler using 2 MIDI
cables (see chapter 4). Only when both cables are connected, the communication will initiate,
and the FCB1010 display will change from “---“ to “01”. If this doesn’t happen, double check your
cables and make sure your FCB1010 doesn’t have a hardware failure in its MIDI circuit. You can
use the FCB1010 “self test” procedure for this:
Connect a MIDI cable between MIDI OUT and MIDI IN of the FCB1010. Then follow the steps
described on page 12 of the FCB1010 manual and verify that during step 3 the display shows
“A1”. If the display shows “F1” instead, your FCB1010 has an internal hardware problem causing
the 2-way MIDI communication to fail.
Temporary workaround:
If you have MIDI in one direction only (from FCB1010 to Profiler), due to a hardware
malfunctioning or because you only have 1 working MIDI cable available, you can still use the
FCB1010 for Kemper Profiler control. To do so, start up the FCB1010 while keeping following
switches pressed:
Page 15
Rig selection and stomp/effect activation will work as expected, but be aware that some of the
functionality will not be available, due to the lack of info coming back from Profiler to FCB1010:
-
Tuner display is not possible
-
Stomp states cannot be synchronized correctly when switching presets. A stomp LED will only
reflect the current state after using that stomp at least once after rig selection.
6.2 Factory reset
You can erase all personal configurations of the UnO for Kemper floorboard by doing a factory
reset. To do so, keep switches 1 and 6 pressed during FCB1010 startup.
This will result in following default configuration:
SWITCH
FUNCTION
1-5
Rig select
6
Stomp A
7
Stomp B
8
Stomp C
9
Stomp X
10
Tap tempo
Left expr.
Wah
Right expr. Volume
Page 16