1
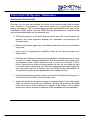
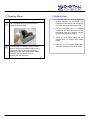
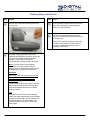
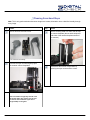
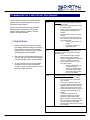
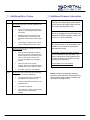
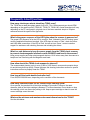
TellerScan 240 Countertop Check Scanner User Manual June 2010 Rev. 061110 1 TellerScan® 240 Operator Maintenance Cleaning the TellerScan® 240 Over time, ink, dirt and dust particles will collect on the scanner rollers and document track. Therefore, it is necessary to clean these areas on a regular basis to assure reliable performance. Tips for performing preventative maintenance by the user on the TellerScan® TS240 include (see the TS240 Routine Maintenance & Troubleshooting video at www.digitalcheck.com for additional info): 14 A Periodic inspection of the entire document track area. The use of flashlight will enhance the visual inspection between the scanheads and throughout the document track. Remove any staples, paper clips, and rubber bands that may have accumulated during use. Have a can of compressed air available to blow out the document track on a regular basis. Purchase the TellerScan® cleaning cards (available at digitalcheck.com) to have on hand for regular cleaning maintenance. Run several scan cycles, flipping the card between cycles, while holding the card to „scrub‟ the first drive or entry rollers. Once the entry rollers no longer deposit dirt onto the card, allow the card to scan through the entire path. Run this through several times while flipping the card end-to-end and top to bottom. (see the TS240 Routine Maintenance & Troubleshooting video at www.digitalcheck.com for additional info) Use the special cleaning swabs, which come with the TellerScan® cleaning kit, to „scrub‟ the four drive rollers under the center cover. Inspect the quality of the captured images on a regular basis. If the image quality drops off, inspect and clean the scanheads following the procedure described later in this manual. If the quality does not appear to be related to dirt or debris, contact your service provider to determine if the scanheads can be recalibrated. Cleaning your Scanner’s Rollers, Magnetic Head and Camera Faceplates In severe environments where ink and dirt build up rapidly, it may be necessary to clean the scanner rollers, magnetic read head, scan head faceplates, and document track every 3,000 to 5,000 documents. This simple maintenance will dramatically improve the reliability of your scanner over its useful life. Scanner Cleaning Supplies (to order visit www.digitalcheck.com or call 847.446.2285) 1. Compressed Air – (acquired from a local office supply provider) 2. Cleaning Cards – Consisting of one box of 25 cleaning cards – (#IS0028) 3. Cleaning Kit – Consisting of box of 25 cleaning cards & 6 cleaning swabs – (#130007-03) Cleaning The TellerScan® 240 using ScanLite Software The ScanLite program, which is available from the Digital Check web site, is an excellent utility to run while performing the cleaning procedures recommended below. ScanLite provides an easy way to initiate the scan cycles in order to feed the cleaning cards properly through the scanner. ScanLite also includes an „Eject‟ button that operates the scanner at half its normal speed, making it easy to scrub off the four main drive rollers when using the cleaning swabs. Visit the following site to download ScanLite: http://www.digitalcheck.com/integration_support/drivers_and_demo_programs 15 Cleaning Steps Step Action Use compressed air to clean the document track as illustrated below: Helpful Hints 1. Do not use stickers to cover up previously sprayed numbers on documents. The backing from the stickers can rub off onto the rollers and cause documents to jam. 2. Do not use White Out on scanned documents, the White Out can rub off the documents onto the scanner camera faceplate and distort the images. 3. Watch for loose debris falling into the scanner such as staples and rubber bands. You may need to remove the center or outer covers to check for other debris that may have entered the scanner. Using two hands pull straight up on the center and left side covers to remove. See the section below for removing the rear right cover. 16 4. Carefully, turn the scanner upside down and shake it to remove any loose debris. Cleaning Steps (continued) Step Action Insert a new TellerScan® cleaning card in the entry pocket. Step Action Flip the card top to bottom and scan the card again, this time letting it move through the scanner into the exit pocket. Turn the card around and repeat the same process of scanning the card several times on the reverse side. Result: The TellerScan cleaning card should have been run through the scanner three to four times, periodically flipping the card or swapping it end for end. Open the imaging application and initiate feeding while holding the card firmly to prevent the card from actually feeding through the scanner. You will want to cancel the transaction after running several scan cycles. Note: You may use the remote deposit application to run the scanner during the cleaning cycle, or the ScanLite demo program available from the Digital Check web site. Important: Run a scan cycle and hold onto the card, but allow it to move into the path so that the second set of rollers is scrubbing on the cleaning card. Flip the card over and run the same procedure again. This ensures that the main entry drive roller and the double feed rollers are being properly cleaned. Tip: Getting the rollers to scrub on the cleaning cards is the most important part of the cleaning procedure. Rollers with a severe buildup of ink and dirt will require use of the swabs to be used to manually scrub all four of the main drive rollers. 17 Cleaning Scan-Head Steps Note: This is only performed when document images are unclear, distorted or have a dark line laterally through every image. Step Action Remove the outer and center covers. Step Action Use the cleaning swab or a clean cloth to wipe the camera faceplate (the two white strips and both sides of the camera faceplate section of the scanner). The covers lift off vertically. Unscrew the nylon screw and gently open the scanner camera faceplates. Note: The swabs are typically used to clean off the four main drive rollers, but can also be used on the scanheads if you have a tough buildup on the glass. 18 Reassemble the scanner components by replacing the nylon screw and the covers. Common Error Codes From The Scanner There are three common error codes that can typically show up depending upon the type of documents being scanned. 216 Periodic and scheduled cleanings should be performed before determining if any further problem determination is needed. See the scanner cleaning document. Helpful Hints 1. Always hand-jog the documents to align the leading and bottom edges for the auto feed models. Visually check the leading edges for bent or curled or curled corners and straighten them as needed. 217 2. Place the stack of documents half way into the entry slot, then slide the stack forward until the LED light comes on/turns orange. 3. Be sure that the entry tray is fully seated and that the exit wire stop is extended enough to allow for approximately ½” more than the longest document. 220 Mis-Feed (The documents failed to leave the entry pocket on time). Remove the documents and re-align the leading edges. Check for bent or excessively curled leading edges and straighten as needed. Verify that documents are not stuck together Insert and rescan the documents. If they continue to get -216 errors, this might indicate that; o The entry drive rollers may be dirty o Something may also be lodged in the path Double Document Feed (More than one document is detected & passed into the exit pocket) Check the exit pocket for a double document feed. If the document is still in the path, grab the upper edges with both hands and wiggle the document back and forth, vertically to remove it. If they continue to get -217 errors, this might indicate: o The entry drive rollers may need to be cleaned o Check the condition of the documents for bent edges o Replace the inside double feed roller and retest. Document Stopped in the path (A document stopped in the path or was slow in exiting). 19 Eject the documents. To clear the error condition. If the document will not eject, grab the upper edges with both hands and wiggle the document back and forth, vertically to remove it from the path. Check the leading edges and corners of the document and straighten as needed. A -220 error code where the document is stopping in the path repeatedly could indicate debris, paper or a staple in the path. Check if the document‟s leading edge looks OK or is catching on something. All of the main drive rollers may need to be cleaned. Additional Error Codes Error 212 Action No Checks (There are no checks indicated in the entry pocket) 553 A scan cycle has been initiated, but the LED is not on indicating that documents are present. Restack the batch of documents and insert them back into the entry pocket. Slide them forward until the LED comes on. This typically can happen when a scan cycle is initiated and the LED is not on. No Print Head (The ink jet cartridge is not being sensed by the scanner) 125 There are other helpful documents available in PDF format on the Digital Check web site. Go to http://www.digitalcheck.com The ink jet cartridge used in the TS240 is the standard HP C6602A cartridge. Typical yield is from 5 to 7 million characters. The TS240 scanner is recommended to use a USB 2.0 port for optimum performance and application timing. When endorsing characters using the ink jet option, the print string is the first function sent down to the scanner at the start of a scan cycle. This error will come up immediately if no cartridge is present. For support, contact your dealer or Digital Check Corporation at 847-446-2285. The Service request form to send scanners into the plant for repair can be filled out on-line by going to the web site at: Open the center cover by lifting vertically. Remove and reseat the ink jet cartridge, being sure it snaps into place. www.digitalcheck.com/clientarea If that fails, try using a new cartridge. No Scanner (The scanner was not found during the application to scanner initialization) 20 Additional Scanner Information The right LED must be on and „Red‟ for the application to acquire the unit. Check the USB cable connections or try a different cable. Try a different USB port. Verify that the PC has the proper drivers and the scanner firmware file is installed. NOTE: Periodic and scheduled cleanings should be performed before determining if any further problem determination is needed. See the scanner cleaning section. Frequently Asked Questions How many checks per minute should my TS240 scan? The TS240 has a rated throughput speed of up to 50, 75 or 100 documents per minute DPM depending on the specific model (TS240-50, TS240-75, TS240-100). Actual throughput will vary depending on the PC configuration, physical size of the items scanned, simple or complex endorsement and the speed of the application. What is the proper sequence of the LED lights when the scanner is powered on? The proper LED sequence is for the LED to come on „Red‟, followed by the LED turning „green‟ once the application has been launched. If the LED does not come on „Red‟, check the power and USB cable connections. If the LED is „Red‟, but will not turn „Green‟, contact customer support for assistance with checking firmware and reloading the drivers. What is a safe distance to keep the power supply from the TS240 check scanner to prevent electromagnetic interference with the MICR read head in the scanner? Keep power supplies and other electromagnetic devices 12-18 inches away from the scanner to keep them from interfering with the Magnetic read head. How often should the TS240 check scanner be cleaned? The recommended cleaning cycle is every 3,000 to 5,000 items in severe environments where ink and dirt may build up quickly. Please reference the cleaning instructions section for specific instructions on how to properly clean the TS240. How long will the inside double feed roller last? From 200,000-300,000 items, depending on the condition of the documents. How many characters does the HP C6602A inkjet cartridge yield? Once opened, the practical life of the inkjet cartridge is six months. However, the rated character yield on the inkjet cartridge is between 5-7 million characters. Do not shake or drop the cartridge, which can cause the printing to fail. Keep a spare cartridge on hand in case the current cartridge cannot be used. What are the minimum and maximum document dimensions for the TS240? See the able below: 21