1
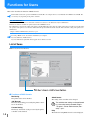
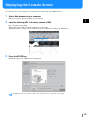
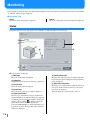
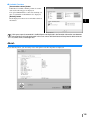
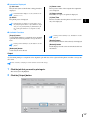
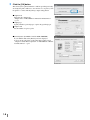
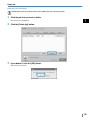
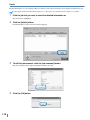
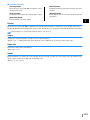
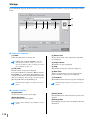
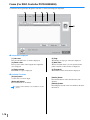
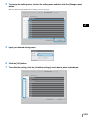
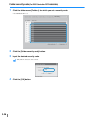
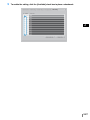
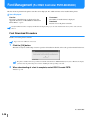
Notice about the law and the standard High Speed Colour Printer Model: HC5500T This product contains RFID (Radio Frequency Identification) system. Model: 444-59005 Contains FCC ID: RPARFMHL00 This device complies with Part 15 of the FCC Rules. Operation is subject to the following two conditions: (1) this device may not cause harmful interference, and (2) this device must accept any interference received, including interference that may cause undesired operation. The user is cautioned that unauthorised changes or modifications not approved could void the user’s authority to operate the equipment. This equipment has been tested and found to comply with the limits for a Class B digital device, pursuant to part 15 of the FCC Rules. These limits are designed to provide reasonable protection against harmful interference in a residential installation. This equipment generates, uses and can radiate radio frequency energy and, if not installed and used in accordance with the instructions, may cause harmful interference to radio communications. However, there is no guarantee that interference will not occur in a particular installation. If this equipment does cause harmful interference to radio or television reception, which can be determined by turning the equipment off and on, the user is encouraged to try to correct the interference by one or more of the following measures: • • • • Reorient or relocate the receiving antenna. Increase the separation between the equipment and receiver. Connect the equipment into an outlet on a circuit different from that to which the receiver is connected. Consult the dealer or an experienced radio / TV technician for help. Contains Canada IC: 4819A-RFMHL00 Operation is subject to the following two conditions: (1) this device may not cause interference, and (2) this device must accept any interference, including interference that may cause undesired operation of the device. This Class B digital apparatus complies with Canadian ICES-003. Cet appareil numérique de la classe B est conforme à la norme NMB-003 du Canada. Countries of intended use Austria/Belgium/Denmark/Finland/France/Germany/Greece/Iceland/Ireland/Italy/Luxembourg/Netherlands/Norway/Portugal/ Spain/Sweden/Switzerland/U.K. Copyright 2006 RISO KAGAKU CORPORATION i Preface Welcome to the world of this product! This machine is an ink jet printer for high-speed full-colour printing that supports network. This printer allows various functions such as data output and printer monitoring to be used from Windows and Macintosh computers. The following three manuals are provided for this machine. • HC5500 Series User's Manual for Printer Main Body • HC5500 Series User's Manual for Printer Driver • HC5500 Series User's Manual for Console (this manual) • RISO HC5500 Navigation Book Before using this machine or when something is not clear during use, read the relevant manual to make good use of this machine for a long period. About This User's Manual Riso shall not be responsible for any damage or expense that might result from the use of this manual. As we are constantly improving our products, the machine may differ in some respects from the illustrations used in this manual. Riso shall not be liable for any direct, incidental, or consequential damages of any nature, or losses or expenses resulting from the use of this product or included manuals. Trademark Acknowledgments Adobe®, Adobe Type Manager®, AdobePS®, ATM®, PostScript®, PostScript®3™, PostScript logo, and PageMaker® are trademarks or registered trademarks of Adobe Systems Incorporated. AppleTalk®, Macintosh® and Mac OS® are registered trademarks of Apple Computer, Inc. in the U.S.A. and other countries. Windows® is a registered trademark of Microsoft Corporation in the U.S.A. and other countries. ColorTune® is a trademark of Agfa-Gevaert N.V. registered at US Patent and Trademark Office and may be registered in other regions of jurisdiction. ComColor™, and FORCEJET™ are trademarks of RISO KAGAKU CORPORATION. is a registered trademark of RISO KAGAKU CORPORATION in Japan and other countries. All other product names and company names written in this manual are trademarks or registered trademarks of their respective companies. About the Manuals The following manuals are supplied with this machine. z HC5500 Series User's Manual for Printer Main Body This manual explains notes that should be known before starting operation of this machine, actual printing operation on the printer, and printer settings. This manual also explains the method of replacing consumables and troubleshooting. z HC5500 Series User's Manual for Printer Driver This manual explains the method of installing the printer and the installation procedure and the functions of the printer driver. z HC5500 Series User's Manual for Console Means this manual. This manual describes the "Monitoring" function that is used for checking the printer status through a network. z RISO HC5500 Navigation Book Explains useful functions and features in colour. ii Notation of Explanation of Operation The following symbols are used in this manual for description of functions, operation, and notes. indicates items that should be noted or that are prohibited. indicates description concerning particularly useful information or information that should be known. indicates a title and page that should be referred to for understanding sufficiently an item. For referring to another operation manual, the name of the manual is also written. and are cautions for safety. "Safety Precautions" are described in the User’s Manual for Printer Main Body. Be sure to read these items before using this machine. iii Contents Chapter1 Printer Monitoring . . . . . . . . . . . . . . . . . . . . . . 1-1 Describes "RISO Console" that allows the printer operation status to be checked through Web browser. Functions for Users . . . . . . . . . . . . . . . . . . . . . . . . . . . . . . . . . . . . . . . . . . . . . . . . . . . 1-2 List of Items . . . . . . . . . . . . . . . . . . . . . . . . . . . . . . . . . . . . . . . . . . . . . . . . . . . . . . . . . . . . . . . . . 1-2 Displaying the Console Screen . . . . . . . . . . . . . . . . . . . . . . . . . . . . . . . . . . . . . . . . . . 1-3 Monitoring . . . . . . . . . . . . . . . . . . . . . . . . . . . . . . . . . . . . . . . . . . . . . . . . . . . . . . . . . . 1-4 Status . . . . . . . . . . . . . . . . . . . . . . . . . . . . . . . . . . . . . . . . . . . . . . . . . . . . . . . . . . . . . . . . . . . . . . 1-4 About.. . . . . . . . . . . . . . . . . . . . . . . . . . . . . . . . . . . . . . . . . . . . . . . . . . . . . . . . . . . . . . . . . . . . . . 1-5 Job Manager . . . . . . . . . . . . . . . . . . . . . . . . . . . . . . . . . . . . . . . . . . . . . . . . . . . . . . . . 1-6 Job Status . . . . . . . . . . . . . . . . . . . . . . . . . . . . . . . . . . . . . . . . . . . . . . . . . . . . . . . . . . . . . . . . . . . 1-6 Archive (For RISO Controller PS7R-9000/5000) . . . . . . . . . . . . . . . . . . . . . . . . . . . . . . . . . . . . 1-12 Storage . . . . . . . . . . . . . . . . . . . . . . . . . . . . . . . . . . . . . . . . . . . . . . . . . . . . . . . . . . . . . . . . . . . . 1-14 Forms (For RISO Controller PS7R-9000/5000) . . . . . . . . . . . . . . . . . . . . . . . . . . . . . . . . . . . . . 1-16 Scan and storage . . . . . . . . . . . . . . . . . . . . . . . . . . . . . . . . . . . . . . . . . . . . . . . . . . . . . . . . . . . . 1-18 Custom Setting . . . . . . . . . . . . . . . . . . . . . . . . . . . . . . . . . . . . . . . . . . . . . . . . . . . . . 1-20 Account record . . . . . . . . . . . . . . . . . . . . . . . . . . . . . . . . . . . . . . . . . . . . . . . . . . . . . . . . . . . . . . 1-21 Head Maintenance . . . . . . . . . . . . . . . . . . . . . . . . . . . . . . . . . . . . . . . . . . . . . . . . . . . . . . . . . . . 1-26 Help . . . . . . . . . . . . . . . . . . . . . . . . . . . . . . . . . . . . . . . . . . . . . . . . . . . . . . . . . . . . . 1-27 Chapter2 Printer Administration (Console) . . . . . . . . . . 2-1 Describes the method of setting the printer controller. What is Administrator Setting? . . . . . . . . . . . . . . . . . . . . . . . . . . . . . . . . . . . . . . . . . . 2-2 Administrator . . . . . . . . . . . . . . . . . . . . . . . . . . . . . . . . . . . . . . . . . . . . . . . . . . . . . . . . . . . . . . . . 2-2 Log-in . . . . . . . . . . . . . . . . . . . . . . . . . . . . . . . . . . . . . . . . . . . . . . . . . . . . . . . . . . . . . . . . . . . . . . 2-2 List of Settings . . . . . . . . . . . . . . . . . . . . . . . . . . . . . . . . . . . . . . . . . . . . . . . . . . . . . . . . . . . . . . . 2-4 Controller Control . . . . . . . . . . . . . . . . . . . . . . . . . . . . . . . . . . . . . . . . . . . . . . . . . . . . 2-5 Restart . . . . . . . . . . . . . . . . . . . . . . . . . . . . . . . . . . . . . . . . . . . . . . . . . . . . . . . . . . . . . . . . . . . . . 2-6 Sample Page Print . . . . . . . . . . . . . . . . . . . . . . . . . . . . . . . . . . . . . . . . . . . . . . . . . . . . . . . . . . . . 2-6 Version . . . . . . . . . . . . . . . . . . . . . . . . . . . . . . . . . . . . . . . . . . . . . . . . . . . . . . . . . . . . . . . . . . . . . 2-7 Controller Setting . . . . . . . . . . . . . . . . . . . . . . . . . . . . . . . . . . . . . . . . . . . . . . . . . . . . 2-8 Network . . . . . . . . . . . . . . . . . . . . . . . . . . . . . . . . . . . . . . . . . . . . . . . . . . . . . . . . . . . . . . . . . . . . 2-9 Date/Time . . . . . . . . . . . . . . . . . . . . . . . . . . . . . . . . . . . . . . . . . . . . . . . . . . . . . . . . . . . . . . . . . . 2-11 Change Password . . . . . . . . . . . . . . . . . . . . . . . . . . . . . . . . . . . . . . . . . . . . . . . . . . . . . . . . . . . 2-11 Security Setting . . . . . . . . . . . . . . . . . . . . . . . . . . . . . . . . . . . . . . . . . . . . . . . . . . . . . . . . . . . . . 2-12 Account Record . . . . . . . . . . . . . . . . . . . . . . . . . . . . . . . . . . . . . . . . . . . . . . . . . . . . . . . . . . . . . 2-14 Clustering (For RISO Controller PS7R-9000/5000) . . . . . . . . . . . . . . . . . . . . . . . . . . . . . . . . . . 2-16 Security print . . . . . . . . . . . . . . . . . . . . . . . . . . . . . . . . . . . . . . . . . . . . . . . . . . . . . . . . . . . . . . . . 2-17 Controller Setting 2 . . . . . . . . . . . . . . . . . . . . . . . . . . . . . . . . . . . . . . . . . . . . . . . . . . 2-18 Initial setting . . . . . . . . . . . . . . . . . . . . . . . . . . . . . . . . . . . . . . . . . . . . . . . . . . . . . . . . . . . . . . . . 2-18 Custom Size Entry (For RISO Controller PS7R-9000/5000) . . . . . . . . . . . . . . . . . . . . . . . . . . . 2-19 Direct Output Setting (For RISO Controller PS7R-9000/5000) . . . . . . . . . . . . . . . . . 2-22 Folder setting . . . . . . . . . . . . . . . . . . . . . . . . . . . . . . . . . . . . . . . . . . . . . . . . . . . . . . 2-24 Folder security code (For RISO Controller PS7R-9000/5000) . . . . . . . . . . . . . . . . . . . . . . . . . . 2-26 Font Management (For RISO Controller PS7R-9000/5000) . . . . . . . . . . . . . . . . . . . 2-28 Font Download Procedure . . . . . . . . . . . . . . . . . . . . . . . . . . . . . . . . . . . . . . . . . . . . . . . . . . . . . 2-28 iv Chapter1 Printer Monitoring You can check printer status by using the Web browser of your computer to access the printer check screen. This check screen is called "RISO Console." RISO Controller HC3R-5000 users must use RISO Console HC3R, and RISO Controller PS7R-9000/ 5000 users must use RISO Console PS7R. 1-1 Functions for Users This section describes the functions of RISO Console. This manual describes the operation for RISO Console HC3R as an example and uses screen illustrations for RISO Console PS7R. The screens may vary depending on the printer controller. User and Administrator The functions of RISO Console are divided into "Functions for all users" and "Functions only for administrator." Functions for all users are limited to printer status check with RISO Console. The administrator can change the setting of the printer controller built in the printer. Since the setting of the printer controller can seriously affect the operation of the printer, a user who has sufficient knowledge about this unit and the network, must control the setting of the printer as an administrator. "Chapter 2 Printer Administration (Console)")p.2-1 For using a RISO console, Java must be installed in your computer. If you use Windows, install Sun Java. If you use Macintosh, update Mac OS to upgrade Java to the latest version. List of Items RISO Console has five functions. ~ Functions of RISO Console Monitoring The printer status can be checked. Job Manager The status of jobs being processed by the printer controller can be checked. Custom Setting The history and details of jobs processed by the printer controller can be checked. 1-2 Administrator The setting of the controller can be changed. The administrator setting can be performed by a user who enters password to log in. "Chapter 2 Printer Administration (Console)")p.2-1 Help The method of using RISO Console can be displayed. Displaying the Console Screen Use a Web browser of your computer to access the printer controller and operate RISO Console. 1 Start a Web browser of your computer. Refer to the operation manual or “Help” of your computer. 2 Input the following URL in the entry column of URL. http: IP address of the printer. The IP address of this unit is set by the administrator of the printer. Input the IP address (example: 172.16.58.76) that you have confirmed by consulting the administrator. 3 Press the ENTER key. The [Monitoring] screen of RISO Console is displayed. To display the Console screen more easily, it is recommended to create a short cut on the desktop. 1-3 Monitoring If you click [Monitoring], the status of the printer will be displayed. You can also check to see if the printer is ready or if consumables are sufficient, without going to the printer. ~ Selectable Tabs Status The current status of the printer is displayed. About.. The status of the printer controller and printer is displayed. Status The current operation status of the printer and consumables are indicated with icons and messages. ~ Information Displayed (1) Message The status of the printer is displayed. (2) Comment Supplementary information for a message is displayed. (3) Printer Icon The status of the printer is displayed. (4) Power Icon The status of the printer power supply is displayed. (5) Paper Information The size, type, and orientation of paper loaded in the Standard Feed Tray and other Feed Trays are displayed. If [Auto tray selection] is selected at [Paper feed tray] in printing, a green symbol ( ) is displayed on the left side of the tray that is automatically selected. If an optional HC Finisher is connected, information on paper that is loaded in the Cover Sheet Tray of the Finisher is also displayed. 1-4 (6) Printer Information The paper size in the selected tray is displayed. If [Auto tray selection] is selected at [Paper feed tray] in printing, [Auto] is displayed. (7) Controller Information The disk space available in the hard disk, the data reception status, and the current job name (if a job is being processed) are displayed. The used disk space is indicated with a red icon. ~ Available Functions [Consumables volume] button If this button is clicked, remaining volume of consumables such as ink and paper are displayed. If an optional HC Finisher is connected, remaining volume of consumables of the Finisher is also displayed. [Refresh] button Details displayed on the screen are refreshed to the latest information. If disk space capasity exceeds 94, the Disk Space Icon displayed in the Controller Information area becomes red and printing cannot be performed. In this case, contact the administrator of the printer to delete unnecessary fonts, forms, and storage data. About.. If you click the [About..] tab, the setting status of the printer controller and printer are displayed. 1-5 Job Manager If you click [Job Manager], the status of jobs processed by the printer is displayed. To display jobs, you must set [Finished job storage] at [Security setting] to [Keep] in the Administrator setting. "Security setting")p.2-12 ~ Selectable Tabs Job status The Job name, Status, Owner name, Output volume, and Date/Time of currently processed job are displayed. Archive (For RISO Controller PS7R-9000/5000) Registered archive data (output data processed with RIP) can be checked and output. Storage Registered jobs can be checked and output. Forms (For RISO Controller PS7R-9000/5000) Registered jobs can be checked and output. Job Status The information on the currently processed job and the current status are displayed. 1-6 ~ Information Displayed (1) Job name The job name (name of the file that is being printed) is displayed. If Job information display is set, the job name is displayed as "****." (2) Status The printing status is displayed. (3) Owner name The log-in user name of the computer that outputs the job is displayed. (4) Output volume The number of copies to be printed is displayed. (5) Date Time The date and time when the printer controller receives the job are displayed. If "Requesting" is displayed, security print is set for the job by the printer driver or [Save all Direct output data.] is set at [Security Print] of [Administrator]. If the security print function is set, input the security code. ~ Available Functions [Output] button A job in which printing was completed can be outputted again. The data can be registered as storage data and a form. If Job operation authority is set, this button is not displayed. [Delete job] button A selected job can be deleted. If Job operation authority is set, this button is not displayed. [Details] button The detailed information of the selected job is displayed. [Refresh] button Details displayed on the screen are refreshed to the latest information. Output A job in which printing was completed can be outputted again. The data can be registered in the printer controller as storage data and a form. Data created by overlaying on a form cannot be stored in the storage. 1 Click the job that you want to print again. The selected job is highlighted. 2 Click the [Output] button. 1-7 3 Click the [OK] button. The selected job is printed under the conditions specified previously. To change the print conditions, to store the data or to register a job in the printer as a form, click the [Change output setting] button. z Output mode Select the data output mode. "Output mode" of "HC5500 User’s Manual for Printer Driver” )p.2-9 z Output page Specify whether to print all pages or print only specified pages. z Output count Set the number of copies to print. z [Details] button (For RISO Controller PS7R-9000/5000) If you click this button, the [Details] screen is displayed. You can set the same items on the printer driver setting screen. "Chapter 2 Printer Driver Operation" of "HC5500 User’s Manual for Printer Driver” )p.2-1 1-8 Delete job Unnecessary jobs can be deleted. 1 Deleted jobs cannot be restored. Make sure to delete jobs after checking carefully. Click the job that you want to delete. The selected job is highlighted. 2 Click the [Delete job] button. 3 If you delete it, click the [OK] button. The selected job is deleted. 1-9 Details Detailed information on a job is displayed. The job comment can be edited, and settings can be displayed and printed in a list. For list display on Macintosh OS X, Internet Explorer 5.2 or later must be used. (On Mac OS 9, list display is not available.) 1 Click the job that you want to check the detailed information on. The selected job is highlighted. 2 Click the [Details] button. Detailed information on the selected job will be displayed. 3 To edit the job comment, click the [Job comment] button. The [Job comment] screen is displayed. Edit the comment as needed. 4 1-10 Click the [OK] button 5 If RISO Controller PS7R-9000/5000 is connected, you can print the settings in a list by clicking the [Print] button. A web browser starts and a list is displayed. Perform print operation on the web browser. 6 When printing is complete, click the [Close] button. 7 After checking the details, click the [Close] button. 1-11 Archive (For RISO Controller PS7R-9000/5000) All jobs stored in the printer controller as archive data are displayed if you click the [Archive] tab. Archive data is output data processed with RIP. ~ Information Displayed (1) Job name The name of a job (file name of data stored as archive data) is displayed. If an optional finisher is connected, ">>_" indicated at the beginning of a job name means that the job was transmitted with the setting [Prt cover separately - Save except cover in archive] in [Details] of [Booklet] on the [Finisher] tab. (2) Owner name The log-in user name of the computer that outputs the job is displayed. (3) Output volume The number of copies is displayed. (4) Page The number of total pages of the job is displayed. (5) Date/Time The data and time at which the data was stored in the printer controller as archive data is displayed. (6) Thumbnail The thumbnail of selected archive data is displayed. 1-12 ~ Available Functions [Preview] button The result of processing with RIP of output data can be checked on the screen. [Output] button A job that has been registered as archive data is output. [Delete job] button Selected archive data can be deleted. [Details] button Detailed information on the selected archive data can be checked. [Refresh] button Details displayed on the screen are refreshed to the latest information. Preview The result of processing with RIP of output data stored in the printer controller as archive data can be checked on the screen. Clicking the [Preview] button displays the specify screen. Specify the page to be displayed and click the [Print Preview] button. If Internet Explorer is used under Mac OS X, this function cannot be used. Output Archive data stored in the printer controller can be recalled and printed. "Output" )p.1-7 (Although the name of the displayed screen is different, the operation procedure is the same.) Delete Job Unnecessary archive data can be deleted. "Delete Job" )p.1-9 Details Detailed information on archive data can be checked. Also the job name of archive data can be changed, the job comment can be edited, and the settings can be displayed and printed in a list. "Details" )p.1-15 )p.1-17 1-13 Storage If you click the [Storage] tab, all the jobs that have been registered in the printer controller as storage data will be displayed in the folder. ~ Information Displayed (1) Folder Select the folder that stores storage data. If RISO Controller PS7R-9000/5000 is connected, when a folder for which a security code is set is selected, the [Folder security code input] screen is displayed. Input the security code. (2) Job name The file name of storage data is displayed. If an optional finisher is connected to RISO Controller HC3R-5000, ">>_" indicated at the beginning of a job name means that the job was transmitted with the setting [Prt cover separately - Save except cover in storage] in [Details] of [Booklet] on the [Finisher] tab. If Job information display is set, this item is not displayed. ~ Available Functions [Output] button A job stored as storage data can be output. [Delete job] button Selected storage data can be deleted. If Job operation authority is set, this button is not displayed. 1-14 (3) Owner name The log-in user name of the computer that outputs the job is displayed. (4) Output volume The number of copies is displayed. (5) Page The number of total pages of the job is displayed. (6) Date Time The date and time where a job was registered in the printer controller as storage data are displayed. (7) Thumbnail The thumbnail of the selected storage data is displayed. If Job information display is set, this item is not displayed. [Details] button Detailed information on the selected storage data can be checked. [Refresh] button Details displayed on the screen are refreshed to the latest information. Output A storage data in the printer controller can be outputted. The job can also be registered in the printer controller as a form. "Ooutput")p.1-7 (Although the name of the displayed screen is different, the operation procedure is the same.) Delete job Unnecessary storage data can be deleted. "Delete job" )p.1-9 Details Detailed information on a storage data can be displayed. Also the job name of storage data can be changed, the job comment can be edited, and the settings can be displayed and printed in a list. If Job information display is set, the name cannot be changed. 1 Click the [Rename] button. 2 Input any job name. 3 Click the [OK] button. 4 Click the [OK] button. 1-15 Forms (For RISO Controller PS7R-9000/5000) A job that has been registered in the printer controller as a form can be displayed and printed. ~ Information Displayed (1) Job name The job name (file name of a form) is displayed. (2) Owner name The log-in user name of the computer that outputs the job is displayed. (5) Date Time The date and time where a job was registered in the printer controller as the form data are displayed. (3) Output volume The number of copies is displayed. (6) Thumbnail The thumbnail of the selected form is displayed. ~ Available Functions [Output] button A job stored as a form is output. [Delete job] button The selected form can be deleted. If Job operation authority is set, this button is not displayed. 1-16 (4) Page The number of total pages of the job is displayed. [Details] button Detailed information on the selected form can be checked. [Refresh] button Details displayed on the screen are refreshed to the latest information. Output A job that has been registered as a form can be printed. A job can also be registered in the printer controller as a storage job. "Output")p.1-7 (Although the name of the displayed screen is different, the operation procedure is the same.) To overlay a form on other data for printing, operate from the printer driver. "How to Print a Form" of "HC5500 User's Manual for Printer Driver" )p.3-33 Delete job Unnecessary form data can be deleted. "Delete job" )p.1-9 Details Detailed information on a form data can be displayed. Also the job name of storage data can be changed, the job comment can be edited, and the settings can be displayed and printed in a list. "Details" )p.1-15 1-17 Scan and storage Data obtained with an optional scanner can be displayed and printed. dz Information displayed (1) Job name As the name of scanned data, "SCAN" + four-digit of number are displayed. To specify a desired name, click the relevant job to select, click the [Details] button, and change the name in the displayed screen. (2) Owner name "SCAN" or the owner name that has been selected in the [Selection] screen is displayed. dz Available Functions [Output] button A job that has been registered is output. [Delete job] button Selected data can be deleted. If Job operation authority is set, this button is not displayed. [Details] button Detailed information on the selected data can be checked. [Refresh] button The information displayed on the screen is refreshed to the latest state. 1-18 (3) Output volume The number of copies is displayed. (4) Page The number of total pages of the data is displayed. (5) Date/Time The data and time at which the data was registered in the printer controller are displayed. (6) Thumbnail The thumbnail of the selected form is displayed. Output Data obtained with an optional scanner can be recalled and printed. Also the data can be registered in the printer controller as a storage job. "Output")p.1-7 Delete Job Unnecessary data can be deleted. "Delete job" )p.1-9 Details Detailed information on data obtained with an optional scanner can be checked. Also the job name of data can be changed, the job comment can be edited, and the settings can be displayed and printed in a list. "Details" )p.1-10 )p.1-15 1-19 Custom Setting If you click [Custom Setting], the account record can be checked and the print head can be cleaned. To display the history of jobs, you must set [Finished job storage] at [Security setting] to [Keep] in [Administrator]. "Security setting" )p.2-12 ~ Selectable Tabs User setting Used to check the printed job history and to clean the print head. ~ Available Functions [Account record] button Displays the history of job processing. [Head Maintenance] button Performs normal cleaning of the print head. 1-20 Account record Detailed history (account record) of jobs processed by the printer controller can be checked. The history can be stored as a file in your computer. The storage term for account records is set in the Administrator setting. "Account record" )p.2-14 ~ Information Displayed (1) Job The job name (printed file name) is displayed. If Job information display is set, the job name is displayed as "****." (2) Owner name The log-in user name of the computer that outputs the job is displayed. (3) Data reception date time The date and time where the printer controller received data is displayed. (4) Data processing time The time that was required for processing data received by the printer controller is displayed. (5) Print time The time that was required for printing is displayed. (6) Page count The number of printed pages is displayed. (7) Output count The number of printed copies is displayed. (8) Final status One of NormalErrorAborted is displayed according to the final status of a job. ~ Available Functions [Store in folder] button Account records can be stored in a file as text delimited with tabs. [Delete] button Unnecessary account records can be deleted. [Display details] button Detailed processing history of an account record can be checked. [Refresh] button Details displayed on the screen are refreshed to the latest information. 1-21 Displaying 1-22 1 Click the [Account record] button. 2 Check the information. 3 After checking, close the Web browser. Store in folder The history of jobs processed by the printer controller can be stored in a file as text delimited with tabs. The stored file can be displayed and edited with spreadsheet software such as Microsoft Excel. This function can be used for control of the situation of usage printer controller. 1 Click the [Store in folder] button. 2 Follow the instructions on the screen to store. 1-23 Delete Selected account records are deleted. Account records can be deleted only if a user logs on as an administrator. ~ Settings Deletes all records. All account records are deleted. 1 Deletes selected record and preceding ones. Account records of the selected and preceding jobs are deleted. Click the account record that you want to delete. The selected account record is highlighted. 2 Click the [Delete] button. If you cannot access it, click [Administrator] to log on and then start from step 1 again. 3 1-24 Select the method of deletion and click the [OK] button. Display details Detailed processing history of an account record is displayed. ~ Information Displayed Event Description of printer processing. 1 Details Print settings, etc. Click the account record on which you want to see the detailed information. The selected account record is highlighted. 2 Click the [Display details] button. 3 After checking the details, click the [Close] button. 1-25 Head Maintenance If a part of printed images blurs or white stripes appear, perform maintenance of the print head. • Head maintenance can also be performed from the menu setting of the printer. • If the print quality is not improved even after head maintenance, perform cleaning from the menu setting of the printer. ) "HC5500 Series User's Manual for Printer Main Body" 1 Click the [Head Maintenance] button. 2 Click the [OK] button. 3 Click the [OK] button. If HC5500 is executing printing, head maintenance is carried out after printing is complete. 1-26 Help The method of using RISO Console is displayed. 1-27 1-28 Chapter2 Printer Administration (Console) This chapter describes administration and methods of printer controller settings. For change of setting of the printer controller, the password for administrator must be inputted. 2-1 What is Administrator Setting? The administrator setting means setting of the printer controller. Only a user who inputs the password for administrator to log in can change the setting. Administrator "Administrator" is a user who is permitted to restart the printer controller and change settings. The administrator is distinguished from general users based on input of the password for themselves. The user who inputs the password for the administrator also has the authority to change the setting of the printer controller. Some functions that may be set by the administrator can seriously affect the operation of the printer. Be sure to appoint dedicated personnel as an administrator to manage and operate the printer on the responsibility of the administrator. Also be sure to carefully control the password. The password can be set when Administrator Setting is performed for the first time. "Change Password")p.2-11 Log-in Input the password and log in as administrator. 1 2-2 Click the [Administrator] button. 2 Input the password and click the [Log in] button. • When the administrator settings are logged into for the first time, click the [Log in] button without entering a password. And be sure to register the password. "Password Change")p.2-11 • If the network setting is initialised, the password is also reset. 2-3 List of Settings ~ Selectable Tabs Controller control Restart of the printer controller and sample page printing can be performed. "Controller Control")p.2-5 Controller setting Network setting of the printer controller, datetime setting, and password change can be performed. "Controller Setting")p.2-8 Controller setting 2 [Custom] of [Original size] and [Output paper size] to be used by the printer driver can be registered. "Controller setting 2")p.2-18 Direct output setting (For RISO Controller PS7R-9000/5000) Printer driver setting can be registered in advance. "Direct Output Setting")p.2-22 Folder setting The name and Folder security cord (For RISO Controller PS7R-9000/5000) of a folder in which storage jobs are registered can be set. "Folder Setting")p.2-24 Font management (For RISO Controller PS7R9000/5000) The list of fonts registered in the printer controller can be displayed. Also additional fonts can be installed in the printer. "Font Management")p.2-28 2-4 Controller Control Restart of the printer controller and sample page printing can be performed. ~ Functions [Restart] button Restarts the printer controller. [Shut down] button Cannot be used for HC5500 Series. [Sample page print] button Prints sample pages stored in the printer controller. [Version] button Displays version of the printer controller. 2-5 Restart If you change the network setting of the printer controller or download a new font, be sure to restart the printer controller. Normally, you need not restart the controller. 1 If a job is being processed, the job is interrupted and the controller will restart immediately. Click the [Restart] button. 2 Click the [OK] button. Sample Page Print A sample pages recorded in the printer controller can be printed, and the operation and settings of the printer can be checked. ~ Selectable Sample Pages Configuration (initial setting) Prints the current setting of the printer. PS font list (For RISO Controller PS7R-9000/5000) Prints the list of PS fonts installed in the printer controller. Sample image Prints sample pages including images and text. The print status can be checked. For sample page print, paper of the following conditions must be set. • Paper size: A4 • Paper type: Standard paper 1 • Feed tray: Standard Feed Tray If "No Paper" is displayed and printing cannot be performed, make sure to check if the paper is set in the Standard Feed Tray. 2-6 1 Click the [Sample page print] button. 2 Select the type of sample page to print. 3 Click the [OK] button. 4 Click the [OK] button. 5 Check the printed sample page. Version Displays the version information on the printer controller. The display items vary depending on the printer controller. • In the case of RISO Controller HC3R-5000: System program / Build number • In the case of RISO Controller PS7R-9000/5000: System program / Build number / Colour profile 1 Click the [Version] button. 2 Check the version information and then click the [OK] button. 2-7 Controller Setting Network setting of the printer controller, datetime setting, and log-in password change for administrator can be performed. ~ Settings Network Sets the printer network information. Date Time Sets the date and time of the printer controller in synchronization with the computer. Change password Changes the password for logging in the Administrator setting. Be sure to set the password for security. Security setting Sets the operation and the display that can be executed in [Job manager]. Account record Sets the method of storing account records. Clustering (For RISO Controller PS7R-9000/5000) Sets the printer controller of a linked printer for using the clustering function. Security print Sets security for an output job. 2-8 Network Sets the network information of the controller. ~ Setting Items Controller name Input the name of the printer controller. Up to 16 alphanumeric characters and underscore can be entered. This name becomes the printer name on the network. Domain name Input the domain name of the network to which the printer is connected. Controller details Detailed information on the printer controller is displayed. Use DHCP server Place a checkmark if the DHCP server is used for acquiring IP. IP address Input the IP address assigned to the printer controller. Subnet mask Input the subnet mask of the network to which the printer controller is connected. Gateway Input the gateway address of the network to which the printer controller is connected. DNS server Input the address of the DNS server if you use the DNS server to connect to the network. Use AppleTalk (For RISO Controller PS7R-9000/5000) Place a checkmark if you use the printer via AppleTalk. AppleTalk zone name (For RISO Controller PS7R-9000/5000) Input the zone name of AppleTalk to which the printer is connected. Link Speed / Duplex Mode Select the transmission speed (10/100/1000BASE-T), communication mode (Full Mode/ Half Mode), and Auto Mode for the printer. Current status The transmission speed and the communication mode for the printer that have been automatically recognized are displayed. [Set default] button Returns the network setting to the factory default setting. 2-9 1 Click the [Network] button. 2 Input information at each item. Confirm the content to be input with your network administrator. 3 Click the [OK] button. The [Confirmation] dialog box is displayed. 4 Click the [OK] button. The [Restart confirmation] dialog box is displayed. 5 2-10 Click the [OK] button. Date Time Synchronizes the printer controller’s date and time with the computer’s clock. The synchronized date and time are also set in the printer. 1 Click the [Date Time] button. 2 Check the date and time and then click the [OK] button. Change Password Change the password for logging in as an Administrator. The password is not set at the factory default, set the password using the following steps. 1 2 Click the [Password change] button. Input the current password at [Old password]. When you log in the Administrator setting for the first time, you need not to input the password at [Old password]. 3 Input the new password at [New password]. 4 For confirmation, input the new password again at [Retype new password]. 5 Click the [OK] button. If an error is indicated, the old password is not correct or the new password and its confirmation input are different. Input them again correctly. 2-11 Security Setting Sets the scope of operation that can be executed in [Job manager]. ~ Items That Can Be Set from [Finished job storage] If [Keep] is set, a printed job can be recalled and printed again from the [Job status] tab of [Job manager]. Also data can be stored or registered as a form in the printer controller. Not keep (initial setting) Deletes finished jobs after printing. Keep Keeps finished jobs for a specified period or keeps a specified number of jobs on the [Job status] tab of [Job manager]. For specifying the method of deleting stored jobs, select one of the following three items. By age (hours) Specifies hours for which a job is kept. Set the time at the counter on the right. The time can be set from 1 to 99 hours. ~ Items That Can Be Set from [Job information display] Hide job names in Job status (excl. admin) Sets whether or not job names (printed file names) are displayed. Hide storage job names/Thumbnail (excl. admin) Sets whether or not the stored job names and the thumbnail of selected storage data are displayed. 2-12 By age (days) Specifies days for which a job is kept. Set the number of days at the counter on the right. The number of days can be set from 1 to 99. By amount Specifies the number of jobs that are kept. Set the number at the counter on the right. The number can be set from 1 to 99. The maximum number of finished jobs that can be stored is 100. If this number is exceeded, the oldest job is automatically deleted regardless of the setting of [Finished job storage]. ~ Items That Can Be Set from [Job operation authority] Forbid job clear in Job status (excl. admin) Forbid retrieval in Job status (excl. admin) Only the administrator can execute deletion of a job of Only the administrator can execute re-output of a job of which printing was completed. which printing was completed. Forbid storage/form job clear (excl. admin) Only the administrator can delete stored data. 1 Click the [Security setting] button. 2 Click [Keep] to place a checkmark. 3 Set [Finished job storage]. Click one of the three items and set the relevant counter on the right. 4 Set [Job information display]. 5 Set [Job operation authority]. 6 Click the [OK] button. 7 Click the [OK] button. 8 Click the [OK] button. 2-13 Account Record Sets the method of storing account records. The maximum number of records that can be stored is 1000. If this number is exceeded, the records are sequentially deleted from the oldest record. ~ Settings Not delete automatically Account records are not automatically deleted. Delete them manually. The maximum number of records that can be stored is 1000. Delete automatically Account records that exceed the specified period or number are automatically deleted. For specifying the method of deleting stored information, select one of the following three items. Save histories The history of account records can be stored in the printer on a monthly or daily basis. The history is stored as a CSV file. By age (hours) Specifies hours for which an account record is kept. Set the time at the counter on the right. The time can be set from 1 to 99 hours. The stored history is not automatically deleted. It must be deleted manually on the [Accounting data history list] screen. By age (days) Specifies days for which an account record is kept. Set the number of days at the counter on the right. The number of days can be set from 1 to 99. History list The list of account records that have been stored with the setting of [Save histories] can be displayed. By amount Specifies the number of account records that are kept. Set the number at the counter on the right. The number can be set from 1 to 99. When Account Records are not automatically deleted: 2-14 1 Click the [Account record] button. 2 Click [Not delete automatically] to place a checkmark. 3 To store the history of account records, click [Save histories] to place a checkmark. 4 Click either [Monthly] or [Daily] to place a checkmark. 5 Click the [OK] button. 6 Click the [OK] button. 7 Click the [OK] button. When Account Records are automatically deleted: 1 Click the [Account record] button. 2 Click [Delete automatically] to place a checkmark. 3 Set the storage condition. 4 Click the [OK] button. Click one of the three items and set the counter on the right side. History List If the history of account records is stored, the history list can be displayed by clicking the [History list] button on the [Account record] screen. ~ Available Functions [Store in folder] button A selected CSV file can be stored in the computer. If Internet Explorer is used under Mac OS X, this function cannot be used. [Delete] button A selected CSV file can be deleted. 2-15 Clustering (For RISO Controller PS7R-9000/5000) Sets the printer controller of the linked printer for using the clustering function. "Clustering" of "HC5500 User’s Manual for Printer Driver" )p.3-26 As a linked printer, only a printer controller of the same model can be specified. Other models or other competitor printer cannot be linked. 1 Click the [Clustering] button. 2 If information on linked HC5500 Series is displayed in the list of the host names and IP addresses, click it. 4 Input the IP address or host name of the linked HC5500 Series. 5 Click the [OK] button. 6 Check that the IP address or host name that has been input in step 4 is displayed, and click the [OK] button. 7 Click the [OK] button. Then, proceed to step 6. If information of linked HC5500 Series is not displayed, proceed to step 3. 3 Click the [Add] button. If multiple units of the printer controller are registered, jobs are transmitted by priority to the printer controller displayed at the upper part of the list. To change the priority of a printer controller, click the IP address of the printer controller and click the [Move up][Move down] button. 2-16 Security print Set the conditions for [Security Print]. ~ Settings Condition Sets the condition of a job that is saved and for which printing is requested. If [Save all Direct output data.] is selected, all jobs including those for which security is not set are saved. If [Save the data which are specified "Security print "on the printer driver.] is selected, only jobs for which [Security print] is set on the [Option] tab of the printer driver are saved. The initial setting is [Save the data which are specified "Security print "on the printer driver.]. By age Sets the time that elapses until automatic deletion is performed if [Automatic deletion setting] is set to [Delete automatically]. The time can be set to 1 to 99 minutes, 1 to 99 hours or 1 to 99 days. • For saved jobs, [Requesting] is displayed at [Job status]. • Saved jobs are not output until output is instructed by the job manager. Automatic deletion setting Sets whether or not to delete automatically a saved job for which a certain time elapses. The initial setting is [Not delete automatically]. 2-17 Controller Setting 2 The initial setting of the printer controller, irregular size original and output paper can be registered. ~ Settings Initial setting Sets the operation of the printer controller and the printer. Custom size entry (For RISO Controller PS7R-9000/5000) Up to 20 custom sizes can be registered in the printer controller. Initial setting Initial setting concerning the operation of the printer controller and the printer can be made. No initial setting is made in the initial state. 2-18 ~ Settings in [Controller setting] (For RISO Controller PS7R-9000/5000) "HC5500 Series User's Manual for Printer Driver" Print the information of Postscript error han"[Advanced] tab" )p.3-4 dler. If a checkmark is placed, when an error occurs in proFinisher: It gives the priority to "speed" in case cessing data transmitted from a computer, the data is of Single side print + stapler. printed until the page that has caused the error. If an optional finisher is connected and a check mark is If a checkmark is not placed, printing is interrupted placed for stapling in single side printing, the processing when an error occurs. speed becomes high. However, stapling is performed To print the information of Postscript error handler, set [Advanced] tab - [PostScript Options] - [Send error handler] to [Yes] in advance. ~ Setting in [Printer setting] Keep the last page of the job in the printer. Sets whether or not to keep the last page of a job in the printer after printing until the next job is printed. If a checkmark is placed, "Menu 3 Temp Data Retrieve" of the menu setting of the printer can be used. from the back side to the front side. If [Security Print] is set in the printer driver, data is not retained in the printer. "HC5500 Series User's Manual for Printer Driver" "Security Print" )p.2-27 )p.2-27 Custom Size Entry (For RISO Controller PS7R-9000/5000) Up to 20 irregular original sizes and output paper sizes can be registered as "Custom" sizes in the controller. The sizes registered here are displayed as custom sizes 1 to 20 for original sizes and output paper sizes that can be used from the printer driver. The paper sizes registered here are stored in the controller. If the printer driver cannot read the controller information (cannot monitor), the custom sizes are not displayed in the pull-down menu for the original sizes and the output paper sizes of the printer driver. ~ Settings Add Displays the Custom size entry screen. Edit Changes the name and the dimensions of a custom size that has been registered. Delete Deletes a custom size that has been registered. 2-19 Add 1 Click the [Custom size entry] button. 4 Click the [OK] button. 5 Click the [OK] button. 4 Click the [OK] button. The Custom size entry screen is displayed. 2 3 Click the [Add] button. Input the name and the size to be registered. Edit 2-20 1 To change the name or size, click the custom size to change and click the [Edit] button. 2 Input any name and size. 3 Click the [OK] button. Delete 1 Click the custom size to delete and click the [Delete] button. 2 Click the [OK] button. 3 Click the [OK] button. 2-21 Direct Output Setting (For RISO Controller PS7R-9000/5000) Printer driver setting can be registered to the printer controllerer in advance. If you want to always print with the same setting, it is useful to register the setting. The registered setting can be selected at [Change output condition] on the [Main setting] tab of the printer driver for direct printing. "Output mode" of "HC5500 User’s Manual for Printer Driver" )p.2-9 )p.3-9 ~ Items Displayed Available Settings Settings with a checkmark displayed are effective and are displayed as choices in the printer driver. Output Setting Name Names of registered settings are displayed. 1 Change settings Print setting can be changed and registered. The setting of "Printer driver setting" can also be changed. Change name Registered print setting names can be changed. Up to 32 characters can be entered. Click [Directx] at [Output setting name]. x is a number from 1 to 9. 2 Click the [Change settings] button. The [Main setting] screen of the printer driver is displayed. 3 Change the setting. "Chapter 2 Printer Driver Operation" of "HC5500 User’s Manual for Printer Driver" )p.2-1 "Chapter 3 Printer Driver Operation" of "HC5500 User’s Manual for Printer Driver" )p.3-1 2-22 4 To change the setting name, click on the setting name and then click the [Change name] button. The name in the first line [Printer Driver Setting] cannot be changed. 5 Input your desired setting name. 6 Click the [OK] button. 7 To enable the setting, click the [Available settings] check box to place a checkmark. 2-23 Folder setting The name of a folder in which jobs are registered can be set. If you create folders according to the purpose and type, storage jobs can be easily classified. Folders registered here can be selected at [Storage folder name] on the [Main setting] tab of the printer driver. "Output mode" of "HC5500 User’s Manual for Printer Driver" )p.2-9 )p.3-9 ~ Settings Change Name Registered folder names can be changed. Up to 32 characters can be entered. Available Setting (For RISO Controller PS7R-9000/ 5000) Folders with a checkmark displayed are effective and are displayed as choices in the driver screen. 1 Folder security code (For RISO Controller PS7R9000/5000) A security code can be set for a folder. If you specify a folder for which a security code is set and input the security code when outputting data, the data is saved in the folder. Up to eight numeric characters can be entered. Click the folder name [Folderx] of which you want to change the name. x is a number from 1 to 9. The name of the first line [Folder0] cannot be changed. 2-24 Folder Name Registered folder names are displayed. 2 Click the [Change name] button. 3 Input your desired folder name. 4 Click the [OK] button. 5 To enable the setting, click the [Available setting] check box to place a checkmark. 2-25 Folder security code (For RISO Controller PS7R-9000/5000) 1 Click the folder name [Folder x] for which you set a security code. x is a number from 1 to 9. 2 Click the [Folder security code] button. 3 Input the desired security code. Only numeric characters can be entered. 4 2-26 Click the [OK] button. 5 To enable the setting, click the [Available] check box to place a checkmark. 2-27 Font Management (For RISO Controller PS7R-9000/5000) The list of fonts registered in the printer controller can be displayed. Also additional fonts can be installed in the printer. ~ Items Displayed Font list The names of installed fonts are displayed in a list. Appendix "Font List" of "HC5500 User’s Manual for Printer Driver" )p.5-2 Font count The number of installed fonts is displayed. Download Installs a font to the printer controller. Newly installed font names are displayed in black. Fonts displayed in grey are the fonts installed at the factory. These fonts cannot be deleted. Font Download Procedure Installs a font to the printer controller. "Type 1 font" and "CID font" can be used. 1 Click the [OK] button. This unit is ready for downloading a font. For operation of installation after this, refer to the operation manual for the font. The printer controller name to be specified as font download destination is "RISO-PS7R (font)." If you use a Macintosh computer, you must select the printer using Chooser before installing the font depending on the font. 2 When downloading of a font is complete, restart RISO Console PS7R. "Restart")p.2-6 033-03025-005 2-28


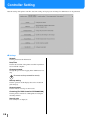
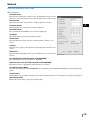

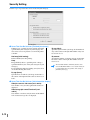


![2 Haga clic en el botón [Aceptar].](http://vs1.manualzilla.com/store/data/006292855_1-18424f3b5bf7ebf043fd2e6aa576beb6-150x150.png)

![[4] para - Riso.com](http://vs1.manualzilla.com/store/data/006041379_1-f987c63d0f56da21f929a771461d5686-150x150.png)


![2 Clique no botão [OK].](http://vs1.manualzilla.com/store/data/006043970_1-e2974f1cd0f0465d2cb4d13e53c48ce2-150x150.png)