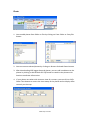
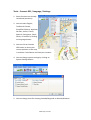
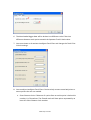
1
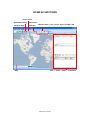
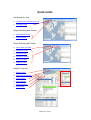
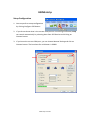
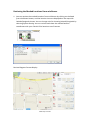
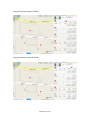
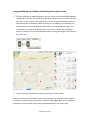
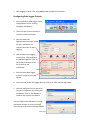
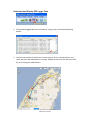
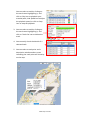
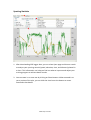
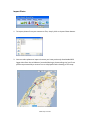
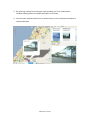
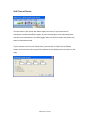
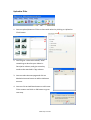
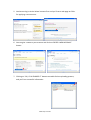
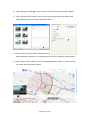
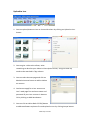
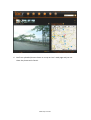
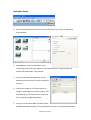
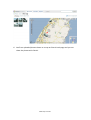
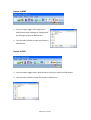
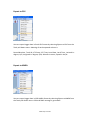
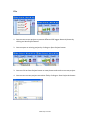
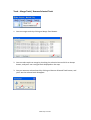
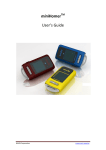
ntripTM User’s Guide
www.ntrip.com.tw
ntrip is an easy to use shareware that turns NAVIN miniHomer into a GPS Guider and
a GPS Data Logger device.
With current turn-by-turn moving map PND navigation devices, the users gradually
cease to build up sense of road and direction of unfamiliar territory as they rely more
and more on the GPS turn-by-turn navigational guidance. The miniHomer GPS Guider
on the other hand provides users with destination direction and distance information,
the users still have the fun of deciding which road to take and which turn to make,
building up a sense of the geo-spatial relationships at the same time.
The miniHomer GPS Guider function helps users get to the destination but with the
fun of making choices.
Enabled with following feature, the miniHomer is turned into a GPS Guider device:
a. Setting of the 5 return locations in the miniHomer using manual input of
destination latitude/longitude coordinates.
b. Setting of the 5 return locations in the miniHomer by clicking destination
locations on the map.
Enabled with following feature, the miniHomer is turned into a GPS Data Logger
device:
a. Record up to 165,000 points of GPS data; each data containing position,
velocity, and time information.
Using the miniHomer as GPS Data Logger while touring a foreign city taking photos,
the GPS logger data can later be used to geo-tag the photos, and share the traversed
trip route with friends.
Using the miniHomer as GPS Data Logger for outdoor fitness training such as jogging,
the GPS logger data can be analyzed for maximum speed, average speed, jogged
distance. The speed profile and statistics could be used to improve fitness training.
www.ntrip.com.tw
With the miniHomer recorded GPS data, ntrip enables user to perform following
functions:
a. Import logged GPS data to show on map.
b. Export the GPS logger data in popular KML, KMZ, GPX, CSV, NMEA formats,
facilitating usage of the GPS logger data with other software.
c. Geo-tag photo images.
d. Ease export of photo images and GPS logger data to Picasa, Locr and Flickr to
share with friends.
e. Facilitate showing of photo images on the map at the location where the
photo is taken.
f. Analyze maximum/minimum/average speed; climb/descend height, and
total time in a trip.
www.ntrip.com.tw
VIEWS & FUNCTIONS
Import Photo
Download Datalog
Write Back
Configure GPS
GPS EXIF
Map
Upload to Flickr / Locr / Picasa ; Export to KMZ / GPX
Track / Photo / Sport / miniHomer
www.ntrip.com.tw
QUICK GUIDE
Get Ready for Use
1. Connect your GPS device to PC.
2. Configure GPS.
Import Datalog and Photos
1. Download Datalog.
2. Import Photo.
Share Datalog and Photos
1. Write Back GPS EXIF.
2. Upload to Flickr.
3. Upload to Locr.
4. Upload to Picasa.
5. Export to KMZ.
6. Export to GPX.
Helpful Function
1. Merge Track.
2. Shift Time of Photos.
3. Track details.
4. Photo details.
5. Sport Statistics.
6. miniHomer.
www.ntrip.com.tw
BEFORE USE
Hardware and Software Setup
1. Download USB driver from ntrip website and install the USB driver on your
Windows PC.
2. Download ntrip shareware from ntrip website and install it on your Windows PC:
unzip the files into a directory, run ntrip setup program from the directory.
3. Connect miniHomer to PC using a standard USB cable. Note that the USB cable
accompanying miniHomer is a special 2-wire USB charger cable, not a standard
USB cable. You need another standard USB cable for use with ntrip; this USB cable
can be used both for data transfer and charging miniHomer.
4. Turn on miniHomer.
5. Now your miniHomer is ready for use with ntrip.
6. When planning to use miniHomer to later geo-tag photo or uploading trip data
with photo to photo-sharing sites, be sure to double check that the camera date
and time function are correct beforehand.
HARDWARE OPERATING PROCEDURE
1. When connecting miniHomer to PC for configuration or downloading of trip data,
always have miniHomer powered off first before connecting to a already turned
on PC, start ntrip, then turn on miniHomer. Having miniHomer already powered
on connecting to PC may sometimes result in flying mouse or unscrollable map
within ntrip.
www.ntrip.com.tw
USING ntrip
Setup Configuration
1. You can perform setup configuration
by clicking Configure GPS button.
2. If you do not know what is the correct COM port for connecting miniHomer, ntrip
can search automatically by selecting Auto Scan GPS Devices and clicking on
Connect button.
3. If you know the correct COM port, you can choose Manual Setting and click on
Connect button. The baud rate for miniHomer is 38400.
www.ntrip.com.tw
Retrieving the Marked Locations From miniHomer
1. You can retrieve the marked locations from miniHomer by clicking on the Read
from miniHomer button, and the location icons are displayed on the map with
latitude/longitude shown. You can change units for showing latitude/longitude by
selecting System Setting. You can retrieve and share the marked location
coordinates with your friends if the locations are of interest.
Decimal Degrees Format Display
www.ntrip.com.tw
Degrees, Decimal Minutes Display
Degrees, Minutes, Seconds Display
www.ntrip.com.tw
Using miniHomer as a Guider and Setting the Location Icons
1. To use miniHomer as a guiding device, you can either enter the latitide/longitude
coordinates manually, or by clicking on Get Point buttons of any location icon and
then click on the map to select location of interest, latitude and longitude of the
selected location is displayed. When entering the coordinates, the location icon
will be shown on the map when the Enter key on the keyboard is pressed. The
coordinates are saved to miniHomer when you click on Write into miniHomer
button. A location can be searched and looked up using the Google search box on
the lower left.
2. You can remove the selected location by clicking on Clear button.
When retrieving marked location data from miniHomer, writing destination data to
miniHomer, connecting to miniHomer, or downloading logger data, the miniHomer
firmware version number will be read and be displayed on the upper right.
www.ntrip.com.tw
Enable or Disable miniHomer Data Logging
After first time connecting miniHomer with ntrip, miniHomer will be enabled with
the GPS data logger functionality. Up to 165,000 points of user position, velocity,
time information can be recorded within the miniHomer device for later retrieval by
ntrip. The overall miniHomer available icons will now be:
data logger icon
1. To enable or disable data logging, click Power/Mode key to select the data logger
icon.
2. Press and hold Mark key, wait until the circle of direction arrows shows up and
then release Mark key.
3. After the circle of direction arrows disappear, if the data logger icon is flashing,
then data logging is enabled. If the data logger icon is not flashing, then data
logging is disabled. Enable or disable of data logging function is toggled by
performing step 2.
4. The number displayed shows percentage of the
logger memory left.
5. If data logging is enabled with data logger icon
flashing, the data logger icon will continue to appear
and flash when clicking Power/Mode key to select
the other modes.
6. If data logging is enabled, auto shutdown is
performed when all the below conditions occur:
a. No key pressed for 10 minutes
b. No position fix for 10 minutes
c. No heading movement over 10 degrees for 10 minutes.
www.ntrip.com.tw
7. Data logging criteria is set using ntrip under Configure GPS button.
Configuring Data Logger Criteria
1. You can perform Data Logger setup
configuration by first clicking
Configure GPS button.
2. Then click the Connect button to
connect to the miniHomer.
3. You can choose an
appropriate movement mode
for your miniHomer to
improve accuracy of data
logging.
4. You can adjust the logging
criteria here. The conditions
are ANDed together. Click on
Set to Device button to set
the criteria to the
miniHomer.
5. You can check data logger
memory usage of your GPS
device.
6. You can erase all the GPS logger data by clicking on Clear Device Log button.
7. You can configure User ID and write
into your miniHomer by clicking the
Set button. Click on Get button to
retrieve User ID from the device.
You can disable Auto Shutdown to keep
miniHomer always on until turned off
manually by press and hold Power/Mode
www.ntrip.com.tw
key for 2~3 seconds.
www.ntrip.com.tw
Download and Display GPS Logger Data
1. To download logged data from miniHomer, simply click on Download Datalog
button.
2. You can select tracks to add to the current project, click on Accept button, and
you’ll see the tracks displayed on the map. Display of the tracks can be turned off
by un-checking the loaded tracks.
www.ntrip.com.tw
You can select a track by clicking on
the track name highlighting it, and
click on Play icon to playback your
traveled path, slide Speed bar to adjust
the playback speed, or click on Stop
icon to stop the playback.
3. You can select a track by clicking on
the track name highlighting it, and
click on Trash Can icon to delete the
track.
4. You can easily check the details of a
selected track.
5. You can select a track point and a
description window and an arrow
indicating the track point will show up
on the map.
www.ntrip.com.tw
Sporting Statistics
1. After downloading GPS logger data, you can select Sport page and choose a track
to analyze your sporting records (speed, elevation, time, and distance) plotted in
a chart. This information can help you find out what to improve and adjust your
training program to achieve better results.
2. You can zoom in or zoom out by clicking on Zoom buttons. When zoomed in to
see a portion of the plot, you can slide the time bar at the bottom to move
foreward or backward.
www.ntrip.com.tw
Import Photo
1. To import photos from your camera or files, simply click on Import Photo button.
2. You can select photos to import. Assume you have previously downloaded GPS
logger data from the miniHomer (recorded during a photo-taking trip) you’ll see
photos represented by a camera icon on displayed tracks showing on the map.
www.ntrip.com.tw
3. By selecting a photo from the upper right window, you’ll see a description
window showing where the photo was taken on the map.
4. You can select a photo and click on a rotate button to turn the photo clockwise or
counterclockwise.
www.ntrip.com.tw
Shift Time of Photos
To know where your photo was taken require the time of your camera and
miniHomer not be too different apart. By time-matching the time-stamped photo
and the time information in the GPS logger data, the location where the photo was
taken is then determined.
If your camera has incorrect shifted time, you can click on Shift Time of Photos
button to correct the time-stamp of the photos and to display them correctly on the
map.
www.ntrip.com.tw
Write Back GPS EXIF
After downloading GPS logger data and photos, you can add coordinates to the
photos by clicking on Write Back GPS EXIF button to add location coordinates to the
photos.
www.ntrip.com.tw
Upload to Flickr
1. You can upload photos to Flickr to share with others by clicking on Upload to
Flickr button.
2. You can give a title to the album, write
something to describe your album in
Description column, and give some key
words to be searched in Tags column.
3. You can select Account page and click on
Maintain Account button to add or delete an
account.
4. You can click on Add New button to add a new
Flickr account and click on OK button to go to
next step.
www.ntrip.com.tw
5. You have to log in with a Yahoo! account first and you’ll see a web page on Flickr
for applying a new account.
6. You can give a name to your account and click on CREATE A NEW ACCOUNT
button.
7. Clicking on “OK, I’ll AUTHORIZE IT” button to enable further uploading process,
and you’ll see successful information.
www.ntrip.com.tw
8. After closing the web page, you’ll see your new Flickr account has been added.
9. After clicking on Exit button, you can select privacy setting of your album and
adjust photo sizes by clicking on pull-down menu.
10. You can click on Write Back GPS Exif button to
add coordinates to photos first and upload to Flickr by clicking on Accept button.
11. After login on Flickr website, you’ll see uploaded photos shown in a map and you
can share the photos with friends.
www.ntrip.com.tw
Upload to Locr
1. You can upload photos to Locr to share with others by clicking on Upload to Locr
button.
2. You can give a title to the album, write
something to describe your album in Description column, and give some key
words to be searched in Tags column.
3. You can select Account page and click on
Maintain Account button to add or delete
an account.
4. You have to apply for a Locr account on
Locr’s web page first and store name and
password of your Locr account in Account
list by clicking on Add New button.
5. You can click on Write Back GPS Exif button
to add coordinates to photos first and upload to Locr by clicking Accept button.
www.ntrip.com.tw
6. You’ll see uploaded photos shown on a map on Locr’s web page and you can
share the photos with friends.
www.ntrip.com.tw
Upload to Picasa
1. You can upload photos to Picasa to share with others by clicking on Upload to
Picasa button.
2. You must give a title to the album, write
something to describe your album in Description column, and give some key
words to be searched in Tags column.
3. You can select Account page and click on
Maintain Account button to add or delete an
account.
4. You have to apply for a Picasa account on
Google’s web page first and store name and
password of your Picasa account in Account
list by clicking on Add New button.
5. You can click on Write Back GPS EXIF button
to add coordinates to photos first and upload to Picasa by clicking Accept button.
www.ntrip.com.tw
6. You’ll see uploaded photos shown on a map on Picasa’s web page and you can
share the photos with friends.
www.ntrip.com.tw
Export to KMZ
1. You can export logger and image data in
KMZ format to be displayed in Google Earth
by clicking on Export to KMZ button.
2. You can select a folder to save the photos in
KMZ format.
Export to GPX
1. You can export logger data in GPX format by clicking on Export to GPX button.
2. You can select a folder to save the photos in GPX format.
www.ntrip.com.tw
Export to CSV
You can export logger data in Excel CSV format by selecting Export to CSV from the
Tools pull-down menu. Meaning of each exported column is:
Record Number, Track ID, UTC Date, UTC Time, Local Date, Local Time , Latitude in
degree, N/S, Longitude in degree, E/W, Altitude in meter, Speed in km/hr.
Export to NMEA
You can export logger data in GPS NMEA format by selecting Export to NMEA from
the Tools pull-down menu. GGA and RMC message is generated.
www.ntrip.com.tw
File
1. You can start a new project to process different GPS logger data and photos by
clicking on New Project button.
2. You can open an existing project by clicking on Open Project button.
3. You can click on Save Project button to save photos and tracks to current project.
4. You can save current project to another file by clicking on Save Project As button.
www.ntrip.com.tw
Track – Merge Track / Remove Selected Track
1. You can merge tracks by clicking on Merge Track button.
2. You can select tracks to merge by checking the selection box and click on Accept
button, and you’ll see a merged track displayed on the map.
3. You can remove a selected track by clicking on Remove Selected Track button, and
you’ll see the selected track disappear.
www.ntrip.com.tw
Photo
1. You can add photos from folder or files by clicking on From Folder or From files
button.
2. You can remove selected photos by clicking on Remove Selected Photos button.
3. After downloading GPS logger data and photos, you can add coordinates to the
photos by clicking on Write Back GPS Exif button to combine the photos with
location coordinate information.
4. If your photos are taken with incorrect time of a camera, you can click on Shift
Photo Time button to correct the time stamp of the photos and to display them
correctly on the map.
www.ntrip.com.tw
Tools – Connect GPS / Language / Settings
1. Some functions are already
introduced previously.
2. You can select English,
Traditional Chinese,
Simplified Chinese, Japanese,
German, Italian, French,
Spanish, Portuguese, Czech,
Dutch, or Russian by clicking
on Language button.
3. You can click on Connect
GPS button to show your
current position on the map
in realtime if miniHomer has fixed your location.
4. You can change system settings by clicking on
System Settings button.
5. You can change units for showing latitude/longitude or altitude/distance.
www.ntrip.com.tw
6. The downloaded logger data will be broken into different tracks if the time
difference between track points exceeds the Separate Track Criteria value.
7. You can activate or de-activate Intelligent Track Filter and change the Track Filter
Criteria settings.
8. You can adjust Intelligent Track Filter Criteria to help remove some bad points or
excess points that are not needed.
a. Short Distance Limit: If distance of a point from an earlier point is below this
number, it is filtered out. The filtered result will have points separated by at
least this Short Distance Limit number.
www.ntrip.com.tw
b. Low Heading Angle Change Limit: If heading change from an earlier point is
below this number, it is filtered out. The filtered result will have points
having heading change by at least this Low Heading Angle Change Limit
number.
c. High Acceleration Limit: If a point has acceleration higher than this number,
it is filtered out.
d. Low Speed Limit: If a point has speed below this number, it is filtered out.
e. High Speed Limit: If a point has speed above this number, it is filtered out.
f. Low Altitude Limit: If a point has altitude below this number, it is filtered
out.
g. High Altitude Limit: If a point has altitude above this number, it is filtered
out.
9. You can group photos together in clusters to have better viewing result on the
map by adjusting the grouping criteria.
10. First, location of the photo is determined by time matching the time stamp on
the photo and the time information associated with each point of the logger data
according to the Time Match Criteria. A photo is matched to a point having the
least time difference; if no point is found to be within the set Time Match Criteria
number, then the photo will not be used to display on map.
11. The photos are then processed sequentially in alphabetical orders for grouping. A
photo is put in a same grouped if distance to the first photo of the group is below
the set Group Photo Criteria number. If no existing group can be matched for the
photo, it is put into another new group and used as the first photo of the group.
www.ntrip.com.tw
www.ntrip.com.tw
The information provided is believed to be accurate and reliable. These materials are provided to customers and may
be used for informational purposes only. No responsibility is assumed for errors or omissions in these materials, or for
its use. Changes to specification can occur at any time without notice.
These materials are provides “as is” without warranty of any kind, either expressed or implied, relating to sale and/or
use including liability or warranties relating to fitness for a particular purpose, consequential or incidental damages,
merchantability, or infringement of any patent, copyright or other intellectual property right. No warrant on the accuracy
or completeness of the information, text, graphics or other items contained within these materials. No liability assumed
for any special, indirect, incidental, or consequential damages, including without limitation, lost revenues or lost profits,
which may result from the use of these materials.
The product is not intended for use in medical, life-support devices, or applications involving potential risk of death,
personal injury, or severe property damage in case of failure of the product.
www.ntrip.com.tw