1
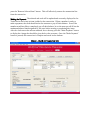
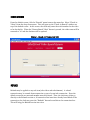
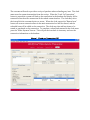
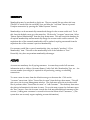
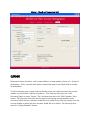
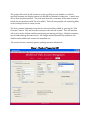
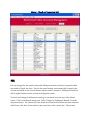
USER MANUAL
Blockwood Check-out and Management System
•
•
•
•
•
•
•
•
Check-out Transaction Functions
Check-in Videos
Refunds
Membership
Accounts
Customers
CRUD Capabilities
Fees
CHECK-OUT TRANSACTION FUNCTIONS
A check-out transaction encapsulates several steps including (a) selecting the member, (b)
adding items to the transaction, and (c) making the payment. Below, you will find a
description for each of these processes.
Selecting the Member. The screen shown below is the default screen at the check-out
counter. From this screen, the clerk can perform all basic check-out functions. The clerk
enters a last name, first name, phone number, or account number in the designated box.
When the “Lookup Members” button is pressed, the system will then search accounts based
on this criteria.
If the clerk entered the account number, only the members on the account will be displayed
in the Members List when the “Lookup Members” button is pressed. If the clerk entered the
last name of the customer, then all customers with that last name will appear in the Members
List. The clerk may then select a member from the list to initiate the transaction.
Adding Items to the Transaction. Rentals, refreshments, sale videos, and premium
memberships may all be added to the same transaction as separate transaction lines. The
clerk should specify a quantity in the respective box and a serial/SKU number for each item
in the transaction. When the “Add Item” button is pressed the item will be added to the
transaction and displayed in the transaction box.
If a customer decides he or she does not want to purchase an item after it has been added to
the transaction, the clerk may select the transaction line in the transaction box and then
press the “Remove Selected Item” button. This will effectively remove the transaction line
from the transaction.
Making the Payment. The subtotal and total will be updated and accurately displayed in the
Totals section each time an item is added to the transaction. When a member is ready to
make a payment, the clerk should invite the customer to pay off their balance. Even if the
member would not like to completely pay off their balance, he or she must pay off all but the
maximum balance limit designated by the store before renting or purchasing any items.
After the clerk enters the amount tendered, he or she may press the “Make Payment” button
to display the change that should be given back to the customer. Once the “Make Payment”
button is pressed, the transaction is complete and saved in the database.
Figure 1. Check-out Transaction GUI
CHECK-IN VIDEOS
From the default screen, click the “Rentals” menu item on the menu bar. Select “Check-in
Videos” from the drop-down menu. This will open up the “Check-in Rentals” window on
top of the default screen. In this screen, the clerk may enter the serial number for the video
to be checked in. When the “Return Rental Video” button is pressed, the video status will be
returned to “in” and the database will be updated.
Figure 1. Check-out Transaction GUI
REFUNDS
Refunds may be applied to any sale item (sale videos and refreshments). A refund
transaction may be a stand-alone transaction or part of a rent/sale transaction. From the
default screen the account and member must be selected. Then, the clerk may either go
directly to the Refunds section or, if transaction line items have already been added to the
transaction, the clerk may press the “Refunds” button located above the transaction box.
This will bring the Refunds section into view.
The customer will need to provide a receipt of purchase when refunding any item. The clerk
must enter the transaction number from the receipt. When the “Look Up Transaction”
button is pressed the system will look up the transaction in the database and display all the
transaction lines from the transaction in the refund transaction box. The clerk may select
the item which the customer desires to return. When the clerk presses the “Return Item”
button, all current transaction lines in the main transaction box will be cleared, and the
refunded item will be added to the transaction. The clerk may then add any items to be
rented or purchased to the transaction. To complete a refund and transaction the clerk must
press the “Make Payment” button. This will put the item back in inventory and save the
transaction information to the database.
Figure 1. Check-out Transaction GUI
MEMBERSHIPS
Memberships may be purchased at check-out. They are treated like any other sale item.
(The SKU is entered into the serial/SKU box, and then the “Add Item” button is pressed.
Complete transaction by pressing the “Make Payment” button.)
Memberships can be automatically renewed and charged to the account credit card. To do
this, from the default screen go to the menu bar. Click on the “Accounts” menu item. Select
“Renew Expired Memberships” from the drop-down menu. This will search the database for
all expired memberships and automatically charge the account credit card for renewal. The
expiration date of the renewed membership will be updated, expiring one month from the
expiration date of the customer’s previous membership.
If a customer would like to cancel a membership, they can simply “purchase” a “Free
Membership” item. This will set the membership level of the customer to “Free.”
Essentially, they have no premium membership advantages.
ACCOUNTS
Accounts are mandatory for all paying customers. Accounts keep track of all customer
information such as Address, Customer Names, Credit Card Info, Membership Type, etc…An
account number (seven digits) is required for all purchasing, renting, or refunding
transactions.
To create a new Account, from the default screen go to the menu bar. Click on the
“Accounts” menu item. Select “Create New Account” from the drop-down menu. This will
take you to the Account Management window. The clerk must select the action he would
like to perform: either “Create New Account” or “Add Customer.” The clerk may then enter
the relative information for the new Account. To save the new account the clerk must press
the “Save” button. Once the Account is saved the clerk may add additional customers to the
account. (Adding new customers is covered in the section below titled “Customers.”) (The
system does not currently support updating account information.)
Figure 1. Check-out Transaction GUI
CUSTOMERS
Information about customers, such as name, address, account number, phone, etc…is kept in
the database. Every customer who makes a transaction must be associated with an account
in the database.
To add a customer to an account, from the default screen, the clerk must enter the account
number you would like to add the customer to. The clerk may then press the “Add
Customer/Update Account” button. The clerk must then select the “Add Customer” radio
button. The clerk may then enter the last name of an existing account member on the
account to which the new customer would like to be added or the clerk may simply enter the
account number to which the new customer would like to be added. The clerk may then
press the “Lookup Members” button.
The system will search for all customers on the specified account number, or with the
specified last name and display them in the BlockWood Members Lookup box. A search may
also be done by phone number. The clerk may then select a member of the same account to
which the new member would like to be added. This will auto populate the remaining fields
in the Lookup Previous Account section.
The New customer information may then be entered and then added by pressing the “Add
Customer” button. This will save the customer to the selected account. This new member
will now be in the database and have purchasing and renting privileges. Multiple customers
may be added during the same session. All changes will be automatically updated in the
database and available and accurate for immediate use.
The system does not currently support updating customer information.
Figure 1. Check-out Transaction GUI
CRUD CAPABILITIES
Create, read, and update abilities are also available for the following: rental video,
conceptual video, store, product, and store product. These items may all be created, read,
and updated in their respective table management windows. These windows may be
accessed from the default screen. Go to the menu bar and click on Inventory Management.
The clerk may then select the inventory that needs updating or adding to from the dropdown menu. This will take you to the Inventory Management window of the selected
inventory. The clerk may then either choose to add or modify an item.
To add an item the clerk must press the “Add” button. This will open a window with empty
text fields in which the clerk may enter the item information. To save the new item to the
database the clerk must press the “Add” button. This will automatically update the
inventory.
To modify an existing item in the inventory the clerk must press select an item from the list
of items in the inventory which are displayed in the inventory table. The clerk must then
press the “Modify” button. This open a window with text fields already populated with the
item’s information. To change the information the clerk must simply click on the text and
modify it. The clerk must then press the “Modify” button. This will save the changes to the
database and will be immediately reflected in the inventory display.
Figure 1. Check-out Transaction GUI
FEES
Fees are charged for late rental returns and delinquent rentals (rentals not returned within
one month of check-out date). Fees for late rental returns are automatically charged to the
account and added to the account balance when a rental is returned. Delinquent rental fees
will be applied when a search is made for delinquent rentals.
To search and charge for delinquent rentals go to the menu bar at the top of the default
screen. Click on the Rentals menu item. Select “Charge for Delinquent Rentals” from the
drop-down menu. The system will then search for all rentals which have not been returned
which have a due date of one month or more previous to the current date. The account
credit card will automatically be charged for the delinquent rental. The fee is equal to the
video purchase price.