1
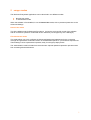
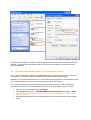
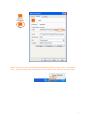
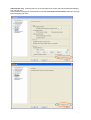
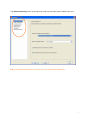
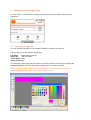
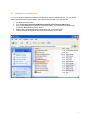
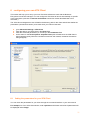
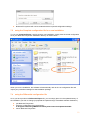
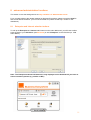
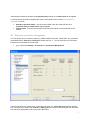
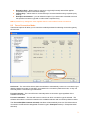
Business Everywhere IT Administrator Guide Version 8.0.7 1 Contents 1 introduction 4 2 usage modes 5 3 getting started 6 4 3.1 installation of Business Everywhere 3.1.1 normal installation 3.1.2 silent installation 6 6 6 3.2 7 launching Business Everywhere in IT Administrator mode basic administration functions 4.1 set an Administrator password 4.2 preventing User access to the Advanced Settings menu 4.2.1 locking all Advanced Settings: 4.2.2 Hiding Individual Screens in the Advanced Settings Menu 5 6 adding your company logo 8 9 9 9 10 13 5.1 creating your logo file 13 5.2 installing the software with your customised logo. 14 5.3 changing the installed logo 15 configuring your own VPN Client 6.1 7 9 finding the parameters for your VPN Client exporting and importing a configuration (.set) file 16 16 18 7.1 exporting a configuration (.set) file 7.1.1 Complete Export 7.1.2 Differential Export 18 18 18 7.2 importing configuration files 19 7.3 using the Complete configuration file for a new installation 20 7.4 using the Differential configuration file 20 advanced administration functions 22 8.1 Enterprise and Internet selection buttons 22 8.2 Enterprise connection management 23 8.3 Force Connection Mode 24 8.4 Authentication Preferences 25 2 9 roaming connection alerts 10 known issues 26 27 10.1 new features in version 8.0.7 27 10.2 other changes since version 8.0.4 27 10.3 Command Line mode 28 10.4 WiFi credential nag when installing .set file 28 3 1 introduction The Business Everywhere Administration mode offers a range of tools for an IT professional to customise the connection manager functionality available to the end user in their business. This can help to ensure business rules relating to cost management and IT security are enforced for all mobile broadband users. Example applications include: Preventing access to some or all of the Advanced Settings by end users Forcing the launch of VPN client on all non-secure Internet connections Restricting usage to (say) a single Private APN if the business has a dedicated Orange link Enforcing data usage limits both in the UK and internationally. (This can include automatic disconnection and prevention or re-connection if required.) Ensuring that the lowest cost bearer (e.g. Private WiFi) is automatically selected when in range Customising the look of the dashboard (adding or removing connection buttons; changing connection text labels; adding your business logo to the display) This guide will show you how to customise these options to suit your specific business needs. Once you have created a dedicated profile for your business, you can export these settings as a file and create your own customised installation package for all users. 4 2 usage modes The Business Everywhere applications can be launched in two different modes: Normal User mode IT Administrator mode When the software is first installed, it runs in Normal User mode, with no password protection on the Advanced Settings. Normal User mode This is the default mode for Business Everywhere. It gives the end-user full control of the software and all connections (unless a customised version has been pre-configured by the IT Manager). IT Administrator mode This mode allows you to pre-configure the Advanced Settings and parameters for the connection manager and generate a customised version of the dashboard specific to your business requirements. These settings can be exported and imported, ready for workgroup deployments. The Administration mode is hidden from the end-users. Optional password-protection prevents users from accessing advanced features. 5 3 getting started 3.1 installation of Business Everywhere NB: As you would expect, Windows operating system Administrator rights are required to perform an installation of the software. If you are preparing to customise your software, it is recommended that you copy the contents of your installation CD (or download the latest CD ISO file from orange.co.uk/businesseverywhere) into a working directory on your PC. This only requires 38MB of disk space. There are two different options to install Business Everywhere. 3.1.1 normal installation Simply double click on setup (BEW Internet UK.exe) in your software folder: 3.1.2 silent installation The silent installation feature allows for background installation of the software without any user prompts or interruption. The user will only know the installation is complete when the Business Everywhere shortcut appears on their desktop. create a shortcut of the setup.exe file right-click on the new shortcut and select Properties in the Target field, add /s at the end of the string “….setup.exe”. Please note the [space] is required after the inverted commas before /s double-click on the shortcut to start the silent installation 6 After the silent installation is complete, a Business Everywhere shortcut will be created on the user’s desktop. On first launch of the software (only), the user will be prompted to accept the End User License Agreement. 3.2 launching Business Everywhere in IT Administrator mode Once you have installed the software, a standard Business Everywhere shortcut will be created on your desktop. (This shortcut will launch Business Everywhere in Normal User mode). Although you can edit the standard shortcut to launch Business Everywhere in IT Administrator mode, it is recommended that you create a new shortcut specifically for this purpose. Once you have created a new shortcut for Business Everywhere, you then need to change the properties of the shortcut to launch Business Everywhere in IT Administrator mode. To do this: • right click on the shortcut and select Properties In the Target string ending ….DESKBOARDAPP -deskboardsplash add -args “-admin” (please note the use of inverted commas for “-admin” and that a [space] is required before – args and “-admin”) select OK and double click on the modified shortcut to launch the software in Administrator mode 7 NB: Be sure that you have quit Business Everywhere fully before you launch it in IT Administrator mode. Check for the Business Everywhere icon in the System Tray, right-click and select Quit. 8 4 basic administration functions 4.1 set an Administrator password You can set a password to prevent unauthorised users from accessing the Administration functions of the software From the Business Everywhere dashboard: • go to Advanced Settings > Administration under Administrator’s password, click Change then proceed to enter and confirm your new password You will now be prompted for the password every time you try to launch the software in IT Administrator mode. 4.2 preventing User access to the Advanced Settings menu This is where the IT Administrator can choose to lock some or all of the Advanced Settings screens from the end user. This is particularly useful when you do not want users to modify connection settings that may impact your connection security policies or data usage limits. 4.2.1 locking all Advanced Settings: go to Advanced settings > Administration check the box Lock Settings click OK 9 The Advanced Settings button on the dashboard is now greyed out in Normal User mode: 4.2.2 Hiding Individual Screens in the Advanced Settings Menu You can choose to hide individual screens in the Advanced Settings menu structure. On the bottom right corner of every menu screen in the IT Administrator mode there is a checkbox Visible by 10 administrator only. Checking this box on the individual menu screen will hide the selected setting(s) from the end user. In the following example we have decided to hide the Threshold and Connections settings to prevent users tampering with them: 11 The Advanced Settings menu in Normal User mode now has these options hidden from view: NB If you hide the main menu item, all of the sub-menu options will be hidden too. 12 5 adding your company logo You can add your company logo or change the branding on the main Business Everywhere dashboard. 5.1 creating your logo file You can use Microsoft Paint or any illustration software to create a new logo file. The logo file must be the following specification: File Name: MainCustomLogo.bmp Image Size: 372 x 66 pixels Colour Depth: 24bit Image Format: bmp You will need to experiment with the position of the logo to avoid it obscuring other areas of the dashboards display. The main “free” area is roughly 25% on the right hand side. NB: to create a transparent background, you will need to set a specific background colour R:255 G:0 B:255 White is not a transparent background colour. 13 5.2 installing the software with your customised logo. You can create an installation package that will automatically place your customised logo on the dashboard. To do this: locate the folder called ExternalBranding installation directory place your new MainCustomLogo.bmp file into this folder. now execute the installation process. Business Everywhere will now always launch with your customised dashboard 14 5.3 changing the installed logo If you have already installed the software and decide you want to change the logo, you can simply replace the MainCustomLogo.bmp file in the software directory with your new logo file quit Business Everywhere go to: C:\Program Files\OrangeBs\BusinessEverywhere\Common\Branding (If you have installed the software in a different location, you need find the right directory containing “BusinessEverywhere” folder.) Replace the original MainCustomLogo.bmp file with your new logo file. Launch Business Everywhere and check the positioning of your logo 15 6 configuring your own VPN Client This section will help you to set up your own VPN client software to work with the Business Everywhere connection manager. You can configure a VPN client to launch automatically on specific or all connections (refer also to Internet and Intranet connection modes described later in this document.) The VPN client management menu will define the directory path for the client and will also define the parameters (command line action) to be used when your client is launched. 6.1 go to Advanced Settings > VPN Client enter the path to your VPN client in the Name field enter the command parameter (i.e. Connect) in the Parameters field do the same for the Access path to stop VPN client (this will make sure the VPN client is disconnected properly when the user disconnects from the network, instead of the session being dropped) finding the parameters for your VPN Client You can check the parameters for your client through the command interface or your user manual For example, for Cisco VPN client solution, enter vpnclient and hit enter and a list of parameters will be displayed under Usage: 16 Example: This is a link to the Cisco VPN client command line guide: http://www.cisco.com/univercd/cc/td/doc/product/vpn/client/rel4_0/admin_gd/vcach4.htm 17 7 exporting and importing a configuration (.set) file 7.1 exporting a configuration (.set) file Once you have completed setting up Business Everywhere to comply with your own business policies, for the end-user, you will be able to export these settings as a configuration file which can then be used for all user installations. (You can also produce a differential file which will make changes or updates to your previously customised settings if required.) • go to Advanced Settings > Administration click on Export and you will be given two options 7.1.1 Complete Export Use this option to export a new configuration file for a new customised install. Click on Complete Export, enter a directory location and name for your file and save the configuration file. (It will be saved with the .set file extension.) 7.1.2 Differential Export Use this option to export a file that makes changes to a previously customised version of Business Everywhere. When you click on Differential Export you will be asked for a reference file. This is a previous version of a Complete Export file that you have created and would like to reference and update or change. 18 When exporting a Differential file, you will need to have the original configuration (.set) file for the software to reference. NB: If you have configured Business Everywhere with additional connection types (e.g. Private WiFi) you will NOT be able to remove these connections with a differential configuration file. If you do not want to remove these connections manually, it is better to prepare another Complete Export configuration file with these connections omitted. 7.2 importing configuration files You can import either Complete or Differential configuration files through the Administration screen. If the installation you are working on has not been previously customised, you can import your Complete configuration file to customise the settings for that installation. If the installation you are working on already has your customised settings, you can import a Differential configuration file to amend or update those settings. go to Advanced Settings > Administration Click on Import Select the file you wish to import and click OK 19 7.3 Business Everywhere will now be restarted with the imported configuration settings using the Complete configuration file for a new installation To use your Complete Export (.set) file during a new installation, simply place the saved configuration file in your Business Everywhere installation directory as shown below. When you run the installation, the software will automatically refer to the .set configuration file and import your pre-defined settings for that installation package. 7.4 using the Differential configuration file Once you have produced a Differential Export file, you can simply place it in the update directory of the installation you wish to change (or populate the update through centralised software distribution.) quit Business Everywhere. Place the configuration file in the directory: C:\Program Files\OrangeBS\BusinessEverywhere\Launcher\Update\Available launch Business Everywhere 20 Once the software has been launched for the first time and has used the differential file, it will be automatically deleted from the program directory. *Note: If the Update folder is not available, please create it. 21 8 advanced administration functions This section covers the settings which are only available in IT Administrator mode. For a complete guide to the general settings for Business Everywhere, please consult the Help file that comes with the software. (This can be accessed as a pdf file via the help ? button on the dashboard.) 8.1 Enterprise and Internet selection buttons To call up the Enterprise and Internet radio buttons on the main dashboard, you will have to either enter the path of your VPN Client (see Section 6) or add “Enterprise” to the VPN field (i.e. VPN Client Name:) Note: The Enterprise and Internet buttons are only displayed on the dashboard if you have an active connection present (e.g. mobile or WiFi) 22 These buttons determine whether the Corporate Proxy settings or the VPN Client will be applied. To specify which connections appear within each mode, please refer to section 8.2 connection management below. 8.2 Enterprise (Intranet) mode – the connections listed under this mode will have your Corporate Proxy and VPN Client settings applied Internet mode – the connections listed under this mode will be connected directly to the network Enterprise connection management You can specify which connection types (e.g. Mobile, Mobile Corporate, Private WiFi, etc.) should be associated with the Internet and Enterprise modes (see 4.2.1). You can also launch a VPN Client based on the designated connection type. • go to Advanced Settings > Connections > Connection Management Use the radio buttons to define which connections will have your Corporate Proxy settings applied. The connections you allow under Internet or Enterprise will only be accessible by the end user when they select the appropriate mode on the main dashboard. 23 Enterprise Only – allows users to connect to a (typically Intranet) network but applies Corporate Proxy and/or VPN Client settings Internet Only – allows users to connect directly to a network without using corporate proxy settings Enterprise and Internet – you can select this option if you want users to be able to access the specified connection type with or without the Corporate Proxy NB Corporate Proxy settings are never applied when the user selects Internet connections 8.3 Force Connection Mode These three options will allow you to control the method permitted for selecting connection types by the end user. Not forced – The user will be able to allow the software to automatically connect to a connection type (Mobile, Mobile Corporate, Private WiFi, etc) based on the connection preference order, or they can manually select a connection type themselves. Forced in manual – The user will have to manually select a connection type regardless of the available connections. Forced in automatic – The user will have no control over which connection type is selected. The software will make the connection based on the available networks and connection preference order. The Force VPN (When Intranet selected) checkbox will automatically launch a VPN Client when a connection is made with the designated connection type in Enterprise mode (i.e. Enterprise button selected). 24 8.4 Authentication Preferences Use the checkbox to specify if you want the user to be asked for their login credentials every time they connect to a network or if they should be automatically logged in based on the saved credentials. If the checkbox is selected, the option for the user to save their credentials (“Automatically use for each connection”) is removed for all connections requiring authentication. go to : Advanced Settings > Connections > Authentication Preferences Note: For the Orange public APNs (businessbroadband & internetvpn) no username and password are required. 25 9 roaming connection alerts go to : Advanced Settings > Connections > Authentication Preferences the Roaming Alert checkbox options are in the lower part of the screen Alert when connecting on a roaming network: By default this box is checked and the user will receive a warning pop-up message every time they connect to a non-UK network. Uncheck this box if you do not want this roaming connection alert to be displayed to the user. Allow the End-User to manage the display of roaming alert: By default the user can cancel future roaming connection alerts by selecting a checkbox option in the initial warning pop-up message. If you uncheck the box, the user will not be presented with this option in the warning message. 26 10 known issues 10.1 new features in version 8.0.7 Reports now includes Roaming mobile data usage in addition to the current Home (UK) usage Advanced Settings now has a new menu option called Threshold. This allows you to program usage limits for both UK and Roaming mobile connections. The action you require when a warning threshold has been reached and after a usage limit has been exceeded is fully customisable. (This includes forcing a disconnection and preventing re-connection.) the Hotspot Locator button has been removed from the dashboard. This is now maintained at the following URL orange.hotspot-directory.com (The connection manager still fully supports Public and Private WiFi connection settings.) Vista 64 drivers are now included for the Option iCON225 and ZTE MF636 USB modems (via device specific updaters), the Option GTMax and GX301 PCMCIA cards, and the Huawei E870 and E881e ExpressCards. Windows 7 support is provided for the above devices (Vista legacy mode) 10.2 other changes since version 8.0.4 • Mobile Corporate > Settings now allows you to specify PAP or CHAP authentication types (or both.) • Connection Order now has checkboxes to allow you to select which of your prioritised connections to be in Automatic Connection mode 27 The path to the General User Interface is now "<root>:\Program Files\OrangeBS\BusinessEverywhere\Launcher\Launcher.exe" -appid DESKBOARDAPP -deskboardsplash Similarly, the path to the IT Adminstrator Interface is now "<root>:\Program Files\OrangeBS\BusinessEverywhere\Launcher\Launcher.exe" -appid DESKBOARDAPP -deskboardsplash -args "-admin" The path for updates using a differential configuration file has changed to <root>:\Program Files\OrangeBS\BusinessEverywhere\Launcher\Update\Available The path for customising your MainCustomLogo file ihas changed to <root>:\Program Files\OrangeBs\BusinessEverywhere\Common\Branding 10.3 Command Line mode This is no longer documented as part of the IT Administrator Guide. If you have an application that requires Business Everywhere command line parameters, please contact Orange Technical PreSales. 10.4 WiFi credential nag when installing .set file The use of public WiFi hotspots functionality in the UK is very limited amongst typical business users. Since version 8.0.4 the standard installation routine does NOT prompt the user to input their WiFi login credentials on first run, since this confuses the majority of users. When preparing your own customised installation (Section 7.3), the end user will be automatically prompted to enter their WiFi credentials on first run again: 28 There are two workarounds for this issue. • • If you never intend to use Orange public WiFi connection then simply remove the Orange WiFi Access #1 connection from your standard settings using the Add/Remove a Connection facility before you export your .set file. If you plan that some of your users may use Orange public WiFi in the future, you can retain the connection but insert a dummy user name and password before you export your .set file. This will prevent the user being prompted for WiFi credentials on first run. 29