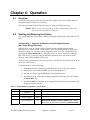
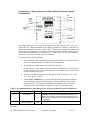
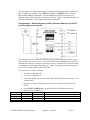
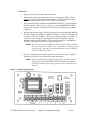
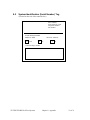
1
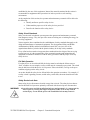
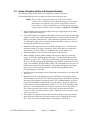
TE / TFH / TFH-HP FLUFF FEED SYSTEM
Part Number: 882.00209.00
Bulletin Number: BF2-600.2
Effective: 4/10/08
Write Down Your Serial Numbers Here For Future Reference:
_________________________
_________________________
_________________________
_________________________
_________________________
_________________________
We are committed to a continuing program of product improvement.
Specifications, appearance, and dimensions described in this manual are subject to change without notice.
DCN No. ____________
© Copyright 2004
All rights reserved.
Shipping Information
Unpacking and Inspection
You should inspect your equipment for possible shipping damage. Thoroughly check the
equipment for any damage that might have occurred in transit, such as broken or loose wiring
and components, loose hardware and mounting screws, etc.
In the Event of Shipping Damage
According to the contract terms and conditions of the Carrier, the responsibility of the
Shipper ends at the time and place of shipment.
Notify the transportation company’s local agent if you discover damage
Hold the damaged goods and packing material for the examining agent’s inspection. Do not
return any goods before the transportation company’s inspection and authorization.
File a claim with the transportation company. Substantiate the claim by referring to the
agent’s report. A certified copy of our invoice is available upon request. The original Bill of
Lading is attached to our original invoice. If the shipment was prepaid, write us for a
receipted transportation bill.
Advise customer service regarding your wish for assistance and to obtain an RMA (return
material authorization) number.
If the Shipment is Not Complete
Check the packing list as back-ordered items are noted on the packing list. In addition to the
equipment itself, you should have:
; Bill of lading
; Packing list
; Operating and Installation packet
; Electrical schematic and panel layout drawings
; Component instruction manuals (if applicable)
Re-inspect the container and packing material to see if you missed any smaller items during
unpacking.
If the Shipment is Not Correct
If the shipment is not what you ordered, contact the parts and service department
immediately at (847) 273-7700. Have the other number and item number available. Hold
the items until you receive shipping instructions.
Returns
Do not return any damaged or incorrect items until you receive shipping instructions from the
shipping department.
TE/TFH/TFH-HP Fluff Feed Systems
Chapter 1: Safety
2
Credit Returns
Prior to the return of any material, authorization must be given by the manufacturer. A
RMS number will be assigned for the equipment to be returned.
Reason for requesting the return must be given.
All returned material purchased from the manufacturer is subject to 15% ($75.00 minimum)
restocking charge.
All returns are to be shipped prepaid.
The invoice number and date or purchase order number and date must be supplied.
No credit will be issued for material that is not within the manufacturer’s warranty period
and/or in new and unused condition, suitable for resale.
Warranty Returns
Prior to the return of any material, authorization must be given by the manufacturer. A
RMS number will be assigned for the equipment to be returned.
Reason for requesting the return must be given.
All returns are to be shipped prepaid.
The invoice number and date or purchase order number and date must be supplied.
After inspecting the material, a replacement or credit will be given, at the manufacturer’s
discretion, if the item is found to be defective in materials or workmanship. Purchased
components are covered under their specific warranty terms.
TE/TFH/TFH-HP Fluff Feed Systems
Chapter 1: Safety
3
Table of Contents
CHAPTER 1: SAFETY ................................................................ 6
1-1
1-2
1-3
How to Use This Manual ............................................................................................. 6
Safety Symbols Used in this Manual .....................................................................6
System Safety Tags ..............................................................................................7
Warnings and Precautions .......................................................................................... 7
Responsibility .............................................................................................................. 8
General Responsibility...........................................................................................8
Operator Responsibility .........................................................................................9
Maintenance Responsibility...................................................................................9
Reporting a Safety Defect .....................................................................................9
CHAPTER 2: FUNCTIONAL DESCRIPTION............................ 10
2-1
2-2
2-3
2-4
2-5
Models Covered in This Manual................................................................................ 10
General Description................................................................................................... 10
Standard Features..................................................................................................... 11
Mechanical Features (All Models) .......................................................................11
Mechanical Features (TE Models).......................................................................11
Mechanical Features (TFH / TFH-HP Models) ....................................................11
Additional Mechanical Features (TFH-HP Models) .............................................11
Electrical Features (All Models)...........................................................................11
Electrical Features (TE Models) ..........................................................................12
Electrical Features (TFH / TFH-HP Models)........................................................12
Additional Electrical Features (TFH-HP Models).................................................12
Optional Features...................................................................................................... 12
Safety Devices and Interlocks ................................................................................... 12
Safety Circuit Standards......................................................................................13
Fail Safe Operation .............................................................................................13
Safety Device Lock-Outs .....................................................................................13
CHAPTER 3: INSTALLATION .................................................. 14
3-1
Uncrating ................................................................................................................... 14
3-2
Mounting Hopper (Units with Remote Grinders) ....................................................... 14
3-3 Setup of System (Units with Remote Grinder)............................................................. 15
3-4
Electrical Connections............................................................................................... 16
3-5
Initial Startup ............................................................................................................. 17
CHAPTER 4: OPERATION ....................................................... 19
4-1
4-2
Overview ................................................................................................................... 19
Starting and Stopping the System............................................................................. 19
Configuration 1: Sequence & Reference From the Digital Operator ..................19
(No Control Wiring Necessary)............................................................................19
Configuration 2: Remote Sequence (2-Wire) & Local Reference (Digital
Operator) .............................................................................................................20
TE/TFH/TFH-HP Fluff Feed Systems
Chapter 1: Safety
4
Configuration 3: Remote Sequence (3-Wire) & Local Reference (Digital
Operator) .............................................................................................................21
Configuration 4: Remote Sequence (2-Wire) & Remote Reference (4-20 mA)..22
Configuration 5: Remote Sequence (3-Wire) & Manual Reference (Speed
Potentiometer) .....................................................................................................23
Configuration 6: Remote Sequence (2-Wire) & Remote Reference (0-10 VDC)
and three digital preset speeds ...........................................................................24
CHAPTER 5: MAINTENANCE .................................................. 26
5-1
5-2
Lubrication................................................................................................................. 26
Greasing Bearings...............................................................................................26
Adjustments............................................................................................................... 26
Grinder Knife Clearance ......................................................................................26
Grinder Knife Sharpening ....................................................................................26
Grinder Drive Belt Tension ..................................................................................26
SCR/Isolator Voltage ...........................................................................................26
CHAPTER 6: CONFIGURABLE SETTINGS............................. 27
6-1
6-2
Settings and Functions.............................................................................................. 27
Recommended Settings ............................................................................................ 27
Motor Drives ........................................................................................................27
Signal Isolator......................................................................................................28
CHAPTER 7: TROUBLESHOOTING ........................................ 30
7-1
General Troubleshooting........................................................................................... 30
CHAPTER 8: APPENDIX .......................................................... 31
8-1
8-2
8-3
Definitions.................................................................................................................. 31
System Identification (Serial Number) Tag................................................................ 32
Technical Assistance (Contact Information).............................................................. 33
Parts Department ................................................................................................33
Service Department.............................................................................................33
Sales Department................................................................................................33
Contract Department ...........................................................................................33
TE/TFH/TFH-HP Fluff Feed Systems
Chapter 1: Safety
5
Chapter 1: Safety
1-1
How to Use This Manual
Use this manual as a guide and reference for installing, operating, and maintaining your
equipment. The purpose is to assist you in applying efficient, proven techniques that enhance
equipment productivity.
This manual covers only light corrective maintenance. No other maintenance should be
undertaken without first contacting a service engineer.
The Functional Description section outlines models covered, standard features, and optional
features. Additional sections within the manual provide instructions for installation, preoperational procedures, operation, preventive maintenance, and corrective maintenance.
The Installation chapter includes required data for receiving, unpacking, inspecting, and setup
of the equipment. We can also provide the assistance of a factory-trained technician to help
train your operator(s) for a nominal charge. This section includes instructions, checks, and
adjustments that should be followed before commencing with operation of the equipment.
These instructions are intended to supplement standard shop procedures performed at shift,
daily, and weekly intervals.
The Operation chapter includes a description of electrical and mechanical controls, in
addition to information for operating the equipment safely and efficiently.
The Maintenance chapter is intended to serve as a source of detailed assembly and
disassembly instructions for those areas of the equipment requiring service. Preventive
maintenance sections are included to ensure that your equipment provides excellent, long
service.
The Troubleshooting chapter serves as a guide for identification of most common problems.
Potential problems are listed, along with possible causes and related solutions.
The Appendix contains technical specifications, drawings, schematics, and parts lists. A
spare parts list with part numbers specific to your machine is provided with your shipping
paperwork package. Refer to this section for a listing of spare parts for purchase. Have your
serial number and model number ready when ordering.
Safety Symbols Used in this Manual
The following safety alert symbols are used to alert you to potential personal injury hazards.
Obey all safety messages that follow these symbols to avoid possible injury or death.
Danger!
DANGER indicates an imminently hazardous situation which, if not
avoided, will result in death or serious injury.
Warning!
WARNING indicates a potentially hazardous situation or practice which,
if not avoided, could result in death or serious injury.
Caution!
CAUTION indicates a potentially hazardous situation or practice which, if
not avoided, may result in minor or moderate injury or in property
damage.
TE/TFH/TFH-HP Fluff Feed Systems
Chapter 1: Safety
6
System Safety Tags
High Voltage
Inside Enclosure
1-2
Read Operation and
Installation Manual
Warnings and Precautions
Our equipment is designed to provide safe and reliable operation when installed and operated
within design specifications, following national and local safety codes. This may include, but
is not limited to OSHA, NEC, CSA, SPI, and any other local, national and international
regulations.
To avoid possible personal injury or equipment damage when installing, operating, or
maintaining this equipment, use good judgment and follow these safe practices:
; Read and follow these operation and installation instructions when installing,
operating, and maintaining this equipment. If these instructions become
damaged or unreadable, additional copies are available from the manufacturer.
; Follow all SAFETY CODES.
; Wear SAFETY GLASSES and WORK GLOVES.
; Work only with approved tools and devices.
; Disconnect and/or lock out power before servicing or maintaining the equipment.
; Use care when LOADING, UNLOADING, RIGGING, or MOVING this
equipment.
; Operate this equipment within design specifications.
; OPEN, TAG, and LOCK ALL DISCONNECTS before working on equipment.
You should remove the fuses and carry them with you.
; Make sure the equipment and components are properly GROUNDED before you
switch on power.
; Use EXTEREME CAUTION when working with system. HIGH VACUUM can
be dangerous. Keep body parts, tools, clothing, and debris away from vacuum inlets.
; When welding or brazing in or around this equipment, make sure VENTILATION is
ADEQUATE. PROTECT adjacent materials from flame or sparks by shielding with
sheet metal. An approved FIRE EXTINGUISHER should be close at hand and
ready for use if needed.
; Do not restore power until you remove all tools, test equipment, etc., and the
equipment and related components are fully reassembled.
; Only PROPERLY TRAINED personnel familiar with the information in this
manual should work on this equipment.
We have long recognized the importance of safety and have designed and manufactured our
equipment with operator safety as a prime consideration. We expect you, as a user, to abide
by the foregoing recommendations in order to make operator safety a reality.
TE/TFH/TFH-HP Fluff Feed Systems
Chapter 1: Safety
7
1-3 Responsibility
These machines are constructed for maximum operator safety when used under standard
operating conditions and when recommended instructions are followed in the maintenance
and operation of the machine.
All personnel engaged in the use of the machine should become familiar with its operation as
described in this manual.
Proper operation of the machine promotes safety for the operator and all workers in its
vicinity.
Each individual must take responsibility for observing the prescribed safety rules as outlined.
All warning and danger signs must be observed and obeyed. All actual or potential danger
areas must be reported to your immediate supervisor.
General Responsibility
No mater who you are, safety is important. Owners, operators and maintenance personnel
must realize that every day, safety is a vital part of their jobs.
If your main concern is loss of productivity, remember that production is always affected in a
negative way following an accident. The following are some of the ways that accidents can
affect your production:
• Loss of a skilled operator (temporarily or permanently)
• Breakdown of shop morale
• Costly damage to equipment
• Downtime
An effective safety program is responsible and economically sound.
Organize a safety committee or group, and hold regular meetings. Promote this group from
the management level. Through this group, the safety program can be continually reviewed,
maintained, and improved. Keep minutes or a record of the meetings.
Hold daily equipment inspections in addition to regular maintenance checks. You will keep
your equipment safe for production and exhibit your commitment to safety.
Please read and use this manual as a guide to equipment safety. This manual contains safety
warnings throughout, specific to each function and point of operation.
TE/TFH/TFH-HP Fluff Feed Systems
Chapter 1: Safety
8
Operator Responsibility
The operator’s responsibility does not end with efficient production. The operator usually has
the most daily contact with the equipment and intimately knows its capabilities and
limitations.
Plant and personnel safety is sometimes forgotten in the desire to meet incentive rates, or
through a casual attitude toward machinery formed over a period of months or years. Your
employer probably has established a set of safety rules in your workplace. Those rules, this
manual, or any other safety information will not keep you from being injured while operating
your equipment.
Learn and always use safe operation procedures. Cooperate with co-workers to promote safe
practices. Immediately report any potentially dangerous situation to your supervisor or
appropriate person.
Maintenance Responsibility
Proper maintenance is essential to safety. If you are a maintenance worker, you must make
safety a priority to effectively repair and maintain equipment.
Before removing, adjusting, or replacing parts on a machine, remember to turn off all electric
supplies and all accessory equipment at the machine, and disconnect and lockout electrical
power. Attach warning tags to the disconnect switch.
Be sure that all non-current carrying parts are correctly connected to earth ground with an
electrical conductor that complies with current codes. Install in accordance with national and
local codes.
When you have completed the repair or maintenance procedure, check your work and remove
your tools, rigging, and handling equipment.
Reporting a Safety Defect
If you believe that your equipment has a defect that could cause injury, you should
immediately discontinue its use and inform the manufacturer.
The principle factors that can result in injury are failure to follow proper operating procedures
(i.e. lockout/tagout), or failure to maintain a clean and safe working environment.
TE/TFH/TFH-HP Fluff Feed Systems
Chapter 1: Safety
9
Chapter 2: Functional Description
2-1
Models Covered in This Manual
This manual provides operation, installation, and maintenance instructions for Fluff Feed
Systems. Model numbers are listed on the serial tag. Make sure you know the model and
serial number of your equipment before contacting the manufacturer for parts or service.
TE fluff feed hoppers are used to feed up to 20% film edge trim into the throat of a 2.5”
extruder. They cannot be used on extruders equipped with a grooved feed throat.
TFH and TFH-HP fluff feed hoppers are used to feed up to 50% film edge into the throat of
3.5” to 10” extruder. They cannot be used on extruders equipped with a grooved feed throat.
2-2
General Description
The TE direct recycle fluff reclaim systems provide the processor with a simple, easy to
operate method of reclaiming edge trim and unprinted roll stock.
The system generally consists of:
An edge trim venturi blower to convey the edge trim from the winder trim station to the
grinder on the TE system.
An edge trim air exhauster designed to exhaust the majority of the trim conveying air and
direct the edge trim into the grinder chamber.
A single or dual stage film grinder with small hole size screen.
A centrifugal fluff-conveying blower.
A high efficiency cyclone separator installed on top of the TE fluff feed hopper assembly,
to exhaust the majority of the conveying air from the fluff blower.
A dual stage SCR drive fluff feed hopper to meter and mix the ground film scrap with
virgin material. The fluff hopper is mounted directly on the extruder throat, mixing the
ground scrap with virgin pellets.
TE/TFH/TFH-HP Fluff Feed Systems
Chapter 2: Functional Description
10 of 33
2-3 Standard Features
Mechanical Features (All Models)
IR Compensation.
Machine-mount flange.
Dependable auger metering.
Mild steel material contact surfaces.
Mechanical Features (TE Models)
Up to 20% fluff re-feed rate (Re-feed rate is based on feeding 1 mil medium slip LDPE film
scrap to a die limited extrusion system. If the system is limited by the extruder, some loss in
output rate may occur when feeding higher percentages of fluff.).
Vertical Mix Auger, horizontal fluff metering auger.
Individual speed adjustments on fluff auger and Verti-Blend mixer.
Mechanical Features (TFH / TFH-HP Models)
Up to 30% maximum fluff re-feed rate (Fluff feedback rate is based on a non-extruder
limited line, recycling 1.25 mil LDPE medium slip film. Extruder screw speed increase may
be required to obtain maximum quoted feed rate. If extruder is running 100% plasticising
capacity on virgin material, loss in output may occur during fluff feeding.
Note: Typical TFH-HP Models fluff feed rates exceed 30% of extruder output
and are know to be as high as 50%. Maximum fluff feed percentages will
vary depending on application.
Independently-adjustable dual control utilizing separate vertical mix auger and
separate horizontal fluff metering auger. Eliminates extruder surging.
Individual speed adjustments using variable frequency drives.
Additional Mechanical Features (TFH-HP Models)
High performance “Verti-Blend” vertical feed auger incorporates vertical compaction and
mixing design to allow maximum fluff feeding.
Vertical side access door on pedestal for easier cleaning and maintenance.
Heavy-duty ICS100 gearbox assemblies.
Electrical Features (All Models)
• 230/1/60 (unless otherwise noted) supply voltage
• Extruder following signal isolator
• Fully accessible NEMA 12 electrical control enclosure
TE/TFH/TFH-HP Fluff Feed Systems
Chapter 2: Functional Description
11 of 33
Electrical Features (TE Models)
• Horizontal and vertical drive DC motors (SCR) 180 VDC
• Individual voltmeters
Electrical Features (TFH / TFH-HP Models)
• AC inverter-duty motors
• Ammeters to monitor both drives
• Fluff hopper bridge breaker
• Optical level sensor with delay timer, with field connection to grinder feed rolls or alarm
device
• Precision speed regulation
• 98% displacement power factor
• 98% drive efficiency
• Internal overload protection
• Programmable auto restart
• Adjustable acceleration and deceleration
Additional Electrical Features (TFH-HP Models)
• Heavy-duty fan-cooled brushless VFD AC vector duty motors with Yaskawa/MagneTek
GPD 515 variable-frequency Vector drives
• 460/3/60 supply voltage
2-4
Optional Features
Options marked with “*” indicate options that can be factory installed or retrofitted in the
field.
Special Voltage Operation.
90° feed pedestal.
Fluff hopper with bottom clean-out door, including safety switch.
Special mounting flange or throat adapter.
Special cyclone hole in fluff hopper cover.
Cyclone separators.
High level sensor with delay timer (TE Series only).
2-5
Safety Devices and Interlocks
This section includes information on safety devices and procedures that are inherent to the
Fluff Feed System. This manual is not intended to supersede or alter safety standards
TE/TFH/TFH-HP Fluff Feed Systems
Chapter 2: Functional Description
12 of 33
established by the user of this equipment. Instead, the material contained in this section is
recommended to supplement these procedures in order to provide a safer working
environment.
At the completion of this section, the operator and maintenance personnel will be able to do
the following:
•
Identify and locate specific safety devices.
•
Understand the proper use of the safety devices provided.
•
Describe the function of the safety device.
Safety Circuit Standards
Safety circuits used in industrial systems protect the operator and maintenance personnel
from dangerous energy. They also provide a means of locking out or isolating the energy for
servicing equipment.
Various agencies have contributed to the establishment of safety standards that apply to the
design and manufacture of automated equipment. The Occupational Safety and Health
Administration (OSHA) and the Joint Industrial council (JIC) are just a few of the
organizations that have joined with the plastics industry to develop safety standards.
Every effort has been made to incorporate these standards into the design of the conveying
system; however, it is the responsibility of the personnel operating and maintaining the
equipment to familiarize themselves with the safety procedures and the proper use of any
safety devices.
Fail Safe Operation
If a safety device or circuit should fail, the design must be such that the failure causes a
“Safe” condition. As an example, a safety switch must be a normally open switch. The switch
must be held closed with the device it is to protect. If the switch fails, it will go to the open
condition, tripping out the safety circuit.
At no time should the safety device fail and allow the operation to continue. For example, if
a safety switch is guarding a motor, and the safety switch fails, the motor should not be able
to run.
Safety Device Lock-Outs
Some safety devices disconnect electrical energy from a circuit. The safety devices that are
used in this fluff feed system are primarily concerned with electrical power disconnection.
WARNING!
Always disconnect and lockout all electrical power and pneumatic (i.e. compressed air)
sources prior to servicing the Fluff Feed System. Failure to do so may result in
serious injury. No one but the person who installed the lockout may remove it.
TE/TFH/TFH-HP Fluff Feed Systems
Chapter 2: Functional Description
13 of 33
Chapter 3: Installation
3-1
Uncrating
Fluff feed systems are shipped mounted on a skid, enclosed in a plastic wrapper, and
contained in a cardboard box.
1. Pry the crating away from the skid.
Note: Remove the nails holding the box to the skid and lift the box
off carefully; avoiding staples in the 1’ x 4’ wood supports.
Cut the steel banding.
2. Use a pry bar to remove the blocks securing the unit to the skid.
3. Lift unit from sides. Use a pry bar if necessary to carefully remove the
skid from the unit.
4. Lower slowly.
3-2
Mounting Hopper (Units with Remote Grinders)
1. Remove the material supply hopper from the extruder.
2. Install the fluff feed hopper assembly on the extruder throat. The holes
will normally have to be drilled to match the extruder flange.
Note: When installing, check the vertical segmented flight auger to ensure that
it is within ½” to ¾” from the top of the extruder screw flight (See figure
1). This will ensure proper feeding of the fluff / pellet mixture without
bridging.
Figure 1: Mounting Clearance
TE/TFH/TFH-HP Fluff Feed Systems
Chapter 3: Installation
14 of 33
3-3 Setup of System (Units with Remote Grinder)
This section provides the procedures for configuring your fluff feed system.
We recommend that you carry out these procedures in the order given here.
Note: If the extruder is equipped with any type of throat other than a
cylindrical one, the fluff feed system should be equipped with a custom
fitted adapter to provide the proper throat configuration to allow for
proper feeding. A fluff system should never be installed on a square or
tangential throat extruder without an adapter. (CONSULT FACTORY)
1. After the hopper has been installed, replace the virgin supply hopper on top of the
angled virgin feed pedestal pipe.
2. If the fluff feed hopper is equipped with a photo cell level switch used for controlling
grinder feed rolls, ensure that a compressed air line is connected to the air blow offs
that keep the photo cell heads clean. This air should be regulated to about 1 P.S.I.
Too much air blowing in these cleanoffs can cause the blower cyclone to carryover
blowing fluff particles out of the cyclone.
3. Install the cyclone separator on top of the fluff feed hopper cover. The bolt circle
will allow rotation in 15 degree increments. If the cyclone has to be oriented at a
special angle, new holes will have to be drilled in the cyclone flange to fit.
4. Install the grinder at a convenient location adjacent to the extruder.
5. When installing, open the grinder chamber and inspect to ensure it is clean and
empty. At this time, check the grinder blade gap. The rotor blades and bed knife
should have a gap of .002”. This is preset at the factory when the unit was test run.
However, this gap can change during shipping, and should be rechecked. If a feeler
gauge is not available, adjust the blades so they will cut through one or two pieces of
notebook paper placed between the blades. The grinder will operate with a larger
gap, however it will run quieter and more efficient with sharp blades and the
recommended gap of .002-.004”.
6. Install the edge trim exhauster on top of the grinder and orient just as was done with
the cyclone.
7. Install the fluff conveying tubing between the fluff blower on the grinder and the
fluff feed hopper cyclone inlet. The interconnecting tubing is normally not furnished
with the system and must be purchased locally. We recommend that the system be
piped with standard thin wall aluminum conveying tubing. The blower outlet and
cyclone inlet are sized to match and are usually 3”, 4”, or 5” O.D. depending on the
system size. We recommend the use of long sweep elbows close to the cyclone. If
flex is used to connect to the cyclone, it can create poor flow and cause some
carryover of fines out of the top of the cyclone. Improper air flow velocity can also
cause some carryover.
8. If the grinder is equipped with feed rolls, ensure that a proper set up is provided to
allow the rolls to be unrolled easily and not put excessive loading on the feed roll
drive. This can result in premature failure of the gearbox or SCR drive.
TE/TFH/TFH-HP Fluff Feed Systems
Chapter 3: Installation
15 of 33
9. Install the edge trim venturi blower adjacent to the extruder system winder. Place the
two (2) pickup bellmouths close to the trim knives and connect the flex hose from the
bellmouth to the “Y” tube. Connect the flex from the “Y” tube to the venturi inlet.
The system will perform more efficiently with aluminum conveying tubing and long
sweep elbows piped from the venturi outlet to the air exhauster on top of the grinder.
10. When installing the edge trim conveying tube from the venturi to the grinder air
exhauster, leave an airgap between the end of the tubing and the exhauster inlet. We
recommend a gap of at least 3-6”, and more if possible. This will allow the grinder to
be opened for blade maintenance easily, and will prevent the cutting chamber from
being overpressurized by the trim blower air. Recheck the edge trim piping to ensure
there are no sharp edges, rivets, etc. protruding into any of the trim conveying pipes.
This will cause intermittent trim hangups and can cause the grinder to jam up with
wads of trim or cause the winder trims to wrap.
3-4 Electrical Connections
Refer to local electrical codes, the schematic and connection diagrams supplied with this unit
and the serial tag for wiring considerations. Run all wiring in conduit if codes require it.
1. After the system is mechanically installed, field connect all the appropriate power
leads.
2. The fluff feed hopper control signal isolator will have to be connected to the extruder
DC drive circuit to allow slaved in performance to keep the fluff feed hopper speeds
in relation to the extruder screw speed. CONSULT THE FACTORY IF YOU
HAVE ANY QUESTIONS.
Caution!
If this is done improperly with the SCR drive units, blown fuses and
ultimate drive failures will occur on the vertical mixer and the fluff
metering auger devices.
TE/TFH/TFH-HP Fluff Feed Systems
Chapter 3: Installation
16 of 33
3-5
Initial Startup
Once the mechanical and electrical components of the fluff feed system have been installed,
the following will need to be checked prior to startup:
1. On systems equipped with hydraulic drives, check the cooling water flow. Do not
run the unit without cooling water or damage to the seals will occur.
2. After the electrical wiring has been completed, check all motor rotations for proper
rotation. Motor rotations must be counter-clockwise from drive end.
Upon Startup:
1. When the extruder has reached production speed, turn on the reclaim system fluff
feed hopper. Adjust the SCR speed on the vertical mixer to approximately 75%.
Watch the drive meter to see that it is not fluctuating and is operating smoothly. If
the meter is fluctuating, slow the drive speed adjustment. If the meter is still
fluctuating, reinspect the vertical mixing auger for binding. If there is no binding, the
material being fed probably has a very low slip coefficient (such as stretch wrap).
The mixer auger should be turned down to a smaller diameter to allow easier
movement. This will have to be done on a trial and error basis to find the proper
clearance between the mixer auger and the fluff feed vertical mixer throat that will
allow this particular material to be mixed easily.
In some cases, an additional mixer auger will have to be purchased and switched if a
wide range of products are to be run on the same extruder. Good performance on a
hard to feed resin might cause a lesser performance on an easy to feed resin. The
fluff feed unit has more adjustments than competitive single screw units, however
there are extreme cases where a mixer change may be necessary.
2. After the vertical mixer has been started properly, start the film grinder and the edge
trim blower. When the edge trim is started, position the bellmouth as close to the
knife and align as straight as possible. This will provide good performance on
conveying the trim away from the winder trim roller.
After the edge trim has reached the grinder exhauster, adjust the upper exhauster
baffle to blow only as much air as necessary to convey the edge trim down the
exhauster into the grinder chamber. Adjust the lower grinder outlet tube air
adjustment to provide as much suction as possible without screen blinding. Watch
the fluff movement through the screen to ensure it is coming out O.K. If fluff is
blowing out of the clearance hole between the grinder rotor shaft and the chamber
side, this indicates that the airflow into the top of the grinder chamber is excessive.
Adjust the upper exhauster baffle and the lower suction adjustment to ensure that the
chamber I under slightly negative pressure.
3. When the ground fluff is being conveyed into the fluff hopper (if the hopper is
equipped with a photo cell level switch), let the fluff build up in the fluff feed hopper
by running the horizontal auger slower than needed to feed the amount of fluff being
conveyed. This sensor should be checked for operation and adjustment. Adjust the
sensitivity as necessary (Don’t forget to shut off the edge trim blower and grinder
when doing this or a mess will be created.).
4. After the level switch has been adjusted and is operating properly, start the horizontal
metering auger. This auger should be started slowly and adjusted so it is running
slightly faster than the amount of edge trim being ground.
TE/TFH/TFH-HP Fluff Feed Systems
Chapter 3: Installation
17 of 33
5. After the system is running satisfactorily on edge trim, start the grinder feed rolls.
Start out with the speed slow and balance the amount of roll scrap with the fluff
hopper horizontal metering auger speed until the proper percentage of fluff is being
fed. The TE hopper should be operating in a “Starve Fed” condition with only
enough fluff in the hopper as necessary to keep the auger full. The grinder feed rolls
should run continuously and not be starting and stopping all the time. Because the TE
hopper is small, if the feed rolls are running too fast and the extruder is stopped
quickly, a blow over can occur.
Caution!
The level switch in the fluff hopper is really only a safety measure to stop
the feed rolls to prevent overfilling.
Note: A typical TE system will feed back approximately 20% of the total
extruder. A typical TFH system will feed back 30% of the total extruder
throughput. (This is based on 1-1/2 mil medium slip LDPE flim being
recycled, and can very with gauge, slip content, etc.) (If the fluff feed is
mounted on a co-extrusion line, the rate will be in relation to the
throughput of the extruder the feeder is mounted on, not the
throughput of the entire extrusion system.)
6. Observe the shut down operation of the SCR signal isolator the first time the extruder
is slowed or stopped to ensure that the unit is slaved in properly and is slowing in the
same relationship as the extruder screw.
TE/TFH/TFH-HP Fluff Feed Systems
Chapter 3: Installation
18 of 33
Chapter 4: Operation
4-1
Overview
Your fluff feed system provides the processor with a simple, easy way to reclaim edge trim
and unprinted roll stock from your extruder.
This section provides the procedures necessary for using your fluff feed system.
Note: Before you carry out any of the procedures in this chapter, the system
must be set up as described in Chapter 3.
4-2
Starting and Stopping the System
This section highlights several of the common operational configurations of the GPD 515/G5
Drive.
Configuration 1: Sequence & Reference From the Digital Operator
(No Control Wiring Necessary)
When the drive is set up with the sequence and the reference coming from the digital
operator, it is in “Local” control. Local control is often used during startup to verify motor
operation, rotation, etc. The drive can be temporarily placed in “Local” control simply by
pressing the LOCAL/REMOTE key. When the drive is in “Local” control, the SEQ and
REF LEDs are off. If power is removed and then restored, the drive will come up in the
“Remote” mode (SEQ and REF LEDs are on).
The drive can be programmed so that even if power is lost, the drive will come up in the local
mode (see Table 2 below).
To operate the drive, do the following:
1. Program the frequency reference into parameter U1-01 (See Table 2 for details).
2. Start the drive by pressing the RUN key on the digital operator.
3. Stop the drive by pressing the STOP key on the digital operator.
4. The direction of the motor can be changed regardless of the motor speed by pressing
the FWD / REV key.
5. Pressing the JOG key when the drive is stopped will cause the motor to run at the jog
frequency reference (d1-09).
Table 1: Programming required for “Local” mode
Parameter
b1-01
b1-02
E2-01
U1-01
Display Text
Reference Source
Operator
Run Source Operator
Motor Rated FLA
E2-01 = X.XX A
Frequency Ref
U1-01= XX.XX HZ
Value
0
Description
Sets the frequency reference to come from the digital operator.
0
User
Set
User
Set
Sets the sequence to come from the digital operator.
Sets the motor full load amps.
Sets the desired frequency reference. Settable by pressing
MENU, DATA / ENTER, then DATA / ENTER, again. Use the
arrow keys to set the desired value then press DATA / ENTER.
NOTE: Programming steps listed above assume no pior adjustments to the drive have been made.
TE/TFH/TFH-HP Fluff Feed Systems
Chapter 4: Operation
19 of 33
Configuration 2: Remote Sequence (2-Wire) & Local Reference (Digital
Operator)
This configuration is used when the sequence comes from a remote source, such as a relay or
a PLC. It can also be used with a maintained switch when it is desirable to have the drive
restart on restoration of power. It should not be used where safety of attending personnel
might be threatened by a restart.
To operate the drive, do the following:
1. Program the frequency reference to parameter U1-01 (See Table 3 for details).
2. Close (K1) to Run Forward at the frequency set in U1-01.
3. Close (K2) to Run Reverse at frequency set in U1-01.
4. If both (K1) & (K2) are closed, the drive stops and displays the error message: “EF
External Fault.”
5. If the LOCAL / REMOTE key is pressed, the drive will behave the same as
illustrated in Configuration 1.
Table 2: Programming Required for Remote 2-wire Sequence & Local Reference
Parameter
A1-03
Display Text
Init Parameters
No Initalize
Value
2220
b1-01
Reference Source
Operator
Motor Rated FLA
E2-01 = X.XX A
Frequency Ref
U1-01 = XX.XX Hz
0
E2-01
U1-01
User
Set
User
Set
Description
This parameter can be found under the “Initalize” menu. CAUTION:
Setting this value will reset all parameters to their original factory settings
(all previous adjustments will be lost) When the drive completes the
reset, this parameter returns to 0 – “No Initalize”.
Sets the frequency reference to come from the digital operator. Display
will read “Reference Source Operator”
Sets the motor full load amps.
Sets the desired frequency reference. Settable by pressing MENU,
DATA / ENTER, then DATA / ENTER, again. Use the arrow keys to set
the desired value, then press DATA / ENTER.
NOTE: After the above adjustments have been made, the DRIVE, SEQ and STOP LEDs will be illuminated.
TE/TFH/TFH-HP Fluff Feed Systems
Chapter 4: Operation
20 of 33
Configuration 3: Remote Sequence (3-Wire) & Local Reference (Digital
Operator)
This configuration is best when a person rather than an external controller (PLC, relay, etc.)
controls the drive.
To operate the drive, do the following:
1. Program the frequency reference to parameter U1-01 (See Table 4 for details).
2. Close pushbutton (PB1) momentarily while pushbutton (PB2) is closed, and the drive
will run at the frequency setting in U1-01. Pushbutton (PB1) does NOT need to be
maintained.
3. Open pushbutton (PB2) at any time and the drive will stop.
4. If switch (SW1) is open, the drive will run in the forward direction. If switch (SW1)
is closed, the drive will run in the reverse direction. Switch (SW1) can be operated
with the drive running at any speed.
5. If the LOCAL / REMOTE key is pressed, the drive will behave the same as
illustrated in Configuration 1.
Table 3: Programming Required for Remote 3-wire Sequence & Local Reference
Parameter
Display Text
Value
A1-03
Init Parameters
No Initalize
3330
B1-01
E2-01
U1-01
Reference Source
Operator
Motor Rated FLA
E2-01= X.XX A
Freqency Ref
U1-01=XX.XX HZ
0
User
Set
User
Set
Description
This parameter can be found under the “Initalize” menu.
CAUTION: Setting this value will reset all parameters to their original
factory settings (all previous adjustments will be lost) When the drive
completes the reset, this parameter returns to 0 – “No Initialize”.
Sets the frequency reference to come from the digital operator. Display
will read “Reference Source, Operator”
Sets the motor full load amps.
Sets the desired frequency reference. Settable by pressing MENU,
DATA / ENTER, then DATA / ENTER, again. Use the arrow keys to set
the desired value then press DATA / ENTER.
NOTE: After the above adjustments have been made, the DRIVE, FWD, SEQ and STOP LEDs will be illuminated.
TE/TFH/TFH-HP Fluff Feed Systems
Chapter 4: Operation
21 of 33
Configuration 4: Remote Sequence (2-Wire) & Remote Reference (4-20 mA)
This configuration is used when the start & stop signals and the frequency reference come
from a remote source, such as a PLC. It can also be used with a maintained switch when it is
desirable to have the drive restart on restoration of power. It should not be used where safety
of attending personnel might be threatened by a restart.
To operate the drive, do the following:
1. Close (K1) to Run Forward.
2. Close (K2) to Run Reverse.
3. If both (K1) & (K2) are closed, the drive stops and displays the error message: “EF
External Fault”.
4. Frequency reference is proportional to the signal level at Terminal 14. 4mA = 0 Hz,
12 mA = 30 Hz, & 20 mA = 60 Hz.
5. If the LOCAL / REMOTE key is pressed, the drive will behave the same as
illustrated in Configuration 1.
Table 4: Programming Required for Remote 2-wire Sequence & Remote (4-20 mA) Reference
Parameter
A1-03
Display Text
Init Parameters
No Initialize
Value
2220
E2-01
Motor Rated FLA
E2-01 = X.XX A
User
Set
Description
This parameter can be found under the “Initialize” menu.
CAUTION: Setting this value will reset all parameters to their original
factory settings (all previous adjustments will be lost) When the drive
completes the reset, this parameter returns to 0 – “No Initialize”.
Sets the motor full load amps.
NOTE: After the above adjustments have been made, the DRIVE, SEQ, REF and STOP LEDs will be illuminated.
TE/TFH/TFH-HP Fluff Feed Systems
Chapter 4: Operation
22 of 33
Configuration 5: Remote Sequence (3-Wire) & Manual Reference (Speed
Potentiometer)
This configuration is best when a person rather than an external controller (PLC, relay, etc.)
controls the drive. Both potentiometers (R1) & (R2) should have a resistance value between
2000Ω and 3000Ω and be rated for at least 1 Watt. The trim pot is optional, but without it the
manual speed pot will output 10V (60 Hz) at just two-thirds of its rotation. A short jumper
wire needs to be installed between terminals 6 & 11. This jumper wire forces the frequency
reference to come from the analog value on terminal 16.
To operate the drive, do the following:
1. Close pushbutton (PB1) momentarily while pushbutton (PB2) is closed and the drive
will start. Pushbutton (PB1) does NOT need to be maintained.
2. Open pushbutton (PB2) at any time and the drive will stop.
3. If switch (SW1) is open, the drive will run in the forward direction. If switch (SW1)
is closed, the drive runs in the reverse direction. Switch (SW1) can be operated with
the drive running at any speed.
4. Frequency reference is proportional to the signal level at Terminal 16. 0V = 0 Hz,
5V = 30 Hz, & 10V = 60 Hz.
5. If the LOCAL / REMOTE key is pressed, the run & stop commands will change
over to the digital operator, but the frequency reference will still come from the
manual speed pot. The jumper installed between terminals 6 and 11 forces the
reference to come from terminal 16 regardless of the Local / Remote setting.
Table 5: Programming Required for Remote 3-wire Sequence & Manual (Speed Pot) Reference
Parameter
A1-03
Display Text
Init Parameters
No Initialize
Value
3330
E2-01
Motor Rated FLA
E2-01= X.XX A
User
Set
Description
This parameter can be found under the “Initialize” menu.
CAUTION: Setting this value will reset all parameters to their
original factory settings (all previous adjustments will be lost)
When the drive completes the reset, this parameter returns to 0
– “No Initialize”.
Sets the motor full load amps.
NOTE: After the above adjustments have been made, the DRIVE, FWD, SEQ, REF, and STOP LEDs will be
illuminated.
TE/TFH/TFH-HP Fluff Feed Systems
Chapter 4: Operation
23 of 33
After the jumper wire and potentiometers are installed and the programming is complete, the
trim pot needs to be calibrated. Press MENU, then DATA / ENTER, and verify that the
SEQ and REF LEDs are illuminated. Turn the Manual Speed Pot (R1) all the way up.
Adjust the trim pot (R2) so that the “Frequency Reference” display is just flickering between
59.99 Hz and 60.00 Hz. This completes the trim pot calibration.
Configuration 6: Remote Sequence (2-Wire) & Remote Reference (0-10 VDC)
and three digital preset speeds
This configuration is used when the start & stop signals and the frequency reference comes
from a remote source such as a PLC. It can also be used with a maintained switch when it is
desirable to have the drive restart on restoration of power. It should not be used where safety
of attending personnel might be threatened by a restart. Two digital speeds and a Jog speed
can be selected using switches (SW1) thru (SW3).
To operate the drive, do the following:
1. Close (K1) to Run Forward.
2. Close (K2) to Run Reverse.
3. If both (K1) & (K2) are closed, the drive stops and displays the error message: “EF
External Fault.”
4. Frequency reference is determined by the status of switches (SW1), (SW2) and
(SW3).
5. If the LOCAL / REMOTE key is pressed, the drive will behave the same as
illustrated in Configuration 1.
(SW1) Status
Open
Open
Closed
Don’t Care
(SW2) Status
Open
Closed
Closed
Don’t Care
(SW3) Status
Open
Open
Open
Closed
TE/TFH/TFH-HP Fluff Feed Systems
Reference Source
Analog value on terminal 13
Digital value stored in parameter d1-03
Digital value stored in parameter d1-04
Digital value (JOG Reference) stored in parameter d1-09
Chapter 4: Operation
24 of 33
Table 6: Programming Required for Remote 2-wire Sequence & Multiple References
Parameter
Display Text
Value
A1-03
Init Parameters
No Initialize
2220
Motor Rated FLA
E2-01 = XX.XX A
Reference 3
d1-03= X.XX HZ
Reference 4
d1-04=X.XX Hz
User
Set
User
Set
User
Set
Jog Reference
d1-09 = X.XX HZ
User
Set
E2-01
d1-03
d1-04
d1-09
Description
This parameter can be found under the “Initialize” menu.
CAUTION: Setting this value will reset all parameters to their
original factory settings (all previous adjustments will be lost)
When the drive completes the reset, this parameter returns to 0 –
“No Initialize”.
Sets the motor full load amps.
Sets the frequency reference when switch (SW1) is open and
switch (SW2) is closed.
Sets the frequency reference when switches (SW1) & (SW2) are
closed.
Sets the frequency reference when switch (SW3) is closed. The
JOG frequency reference input overrides all other frequency
references. The position of (SW1) and (SW2) are irrelevant.
NOTE: After the above adjustments have been made, the DRIVE, SEQ, REF, and STOP LEDs will be illuminated.
TE/TFH/TFH-HP Fluff Feed Systems
Chapter 4: Operation
25 of 33
Chapter 5: Maintenance
5-1
Lubrication
Greasing Bearings
The grinder bearings should be greased as required, no less than once a month.
TE hopper, feed roll, and blower bearings grease every 2 months.
5-2
Adjustments
Grinder Knife Clearance
Set at .002” to .004”
Grinder Knife Sharpening
Sharpen bed knife @ 15 degrees, Rotor @ 37 degrees
Grinder Drive Belt Tension
½” side deflection with 15# load.
SCR/Isolator Voltage
Set at 90VDC maximum motor voltage WHEN THE LINE IS OPERATING at maximum
production speed.
TE/TFH/TFH-HP Fluff Feed Systems
Chapter 5: Maintenance
26 of 33
Chapter 6: Configurable Settings
This section describes the proper setup of the High Performance Fluff Feed System
parameters. These parameters are operator changeable; however, these items should require
setup only during the initial installation. Only authorized personnel should change them.
Many of the variables and setup parameters have been preset at the factory and do not need to
be changed. However, this section of the manual will address all of the setup parameters that
were available at the time of printing. The purpose of this is to familiarize the reader with all
the setup parameters and their usage. The parameters listed below, along with others, may
have to be modified for proper system operation. Consult factory for any modification
required or requested.
Note: Setup must be performed in Flux Vector mode.
6-1
Settings and Functions
Name
Description
B1-04 [1]
B1-05 [1]
E1-09 [.2 hz]
F1-05 [0 or 1]
H4-01 [5]
H4-04 [9]
H4-05 [1.0]
L7-01 [40%]
Disables reverse.
Zero speed operation set to stop
Works with B1-05 to eliminate motors from turning when input frequency is below
setting.
Encoder direction. If motor leads have to be changed for direction, encoder must
be switched to match.
0-10 V output will match rpm setting of drive.
0-10 V output matches current setting of drive.
100% reading of torque output.
This is factory set low. Final setting should be to process requirements.
Note: Once current level of set parameter is reached, drive will trim output and
maintain current output to setting.
6-2
Recommended Settings
Motor Drives
Motor drives require motor and encoder wiring. Keep separate for proper operation. Each
drive can be trimmed to “tune” material flow through the system with potentiometers on the
front of the enclosure.
Digital LED meters are provided for Current and RPM of both Horizontal and Vertical
drives.
TE/TFH/TFH-HP Fluff Feed Systems
Chapter 6: Configurable Settings
27 of 33
Signal Isolator
A Signal Isolator is provided for following a DC signal from the extruder. 0-10VDC is the
recommended input.
Zero = zero speed of the Fluff Feed System. 10V = Full speed of the Fluff Feed System.
The Isolator is calibrated for 10VDC input at the factory and must be recalibrated for a
different DC voltage input. Manual controls are included with the unit if required.
Signal Isolator Adjustment
Although your Speed Controllers have been factory adjusted to provide a Ω to 180VDC
output to the vertical and horizontal auger motors, the Signal Isolator will need to be adjusted
to suit your specific voltage or current speed inputs.
WARNING!
This equipment should be adjusted by qualified electrical maintenance personnel
familiar with the construction and operation of the equipment and the hazards
involved.
WARNING!
Circuits are at a potential of 115 or 230 volts above ground, unless an isolation
transformer is in the circuit. Hazardous voltage exists on the printed circuit boards
and the primary circuit components. Direct contact with these elements could cause
serious injury or fatality. Use a non-metallic screwdriver when adjusting trimpots.
Summary
There are three pots on the Signal Isolator that pertain to this procedure: MINIMUM
OUTPUT sets the output voltage desired at the minimum input signal level; MAXIMUM
OUTPUT sets the output voltage when the maximum input signal is received; INPUT trimpot
sets the linearity or scaling required to match the given range of input signal with the desired
range of output voltage.
Before Calibration
1. Make sure the Auto/Manual switches are in the Auto position.
2. Turn both speed pots FCW (full clock-wise).
3. Preset all three trimpots on the Signal Isolator to their FCCW (full counter clockwise) position.
4. Refer to Figure 2 on the next page while calibrating.
5. Ensure that the input signal wiring is installed correctly. Pin 5 is (-) or COMMON.
The (+) lead goes to pin 6 if the range of 0-25VDC, and pin 8 if range is 0-550VDC.
6. Make sure that the Current/Voltage switch is in the correct position for your type of
input.
TE/TFH/TFH-HP Fluff Feed Systems
Chapter 6: Configurable Settings
28 of 33
Calibration
1. Apply power and set the input signal to maximum.
2. With negative lead on pin 5 and positive lead on TP, adjust the INPUT trimpot
slowly to 1.10VDC for Minarik speed controllers, 3.60VDC for KB Electronics
model KB-240 controllers, and 4.15VDC for KB-225 controllers.
3. Apply minimum input signal and adjust MINIMUM OUTPUT CW until motor(s)
just start to rotate. Observe pins 9 (-) and 10 (+). Adjust MINIMUM OUTPUT
trimpot CCW again just until voltage reads 0.0VDC or until motors stop turning
completely.
4. Apply maximum input signal. While observing pins 9 and 10, adjust MAXIMUM
OUTPUT trimpot for 2.20VDC for Minarik controllers, 7.20VDC for KB-240, and
8.30VDC for KB-225 controllers. The motors should be turning at max RPM. To
verify that correct voltage is being supplied to the motor controllers, read the
Armature outputs on each controller. They should read 180VDC. MAXIMUM
OUTPUT can be adjusted while observing this output also.
Note: Due to inherent electrical differences between the two motor controller
circuits, there may be as much as 1 to 5 volts difference between the two
outputs at max. Adjust to an acceptable midpoint, such as 178VDC on
one and 182VDC on the other.
5. Do steps 1 through 4 again. Repeat a third time to increase accuracy. The third
calibration (if necessary) will require only minor adjustments.
Note: If at any point during the adjustment procedure, the motors begin to
oscillate, back off the MAXIMUM OUTPUT and INPUT trimpots to
FCCW again and start over, being careful not to overshoot the target
voltages.
Figure 2: Minarik Signal Isolator
TE/TFH/TFH-HP Fluff Feed Systems
Chapter 6: Configurable Settings
29 of 33
Chapter 7: Troubleshooting
7-1
General Troubleshooting
Problem
System will not run.
Feed rolls won’t run.
Auger/Mixer won’t run.
Product Gauge Varies.
Possible Cause
Fuse blown.
Signal Isolator not working.
Fuse blown.
Solution
Check fuses.
Check signal isolator signal.
Check fuses.
Controller not responding.
Material level is too high.
Fuse blown.
Material is bound up in
auger/mixer.
Signal Isolator is not receiving
power.
Feeding too much regrind.
Check controller.
Check level switch.
Check fuses.
Check for binding.
Screen size is too large in
grinder.
Extruder Starving.
Product Gels
Vertical mixer speed is too slow.
Grinder knives are dull.
Increased extruder speed.
Fluff Bridging.
No auto acceleration.
Throat “plugging,” no fluff being
fed.
Grinder screen holes are too
large for film gauge.
Grinder knives are dull.
Mixer speed is too slow.
High % of fluff.
High % of fluff.
TE/TFH/TFH-HP Fluff Feed Systems
Check Signal Isolator voltage.
Slow roll feed.
Replace with smaller screen.
(Contact the Parts & Service
Department for assistance.)
Increase mixer speed.
Resharpen them.
Slow the horizontal fluff auger.
Check vertical mixer for stringers.
Check signal isolator voltage.
Check vertical mixer clearance
from extruder screw.
Replace the grinder screen with
one that has smaller holes.
(Contact the Parts & Service
Department for assistance.)
Sharpen grinder knives.
Increase mixer speed.
Install smaller size extruder
screenpack for more
backpressure.
Lower fluff feed percentage.
Chapter 7: Troubleshooting
30 of 33
Chapter 8: Appendix
8-1
Definitions
Sequence – refers to how the drive is started, stopped, and told which direction to run. When
the sequence comes from the digital operator (local), the drive is started and stopped using
the “RUN” and “STOP” keys on the digital operator, and direction is given via the
“FWD/REV” key. Sequence can also come from the drive’s control terminals (remote) using
either two-wire or three-wire control. The sequence inputs to the drive do NOT require
any outside voltages to activate them. Instead, contact closures (either from switches, relay
contacts or open collector circuits) activate the sequence inputs.
Two-wire sequence – utilizes a “maintained” switch or relay contact. It is used on
applications where it is desirable to have the drive restart on restoration of power. It should
not be used where safety of attending personnel might be threatened by a restart. This
method is generally restricted to unattended fans & pumps, or where another controller is
entrusted with the decision to restart. Direction is controlled by maintaining either a forward
run or a reverse run command.
Three-wire sequence – utilizes “momentary” buttons or switches. This control scheme
emulates the traditional 3-wire motor starter control. A momentary closure of a normally
open run switch latches the drive in the RUN mode (STOP
switch must be closed or the drive will not accept the
momentary RUN command). A momentary opening of
the normally closed STOP switch unlatches RUN mode
bringing the drive to a stop. The three-wire sequence is
used where it would be dangerous for the drive to restart
after a power outage. This method requires an intentional
restart, as the RUN command is unlatched immediately on
loss of power. Direction is determined by another
maintained contact closure (closed = reverse).
Reference: The frequency reference tells the drive how fast to run the motor. There are
several source options for the frequency reference. First, the frequency reference can come
from the digital operator (local). Simply put, the motor speed can be entered into the keypad.
Second, the frequency reference can come from an analog signal (remote), such as 0 to 10
Volts DC. When 0 Volts is applied to the drive, the drive runs at zero speed. When 10V is
applied to the drive, it will run at full speed. Apply anything in between and the drive will
run at that corresponding frequency (2.5VDC = 25% speed = 15 Hz). If the drive is
commanded to run but doesn’t, and the RUN LED comes on and the STOP LED flashes, the
frequency reference is below the minimum frequency. Increase the frequency reference to
run the drive.
Local Control – is when the sequence and/or reference comes from the digital operator. If
the reference is supposed to come from the digital operator, the REF LED will be off. If the
start/stop (sequence) is supposed to come from the digital operator, the SEQ LED will be off.
Remote Control – is when the sequence and/or reference comes from the control terminals.
If the reference source is supposed to come from terminals 13 or 14, the REF LED will be on.
If the start/stop (sequence) is supposed to come from the terminals (2-wire or 3-wire control)
the SEQ LED will be on.
TE/TFH/TFH-HP Fluff Feed Systems
Chapter 8: Appendix
31 of 33
8-2
System Identification (Serial Number) Tag
(Located on the side of the controller box)
Street Address
Town, State Zip Code
Telephone Number
Fax Number
FLUFF FEED SYSTEM
Model No. XXX
115
Volt
Serial No. 31K0182
60 Hz
1
Ph
Control Voltage 24VDC
TE/TFH/TFH-HP Fluff Feed Systems
Chapter 8: Appendix
32 of 33
8-3
Technical Assistance (Contact Information)
Parts Department
Call toll-free 7am–5pm CST [800] 423-3183 or call [847] 273-7700, Fax [847] 273-7812
The ACS Customer Service Group will provide your company with genuine OEM quality parts
manufactured to engineering design specifications, which will maximize your equipment’s performance
and efficiency. To assist in expediting your phone or fax order, please have the model and serial
number of your unit when you contact us. A customer replacement parts list is included in this manual
for your convenience. ACS welcomes inquiries on all your parts needs and is dedicated to providing
excellent customer service.
Service Department
Call toll-free 8am–5pm CST [800] 423-3183 or call [847] 273-7700
Emergencies after 5pm CST, call [847] 439-5655
We have a qualified service department ready to help. Service contracts are available for most of our
products. www.acscustomerservice.com
Sales Department
Call [847] 273-7700 Monday–Friday, 8am–5pm CST
Our products are sold by a world-wide network of independent sales representatives. Contact our Sales
Department for the name of the sales representative nearest you.
Contract Department
Call [847] 273-7700 Monday–Friday, 8am–5pm CST
Let us install your system. The Contract Department offers any or all of these services: project planning;
system packages including drawings; equipment, labor, and construction materials; and union or nonunion installations.
TE/TFH/TFH-HP Fluff Feed Systems
Chapter 8: Appendix
33 of 33