1
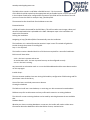
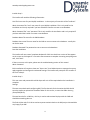
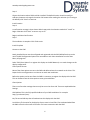
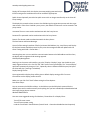
www.dynamicdysplaysystem.com DSS Documentation Welcome to the user manual for DSS - this documentation applies to DSS Version 1.7.1. We would like to take this opportunity to thank you for using DSS. DSS is a powerful Digital Signage content management system and suite of signage players. According to Wikipedia, Digital Signage is: Digital signage is a form of electronic display that shows information, advertising and other messages. Digital signs (such as LCD, LED, plasma displays, or projected images) can be found in public and private environments, such as retail stores and corporate buildings Various authors from Wikipedia DSS is a digital signage solution and is a suite of applications, including a: Content Management System (CMS) Windows Display Client Ubuntu Display Client Ubuntu Off-line Download Client Android Display Client (Commercial Software*) With DSS the content is designed from anywhere using a web browser on the internet accessible CMS, scheduled to your Display clients and then downloaded automatically when appropriate. This manual will guide you through the application from installation to troubleshooting, from the CMS to the display clients. Commercial software provided by the project sponsors. Getting Help We understand that using complicated software like DSS is not always straight forward and that this manual may not always be sufficient. Therefore we have a suite of other resources and a question & answer forum to help! The official DSS FAQ is here: https://community.DSS.org.uk/c/faq If you would like any further help with the information contained in this document, or the software package in general, please visit: https://community.DSS.org.uk/. DSS Display Client 3 great clients to choose from! The DSS client comes in three flavours - the .NET Windows Client, the Python Ubuntu Client and an Android Client. The windows client was born first and is therefore the client of choice for a stable installation. The Python client has greater potential in the future and will eventually become the only client for Windows and Linux. The Android client is commercial software from our Sponsor and brings DSS to low cost, low power devices. Getting Started 1 www.dynamicdysplaysystem.com What next? Like the sound of DSS and want to learn more? Or already have a CMS installation running? Skip straight to our Overview to learn more about DSS. Ready to install DSS on your own infrastructure? Proceed to the Installation Instructions. Closing thoughts Think about your target audience... Digital signs are there to service a need for information. People will only look at a digital sign if there is some information being shown that they need, or are interested in. It's important then to ensure a good mix of information and targeted advertising (if desired) to meet the business's goals. For example, combine a list of upcoming events with a list of sports results, a news feed or bus times to draw attention. DSS can schedule different items to be shown at different times of the day. Be sure to target content to the times when your target audience are in the building (eg advertise events for young children when parents are arriving to drop of or collect children for an existing event). People need to be able to read what is on the sign. Be sure to take a look at your completed work and make sure it's possible to read it in the time that it appears on the screen, and that the font size is large enough etc. CMS Installation The DSS CMS is a PHP web application which sits on a MySQL database. The PHP / MySQL combination is very popular as a web platform and can be run on Linux or Windows servers. We have provided some basic instructions for installing your own web server here, but would recommend a Cloud based solution or something managed by an I.T department if the signage application is critical. Installation Beyond this point it is assumed that a web server running with PHP and MySQL is available and that the compressed archive (ZIP or Tarball) of the CMS installation package has been transferred to the server. The basic process is as follows: Download and extract the archive Starting the Installation Pre-requisites Creating the database Database details Starting the Installation Final Configuration Complete Download and extract the archive 2 www.dynamicdysplaysystem.com The CMS archive contains a sub folder called DSS-server-1.7.0, the contents of this folder should be copied into the appropriate web serviceable location on your web server. In the simplest of web server configurations the name of this folder will be the name of the URL you use to access the CMS. For example: http://localhost/DSS. The extracted archive should look like the below screen shot: Extracted Archive A folder will need to be created for the DSS library. This will be used to store images, videos and other file based media that is uploaded to the CMS. Subsequent steps in the installation will require this information. Starting the Installation Navigating to http://localhost/DSS will automatically start the installation. The installation is in a wizard format that contains 6 steps in total. The wizard will guide the installer through the process of installing DSS. Step 1 - Pre-requisites The installer contains a detailed check list of all the items required for a successful installation. Each item will have either: A tick - the item is present and correct An exclamation mark - the item is present but may not be configured correctly. A cross - the item is missing. Any items with an exclamation mark or a cross should be addressed and the retest button used to run this step again. Installer Step 1 The most common problems here are missing PHP modules, configuration of PHP settings and file permissions issues to the library. Once all the items are ticked press next to advance. Creating the database The CMS can install into a new database, or an existing one. We recommend a new database. DSS does not prefix its table names and may conflict with content in an existing database. The choice for a new or existing database can be made by switching between the two available tabs. Database Details Whether you chose an existing database or a new one, the installer will need to collect some information about that database to allow the CMS to connect, read and write. 3 www.dynamicdysplaysystem.com Installer Step 2 The installer will need the following information: Host The host name for your MySQL installation - in the majority of cases this will be "localhost". Admin Username The "root" user name for your MySQL installation. This is only used for the installation and is only required if you have asked the installer to create a new database. Admin Password The "root" password. This is only used for the installation and is only required if you have asked the installer to create a new database. Database Name The name for the CMS database. Database User name The user name for the CMS to use to connect to the database - usually this can be the same. Database Password The password to use to connect to the database. Start the Installation The installer will now create / populate database for DSS. You should see a series of dots appear on the screen as this happens. It can take a few moments to complete. Assuming everything went well, click "Next". If there are errors at this point, please see the troubleshooting section of this manual. Admin Password Each installation will require at least one "Super User" level Administrator to manage the system, apply upgrades and configure the advanced settings. The installer will prompt for the creation of this user at Step 3. Installer Step 3 This user name and password should be kept safe as it will be required when the installation is complete. Settings The next screen deals with configuring DSS. The first box asks for the location that DSS should store the media you upload. We created a folder for this earlier, so enter that folder here e.g /home/DSS/library. The next box asks for a CMS key - this key is used to authenticate Displays with the CMS and should be something obscure. The final tick box asks if it's OK to send anonymous statistics back to the DSS project. We would be very happy if you did! 4 www.dynamicdysplaysystem.com Install Step 4 Complete The installation is now complete and the system is ready to log in. Install Complete Windows Client Installation The DSS windows client is distributed as a windows installer file (MSI) which is a standard "double click" installation. There are 3 steps to follow: Preparation - Minimum Requirements and MSI Installation - Double click the MSI to start the installation process. Connect - Connect your client to the CMS Minimum Requirements DSS is a low resource signage solution, however with the advance of technology it has been necessary to set out some minimum requirements. The installation process will check these for you, but they are listed below for convenience: A network connection to the CMS (possibly over the Internet) Microsoft Windows XP SP3 / Windows Vista / Windows 7 (recommended Windows 7) .NET Framework v3.5 SP1 Internet Explorer 7+ (recommended IE10 or higher) Flash Player Version 9 or later Windows Media Player 11 or later For PowerPoint support, Microsoft PowerPoint 2003 or later. PowerPoint viewer is not suitable. Installation To start the installation double click on the DSS-client-1.7.0-beta-x86.msi file you downloaded along with the package. The installer will take you through a number of screens asking for your confirmation at each stage. The steps are outlined below. Step 1 You may see the following security warning when installing DSS. Please click on "Run" to begin the installation. Security Warning Step 2 The installer presents a welcome screen. Please press "Next". Welcome Screen 5 www.dynamicdysplaysystem.com Step 3 Choose the location where DSS should be installed. The default location should normally be sufficient, however to change the location click browse. After making the selection (or if leaving to the default) click "Next" to continue. Install Location Step 4 A confirmation message is then shown. When happy with the selections made click "Install" to begin. Otherwise click "Back" to correct any errors. Begin Installation Confirmation Step 5 The Installation is complete. Click finish to exit. Install Complete Connect to the CMS Newly installed clients must be configured and registered with the DSS CMS before they can be used. The DSS Configuration Options are accessible on each client installation from the Start Menu, All programs. Select "DSS Client Options" to register this display on the DSS Network; or to make changes to this display configuration. Client Options Screen Most of the client options are set on the CMS and delivered over the network to the client. This keeps the client configuration to a minimum on each new installation. Before the options can be sent from the CMS it is necessary to register the display with the CMS. This can be done from the client options screen, pictured below. Client Options There are a few other settings that can only be set on the client side. These are explained below. Settings CMS Address This is the fully qualified address of your CMS installation. For example http://your.domain/cms/. Key The secret CMS Key that will authenticate this display with the CMS. Local Library The location for the display client to store its local files. Files are downloaded from the CMS so that the client will still function if it looses connection with the CMS. 6 www.dynamicdysplaysystem.com Display ID The unique ID for this display. An automatically generated unique ID will be assigned at installation but can be modified if appropriate. Splash Screen Optionally override the splash screen with an image stored locally on the client PC. Proxy settings The display client needs to have access to the CMS during the registration process and also to get new content. If the client is behind a proxy server, then details of that server can be entered in the proxy section. Username The user name used to authenticate with the Proxy Server. Password The password used to authenticate with the Proxy Server. Domain The domain used to authenticate with the Proxy Server. The Save button and Status Messages Once all of the settings have been filled in (minimum CMS Address, Key, Local Library and Display ID) the Save button should be pressed. At this point the message window will update with the status "Saving with CMS... Please Wait...." Assuming there are no errors with the communication between the CMS Address and the client, the display will be registered and awaiting approval. CMS Display Management Now log in to the server web interface, go to the "Display->Displays" page. You should see your newly registered client in the list. Click the "Edit" button next to the display. The "License Display" option will automatically change to "Yes". Optionally select a different default layout (the layout the client will play if nothing is scheduled). Display Setting Profiles Once registered the display client will be given a default display setting profile. For more information see the display profiles section. Make sure you click Click "Save" before exiting the Client Options. Start Client Player You can now start the DSS Client Player. It should show you the DSS splash screen while the default layout and its media contents (and anything else you have scheduled) are downloaded and then begin playing layout contents. Windows Modifications Here are some suggested settings for Windows / PowerPoint for a Display Client: Turn off all screen savers Turn off screen power saving Load the "No Sounds" Sound Scheme (Control Panel -> Sounds and Audio Devices Properties) 7 www.dynamicdysplaysystem.com Set a plain wallpaper (Hopefully nobody will see it, but you might need to reboot the client, or restart DSS and a sane wallpaper is a help) If the client is accessible from where you manage your displays from, you might want to install UltraVNC server so you can connect in and check on the client from time to time. Use the "View only" option in the VNC client to avoid disturbing the display. Set Windows to log on as your display client user automatically Disable balloon tips in the notification area Displays that will show PowerPoint should follow the detailed preparation instructions. Please take a backup before modifying the registry Multiple Clients It is possible to run more than one of the Display client on Windows. Installation Instructions Screen Saver It is possible to run DSS as a Screen Saver. Installation Instructions. Watchdog The Watchdog is an optional component which can be used to monitor the stability of the main application and restart it where necessary. Installation Instructions. Introduction There follows some basic instructions for installing the DSS Python client on Linux. This guide is for the 1.6.0 Development Preview release. Note that this is beta software. It should not be used in production. Who should test this software Lots of people have asked about testing the Python code base early. While it would be great to have lots of feedback early on, we're a very very small development team and can't support even tens of people though the installation and configuration. I respectfully request therefore that you have a few months of experience with the DSS system and enough Linux know-how that you'd be comfortable compiling some software from source yourself if you want to be involved at this early stage. What you should expect The goal initially is to replicate the functionality of the Windows .net client, with the exception of PowerPoint support. It should give you broadly the same output for any given layout, except that the Python client is multi-threaded so there are some low level differences between the two. The Python client will not play any layout that contains PowerPoint items. The Python client supports overlapping regions. The Python client does not currently return layout statistics, but can return media statistics. Hardware Requirements 8 www.dynamicdysplaysystem.com Most reasonably modern PCs should be fine. If you need HD video playback then the faster the CPU the better, otherwise the most basic nettops are normally OK providing they have nVidia graphics. You must have a supported graphics card - most nVidia cards work fine using the binary nVidia drivers. There is a list of hardware and it's compatibility here: Python Client Hardware Compatibility List Software Requirements Most modern linux distros should work. I'm developing on Ubuntu so Ubuntu 12.04 - 32 bit Desktop edition. I've not built, tested or provided binaries for 64 bit versions. DSS server 1.6.0 or later. Automated Installation The easiest way to install the client is by using the official installer. It can be downloaded from the release page - currently https://launchpad.net/DSS/1.6/1.6.0-rc1. Once downloaded on to your Ubuntu system, open a Terminal and type sudo bash /path/to/the/DSS-1.6.0-ubuntu.all-pyclient.sh The installer will then take you through the steps required to install. Skip straight to the configuration section below. Manual Install Guide The official manual install guide is below. You're recommended to use the official installer where possible as it's a great deal simpler! Ubuntu 12.04 and derivatives This guide is aimed at people who know what they're doing with Linux, so I'm not going to hold your hand through the install. Here's the basic information you need based on an Ubuntu 12.04 Precise Pangolin installation. Download Ubuntu 12.04 32 bit Desktop Edition and install on the target machine. I suggest a 20GB / partition, some swap and the remainder of the disk formatted and mounted as /opt/DSS. This ensures that the client writing logs etc won't lock you out of the box if the drive fills up. Once Ubuntu is installed, update the machine to get any patches etc: sudo apt-get update sudo apt-get dist-upgrade Reboot 9 www.dynamicdysplaysystem.com If you're using a nVidia card, ensure you're using the binary drivers by referring to the Restricted Driver Manager and enabling them if they're disabled. (Note: I've not tried the new OS nVidia drivers - they may work now). Install the following packages: sudo apt-get install bzr libvdpau1 libboost-python1.46.1 libboost-thread1.46.1 libdc1394-22 libswscale2 libavformat53 python-soapy libxss1 python-feedparser python-serial flashpluginnonfree libavcodec53 libavformat53 libswscale0 Unpack the binary distribution of libavg/Berkelium/libbrowsernode in to /. Binaries are available here: [1] If for some reason you need to compile all that yourself then full source and build instructions are available here: libbrowsernode Build Instructions. (Trust me you don't want to. It takes hours and requires about 4GB of disc space) Run the following: sudo ldconfig If you want to use the Tahoma font, install the ttf-tahoma-replacement package. Download the python client: cd /opt/DSS bzr branch lp:DSS/1.6 pyclient Configuration Online Mode Create / edit the configuration in /opt/DSS/pyclient/client/python/site.cfg. A site.cfg.default is provided for you to copy as a starting point. defaults.cfg contains all the possible configuration directives. You'll need to edit at least the following: [Main] xmdsUrl=[http://127.0.0.1](http://127.0.0.1) xmdsClientID=test xmdsKey=test xmdsUpdateInterval=90 requireXmds=false width=960 height=540 bpp=24 fullscreen=false xmdsUrl is the address of your DSS server (eg http://my.DSS.server.com/DSS) xmdsClientID is a random string used to generate the client identifier. This will change in future but for now just set it to something random. 10 www.dynamicdysplaysystem.com xmdsKey is the server key for your DSS instance xmdsUpdateInterval is the number of seconds between polls to the webservice for updated content requireXmds can be either "true" or "false" (ie not "True" or "False"). If true, the client must successfully connect to the webservice before playing cached content. width is the width of your screen in pixels (or the window you want the player to run in if not in fullscreen mode) height is the height of your screen in pixels (or the windows you want the player to run in if not in fulscreen mode) fullscreen can be either "true" or "false" (ie not "True" or "False"). If true, the client will run fullscreen otherwise it'll run windowed. Offline Mode The client can be configured to run in an offline mode - where the client will have no direct communication with the DSS server. This feature is available in client versions 1.2.1a1 onwards. In this mode, the client receives updates via a USB stick. Content is put on to the memory stick by the Offline Download Client. Create / edit the configuration in /opt/DSS/pyclient/client/python/site.cfg. A site.cfg.default is provided for you to copy as a starting point. defaults.cfg contains all the possible configuration directives. You'll need to edit at least the following: [Main] xmdsLicenseKey=key here manualUpdate=true width=960 height=540 bpp=24 fullscreen=false xmdsLicenseKey is the client's license key. You generate this with the offline download application. manualUpdate puts the client in offline update mode. width is the width of your screen in pixels (or the window you want the player to run in if not in fullscreen mode) height is the height of your screen in pixels (or the windows you want the player to run in if not in fullscreen mode) fullscreen can be either "true" or "false" (ie not "True" or "False"). If true, the client will run fullscreen otherwise it'll run windowed. 11 www.dynamicdysplaysystem.com The client expects the operating system to mount USB sticks inserted in to the client PC under the /media directory. The client will scan that location frequently looking for updated content for that display (a USB stick can hold updated content for one or more clients). If new content is found, an amber dot will be shown at the top left of the screen. Once the client has finished downloading content from the USB stick, the amber dot will be replaced with a green dot which will remain for a few seconds to indicate completion. Running the client cd /opt/DSS/pyclient/client/python ./run.sh Once the client is running, it will first attempt to register with the server and then proceed to attempt to pull content. Once the client is running, go to the server and give it a license. To see what the client is doing, press 'i' to bring up the hidden infoscreen. You'll see the client's IP address, remaining disk space, currently running layout ID, scheduled layout IDs and a list of media items for those layouts. Media items in italics failed checking and are therefore invalid. They will be downloaded again automatically. With the infoscreen up, you can force the client to collect from the server by pressing 'r' (refresh). You'll see the 'Schedule' and 'Required Files' lights blink amber as the client connects up and return to green. Red lights indicate either the client isn't licensed or a problem connecting to the server. Grey lights indicate no attempt to connect to the server yet. With the infoscreen up, you can skip to the next layout by pressing 'n'. You quit the client by pressing 'q'. Reporting Problems As this isn't released code please do NOT report bugs in Launchpad bugs. Please ask a question in Launchpad questions making it very clear that you're using the python client and which bzr revision you've got. You can find out as follows: cd /opt/DSS/pyclient bzr log | head -----------------------------------------------------------revno: **182** committer: Alex Harrington <[email protected]> branch nick: DSS-python timestamp: Fri 2009-12-18 23:09:25 +0000 message: [pyclient] Fixed a whole raft of issues with the previous two commits. -----------------------------------------------------------If the client throws an exception then I'll need the full text of the exception along with the circumstances that caused it. If the client isn't doing what you expect, send a question. I may well ask you for full debug output as follows Full Debug Output 12 www.dynamicdysplaysystem.com Edit site.cfg: [Logging] logWriter=DSSLogFile logLevel=10 Now run as normal (ie ./run.sh) Once the problem has occured, stop the client running and compress run.log (which will hopefully contain the information we need). Known Issues Troubleshooting and FAQ Need help? We hope one of the articles below can provide assistance. If the topic is not listed, please ask for help or advice in the DSS Community. When asking for assistance please make it clear the version you are using. We have lots more FAQ's in the Community Forum. Logging In Reset the admin password Unable to login Widgets (media on region time lines) Using Tickers and other external resources over HTTPS Windows Player Configuring the DSS web engine to use a specific version of Internet Explorer CMS Settings Like any complex application the DSS CMS comes with a number of options. These are configured in the Administration menu, Settings sub menu. The settings are organised into relevant categories which are accessible using the category selector on the left hand side. Setting_Content Changes to settings can be saved using the Save button in the category selector or at the top of the page. Categories 13 www.dynamicdysplaysystem.com The settings are split into related Categories: Configuration Essential configuration options that must be set. Content Settings for defaulting the durations of certain media items. Defaults Settings for defaulting certain form fields to particular selections. Displays Settings related to Displays and display management pages. General General settings for the behaviour of items in the CMS. Maintenance Settings related to the Maintenance Module. Network Network settings such as Proxy Server information (if your CMS is behind a proxy) Permissions Settings for controlling how permissions effect certain things in the CMS. Regional Timezone and Language regional settings. Troubleshooting Tab allows you to alter how DSS handles errors. You can turn the error and audit logs on and off. As logs records size growth rapidly, you should take care to enable it only when necessary e.g. during system debug. Users Authentication and Password policy settings. Notable Settings 14 www.dynamicdysplaysystem.com User Password Management This section will take a look at the User Password Management with three features / improvements: Users can change their passwords without having access to the user administration page Administrators can set a regular expression to test password complexity Administrators can override users passwords in a more intuitive way User Password Policy This feature has the utmost flexibility given to the administrator to test passwords in which ever way they chose. This is done with a setting in the Permissions tab called USER_PASSWORD_POLICY. An administrator can put any valid regular expression in this box, which will cause all users password change requests (and new users) to be tested against this expression. It is also important for the user to know what the policy actually is; the setting USER_PASSWORD_ERROR which will be presented to the user when they enter a password that does not validate against the regular expression. Library Size & Bandwidth To manage limits on the library file size and monthly bandwidth usage. This is done by virtue of two settings in the database table (LIBRARY_SIZE_LIMIT_KB & MONTHLY_XMDS_TRANSFER_LIMIT_KB). If no limits are entered in database, everything continues to work without restriction; however once a limit is entered DSS will start validating against these limits, and when they are exceeded will prevent the upload of new media / updates to clients. However these two settings are currently not available through the user interface; Only the statistical data is shown in Content page Maintenance Maintenance is a very import part of the system and therefore is covered in its own section. Other functions The settings page has a set of other functions available in the top right corner of the sub-menu bar. Import Import the entire CMS database. Export Export the entire CMS database. Tidy Library 15 www.dynamicdysplaysystem.com The library tidy function clears up orphaned media items and temporary files. Maintenance Maintenance is an important part of any system and should always be configured. Maintenance keeps the database and files in trim condition, alerts when there are errors and runs in the background. Maintenance is configured in the CMS settings, under the Maintenance heading. Introduction When DSS is running, logs and statistics slowly accumulate on the server and consume disk space. In extreme cases the sheer volume of those records can cause the server interface to slow and become unresponsive. It is also reassuring to know that if there is a problem with a display and it stops checking in with the DSS server, you will be notified by email so you can take action to resolve the problem. The maintenance script can be scheduled to run periodically and perform background clean-up tasks such as deleting old logs and statistics, and checking the status of the displays. Prerequisites In order to send email notifications, your PHP must have a working mail() command. You need to ensure your PHP installation is configured to send mail via a local or remote SMTP server. Once you have verified that your PHP installation has a working mail() command, you can proceed to the next step. Setup for New DSS Installations DSS server 1.2.0 and later have the maintenance functionality. New DSS installations come pre-populated with some default values for the maintenance script, but with the entire system disabled. You can proceed to the configuration section. Setup for DSS Installations < 1.2.0 Only DSS server versions 1.2.0 and later have this functionality. If you're upgrading your older DSS server installations to 1.2.0 then you will be prompted to modify the default settings as part of the upgrade process. If you decide to enable the maintenance script as part of your upgrade, it will automatically be configured to use "protected" mode as this is the most secure option. The other options are discussed in detail below. You should change your Maintenance Key immediately in protected mode as the default key is publicly available and offers no protection. Configuration 16 www.dynamicdysplaysystem.com Configuration for the maintenance script can be found in DSS server at "Administration -> Settings -> Maintenance" tab. There are several options associated with the maintenance script: Maintenance Enabled (MAINTENANCE_ENABLED): Off - All maintenance functionality is disabled. On - All maintenance functionality is enabled. You can use any of the methods below to call the maintenance script on a schedule without specifying a key. Protected - All maintenance functionality is enabled. You must specify the correct key when calling the maintenance script. This is to prevent unauthorised persons from repeatedly calling the script and generating large amounts of alert email. Maintenance Key (MAINTENANCE_KEY) The secret key required to allow the maintenance script to run when "Maintenance Enabled" is set to "Protected" mode. Email Alerts (MAINTENANCE_EMAIL_ALERTS) Globally enable or disable the sending of email alerts. You can enable/disable alerts for individual displays in Display Management. Alert Timeout (MAINTENANCE_ALERT_TOUT) Globally configure how many minutes after a display lasts connects to the server we should consider it to have a problem and cause analert to be sent. You can override this default for individual displays in Display Management. You should make sure this time is longerthan the collection interval you have configured on your clients to avoid false positive alerts. Email To (mail_to) Who should the alert emails be sent to? Email From (mail_from) Who should the alert emails appear to be from? Log Maximum Age (MAINTENANCE_LOG_MAXAGE) How many days worth of log messages to keep. Logs older than this will be deleted. Set to 0 to keep all logs indefinitely. Statistics Maximum Age (MAINTENANCE_STAT_MAXAGE) How many days worth of statistics to keep. Statistics older than this will be deleted. Set to 0 to keep all statistics indefinitely. 17 www.dynamicdysplaysystem.com Once you have decided which of the options you want to enable and the parameters required, you need to setup some mechanism for calling the maintenance.php script on a schedule. Skip to the appropriate section for your server below. If you do not have permission to setup scheduled tasks on your server, you could arrange for a remote computer to call the maintenance.php script. Windows Scheduled Task This section is broadly based upon the Moodle Cron documentation available here. Find the php.exe or php-win.exe program on your server. It will be in your PHP installation directory. Setup a Scheduled Task Go to Start -> Control Panel -> Scheduled Tasks -> Add Scheduled Task. Click "Next" to start the wizard: Click the "Browse..." button and browse to your php.exe or php-win.exe and click "Open" Type "DSS Maintenance" as the name of the task and select "Daily" as the schedule. Click "Next". Select "12:00 AM" as the start time, perform the task "Every Day" and choose today's date as the starting date. Click "Next". Enter the username and password of the user the task will run under (it does not have to be a privileged account at all).Make sure you type the password correctly. Click "Next". Mark the checkbox titled "Open advanced properties for this task when I click Finish" and click "Finish". In the new dialog box, type the following in the "Run:" text box: c:\php\php-win.exe -f c:\path\to\DSS\maintenance.php secret Replace secret with your Maintenance Key if you are running in Protected Mode. Click on the "Schedule" tab and there in the "Advanced..." button. Mark the "Repeat task" checkbox and set "Every:" to 5 minutes, and set "Until:" to "Duration" and type "23" hours and "59" minutes.If you are Alert Timeouts are less than 5 minutes, you may want to run the maintenance script more often. Click "OK".* Test your scheduled task. You can test that your scheduled task can run successfully by clicking it with the right button and chosing "Run". If everything is correctly setup, you will briefly see a DOS command window while php executes and fetches the cronpage and then it disappears. If you refresh the scheduled tasks folder, you will see the Last Run Time column in detailed folder view) reflects the current time, and that the Last Result column displays "0x0" (everything went OK).If either of these is different, then you should recheck your setup. Maintenance on Unix Servers 18 www.dynamicdysplaysystem.com This section is broadly based upon the Moodle Cron documentation available here. There are different command line programs you can use to call the maintenance page from the command line. Not all of them may be available on a given server. For example, you can use a Unix utility like 'wget': wget -q -O /dev/null http://example.com/DSS/maintenance.php?key=changeme Note in this example that the output is thrown away (to /dev/null). The same thing using lynx: lynx -dump http://example.com/DSS/maintenance.php changeme > /dev/null Note in this example that the output is thrown away (to /dev/null). Alternatively, you can use a standalone version of PHP, compiled to be run on the command line. The disadvantage is that you need to have access to a command-line version of php. The advantage is that your web server logs are not filled with constant requests to maintenance.php and you can run at a lower I/O and CPU priority. php /var/www/DSS/maintenance.php changeme Example command to run at lower priority: ionice -c3 -p$$;nice -n 10 /usr/bin/php /var/www/DSS/maintenance.php changeme > /dev/null Running maintenance with crontab This section is broadly based upon the Moodle Cron documentation available here. Most unixbased servers run a version of cron. Cron executes commands on a schedule. Modern Linux distributions use a version of cron that reads its configuration from /etc/crontab. If you have an /etc/crontab, edit it with your favourite editor, otherwise run the following to edit the crontab: crontab -e and then adding one of the above commands like: */5 * * * * wget -q -O /dev/null http://example.com/DSS/maintenance.php?key=changeme The first five entries are the times to run values, followed by the command to run. The asterisk is a wildcard, indicating any time. The above example means run the command wget -q -O /dev/null... every 5 minutes (/5), every hour (), every day of the month (), every month (), every day of the week (*). 19 www.dynamicdysplaysystem.com The "O" of "-O" is the capital letter not zero, and refers the output file destination, in this case "/dev/null" which is a black hole and discards the output. If you want to see the output of your cron.php then enter its url in your browser. A basic crontab tutorial Online version of the man page For beginners, "EDITOR=nano crontab -e" will allow you to edit the crontab using the nano editor. Ubuntu defaults to using the nano editor. Usually, the "crontab -e" command will put you into the 'vi' editor. You enter "insert mode" by pressing "i", then type in the line as above, then exit insert mode by pressing ESC. You save and exit by typing ":wq", or quit without saving using ":q!" (without the quotes). Here is an intro to the 'vi' editor. 20