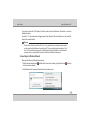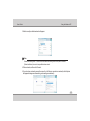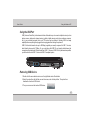
1
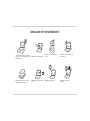
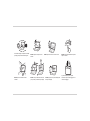
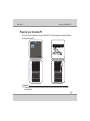
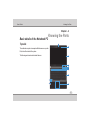
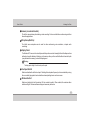
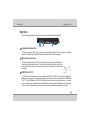
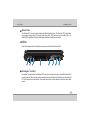
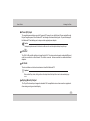
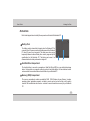
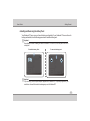
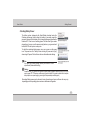
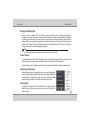
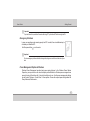
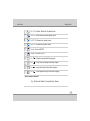
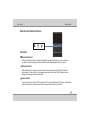
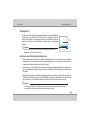
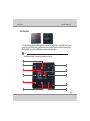
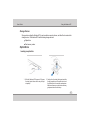
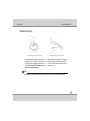
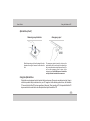
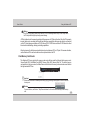
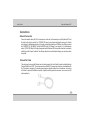
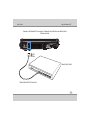
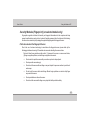
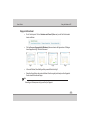
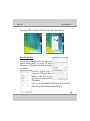
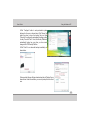
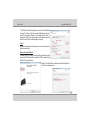
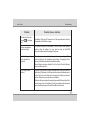
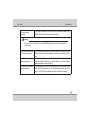
Notebook PC User’s Guide REV - 1.0 Notational Conventions Throughout this manual, the following conventions are used to distinguish elements of text. Note: Identifies additional information that requires special attention. Warning : Identifies additional information that requires special attention. Tip : Identifies additional information that requires special attention. Caution: Identifies important information that, if not followed, may result in loss of data or damage to the computer. Keyboard keys are shown in a bold typeset. For example: Press Enter to complete. When keys are joined by a plus sign (+), press the first key, and, while keeping the first key down, press the remaining keys, finally release all the keys. When necessary, keys are also shown in graphics. Any title, command, setup item, or button that you can see on the screen is shown in boldface. Overview Chapter - 1 Introducing the Notebook PC 1-1 Chapter - 2 Knowing the Parts 2-1 Chapter - 3 Getting Started 3-1 Chapter - 4 Using the Notebook PC 4-1 Chapter - 5 Troubleshooting 5-1 TAKING CARE OF YOUR NOTEBOOK PC To prevent possible overheating of the computer's processor, make sure you don't block the openings provided for ventilation. DO NOT press or touch the display panel. DO NOT place or drop objects on the computer and DO NOT apply heavy pressure on it. DO NOT subject the computer to magnetic fields. DO NOT place on uneven or unstable work surfaces. DO NOT use your notebook computer under harsh conditions. DO NOT expose to direct sunlight. DO NOT use or store in extreme temperatures. Avoid sudden changes in temperature or humidity by keeping it away fromA/C and heating vents. DO NOT expose to dust and/or corrosive chemicals. DO NOT expose the computer to rain or moisture. DO NOT slam your notebook shut and never pick up or hold your notebook by the display. DO NOT place near fire or other sources of heat. DO NOT spray water or any other cleaning fluids directly on the display. DO NOT tamper with the batteries. Keep them away from children. If you are traveling with your computer, remember to carry it as hand luggage. Do not check it in as baggage. User's Guide Introducing the Notebook PC Chapter - 1 Introducing the Notebook PC Congratulation on the purchase of new HCL Notebook Computer! Transportation Precautions To prepare the Notebook PC for transport, you should turn it OFF and disconnect all external peripherals to prevent damage to the connectors. The hard disk drive's head retracts when the power is turned OFF to prevent scratching of the hard disk surface during transport. Therefore, you should not transport the Notebook PC while the power is still ON. Close the display panel to protect the keyboard and display panel. Operating Environment Since users are likely to maintain the same posture for a long period of time when using the computer, they will be exhausted more easily if compared with other users engaged in other general operations. This section will illustrate the suggested posture and the operating environment for the use of the computer. Health Management Take a 2 to 3-minute break every 30 minutes after you have operated the machine for a long time. Sedentariness will also cause stress. Do some gentle gymnastics during your break for recreation. When you have symptoms such as eyestrain, sleepiness, dizziness, stiff in the shoulders, or numbness of the wrists or hands, have a rest right away. In case these symptoms remain the next day, please contact your doctor as soon as possible. 1-1 User's Guide Introducing the Notebook PC Posture When You Are Using the Computer Please use the computer with your body relaxed and with a good sitting posture. For this, please pay attention to the following tips. Adjust the height of the desk and the chair to look down from a position a little bit higher than the screen. Adjust the chair until you can lean your back closely on the chair and sit down with your back stretched. Relax with no strength put onto your shoulders and bend your knees comfortably. Put your wrist comfortably to keep it parallel to the desk. Your eyes will feel tired easily if you cannot see the screen clearly. Pay attention to the following tips and adjust the screen constantly to ensure its clear visibility. Use appropriate lighting Use the same appropriate lighting that is intended for office use when you use the computer. 1-2 User's Guide Introducing the Notebook PC Adjust the angle of the display to the position with which you can see the display clearly You won't see the screen clearly if the display reflects light. In addition, the visibility of the display varies with the angle due to its feature. Adjust the angle of the display to ensure its clear visibility. Clean the display A dusty display makes the screen hard to see clearly. Wipe gently with a soft, dry cloth to clean the display regularly. Cover Your Notebook PC You can purchase an optional carrying case to protect it from dirt, water, shock, and scratches. Note : The Notebook surface is easily dulled if not properly cared for. Be careful not to rub or scrap the Notebook PC surfaces when transporting your Notebook PC. Cover Your Batteries If you intend to use battery power, be sure to fully charge your battery pack and any optional battery packs before going on long trips. Remember that the power adapter charges the battery pack as long as it is plugged into the computer and an AC power source. Be aware that it takes much longer to charge the battery pack when the Notebook PC is in use. 1-3 User's Guide Introducing the Notebook PC Important Safety Instructions Portable computers take the most beating from end users. This section gives you detailed information about how to maintain a safe working environment while using the notebook computer. You can maintain its condition and performance by following these guidelines. Please read it carefully to ensure maximum safety. Before cleaning the notebook computer, make sure it is disconnected from any external power supplies (i.e. AC adapter, car adapter and so on). When cleaning, do not use liquid or sprayed detergent for cleaning. Instead, use moisture sheet or a cloth for cleaning. Use your Notebook where the socket outlet is nearby and easily accessible. Please keep the notebook computer away from humidity. Lay the notebook computer on a reliable surface when installing. A drop or fall may cause injury. The openings on the enclosure are for air convection hence the notebook computer can be protected from overheating. DO NOT COVER THE OPENINGS. Be careful of using power supply. The notebook computer has specific power requirements. Use only a power adapter approved for use with this notebook computer. While unplugging the power cord, disconnect it by the plug head, not by its wire. 1-4 User's Guide Introducing the Notebook PC Make sure the socket and any extension cords you may use can support the total current load of all the connected devices. Place the power cord in such a way that people can not step on it. Do not place anything over the power cord. All cautions and warnings on the notebook computer should be noted. If the notebook computer is not in use for a long time, disconnect it from mains to avoid possible damage by transient over-voltage. Never pour any liquid into openings as this may cause fire or electrical shock. Never open the body of notebook computer. For safety reason, the notebook computer should only be opened by qualified service personnel. Do not leave this notebook computer in an environment unconditioned. Storage temperature above 60ºC (140ºF) may damage the notebook computer. To avoid any damage to the internal device, you should first disconnect the AC adapter and remove the battery pack from the notebook when replacing any internal device. 1-5 User's Guide Introducing the Notebook PC Airplane Precautions Contact your airlines personnel if you want to use the Notebook PC in the airplane. Most airlines will have restrictions for using electronic devices. Most airlines will allow electronic use only between and not during takeoffs and landings. Caution : There are three main types of airport security devices: X-ray machines (used on items placed on conveyor belts), magnetic detectors (used on people walking through security checks), and magnetic wands (hand-held devices used on people or individual items). You can send your Notebook PC and diskettes through airport X-ray machines. However, it is recommended that you do not send your Notebook PC or diskettes through airport magnetic detectors or expose them to magnetic wands. Cleaning Your Computer When it is necessary to clean the plastic case and keyboard, use a soft, lint-free cloth, slightly dampened with a mild detergent solution or use the contents of any commercially available computer cleaning kit. Never use alcohol, petroleum-based solvents, or harsh detergents to clean the notebook. Also never spray any liquids directly on the computer case, keyboard, or screen. If the liquid-crystal display (LCD) screen has become smeared or dusty, clean the screen by first applying a mild glass cleaner to a soft, clean, lint-free cloth and gently wipe the glass. Never apply liquids directly on the screen surface. Moreover, do not use paper towels to clean the display screen. Paper can scratch the display screen matte. 1-6 User's Guide Introducing the Notebook PC Preparing your Notebook PC These are only quick instructions for using your Notebook PC. Read the later pages for detailed information on using your notebook PC. 2 1 3 1. Install the battery pack 3. Open the Display Panel 2. Connect the AC Power Adapter 4. Turn ON the Notebook PC Important : When opening, do not force the display panel down to the table or else the hinges may break! Never lift the notebook PC by the display panel! 1-7 User's Guide Knowing the Parts Chapter - 2 Basic details of the Notebook PC Knowing the Parts Top side 1 2 The notebook computer is compact with features on every side. First, look at the inside of the system. The following sections describe inside features. 3 4 5 6 7 8 10 11 9 2-1 User's Guide 1 Knowing theyou Parts Before Start Camera (on selected models) The built-in camera allows picture taking or video recording. Can be used with video conferencing and other interactive applications. 2 Microphone (Built-in) The built-in mono microphone can be used for video conferencing, voice narrations, or simple audio recordings. 3 Display Panel The Notebook PC uses an ultra-clear fat panel which provides excellent viewing like that of desktop monitors without any harmful radiation or flickering, so it is easier on the eyes Use a soft cloth without chemical liquids (use plain water if necessary) to clean the display panel. Warning : The display panel is fragile. Do not to bend or press the panel. 4 Touchpad Switch Enables or disables the built-in touchpad. Disabling the touchpad will prevent you from accidentally moving the cursor while typing and is best used with an external pointing device such as a mouse. 5 Wireless Switch Enables or disables the built-in wireless LAN (on selected models). When enabled, the wireless status indicator will light. Windows software settings are necessary before use. 2-2 User's Guide 6 Knowing the Parts Power Switch The power switch turns the Notebook PC ON and OFF or puts the Notebook PC into sleep or hibernation modes. Actual behavior of the power switch can be customized in Windows Control Panel “Power Options.” 7 Audio Speakers The built-in stereo speaker system allows you to hear audio without additional attachments. The multimedia sound system features an integrated digital audio controller that produces rich, vibrant sound (results improved with external stereo headphones or speakers). Audio features are software controlled. 8 Keyboard The keyboard provides keys with comfortable travel (depth at which the keys can be depressed) and palm rest for both hands. A Windows function key is provided to help ease navigation in the Windows operating system. 9 Touchpad and Buttons The touchpad with its buttons is a pointing device that provides the same functions as a desktop mouse. A software-controlled scrolling function is available after setting up the included touchpad utility to allow easy Windows or web navigation. 10 Status Indicators Status indicators represent various hardware/software conditions. See indicator details in Section 3. 11 Fingerprint Scanner (on selected models) The built-in fingerprint scanner allows use of security software using your fingerprint as your identification key. 2-3 User's Guide Knowing the Parts Right Side Refer to the diagram below to identify the components on this side of the Notebook PC. 1 1 2 3 4 Headphone Output Jack The stereo headphone jack (1/8 inch) is used to connect the Notebook PC’s audio out signal to amplifed speakers or headphones. Using this jack automatically disables the built-in speakers. 2 Microphone Input Jack The mono microphone jack (1/8 inch) can be used to connect an external microphone or output signals from audio devices. Using this jack automatically disables the built-in microphone. Use this feature for video conferencing, voice narrations, or simple audio recordings. 3 USB Ports (2.0/1.1) The USB (Universal Serial Bus) ports are compatible with USB 2.0 or USB 1.1 devices such as keyboards, pointing devices, cameras, hard disk drives, printers, and scanners connected in a series up to 12Mbits/sec (USB 1.1) and 480Mbits/sec (USB 2.0). USB allows many devices to run simultaneously on a single computer, with some peripherals acting as additional plug-in sites or hubs. USB supports hot-swapping of devices so that most peripherals can be connected or disconnected without restarting the computer. 2-4 User's Guide 4 Knowing the Parts Optical Drive The Notebook PC comes in various models with different optical drives. The Notebook PC’s optical drive may support compact discs (CD) and/or digital video discs (DVD) and may have recordable (R) or rewritable (RW) capabilities. See the marketing specifications for details on each model. Left Side Refer to the diagram below to identify the components on this side of the Notebook PC. 1 1 2 3 4 5 6 7 8 ® Kensington Lock Port Kensington® lock port allows the Notebook PC to be secured using Kensington® compatible Notebook PC security products. These security products usually include a metal cable and lock that prevent the Notebook PC to be removed from a fixed object. Some may also include a motion detector to sound an alarm when moved. 2-5 User's Guide 2 Knowing the Parts Power (DC) Input The supplied power adapter converts AC power to DC power for use with this jack. Power supplied through this jack supplies power to the Notebook PC and charges the internal battery pack. To prevent damage to the Notebook PC and battery pack, always use the supplied power adapter. Caution : The adaptor may become warm to hot when in use. Be sure not to cover the adaptor and keep it away from your body. 3 LAN Port The RJ-45 LAN port with eight pins is larger than the RJ-11 modem port and supports a standard Ethernet cable for connection to a local network. The built-in connector allows convenient use without additional adapters. 4 Air Vents The air vents allow cool air to enter and warm air to exit the Notebook PC. Important : Make sure that Paper, books, clothing, cables or other objects do not block any of the air vents or else overheating may occur. 5 Display (Monitor) Output The 15-pin D-sub monitor port supports a standard VGA-compatible device such as a monitor or projector to allow viewing on a larger external display. 2-6 User's Guide 6 7 Knowing the Parts Reserved not implemented in this model. HDMI Port HDMI (High-Defnition Multimedia Interface) is an uncompressed all-digital audio/video interface between any audio/video source, such as a set-top box, DVD player, and A/V receiver and an audio and/or video monitor, such as a digital television (DTV). Supports standard, enhanced, or high-defnition video, plus multi-channel digital audio on a single cable. It transmits all ATSC HDTV standards and supports 8-channel digital audio. Note : The HDMI port does not provide simultaneous audio and video output when transmitting to an external device. In such instances only the video signal will be transmitted. 8 E-SATA Port External SATA or eSATA allows external connection of Serial-ATA devices originally designed for use inside the computer. It is up to six times faster than existing USB 2.0, & 1394 for external storage solutions and is also hot pluggable using shielded cables and connectors up to two meters. 2-7 User's Guide Knowing the Parts Front Side Refer to the diagram below to identify the components on this side of the Notebook PC. 1 1 Flash Memory Card Reader This Notebook PC has a built-in high-speed memory card reader that can conveniently read from and write to many flash memory cards used in devices such as digital cameras, MP3 players, mobile phones, and PDAs. 2-8 User's Guide Knowing the Parts 1 Bottom Side Refer to the diagram below to identify the components on this side of the Notebook PC. 1 Battery Pack The battery pack is automatically charged when the Notebook PC is connected to an AC power source and maintains power to the Notebook PC when AC power is not connected. This allows user when moving temporarily between locations. Battery time varies by usage and by the specifications for this Notebook PC. The battery pack cannot be disassembled and must be purchased as a single unit. 2 1 2 3 Hard Disk Drive Compartment The hard disk drive is secured in a compartment. Hard Disk Drive (HDD) is a non-volatile data storage device. It stores data on a magnetic surface layered onto hard disk platters. Visit an authorized service center or retailer for more information on hard disk drive for your Notebook PC. 3 Memory (RAM) Compartment The memory compartment contains pre-installed RAM. RAM (Random Access Memory) is where operating system, application programs, and data in current use are kept so that they can be quickly reached. Visit an authorized service center or retailer for more information on memory for your Notebook PC. 2-9 User's Guide Getting Started Chapter - 3 Getting Started Power System Using AC Power The Notebook PC power is comprised of two parts, the power adapter and the battery power system. The power adapter converts AC power from a wall outlet to the DC power required by the Notebook PC. Your Notebook PC comes with a universal AC-DC adapter. That means that you may connect the power cord to any 100V-120V as well as 220V240V outlets without setting switches or using power converters. Different countries may require to connect the provided Indian-standard AC power cord to a different standard. Most hotels will provide universal outlets to support different power cords as well as voltages. It is always best to ask an experienced traveler about AC outlet voltages when bringing power adapters to another country. With the AC power cord connected to the AC-DC adapter, connect the AC power cord to an AC outlet (preferably with surge-protection) and then connect the DC plug to the Notebook PC. Connecting the AC-DC adapter to the AC outlet first allows you to test the AC outlet's power and the AC-DC converter itself for compatibility problems before connecting the DC power to the Notebook PC. The power LED on the adapter lights up if the power is within accepted ranges. 3-1 User's Guide Getting Started Important : Damage may occur if you use a different adapter to power the Notebook PC or use the Notebook PC's adapter to power other electrical devices. If there is smoke, burning scent or extreme heat coming from the AC-DC adapter, seek servicing. You may damage both your battery pack and the Notebook PC with a faulty AC-DC adapter. Note: This Notebook PC may come with a three-prong plug. You must use a grounded AC outlet to ensure safe operation of the Notebook PC. Warning: The power adapter may become warm to hot when in use, be sure not to cover the adapter and keep it away from your body. Using Battery Power The Notebook PC is designed to work with a removable battery pack. The battery pack consists of a set of battery cells housed together. A fully charged pack will provide few hours of battery life. 3-2 User's Guide Getting Started Installing and Removing the battery Pack Your Notebook PC may or may not have its battery pack installed. If your Notebook PC does not have its battery pack installed, use the following procedures to install the battery pack. Important : Never attempt to remove the battery pack while the Notebook PC is turned ON, as this may result in the loss of working data. To Install the battery Pack : To remove the battery pack : 2 2 1 3 1 1 Important : Only use battery packs and power adapters supplied with the Notebook PC or specifically approved by the manufacturer for use with this model or else damage may occur to the Notebook PC. 3-3 User's Guide Getting Started Warning! For safety reasons, DO NOT throw the battery in fire, DO NOT short circuit the contacts, and DO not disassemble the battery. If there is any abnormal operation or damage to the battery pack caused by impact, turn OFF the Notebook PC and contact HCL authorised service center Note: To achieve optimal battery performance, you may need to do a battery calibration at a 3-month interval. To do this: Fully charge the battery. Fully discharge the battery in idle mode till it shutdown. Fully charge the battery again. 3-4 User's Guide Getting Started Checking Battery Power The battery system implements the Smart Battery standard under the Windows environment, which allows the battery to accurately report the amount of charge left in the battery. A fully-charged battery pack provides the Notebook PC a few hours of working power. But the actual figure varies depending on how you use the power saving features, your general work habits, the CPU and system memory size. To check the remaining battery power, move your cursor over the power icon. The power icon is a " battery" when not using AC power and a "plug" when using AC power. Click on the icon for more information and settings. Note: If you ignore the low battery warning, eventually the Notebook PC enters suspend mode (Windows default settings) Warning : Suspend-to-RAM (STR) does not last long when the battery power is depleted. Suspend-to-Disk (STD) is not the same as power OFF. STD requires a small amount of power and will fail if no power is available due to complete battery depletion or no power supply (e.g. removing both the power adapter and battery pack). Remaining Battery power may be shown in terms of percentage or hours, and these units may vary depending upon the operating system versions or hardware configuration. 3-5 User's Guide Getting Started Charging the Battery Pack Before you use your Notebook PC you will have to charge the battery pack. The battery pack begins to charge as soon as the Notebook PC is connected to external power using the power adapter. Fully charge the battery pack before using it for the first time. A new battery pack must completely charge before the Notebook PC is disconnected from external power. It takes a few hours to fully charge the battery when the Notebook PC is turned OFF and may take twice the time when the Notebook PC is turned on. The battery charge light turns OFF when the battery pack is charged. Note: The battery stops charging if the temperature is too high or the battery voltage is too high. Power Options The power switch turns ON and OFF the Notebook PC or putting the Notebook PC into sleep mode. Actual behavior of the power switch can be customized in Windows Control Panel "Power Options.” For other options, such as "Switch User, Restart, Sleep, Hibernate or Shut Down" click the arrowhead icon. Restarting or Rebooting After making changes to your operating system, you may be prompted to restart the system. Some installation processes will provide a dialog box to allow restart. To restart the system manually, click Windows Start button and select “Restart” by clicking the arrow as shown in figure. Powering Off In Windows Vista, power OFF the Notebook PC by clicking Windows Start button and click the arrowhead icon and select “Shut down” as shown in figure. 3-6 User's Guide Getting Started Important : To protect the hard drive, wait at least 5 seconds after turning OFF your Notebook PC before turning it back ON. Emergency Shutdown In case your operating system cannot properly turn OFF or restart, there is a additional way to shutdown your Notebook PC: Hold the power button over 4 seconds Important : Do not use emergency shutdown while data is being written; doing so can result in loss or destruction of your data. Power Management Options in Windows Windows Power Management provides basic power saving features. In the Windows Power Options Properties, you may enter time-out values for display and hard disk drive. Windows power manager saves power by turning off hard drive after 1 minute of inactivity and so on. Also the power management settings can be found in Windows > Control Panel > Power options. Choose the required power configuration like Sleep, Hibernate, Shutdown etc., 3-7 User's Guide Getting Started Special Keyboard Functions Functional keys The following define the functional keys on the Notebook PC's keyboard. The colored commands can only be accessed by first pressing and holding the function key while pressing a key with a colored command. Note: The Hot Key locations on the function keys may vary depending on model but the functions should remain the same. Follow the icons instead of the function keys. Fn + F1 : System sleep button Fn + F2 : To Enable / Disable the WLAN Fn + F3 : To Enable / Disable the Bluetooth function Fn + F4 : To Change Power schemes Fn + F5 : To Decrease the brightness of LCD display Fn + F6 : To increase the brightness of LCD display Fn + F7 : To Turn off/on the LCD Backlit Fn + F8 : To Toggle display between Inbuilt LCD and External Monitor 3-8 User's Guide Getting Started Fn + F9 : To Enable / Disable the Touchpad function Fn+F10 : To Mute/Unmute the inbuilt speaker volume Fn+F11 : To Decrease the speaker volume Fn+F12 : To Increase the speaker volume Fn+Ins : Num lock ON/OFF Fn+Del : Scroll lock ON/OFF Fn + : To Stop the running Audio/Video program Fn + : To Play/Pause the running Audio/Video Program Fn + : To move next track (in Audio/Video Programs) Fn + : To move previous track (in Audio/Video Programs) Quick Launch Buttons Two –WLAN enable/ Disable & Touchpad Enable / Disable 3-9 User's Guide Getting Started Switches and Status Indicators Switches Touchpad Switch Enables or disables the built-in touchpad. Disabling the touchpad will prevent you from accidentally moving the cursor while typing and is best used with an external pointing device such as a mouse. Wireless Switch Wireless Models Only: Toggles the internal wireless LAN (on selected models) ON or OFF with an onscreen display. When enabled, the corresponding wireless indicator will light Windows software settings are necessary to use the wireless LAN. Power Switch The power switch turns ON and OFF the Notebook PC or puts the Notebook PC into sleep or hibernation modes. Actual behavior of the power switch can be customized in Windows Control Panel. 3-10 User's Guide Getting Started Status indicators Power Indicator The power indicator lights when the Notebook PC is turned ON and blinks slowly when the Notebook PC is in the Suspend-to-RAM (Sleep) mode. This indicator is OFF when the Notebook PC is turned OFF or in the Suspend-to-Disk (Hibernation) mode. Drive Activity Indicator Indicates that the Notebook PC is accessing one or more storage device(s) such as the hard disk & ODD. The light flashes proportional to the access time. Battery Charge Indicator The battery charge indicator shows the status of the battery’s power as follows: ON: The Notebook PC’s battery is charging when AC power is connected. OFF: The Notebook PC’s battery is charged or completely drained. Blinking: Battery power is less than 10% and the AC power is not connected. Wireless Indicator This is only applicable on models with built-in wireless LAN & Bluetooth. When the built-in wireless LAN or Bluetooth is enabled, this indicator will light. (Windows software settings are necessary.) 3-11 User's Guide Using the Notebook PC Chapter - 4 Using the Notebook PC Operating System This Notebook PC may offer its customers the choice of a pre-installed operating system such as Windows Vista or Windows 7. The levels of hardware and software support may vary depending on the installed operating system. Support Software (On selected models only) This Notebook PC comes with a driver CD / DVD’s (optional) that provides, drivers and applications to enable hardware features, extend functionality, help manage your Notebook PC, or add functionality not provided by the native operating system. The driver CD / DVD’s does not include the operating system itself. Note : Some of the Notebook PC's components and features may not work until the device drivers and utilities are installed. 4-1 User's Guide Using the Notebook PC Pointing Device The Notebook PC's integrated touchpad pointing device is fully compatible with all two button and scrolling knob PS/2 mouse. The touchpad is pressure sensitive and contains no moving parts therefore, mechanical failures can be avoided. A device driver is still required for working with some applications software. Important : Do not use any object in place of your finger to operate the touchpad or else damage may occur to the touchpad's surface Cursor Movement Left Click Right Click Here how to use the touchpad pointing device: 1.The flat surface acts like a miniature duplicate of your display screen. To move the mouse cursor, place the finger lightly on the sensor pad and move in the desired direction. If you reach the end of the pad, lift your finger and place it back down on the other side of the pad. 2.To select an item, click on the item by pressing the left button or by simply tapping on the surface once. A light, quick tap always works best. To execute an item, click the left button twice or do a quick double tap on the surface. 3.To simulate holding the mouse button down (dragging an icon or selection), use the tap-and-drag gesture. This feels much like a double-click, except that the finger remains on the pad after the second tap: Tap, lift, tap, hold and move. The simulated button remains held as long as the finger remains on the pad. Important : Avoid spilling any liquid on the touchpad surface and always keep the touchpad surface and pointing finger dry from sweat built-up. Also do not expose touchpad to any magnetic source object. 4-2 User's Guide Using the Notebook PC Dual Touchpad To Change between normal touchpad operation mode and Multimedia button mode (MMB) mode just tap (Single tap) on the MODE button (right side corner of the touchpad) which is marked in the above figure. When the MMB mode is ON the MMBs will glow as shown in the above figure. Note: While MMB mode is enabled, the normal touchpad operations will not work. 10 7 1 9 8 6 5 4 2 11 3 4-3 User's Guide Using the Notebook PC 1. Mode To Change between normal touchpad operation mode and Multimedia button mode (MMB). 2. Volume Control Scroll up and down to increase or decrease the volume. 3. Brightness Up To increase the Brightness of the system. 4. Brightness Down To decrease the Brightness of the Notebook. 5. Next Track To move next track (in audio video programs) 6. Previous Track To move previous track (in audio video programs) 7. Application Buttons The Application Buttons are User - Configurable. After tapping the application button a dialogue box will appear as shown below and from that you can select the application you want. 4-4 User's Guide Using the Notebook PC 8. Play / Pause To Play / Pause the running Audio / Video Programs. 9. Stop To stop the running Audio / Video Programs. 10. Media Player To Launch Media Player0. 11. Mute To Mute / Unmute the Built-in Speaker Volume. 4-5 User's Guide Using the Notebook PC Caring for the Touchpad The touchpad is pressure sensitive. If not properly cared for, it can be easily damaged. Take note of the following precaution: Make sure the touchpad does not come into contact with dirt, liquids or grease. Do not touch the touchpad if your fingers are dirty or wet. Do not rest heavy objects on the touchpad or the touchpad buttons. Do not scratch the touchpad with your finger nails or any hard object. Note : The touchpad responds to movement not to force. There is no need to tap the surface too hard. Tapping too hard does not increase the responsiveness of the touchpad. The touchpad responds best to light pressure. 4-6 User's Guide Using the Notebook PC Storage Devices Storage devices allow the Notebook PC to read or write documents, pictures, and other files to various data storage devices. This Notebook PC has the following storage devices : Optical drive Flash memory reader Optical Drive Inserting an optical disc 1. While the Notebook PC's power is ON, press the drive's eject button and the tray will eject out partially. 2. Gently pull on the drive's front panel and slide the tray completely out. Be careful not to touch the Optical drive lens and other mechanisms. Make sure there are no obstructions that may get jammed under the drive's tray. 4-7 User's Guide Using the Notebook PC Optical Drive (Cont') 1. Hole the disc by the edge and face the disc's printed side up. Push down on both sides of the disc's center until the disc snaps onto the hub. The hub should be higher than the disc when correctly mounted. 2. Slowly push the drive's tray back in. The drive will begin reading the table of contents (TOC) on the disc. When the drive stops, the disc is ready to be used. Note : It is normal to hear as well as feel the Media spinning with great intensity in the Optical drive while data is read. 4-8 User's Guide Using the Notebook PC Optical Drive (Cont') Removing an optical disc Eject the tray and gently force the edge of the disc upwards at an angle to remove the disc from the hub. Emergency eject The emergency eject is located in a hole on the optical drive and is used to eject the optical drive tray in case the electronic eject does not work. Do not use the emergency eject in place of the electronic eject. Note : Make sure not to stab the activity indicator located in the same area. Using the Optical Drive Optical discs and equipment must be handled with care because of the precise mechanics involved. Keep in mind the important safety instructions form your CD suppliers. Unlike desktop optical drives, the Notebook PC uses a hub to hold the CD in place regardless of the angle. When inserting a CD, it is important that the CD be pressed onto the center hub or else the optical drive tray will scratch the CD. 4-9 User's Guide Using the Notebook PC Warning : If the CD disc is not properly locked onto the center hub, to CD can be damaged when the tray is closed. Always watch the CD closely while closing the tray slowly to prevent damage. A CD drive letter should be present regardless of the presence of a CD disc in the drive. After the CD is properly inserted, data can be accessed just like with hard disk drives except that nothing can be written to or changed on the CD. Using the proper software, a CD-RW drive or DVD+CD-RW drive can allow CD-RW discs to be used like a hard drive with writing, deleting, and editing capabilities. Vibration is normal for all high-speed optical drives due to unbalanced CD’s or CD print. To decrease vibration, use the Notebook PC on an even surface and do not place labels on the CD. Flash Memory Card Reader This Notebook PC has a single built-in memory card reader that can read the following flash memory cards: Secure Digital (SD), Multi-Media Card (MMC), Memory Stick (MS), Memory Stick Pro. The built-in memory card reader is not only convenient, but faster than most other forms of memory card readers because it utilizes the high-bandwidth PCI bus. ) Important : Never remove cards while or immediately after reading, copying, formatting or deleting data on the card or else data loss may occur. Warning: To prevent data loss, use Windows ” Safely Remove Hardware" on the taskbar before removing the flash memory card. 4-10 User's Guide Using the Notebook PC Connections Network Connection Connect a network cable, with RJ-45 connectors on each end, to the network port on the Notebook PC and the other end to a hub or switch. For 100 BASE-TX speed, your network cable must be category 5 or better (not category 3) with twisted-pair wiring. If you plan on running the interface at 100Mbps, it must be connected to a 100 BASE-TX / 1000 BASE-T hub (not a BASET4 hub). For 10Base-T, use category 3, 4, or 5 twisted-pair wiring. 10/100/1000 Mbps Full-Duplex is supported on this Notebook PC but requires connection to a network switching hub with “duplex” enabled. The software default is to use the fastest setting so no user-intervention is required. Twisted-Pair Cable The cable used to connect the Ethernet card to a host (generally a Hub or Switch) is called a straight-through Twisted Pair Ethernet (TPE). The end connectors are called RJ-45 connectors, which are not compatible with RJ-11 telephone connectors. If connecting two computers together without a hub in between, a crossover LAN cable is required (Fast-Ethernet model). (Gigabit models support auto-crossover so a crossover LAN cable is optional.) 4-11 User's Guide Using the Notebook PC Example of the Notebook PC connected to a Network Hub or Switch for use with the built-in Ethernet controller. LAN connector Network Hub or Switch Network cable with RJ-45 connectors 4-12 User's Guide Using the Notebook PC Wireless LAN Connection (on selected models) The optional built-in wireless LAN is a compact easy-to-use wireless Ethernet adapter. Implementing the IEEE 802.11 standard for wireless LAN (WLAN), the optional built-in wireless LAN is capable of fast data transmission rates using Direct Sequence Spread Spectrum (DSSS) and Orthogonal Frequency Division Multiplexing (OFDM) technologies on 2.4 Ghz or 5 Ghz frequencies (depending of the card specifications). The optional built-in wireless LAN is backward compatible with the earlier IEEE 802.11 standards allowing seamless interfacing of wireless LAN standards. The optional built-in wireless LAN is a client adapter that supports Infrastructure and Ad-hoc modes giving you flexibility on your existing or future wireless network configurations for distances up to 40 meters between the client and the access point. But this depends upon the environmental conditions like presence of high magnetic and electrical field etc. To provide efficient security to your wireless communication, the optional built-in wireless LAN comes with a 64-bit/128-bit Wired Equivalent Privacy (WEP) encryption and Wi-Fi Protected Access (WPA) features. 4-13 User's Guide Using the Notebook PC If you have included an PCIe Wireless LAN card make sure that the Wireless LAN module is on before installing the driver. Use the Fn + F2 key combination to toggle power to the Wireless LAN module. Make sure you install the drivers in the order indicated. Warning: Wireless Device Operation Aboard Aircraft: The use of any portable electronic transmission devices aboard aircraft is usually prohibited. Make sure the module(s) are OFF if you are using the computer aboard aircraft. Use the Fn + F2 key combination to toggle power to the WLAN module, and check the indicator to see if the module is powered on or not (or) use aeroplane hot key to switch off Wireless and Bluetooth simultaneously. Connecting to a Wireless Network Make sure the Wireless LAN module is turned on. 1. Click the taskbar wireless icon click Connect to a network). , and then click Connect to a network (or right click the icon , and then 2. In the Show list, click to choose Wireless from the drop-down menu. 4-14 User's Guide Using the Notebook PC 3. A list of currently available networks will appear. Note: Network and Sharing Center: You can also use the Network and Sharing Center control panel in Windows (Network and Internet) to connect to any available wireless networks. 4. Click a network, and then click Connect. 5. If you do not see a network you want to connect to, click Set up a connection or network (a list of options will appear allowing manual searching, and creating a new network). 4-15 User's Guide Using the Notebook PC 6. Move the cursor over the taskbar icon to see the connection status (see below). 7. To disconnect from the wireless network you can click the taskbar wireless icon , and then select Connect or disconnect to access the network menu, and click Disconnect (or right-click the icon , and then click Disconnect from). Warning: Security Enabled Networks: You should try to make sure that any network you are connecting to is a secure network. Connecting to unsecure networks may allow unauthorized access to your computer, documents, websites and files etc. 4-16 User's Guide Using the Notebook PC Using the USB Port USB (Universal Serial Bus) is a hardware interface that enables you to connect multiple devices (such as printers, mouse, keyboards, storage devices, joysticks, digital cameras, and video conference cameras, etc.) to your notebook computer, and up to 127 devices can be attached. Besides, USB’s hot swap capability allows everything to be plugged in and unplugged without turning the system off. USB 2.0 offers data transfer rate up to 480Mbps (megabits per second) compared to USB 1.1 devices, which transfer at speeds of 12Mbps. So, you could know that USB 2.0 can transfer data between the computer and its peripherals 40 times faster than USB 1.1. However, USB 2.0 is fully backward compatible, you will be able to use a USB 1.1 device in a USB 2.0 compliant system. Removing USB Device 1. Double click the removable device icon on the right bottom side of the taskbar. 2. Select the socket from the list that you want to remove, and click stop button. The system then disables the function of USB device. 3. Then you can remove the inserted USB device. 4-17 User's Guide Using the Notebook PC Using the External Monitor Port Your computer has a 15-pin Monitor port for supporting any external CRT or LCD color monitor. You need a display signal cable (usually provided with the monitor). One end of the cable must have a 15-pin connector for the system. To connect an external monitor: 1.Turn off your computer and make sure the monitor power switch is turned off. The notebook computer must be powered off or suspended while the monitor is being connected. Although you can connect the external Monitor without power off the computer and the external monitor, however, it is harmful to both devices and it shortens the life of these devices. 2.Connect the connector cable of the monitor to the VGA port of your computer. Secure the cable connection with the screws provided. 3.Connect the monitor power cable and plug it into a properly grounded wall outlet. 4.Turn on the power of the monitor. 5.Turn on your computer. Both the LCD panel and the monitor screen will show the display. Your computer is set at default to run at simultaneous display mode. 4-18 User's Guide Using the Notebook PC 6.If you only want to show the display on the external monitor or projector and shut off the LCD display, you can use the <Fn> + <F8> hot-key to switch display type between LCD and external monitor. Keep pressing the hot-key until you get the display to external monitor only. Using the External Audio System At the right side of your computer, you will find the built-in audio ports. You can connect Microphone jacks, earphone or powered speaker. To connect to a audio jack: 1. Locate the audio port (Microphone, Headphone) that you want to use to the target device. 2. Plug the jack into the port on the right side of the system. Note: If you use external speakers and experience the sound distortion or feedback, please lower the volume. Some factors is caused by too close locating the microphone and speakers from each other, moving away the external audio option from the unit may also help. 4-19 User's Guide Using the Notebook PC Bluetooth Module (on selected models) Before installing the Bluetooth driver, make sure that the optional Bluetooth module is on. And then install Bluetooth driver from the driver CD. Warning: Wireless Device Operation Aboard Aircraft: The use of any portable electronic transmission devices aboard aircraft is usually prohibited. Make sure the module(s) are OFF if you are using the computer aboard aircraft. Use the Fn + F3 key combination to switch ON & OFF the Bluetooth module. Bluetooth Wireless Connection Notebook PCs with Bluetooth technology eliminates the need for cables for connecting Bluetooth enabled devices. Examples of Bluetooth- enabled devices may be Notebook PCs, Desktop PCs, mobile phones, and PDAs. Note: If your Notebook PC did not come with built-in Bluetooth, you need to connect a USB or Express Card Bluetooth module in order to use Bluetooth. To send a Data/File 1. Power on the Bluetooth by pressing Fn+F3, then Bluetooth will be enabled. 2. Right click on Bluetooth tray icon and select send a file option. 3. Bluetooth file transfer wizard will be opened, browse & select the device the file need to be sent. 4. During file sending the machine will ask for passkey & use passkey to connect the other machine if required. 4-20 User's Guide Using the Notebook PC 5. Then select the sending and give send file. To Receive a Data/File 1. Power on the Bluetooth by pressing Fn+F3 function key or Hot Key. 2. Right click on the Bluetooth tray icon is select Receive a file. 3. Waiting for a connection form another computer or device dialog box will appear. 4. Then send the file from other machine to this machine. 5. Accept the sent file. Note: While receiving file, select receive a file from tray icon, before selecting this you shouldn't send file from other machine. PC Camera Module (on selected models) The 1.3Megapixel or 2.0Megapixel(Megapixel will vary according to your configuration) camera module is UVC ( USB Video Class) and uses the OS inbuilt driver and application to capture pictures (Windows XP).In Windows Vista and Windows 7 OS, use the freeware utility provided along with the driver CD / DVD. Note: Vista OS doesn't have inbuilt webcam preview function by default. But still the VoIP applications (video chat) will have these features and work normally. However a free utility is included in the driver CD for basic testing purpose only. 4-21 User's Guide Using the Notebook PC Security Modules (Fingerprint ) (on selected models only) Fingerprint recognition is feature that enrolls your fingerprint information into the computer and helps prevent unauthorized access by others. Instead of inputting password from the keyboard, the following function can be carried out just by swiping the registered finger against the fingerprint sensor. Points to note about the Fingerprint Sensor Due to the use of advance technology to manufacture the fingerprint sensor, please abide by the following guidelines when using it. Please take extra care when handling the sensor surface. Failure to follow these guidelines might result in (1) damage to the sensor or cause sensor failure, (2)finger recognition problems, or lower finger recognition success rate. Do not scratch or poke the sensor with your nails or any hard or sharp objects. Do not press the sensor strongly. Do not touch the sensor with a wet finger or any wet objects. Keep sensor surface dry and free of water vapor. Do not touch the sensor with a soiled finger. Minute foreign particles on a soiled or dirty finger may scratch the sensor. Do not paste sticker or write on the sensor. Do not touch the sensor with a finger or any object with built-up static electricity. 4-22 User's Guide Using the Notebook PC Observe the following before you place your finger on the sensor whether for fingerprint enrollment/registration or recognition. Wash and dry your hands thoroughly. Remove static electricity form your finger by touching any metal surface. Static electricity is a common cause of sensor failures, especially when the weather is dry. Avoid the following finger conditions for enrollment or recognition as they may result in fingerprint enrollment errors or a drop in the fingerprint recognition success rate. Soaked or swollen finger (e.g. after taking bath) Injured finger Wet finger Soiled or oily finger Extremely dry skin condition on finger Observe the following to improve the fingerprint recognition success rate. Enroll two or more fingers. Enroll additional fingers if recognition failure occurs often using enrolled fingers. Check your finger condition. Changed conditions, such as injured, rough, extremely dry, wet, soiled, dirty, soaked, swollen fingers, may lower the recognition success rate. Also if the fingerprint is worn down or the finger becomes thinner or fatter, the recognition success rate may be lowered. The fingerprint for each finger is different and unique. Please ensure that only the registered or enrolled fingerprint or fingerprints are used for identification. 4-23 User's Guide Using the Notebook PC Fingerprint Enrollment Go to Control panel. Click on Hardware and Sound Option and you will find the biometric device as follows. Click on Use your fingerprint with Windows Option as shown in the figure above. A Dialogue box will appear as in fig 1. Enter the Password. Fig 1 Fig 2 Fig 3 Fig 4 In the next Window, Select the finger that you want to Enroll as in fig 2. Swipe the finger that you have selected three to five times gently and slowly over the fingerprint Sensor to enroll the selected finger. Note: After setting your Windows password only you can Enroll your Fingerprint. 4-24 User's Guide Using the Notebook PC TPM (Trusted Platform Module) Procedure Brief: Following procedure are used for installing the TPM in Windows (XP, Vista, 7) OS using TPM driver. Enter into BIOS and set Trusted Platform Modules () as 'Enable' instead of 'Disable'. Install the TPM support Drivers such as NTRU and TPM Installer. Install the TPM Driver for XP if the OS is XP otherwise install TPM driver for VISTA if the OS is VISTA otherwise install TPM driver for Windows 7 if the OS is Windows 7 . After installing the drivers for TPM it is followed by establishing Owner & Master Passwords and create the same now. Now install the TPM software utility i.e. Embassy Trust Suite Utility. Here the Vault is created as another drive inside the My Computer and the Document Manger is also established on Desktop. Thus the TPM is installed successfully. Procedure: 1. Right click on the TPM icon from available Tray icons, then select “Manage Security Platform”. 4-25 User's Guide Using the Notebook PC 2. There will be a prompt asking for Initialization, when any option is selected from Infineon Security platform Setting Tool, Give Ok & proceed for Initialization. (i) Quick initialization (recommended for most users) 3. Insert a Removable Device (USB Drive need not be empty but Free space required) 4. Select the Removable Device & click next 5. Need to Shutdown & Restart the machine 6. After Powering on the machine in Logo screen Press F10 & proceed 7. Again repeat from step 1 to 4 6. Select EFS & PSD as required 7. Set the Password & click Next 4-26 User's Guide Using the Notebook PC 8. Wait for Security Platform to get configured, Make sure you follow the Warning given 9. Once progress completed click Next 10. Goto details, take required Back of all the Details then click Finish 4-27 User's Guide Using the Notebook PC 11. Then the below two icons will be auto created in the Desktop 12. Now again right click on the TPM Icon select Manage Security Platform 13. Select User Setting Tab in the Infineon Security Platform Setting Tool 14. Click on “Configure” which is below the Security Platform Features 4-28 User's Guide Using the Notebook PC 15. Enter the password to authorize the configuration steps, shown as the following pictures. Advanced Initialization (for expert users) 4-29 User's Guide Using the Notebook PC B. Disable TPM Security Platform 1.Double click the TPM tray icon, then to “Advanced” tab. 2. Click “Disable” then key in the owner password; shown as below 3. If you key in the right owner password, the TPM Security Platform will be disabled successfully. Criteria 1.To make sure there is a red mark on the TPM tray icon and shown “Security Platform operation is disabled.” when cursor is over the tray icon. Enter Infineon Security Platform Settings Tool to check that security platform operation is disabled. 4-30 User's Guide Using the Notebook PC Enable TPM Security Platform 1.After TPM Security Platform is disabled, you can enable it. 2.Click “Enable” button then key in the owner password. If you key in the right owner password, the TPM Security Platform will be enabled successfully. Criteria 1.To make sure TPM tray icon shown as over the tray icon. and there is “Security Platform is ready to use.” when cursor is Enter Infineon Security Platform Settings Tool to check that security platform operation is enabled. Clear TPM Security Platform 1.Restart the computer then press “F2” to enter BIOS Setup Utility. 2.Under “Advanced” tag of BIOS Setup Utility, “Trusted Computing” and press Enter 3.Goto “Pending TPM operation” then press Enter 4.Now select “TPM Clear” then save configuration and reset “Yes” 5.Computer will automatically shutdown then turn on the computer 4-31 User's Guide Using the Notebook PC After clearing the TPM Security Platform, the TPM status should be like the following two pictures: Backup Security Platform 1.There are two levels of backup solution for user to use. One named “Automatic Scheduled backups” is of the whole TPM Security Platform and only for TPM administrator; the other is used to backup user's information. 2.Automatic scheduled backup is configured when TPM Security Platform is initialized, as shown below. Then click “Next” following the wizard to finish the TPM initialization. 3.When you have finished initializing the TPM, then open the Infineon Security Platform Settings Tool as administrator and enter the “Backup” tag. 4-32 User's Guide Using the Notebook PC 4.Click “Configure” button to setup automatic system backups for all users, as shown below. Click “Browse” to locate the place to store the backup files, and click “Schedule” to configure the automatically backing up time of a day. Then click “Next”. In fact, the Security Platform is automatically backed up every time you have made changes to the TPM Security Platform. 5.Click “Finish” to run automatic backup immediately, as shown below. 6.Now open the Infineon utility as a standard user then to “Backup” tag, as shown below. Under this condition, you can only backup files for current user. 4-33 User's Guide Using the Notebook PC 7. Click “Backup” button to backup for current user; click “Browse” to locate the folder for the file named “SpBackupArchive.xml”; check the box before “Backup my Personal Secure Drive” to backup your PSD if you have configured this feature,as shown below. Then click “Next” until finishing successfully. Criteria To make sure system level backup and user level backup can be finished successfully. Restore Security Platform 1.Double click the TPM tray icon to begin the restoration (A quick way to make TPM ready to be used when TPM is cleared), then click “Next”, as shown below 2.Select “Security Platform restoration from a Backup Archive.” Then “Next”, as shown below 4-34 User's Guide Using the Notebook PC 3.Click “Browse” to locate “SPSystemBackup.xml” file and then “Next”. 4.Enter the Owner Password then “Next”, as shown below. 5.Click “Browse” to specify “SPEmRecToken.xml” file and enter the password gone with this file, then “Next”, as shown below 6.Select User from Backup data then “Next”, as shown below. 4-35 User's Guide Using the Notebook PC 7.Enter Basic User Password then “Next”. 8.Click “Finish” to complete successfully. 9.Now you can find that the status of the TPM is ready to use and even Personal Security Driver can be loaded successfully. 10.In fact, the data in the Personal Security Driver is encrypted then stored in C:\Security Platform\. What is the result if I have deleted the file before restoring? As shown below 11.Restore the TPM Security Platform as before. After initializing the TPM successfully, you will find that the PSD cannot be loaded. As shown below 4-36 User's Guide Using the Notebook PC 12.Now user level backup is needed to fetch back my PSD. Enter Infineon Security Platform Settings Tool then to “Backup” tag. 13.C l i c k “ R e s t o r e ” t h e n C l i c k “ B r o w s e ” t o s p e c i f y “SpBackupArchive.xml” then “Next”, as shown below 14.Enter Owner Password then “Next”. 15.Click “Browse” to specify “SPEmRecToken.xml” then enter the password gone with this file then “Next”, as shown below 4-37 User's Guide Using the Notebook PC 16.Select User from Backup data then “Next”. 17.Restore my Personal Secure Drive and click “Browse” to specify “SpPSDBackup.fsb” then “Next”, as shown below 18.Enter basic user password then “Next”. 19.There is a pop up dialog at the process of restoration, click “Yes” to go on. 20.After the finish of the process, you will find that the Personal Security Drive can be loaded successfully. Criteria 1.To make sure that everything has been configured can be restored successfully. 2.User's Personal Security Drive can be restored from user level backup even if the “Security Platform” folder has been deleted 4-38 User's Guide Using the Notebook PC Migration 1. Prepare two computers both with TPM module and initialize TPM Security Platform to be ready for the following test. It is strongly recommended to configure all of the features supported by TPM module so we can migrate everything possible. 2. Double click the TPM tray icon, and then to “Migration” tag, you will be here. 3. The first step of migration is that the destination platform will give out a credential for the source platform to authorize the migration. Choose "This is the destination platform" then click “Save” button to save the file to a folder named “destination”. 4. In the following steps, we will use network to transfer the related migration data between the two platforms. So I share the folder “destination”. 5. At the source platform, choose “This is the source platform” first then click “Authorize”, as shown below 4-39 User's Guide Using the Notebook PC 6. Import the credential from destination which has been shared on the network, as shown below. Then enter the owner password, as shown below. Now the destination platform (joak-PC) has been authorized and we can go on. 7. Click “Export” and select “joak-PC” then “Next”, as shown below 4-40 User's Guide Using the Notebook PC 8. Save “SpMigrationArchive” to a folder named “source”, as shown below. The same as before, the “source” folder should be shared on the network. Then basic user password is needed, as shown as following two pictures. 9. Click “Finish” button to complete the process successfully, as shown as following two pictures. 4-41 User's Guide Using the Notebook PC 10. Back to the destination platform. Click “Import” button to browse the file named “SpMigrationArchive.xml” exported by the source platform, shown as the following two pictures: 11. Now the source platform basic user password is needed then “Next” until the whole process ends successfully. There are 4 pictures here: 4-42 User's Guide Using the Notebook PC Criteria 1.Basic User Password of the destination platform should be the same as the source. 2.Security Platform Features such as EFS, PSD should be migrated from source to destination successfully. 3.Security Platform Certificates should be migrated from source to destination successfully. Password Reset 1.Double click the TPM tray icon then to “Password Reset” tag. First of all, you must check that “Create Password Reset Token for all users” is configured and “Enable Password Reset for current user” is enabled. 2.Click “Prepare” then there will be a dialog box for you to choose which user you want to reset, as shown below. In the figure you will find there are two users: Kunlun & Sesedi. Kunlun is the administrator user of my computer; Sesedi is a standard user. 3. If you choose to reset Kunlun's password first then click “Next” button, you will be here. 4-43 User's Guide Using the Notebook PC 4. Click “Browse” button to specify the “SPPwdResetToken” file which is configured when you initialize your TPM Security Platform, and then enter the password gone with the file, as shown below Click “Next”. 5. Click “Browse” to specify “SPPwdResetSecret”, then click “Next”. 6. Now enter the new Basic User Password twice as you like, as shown below. Then and click “Finish” finally. 4-44 User's Guide Using the Notebook PC 7. But what about if I choose to reset Sesedi's password(standard user)? Select Sesedi then “Next”. 8. Click “Browse” button to locate the “SPPwdResetToken” file which is configured when you initialize your TPM Security Platform, and then enter the password gone with the file and then Click “Next”. 9. Now there is a pop up dialog box named “Reset Authorization Code”; click “Save to File” button to save”SPPwdResetCode” and then click “Finish” to succeed. 10. Click “Start”->”Switch User” to switch user from Kunlun to Sesedi. 11. Double click the TPM tray icon and to “Password Reset” tag. Now you can only click “Reset” button under “User Task”. 4-45 User's Guide Using the Notebook PC 12. Click “Reset” button as shown in 1st pic, then click “Get from File” to get the file “SPPwdResetCode” which is allocated by the administrator of the TPM (Kunlun), as shown below in the 2nd pic. Then “Next”. 13. Now enter the new Basic User Password twice as you like and Press “Next” until succeeding. Criteria 1. After the operation of “Password Reset”, the Basic User Password must be changed successfully. 2. If you log onto the system as the administrator user, “SPPwdResetCode.xml” is not needed. If you log onto the system as the standard user, “SPPwdResetCode.xml” is needed. NOTE : All screenshots taken from Windows Vista and same will be applicable for Windows 7 as well. 4-46 User's Guide Troubleshooting Chapter - 5 Troubleshooting Overview When you have any problems with your computer, before consulting your service representative, you may want to try to solve the problem yourself. This chapter lists some common problems and their possible solutions. This can’t anticipate every problem, but you should check here before you panic. If you don’t find the answer in these pages, make sure you have followed the instructions carefully and observed the safety precautions in the preface. If all else fails, talk to your service representative. You should also make a record of what happened and what remedies you tried. Of course, if something goes wrong, it will happen at the most inconvenient time possible, so you should preview this section just in case. If, after you’ve tried everything, and the system still won’t cooperate, try turning it off for a few minutes and then reboot. You will lose any unsaved data, but it may start working again. Else approach for your service representative. Basic Hints and Tips Many of the following may seem obvious but they are often the solution to a problem when your computer appears not to be working. Power - Is the computer actually plugged into a working electrical outlet? If plugged into a power strip, make sure it is actually working. Check the LED Power & Communication Indicators to see the computer’s power status. Connections - Check all the cables to make sure that there are no loose connections battery, adapter anywhere. 5-1 User's Guide Troubleshooting Power Savings - Make sure that the system is not in Hibernate or Sleep mode use power button to wake-up the system. Brightness - Check the brightness of the screen by pressing the Fn+F5 and Fn+F6 keys to adjust the brightness. Display Choice - Press Fn + F8 to make sure the system is not set to “external only” display. Boot Drive - Make sure there are no disc and/or USB storage devices in any connected drive (this is a common cause of the message “Invalid system disk - Replace the disk, and then press any key”/ “Remove disks or other media. Press any key to restart”). Check to see if the problem persists when all the external devices are removed. Check to see if your keyboard is operational by pressing and holding any key. Be sure you have not performed an incorrect setting on the hardware devices in the BIOS Setup utility. A faulty setting may cause the system to misbehave. If you are not sure of the changes you made, try to restore all the settings to factory defaults. Be sure all the device drivers are installed properly. For example, without the audio driver properly installed, the speakers and microphone will not work. If external devices such as USB camera, scanner, printer do not function correctly when connected to the system, it is usually the device's own problem. Consult the device's manufacturer first. Some software programs, which have not gone through rigorous coding and testing, may cause problems during your routine use. Consult the software vendor for problem solving. 5-2 User's Guide Troubleshooting Backup and General Maintenance Always backup your important data, and keep copies of your OS and programs safe, but close to hand. Don’t forget to note the serial numbers if you are storing them out of their original cases, e.g. in a CD wallet. Run maintenance programs on your hard disk and OS as often as you can. You may schedule these programs to run at times when you are not using your computer. You can use those that are provided free with your OS, or buy the more powerful dedicated programs to do so. Write down your passwords and keep them safe (away from your computer). This is especially important if you choose to use a Supervisor password for the BIOS password. Keep copies of vital settings files such as network, mail settings etc.(even if just brief notes). Viruses Install an Anti-Virus program and keep the definitions file (the file which tells your program which viruses to look for) up to date. New computer viruses are discovered daily, and some of them may seriously harm your computer and cause you to lose data. Anti-Virus programs are commercially available and the definitions file updates are usually downloadable directly from the internet. Be aware when e-mail, downloading file from internet, ensure those are virus free. 5-3 User's Guide Troubleshooting Upgrading and Adding New Hardware/Software Do not be tempted to make changes to your Windows Registry unless you are very sure of what you are doing, otherwise you will risk severely damaging your system. Don’t open your computer or undertake any repair or upgrade work if you are not comfortable with what you are doing. This will void your warranty. Read the documentation. We can assume, since you are reading this that you are looking at the computer’s manual, but what about any new peripheral devices you have just purchased? Many problems are caused by the installation of new hardware and/or software. Always refer to the documentation of any new hardware and/or software, and pay particular attention to files entitled “READ ME” or “READ ME FIRST”. When installing a new device always make sure the device is powered on, and in many cases you will need to restart the computer. Always check that all the cables are correctly connected. Make sure you have installed the drivers for any new hardware you have installed. Thoroughly check any recent changes you made to your system as these changes may affect one or more system components, or software programs. If possible, go back and undo the change you just made and see if the problem still occurs. Don’t over complicate things. The less you have to deal with then the easier the source of the problem may be found; Example - if your computer has many devices plugged into its ports, and a number of programs running, then it will be difficult to determine the cause of a problem. Try disconnecting all of the devices and restarting the computer with all the peripheral devices unplugged. A process of elimination (adding and removing devices and restarting where necessary) will often find the source of a problem, although this may be time consuming. 5-4 User's Guide Troubleshooting Problem Possible Cause - Solution The battery LED power indicator , is blinking Red. Low Battery. Plug in the DC power source. If the computer doesn’t start up immediately, turn it off then on again. You are losing battery power too quickly. The system is using too much power. If your OS has a Power Options scheme check its settings. You may also be using an Card/USB device/external device that is drawing a lot of power. Actual battery operating time is shorter than expected. The battery has not been fully discharged before being recharged. Make sure the battery is fully discharged and recharge it completely before reusing. Refer battery tips which care with the machine. Power Options have been disabled. Go to the Control Panel in Windows and re-enable the options. The computer feels too hot. Make sure the computer is properly ventilated and the Vent/Fan intakes are not blocked. If this doesn’t cool it down, put the system into Hibernate mode or turn it off for an hour. Make sure the computer isn’t sitting on a thermal surface . Make sure you’re using the correct adapter. Make sure that your notebook is completely powered off before putting it into a travel bag (or any such container). Putting a notebook which is powered on in a travel bag may cause the Vent/Fan intakes to be blocked. 5-5 User's Guide Troubleshooting You forget the boot password. If you forget the password, you may have to discharge the battery of the CMOS. Contact your service representative for help. Warning: If you choose to set a boot password, (If supported) NEVER forget your password. The consequences of this could be serious. The sound cannot be heard or the volume is very low. The system never goes into a power saving mode. The Wireless LAN modules cannot be detected. The volume might be set too low. Check the volume control in the Volume Control Panel in the Windows taskbar, or use the key combination Fn+F12 key. Power Options features are not enabled. Go to the Windows Power Options menu and enable the features you prefer. Make sure you have enabled Hibernate mode from the control panel. The modules are off. Check the LED indicator and/or function key indicator to see if the WLAN switch is on or off. If the LED indicator is off, then press the Fn + F2 (WLAN) key combination(s) in order to enable the modules. 5-6