1
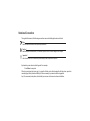
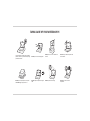
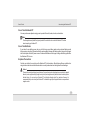
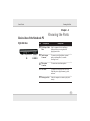
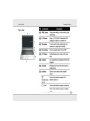
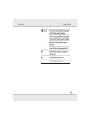
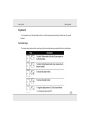
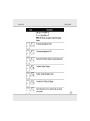
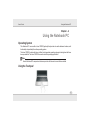
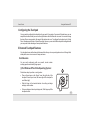
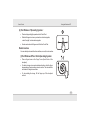
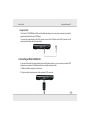
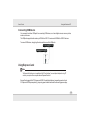
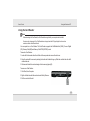
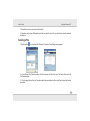
Notebook PC User’s Guide REV 4.0 Notational Conventions Throughout this manual, the following conventions are used to distinguish elements of text. Note: identifies additional information that requires special attention. Caution ! identifies important information that, if not followed, may result in loss of data or damage to the computer. Important ! vital information that must be followed to prevent damage to data, components or persons. Keyboard keys are shown in a bold typeset. For example: Press Enter to complete. When keys are joined by a plus sign (+), press the first key, and, while keeping the first key down, press the remaining keys, finally release all the keys. When necessary, keys are also shown in graphics. Any title, command, setup item, or button that you can see on the screen is shown in boldface. Overview Chapter - 1 Introducing the Notebook PC 1-1 Chapter - 2 Knowing the Parts 2-1 Chapter - 3 Getting Started 3-1 Chapter - 4 Using the Notebook PC 4-1 Chapter - 5 Troubleshooting 5-1 TAKING CARE OF YOUR NOTEBOOK PC To prevent possible overheating of the computer's processor, make sure you don't block the openings provided for ventilation. DO NOT press or touch the display panel. DO NOT place or drop objects on the computer and DO NOT apply heavy pressure on it. DO NOT subject the computer to magnetic fields. DO NOT place on uneven or unstable work surfaces. DO NOT use your notebook computer under harsh conditions. DO NOT expose to direct sunlight. DO NOT use or store in extreme temperatures. Avoid sudden changes in temperature or humidity by keeping it away from A/C and heating vents. DO NOT expose to dust and/or corrosive chemicals. DO NOT expose the computer to rain or moisture. DO NOT slam your notebook shut and never pick up or hold your notebook by the display. DO NOT place near fire or other sources of heat. DO NOT spray water or any other cleaning fluids directly on the display. DO NOT tamper with the batteries. Keep them away from children. If you are traveling with your computer, remember to carry it as hand luggage. Do not check it in as baggage. Introducing the Notebook PC User's Guide Chapter - 1 Introducing the Notebook PC Congratulation on the purchase of new HCL Notebook Computer! Operating Environment Since users are likely to maintain the same posture for a long period of time when using the computer, they will be exhausted more easily if compared with other users engaged in other general operations. This section will illustrate the suggested posture and the operating environment for the use of the computer. Health Management Take a 2 to 3-minute break every 30 minutes when you are operating the computer for a long time. Sedentariness will also cause stress. Do some gentle gymnastics during your break for recreation. When you have symptoms such as eyestrain, sleepiness, dizziness, stiff in the shoulders, or numbness of the wrists or hands, have a rest right away. In case these symptoms remain the next day, please contact your doctor as soon as possible. Posture When You Are Using the Computer Please use the computer with your body relaxed and with a good sitting posture. For this, please pay attention to the following tips. ! ! Adjust the height of the desk and the chair to look down from a position a little bit higher than the screen. Adjust the chair until you can lean your back closely on the chair and sit down with your back stretched. 1-1 User's Guide ! ! Introducing the Notebook PC Relax with no strength put onto your shoulders and bend your knees comfortably. Put your wrist comfortably to keep it parallel to the desk. Operating Environment Your eyes will feel tired easily if you cannot see the screen clearly. Pay attention to the following tips and adjust the screen constantly to ensure its clear visibility. 1-2 User's Guide Introducing the Notebook PC Use appropriate lighting Use the same appropriate lighting that is intended for office use when you use the computer. Adjust the angle of the display to the position with which you can see the display clearly You won't see the screen clearly if the display reflects light. In addition, the visibility of the display varies with the angle due to its feature. Adjust the angle of the display to ensure its clear visibility. Clean the display A dusty display makes the screen hard to see clearly. Wipe gently with a soft, dry cloth to clean the display regularly. Important ! This machine is a precision machine. For the place of installation and operation, please read carefully the section “For the Correct Use of this Product and Your Safety” to ensure the correct operation. Transportation Precautions To prepare the Notebook PC for transport, you should turn it OFF and disconnect all external peripherals to prevent damage to the connectors. The hard disk drive's head retracts when the power is turned OFF to prevent scratching of the hard disk surface during transport. Therefore, you should not transport the Notebook PC while the power is still ON. Close the display panel and check that it is latched securely in the closed position to protect the keyboard and display panel. 1-3 User's Guide Introducing the Notebook PC Cover Your Notebook PC You can purchase an optional carrying case to protect it from dirt, water, shock, and scratches. Note : The surface glaze is easily dulled if not properly cared for. Be careful not to rub or scratch the Notebook PC surfaces when transporting your Notebook PC. Cover Your Batteries If you intend to use battery power, be sure to fully charge your battery pack and any optional battery packs before going on long trips. Remember that the power adapter charges the battery pack as long as it is plugged into the computer and an AC power source. Be aware that it takes much longer to charge the battery pack when the Notebook PC is in use. Airplane Precautions Contact your airline if you want to use the Notebook PC on the airplane. Most airlines will have restrictions for using electronic devices and will allow electronic use only between and not during takeoffs and landings. Caution ! There are three main types of airport security devices: X-ray machines (used on items placed on conveyor belts), magnetic detectors (used on people walking through security checks) and magnetic wands (hand-held devices used on people or individual items). You can send your Notebook PC and diskettes through airport X-ray machines. However, it is recommended that you do not send your Notebook PC or diskettes through airport magnetic detectors or expose them to magnetic wands. 1-4 Introducing the Notebook PC User's Guide Preparing your Notebook PC These are only quick instructions for using your Notebook PC. 1. Install the battery pack 3. Open the Display Panel 2. Connect the AC Power Adapter 4. Turn ON the Notebook PC Important ! When opening, do not force the display panel down to the table or else the hinges may break! Never lift the notebook PC by the display panel! Note: To power ON , the power button needs to pressed slightly deeper and to be hold for a second. 1-5 Knowing the Parts User's Guide Chapter - 2 Basic sides of the Notebook PC Right-Side View Ref Knowing the Parts Component Description DVD Super Multi Used for compact disc for installing or loading software, accessing data, and playing music/video. Audio Output To connect a set of headphones, external speakers with amplifier, or an audio recording device. Microphone To connect an external microphone. USB Ports To connect a USB device, such as a USB flash disk, printer, digital camera, joystick, and more. Kensington Lock Locks the computer to a stationery object for security. Drive Connector Connector 2-1 Knowing the Parts User's Guide Left-Side View Ref Component Description Power Connector VGA Port USB Port To connect the AC adapter. RJ-45 Connector Card Reader To connect the LAN cable. ExpressCard Used to con nect (34mm only) Express Card To connect an external monitor. To connect a USB device, such as a USB flash disk, printer, digital camera, joystick, an d more. Allows a MultiMediaCard (MMC), Secure Digital (SD), Memory Stick (MS) or Memory Stick PRO (MS PRO) card for removable storage media. Slot 2-2 Knowing the Parts User's Guide Bottom view Ref Component Description Battery Pack Supplies power to you r computer when external power is n ot connected. Speakers Built-in stereo speaker system allow to hear audio without additional attachment 2-3 User's Guide Knowing the Parts Top - view 2-4 User's Guide Knowing the Parts 2-5 User's Guide Getting Started Chapter - 3 Getting Started Power System Using AC Power The Notebook PC power is comprised of two parts, the power adapter and the battery power system. The power adapter converts AC power from a wall outlet to the DC power required by the Notebook PC. Your Notebook PC comes with a universal AC-DC adapter. That means that you may connect the power cord to any 100V-120V as well as 220V240V outlets without setting switches or using power converters. Different countries may require that an adapter be used to connect the provided Indian-standard AC power cord to a different standard. Most hotels will provide universal outlets to support different power cords as well as voltages. It is always best to ask an experienced traveller about AC outlet voltages when bringing power adapters to another country. With the AC power cord connected to the AC-DC adapter, connect the AC power cord to an AC outlet (preferably with surge-protection) and then connect the DC plug to the Notebook PC. Connecting the AC-DC adapter to the AC outlet first allows you to test the AC outlet's power and the AC-DC converter itself for compatibility problems before connecting the DC power to the Notebook PC. The power LED on the adapter lights up if the power is within accepted ranges. 3-1 User's Guide Getting Started Important ! Damage may occur if you use a different adapter to power the Notebook PC or use the Notebook PC's adapter to power other electrical devices. If there is smoke, burning scent, or extreme heat coming from the AC-DC adapter, seek servicing. You may damage both your battery pack and the Notebook PC with a faulty AC-DC adapter. Caution ! The power adapter may become warm to hot when in use, be sure not to cover the adapter and keep it away from your body. Using Battery Power The Notebook PC is designed to work with a removable battery pack. The battery pack consists of a set of battery cells housed together. A fully charged pack will provide few hours of battery life. Battery Care The battery pack is the internal power source for the computer. It is rechargeable using the AC adapter.The operating time of a fully charged battery pack depends on how you are using the computer. Caution ! For safety reasons, DO NOT throw the battery in fire, DO NOT short circuit the contacts, and DO NOT disassemble the battery. If there is any abnormal operation or damage to the battery pack caused by impact, turn OFF the Notebook PC and contact an authorised service center Note: 1. On while Battery Charging, a common safety feature included in battery designs. I.e. If the adapter is plugged in when battery % is 90 to 99%, it will not get charged further. Because doing this kind of charging so frequently(short charge / discharge cycles between 90% and 100%) may cause battery age to reduce. 2. Also another type of general safety feature is to hold battery from charging if battery internal temperature exceeds its limit due to overheating ,In this situation remove the adapter and let the notebook to cool down to resume charging. 3-2 Getting Started User's Guide Installing and Removing the battery Pack Your Notebook PC may or may not have its battery pack installed. If your Notebook PC does not have its battery pack installed, use the following procedures to install the battery pack. To Install the battery Pack : To remove the battery pack : Important ! Only use battery packs and power adapters supplied with the Notebook PC or specifically approved by the manufacturer for use with this model or else damage may occur to the Notebook PC. Never attempt to remove the battery pack while the Notebook PC is turned ON, as this may result in the loss of working data. 3-3 Getting Started User's Guide Powering ON the Notebook PC Use power button to turn ON the PC. If you need to run the BIOS Setup to set or modify the system configuration, press (F2) upon boot up to enter the BIOS Setup. To view post screen press Tab key during logo screen. To stop in this mode Do this To start up or resume again Off Follow the shutdown procedure of your operating system. This can prevent loss of unsaved data or damage to your software programs. If the system is locked up because of hardware or software problems, press the power button to turn off the computer. Press the power button. Standby Depending on your settings in Windows, you can put the computer in Standby mode by: Press any key or Press power button. Closing the display cover Pressing the Fn+F12 function key Pressing the power button Hibernation Depending on your settings in Windows, you can put the computer in Hibernation mode by: Press the power button. Closing the display cover Pressing the Fn+F12 function key Pressing the power button If you choose to stop in Standby or Hibernation mode, you can return to where you left off the next time you start up the computer. 3-4 User's Guide Getting Started Using the Quick launch Button ECO mode: Battery saving feature in-build in the Notebook: To select or switch between power modes(applicable in DC mode only) To initiate the ECO mode, press the ECO button (located next to the power button). The following changes take place and the light under the button turns on to indicate that the computer is in ECO mode. The CPU runs at the lowest power state. The LCD backlight is adjusted to the lowest brightness level. The radio for all the wireless modules (WLAN, Bluetooth, and 3G) is turned off. In ECO mode, you can still increase the LCD brightness and switch on the radio for individual wireless modules. To end the ECO mode, press the ECO button. The ECO mode automatically ends when the computer is shutdown, enters the Hibernation mode, or is connected to AC power. Note: The ECO button works only when you are using the battery power. Hot key change results of LCD brightness or wireless radio in the ECO mode will remain even after the computer is brought out of the ECO mode. If the computer enters the Sleep mode while in the ECO mode, the LCD brightness level will restore to the Windows' default setting when the computer resumes. 3-5 User's Guide Getting Started Keyboard Your keyboard has all the standard functions of a full-sized keyboard including Functional key for specific functions. Function Keys The function keys (marked in blue colour keys) will act as hot keys when pressed while the fn key is held down. 3-6 User's Guide Getting Started 3-7 User's Guide Using the Notebook PC Chapter - 4 Using the Notebook PC Operating System This Notebook PC comes with a driver CD/DVD(optional) that provides to enable hardware features, add functionality not provided by the native operating system. Ths driver CD/DVD contains all drivers, utilities for all supported operating systems including those that have been pre-installed. The driver CD/DVD does not include the operating system itself. Note : Some of the Notebook PC's components and features may not work until the device drivers and utilities are installed. Using the Touchpad 4-1 User's Guide Using the Notebook PC Here how to use the touchpad pointing device: 1.The touchpad surface acts like a miniature duplicate of your display screen. To move the mouse cursor, place the finger lightly on the sensor pad and move in the desired direction. If you reach the end of the pad, lift your finger and place it back down on the other side of the pad. 2.To select an item, click on the item by pressing the left button control or by simply tapping on the surface once. A light, quick tap always works best. To execute an item, click the left button twice or do a quick double tap on the surface. 3.To simulate holding the mouse button down (dragging an icon or selection), use the tap-and-drag gesture. This feels much like a double-click, except that the finger remains on the pad after the second tap: Tap, lift, tap, hold and move. The simulated button remains held as long as the finger remains on the pad. Important ! Avoid spilling any liquid on the touchpad surface and always keep the touchpad surface and pointing finger dry from sweat built-up. Also do not expose touchpad to any magnetic source object. 4-2 User's Guide Using the Notebook PC Configuring the Touchpad You may want to configure the touchpad to suit your needs. For example, if you are a left-handed user, you can swap the two buttons so that you can use the right button as the left button and vice versa. You can also change the size of the on-screen pointer, the speed of the pointer, and so on. To configure the touchpad, go to Control Panel® Hardware and Sounds® Mouse Properties. However, you can install the touchpad driver supplied with your computer to take advantage of more powerful features. Enhanced Touchpad Features Your touchpad comes with enhanced features which allow you to use special gestures to scroll through lists, rotate photos, zoom-in or zoom-out of maps, and more. Scroll Gesture You can scroll continuously with one, smooth, circular motion. scrolling speed is controlled by finger speed. (i) For Windows XP and Vista Operating System : Follow these steps to perform a scroll gesture: ? Place a finger down on the “target” zone (the right side of the touchpad to scroll up or down, the lower edge of the touchpad to scroll left or right) ? Slide the finger in the desired direction of scrolling and begin making a circular motion. ? To stop scrolling and return to pointing mode, lift the finger up off the touchpad surface. 4-3 User's Guide Using the Notebook PC (ii) For Windows 7 Operating System : ? Place two fingers slightly separated on the TouchPad. ? Slide both fingers in unison up or down for vertical navigation, and left or right for horizontal navigation. ? Gesture ends when both fingers are lifted from TouchPad. Rotate Gesture You can rotate photos and other items with one, smooth, circular motion. (I) For Windows XP and Vista Operating System : ? Place a finger down on the “target” zone (the left side of the touchpad). ? To rotate an image in a counterclockwise direction, slide the finger downwards and begin making a circular motion. The selected item will rotate in 90 degree increments. ? To stop rotating the image, lift the finger up off the touchpad surface. 4-4 User's Guide Using the Notebook PC (ii) For Windows 7 Operating System : ? Place two separated fingers on the TouchPad. ? Retain one finger in fixed position, and move other finger in an arching Motion while maintaining uniform finger separation. ? Left arching motion initiates left rotation. Right arching motion initiates right rotation. ? Gesture ends when both fingers are lifted from TouchPad. Pinch Gesture for Zooming In many windows applications, you can use the pinch gesture to zoomin on or zoom-out of items such as photos, maps or documents. (I) For Windows XP, Vista & Windows 7 Operating System: ? Place two fingers down on the touchpad. ? Slide the fingers closer together to zoom-out or further apart to zoom-in. ? Gesture ends when both fingers are lifted from TouchPad. 4-5 User's Guide Using the Notebook PC Flick Gesture for Browsing to the Previous/ Next Page The function performed by a flick gesture is application specific; for example, in a web browser a left flick can be used to “Browse Back”. (I) For Windows XP and Vista Operating System : ? Place two fingers on the touchpad surface, slightly separated. ? Flick the two fingers across the touchpad in a linear, continuous motion. ? Gesture ends when both fingers are lifted from TouchPad. (ii) For Windows 7 Operating System : ? Place three fingers on the touchpad surface, slightly separated. ? Flick the three fingers across the touchpad in a linear, continuous motion. ? Gesture ends when three fingers are lifted from TouchPad. 4-6 User's Guide Using the Notebook PC Caring for the Touchpad The touchpad is pressure sensitive. If not properly cared for, it can be easily damaged. Take note of the following precaution: ? Make sure the touchpad does not come into contact with dirt, liquids or grease. ? Do not touch the touchpad if your fingers are dirty or wet. ? Do not rest heavy objects on the touchpad or the touchpad buttons. ? Do not scratch the touchpad with your finger nails or any hard object. Note : The touchpad responds to movement not to force. There is no need to tap the surface too hard. Tapping too hard does not increase the responsiveness of the touchpad. The touchpad responds best to light pressure. 4-7 User's Guide Using the Notebook PC Using the ODD Drive Inserting and Removing a Disc Follow this procedure to insert or remove a disc: 1. Turn on the computer. 2. Press the eject button and the DVD tray will slide out partially. Gently pull on it until it is fully extended. 3. To insert a disc, place down the disc in the tray with its label facing up.Slightly press the center of the disc until it clicks into place. 4. Gently push the tray back into the drive. Note: In the unlikely event that you are unable to release the DVD tray by pressing the Eject Button, you can manually release the disc. To remove a disc, hold the disc by its outer edge and lift it up from the tray. Eject Button How to care the Optical Disks (CDs, DVDs, etc.) When you handle CDs, pay attention to the following guidelines: ? Avoid scratching or soiling either side of the disk. ? Do not write with the hard ball-point pen or apply labels on either side of the disk. ? Keep the disk away from direct sunlight or high temperatures. ? Clean fingerprints or dust from the disk by wiping it with a soft cloth. The above points also apply to other optical storage media. 4-8 User's Guide Using the Notebook PC Important ! Be careful when inserting and removing the optical media from the optical disc drive. Avoid touching the optical disc drive lens directly. Using the Audio Features Note : To take advantage of the enhanced audio capabilities, the audio driver supplied with your computer must be install. If you experience interference while recording, try lowering the microphone recording volume. The audio subsystem of your computer features: ? Built-in microphone ? External audio connectors, and ? Set of speakers Ways of playing and recording sound vary with the operating system used. See your operating system documentation or online help for specific information. 4-9 User's Guide Using the Notebook PC Connecting Audio Devices For higher audio quality, you can use external audio devices. Note : After connecting an external audio device, make sure that you specify the use of the correct audio device in Windows. ? Audio Output Connector ( ) can be connected to speakers, headphones, or earphone set. ? Microphone Connector ( ) can be connected to an external microphone for recording voice or sound. Note: When using the external speakers/headphones or microphone, you cannot use the internal one. 4-10 User's Guide Using the Notebook PC Dolby Experience (for selected SKUs only): Selected models of HCL notebooks are certified for 'Dolby Advanced Audio' by Dolby Laboratories. Dolby enablement is possible only under supported SKUs of Windows Vista and Windows 7 only (not in any other operating systems). The Dolby technologies are controlled from the Dolby tab from the “properties” page of the speaker's playback endpoint from the sound control panel. There is a box for enabling the Audio Enhancer which controls the Natural Bass, High Frequency enhancer and inverse filtering on internal speakers processing, and natural bass and high frequency enhancer on the headphones and external speakers.The Surround Sound check box enables Dolby Headphone feature on Headphones only. To use the above said Dolby settings, (I) Right Click “Volume icon” in the System tray and select “Playback Devices”. In the pop up window, double click on the “Speakers”. (II).Then in the popup windows, you can see these settings under “Dolby” tab (Sorround sound will not appear if no device is connected to the Audio out jack) 4-11 User's Guide Using the Notebook PC Using the LAN The internal 10/100/1000 Mbps LAN (Local Area Network) allows you to connect your computer to a network. It supports data transfer rate up to 1000 Mbps. To connect the network cable to the LAN, connect one end of the LAN cable to the RJ-45 connector on the computer and the other end to the network hub. Connecting an External Monitor If you want the benefits of a larger display screen with higher resolution, you can connect an external CRT monitor to your computer. Follow this procedure to connect an external monitor: 1. Make sure that the computer is not turned on. 2. Plug the monitor’s signal connector to the computer’s VGA connector. 4-12 User's Guide Using the Notebook PC 3. Plug one end of the monitors power cord into the power socket on the monitor and the other end to an electrical outlet. 4. To use the monitor, turn on the monitor before turning on the computer. 5. The monitor should respond by default. If not, you can switch the display to the monitor or to both (simultaneous display), or to multi-display by pressing the Fn+F5 hot key. In Windows, you can also change the display through the settings in Display Properties. 6. You can change display settings through your operating system. See your operating system documentation or online help for specific information. Caution ! Do not disconnect the external monitor while the computer is in the Standby mode or Hibernation mode. If no external monitor is connected when the computer resumes, the LCD might not display properly. Note: Make sure that the VGA driver is installed correctly. 4-13 User's Guide Using the Notebook PC Connecting USB Device Your computer has three USB ports for connecting USB devices, such as a digital camera, scanner, printer, modem, and mouse. The USB ports support transfer rates up to 12 Mb/s for USB 1.1 devices and 480 Mb/s for USB 2.0 devices. To connect USB device, simply plug the device cable to one of the USB ports. Using Express Cards Note: The ExpressCard interface is not compatible with the PC card interface. You need optional adapters for using PC cards on your computer.Your computer has an ExpressCard slot. ExpressCard supports the PCI Express and USB 2.0 serial data interfaces (supporting speeds of upto 2.5 Gbps and 480 Mbps respectively), improving speed in data transfer while conserving power usage. 4-14 Using the Notebook PC User's Guide ExpressCard Type Your computer has an ExpressCard/34 slot. ExpressCard supports the PCI Express and USB 2.0 serial data interfaces (supporting speeds of up to 2.5 Gbps and 480 Mbps respectively), improving speed in data transfer while conserving power usage. Typical ExpressCards support a very extensive range of applications including memory, wired and wireless communication cards, and security devices. Inserting and Removing an ExpressCard To insert an ExpressCard: 1. Locate the ExpressCard slot on the left side of the computer. 2. Slide the ExpressCard, with its label facing up, all the way into the slot until the rear connectors click into place. 3. When a new card is seated, the computer will detect it and try to install the appropriate driver. Follow the onscreen instructions to complete the process. To remove an ExpressCard: 1. Double-click on the Safely Remove Hardware Remove Hardware window appears on screen. icon found on the Windows taskbar and the Safely 2. Select (highlight) the ExpressCard from the list to disable the card. 3. Push the ExpressCard slightly to release the card. 4. Pull the card out of the slot. 4-15 User's Guide Using the Notebook PC Using the Card Reader Note: To take advantage of the Card Reader, the Card Reader driver supplied with your computer must be installed. You can use only storage cards. Your Card Reader does not support cards with I/O (input/output) functions such as a wireless network card or Bluetooth card. Your computer has a Card Reader.The Card Reader supports the MultiMediaCard (MMC), Secure Digital (SD), Memory Stick (MS) and Memory Stick PRO (MS PRO) cards. To insert an Card Reader: 1. Locate the Card reader slot on the left side of the computer and remove the slot cover. 2. Align the card with its connector pointing to the slot and its label facing up. Slide the card into the slot until it reaches the end. 3. Windows will detect the card and assign it a drive name (typically E). To remove an Card Reader: 1. Click Start, then Computer. 2. Right-click the drive with the card and select Safely Remove. 3. Pull the card out of the slot. 4-16 User's Guide Using the Notebook PC Using the Wireless LAN (optional) Depending on your model, an internal half mini PCI-E wireless LAN (WLAN) card may have been pre-installed in your computer. This card allows you to access corporate networks or the Internet in a wireless environment. The WLAN features include: ? Peer-to-Peer (Ad-Hoc) and Access Point (Infrastructure) modes support. ? WEP (Wired Equivalent Privacy) 64/128-bit data encryption ? IEEE 802.11b/g/n standard compliance Turning Off/On the WLAN Radio If you need to temporarily turn off the radio, press Fn+F1. To resume network connection, press Fn+F1 again. Connecting to a Wireless Network 1.Make sure that the WLAN radio is on. 2.Right-click the Wireless Network Connection icon located on the Windows system tray and select Connect to a network. 3.If any wireless network is detected, the following window appears on screen. Click the Show drop down menu and select Wireless. 4. Select a wireless network to connect to by clicking on a selection, then click on Connect. 5. Depending on the settings, you may be asked to enter a WEP key (refer to your Windows online help for more information on setting a wireless network connection). 4-17 Using the Notebook PC User's Guide Using the Bluetooth® Wireless Feature (Optional) Note: To take advantage of the Bluetooth feature, the Bluetooth driver supplied with your computer must be installed. Depending on your model, your computer may incorporate the Bluetooth capability for short-range (about 10 meters) wireless communications between devices without requiring a cable connection. With Bluetooth, data can be transmitted through walls, pockets and briefcases as long as two devices are within range. Turning Off/On the Bluetooth® Wireless Feature Your computer has a built-in Fn+F2 hot key to switch the Bluetooth radio on/off. If you want to turn off the Bluetooth radio, press Fn+F2. To turn on the radio, press Fn+F2 again. The status of the Bluetooth connection is indicated by the Bluetooth icon located in the system tray in the lowerright part of the screen. Status Icon Off ® On ® Connected ® (blue with red logo) (blue with white logo). (blue with green logo) You can use the Bluetooth Utility to configure Bluetooth connection settings and transfer files. 4-18 Using the Notebook PC User's Guide Connecting to Another Bluetooth Device 1. Make sure that the target Bluetooth device is turned on, discoverable and within close range. 2. Double-click the icon, then click on New Connection or click on Bluetooth, then Add New Connection . . . Or right-click the icon, and then click on Add New Connection. or 3. The Add New Connection Wizard window appears. Select Express Mode (Recommended), then click on Next. 4-19 Using the Notebook PC User's Guide 4. Select the device to connect to and click on Next. 5. Depending on the type of Bluetooth device that you want to connect to, you will need to enter the pertinent information. Sending a File 1. Right-click the icon, and then click Wireless File Transfer. The following screen appears. 2. In the Wireless File Transfer window, click Add to browse for the file to send. The file(s) will show on the File/Folder window. 3. Click the target device from the Transfer-enabled device window, and then click Send to start the transfer procedure. 4-20 User's Guide Using the Notebook PC Using the Cable Lock You can use a Kensington-type cable lock to protect your computer against theft. The cable lock is available in most computer stores. To use the lock, loop the lock cable around a stationary object such as a table. Insert the lock to the Kensington lock hole and turn the key to secure the lock. Store the key in a safe place. 4-21 User's Guide Troubleshooting Chapter - 5 Troubleshooting Overview When you have any problems with your computer, before consulting your service representative, you may want to try to solve the problem yourself. This chapter lists some common problems and their possible solutions. This can’t anticipate every problem, but you should check here before you panic. If you don’t find the answer in these pages, make sure you have followed the instructions carefully and observed the safety precautions in the preface. If all else fails, talk to your service representative. You should also make a record of what happened and what remedies you tried. Of course, if something goes wrong, it will happen at the most inconvenient time possible, so you should preview this section just in case. If, after you’ve tried everything, and the system still won’t cooperate, try turning it off for a few minutes and then reboot. You will lose any unsaved data, but it may start working again. Else approach for your service representative. Basic Hints and Tips Many of the following may seem obvious but they are often the solution to a problem when your computer appears not to be working. Power - Is the computer actually plugged into a working electrical outlet? If plugged into a power strip, make sure it is actually working. Check the LED Power & Communication Indicators to see the computer’s power status. Connections - Check all the cables to make sure that there are no loose connections battery, adapter anywhere. 5-1 User's Guide Troubleshooting Power Savings - Make sure that the system is not in Hibernate or Sleep mode use power button to wakeup the system. Brightness - Check the brightness of the screen by pressing the Fn+F6 and Fn+F7 keys to adjust the brightness. Display Choice - Press Fn + F5 to make sure the system is not set to “external only” display. Boot Drive - Make sure there are no optical media and/or USB storage devices in any connected drive (this is a common cause of the message “Invalid system disk - Replace the disk, and then press any key” / “Remove disks or other media. Press any key to restart”). Check to see if the problem persists when all the external devices are removed. Check to see if your keyboard is operational by pressing and holding any key. Be sure you have not performed an incorrect setting on the hardware devices in the BIOS Setup utility. A faulty setting may cause the system to misbehave. If you are not sure of the changes you made, try to restore all the settings to factory defaults. Be sure all the device drivers are installed properly. For example, without the audio driver properly installed, the speakers and microphone will not work. If external devices such as USB camera, scanner, printer do not function correctly when connected to the system, it is usually the device's own problem. Consult the device's manufacturer first. Some software programs, which have not gone through rigorous coding and testing, may cause problems during your routine use. Consult the software vendor for problem solving. 5-2 User's Guide Troubleshooting Backup and General Maintenance Always backup your important data, and keep copies of your OS and programs safe, but close to hand. Don’t forget to note the serial numbers if you are storing them out of their original cases, e.g. in a CD wallet. Run maintenance programs on your hard disk and OS as often as you can. You may schedule these programs to run at times when you are not using your computer. You can use those that are provided free with your OS, or buy the more powerful dedicated programs to do so. Write down your passwords and keep them safe (away from your computer). This is especially important if you choose to use a Supervisor password for the BIOS. Keep copies of vital settings files such as network, dial-up settings, mail settings etc.(even if just brief notes). Viruses ? Install an Anti-Virus program and keep the definitions file (the file which tells your program which viruses to look for) up to date. New computer viruses are discovered daily, and some of them may seriously harm your computer and cause you to lose data. Anti-Virus programs are commercially available and the definitions file updates are usually downloadable directly from the internet. Be aware when e-mail, downloading file from internet, ensure those are virus free. Upgrading and Adding New Hardware/Software ? Do not be tempted to make changes to your Windows Registry unless you are very sure of what you are doing, otherwise you will risk severely damaging your system. 5-3 User's Guide Troubleshooting Don’t open your computer or undertake any repair or upgrade work if you are not comfortable with what you are doing. This will void your warranty. Read the documentation. We can assume, since you are reading this that you are looking at the computer’s manual, but what about any new peripheral devices you have just purchased? Many problems are caused by the installation of new hardware and/or software. Always refer to the documentation of any new hardware and/or software, and pay particular attention to files entitled “READ ME” or “READ ME FIRST”. When installing a new device always make sure the device is powered on, and in many cases you will need to restart the computer. Always check that all the cables are correctly connected. Make sure you have installed the drivers for any new hardware you have installed. Thoroughly check any recent changes you made to your system as these changes may affect one or more system components, or software programs. If possible, go back and undo the change you just made and see if the problem still occurs. Don’t over complicate things. The less you have to deal with then the easier the source of the problem may be found; Example - if your computer has many devices plugged into its ports, and a number of programs running, then it will be difficult to determine the cause of a problem. Try disconnecting all of the devices and restarting the computer with all the peripheral devices unplugged. A process of elimination (adding and removing devices and restarting where necessary) will often find the source of a problem, although this may be time consuming. Note : Please note that CPU in this notebook is embedded type. This can be chosen only when ordering the product, cannot be upgraded thereafter. 5-4 Troubleshooting User's Guide Problem Possible Cause - Solution The battery LED power indicator , is blinking Red. Low Battery. Plug in the DC power source. If the computer doesn’t start up immediately, turn it off then on again. You are losing battery power too quickly. The system is using too much power. If your OS has a Power Options scheme check its settings. You may also be using an ExpressCard/USB device/external device that is drawing a lot of power. Actual battery operating time is shorter than expected. The battery has not been fully discharged before being recharged. Make sure the battery is fully discharged and recharge it completely before reusing. Refer battery tips which care with the machine. Power Options have been disabled. Go to the Control Panel in Windows and re-enable the options. The computer feels too hot. Make sure the computer is properly ventilated and the Vent/Fan intakes are not blocked. If this doesn’t cool it down, put the system into Hibernate mode or turn it off for an hour. Make sure the computer isn’t sitting on a thermal surface . Make sure you’re using the correct adapter. Make sure that your notebook is completely powered off before putting it into a travel bag (or any such container). Putting a notebook which is powered on in a travel bag may cause the Vent/Fan intakes to be blocked. 5-5 Troubleshooting User's Guide You forget the boot password. If you forget the password, you may have to discharge the battery of the CMOS. Contact your service representative for help. Caution ! If you choose to set a boot password, NEVER forget your password. The consequences of this could be serious. If you cannot remember your boot password you must contact your vendor and you may lose all of the information on your hard disk. The sound cannot be heard or the volume is very low. The volume might be set too low. Check the volume control in the Volume Control Panel in the Windows taskbar, or use the key combination Fn + F4 keys. The CD/DVD cannot be read. The CD/DVD is dirty. Clean it with a CD/DVD cleaner kit. Unwelcome numbers appear when typing. The system freezes or the screen goes dark. If the LED The system never goes into a power saving mode. The Wireless LAN/ Bluetooth modules cannot be detected. is lit, then Num Lock is turned ON. The system’s power saving features have timed-out. Use the AC/DC adapter, press the sleep (Fn + F12) key combination, or press the power button if no LEDs are lit. Power Options features are not enabled. Go to the Windows Power Options menu and enable the features you prefer. Make sure you have enabled Hibernate mode from the control panel. The modules are off. Check the LED indicator and/or function key indicator to see if the WLAN/Bluetooth switch is on or off. If the LED indicator is off, then press the Fn + F1 (WLAN) & Fn + F2 (BT) key combination(s) in order to enable the modules. 5-6