1
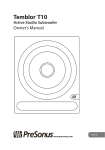
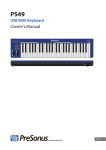
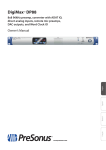
Table of Contents
Table of Contents
1.0 What’s in the Box — 1
2.0 Register Your StudioLive RM-Series Mixer! — 2
3.0 Download UC-Surface for iPad® and QMix™-AI — 2
4.0 Meet the StudioLive RM32AI and RM16AI — 3
Front — 3
Rear — 4
5.0 Wired Ethernet Control Setup — 4
6.0 Wireless Control Setup — 5
7.0 Computer Recording Setup — 6
8.0 Getting Started with UC-Surface — 7
9.0 Fat Channel Area — 9
9.1
Parameter Box — 9
9.2
Channel Options — 10
10.0 Presets Button — 10
11.0 Channel Strip Area — 11
12.0 Flex Master Channel Strip — 11
13.0 Mix Selection Area — 12
13.1
Mix Settings — 12
13.2
FX Settings — 13
14.0 Main Output Area — 13
15.0 Input Meter Bridge and Navigation — 14
PreSonus® StudioLive™ RM32AI/RM16AI
Visual Quick Start Guide
1.0

1.0
What’s in the Box
PreSonus® StudioLive™ RM32AI/RM16AI
Visual Quick Start Guide
What’s in the Box
•• StudioLive™ RM32AI or RM16AI
•• USB Wi-Fi dongle
•• FireWire 800 cable
•• Ethernet cable
•• Power cable
•• Product registration and software authorization card
•• This Quick Start Guide
1
2.0

2.0
Register Your StudioLive RM-Series Mixer!
PreSonus® StudioLive™ RM32AI/RM16AI
Visual Quick Start Guide
Register Your StudioLive RM-Series Mixer!
Before you do anything else, please register your StudioLive RM-series mixer online at
https://my.PreSonus.com so you can download and authorize the included software,
manuals, and video guides.
Your StudioLive RM-series mixer is more than a mixer; it’s a powerful suite of
integrated hardware and software solutions that take you from stage to studio to
fans. The following software is included with the StudioLive RM32AI and RM16AI.
•• UC-Surface battle-ready mix-control application
•• QMix™-AI personal monitor control
•• Capture™ multitrack recording and virtual sound check
•• Studio One® Artist professional DAW
•• Nimbit® Free publishing and marketing account
3.0
Download UC-Surface for iPad® and QMix™-AI
PreSonus’ UC-Surface battle-ready mix-control app for iPad® and
QMix™-AI aux-mix control app for iPhone®/iPod touch® are free downloads from the
Apple App Store. You’ll need this software to control your StudioLive RM-series mixer,
so please download it now.
2
4.0

Meet the StudioLive RM32AI and RM16AI
4.0
PreSonus® StudioLive™ RM32AI/RM16AI
Visual Quick Start Guide
Meet the StudioLive RM32AI and RM16AI
Front
5
7 8
6
4
9 10
11
12
13
Meters
1
STUDIOLIVE RM32
32 channel x 25 bus digital mix core
with 32 remote XMAX preamps
3
2
17 18
3
4
5
6
7
8
9
10
11 12 13 14 15 16
19 20 21 22 23 24 25 26
27 28 29 30 31 32
+48V
Mute
All
L
Cue
R
USB
-80
-80
+6
Level
+6
Level
Left
Right
2
2
1
1
2
3
4
5
6
7
8
9
10
17
18
19
20
21
22
23
24
2
25
26
1
2
3
4
5
6
7
8
9
10
1.
Mix outputs
2.
Microphone inputs
3.
USB port (supports firmware updates and Wi-Fi dongle)
4.
Power/status indicator
5.
Input signal/clip/+48V indicators
6.
+48V meters mode button
7.
Mute All button
8.
Headphone source selection buttons
9.
Headphone level knob
11
27
11
12
28
12
13
29
13
14
30
14
15
16
31
32
15
16
10. Headphone output
11. Tape input
12. Main Mono output and trim knob
13. Main Left/Right outputs and trim knob
3
4.0

Meet the StudioLive RM32AI and RM16AI
PreSonus® StudioLive™ RM32AI/RM16AI
Visual Quick Start Guide
Rear
WARNING:
TO REDUCE THE RISK OF FIRE OR ELECTRIC
SHOCK, DO NOT EXPOSE THIS EQUIPMENT TO RAIN OR
MOISTURE. DO NOT REMOVE COVER. NO USER SERVICEABLE
PARTS INSIDE. REFER SERVICING TO QUALIFIED PERSONNEL.
AVIS: RISQUE DE CHOC ELECTRIQUE — NE PAS OUVRIR
R
DESIGNED AND ENGINEERED BY PRESONUS • MANUFACTURED IN CHINA • PATENTS PENDING
“PreSonus”,“STUDIOLIVE” AND “ACTIVE INTEGRATION” ARE REGISTERED TRADEMARKS OF PRESONUS AUDIO ELECTRONICS
SERIAL NUMBER
STUDIOLIVE RM32
MANUFACTURING DATE
32 channel x 25 bus digital mix core
with 32 remote XMAX preamps
This device complies with Part 15 of the FCC Rules and ICES-003 for Canada. Operation is subjected to the
following two conditions: (1) this device may not cause harmful interference, and (2) this device must
accept any interference received, including interference that may cause undesired operation.
IN
15
POWER
OUT
WARNING:
Power down unit before removing option card
100-230V , 50-60 Hz. 120W
S800
14
S/PDIF
S800
Control
16
Output
17
18
14. Power switch
15. Power inlet
16. MIDI input and output
17. Digital option-card slot
18. Mix outputs (mirror of front panel mix outputs)
5.0
Wired Ethernet Control Setup
following two conditions: (1) this device may not cause harmful interference, a
accept any interference received, including interference that may cause
WARNING:
TO REDUCE THE RISK OF FIRE OR ELECTRIC
SHOCK, DO NOT EXPOSE THIS EQUIPMENT TO RAIN OR
MOISTURE. DO NOT REMOVE COVER. NO USER SERVICEABLE
PARTS INSIDE. REFER SERVICING TO QUALIFIED PERSONNEL.
AVIS: RISQUE DE CHOC ELECTRIQUE — NE PAS OUVRIR
R
DESIGNED AND ENGINEERED BY PRESONUS • MANUFACTURED IN CHINA • PATENTS PENDING
“PreSonus”,“STUDIOLIVE” AND “ACTIVE INTEGRATION” ARE REGISTERED TRADEMARKS OF PRESONUS AUDIO ELECTRONICS
STUDIOLIVE RM32
MANUFACTURING DATE
SERIAL NUMBER
32 channel x 25 bus digital mix core
with 32 remote XMAX preamps
This device complies with Part 15 of the FCC Rules and ICES-003 for Canada. Operation is subjected to the
following two conditions: (1) this device may not cause harmful interference, and (2) this device must
accept any interference received, including interference that may cause undesired operation.
IN
IN
POWER
OUT
OUT
WARNING:
Power down unit before removing option card
100-230V , 50-60 Hz. 120W
S800
S/PDIF
S800
Control
WER
100-230V , 50-60 Hz. 120W
Output
WARNING:
Power down unit before removing option card
S800
S/PDIF
S800
Control
Ethernet cable
Your StudioLive RM32AI and RM16AI can be set up for control with a wired Ethernet connection in seconds.
Simply connect the included Ethernet cable to the Ethernet control port on the back of the mixer and to a
network router that is also connected to your computer or iPad.
When you launch UC-Surface with the computer and StudioLive RM32AI or RM16AI connected to the same
network, the software should automatically see the mixer.
4
Output
6.0

6.0
Wireless Control Setup
PreSonus® StudioLive™ RM32AI/RM16AI
Visual Quick Start Guide
Wireless Control Setup
A
C
Meters
1
STUDIOLIVE RM32
32 channel x 25 bus digital mix core
with 32 remote XMAX preamps
2
17 18
10
11 12 13 14 15 16
19 20 21 22 23 24 25 26
3
4
5
6
7
8
9
27 28 29 30 31 32
+48V
L
Cue
Mute
All
1
STUDIOLIVE R RM32
Level
USB
-80
-80
+6
2
3
4
5
6
7
8
9
10
11 12 13 14 1
+6
Level
32 channel x 25 bus digital mix core
with 32 remote XMAX preamps
Left
Right
17 18
19 20 21 22 23 24 25 26
27 28 29 30 31 3
USB
B
1
2
3
4
5
6
7
8
9
10
17
18
19
20
21
22
23
24
2
25
26
2
3
4
5
6
7
8
9
10
1
12
27
1
28
212
11
13
14
29
13
30
3
14
15
16
31
32
15
4
16
5
6
WARNING:
100-230V , 50-60
POWER
11
TO REDUCE THE RISK OF FIRE OR ELECTRIC
SHOCK, DO NOT EXPOSE THIS EQUIPMENT TO RAIN OR
MOISTURE. DO NOT REMOVE COVER. NO USER SERVICEABLE
PARTS INSIDE. REFER SERVICING TO QUALIFIED PERSONNEL.
AVIS: RISQUE DE CHOC ELECTRIQUE — NE PAS OUVRIR
R
DESIGNED AND ENGINEERED BY PRESONUS • MANUFACTURED IN CHINA • PATENTS PENDING
“PreSonus”,“STUDIOLIVE” AND “ACTIVE INTEGRATION” ARE REGISTERED TRADEMARKS OF PRESONUS AUDIO ELECTRONICS
STUDIOLIVE RM32
32 channel x 25 bus digital mix core
with 32 remote XMAX preamps
SERIAL NUMBER
17
MANUFACTURING DATE
18
19
20
21
22
3
4
5
6
This device complies with Part 15 of the FCC Rules and ICES-003 for Canada. Operation is subjected to the
following two conditions: (1) this device may not cause harmful interference, and (2) this device must
accept any interference received, including interference that may cause undesired operation.
IN
POWER
OUT
WARNING:
Power down unit before removing option card
100-230V , 50-60 Hz. 120W
S800
S800
1
S/PDIF
Control
2
Output
StudioLive AI mixers do not support hot-swapping the Wi-Fi LAN Adapter so you
must have it plugged into the front-panel USB port prior to turning on your mixer.
By default, StudioLive mixers are configured to automatically connect to a wireless
network with the following name and password:
•• Wireless network name: StudioLive
•• Wireless network password: StudioLive
If you would like to connect to a custom wireless network, you first need to
connect to the mixer with a wired connection and configure the wireless network
preferences.
1.
Connect to a wired control network, as described in Wired Ethernet control setup.
2.
Launch UC-Surface on a Mac or Windows computer or iPad that is connected to
the same network.
3.
Open the Settings page.
4.
At the top of the Settings page select the wireless connection icon.
5.
Choose the wireless network you would like to use from the list shown.
6.
If a password is required you will be prompted to enter it.
7.
You are now configured to connect to the new wireless network for control.
8.
Every time you turn on your StudioLive AI mixer, if there is no wired Ethernet
connection, and the USB Wi-Fi dongle is plugged in, the mixer will look for this
network and attempt to connect to it.
Note: StudioLive AI only supports WPA and WPA2 security. Please be sure that your
router is configured using one of these security protocols.
5
7.0

Computer Recording Setup
7.0
PreSonus® StudioLive™ RM32AI/RM16AI
Visual Quick Start Guide
Computer Recording Setup
DESIGNED AND ENGINEERED BY PRESONUS • MANUFACTURED IN CHINA • PATENTS PENDING
“PreSonus”,“STUDIOLIVE” AND “ACTIVE INTEGRATION” ARE REGISTERED TRADEMARKS OF PRESONUS AUDIO ELECTRONICS
STUDIOLIVE RM32
SERIAL NUMBER
MANUFACTURING DATE
32 channel x 25 bus digital mix core
with 32 remote XMAX preamps
This device complies with Part 15 of the FCC Rules and ICES-003 for Canada. Operation is subjected to the
following two conditions: (1) this device may not cause harmful interference, and (2) this device must
accept any interference received, including interference that may cause undesired operation.
WARNING:
S800
TO REDUCE THE RISK OF FIRE OR ELECTRIC
SHOCK, DO NOT EXPOSE THIS EQUIPMENT TO RAIN OR
MOISTURE. DO NOT REMOVE COVER. NO USER SERVICEABLE
PARTS INSIDE. REFER SERVICING TO QUALIFIED PERSONNEL.
AVIS: RISQUE DE CHOC ELECTRIQUE — NE PAS OUVRIR
R
S800
DESIGNED AND ENGINEERED BY PRESONUS • MANUFACTURED IN CHINA • PATENTS PENDING
“PreSonus”,“STUDIOLIVE” AND “ACTIVE INTEGRATION” ARE REGISTERED TRADEMARKS OF PRESONUS AUDIO ELECTRONICS
MANUFACTURING DATE
SERIAL NUMBER
STUDIOLIVE RM32
32 channel x 25 bus digital mix core
with 32 remote XMAX preamps
IN
This device complies with Part 15 of the FCC Rules and ICES-003 for Canada. Operation is subjected to the
following two conditions: (1) this device may not cause harmful interference, and (2) this device must
accept any interference received, including interference that may cause undesired operation.
S800
S800
Control
OUT
WARNING:
Power down unit before removing option card
S800
IN
Control
OUT
S/PDIF
S800
Control
Output
WARNING:
Power down unit before removing option card
S800
S/PDIF
S800
Control
Ethernet
cable
Output
Ethernet
cable
FireWire
cable
5
4
3
2
1
FireWire
cable
Network router
5
4
3
2
1
Network router
Touch screen
computer
StudioLive RM32AI and RM16AI have been designed for tight integration with the included Capture and Studio
One Artist software. You can record a live show quickly and with confidence to Capture, save the StudioLive AI
mixer scene with the Capture Session, and then open that recording, complete with mixer scene, in Studio One.
The Studio One mixer will be set to match your StudioLive AI mixer scene, including fader values, mutes, pan,
and effects-send mixes. Fat Channel settings will be loaded into Studio One’s new Fat Channel Native
Effects™ plug-in.
You can also use the StudioLive AI mixer as an audio interface and monitor mixer for studio recording.
R
1.
After registering your StudioLive AI mixer, download the Universal Control installer
for Mac or Windows from your My PreSonus account. This installer includes the
UC-Surface mix-control software and necessary drivers.
2.
Launch the installer and follow the onscreen instructions. When the installer is
finished, reboot your computer to complete the installation.
3.
When the installation is complete simply connect your StudioLive AI mixer to your
computer with the included FireWire cable.
4.
For additional details and instruction on configuring your StudioLive AI as your
default sound input and output device, please refer to your manual and the video
guides in your My PreSonus account.
STUDIOLIVE RM32
32 channel x 25 bus digital mix core
with 32 remote XMAX preamps
IN
OUT
WARNING:
Power down unit before removing option card
S800
S800
S800
S800
FireWire 800 cable
6
8.0

Getting Started with UC-Surface
8.0
PreSonus® StudioLive™ RM32AI/RM16AI
Visual Quick Start Guide
Getting Started with UC-Surface
StudioLive RM32AI and RM16AI are controlled with the UC-Surface battle-ready mix-control application, which
is designed specifically for live mixing. All primary mixing functionality is at your fingers without the need to
navigate complex views or deep menus.
1
2
3
4
5
1.
Connected device tabs
2.
Settings button
3.
Fat Channel area
4.
Presets button
5.
Channel strip area
6.
Flex channel strip
7.
Mix selection area
8.
Main output area
9.
Input Meter Bridge and navigation
6
7
8
9
7
8.0

Getting Started with UC-Surface
PreSonus® StudioLive™ RM32AI/RM16AI
Visual Quick Start Guide
Connected device tabs.
These tabs switch between different mixers available for control on the network.
Selecting a tab will open the associated mixer control.
Settings button.
Selecting this button will open the mixer settings screen. This is where you can
configure global mixer settings such as sampling rate, permissions, wireless network
settings, and more.
1
8
2
3
4
1.
ux Routing tab. This tab displays the routing options for the auxiliary digital
A
outputs on the installed option card.
2.
evice Settings tab. This tab contains all device settings, such as Global Aux
D
Mute, Talkback Input Source, Headphone Cue Source, and Permissions.
3.
ireless connection. Selecting the wireless connection enables you to change
W
the network and password for wireless control of the mixer.
4.
Sampling rate. Here you can change the sampling rate.
9.0

9.0
Fat Channel Area
PreSonus® StudioLive™ RM32AI/RM16AI
Visual Quick Start Guide
Fat Channel Area
The information displayed in this area will change based on where you are in your workflow.
• Select any input channel, the Flex Master Channel, or a Main output to display the associated Fat Channel DSP.
• Select the Flex Master Channel GEQ or FX Edit to display the associated graphic EQ or effects settings.
• Select Scenes/Mutes (main output area) to display the Quick Scenes and Mute Groups.
9.1
Parameter Box
In UC-Surface, we’ve replaced the traditional “knob” graphics with a more informative
parameter box. This area displays the name of the parameter, text of the current
value, and a meter showing the value.
•• When working on a touchscreen, touching the parameter box will open an
adjustment meter under you finger. Move your finger along the meter to change
the value. Remove your finger when done, and the meter will snap back to show
the compact parameter box.
•• When working with a mouse, click on the parameter box to display the
adjustment meter or use the scroll wheel to adjust the value without opening the
adjustment meter.
9
9.0

9.2
Fat Channel Area
PreSonus® StudioLive™ RM32AI/RM16AI
Visual Quick Start Guide
Channel Options
In the Fat Channel view, you can open the channel options to edit the channel name
and choose an input source, the channel type and icon, and stereo linking.
Channel types and icons provide a host of great benefits to your workflow. When
you select a channel type, it will name your channel, display the icon type, and tag
the channel type for contextual filtering of other channel options. For example,
when choosing a Fat Channel preset, if the selected channel is assigned to “guitar,”
the presets displayed will be filtered to only show you presets tagged for guitar,
making it easier to find the preset you need. Choosing a channel type will also create
automatic Filter Groups for quicker navigation and enhanced mixing workflows.
Learn more about Filter Groups in the section describing the Mix selection area or in
the user manual and video guides in your My PreSonus account.
10.0 Presets Button
This button brings up the Presets menu when working with the Fat Channel, graphic
EQ, or FX bus and calls up the Complete Scenes menu when working in the Scenes/
Mute Groups. For details on working with presets and scenes, please refer to the user
manual and video guides in your My PreSonus account.
10
11.0

Channel Strip Area
PreSonus® StudioLive™ RM32AI/RM16AI
Visual Quick Start Guide
11.0 Channel Strip Area
This area displays the input channels and fader levels for the selected mix.
1
2
3
1.
EQ micro view. Selects the associated channel and brings up the
Fat Channel.
2.
Solo
4
3.
Mute
4.
Pan
5.
Channel fader. Controls the channel level for the selected mix.
6.
Input meter
7.
Compressor gain-reduction meter
8.
Gate gain-reduction meter
9.
Channel number, name, and type icon. Selects the associated channel and
brings up the Fat Channel.
5
6
7
8
9
12.0 Flex Master Channel Strip
1
2
3
4
5
6
7
The Flex Master channel strip shows the master channel for the selected mix. For
example, when Mix 3 is selected, the Flex Master is the main output for Mix 3.
1.
EQ micro view. Selects the associated Mix master and brings up the Fat Channel.
2.
Solo
3.
Mute
4.
GEQ or FX Edit. Opens the associated graphic EQ or effects editor in the Fat
Channel area.
5.
Mix fader
6.
Output meter
7.
Compressor gain-reduction meter
8.
Gate gain-reduction meter
9.
Mix number, name, and type icon. Selects the associated Mix master and
brings up the Fat Channel.
8
9
11
13.0

Mix Selection Area
PreSonus® StudioLive™ RM32AI/RM16AI
Visual Quick Start Guide
13.0 Mix Selection Area
This is the primary navigation area for your mixer. Here you’ll select the mix that’s
currently being controlled by the channel faders. This is also where you’ll find the
settings for each mix.
1
13.1
1
2
3
4
12
2
3
4
1.
Mix selection buttons
2.
Main Mix Select button
3.
FX Mix selection buttons
4.
Mix settings and Filter Groups area
1.
Mix name. Select to rename.
2.
Stereo Link. Select to link two adjacent mixes for stereo operation.
3.
Copy/Paste. Copies the currently selected mix so you can paste into other mixes.
4.
Mix Position. Selects routing position for the selected mix (Pre 1, Pre 2, Post).
5.
Mix Delay. Adjusts the output delay for the selected mix, if available.
Note: when a delay is assigned to a mix, a delay settings box will be shown in
this area.
Mix Settings
13.0

13.2
Mix Selection Area
PreSonus® StudioLive™ RM32AI/RM16AI
Visual Quick Start Guide
FX Settings
When an FX mix is selected, this area provides quick access to all FX mutes and Tap
Tempo buttons for the delay effects.
14.0 Main Output Area
1
1.
EQ micro view. Selects the associated main mix and brings up the
Fat Channel.
2
2.
Talkback. Turns Talkback on and off.
3
3.
Scenes/Mutes. Displays the Quick Scenes and Mute Groups in the
Fat Channel area.
4.
Main Mono/Center channel strip. Displays the fader and meter for the
Main Mono mix bus.
5.
Main Left/Right channel strip. Displays the fader and meters for the Main
Left/Right mix bus.
4
5
13
15.0

Input Meter Bridge and Navigation
PreSonus® StudioLive™ RM32AI/RM16AI
Visual Quick Start Guide
15.0 Input Meter Bridge and Navigation
The Meter Bridge along the bottom the application shows the input meters for all available channels. A
highlighted window shows the channels that are currently displayed in the input channel area. You can use the
Meter Bridge to navigate to a specific channel by selecting the channel to “jump” the input channel view to that
area or drag the highlighted window to scroll to that area. You can also swipe the input channel area to scroll
through the available channel, and the highlighted window in the Meter Bridge will follow your location.
There’s a lot more you can do with the battle-ready UC-Surface control application. Please refer to the user
manual and video guides in your MyPreSonus account to learn more.
®
18011 Grand Bay Court • Baton Rouge
Louisiana 70809 USA • 1-225-216-7887
www.presonus.com
14
Part# 825-WLV0049-B