1
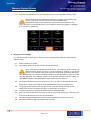
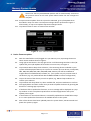
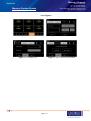
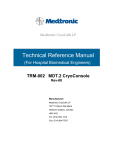
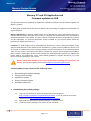
Mercury Support
Issue: 04
Oxford Instruments
tel: +44 (0)1865 393311
fax: +44 (0)1865 393333
email: [email protected]
www. mymercurysupport.com
Mercury System Update
Mercury iTC and iPS Application and
Firmware updates via USB
This document presents guidelines to application (software) and device (card) firmware updates for
Mercury systems.
To distinguish between these two types of updates the terminology for application and firmware is
explained below.
Mercury Application is computer software that runs on the Mercury system and enables the user to
interact with the system using the touch screen; it translates and communicates user commands to
appropriate devices on the system. The user is able to control the behaviour of the Mercury systems
via this application. To view the application version installed on your system please follow the
guidelines in support document [1].
Firmware is a small program that is embedded into the Mercury system’s devices (hardware cards)
which includes devices on the mother board. Each Mercury system consists of different devices such
as a heater or temperature sensor. Firmware dictates the correct behaviour of the underlying device
when the user issues a command to that device. On Mercury systems devices will be listed as MB or
DB, for mother and daughter boards (cards) respectively, with appropriate symbols, e.g. MB0.H1 for
heater, MB1.T1 for temperature sensor. Please follow guidelines in support document [1] to view
the list of devices installed in your system.
Always update APPLICATION to the latest version before updating the firmware on the
devices. For help and support please email [email protected]
The full update process consists of the following steps:
1.
2.
3.
4.
5.
Downloading the update package.
Saving current settings.
Application update
Device firmware update.
Hardware calibration.
1. Downloading the update package:
1.1.
1.2.
1.3.
Log in to your account at mymercurysupport.com and navigate to
http://mymercurysupport.com/downloads/firmware , if you do not have an account
request one at http://mymercurysupport.com/user/register
Download the latest Release update package, e.g. Release 1.0.12,
Unzip the release package to any folder on your computer.
Page 1 / 6
Mercury Support
Issue: 04
Oxford Instruments
tel: +44 (0)1865 393311
fax: +44 (0)1865 393333
email: [email protected]
www. mymercurysupport.com
Mercury System Update
1.4.
Copy the unzipped files from your computer directly onto a USB flash memory drive.
Please ensure that your USB memory flash drive contains the following files:
cryosys_update.tar, auxPort.a43, heater.a43, levelMeter.a43,
magnetPowerSupply.a43, tempPressureSensor.a43 and tempSensor.a43.
These files need to be placed directly on your USB drive without any folder or subfolder
(e.g. E:\cryosys_update.tar)
Figure 1. Home Screen.
2. Saving current settings.
This step is optional, it allows you to restore current configuration should the system fail the
update process.
2.1.
2.2.
Power up Mercury system.
Tap Settings button on Home Screen as shown in Figure 1.
If your system has a customised Home Screen, e.g. Cryojet or Heliox system, the
Settings button shown in Figure 1 can be accessed by tapping on the arrow
button in the bottom-right corner and then confirming by pressing OK button
on a message pop-up window. A window similar to the one presented in Figure 1 should
now be displayed. This window consists of six framed channel-summary panels, for
detailed description of the panels please refer to Mercury User Manual.
2.3.
2.4.
2.5.
2.6.
2.7.
2.8.
Verify that the Remote Access is set to Local; if it is not, tap once Remote Access dropdown menu, select Local, confirm by tapping OK button and press Apply button.
Using right arrow button in the top right corner scroll the Settings window to the
Factory tab, tap on the Factory to make it an active view, see Figure 2.
Tap Enter name box to bring up an alphanumerical keypad window.
Enter the name under which you want to save current configuration (e.g. backup1) and
press OK or RET button to exit the keypad window.
Tap Save Configuration button and then press OK button to confirm your action.
Tap Home button to return to Home Screen window.
Page 2 / 6
Mercury Support
Issue: 04
Oxford Instruments
tel: +44 (0)1865 393311
fax: +44 (0)1865 393333
email: [email protected]
www. mymercurysupport.com
Mercury System Update
Figure 2. Factory Setting Tab.
3. Application update
3.1.
3.2.
3.3.
3.4.
Plug in USB flash drive to the USB slot located at the back of Mercury unit.
Power up the system; if the system is already running wait approximately 5 seconds for
the flash drive to be detected and scanned. This is a background process and no
information will be displayed to the user.
Tap Settings button on Home Screen as shown in Figure 1.
Using right arrow button in the top right corner scroll the Settings window to the F/W
Update tab, tap once F/W Update to make it an active view, see Figure 3.
Figure 3. F/W Update Tab.
3.5.
3.6.
3.7.
3.8.
3.9.
Tap Firmware Device drop-down selection once, press APPLICATION and then OK button
to confirm your choice.
Tap Firmware File drop-down selection and tap cryosys_update.tar file; this will
highlight the name of the file; tap OK button to confirm.
Tap Apply button and confirm that you wish to start the update process by pressing OK
button on the message pop-up window.
At the end of the process the system will automatically reboot.
On system reboot the user might be presented with a series of pop-up messages
informing about the changes to system configuration. Please reject all the changes at
this stage by tapping Cancel button on the message box.
Page 3 / 6
Mercury Support
Issue: 04
Oxford Instruments
tel: +44 (0)1865 393311
fax: +44 (0)1865 393333
email: [email protected]
www. mymercurysupport.com
Mercury System Update
Please note that any APPLICATION updates will be automatically reverted to
the previous version on the next system reboot unless the new changes are
accepted.
3.10. Accept Firmware update: after the system has rebooted, go to F/W Update tab as
described in steps 3.3 and 3.4 and tap Save Changes button presented in Figure 4.
Alternatively, to reject new updates tap Revert Changes button.
3.11. Tap Home button to return to Home Screen window.
Figure 4. Save or Revert New Updates.
4. Device firmware update.
4.1.
4.2.
4.3.
4.4.
4.5.
4.6.
4.7.
4.8.
4.9.
With the USB flash drive still plugged into your Mercury unit, tap Settings button on
Home Screen window shown in Figure 1.
Using right arrow button in the top right corner scroll the Settings window to the F/W
Update tab, press F/W Update tab to make it an active view, see Figure 3.
Tap Firmware Device drop-down selection; a list containing devices available on your
system will be displayed. Mercury ITC system can contain up to 10 devices, namely DB1,
DB2, DB3, DB4, DB5, DB6, DB7, DB8, MB0, MB1, Mercury IPS will have additional
magnet devices named PSU.M1, PSU.M2, etc; your system may only contain some of
the devices (e.g. only motherboard devices MB0 and MB1 in its basic configuration)
Tap on the name of the device you wish to update, e.g. DB1 and tap OK button to
confirm your selection.
Tap Firmware File drop-down list, select available file, and press OK button to confirm.
Click Apply button and then confirm that you wish to update the device by pressing OK
button on a message pop-up window.
If the device fails to update the firmware, an error message will be displayed on a popup window. In such case please tap OK button and then Apply button and try the
update process again.
If the firmware on the selected device is successfully updated user should follow steps
4.3 to 4.6 to update the firmware on all available devices in the system.
After all the devices have been updated power the system down, wait 30 seconds and
power the system up again.
Page 4 / 6
Mercury Support
Issue: 04
Oxford Instruments
tel: +44 (0)1865 393311
fax: +44 (0)1865 393333
email: [email protected]
www. mymercurysupport.com
Mercury System Update
4.10. On system reboot the user will be presented with a series of pop-up messages
informing about the changes made to devices’ configuration. Please accept all the
changes by tapping OK button on the message box.
Note: if the pop-up message indicates a change to None in the device type (e.g.
DB1 type = None) it means that this particular device (DB1) failed to update.
Please accept this change by tapping OK button on the pop-up message and
follow again the firmware update procedure for this device only. In step 4.5 you will be
presented with a list of files; selecting appropriate firmware file will be based on the
user knowledge of this device, e.g. heater, temperature. If in doubt, please contact our
customer support team. DO NOT attempt to update the device if you are not certain of
its type.
5. Hardware Calibration
5.1. Heater calibration: the system will calibrate all the heater devices at once :
5.1.1. Tap Heater button on Home Screen, this will display a list of available heater devices.
5.1.2. Tap Calibrate button in the right bottom corner, confirm you action by pressing OK
button on the message pop-up window.
5.1.3. Tap Home button to return to Home Screen when calibration is finished.
5.2. Temperature sensor calibration: temperature sensors are calibrated one by one; the
temperature sensors can be easily identified by the .T1 suffix in the device name, e.g.
MB1.T1, DB6.T1. Follow the steps below to calibrate the temperature sensor devices.
5.2.1. Tap twice on one of the six channel-summary panels, presented in Figure 1, that has
not been previously configured (such panel is characterised by None nickname and
0.0000 value); this will bring Channel Display Configuration window.
5.2.2. On Channel Display Configuration window tap on the Devices drop-down list; select
one of the temperature sensors (device name with .T1 suffix) and confirm by
pressing OK button.
5.2.3. Tap Signals drop-down list and select Temperature, tap OK button to confirm.
5.2.4. Tap Assign button; this will bring back Home Screen with the newly assigned
channel-summary panel.
5.2.5. Tap once on the newly assigned channel-summary panel on the Home Screen; this
will bring Temperature Sensor Details screen.
5.2.6. Tap Calibration button and confirm your action by selecting OK button on the
message pop-up window.
5.2.7. After the calibration is finished, tap Home button to return to the Home Screen.
5.2.8. Tap twice on the same channel-summary panel as in step 5.2.5 to bring again the
Channel Display Configuration window.
5.2.9. Follow steps 5.2.2 to 5.2.8 for every temperature sensor present in the system.
5.3. Reboot the Mercury system.
Support Documents:
[1] http://mymercurysupport.com/sites/default/files/Where-can-I-find-firmware-versioninstalled-on-my-Mercury.pdf
Page 5 / 6
Mercury Support
Issue: 04
Oxford Instruments
tel: +44 (0)1865 393311
fax: +44 (0)1865 393333
email: [email protected]
www. mymercurysupport.com
Mercury System Update
List of Figures:
Figure 2. Home Screen.
Figure 2. Factory Setting Tab.
Figure 3. F/W Update Tab.
Figure 4. Save or Revert New Updates.
Page 6 / 6