1
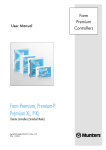
ENSEMBLE® Central Nurse Station USER MANUAL DDM-555-001 Rev C. Nov. 2014 Conformity according to the Council Directive 93/42/EEC concerning Medical Devices Manufacturer’s Name : Mennen Medical Ltd. 4 Hayarden Street, Yavne, 81228 P.O. Box 102, Rehovot, 76100, Israel Tel.: +972-8-9323333 Fax: +972-8-9328510 European Representative : Charter-Kontron Limited Unit 18 Avant Business Centre 21 Denbigh Road Milton Keynes MK1 1DT England Tel.: 01 908 646070 Fax: 01 908 646030 US Representative: Mennen Medical Corp. 092Andrews Road Feasterville-Trevose, PA 19053-3480 Tel.: 215-259-1020 Fax: 215- 357-2010 Publication No. DDM-555-001 Rev.C Ver. 7.0 November 2014 Copyright © Mennen Medical Mennen Medical Ltd. 2014. All RIGHTS RESERVED Registered trademarks are the intellectual property of their respective holders. Mennen Medical 1 Table of Contents CHAPTER 1: OVERVIEW ................................................................................ 1-1 Intended Use ................................................................................................................... 1-1 Training ........................................................................................................................... 1-2 Prescription Notice........................................................................................................... 1-2 6BCompliance ...................................................................................................................... 1-2 7BExplosion Hazard.............................................................................................................. 1-2 8BWarnings and Precautions ................................................................................................ 1-2 9BResponsibility of Manufacturer ........................................................................................ 1-2 Disposal of Monitors and Accessories ............................................................................... 1-3 10BIdentification Label .......................................................................................................... 1-3 1BSystem Specifications ....................................................................................................... 1-4 System Description (Ensemble and Enguard)..................................................................... 1-6 12BScreen Format.................................................................................................................. 1-7 13BAlarms ............................................................................................................................. 1-8 General Features............................................................................................................ 1-8 42BAlarm Priority Notification ............................................................................................. 1-9 Visual Response ............................................................................................................. 1-9 4BAudio Response ............................................................................................................. 1-9 45BAlarm Priority ............................................................................................................... 1-10 46BAlarm Controls ............................................................................................................. 1-11 CHAPTER 2: 62BCONFIGURING THE MULTI-BED ............................................... 2-1 14BWF Order Panel ................................................................................................................ 2-2 15BEnsemble Volume ............................................................................................................ 2-3 16BBedside Alarm Volume ..................................................................................................... 2-4 7Language Setup ................................................................................................................ 2-5 18BDate & Time Setup ........................................................................................................... 2-5 19BTime Server .................................................................................................................... 2-7 Software Version ............................................................................................................. 2-7 20BQuick Keys ....................................................................................................................... 2-8 21BRemote View ................................................................................................................. 2-10 Mennen Medical ii Overview Ensemble User’s Guide 2BScreen Format................................................................................................................ 2-10 23BPreconfigured Setup ....................................................................................................... 2-11 24BPatient Area Color .......................................................................................................... 2-12 25BShutdown ...................................................................................................................... 2-14 26BSystem Local Setup ........................................................................................................ 2-14 CHAPTER 3: 3BUSING THE MULTI-BED SCREEN ............................................. 3-1 27BStarting Up the System ..................................................................................................... 3-1 28BScreen Display.................................................................................................................. 3-2 29BAdmission, Discharge and Transfer Procedures ................................................................. 3-2 FEATURES SPECIFIC TO THE MULTI-BED .................................................. 3-3 47BAdmitting a Patient ........................................................................................................ 3-3 48BDischarging a Patient ..................................................................................................... 3-4 49BTemporarily Discontinuing a Patient Monitor ............................................................... 3-5 50BFree/Preconfigured Setup.............................................................................................. 3-5 51BConnecting a Patient to the Central Station .................................................................. 3-5 52BDisconnecting a Patient ................................................................................................. 3-6 53BMoving the Patient Display ............................................................................................ 3-7 54BMonitoring a Patient at the Central Station .................................................................. 3-7 30BWaveform Order .............................................................................................................. 3-8 CHAPTER 4: 4BSYSTEM LOCAL SETUP............................................................ 4-1 31BOverview ......................................................................................................................... 4-1 32BAccessing the System Local Setup Menu ........................................................................... 4-1 3BAlarm Volume & Controls ................................................................................................. 4-4 5BEnable Tones Off ............................................................................................................ 4-4 56BSilence Time ................................................................................................................... 4-5 57BAlarm Tone Setting ........................................................................................................ 4-5 58BSetting the Alarm Volume & Control Panel ................................................................... 4-6 34BVital Sign (VS) Color Setup ................................................................................................ 4-7 35BNetwork Setup ................................................................................................................. 4-8 36BLink to Enguard ................................................................................................................ 4-8 37BInter Unit Privileges.......................................................................................................... 4-9 38BChange Password ........................................................................................................... 4-10 Mennen Medical iii Overview Ensemble User’s Guide 39BCheck Disk ...................................................................................................................... 4-10 40BPermission Editor ............................................................................................................ 4-11 Mennen Medical iv Chapter 1: Overview 1B The Mennen Medical Ensemble Central Nurse Station is a system for central display of up to 16 patients connected to bedside monitors. Between 1 to 8 waveforms can be displayed per patient, depending on the number of patients monitored at the station. The Ensemble can remotely control certain functions of the bedside monitors. It can display vital signs information collected from bedside patient monitoring devices, such as: ECG, Arrhythmia (basic and extended alarms), ST Segment, Respiration, Temperature, Invasive Blood Pressures, NonInvasive Blood Pressure, Pulse Oximetry, and End Tidal CO2. Connection to all monitoring devices is through an Ethernet LAN. The Ensemble can be configured under the supervision of the System Manager to reflect the monitoring practices of your hospital. The Ensemble can be configured specifically for each of the applications at the different clinical specialties within the hospital. The Ensemble Central Nurse Station operates similarly to the Envoy/VitaLogik bedside monitor. Monitoring, administrative and configuration procedures are performed in the same way, using the same menus and panels. Therefore to operate the Ensemble you must first be familiar with the Envoy/VitaLogik/Menntor X7. Note: For information on using the Envoy bedside monitor, refer to the Envoy Operating manual. Note: For information on using the VitaLogik bedside monitor, refer to the VitaLogik Operating manual. Note: For information on using the Menntor X7 bedside monitor, refer to the Menntor X7 Operating manual. This manual describes the functions unique to the Central Station. Intended Use 5B Ensemble includes the essential features of a central station for up to 16 patients. It can display vital sign information from bedside monitoring devices such as: ECG/Heart Rate, Arrhythmia, ST segment, Respiration, Temperature, Invasive Blood Pressures, Noninvasive Blood Pressure, Pulse Oximetry, and End Tidal CO2, The Ensemble may be used in system application in many different clinical specialties within the hospital. Mennen Medical 1-1 Overview Ensemble User’s Guide Training Mennen Medical. or its authorized distributer will provide training for the system user as per the Intended use of the device or system. The training may be personal or by training the trainers. The scope of the training is part of the agreement between Mennen Medical or its authorized distributer, and the end user. It is the responsibility of the hospital management that only users trained to use the equipment efficiently and safely, should operate the equipment. Prescription Notice Federal United States law restricts the sale and use of this instrument to qualified medical personnel only. Compliance 6B The Ensemble central station is designed to comply with the international safety requirements for medical electrical equipment IEC 60601-1, IEC 60601-1-2. European Directive 93/42/EEC classifies the Ensemble central station as a Class IIb device. Explosion Hazard 7B This device is not intended for use in the presence of flammable anesthetic agents. Warnings and Precautions 8B WARNING!!! Do not use the unit in an atmosphere with flammable anesthetic mixtures. Caution! The Ensemble central station works on the electrical mains. To prevent shutdown of the Ensemble, use an Uninterrupted Power Supply – UPS Responsibility of Manufacturer 9B Mennen Medical, Ltd. considers itself responsible for the effects on safety, reliability, and performance of the equipment only if: Repairs are carried out by authorized Mennen Medical personnel only. Electrical installation of the relevant room complies with the appropriate requirements. Mennen Medical 1-2 Overview Ensemble User’s Guide The equipment is used in accordance with instructions for use. Disposal of Monitors and Accessories Dispose the equipment and its accessories, according to the rules and regulation of your country. Identification Label 10B The Identification label is located on the Processing unit Figure 1-1: Identification Label The label includes warnings and compliance information as follows: Identification information: Part Number (P/N), Serial Number (S/N), and Model name Place of manufacture Warning Symbols Mennen Medical 1-3 Overview Ensemble User’s Guide Labeling Symbols Error! Reference source not found. includes a description of the meaning of the various symbols which appear on the Ensemble and its label. Table 1: Labels Symbol Description Attention, consult accompanying documents (Service to be performed by qualified technician, consult Service Manual before removing cover Refer to instruction manual Restrict the use and sale of this instrument to qualified medical personnel only Not for use in explosive gas environment Electrical and electronic equipment – dispose according to local regulation Date of manufacture System Specifications See the following page for system specification. Mennen Medical 1-4 +DUGZDUHDQG3DUDPHWHUV (QVHPEOHLVFHQWUDO1XUVH6WDWLRQZLWKD´H[WHUQDO GLVSOD\H[WHUQDOGLVSOD\RSWLRQDO &38'HWDLOV x,QWHO;IDPLO\PDLQ&38 x6RXQG%ODVWHU:DXGLRSRZHUƻ x0DVVVWRUDJH*%IL[HGGLVN x2SHUDWLQJ6\VWHP41; x:LQGRZPDQDJHU3KRWRQ 'LPHQVLRQV:HLJKW x +[:['[[PP[[LQFKHV x :HLJKW.JOE 3RZHUUHTXLUHPHQW ł9$&$+] ł9$&$+] (QYLURQPHQWDO2SHUDWLQJ&RQGLWLRQV ł7HPSHUDWXUH&WR&)WR) ł+XPLGLW\WRSHUFHQWQRQFRQGHQVLQJ (QYLURQPHQWDO6WRUDJH&RQGLWLRQV 2 2 ł7HPSHUDWXUH& WR& )WR) ł+XPLGLW\WRSHUFHQWQRQFRQGHQVLQJ 1HWZRUN ł/$13K\VLFDO,((((WKHUQHWLQWHUIDFH%DVH7 ł3URWRFRO7&3,3 'LVSOD\ ł1(&´/&'RU/&'RSWLRQDO x1XPEHURIEHGVXSWRZLWKZDYHIRUPVSHUEHG x1XPHULF9LWDO6LJQV x$ODUPV²&RORU%DFNJURXQG x:DYHIRUPV x67 x$UUK\WKPLD x6FUHHQ)RUPDWV &XVWRPL]DWLRQ&DSDELOLWLHV x8SWRVRIWZDUH4XLFNLHV xVFUHHQIRUPDWV xODQJXDJHVVXSSRUW x/LQNWR(QJXDUG x)UHHRUIL[HGSUHFRQILJXUHGVHWXS x%HGVLGHRU9LWDOVLJQFRORUVHWXS x0HQXFXVWRPL]DWLRQE\SHUPLVVLRQHGLWRU x,QWHU8QLWSULYLOHJHRSWLRQV 5HDG:ULWH5HDGRQO\RU1RDFFHVV 8VHU&RQWUROV ł)L[HGNH\V ł4XLFNQRE ł5HPRWH&RQWURO.H\SDGRSWLRQDO x .H\ERDUGDQGPRXVH x 7RXFK6FUHHQRSWLRQDO $FFHVVWRPRQLWRUHG3DWLHQW'DWDVWRUDJH x3DWLHQW,QIRUPDWLRQ$'7 x&KDUWV1XPHULFDO ł7UHQG*UDSKLF ł)XOO'LVFORVXUH$OOOHDGV(&*ZDYHIRUP ł2YHUYLHZ$OO:DYHIRUPVZLWKWRS(&* ł(YHQW6WULSV)XOO'LVFORVXUHDQG2YHUYLHZ /DQJXDJHV (QJOLVK'XWFK)UHQFK,WDOLDQ6SDQLVK(VSDQRO3RUWXJXHVH 7XUNLVK5XVVLDQ3ROLVK 5HJXODWRU\$SSURYDOV ł(1 ł(1 ł(1 x&(0DUN ¡ WRIXOOOHQJWK ł)'$&OHDUHG. ¡ WRKDOIOHQJWK x:DYHIRUP'LVSOD\ ¡ )XOOOHQJWKVHFRQGV8SWREHGV ¡ +DOIOHQJWKVHFRQGV x8SWRWUDFHVIRUVLQJOHEHG x8SWRWUDFHVIRUEHGV $ODUP x'LVWLQFWDODUPWRQH x$ODUPPHVVDJH x$ODUPLQJSDUDPHWHUVYDOXHFRORUEDFNJURXQGIODVKHV x6HWDODUPOLPLWVRQEHGVLGHPRQLWRUV x*HWDODUPOLPLWVIURPEHGVLGHPRQLWRU &RQWURORIEHGVLGHPRQLWRUV )XOOFRQWURORI(QYR\9LWDORJLNDQG0HQQWRU;EHGVLGHPRQLWRUV x3DWLHQWGHPRJUDSKLFV x$GMXVWPHQWRIDODUPOLPLWV x3DFHULGHQWLILFDWLRQ x5HFRUGLQJSDUDPHWHUV x5HYLHZWUHQGHGGDWD '*05(9% 0HQQHQ0HGLFDO/WG$OOULJKWVUHVHUYHG6SHFLILFDWLRQVXEMHFWWREHFKDQJHGZLWKRXWQRWLFH ¡ )XOO/HQJWKVHFRQGVIRUEHGV :HIROORZHYHU\EHDWRI\RXUKHDUW Overview Ensemble User’s Guide System Description (Ensemble and Enguard) The Enguard View system consists of a multi-bed Ensemble Nurse Station, and a single-bed Enguard terminal, connected through an Ethernet-LAN hub to bedside patient monitors. Figure 1-2: Enguard View System Ensemble provides: Patient Discharge - you can discharge patients directly from the Ensemble. Patient information – Patient demographic information can be inserted from the Ensemble. Real-time visual and audio indications of a patient’s vital signs. Alarm functions, including notification, setting alarm limits and alarm suspension. Patient data review in the form of trends, charts, and full disclosure waveforms. Initiation of bedside recording and printing. You can operate the Ensemble by using one of the fixed keys on the front panel of the main processing unit; or right click the mouse to open the virtual keyboard panel and click on the desired key –( see Figure 1-3 ): Mennen Medical 1-6 Overview Ensemble User’s Guide Figure 1-3: Virtual Keyboard Panel Screen Format 12B The Single-bed screen shows all waveforms that are displayed on the Envoy/VitaLogik/Menntor X7 bedside monitor selected for viewing. The Multi-bed Central Station screen can be configured in one of several different formats. You can choose the format of your preference. The screen can display between 1 to 16 patients. The number of waveforms displayed per patient depends on the number of patients that you choose to display: the more patients you display, the less room is available on your screen for display of waveforms per patient. Depending on the screen format that you choose, you can display either more waveforms per patient, each at a short display time, or less waveforms, each for a longer display time: Figure 1-4: Waveform display In the following screen format there are six patient areas. Mennen Medical 1-7 Overview Ensemble User’s Guide Three patients are currently connected to the Multi-bed screen. Each patient area represents the main screen of the Envoy/VitaLogik/Menntor X7 to which the patient is connected. More patients can be connected to the empty areas at any time. Figure 1-5: Multi bed screen Connecting patients to the Multi-bed is easy. All you have to do is click an empty area, and enter patient information. Once the patient is connected, you can monitor all vital signs by clicking the required vital sign and accessing the appropriate panel. Connecting a patient to the Multi-bed screen is performed by clicking the Device name box, and selecting one of the beds on the network. Multi-Parameter Devices Multi-parameter devices such as Ventilators and Anesthesia connected to the bedside monitor via UIM and Spirometry module, are not displayed on the Ensemble. Charts of data collected by the monitor from such devices can be accessed by the Ensemble via the Patient data (Orange) key Alarms 13B General Features 41B Alarms are detected by each monitor according to pre-configured alarm settings. The information is sent to the Ensemble central nurse station Mennen Medical 1-8 Overview Ensemble User’s Guide When an alarm is triggered, the following occurs at the Ensemble: An audio signal is generated according to the highest priority alarm A visual display on the parameter that causes the alarm appears at the relevant bed area. If the alarm is Clinical C1 or C2, a red frame is added to the bed area. To activate the red frame: 1. Open Screen Format (Figure 3-2) and set "alarm Frame to On (green). Alarm Priority Notification 42B When an alarm condition is detected, the Ensemble informs you by providing both visual and audible messages. Visual Response 43B Identifying the source of an alarm is made easier by the display of alarm messages and a change in the color of the vital sign which has generated the alarm. Clinical level alarm message is displayed on the relevant bed area. The Alarm priority will be marked on each of the alarm messages as follows: 4B Mark For *** High priority (C1) ** Medium priority (C2) * Lower priority / Technical alarm T1 // Technical alarm T2 Audio Response The High (C1), Medium (C2) and Low (C3; C4) priority audible alarm sounds, are according to the requirements of the ISO 60601-1-8. Note: We are offering additional *.wav files that are user defined. These files will not have the characteristics required by the standard. Note: Specific parameter sounds, such as High HR, Low HR, and SpO2 Unique will not have the characteristics required by the standard, since they do not represent Alarm Priority. Mennen Medical 1-9 Overview 45B Ensemble User’s Guide Alarm Priority Bedside alarms have different priority levels which affect the order of audible and visual alarm notification. The following list is presented in order of descending importance: Clinical Level 1 (C-1) – Emergency; a life-threatening situation requiring immediate response. Clinical Level 2 (C-2) – Abnormal; a situation requiring a prompt response. Clinical Level 3 (C-3) - Notification to make the staff aware of the condition. Clinical Level 4 (C-4) - Notification to make the staff aware of the condition. Technical Level 1 (T-1) - Notification that monitoring has stopped due to equipment trouble. Technical Level 2 (T-2) - Notification of an equipment-related problem. Table 2: Alarm Response Priority Audible Response Visual Response Clinical Level 1 (C-1) bbb-bb --- bbb-bb repeat every 2.5 Sec Blinking red Clinical Level 2 (C-2) bbb-bb Repeat every 5 seconds Blinking red Clinical Level 3 (C-3) bbb Repeat every 15 seconds Blinking Yellow Clinical Level 4 (C-4) bbb Repeat every 20 seconds Continuous Yellow Technical level 1(T-1) aaa Repeat every10 Continuous Cyan Technical level 2(T-2) aaa Repeat every20 Continuous Cyan Mennen Medical 1-10 Overview 46B Ensemble User’s Guide Priority Audible Response Visual Response SpO2 unique alarm Hi-Lo-Hi pause every 5 sec Continuous Yellow Alarm Controls Alarm Silence 59B The Silence button (fixed key) on the front panel of the CPU is a toggle button - pressing it stops all audible alarms, and pressing it again enables all audible alarms. The silence is effective for a pre-defined period (Default is 60 seconds). Alarms Off The “Alarms Off” key is effective only when a specific bed is selected. It disables all detection of clinical alarms for a pre-defined period set at the bedside. Technical alarms are still detected and visually displayed in the appropriate area on the main screen. Mennen Medical 1-11 Chapter 2: 62B Configuring the Multi-Bed 2B Local Setup allows you to define global settings, such as screen format, alarm volume and date and time setup for the Multi-bed. The Multi-bed comes with a basic configuration that enables the user to operate the system when first started up. The system can be configured at any time to reflect the monitoring practices of your hospital or unit. Local Setup defines for the Multi-bed those parameters that are independent of similar settings at the bedside monitors. For example, setting the alarm volume at the Central Station has no affect on the Envoy/VitaLogik/Menntor X7s. The Local Setup menu consists of the following panels: WF Order PanelWF Order Panel 14B 14B Ensemble Volume Bedside Volume Language Setup Date & Time Setup Software Version Quick Keys Remote View Screen Format Preconfigured Setup Patient Area Color Shutdown •System Local Setup To access the Local Setup menu: 1. Using the QuicKnob or the mouse, click the Device name box at the top left corner of the screen. The Local Setup panel appears. Mennen Medical 2-1 Configuring the Multi-Bed Ensemble User’s Guide ` Figure 2-1: Local Setup Panel 2. Click the item of your choice. The item panel is displayed. WF Order Panel 14B Use the WF Order panel to set the waveform order at the Central Station. The number of waveforms (WFs) that can be presented by each bed at the Central Station depends on the Screen Format set by the Local Setup at the Central Station. For a 12-Bed Central Station configuration, two waveforms can be displayed per bed. The maximum number of WFs per bed possible is seven. You can define the same waveform order format for all the beds monitored at the Central Station. To prepare the common waveform order: 1. Select the Central Station Identity bar on the top, left side of the screen by using the mouse or the Quick Key - the Local Setup menu opens (Figure 2-1). 2. Select the WF order panel (Figure 2-2). 3. Select the required waveforms. The WF order for each bed display is selected by the panel shown below. Waveform #1 (WF#1) must always be one of the ECG leads. For WF#2 and up, any of the vital sign waveform parameters can be selected. Mennen Medical 2-2 Configuring the Multi-Bed Ensemble User’s Guide Each new bedside monitor connected to the Central Station will use the preset waveform order. If required, you can change the waveform order of a specific bed - see Chapter 3: 0Screen Display page 3-2. 28B Note: Changing the waveform order will have effect on all connected beds and a recovery of the central will be viewed. The top displayed ECG leads will not be changed and will accept the ECG leads of the individual monitors. Figure 2-2: Setting WF Order Ensemble Volume 15B Use the Alarm Volume panel to set the alarm volume at the Central Station. You can set on a scale from 1-10. If the Alarm Volume is set to “Off”, then the following blinking message appears on the top of the screen: “All Alarm Tones Off”. Mennen Medical 2-3 Configuring the Multi-Bed Ensemble User’s Guide Figure 2-3: Setting Alarm Volume of Ensemble Bedside Alarm Volume 16B Use the Bedside Alarm Volume to set the alarm volume for all bedside monitors that are displayed at the Central Station. You can set the alarm volume on a scale of 1 - 10. Note: If you set the alarm volume of all the bedside monitors via the Ensemble to zero volume, and at the same time the Ensemble alarm volume is also zero, then the Ensemble alarm volume will automatically be increased to 1. Figure 2-4: Alarm Volume Panel of Bedside Monitor Mennen Medical 2-4 Configuring the Multi-Bed Ensemble User’s Guide Language Setup 7 Use this panel to change the language of Ensemble: The available languages are: English, Dutch, French, Italian, Spanish, Espanola, Portuguese, Polish, Turkish, Russian, and Greek To change a language: 1. Select System Setup (password protected) in the Setup menu. 2. Select Language Setup in the System Setup menu. 3. Select the new language. 4. Shutdown and restart Ensemble. Date & Time Setup 18B This panel enables you to set the date and time and to set time display formats for the Multi-bed screen. The panel is divided into 3 major areas: Current Date and Time The current date and time are set in this area. Shift End Time Specify the end times for each work shift according to what is standard in your department or hospital. The end time defined for the shift also indicates the start time of the following shift. For example, if the Day shift ends at 15:00, this indicates that the Evening Shift begins at 15:00. The Date & Time Setup panel provides space for three shifts: Day, Evening and Night. Display Format In the Display Format area, you define how the time and the date appear on the main screen display. Mennen Medical 2-5 Configuring the Multi-Bed Ensemble User’s Guide Figure 2-5: Date and Time Setup Panel To set the date and time and date and time display formats: 1. From the Local Setup menu, select Date & Time Setup. The Date & Time Setup panel appears. 2. In the Date textbox, enter the day, month and year. 3. In the Time textbox, enter the hour/minutes. 4. Under Shift End Time, select Day, Evening or Night, and enter the shift end time. 5. Under Display Format: Select Date Format. A list of four available options is displayed: ddmmyy, ddmmmyyyy, mmddyy or yymmdd. The factory default is mmddyy. Select Separator, and define the character to be used by the system as a separator between elements of a date (such as “.” or “/” or “-”). Only a single character can be selected. 6. Under Display Leading Zeros, check the Date or Time box to activate display of a leading zero (for example, 01/01/98, or 01:30). Clear the checkbox to deactivate. 7. Select the 24 Hour Display checkbox to activate display of time in a 24hour format (00:00 - 24:00). Clear the checkbox to have time displayed in a 12-hour format (12A.M. and 12 P.M.). 8. When the 24 Hours Display checkbox is not selected, the Suffix (am/pm) checkbox is enabled. Select to display the suffix AM or PM after the time when time is displayed in 12- hour format. Clear the checkbox to remove the suffix. 9. Select Discard Changes to close the panel without applying any changes, Mennen Medical 2-6 Configuring the Multi-Bed Ensemble User’s Guide - or Select Main Screen to apply the changes and close the panel. Time Server 19B Note: Time Server is (implemented in Envoy/VitaLogik/Menntor X7/Ensemble/Enguard SW Version 3.4 and up): The Date and Time setting of the Envoy/VitaLogik/Menntor X7 monitor can be set on each monitor individually, or, if the monitors are connected to a LAN, by one device defined as the Time Server. Only ONE device on the network (e.g.Envoy/VitaLogik/Menntor X7, Enguard, or Ensemble) can function as the Time Server. If one of the devices is set to become the Time Server, then the Date and Time setting on all other devices will be disabled and the time can be changed only on the Server device. The Time Server sends a time signal every 30 seconds to all the devices on the network. Envoy/VitaLogik/Menntor X7 monitors that are in the Discharge mode, reset their time to the time sent by the server. Envoy/VitaLogik/Menntor X7 that are in the process of monitoring a patient, will not respond to the Time Server. The Enguard always responds to the Time Server and resets its own time, but this will not affect the device that the Enguard is viewing. The Ensemble always responds to the Time Server and will reset its own time, but this will not affect the device/s it is viewing. To create a Time Server: 1. Select System Setup (password protected) in the Setup menu. 2. Select Date & Time Setup in the System Setup menu. 3. In the Time Server Master, set the "Time server Master" to ON (Green). 4. Use the Current Date & Time box to change the time and/or date. Note: If there is a Time Server Master on the network, then: 5. All other devices will show the Device ID and the Device name of the Time Server Master on the "Date & Time" panel. 6. The "Current Date & Time" box will show the date & time, but will be dimmed and not accessible. Software Version The Software Version panel displays the software version of the Multi-bed. Mennen Medical 2-7 Configuring the Multi-Bed Ensemble User’s Guide Quick Keys 20B The Quick Key bar is a row of up to 12 user-defined function keys that appear on the bottom of the main screen display. Quick Keys provide rapid access to your most frequently used functions. Any function available on the system can be configured as a quick key. For example, if you want to access the Screen Format panel directly, instead of going through the Local Setup menu, you can simply click a preconfigured Screen Format Quick Key to open the Screen Format panel directly. You can create two types of Quick Keys: Quick Keys that control bedside monitors, directly from the Central Station. For example, you can select a patient by clicking the required patient area, and then click on ECG Lead & Gain Quick Key to modify the ECG monitoring of the patient. All Envoy/VitaLogik/Menntor X7 monitoring functions can be defined as quick keys. Quick Keys unique to the Multi-bed that enable control of functions related to the Central Station. Note: When you select a patient area, all Quick Keys relating to the Multi-bed appear dimmed. When no patient is selected, the Quick Keys relating to peripheral monitors appear dimmed. When opening the Quick Keys panel, a menu tree that includes all menu options appears. You can click the (+) icon to the left of a menu item to access the menu level below that. Figure 2-6: Defining Quick Keys The first three options on the Menu Tree, Patient Data, Vital Signs and Setup, include all options for monitoring patients. You can define a quick key for each. Local Setup and Keypad are specific to the Multi-bed. Mennen Medical 2-8 Configuring the Multi-Bed Ensemble User’s Guide Local Setup You can create Quick Keys for each of the Local Setup menu options: WF Order, Alarm Volume, Language Settings, Date & Time Setup, Software Version, Quick Keys, Screen Format, Preconfigured Setup, Patient Area Color, System Local Setup. Keypad You can create a Quick Key that opens a window identical to the Envoy/VitaLogik/Menntor X7 front panel, featuring the fixed keys. Figure 2-7: Keypad panel To configure Quick Keys: 1. From the Local Setup menu, select Quick Keys. The Quick Keys window appears displaying a menu tree and a graphic representation of the function keys indicating all currently assigned keys. 2. Click an empty Quick Key at the bottom of the panel. 3. In Menu Tree, click the plus (+) icon that appears to the left of a menu item to access the menu level below that listed on the screen. Any item from any level can be selected as a Quick Key. 4. Select the required menu item. 5. Repeat steps 2 to 4 until all required Quick Keys have been created. 6. Click Main Screen to apply changes and close the panel. To activate a Quick Key: 1. On the Multi-bed main screen, select a bed. Mennen Medical 2-9 Configuring the Multi-Bed Ensemble User’s Guide 2. Click a required Quick Key. The appropriate panel opens. Remote View 21B Remote View provides an option for one Ensemble to view other Ensemble central stations that are on the network. It can be used, for example, in a doctors' room to view remotely each of the Ensembles on the network. As a rule this function will not be in use (deleted by the permission editor). Caution: Using Remote View transfers to the Ensemble station the format and beds of the remote Ensemble. The setup prior to the Remote View is lost. Screen Format 2B The Screen Format panel enables you to configure the preferred screen display for the Multi-bed. You can define the number of beds displayed (between 1 to 16). The number of waveforms that you can display for each patient depends on the number of beds on the screen: the more beds you display, the less area is left on your screen for display of waveforms per patient. The wave length of each waveform also depends on the selected screen format: a 2 full display, for example, enables display of longer wave lengths than a 2 split display, however the latter can display more waveforms in the available area (see Figure 2-9: Selecting the Screen Format). To select Screen Format: 1. From the Local Setup menu, select Screen Format. The Screen Format panel opens displaying all screen formats. Mennen Medical 2-10 Configuring the Multi-Bed Ensemble User’s Guide Figure 2-8: Selecting the Screen Format 2. Select the preferred screen format and click Main Screen. The selected format becomes the default. Preconfigured Setup 23B You can configure a specific Envoy/VitaLogik/Menntor X7 to be permanently assigned to a specific patient area on the screen. For example, bed number 1 is assigned at all times to the top left area of the screen. When this is configured, a patient admitted at that bedside and connected to the Envoy/VitaLogik/Menntor X7 is automatically admitted at the Central Station as well. Any personal data can be entered in the Patient Identification dialog box whenever convenient. To assign a bedside monitor to a patient area: 1. Select the screen format of your preference. 2. In the Local Setup menu, select Preconfigured Setup. The Preconfigured Setup panel opens. Mennen Medical 2-11 Configuring the Multi-Bed Ensemble User’s Guide Figure 2-9: Preconfigured Setup 3. Under Patient Areas, a graphic representation of the screen format appears, including devices that have already been assigned a patient area, if any. Select the patient area to which you want to assign a specific Envoy/VitaLogik/Menntor X7. 4. In the Units list, select the required unit. 5. In the Available Devices list, select the required device and Click to assign the Envoy/VitaLogik/Menntor X7 to the selected patient area. 6. Click Main Screen to apply changes and close the panel. Note: To disconnect an Envoy/VitaLogik/Menntor X7 from a patient area, select the area and click . Patient Area Color 24B The Multi-bed Central Station can display colors of vital signs waveforms and values in one of two forms: According to each vital sign - all waveforms of a specific vital sign are displayed in the same color. According to patient area - all waveforms and values for a specific patient appear in a selected color. By default, colors of waveform and values for each patient are transferred from the bedside monitors to the Multi-bed, resulting in a specific color of each vital sign. In the Patient Area Color panel you can define for each patient Mennen Medical 2-12 Configuring the Multi-Bed Ensemble User’s Guide area a unique color for display of waveforms and values. You can choose from 16 available colors. All waveforms and values for the specific patient area appear in the selected color. To set color according to patient area 1. From the Local Setup menu, select Patient Area Color. The Patient Area Color panel appears. Figure 2-10: Patient Area Color 2. Select the By Patient Area checkbox. 3. Under Patient Areas, a graphic representation of the screen format appears. Select the patient area to which you want to assign a color. A color panel appears. Figure 2-11: Assigning a color according to patient area 4. Select the required color. 5. Repeat steps 3 to 4 for each patient area. 6. Click Main Screen to apply changes and close the panel. All waveforms for the selected areas appear in the defined color. Mennen Medical 2-13 Configuring the Multi-Bed Ensemble User’s Guide Shutdown 25B Use the Shutdown procedure to shutdown the power. Select the Setup menu and then select Shutdown. A warning Shutdown panel appears. Figure 2-12: Shutdown Panel You can now do one of the following: Click Cancel to return to the main screen. Click Restart to reset the monitor without turning of the power. Click Shutdown - a gray screen appears. Wait for the message: "Shutdown - System may now be powered down". Switch off the power. System Local Setup 26B The System Configuration menu is password protected and can be accessed only by the System Administrator or Technical Engineer. The system can be configured to reflect the monitoring practices of your hospital or unit. See Chapter 4, “System Local Setup”, for instructions on how to perform system configuration. Mennen Medical 2-14 Chapter 3: Using the Multi-Bed Screen 3B This chapter describes the operating procedures for the Multi-bed. All patient monitoring procedures can be performed via the Multi-bed in the same way as in the Envoy/VitaLogik/Menntor X7. For this reason they will not be described here. For information on monitoring vital signs, refer to the appropriate chapter in the Envoy/VitaLogik/Menntor X7 Operating Manual. You can operate the Central Nurse Station by using one of the fixed keys on the front panel of the main processing unit; or right click the mouse to open the virtual keyboard panel and click on the desired key, see Figure 3-1. Figure 3-1: Virtual Keyboard Panel Starting Up the System 27B The Multi-bed screen of the Central Nurse Station is designed to run continuously. To start up the Multi-bed: Turn on the power switch. The Multi-bed runs a self diagnostic program and automatically starts up. The system is immediately ready to monitor patients. Mennen Medical 3-1 Using the Multi-Bed Screen Ensemble User’s Guide Screen Display 28B When you open a large panel that expands across the screen, all patient areas are hidden. To enable you to continue viewing basic patient data, the 8,12 or 16 patient areas are minimized and appear at the top part of the screen. In the following example the Screen Format panel is displayed, and patients connected to the Multi- bed appear above it: Figure 3-2: Screen display when opening a panel Each minimized patient area displays the following information: Bed number Heart rate Alarm messages Admission, Discharge and Transfer Procedures 29B The ADT (Admit, Discharge, Transfer) menu provides access to basic administrative functions. Some of these functions can be performed also at the bedside monitor: Patient Identification Discharging a Patient Temporarily discontinuing monitoring of a patient The following functions are specific to the Multi-bed: Mennen Medical 3-2 Using the Multi-Bed Screen Ensemble User’s Guide Connecting a patient Disconnecting a patient Moving the patient’s vital sign display to another area on the screen. To access the ADT menu: 1. On the main screen display, select a patient area. 2. Click the heading of the patient area. The Patient ID panel appears. 3. Click ADT to open the ADT menu. F Figure 3-3:ADT menu Admitting a Patient 47B A patient must be admitted at the bedside monitor. When a patient is admitted, all personal data can be entered via the Ensemble Central Station in the Patient Identification panel. To access the Patient Identification panel: 1. On the main screen display, click a patient area. 2. In the ADT menu, select Patient Identification. The Patient Identification panel appears. 3. Enter all patient information as you would when performing this procedure at the Envoy/VitaLogik/Menntor X7. Mennen Medical 3-3 Using the Multi-Bed Screen Ensemble User’s Guide Note: If the system has been configured so that each bedside monitoring device corresponds to a specific patient area on the screen, the Connect, Disconnect and Move keys will be dimmed and cannot be used. Discharging a Patient 48B A patient can be discharged from either the bedside monitor or from the Central Station. When you discharge a patient, the following actions occur: • All monitoring functions stop. • If not specified otherwise, all stored data in the monitor is erased. • The main screen display at the Envoy/VitaLogik/Menntor X7 is cleared, and Admit keys are displayed in preparation for admitting a new patient. To discharge a patient via the Central Station: 1. On the main screen display, select the patient you want to discharge. 2. From the ADT menu, select Discharge Patient. 3. A message appears, Discharge erases all Stored Data. Do you wish to discharge? Press Cancel to cancel the discharge and return to the main screen -orPress Discharge to complete the Discharge procedure. Press Save and Discharge to save patient data. Patient discharge is complete. All data is erased from both the bedside monitor and the Multi-bed. The corresponding patient area on the main screen is now empty. To Save and discharge a patient via the Central Station: 1. On the main screen display, select the patient you want to discharge. 2. From the ADT menu, select Save & Discharge Patient. A message appears: Discharge erases all Stored Data. Do you wish to discharge? 3. Click Cancel to cancel the discharge and return to the main screen -orClick Save and Discharge to save patient data. Patient discharge is complete. Full disclosure data is erased from both the bedside monitor and the Multi-bed. Chart, and Event strips are saved The corresponding patient area on the main screen is now empty. Mennen Medical 3-4 Using the Multi-Bed Screen Ensemble User’s Guide Temporarily Discontinuing a Patient Monitor 49B The Temporarily Discontinue feature notifies the bedside monitor to temporarily stop monitoring a patient. When you discontinue monitoring, the following occur: All monitoring functions stop. Demographic information and all stored data is saved. This function is useful when a patient who is being monitored is temporarily transferred for examination or surgery, and is expected to return to the same bed, or when you want to pre-admit a patient who is expected to arrive. In the Patient Identification panel you can enter all known information on the patient, and place the patient area (and bed) on Temporary Discontinue until the actual arrival of the patient. To temporarily discontinue patient monitoring: 1. On the main screen display, select the patient for which you want to discontinue monitoring. 2. From the ADT menu, select Discontinue Monitoring. Patient monitoring stops, and on the screen appears the Resume button and the patient’s name and ID. 3. Resume monitoring, has to be performed at the bedside monitor. Free/Preconfigured Setup 50B At the Multi-bed, you can work in two modes: Free setup - you can arbitrarily assign a bed to any patient area on the display. Preconfigured setup - each patient area on the display is assigned a specific bed (See “Preconfigured Setup” on page 2-10). X X Connecting a Patient to the Central Station 51B Using the Connect panel you can connect a patient to the Multibed display at the Central Station. To connect a patient to the Multi-bed screen: 1. On the main screen display, select an empty patient area. The selected area is surrounded by a frame and the Connect panel opens -orFrom the ADT menu, select Connect. The Connect panel appears. Mennen Medical 3-5 Using the Multi-Bed Screen Ensemble User’s Guide Figure 3-4: Connecting a patient to the Multi-bed 2. Select the unit and bed of the patient being connected. Note: a) During connection time, the patient area will display a message: “connecting”. b) If there is a failure in connection, the message “connection failed” is displayed. c) If the requested bed is not on the network or the power of the bedside monitor is off, the message “no comm” is displayed. Disconnecting a Patient 52B You can remove a patient from the Multi-bed Central Station at any time. Removing a patient from the display does not affect in any way monitoring of the patient at the bedside monitor. To disconnect a patient: 1. On the main screen display, select the patient area that you want to remove. 2. In the ADT menu, select Disconnect. The patient data is removed from the main screen display. Mennen Medical 3-6 Using the Multi-Bed Screen Ensemble User’s Guide Moving the Patient Display 53B The Move feature allows you to move a patient display from one patient area on the main screen to another. To move a patient display area: 1. Select the ADT area of any patient. 2. From the ADT menu, select Move. The Move panel appears, displaying a graphic representation of the main screen display. Figure 3-5: Moving a patient on the display 3. Under Patient Areas, select the patient to be moved. A duplication of the display appears on the right side of the screen. 4. Select the area where you want the patient to be relocated. 5. Click Main Screen to apply change and close the panel. Monitoring a Patient at the Central Station 54B All vital signs of a patient connected to a bedside monitor can be monitored at the Multi-bed. Monitoring is performed in the same way as in the Envoy/VitaLogik/Menntor X7. The number of vital sign waveforms displayed for each patient depends on the number of patients displayed on your screen. The less patients you display, the more room is available for vital signs per patient. You can divide the screen either vertically or horizontally, as can be seen in the following two bed displays: Mennen Medical 3-7 Using the Multi-Bed Screen Ensemble User’s Guide Figure 3-6: Two bed display When dividing the screen horizontally, you can view a small number of waveforms, each for a long time (approximately 7 seconds); when dividing the screen vertically, you can view more waveforms per patient, each waveform at a shorter length (approximately 3.5 seconds). Waveform Order 30B Use the Setup menu>>Waveform Order Panel to select the vital signs displayed as waveforms. The number of waveforms per patient area at the Central Station depends on the screen format. The ECG waveform is always displayed on top. To set the waveform order: 1. Select the required bed - it is marked by a yellow frame. 2. Open the Keypad panel (Fig. 2-7) by right clicking the mouse. 3. Select Setup. 4. Select Waveform Order panel (see Figure 3-6 below) from the Setup menu. The number of available windows (2-7) depends on the screen format. 5. Select the required waveforms. Note: See Table 1 on page 3-10 for the number of displayed waveforms in “Full” X X X X and “Split” mode. Note: The two top displayed ECG leads are “linked” to the Envoy/VitaLogik/Menntor X7 bedside monitor - any changes made to these two leads at the Central station, occurs also at the Envoy/VitaLogik/Menntor X7. Parameters not displayed as waveforms will appear as secondary numeric values according to the space available. Mennen Medical 3-8 Using the Multi-Bed Screen Ensemble User’s Guide Figure 3-7: Waveform Order Panel The vital signs displayed for each patient are those defined at each bedside monitor, according the defined parameter hierarchy. The vital signs parameters can be controlled either at the bedside or from the Multi-bed. Figure 3-8: Bed area on four bed Central Station display To control bedside monitoring from the Multi-bed: 1. Select one of the bed areas by clicking on the waveform area with the mouse or by rotating and pressing the Quick Key on the selected bed area. 2. Click the required vital sign of a specific patient. The appropriate menu Mennen Medical 3-9 Using the Multi-Bed Screen Ensemble User’s Guide appears. Note: To select ECG, click on the heart rate number - (e.g. “60” in Figure 3-8) 3. Perform required monitoring procedures. The menu that appears is the same as the Envoy/VitaLogik/Menntor X7 bedside monitor menu and has the same effect – see Figure 3-9. Note: In general, menu functions affect the display on the Central Station only and not the display on the Envoy/VitaLogik/Menntor X7 bedside monitor; however, some of the menu functions (such as top displayed ECG leads) are linked to the Envoy/VitaLogik/Menntor X7. Figure 3-9: Eral Station Note: The name of the unit, bed and patient being monitored appear at the top of each vital sign panel. To enter patient data: 1. Click the title of the patient area The Patient Identification panel appears. 2. Enter all patient demographic data. Full screen width display Split screen No. of waveforms 1 patient 2 8 2 4 5 Mennen Medical 3-10 Using the Multi-Bed Screen Ensemble User’s Guide Full screen width display Split screen No. of waveforms 3 6 3 4 8 2 5 10 2 6 12 2 8 16 2 Note: Mennen Medical When the Ensemble displays 5 , 6 or 8 Patients in Full mode, and 10 , 12 or 16 patients in split mode, then the two waveforms are superimposed if one of the waveforms is an ECG waveform, and the other a non-ECG waveform (e.g. Respiration or BP). 3-11 Chapter 4: System Local Setup 4B Overview 31B System Local Setup enables configuration of global controls, such as setting the alarm and volume controls and network setup for the Multi- bed. The Multibed is configured at the factory with Mennen Medical default values, which can be changed as needed by your hospital or department. Access to the System Local Setup menu is limited to authorized personnel, such as a System Administrator or Hospital Biomedical Engineer possessing a predefined password. Accessing the System Local Setup Menu 32B From the System Local Setup menu, you can access the following panels: Store Diagnostic File Use this panel to store diagnostic file to be sent to Mennen Medical service department, in case of question. Alarm Volume & Controls Use this panel to define general alarm-related parameters, such as alarm volume, color scheme, etc. VS Color Setup Use this panel to choose the desired color for the vital signs. The chosen color will be the same for a given VS on all the beds. Network Setup Use this panel to configure devices such as monitors, printers, etc. on the network. Link to Enguard Use this panel to link the Ensemble to an Enguard. Selection of a bed on the Ensemble will cause the Enguard to link to the selected bed. Inter Unit Privileges Use this panel to define reading and writing privileges for each Central Station on the network. Mennen Medical 4-1 Using the Multi-Bed Screen Ensemble User’s Guide Change Password Use this panel to define a new password for entering the System Local Setup menu. Check Disk Check disk is a technical procedure that does not affect user-defined parameters. This panel should be used by authorized service personnel only. Permission Editor Use this panel to define which Envoy/VitaLogik/Menntor X7 menu options are available for the current Ensemble user. To access the System Local Setup menu: 1. Click the Device name box at the top left corner of the screen. The Local Setup panel appears. Figure 4-1: Local Setup Panel 2. On the menu, choose System Local Setup. The System Password panel appears requesting the password. Mennen Medical 4-2 Using the Multi-Bed Screen Ensemble User’s Guide Figure 4-2: System Password Panel 3. Enter the correct password. The System Local Setup menu is displayed see Figure 4-3. Figure 4-3: System Local Setup Menu Mennen Medical 4-3 Using the Multi-Bed Screen Ensemble User’s Guide Alarm Volume & Controls 3B Use this panel to define general alarm-related parameters, such as alarm volume, color scheme, etc. These parameters are defined for each alarm priority level, enabling the alarm response for each alarm priority to be unique. For a more detailed description of Alarms, including alarm priority and notification, refer to Chapter 7, “Alarms”, in the Envoy/VitaLogik/Menntor X7 Operating Manual. Figure 4-4: The Alarm Volume & Controls Panel The panel is divided into two major areas. Parameters common to all alarms are located on the left of the panel. These parameters include; Alarms Tone Off and Silence Time. On the right side of the panel, parameters specific to each alarm priority are set. These fields include; File Name, Repeat Every (sec), End and Init Volume, Delay, Step and Increase Intensity. These parameters remain disabled until an alarm priority is selected. A description of each Alarm Volume and Control panel field follows. Enable Tones Off 5B Pressing the Enable Tones Off key (green button), enables you to reduce the alarm volume in local setup to 0 and the tone to “Off”. If the Enable Tones Off key is not enabled (grey button), then the alarm volume can be set to a minimum level of 1. Mennen Medical 4-4 Using the Multi-Bed Screen Ensemble User’s Guide Silence Time 56B When pressed, the Silence key terminates any audio alarms active at that moment for a predefined period which you can set under Silence Time. The available options are; 30, 60, 90, and 120 seconds. The factory default is 30 seconds. 57B Alarm Tone Setting Defines the alarm priority level for which you wish to define alarm volume parameters. The available priority levels are; C1, C2, C3, C4, T1, T2, and SpO2. When you select an alarm priority level, the following fields are enabled: File Name Defines the .wav file (sound file) which supplies the alarm tone for the selected alarm priority. The available options are; C1.WAV, C2.WAV, C3.WAV, C4.WAV, T1.WAV, T2.WAV and SpO2.WAV. Each file corresponds to the alarm priority of that name. Repeat Every (sec) Defines the time period after which an alarm is repeated (every 10 seconds, every 20 seconds, etc.). The available options are; 10, 20, 30, 40, 50, and 60 seconds. You can press the Play button to sample the selected alarm tone. The factory default values are as follows: C1, C2 - 0 seconds C3, C4 - 20 Sec T1 - 10 seconds T2 - 20 seconds SpO2 - 5 seconds Note: A repeat time of 0 seconds indicates that the alarm tone is continuous. End and Init Volume Sets the volume of the alarm tone when the alarm is first triggered (Initial Volume) and the maximum volume the alarm can reach until responded to (End Volume). The alarm volume gets progressively louder until it reaches the maximum level then remains at that maximum level until someone responds. End and Init Volume is set on a scale of 0-100. Sliders are provided to set the volume. The left slider controls the end (maximum) volume and the right slider controls the init (initial) volume. Delay (sec) Sets the time delay (in seconds) until the alarm increases in volume. Delay is set on a scale of 10-60. Mennen Medical 4-5 Using the Multi-Bed Screen Ensemble User’s Guide Step (vol) Sets the increase in alarm volume after each delay. Step is set on a scale of 020 (in units of 4). Increase Intensity Select this checkbox to enable increase in alarm volume. If this option is disabled, the alarm tone remains at its initial level of volume. Setting the Alarm Volume & Control Panel 58B You can access the Alarm Volume & Controls panel from the System Local Setup menu. To set Alarm Volume and Controls: 4. Select or clear the EnableTones Off checkbox, as required. 5. From the Silence Time drop-down menu, select the alarm silence time. 6. From the Priority Level drop-down menu, select the alarm priority level to be configured. 7. From the File Name drop-down menu, select the alarm tone.WAV file for the selected priority level. 8. Set the Repeat Every (sec) scale by moving the slider to the required time period. Select Play to hear a sample of the alarm tone. Select Stop to end the playback of the alarm tone. 9. Under End and Init Volume, set the left slider to the maximum alarm volume and the right slider to the initial alarm volume. 10. Set the Delay slider to the required delay (in seconds). 11. Set the Step slider to the required number of steps for each alarm volume increase. 12. Select the Increase Intensity checkbox to activate this function. Clear the checkbox to deactivate. 13. Press Discard Changes to close the panel without applying any changes made -orPress Main Screen to apply the changes and exit to the main screen. Mennen Medical 4-6 Using the Multi-Bed Screen Ensemble User’s Guide Vital Sign (VS) Color Setup 34B Use this panel to choose the desired color for the supported vital signs. Note: Choose the vital sign color before connecting beds. After choosing a color for a specific vital sign, the color chosen will be the same for that vital sign in all the monitored beds. e.g. if you choose yellow to display ECG, then the ECG of all monitored patients will be displayed in yellow. To set VS colors: 1. Click on the VS Color Setup in the System Local Setup Menu - a panel is displayed, showing all the VS colors supported by the Ensemble, including the default colors for each VS. Figure 4-4: VS Color Panel 2. Select a VS box - a color table opens. 3. Select the desired color. 4. Repeat the above procedure for all monitored vital signs. 5. Select Discard Changes to close the panel without applying any changes, -orSelect Main Screen to apply the changes and close the panel. Mennen Medical 4-7 Using the Multi-Bed Screen Ensemble User’s Guide Network Setup 35B The Network Setup panel is used to name a device and to name and define which unit each device is associated with. It also displays the device ID number, and IP address as identified by the system. If a printer is located on the LAN, you can enable the printer. To configure Network Setup: 1. In the System Local Setup menu, click Network Setup. Figure 4-6: Setting up the Network 2. Click in the Device Name box, and enter the name of the device. 3. Click in the Device Unit/Group box, and enter the name of the unit or group. 4. Click the Printer checkbox to activate or deactivate the printer. 5. Select Discard Changes to close the panel without applying any changes. -orSelect Main Screen to apply the changes and close the panel. Link to Enguard 36B When the Ensemble and an Enguard, remote monitor, are of the same UNIT as defined in the Network setup of the Ensemble and the Enguard, it is possible to link the Enguard to the bed that is in focus (yellow frame) on the Ensemble. To activate the Link to Enguard: 1. Select System Local Setup (password protected) in the Local Setup menu. 2. Select Link to Enguard in the System Local Setup menu. Mennen Medical 4-8 Using the Multi-Bed Screen Ensemble User’s Guide 3. On the Link to Enguard panel select the Enguard Device Name as defined in the Network setup of the Enguard. From now on, when a bed is selected on the Ensemble it is displayed on the selected Enguard. To deactivate the Link to Enguard: Use Unlink key on the Link to Enguard panel. Inter Unit Privileges 37B Different units located on the same network can be connected to each other. Each unit’s Central Station can interact with monitors of other units. Inter Unit privileges define whether a Central Station in one unit may or may not interact with another unit. In the Inter Unit Privileges panel you define reading/writing privileges from a Central Station to each of the units connected. Three options are available: Read - allows reading parameters, but not to perform any procedures or change parameters on the remote unit. Read/Write - allows reading parameters, perform monitoring procedures or define settings. N/A - does not allow reading or writing of parameters. To define inter unit privileges: 1. In the System Local Setup menu, select Inter Unit Privileges. The Inter Unit Privileges panel opens. Figure 4-5: Setting Inter Unit Privileges Mennen Medical 4-9 Using the Multi-Bed Screen Ensemble User’s Guide 2. Under Units List, select the unit to which you want to define privileges. 3. Define reading/writing privileges. 4. Click the Main Screen button to apply the changes and exit to the main screen. Change Password 38B The Change Password option allows you to change the password that enables access to the System Local Setup menu. Access to the System Local Setup menu is limited to authorized personnel, such as a System Administrator or Hospital Biomedical Engineer. To change the password: 1. In the System Local Setup menu, click Change Password. The Change Password panel opens. Figure 4-6: Changing the Password 2. Enter the new password and click Accept. 3. A panel appears requesting you to type again the password. Type the password again and click Accept. Check Disk 39B When running Check Disk, all patient information on the disk is erased. WARNING!! Avoid using this option. To run Check Disk: In the System Local Setup menu, select Check Disk. Mennen Medical 4-10 Using the Multi-Bed Screen Ensemble User’s Guide Permission Editor 40B In the Permission Editor panel you can define which Envoy/VitaLogik/Menntor X7/ Ensemble functions can be accessed at this Central Station. By default, access to all functions is available at the Multibeds. However, you can configure the station to make certain functions unavailable. For example, you can decide that at the current station recording of vital signs data cannot be performed. The Permission Editor displays the entire Envoy/VitaLogik/Menntor X7/ Ensemble menu in tree format, and allows you to define, for each menu option, whether it is available or unavailable for the current Central Station. The following modes can be set for each menu option: On - select this checkbox to activate the menu option. The option appears in the appropriate panel and can be accessed. Off - select this checkbox to remove the menu option from the appropriate panel. The option cannot be accessed. Dimmed - select this checkbox when you want the menu option to appear dimmed on the panel. The option cannot be accessed. Figure 4-7: Permission Editor To define permission for a menu option: 1. From the Local Setup menu, select Permission Editor. The Permission Editor panel appears displaying a menu tree with all Envoy/VitaLogik/Menntor X7 menu options. 2. In the menu tree, click the plus (+) icon that appears to the left of a menu item to access the menu level below that listed on the screen. Any item from any level can be selected when assigning permission. Mennen Medical 4-11 Using the Multi-Bed Screen Ensemble User’s Guide 3. Select the required menu item, and then select the permission status for the item. 4. Repeat steps 3 to 4 until defining permission for all the menu option that you want. 5. Click Main Screen to apply changes and close the panel. Mennen Medical 4-12