1
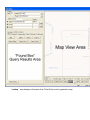
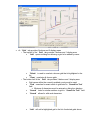
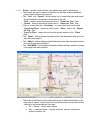
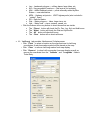
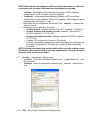
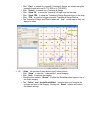
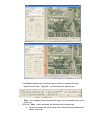
Blue Stakes of Utah Remote Access for Excavators (QTE & RTE) Ticket Entry & Ticket Search User Manual Updated 3/2/11 Welcome to the Blue Stakes Remote Access for Excavators user’ s manual. This form of ticket entry is designed to help contractors enter their own utility location requests through the internet. This document will serve as an instructional manual and reference guide. It will give step-by-step information on how to use the Ticket Entry screen, as well as what information is required to process each locate request. Remote Access for Excavators is designed to be user friendly. The requirements for using this system are a connection to the Internet (the faster, the better of course) and Internet Explorer 6.0 Service Pack 1 (SP1) or higher. This program will only work using Internet Explorer; it does not function properly with Mozilla, Firefox, Chrome, Netscape, AOL or any other browser. In order to see the screen in its entirety, it is recommended to set the screen size at 1024 x 768. Remote Access for Excavators Table of Contents I. Getting Started A. Connecting to the site B. Newtin Remote Access for Excavators Page Menu Options II. Ticket Entry A. Explanation of Fields B. Buttons and Functions C. Types of Tickets D. Mapping Instructions III. Addresses A. Single address entry B. Multiple property address C. Intersection entry D. Street to street entry E. Begin at address, end at intersection F. Excavation bound by four roads G. Highway and milepost marker H. Directions from nearest address IV. Ticket Search A. Search Criteria B. Output Columns C. Help V. Helpful Information A. Shortcut keys and help B. Function Keys C. Quick reference: Do’ s and don’ ts [ Top ] [ Table of Contents ] [ Section I ] [ Section II ] [ Section III ] [ Section IV ] [ Section V ] I. Getting Started A. Connecting to the site: To enter utility locate requests to go to www.bluestakes.org and then click on the Web Applications link on the left-hand side of the screen. Click on the Newtin User Login and enter the Username in the top line and the Password in the bottom line of the pop-up box. It is recommended NOT to check the “ Remember my credentials” option. Username: User names start with the letter “ q” or “ r” (for Quick Ticket or Remote Ticket), then the first initial of the first name and then the full last name (Example for Quick Ticket user John Doe = qjdoe). ** Not case sensitive** Password: The Newtin system requires passwords to have a minimum of 7 digits, including at least three letters, three numbers and a special character. (!@$%&*^) ** Passwords are case sensitive to how the they are entered during setup** Click the "OK" button to log in to the Newtin Remote Access for Excavators page. B. Newtin Remote Access for Excavators Page Menu Options: There will be 3 sections across the top of the screen with the following menu options: Tickets, Maintenance and Reports. Tickets: Ticket Entry: This application will process locate requests. It allows the user to submit new tickets as well as retransmit, update, cancel and 2nd notice existing tickets. Inquiry allows viewing of previous tickets. Emergency and meet requests are not available through this application and will still need to be called into the Blue Stakes Center. See “ Ticket Entry” (Section II) Ticket Search: This application gives the ability to search, print, and archive tickets that have been entered by users from the same company. See “ Ticket Search” (Section IV) Remote Access User Downloads: Ticket Entry & Search Applications: Use this link to download Ticket Entry and Ticket Search onto your computer. After clicking on the link, tell it to Run the program and then follow the instructions in the Newtin Applications Setup Wizard to install the programs. Documents: Newtin Applications Setup: Instructions on how to download and run Newtin applications on any computer used to enter tickets. Remote Access for Excavators User Manual: This opens your user reference guide. This manual contains instructions, rules and guidelines on how to use Ticket Entry and Ticket Search. RA User Agreement: This is a copy of the Remote Access User Agreement all users accept when using Remote Access applications such as Ticket Entry and Ticket Search. Log Out: Logs you out from the Remote Access for Excavators page. All browser windows must also be closed down in order to completely sign out of the site. Maintenance: o Profile: This allows you to update various details of your company and personal information. Make any changes necessary and then click on the "Update" button to save the changes. All other changes need to be made by contacting Member Services. Type: Indicates whether you're an Excavator or Other. (All companies should remain as an E.) Company/Name: The name of the company. Address: Company mailing address, including state & zip code. Ext.: Phone extension. (If applicable) Caller: Users first and last name. Fax: Fax number including area code. E-mail: A preferred, accurate email address to receive copies of quick tickets for confirmation and receive communication from member utility owners. *Required* Comments: Not Applicable o RA Signup: This is a link to the Remote Access for Excavators account request form. Only the user whose name is on the Remote Access for Excavators account should be using the account. Each individual in the company who wishes to process Blue Stakes requests using Remote Access for Excavators is required to have an account in their own name. Reports: o None available at this time for Remote Access for Excavators. [ Top ] [ Table of Contents ] [ Section I ] [ Section II ] [ Section III ] [ Section IV ] [ Section V ] II. Ticket Entry A. Explanation of Fields: Helpful features of Ticket Entry are the data entry prompts. When the cursor is blinking in any field on the ticket, look at the bottom left-hand side of the screen and see a brief description of the information that should be entered into that field. The following is a brief explanation of each field in the Ticket Entry screen for quick reference. Note: In Ticket Entry, required fields are indicated in Red. Grayed out fields are populated by the system or from the user’ s profile information. Some changes are allowed under maintenance of the user’ s profile on the main screen. For other needed changes please contact Member Services at [email protected] or 801-2082103. Phone – Company’ s main phone number P Button – For Blue Stakes purposes only Company – Name of company C Button – For Blue Stakes purposes only Caller – First and last name for the QTE account user Phone – An alternate daytime contact phone number Ext – Phone number extension if applicable Caller Type – “ E” represents Excavator Email – A preferred, accurate email address to receive copies of quick tickets for confirmation and receive communication from member utility owners. This – Sends an email confirmation of this ticket to the provided email address. All – Sends an email confirmation of this and all future tickets to the provided email address. Fax – Company fax number. This – Sends a fax confirmation of this ticket to the fax number. Address – The company mailing address. Zip – Zip code (in mailing address). State – State name (in mailing address). Place – City that relates to zip code (in mailing address). Field Contact – Name of person on site to contact, or someone familiar with the project. Phone – Enter the field contact’ s phone number including the area code, but without dashes. Ext – If there is an extension number for the field contact, enter it; if not, leave it blank. Done For – Who the work is being done for. Work Type – Type of work being done. This field contains a drop down list of work types. It is also a free text field to enter the type of work if it is not found in the list. Please be specific with the work type descriptions in order for the utility companies to know specifically what you will be digging for as required by law. DO NOT use Excavation, Boring, Digging or Trenching. E.g. instead of entering INSTL UTILITIES, something more specific would be INSTL SWR / WTR / PWR LINES. Trenchless? – Will boring, tunneling, or trenchless drilling be done? (Y/N/U) Upon answering this question the cursor will automatically be moved to the next field. Blasting? – Will explosives be used? (Y/N) Upon answering this question the cursor will automatically be moved to the next field. State – The State where will be done. Always UT for Utah County – The County where excavation will be done. Click on the drop down box for a list of all county names in Utah. Place – The place where excavation will be done (place name or unincorporated county). Place name may be selected from the drop down box that will list all of the incorporated place names specific to the county that is entered. For dig sites not located within the city limits of one of the place names listed in the drop down box, please select “ Unincorporated ____ County.” Note: The city, town, or county listed in the place field plays a very important role in the proper notification of utility members. Please make sure the entire dig site is actually in the place names provided or listed in the appropriate unincorporated county. Example: Do not put Park City in the Place field if the dig site is in Jeremy Ranch, which is outside of the Park City limits. If it is in unincorporated county, remember to put how far and in which direction it is from the nearest city; this information should be entered in the Remarks field. Address – Address of property or properties where excavation will be done (numbers only). Please only enter building or house addresses in this field. Do not enter numbered streets in this field. Street – Street name of property address. Be sure to include the directional prefix for the street name whenever applicable (e.g. E Barton Ave). Use abbreviations for directional prefixes (N for North, S for South, E for East and W for West) Directional prefixes are required for all addresses in Salt Lake County. Make sure you include the street type as well (e.g. ST, RD, BLVD, AVE, CIR, etc.) and don’ t include punctuation. ST Button – Look up street name (to confirm spelling). Pressing this button will do a search in the mapping database and list all roads similar to the street entered in the street field. Please be careful when selecting a street from this box. Upon selecting a street, it will change what was entered in the street field; make sure that is the right road and is in the correct place. Coords – Numbered coordinate for street name. This is a required field for named streets in Salt Lake County. Although it is not required in any other county a street coordinate is extremely helpful in the location of the address on the map, as well as out in the field. Cross 1 – First intersecting cross street. Only enter something in this field if the work will be starting from an intersection. This field cannot have anything in it if there is something in the Address field (See section III. C). C1 Button – Works the same as the ST Button. Coords – Numbered coordinate for Cross 1 street name (Do not enter “ approx” or “ about” in this field). Cross 2 – Second intersecting cross street (only used for street to street entry. See section III. D). C2 Button – Works the same as the ST Button. Coords – Numbered coordinate for Cross 2 street name (Do not enter “ approx” or “ about” in this field). Subdivision – Subdivision, complex, business name, if applicable. Lot – Lot, unit, or building number if applicable. (Do not list this information in the street field) Side of St – Side of street the property is on. Select from the drop down list. (N /S / E / W / NW / NE / SW / SE / or B for Both). Note: Entering B in Side of St does not mean they will mark all the way across the street, this is telling the locators mark a part of the property on both sides of the road, not the road itself. Side of Lot – Which part(s) of the property the digging will be on. Drop down list available to select the part of lot to be marked. If the options provided in the list do not describe exactly what needs to be marked, leave this field blank and enter the specific staking instructions in the Locate/Stake Info field. This field may only be left blank if there are staking instructions in the Locate/Stake Info field. Note: If the lot is on a corner do not enter “ front” in the Side of Lot field because there are two frontages, so locators won’ t know which frontage to mark. In the Locate/Stake Info field please type in “ PLS STK BOTH FRONTAGES” or specify which frontage by selecting it from the drop down list: NORTH, SOUTH, EAST, or WEST. Rd Excv – Will excavation be done in or under the road? (Y/N) Upon answering “ N,” the cursor will jump to the Locate/Stake Info field. If “ Y” is entered the cursor will go to the Rd Excv Area field. Rd Excv Area – Part(s) of the road/intersection to be checked for utility lines. Use the drop down list to select which part of the road/intersection is to be marked. Short – Half way into road Long – All the way across the road (from curb to curb, nothing beyond the asphalt) Entire Intersection – Intersection itself, nothing into the lots on any corner Any Quarter or Half of Intersection – As specified in drop down list. Note: If there is more than one road that fronts the dig site (corner lot), specify in the Location/Stake Info field which road(s) need to be marked. If the selections from the list do not clearly explain what part of the road needs to be marked, then select SEE LOCATE FIELD. Then in the Locate/Stake Info field enter the specific staking instructions that pertain to the road. Just remember “ SEE LOCATE FIELD” refers to the Locate/Stake Info field below, it does not mean to go to the actual dig site. Locate/Stake Info – Additional staking instructions if needed. If Side of Lot is left blank, there must be staking instructions in this field. Specific staking instructions like, “ STK A 10 FT RADIUS AROUND THE EXISTING POWER POLE ON THE EAST SIDE OF THE PROPERTY,” or “ STAKE 10 FT INTO THE FRONT OF THE LOT FROM THE EDGE OF THE ROAD ON THE WEST SIDE OF THE RD,” go here. If digging in the road only, put the note **DIGGING IN THE ROAD ONLY** in this field. Remember to also spell out directions when using them (e.g. If you are continuing north for 500 ft, spell out north, do not abbreviate it as N). This field may only be left blank if there is something entered in the Side of Lot field. Remarks – Additional description information if needed. Enter information that does not directly pertain to the physical marking of the request. This would include: directions to a dig site, the description of a house (e.g. this is a pink house on a ½ acre of ground). Notes may be entered in this field that the “ address is in a cul-de-sac” , or the coordinate for a given road is an approximate. Notes such as, **PLEASE USE PAINT & FLAGS** or **AREA HAS BEEN PRE-MARKED WITH WHITE PAINT** belong in this field. Remarks for 2nd Notices, Retransmits and Cancels are also entered here. Remember, when giving driving directions, do not use abbreviations for north, south, east, or west. Also remember, if “ Unincorporated ____ County” is in the place field please specify how far and in which direction the dig site is from the nearest city in this field as well. Map Button – Click this button to enter the map. Latitude – Latitude of excavation if applicable (north coordinate). Longitude – Longitude of excavation if applicable (west coordinate, must begin with – sign). Normal – The “ Y” in this field indicates that the ticket will be sent through with ‘ Normal’ priority. Remote Access for Excavators tickets can only be submitted under this priority. If you need to submit a ticket with Emergency or Meet status then call Blue Stakes at 811. Emergency – This field is not accessible, if it is an emergency, it must be called in to the Blue Stakes contact center. Meet – This field is not accessible, to set up a meet, it must be called in to the Blue Stakes contact center. Meet Date – This field is not accessible, to set up a meet, it must be called in to the Blue Stakes contact center. Header – Secondary header message (appears immediately after the ticket header when ticket is delivered). It is not necessary to enter the header for 2nd Notices, Cancels or Retransmits, because when this type of ticket is processed it will automatically be entered. Get Members Button – This adds member utilities to ticket from selected map area. The ticket will be sent to these utilities. For QTE users this button is grayed out except on Update tickets. Mbr Info Button – Clicking this button will display the member descriptions, phone numbers and who marks the lines. The receiver numbers will be listed first (white), then after-hours emergency numbers (red) and then engineering contacts (blue). This button only functions if members are listed in the Members field. Submit – Submits ticket for delivery when doing an Update, 2nd Notice, Retransmit, or Cancel. This will also submit New tickets for RTE users. Add Member – Adds a member to the ticket. Map Suspend – For QTE users, submits New tickets to Blue Stakes for mapping and final processing. Suspend – Suspends the ticket. Void – Voids the ticket. Abort – Stops the action being taken (New ticket, Update, Retransmit, 2nd Notice, Cancel). This will not cancel an already existing ticket. B. Buttons and Functions: The function buttons are listed across the top of the screen. Choose any function by either clicking on that button or by pressing ALT and the underlined letter. To view the underlined letter, press the ALT key. Grayed out buttons are unavailable for Remote Access Users. Inq (Inquire) (Alt I) - Allows you to look at an existing ticket. Enter the nine-digit number into the white box and then click on OK button, or hit enter. The ticket will then be displayed. New (Alt N) - Creates a new ticket. Select the appropriate button: Yes (to clear everything), or No, but clear polygon (keeps everything but map), or No, but keep polygon (keeps everything, including map). Note: When resubmitting an expired ticket that Blue Stakes has already mapped please be sure to select “ No, but keep grids” so that it does not have to be mapped again. Update (Alt P) - Allows an update of an existing ticket, extending the expiration date by 14 calendar days. 2nd Notice (Alt 2) - Use this to re-notify the utilities, letting them know that the requested area has not been marked yet and their staking time has expired. Re-Mark (Alt R) – Use this function to request utility lines be re-marked (marked again), because the markings have been destroyed by construction or weather. reXmit (Retransmit) (Alt X) - Use this to clarify information on an existing request. However, DO NOT ADD any additional staking instructions or change the address. To change the address or staking instructions a new ticket must be submitted. Cancel (Alt C) - Use this to cancel an existing ticket. Reasons for canceling a ticket might be that the address, county or place was entered incorrectly, or that the work being done at that address will not commence. Add Com – Not applicable for Remote Access for Excavators users. Unsuspend – Not applicable for Remote Access for Excavators users. Map Unsuspend – Not applicable for Remote Access for Excavators users. QT Unsuspend – Not applicable for Remote Access for Excavators users. Ite Unsusp – Not applicable for Remote Access for Excavators users. Display Ticket (Alt D) – Will show a full view of the ticket including all lines in the Locate and Remarks field. This option allows the ticket to be printed. Clock – Not applicable for Remote Access for Excavators users. Web (Alt W) – This will go to the Newtin Remote Access for Excavators page once you have entered your Username and Password. Verify – Not applicable for Remote Access for Excavators users. Search – Not applicable for Remote Access for Excavators users. C. Types of Tickets: There are several different types of tickets that can be processed using the buttons at the top of the screen as described above. Below are descriptions of different types of tickets and how to use the buttons as well and what information is needed for those types of tickets. Cancel (Alt C) – If the county, city, address or staking information you entered is incorrect and the ticket has already been sent through, first create a new ticket with the correct information. Write the new ticket number down, and then cancel the first ticket. Do this by clicking the Cancel button at the top of the screen; enter the old ticket number in the white box and then click the OK button or hit enter to pull up the ticket. Look at the address to make sure it is the one that should be canceled. Notice that you can only access the Remarks field. In this field enter the reason for cancellation and the new ticket number it is being replaced with. Press the F3 function key at the top of the keyboard to insert the message: >>> CANCEL <<< PER (your name) - INCORRECT ADDRESS (or reason for cancellation) RPLCD W/# (new number), or simply type a cancellation message. (For a full list of the function key shortcuts, please see V: Helpful Information, section B). Here is an example: Once the request is submitted it will automatically put a stamp that has the account name, date and the time of the cancellation: >>> RCGRABLE 03/01/10 02:07:55 PM <<< Update (Alt P) – The time to update an active request is no later than two business days before the ticket will expire. Update will extend the legal digging period for 14 days from date of expiration of current ticket. The 1st update may be entered on the same day as the original ticket and will take effect exactly when the original request expires. Click on the update button, type in the ticket number to be updated in the box and click the OK button or hit enter. When it pulls up the ticket verify that all the information is still correct and that the mapped dig site is correct (Alt-M). Remove any notes no longer applicable from the Remarks field (2 nd Notice, Retransmit, etc). Then click the Get Members button. This will bring up a dialogue box containing the legal dates and times; click OK to close the dialogue box. Then click on the Submit button. The new ticket number will be in the top left corner of the screen. Note: Updates do not permit changes to the dig site information. The only available fields that may be altered include the field contact, phone number and done for fields. Be sure to update the request before the time and date given on the original request. If the ticket has expired then do a new ticket. Keep the information the same by clicking on the Inq button, type in the ticket number, and then click OK. This will pull up the ticket, and then click on the New button and select “ No, but keep polygon” when the New Ticket box appears. Re-Mark (Alt R) – This function will be used to request utility lines be re-marked (marked again), because the markings have been destroyed by construction or weather, as described in state law (54-8a-4(7)). The law allows the utility companies 2 business days to mark their lines again; this function will add that time stamp to the ticket. When you click the Re-Mark function, a window will prompt you to indicate which markings have been destroyed and which utilities need to re-mark their lines. If you are unsure which utilities need to respond, you can select all. Please use the Additional Comments box in this window to enter your name to indicate who is requesting the Re-Mark and provide a field contact if appropriate. A message like this will be added to the ticket: Retransmit (Alt R) – Retransmit a request to add additional contact information or to clarify existing instructions. Remember not to use Retransmit to make any changes to the address or to expand staking instructions to include a larger area. Click the Retransmit button, type in the ticket number and then click OK, or hit enter to pull up the ticket. Add the retransmit notes to the Remarks field. Once the cursor is in the Remarks field, pressing F4 will add the note “ >>> RETRANSMIT <<< PER” . Insert the user name after per, followed by the reason for the retransmit. This is what it should look like: Once you submit the request, it will automatically put a stamp that has your account name, date and the time of the retransmit: >>> RPGODBOUT 03/01/10 03:11:21 PM <<< 2nd Notice (Alt 2) – If the dig site has not been marked by the Legal Date issue a 2 nd Notice letting the locators know that their staking time has expired and the area is not marked. Click the 2nd Notice button, type in the ticket number and then click OK, or hit enter. The Remarks field will be the only field you can access, so you will put your 2 nd notice remarks here. Pressing the F2 function key will insert the note “ >>> 2ND NOTICE <<< PER - HAS NOT MARKED - CREW IS ON SITE DIGGING NOW - PLEASE STAKE ASAP OR CALL TO CLEAR THE AREA.” Fill in the specific information about which utilities have/have not marked. Utilities should respond within 2 hours or as soon as possible to mark their lines. Note: Please be specific about which company or which type of underground lines have not been marked. This is what it should look like: Once you submit the request, it will automatically put a stamp that has your account name, date and the time of the 2nd Notice: >>> RCGRABLE 03/01/10 03:15:56 PM <<< D. Mapping Instructions: When a ticket is created, Blue Stakes of Utah uses a system called QuickMap to find what utilities will be affected in the work area specified. When an address is located on the map a polygon is drawn to appropriately cover the dig site. Any utility whose lines are located within the polygon are then notified that digging will be taking place at the specified address and the marking of their lines is required. QuickMap ‘ Map’ button accesses QuickMap. Move the mouse pointer over any field or button (without clicking) to view its description ‘ Lookup’ area displays information from Ticket Entry used to generate a map State (Required) o Defaults to Utah (cannot be changed) County (Required) o Displays currently enabled county (cannot be changed in QuickMap) ‘ C’ button (Optional) o Allows you to switch the current county to an adjacent county visible on the map Place (Required) o City or town used to query the database (may be changed) ‘ P’ button (Optional) o Jumps the map view to the center of the Place entered Address (Optional) o Address number used to query the database (may be changed) Street (Required) o Primary street used to query the database (may be changed) Cross1 & Cross2 (Optional) o Cross streets QuickMap uses to query the database (may be changed) Swap (Optional) o Switches ‘ Street’ field with ‘ Cross1’ field (or ‘ Cross1’ with ‘ Cross2’ ) Below the Lookup section QuickMap comes with a set of 9 tabs and associated buttons that may be utilized in finding an area and displaying it on the map. 1 - ‘ Find’ tab contains 7 buttons and 1 display area o ‘ Find’ and ‘ Cross1’ & ‘ Cross2’ search for exact matches o If an exact match is not found, a dialog box displays o o o o Click ‘ OK’ and QuickMap will begin searching for similar matches If similar matches are not found, QuickMap displays a blank screen If similar matches are found, they will be listed in the ‘ Found Box’ Click any result in the ‘ Found Box’ to display that area on the map o Highlight a selection from the ‘ Found Box’ , click ‘ Copy to Street’ or ‘ Copy to Cross’ and that information will copy to the corresponding field in Ticket Entry when ‘ Save All’ is selected 2 - ‘ Search’ tab provides 9 buttons and 2 display areas o Text can be manually entered into the ‘ Search for Text’ field o ‘ Copy from Street’ places text from the street field into the ‘ Search for Text’ field. Double-click to copy only the root of the street name. o ‘ Copy from Cross1’ and ‘ Copy from Cross2’ do the same thing for the cross street fields o ‘ Search’ queries information entered in ‘ Search for Text’ field Results are listed in the results area below ‘ Search for Text’ field Highlight a result to display street segments in ‘ Found box’ o Highlight street segments in the ‘ Found box’ , click ‘ Copy to Street’ or ‘ Copy to Cross’ and that information will copy to the corresponding field in Ticket Entry once ‘ Save All’ is selected o ‘ Sndx’ will search using a “ sounds like” index to find similar street names o o o o ‘ ‘ ‘ ‘ HL1,’ will highlight the entire found road in the ‘ Street’ field in red HL2’ will highlight the entire found road in the ‘ Cross1’ field in green HL3’ will highlight the entire found road in the ‘ Cross2’ field in blue All HL’ combines the functions of the previous 3 buttons 3 - ‘ Intersection’ tab provides 5 buttons and one display area o ‘ Find’ looks for the exact intersection of ‘ Street’ and ‘ Cross1’ fields o ‘ Search’ looks for similar intersections of the ‘ Street’ and ‘ Cross1’ fields o ‘ Find2’ looks for an exact match of the section of ‘ Street’ between ‘ Cross1’ and ‘ Cross2’ o ‘ Search2’ looks for similar matches of the section of ‘ Street’ between ‘ Cross1’ and ‘ Cross2’ o Matching results display in the ‘ Found box’ o ‘ Copy to Street/Cross’ copies the highlighted result from the ‘ Found Box’ back to the corresponding fields in Ticket Entry once the or ‘ Save All’ button has been selected 4 - ‘ Grid’ tab provides 6 buttons and 2 display areas o The top half of the ‘ Grid’ tab provides 3 buttons and 1 display area ‘ Add’ opens a dialog box allowing a grid to be added by name ‘ Delete’ is used to unselect a chosen grid that is highlighted in the list ‘ Clear’ unselects all chosen grids o The bottom half of the ‘ Grid’ tab provides 3 buttons and 1 display area Grid names within the currently enabled county must be used ‘ Find’ searches for exact match to grid listed in ‘ Search for Text’ field Minimum 4 characters must be entered or dialog box displays ‘ Search’ looks for similar matches to grid in ‘ Search for Text’ field ‘ Search’ allows for wild card characters ‘ Add’ will add a highlighted grid to the list of selected grids above 5 – ‘ Points’ tab has 4 main buttons, one display area, and 3 other buttons o The buttons are used to search for features on the map, such as landmark points, water features, hwy mpm etc. o The ‘ Find’ and ‘ Search’ buttons allow you to search the base map layers that are checked in the boxes at the bottom of the tab. o ‘ Find’ looks for points that begin with text in ‘ Search for Text’ field o ‘ Search’ looks for points that contain text in ‘ Search for Text’ field o Click on a result from the ‘ Found box’ to jump to that point on the map o ‘ Copy From Place’ copies the text from the ‘ Place’ field to the ‘ Search for Text’ field o ‘ Copy To Place’ copies the text from the results window to the ‘ Place’ field o The ‘ Points’ button displays landmark points (see description below) on the map with red pushpins o The ‘ Added’ button displays added landmark points (see description below) on the map with green pushpins. o The ‘ Hwy MPM’ button displays highway milepost markers and exit numbers on the map with blue pushpins. o The boxes at the bottom of the window allow you to check which layers of the base map to search. Hover the mouse (move the pointer over the box without clicking) to see a description of the layer. Plc – Places – cities, towns, places Dec – Landmark points – places, churches, schools, cemeteries, points of interest, etc Lpy – Landmark polygons – military bases, large lakes, etc Kgl – Key geographic locations – (this layer is not included) Add – Added landmark points – points manually added by Blue Stakes – new subdivisions MPM – Highway exit points – UDOT highway exits (also included in “ added” layer) RR – Railroad tracks Wat – Water polygons – lakes, large rivers, etc Hyd – Water lines – rivers, streams, canals, etc o Click the buttons at the very bottom to check boxes that are similar. The ‘ Places’ button will check the Plc, Dec, Lpy, Kgl, and Add boxes The ‘ Water’ button will check the Wat and Hyd boxes The ‘ All’ button will check all boxes The ‘ Clear’ button will un-check all boxes 6 - ‘ Lat/Long’ tab provides 4 buttons and 3 display areas o Click ‘ Point’ to select a location on the map and save its Lat/Long coordinates. A red plus marker symbol will be placed on the map o Click ‘ Clear’ to remove Lat/Long marker from map display o Click ‘ Remove’ to clear Lat/Long marker from map display as well as remove the coordinate from the ‘ Latitude’ and ‘ Longitude’ fields in Ticket Entry NOTE: Both Latitude and Longitude fields must hold information in order for a coordinate to be correctly found and properly displayed on the map. o ‘ Latitude’ field displays/holds North/South reading of GPS coordinate (always North in Utah, between 37 and 42 degrees) o ‘ Longitude’ field displays/holds East/West reading of GPS coordinate (always West in Utah, between 109 and 115 degrees). Enter longitude values beginning with the negative (-) sign o Once valid Lat/Long coordinates are entered, click ‘ Jump to’ to display that area on the map o Coordinates can be entered in 3 formats decimal degrees - example: latitude 40.511677, longitude -111.886314 degrees, minutes, and decimal seconds - example: : latitude 40 30 42.0372, longitude -111 53 10.7304 degrees and decimal minutes - example: latitude 40 30.7006, longitude 111 53.1788 1 degree = 60 minutes and 1 minute = 60 seconds Enter the coordinates in appropriate format, depending upon how they are provided by the excavator. The other two formats will be automatically calculated. NOTE: Entered coordinates that reside outside of the currently enabled county will display without street detail on the map, and therefore cannot be used as a reference point on the current ticket. 7 - ‘ Location’ tab provides 2 display areas o ‘ Location’ shows the information entered in the ‘ Location/Stake info’ field from the ticket o ‘ Remarks’ shows the information entered in the ‘ Remarks’ field from the ticket 8 - ‘ TRS’ tab provides 5 buttons and 1 display area o Click ‘ Find’ to search for a specific Township & Range, as entered using the example format (such as SL T1S R2E or UI T2S R2W) o Click ‘ Search’ to search for a Township & Range o Click ‘ Show TR’ to show the Township & Range layer on the map o Click ‘ Show TRS’ to show the Township & Range Sections layer on the map o Click ‘ TRS’ to create a polygon around a Township & Range Section o The Township & Range and Section labels will “ float” on the map so they can always be seen. O – ‘ Ortho’ tab provides 2 main buttons and 2 other buttons o Click ‘ Show’ to view the “ orthorectified” aerial imagery o Click ‘ Hide’ to remove the imagery o Check the box marked ‘ Streets’ to show the QuickMap street layer on top of the Ortho imagery o The ‘ Colors’ and ‘ Angle/Zoom/Offset’ features allow you to adjust the contrast and view of the imagery. Clicking the ‘ Reset’ buttons will restore the default settings o QuickMap supplies many tools that may be utilized to navigate the map, inquire streets, draw ‘ Dig Sites’ and select grids to name a few o ‘ Mov’ is a navigation button allowing the map to be re-centered and to zoom in and out o With the ‘ Mov’ button activated, the following can be performed Click on an area in the current map view to have that point become the center of the map Hold down left click and drag the mouse to draw a box around an area in the map and zoom in, (Lower the altitude) Hold down right click and drag the mouse to draw a box around an area in the map and zoom out, (Raise the altitude) Hold down middle click and drag the mouse to pan/drag the map o ‘ Grids’ toggles the grids layer on and off Only works at map zoom level 5 or lower Must be activated in order to manually select grids from map Selected grids display in an orange color Unselected grids display hollow with a red outline o ‘ Bulls’ is a distance tool used to determine the size of a radius Displays 100ft increment rings with outer red ring marking 1,000ft o ‘ Near’ is an identify tool used to identify particular street segments Click on a street in the map display and ‘ Near’ will mark it in red and display the address range and name information at the lower left hand corner of the screen o ‘ Place’ is an identify tool used to identify the place/city or town associated to the current map display Not all areas are associated to a place/city or town o ‘ Point’ Latitude/Longitude button used to manually mark a specific coordinate on the map The bottom of the map screen below the tools, displays the coordinates for the current mouse location on the map o ‘ Street’ highlights entire length of the street listed in ‘ Street’ field o ‘ Cross’ highlights entire length of the street listed in ‘ Cross’ field o ‘ Streets’ lists all streets in current map view in the ‘ Found box’ Must be a map zoom level 1 or 2 o ‘ Lat/Long’ toggles the Latitude/Longitude reference layer on and off o ‘ Poly’ three phase button used to create polygons with mathematically precise extents or boundaries o With ‘ Poly’ button activated, the following may be performed Point mouse to a location on the map and double click to create a radius Point mouse to a location on the map, single click and drag the mouse in any direction. Double click to create a precise linear polygon Point mouse to a location on the map, single click and drag the mouse in any direction. Single click and continue to drag the mouse in another direction (continue as needed). Double click to create an area polygon with precise mathematical boundaries NOTE: For better control of the area a polygon covers, designate a customized buffer distance into the ‘ Buff’ field anywhere from 100ft to 2,640ft. o ‘ Line’ creates precise linear polygons with mathematical extents or boundaries Click ‘ Line’ , click on a start point on the map and drag the mouse in any direction. Single click to change direction and double click to create a linear polygon o ‘ Seg’ automatically covers a highlighted street segment with the buffer distance set in the ‘ Buff’ field Only works if a street segment is chosen from the ‘ Found box’ or is displayed in red on the map o ‘ Pdrw’ freehand drawing tool used to draw dig sites Click ‘ Pdrw’ , point mouse to a start point on the map and hold down left click. Drag mouse in any direction and a red line will appear tracing the path taken. When the end point is reached, release left click to create a polygon covering the selected area o ‘ Ldrw’ freehand drawing tool used to draw dig sites Click ‘ Ldrw’ , point mouse to a start point on the map and hold down left click. Drag the mouse in any direction and a red line will appear tracing the path taken. When the end point is reached, release left click to create a polygon covering the selected area with the prescribed buffer distance listed in the ‘ Buff’ field o ‘ +’ used to add to existing polygon by drawing another. Click button to set to ‘ -‘ , which is used to subtract from existing polygon by drawing another using any of the polygon drawing tools. o ‘ Dist’ measuring tool used to determine distances between locations or objects on the map Measurements are displayed in feet at the bottom left hand corner of the map screen Click ‘ Dist’ and point the mouse to a start point on the map. Click and drag the mouse in any direction. Single click to change direction and double click to exit the ‘ Dist’ tool When directions are changed in the ‘ Dist’ tool, the reading displays the length of the current segment as well as the total distance from the start point o ‘ Buff’ displays the current buffer (in feet) that will be applied to all drawn linear polygons Buffer range may be between 100ft and 2,640ft o ‘ C’ clears objects from the map display, such as bullseyes, distance lines, address ranges, etc (everything except grids & polygons) ‘ Clear’ cannot be undone o ‘ Cl’ clears all objects, selected grids and drawn polygons from the map display ‘ Clear’ cannot be undone o ‘ 1’ ,’ 2’ ,’ 3’ ,’ 4’ ,’ 5’ ,’ Z’ are preset map zoom levels ‘ 1’ displays the map from an altitude of 1,000ft ‘ 5’ displays the map from an altitude of 5,000ft ‘ Z’ displays the map at a zoom level to show the entire county o '+’ and ‘ -‘ zoom in and out 1 step (also ‘ ctrl +/-‘ performs the same function) o ‘ <’ returns to the previous map (also ‘ alt ’ performs the same function) o ‘ A’ positions the map to display the area where grids are selected o ‘ G’ positions the map to display the area where a polygon is drawn o ‘ Save’ returns to Ticket Entry saving polygonal and grid selections o Save All’ returns to Ticket Entry saving polygonal and grid selections as well as any street name or address changes that may have been made while in the map o ‘ Cancel’ returns to Ticket Entry without saving any selections or modifications made while in the map [ Top ] [ Table of Contents ] [ Section I ] [ Section II ] [ Section III ] [ Section IV ] [ Section V ] III. Addresses A. Single Property Address In the Address field enter the address coordinate (building or house number only). In the Street field, enter the directional prefix and then the street name. If you can get a coordinate for the street, enter it in the Coords field following the street field. Remember: Street coordinates are required for all named roads in Salt Lake County. B. Multiple Property Address In the Address field, enter the beginning address coordinate (building or house number), then a dash ( - ) and then enter the ending address coordinate (building or house number). In the Street field, enter the address’ directional prefix and the street name. Note: when entering a range of addresses, only house or building addresses can go into the address field. Do not put street ranges in this field (see D. Street to street entry). C. Intersection Entry In the Street field enter the first street name. In the Cross 1 (cross street) field enter the other street name. D. Street to street entry First, enter the street you are digging along in the Street field, then enter the street you are beginning at in the Cross 1 field, and last enter the street you are ending at in the Cross 2 field. E. Beginning at an address and ending at an intersection Using the format of a single property address, enter the property address where the digging will begin. Then, in the Location/Stake Info field enter: Continue staking (north, south, east or west) to the (north, south, east or west) of (ending street), followed by your staking instructions. Remember, you must include which side of the street the digging will take place on. Note: You should always spell out the direction while giving instructions. When you are putting in a directional prefix or suffix you should abbreviate it, but do not use periods. F. Excavation bound by 4 roads Choose an intersection or single address to enter into the address fields. Then in the Locate/Stake Info field list all four boundaries. When using perimeters, leave the Side of Street and Side of Lot fields blank. Once you have established the perimeters, specify what you want marked within the perimeters. Remember: You may only use this format when the area you are requesting is entirely vacant! You may not use this format to ask for an entire subdivision to be marked unless it is an entirely vacant lot. G. Highway and Milepost marker Enter the highway in the Street field and then re-enter the highway and milepost marker in the Location/Stake Info field for clarification. Note: Freeway exit numbers are milepost markers, so you would enter a freeway and exit number in this same fashion. If you can get the name of the freeway and exit, include this information in the Locate/Stake Info field. Example: *** I-15 @ EXIT # 305 (Pleasant Valley exit) *** H. Nearest address or intersection & directions Enter the nearest address or intersection in the appropriate format. In the Remarks field enter: “ THE GIVEN ADDRESS/INTERSECTION IS THE NEAREST AVAILABLE – FROM HERE (GIVE DIRECTIONS TO THE DIG SITE).” Be sure to give detailed directions to the dig site including distances and directions. Do not use right or left in your description; instead use north, south, east, and west. In the Location/Stake Info field enter the detailed staking instructions. [ Top ] [ Table of Contents ] [ Section I ] [ Section II ] [ Section III ] [ Section IV ] [ Section V ] IV. Ticket Search To search for a ticket that has already been entered into the system, double-click on the Ticket Search icon. This will open another window; click on the large SEARCH (ALT S) button in the top left hand side of the screen and a pop up box will come up where you will enter your search criteria. You can only search for tickets within a range of 30 days at a time. However, you can search for tickets processed as far back as 350 days. If the ticket is older than that, it has already been archived and you will not be able to retrieve it without calling the Blue Stakes center. A. Search Criteria Completed – Beginning search date. This is also the date range that the ticket was entered. If you want to know all of the tickets that you have entered for the week, or a certain date range, click on the drop down button to pull up the calendar and enter the beginning date range you wish to search. To – Ending search date, no more than 30 days from beginning date. This is also the date range that the ticket was entered. Work Date – This is the Legal date, or the date when the ticket cleared. You can also search by this date if you know when it cleared, but not when it was entered or called in. Just make sure you check the box to the left of this field and then you can access it. To – Ending search date, no more than 30 days from the beginning date. Ticket – If you have the ticket number enter it here and then click on the SEARCH button on the top right side of this box. This will pull up a list of different revisions done on this particular ticket. If there are no revisions, you will only see one line for that ticket. Type – This is will search for ticket by type: 2NDR (2nd notice), ACMT (Add Comment), CNCL (cancel), NEW (new), NSHW (no show—not used), RSND (resend—not used), RXMT (retransmit), UPDT (update), or VOID. Priority – This is the priority that the ticket went through as: DAMG (damage – not used), EMER (emergency), NORM (normal), RUSH (rush or 2nd notice) or SHRT (short notice – not used). Category – This will always say “ LREQ” for “ Locate Request.” Lookup – This will search for tickets that notify Members by grids or by place (whichever is specified). Note: approximately 99.80% of tickets are processed with grids. Blue Stakes of Utah does not use the CNTY, NONE, or STRT filters in this field. Channel – This is the channel the ticket was sent through: 123 (called in to center), ITE (Internet Ticket Entry), OTR (Online Ticket Revision), QT (Quick Ticket), or WEB (Remote Ticket Entry). Operator – This will search for tickets by the name of the operator who processed the request. Verified – This will search for tickets by whether or not they have been verified. Member – This will search by members notified on a ticket. Grids – This will search for all tickets that have the specific grid number you enter here. County – County and state the ticket was entered in. Place – Place, or city, the ticket was entered in. This must be exactly what was on the ticket. If you are not sure you can leave it blank as long as other information is filled out. Subdivision – This will search for all tickets in the specified subdivision, if subdivision is listed on the ticket. Address – This will search for tickets with the specified posted address. This is for the address on the building only and does not include the street the address is on. Lot – This will search for tickets with the specific lot number entered. Street – This will search the street the address is on. If the address is 148 E 13200 S, you would enter 13200 S in this field. Cross 1 – This will search the cross street, if applicable. Cross 2 – This will search the second cross street, if applicable. Done For – This will search who the work is being done for. Location – This will search for specific phrases entered in the Location field on the ticket. Field Contact – This will search for tickets by the person listed as the field contact. Company – This will search by company name. Company Phone – This will search for tickets by the company phone number. Caller – Enter the first and last name of the person that called in, or entered the request through the internet. Caller Phone – This will search for tickets by the caller’ s phone number. Caller Type – Select E (excavator) to restrict your search to excavators or O (other) to search for all other types of callers, EX. property manager, HOA, etc. Work Type – This will search for by specific type of work that was entered on the ticket. Remarks – This will search by specific information that was entered in the Remarks field on the ticket. Header – This will search by information that was entered into this field on the ticket. Once you have entered all the information you wish to search for click on the SEARCH (ALT S) button on the top right side of this box and it will generate all of the tickets that match your criteria. Note: The more information entered in these fields, the more precise the search will be. The search is also very particular, so you need to make sure that whatever you are searching for is exactly what was entered on the ticket. You can search using as little information as the date range and the City, or the date range and the Street name. If you’ re not sure how the street name is spelled, just enter the first few letters and it will find anything similar to what was entered. To search for all tickets you’ ve entered for a specific period, enter the date range and the company name or company phone number listed on the account, as this information will be the same on all of your tickets. After you have clicked the SEARCH button it will take you back to the first screen and this is where it will list all of the tickets that were found using the search criteria. To view the full ticket you can point to and then double click on the ticket and it will open it in another screen, or you can point to, then single click on the ticket and then click on the DETAILS button (ALT D) at the top of the screen. You can print the tickets from this page, just highlight the tickets you want to print and then click the PRINT (ALT P) button and it will print each ticket individually. You can also print them from the screen that it pulls up when you open the ticket. If there is a ticket number that appears twice, that means there has been a revision to the ticket, such as a 2nd notice, retransmit, or cancellation. B. Output Columns This tab allows you to select the output columns to display when searching for tickets. C. Help This tab contains information designed to help with troubleshooting, problem-solving, as well as additional search tips. [ Top ] [ Table of Contents ] [ Section I ] [ Section II ] [ Section III ] [ Section IV ] [ Section V ] V. Helpful Information A. Short Cut Keys and Helps Readjusting the display properties: Right-click on a blank part of the desktop and select Properties. Go to the Settings Tab. In the Screen Area section select the amount of pixels you want. The higher the number, the more you can see on the screen at one time. We suggest 1024 by 764 pixels in order to view the entire TE screen without scrolling from side to side. You can change it back and forth from your normal settings if you need/want to. You can also click on a box that allows you to have the desktop settings show up in your system tray, which makes it quick and easy to change these settings. F11 key: If your cursor is in the Locate/Stake Info or Remarks field pressing F11 will automatically maximize the window screen and allow more information to be displayed on the monitor at one time. Pressing F11 again will take you back to normal view. B. Function Keys Here is a list of the function keys and the message they enter: (Remember: these are to be used in Remarks field) F2 >>> 2ND NOTICE <<< PER - HAS NOT MARKED - CREW IS ON SITE DIGGING NOW - PLEASE STAKE ASAP OR CALL TO CLEAR THE AREA. F3 >>> CANCEL <<< PER - INCORRECT ADDRESS - RPLCD W/# F4 >>> RETRANSMIT <<< PER F5 DIGGING IN ROAD ONLY. F6 >>> EXCAVATOR REQUESTS TO PLEASE USE PAINT AND FLAGS <<< F7 >>> AREA IS PREMARKED WITH WHITE PAINT <<< F8 PLS STK THE FRONT/REAR OF THE LOT TO THE REAR/FRONT CORNERS OF THE HOUSE. F9 EXCAVATOR REQUESTS TO PLEASE NOT PAINT ON ANY CEMENT OR PERMANENT STRUCTURES F10 GIVEN ADDRESS/INTSXN IS NEAREST AVAILABLE. DIRECTIONS TO DIG SITE FROM GIVEN ADDRESS/INTSXN: The F8 and F5 function keys are set up as staking instructions and are the ONLY ones that are allowed in the Location field and not in the Remarks field. These function keys are there for you to use to save yourself some time, but if you feel more comfortable typing each one out you can do that; just make sure you put in the required information in the Remarks field telling the utilities why you are doing a 2nd Notice, Retransmit, or Cancel. Also remember that these are just templates and can be changed as needed to suit each specific situation. C. Quick Reference Do’ s and Don’ ts 2nd notices: You will want to second notice a ticket when the legal date and time has passed and there are no utility markings or if the markings are incomplete. Be sure to state which utilities have marked and if you have crews on site ready to dig or when they will begin digging. Please also list a field contact for the locators to contact to clear the area or for questions. Don’ t: Send a second notice because the marks were destroyed due to weather or excavation. Change or add any staking instructions. Re-Mark: Use this function to request utility lines be re-marked (marked again), because the markings have been destroyed by construction or weather. Don’ t: Change or add any staking instructions. Retransmits (RXMT): You can retransmit a request to clarify the staking instructions or add additional contact information. Don’ t: Change the address or add any staking instructions. Cancel: Cancel a ticket when it has an incorrect address or if it was gridded incorrectly. You can also cancel a ticket if you no longer need to dig at that address. Try to cancel the ticket within the two working days that it is supposed to be marked by. Do not cancel the ticket because you finished the work early. You can just let the ticket expire. Don’ t: Cancel the wrong ticket. Once a ticket is cancelled, you are no longer covered to dig in that area and you cannot make any changes to that particular ticket. This action cannot be undone! Update: Update a ticket at least 2-working days before it expires. That way you will have continuous coverage. Remember to erase any notes that may have been entered in the Remarks field from the previous ticket (2nd Notice, Retransmit, Emergency, or Meet information, etc). Don’ t: Add or change any of the staking instructions. If you need a different area marked or want to narrow down the dig site, do a new ticket. [ Top ] [ Table of Contents ] [ Section I ] [ Section II ] [ Section III ] [ Section IV ] [ Section V ]