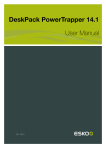
1
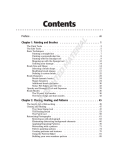
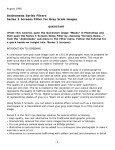
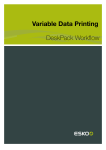
PRO Etching®
Version 1.0
USER MANUAL
Contents
Introduction .................................................................................................................................. 3
The program interface.................................................................................................................. 4
The panel of tools for work with files (Files) .................................................................................5
The panel of tools for image viewing (Zoom/Preview) ................................................................. 6
The panel of adjustment of parametres of an engraving (Hatching parametres) ......................... 8
The panel of adjustment of zones of engraving (Zones Splitting) .............................................. 10
The panel of a choice of the kept options of engraving (Etching Presets) ................................. 11
Window of the initial image, working window, metric rulers and status line................................ 12
Hotkeys ...................................................................................................................................... 14
Mode of the manual task of areas of shading ............................................................................ 15
Shadings .................................................................................................................................... 16
2
Introduction
Work in program PRO Etching begins with loading raster black-and-white (Grayscale) or colour (Color)
images which will be used further for creation of imitation of an engraving. For loading of the initial
image it is necessary to take advantage of the button of fast access of the panel of tools for work with
files, or a combination of "hotkeys" (Hotkeys) — Ctrl+O. The program gives to the user the expanded
possibilities for choice shadings and management of layers with masks.
The loaded image should be obligatory in a format *.BMP or *.TIF (.TIFF) without a compression
(uncompressed).
3
The program interface
For convenience of using in the program panels of tools are provided:
- The panel of tools for work with files (Files)
- The panel of tools for image viewing (Zoom/Preview)
- The panel of adjustment of parametres of an engraving (Hatching parametres)
- The panel of adjustment of a zone of engraving (Zones Splitting)
- The panel of a choice before the kept options of engraving (Etching Presets)
The program interface also has a window of the initial image, a working window, metric rulers and a
status line.
Access to the most important functions, tools and program options are available also in Hotkeys
(Hotkeys)
4
The panel of tools for work with files (Files)
The panel is intended for management of files of images, their adjustment and to access to the additional
information.
Buttons:
— Loading of the initial image or before the kept adjustment of parameters of engraving (Load
Picture / Etch Style). The Hotkey (Hotkey) — Ctrl+O.
— Preservation of options of parameters of engraving (Save Etch Style). The Hotkey — Ctrl+S.
— Preservation of options of parameters of engraving under other name (Save Etch Style as
…). The Hotkey — Shift+Ctrl+S.
— Export of the ready image to a format *.TIF/TIFF (Export). The Hotkey — Ctrl+E. At
preservation the standard window of a choice of the catalogue and the task of a name of a file is
caused. In the course of preservation the program requests the permission of a written down file. The
necessary permission can be chosen from the falling menu or to enter it manually.
— Serves for adjustment of brightness and contrast of the initial image (Brightness and
Contrast). The Hotkey — Ctrl+B. At use of this function there is a panel «Adjust Image» with
toddlers for change of current values of brightness and contrast.
The given values can be entered and in a manual mode (manual mode). At noted point (checkbox)
«Preview», all changes can be observed in real time in a window of the initial image. All options
of brightness and the contrast, distinct from initial, remain together with options of parameters of
engraving.
— A call of the given inquiry (Help). The Hotkey — F1.
— The information on the program (About Pro Etching).
5
The panel of tools for image viewing (Zoom/Preview)
The panel is intended for fast access to tools of scaling, measurements and viewing modes.
Buttons:
— The tool «Pan Tool» serves for moving of the increased image in a working window. A
hotkey — F4.
— The tool «Measure Tool» (the Hotkey — F5), is intended for various measurements, in
particular thickness of lines, distances between them, a corner of their inclination and so forth For
use of this tool it is necessary to position the index in an index point, to press the left key of the
mouse and, not releasing it to move the index in the necessary direction. Not releasing the left key
of the mouse to fix the index in the necessary point. In the left part of a status line index point coordinates, width and rectangle height in which the spent line is entered, a corner of an inclination
of a line and distance between initial and final points will be displayed.
— The tool «Zoom Tool», is intended for increase/reduction in scale of the image in a
working window. A hotkey — F6. For image increase it is necessary to click with the left key of
the mouse in the necessary part of the image. Thus the image will increase and positioned in a
working window concerning a point in which has been made cliques. For increase in any part of
the image it is necessary to press the left button of the mouse and keeping it to pull, establishing
an increase zone. For image reduction it is necessary to click with the left key of the mouse in the
necessary part of the image, keeping pressed a key «Alt». Everyone cliques reduces or increases
image scale by 25 %.
— The window of the falling menu «Choose scale of viewing», shows current value of
scale. For its change it is possible to enter numerical value manually, it is direct in this window,
and to press a key «Enter» or to choose in the falling menu one of the reestablished values from 25
% to 2000 %. At a value choice «To Width», the image will be increased or reduced on horizontal
borders of a working window. At a value choice «To Height», the image will be increased or
reduced on vertical borders of a working window (#8).
— The tool «Actual pixels» establishes image scale in a working window 1:1. The Hotkey —
Ctrl+1.
— The tool «Fit to Screen», allows increasing or reducing the image on the screen on borders
of a working window. A hotkey — Ctrl+0.
— Tool "Anti-aliased" (the Hotkey — F10), switches a mode of display with smoothing or
without it. The mode of display with smoothing is intended for more realistic display of result of
work of the program. It is necessary to remember, that at the included smoothing the image
6
portrayal on the screen occurs more slowly, than without smoothing. On unproductive computers
it can worsen comfort of work of the operator considerably.
In the program it is provided three modes of smoothing. To learn a current mode, it is necessary to
click with the right button of the mouse button "Anti-aliased".
In the dropping out menu the current mode is noted by a fat point. To replace a mode, it is
necessary to choose simply the mouse other point of the menu.
— The tool «View Mode», serves for switching of modes of viewing of the image in a
working window. Switching allows to look through the initial image and a corresponding variant
of an engraving in current scale. The button kind varies depending on the chosen mode of
viewing.
7
The panel of adjustment of parameters of an engraving (Hatching
parameters)
The user has possibility to choose shading type.
The panel is intended for change of parameters of the engraving which distinct from are used by default
or before kept options (Presets). Any parameters in fields of digital input can be changed to one unit at
use of keys of the cursor "upwards" and "downwards", or on ten units, at use of keys of the cursor
"upwards" and "downwards" with simultaneous deduction of a key «Shift». Transition between fields
occurs to use of a key of tabulation — «Tab».
Parameters of options:
— «Frequency», the parameter displaying quantity of strokes of an engraving on inch
or centimeter.
To choose units of measure — lines on inch or lines on centimeter — it is necessary to click with
the right button of the mouse on an icon of a lineature and in the appeared menu to choose
necessary value.
— «Wave», the parameter which is responsible for amplitude of lines of an
engraving. Zero value displays a straight line.
— «Angle (Degrees)», displays in degrees size of an inclination of primary lines of an
engraving from a vertical.
8
— «Type hatching». In the given window in real time
change of lines of an engraving on an example of a black-and-white gradient is visually displayed
at current options of engraving. The image in the field of viewing has the same scale, as the image
in a working window.
— «Light Tuning», serves for adjustment of secondary
white lines which are imposed on primary lines of an engraving, actually transforming them in a
dotted line. For inclusion of these options it is necessary to allocate (select) the given option
(checkbox). The toddler sets intensity white, and the parameter «Angle» allows to change a corner
of an inclination of these lines.
— «Shadows Tuning», serves for adjustment of secondary
black lines which are imposed on primary lines of an engraving. For inclusion of these options it is
necessary to allocate (select) the given option (checkbox). The toddler sets intensity black, and the
parameter «Angle» allows to change a corner of an inclination of these lines.
9
The panel of adjustment of zones of engraving (Zones Splitting)
The panel serves for adjustment of zones of engraving. Splitting into zones is necessary to avoid
monotony of strokes of an engraving. Thus in each next zone there is a change of a direction of shading.
Tools:
— In the program it is provided three kinds of splitting into
zones: Level (Levels), Gradient (Gradient) both Color (Color) and User ` s (User). At a choice
«Level» splitting into zones will occur depending on quantity of the white image in this or that
site. At a choice «Gradient» splitting into zones occurs depending on a gradient direction, i.e. from
a direction of transition from light to the dark. At a choice «Color» splitting into zones occurs
depending on presence of this or that colour in the given site of the image.
— The parameter «Zones Quantity» is responsible for quantity of zones with
a changing direction of lines of an engraving.
— The parameter «Blur» serves for adjustment of smooth transition between zones.
10
The panel of a choice of the kept options of engraving (Etching
Presets)
Displays kept before engraving adjustment.
Program Pro Etching is delivered with ten specially developed options simulating various styles of
engraving:
• Cross dash lines: crossing lines with dashes in light parts.
• Cross lines: crossing lines.
• Etching-1: a version of chisel etching imitation.
• Etching-2: a version of chisel etching imitation.
• Etching-3: a version of chisel etching imitation.
• Mezzotint: mezzotint etching imitation.
• One line: line raster.
• Reticulation: photographic reticulation (photo typing).
• Stochastic: stochastic raster imitation.
• Zinc: zincography imitation.
For application of style it is enough to click twice under its name.
If in this folder the user keeps new options of an engraving, they automatically will appear in the list
«Etching Presets».
In the course of work «styles by default» can be changed, however there is a possibility to return to their
initial installations. For this purpose it is necessary to click with the right button of the mouse on any style
and to choose «Restore default Presets» from the opened contextual menu. Thus the additional styles kept
by the user, remain untouched.
11
Window of the initial image, working window, metric rulers and
status line.
Window of the initial image. Shows the initial image, and also with a framework allocates on it the area
displayed in a working window. This allocation can be moved by means of the mouse. Thus the image in
a working window will move synchronously allocated area.
12
Working window. All actions which are spent over the image are reflected in a working window of the
program. The window can display only the initial image or only the result. Display modes can be operated
from the panel of tools "Zoom/Preview" by means of the tool «View Mode».
Metric rulers. Display the sizes of the image, and also a cursor position.
The program supports two systems of measurement, metric and inch. For switching between them it is
necessary to click the mouse on the pictogram of the beginning of co-ordinates of measuring rulers and in
the dropping out menu to choose the necessary system of measurement.
Status line. The line of the status shows the office information. It is divided into three parts:
1. Co-ordinates of the cursor or data of measurements at tool use «Measure Tool».
2. The sizes and the permission of the initial image.
3. A way to the initial image.
13
Hotkeys
Hotkeys — combinations of keys to which the appendix in an operating time can react.
1. Load Picture / Etch Style — Ctrl+O
2. Save Etch Style — Ctrl+S
3. Save Etch Style as … — Shift+Ctrl+S
4. Export — Ctrl+E
5. Brightness AND Contrast — Ctrl+B
6. Help — F1
7. Pan Tool — F4
8. Measure Tool—F5
9. Zoom Tool — F6
10. Actual pixels — Ctrl+1
11. Fit to Screen — Ctrl+0
12. Anti-aliased — F10
14
Mode of the manual task of areas of shading
In a mode of splitting into zones "User ` s" management of shading areas in a manual mode is possible.
For each zone probably to appoint the shading with certain parameters.
Example of use of a manual mode of division into zones.
15
Shadings
The linear:
The radial: (the Corner = 0)
The radial: (the Corner = 90)
The radial: (the Corner = 45)
Points:
The text:
Puantile:
16