1
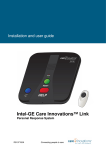
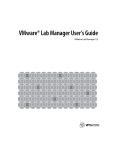
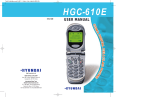
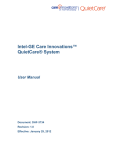
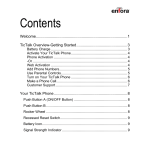
Link–Mobile Dashboard User Manual DHF-7715 Contents 1. Purpose of this Document .............................................................................................................. 4 2. Introduction ................................................................................................................................... 5 3. Accessing the Link–Mobile dashboard ........................................................................................... 5 3.1. Registering a New Equipment Set ........................................................................................... 5 3.2. Logging On ............................................................................................................................... 7 3.3. Logging Out ............................................................................................................................. 8 3.4. Recovering a Password ............................................................................................................ 8 3.5. Getting started ........................................................................................................................ 9 3.6. Navigating through the Dashboard ....................................................................................... 10 3.6.1. Top Menu Bar ................................................................................................................. 10 3.6.2. Breadcrumb Bar ............................................................................................................. 11 3.7. Using Maps ............................................................................................................................ 11 4. Managing Your Account ............................................................................................................... 12 4.1. User Profile ............................................................................................................................ 12 4.1.1. View User Profile ............................................................................................................ 12 4.1.2. Amend User Profile ........................................................................................................ 13 4.1.3. Update User Password ................................................................................................... 13 4.2. User Contacts ........................................................................................................................ 14 4.2.1. Viewing Contact Details ................................................................................................. 14 4.2.1.1. Details ...................................................................................................................... 15 4.2.2. Adding a new Contact .................................................................................................... 15 4.2.3. Amending Contact Details .............................................................................................. 16 4.2.4. Removing a Contact ....................................................................................................... 17 5. Managing Wearers ....................................................................................................................... 17 5.1. Accessing Wearer Details ...................................................................................................... 18 5.1.1. Zones .............................................................................................................................. 19 5.1.1.1. Adding a New Zone ................................................................................................. 21 5.1.1.2. Enabling / Disabling a Zone ..................................................................................... 23 5.1.1.3. Viewing a Zone ........................................................................................................ 23 5.1.1.4. Amending a Zone ..................................................................................................... 24 5.1.1.5. Removing a Zone ..................................................................................................... 26 5.1.2. Locate and Trace ............................................................................................................ 27 5.1.2.1. Highlighting a Location ............................................................................................ 27 5.1.2.2. Viewing More or Less Locations .............................................................................. 27 5.1.2.3. Filtering Locations ................................................................................................... 28 5.1.2.4. Address Lookup ....................................................................................................... 28 5.1.3. Notifications ................................................................................................................... 30 5.1.3.1. Viewing More or Less Notifications ......................................................................... 30 5.1.3.2. Filtering Notifications List ........................................................................................ 30 5.1.3.3. Viewing Notification Location ................................................................................. 31 5.1.4. Activity ............................................................................................................................ 32 Page 2 of 46 5.1.5. Profile ............................................................................................................................. 34 5.1.5.1. Viewing Wearer Details ........................................................................................... 35 5.1.5.2. Updating Wearer Information ................................................................................. 36 5.1.5.3. Clearing Wearer Photograph ................................................................................... 38 5.1.6. Contacts ......................................................................................................................... 38 5.1.6.1. Adding Contact to Wearer ....................................................................................... 38 5.1.6.2. Amending Contact for Wearer ................................................................................ 39 5.1.6.3. Ordering Emergency Contacts for Wearer .............................................................. 40 6. Safety/Regulatory Information .................................................................................................... 41 7. Contact us .................................................................................................................................... 45 Copyright © 2014 Intel-‐GE Care Innovations LLC. All rights reserved. Care Innovations, the Care Innovations logo, and the Caring Icon logo are trademarks of Intel-‐GE Care Innovations LLC. Intel and the Intel corporate logo are trademarks of Intel Corporation in the United States and/or other countries, used under license. GE and the GE Monogram are trademarks of General Electric Company in the United States and/or other countries, used under license. Page 3 of 46 1. Purpose of this Document This document will be accessible by all the Users of the Link–Mobile dashboard. Not all sections apply to all users as the level of access each User has to the Link–Mobile dashboard may vary. In case you require assistance, would like to provide feedback or you believe an amendment is required, please contact Customer Care: Telephone: (855) 885-‐CARE (2273) (M-‐F, 8am-‐5pm Pacific) E-‐mail : [email protected] Page 4 of 46 2. Introduction Care Innovations created Link–Mobile to help people summon and receive help within the early minutes after a life threatening event like a stroke, car accident, heart attack, or fall. Immediate access to help minimizes the concern of not being able to reach out in an emergency. Timely response can mean recovering faster and suffering less severe complications. Link-‐Mobile takes the best parts of the cell phone experience and marries it to a discrete Wristband that can be comfortably worn day and night. The Wristband can be set to manually or automatically trigger a notification to be sent to friends, neighbors, and loved ones or directly notify a 24-‐hour a day emergency monitoring center. We transformed the traditional PERS base station into a pocket sized device portable (the Clip) complete with two-‐way voice, making it easy to take along with you when you leave home. Carry the Clip in a purse, wear it on a belt, or clip it to a car’s seatbelt when driving. In the event of an incident, your notification along with your location will be sent automatically either to the Emergency Response Center or a text message and email can be sent to listed personal emergency contacts enabling the Communications Clip to receive calls. In addition to being ready to request help in an emergency, wearers and their approved viewers can observer their daily activity levels and set personal goals to encourage healthful movement and other activities. 3. Accessing the Link–Mobile dashboard The Link–Mobile dashboard is the online monitoring system that provides you the ability to manage your account. You can access the Link–Mobile dashboard via the following URL: https://www.Link-‐Mobile.com This site can be accessed from any approved internet-‐enabled device. Help details can be found in the HelpContact us section of this guide. 3.1. Registering a New Equipment Set Most users will have equipment registered for them at time of shipment. These users will receive an email containing their log in user name and password. If you did not receive this email, you may register a new set of equipment using the Navigate to the website given above in your preferred web browser and you will be presented with the login screen (as seen below). Click on the link to be taken to the registration page (see below). Page 5 of 46 Figure 1: New Set Registration Page This page allows you to enter the details of the new equipment and yourself. NOTE: Entering your details here will make you the Dashboard Account Owner. You will be able to grant access to view data related to the device from your account. The wearer is the individual typically wearing the Wristband and the person expected to summon help in an emergency. Follow these steps to register the new equipment set: 1. Enter the SET ID that accompanied your equipment into the ‘SET ID’ box provided. This can be found on your packaging and on the bottom of the Dock. 2. Enter your name, email address, telephone number and password into the spaces provided. 3. If you are going to the be the person that is physically wearing and using the devices, ensure that the ‘Register myself as a wearer in the system’ is set to ‘Yes’ . 4. If someone else will be wearing and using the equipment, ensure that the ‘Register myself as a wearer in the system’ is set to ‘No’. 5. Click to review, then move the ‘Agree to Terms and Conditions’ slider to Yes’ to indicate that you agree to the terms and conditions of use. 6. Click on the ‘Register’ button which will configure the equipment within the system to your account. You will be forwarded to the Link–Mobile dashboard home page (see section 3.5 onwards) from which you can manage your account as you wish. Page 6 of 46 3.2. Logging On During the ordering process, you were asked for an email. A welcome email was sent to this address along with a unique password to gain access to the Link–Mobile dashboard. If you are setting up a set manually, you will be asked for an email address. Your login details will be sent automatically to this email address. You will be required to verify your email address from this automated email. You will not be able to log onto the Link–Mobile dashboard until you have successfully verified your account. If you are having trouble verifying your account, please refer to 3.1 -‐ Registering a New or contact the Customer Care team (Contact details can be found in the Contact us section of this document). Figure 2: Link–Mobile dashboard login screen If you received a welcome email with user name and password, you may log into the Link–Mobile dashboard using the following steps: 1. Navigate to the Link–Mobile dashboard URL provided above. This is done by entering the address into the address bar of your internet-‐enabled web browser. 2. Enter your email address in the space provided for your username (see below). Figure 3: Email address entry box 3. Enter your password into the box provided (see below). Figure 4: Password entry box Page 7 of 46 4. Click the ‘Login’ button displayed to initiate the login process. If the login is successful, you will be presented with the Link–Mobile dashboard home page. If the login fails, you will be given a visual indication of the failure (see below) and you will be prompted to check and re-‐enter your login credentials. Figure 5: Login failure popup dialog 3.3. Logging Out To exit the dashboard, select “Exit” from the dropdown available in the upper right hand corner of the website. Figure 7: Logging Out of Link–Mobile Dashboard 3.4. Recovering a Password If you have forgotten your password that is required to log into the Link–Mobile dashboard, you can recover access by selecting the ‘Forgotten your password?’ option located on the Login page, see below. Page 8 of 46 Figure 8: 'Forgotten your password' link This will prompt you to enter the email address that is registered for your account. Click the ‘Submit’ button which will send an email to your registered email address with the necessary details for resetting your password. Please follow the instructions contained in the email to complete the password reset. If you have trouble, please contact the Customer Care team (Contact details can be found in the Contact us section of this guide). 3.5. Getting started Once you have successfully accessed the Link–Mobile dashboard by logging in, you will be presented with the following screen (see below): Page 9 of 46 Figure 6: The Link–Mobile dashboard landing page (single wearer) 3.6. Navigating through the Dashboard The Link–Mobile dashboard is designed to be a simple to use and navigate as possible. There are two easy ways of navigating around the Dashboard wherever you happen to be. 3.6.1. Top Menu Bar The Top Menu Bar, which is located at the very top of each page, will allow you to return to the ‘Home’ page (see below) wherever you happen to be within the Link–Mobile dashboard. Figure 7: Top Menu Bar Clicking the ‘Home’ option ( page. Page 10 of 46 ) from this menu bar will always take you back to the Home 3.6.2. Breadcrumb Bar The Breadcrumb Bar keeps a track of where you are at any point within the Link–Mobile dashboard. It is located towards the top of each page and will grow or contract depending on how deep you are into the Link–Mobile dashboard. Figure 8: Breadcrumb Bar The item listed to the very right of the Breadcrumb bar is the location you are currently viewing, with each step back to the left being the trail you have followed. To return to any point in the trail, click on that option in the Breadcrumb Bar. You can always return to the Home page by selecting the ‘Account Home’ ( 3.7. ) option. Using Maps Each map that is utilized within the Link–Mobile dashboard has a series of common controls. These are: Pan and Zoom bar: See below. This allows you to pan and zoom each map, it allows you to find the location on the map that you require. Figure 9: Pan and Zoom bar Download PDF Button: This button allows you to open a PDF copy of the currently configured map along with a number of data points. You may save or print the map using the browser dialog box. Page 11 of 46 Map Type Panel: This option allows you to select the map rendering engine that you wish to use. To activate the panel, click the ‘Expand’ button show the panel (see below). at the top right hand side of the map, which will Figure 10: Map Renderer panel 4. Managing Your Account The Link–Mobile dashboard provides you with a number of areas to configure and maintain details related to your account. 4.1. User Profile As you have access to the Link–Mobile dashboard, you have a Profile that contains details required for the successful running of your devices and user account. 4.1.1. View User Profile To view the details for your User account, follow these steps: 1. Click on your name in the top right hand corner of the Link–Mobile dashboard (see below). Figure 11: User options drop down list 2. This will display the options available for your account. Click on the ‘Profile’ option. 3. This will display the User Profile Page that contains the functionality for updating your name, telephone number and password, see below. Page 12 of 46 Figure 12: User Profile Page 4.1.2. Amend User Profile To amend the details of your User Profile, follow the steps in section 4.1.1 above and then: 1. Update the details required. 2. Click the ‘Update’ button at the bottom of the page to commit the changes to the system. 3. A visual indication will be provided to confirm the successful update. 4.1.3. Update User Password To change your login password, follow the steps in section 4.1.1 above and then: 1. Select the ‘Yes’ option below ‘Update Password’ to display the password controls (see below). Figure 13: Update Password option 2. Enter your current password in the ‘Current Password’ box. 3. Enter your new password in the ‘New Password’ box. 4. Confirm your new password in the ‘Confirm New Password’ box. 5. Click the ‘Update’ button at the bottom of the page to commit the changes to the system. 6. A visual indication will be provided to confirm the successful update. Page 13 of 46 7. You will also receive an email confirming that you have successfully changed your password. This is for security reasons. 4.2. User Contacts The User Contacts section allows you to configure your ‘Contacts Book’ for your account. Once you have configured a Contact in the User Contacts section, you can then associate these Contacts with Wearers in the Wearer Contacts. When you load the User Contacts page, you will be given a list of currently configured Contacts for your account, see below. From here you can manage these Contacts or add new Contacts as required. Figure 18: User Contacts page 4.2.1. Viewing Contact Details To view the current details of a Contact, follow these Steps: 1. Navigate to the User Contacts page where the list of currently configured User Contacts is displayed. 2. Click on the Contact that you wish to view. 3. The system will take you to the User Contact Details Page with all the details for that Contact displayed (see below). Page 14 of 46 Figure 19: User Contact Edit Page The details for each Contact are broken down into a number of collapsible panels. These panels are described below. 4.2.1.1. Details This screen provides the core information that is required for the Contact. Required fields are indicated by the bold text of the label describing it. The Details Panel includes: • • • • • • • 4.2.2. Salutation, First name, Last name, Photograph. Primary contact number, SMS Number (NOTE: Message rates from their cellular carrier may apply!) Email Address Adding a new Contact To add a new Contact to your account, follow these steps: Page 15 of 46 1. Navigate to the top menu and select Global Contacts. Figure 23: Associated Wearer Panel 2. Click the ‘Add Contact’ button in the top right hand corner of the page. 3. The system will display the Add Contact page that contains the Details, General and System Access Panels described above. Enter the necessary details into the spaces provided (see below). Figure 14: Contact Add Page 4. Once complete Details and General tab, click the ‘Add’ button located at the bottom of the page. 5. The system will add the Contact as requested and return you to the User Contacts List Page. 4.2.3. Amending Contact Details To amend the details of a Contact, follow the steps outlined in 4.2.1 and make any changes to the information required on the panels displayed. Once you are satisfied with the changes click the ‘Update’ button Page 16 of 46 at the bottom of the page to commit the changes to the system. 4.2.4. Removing a Contact To remove a Contact, follow these instructions: 1. Hover over the tile that represents the Contact that you wish to remove. This will display the ‘Remove’ icon in the top right hand corner of the tile (see below). Figure 15: Remove Contact icon 2. The system will display a confirmation dialog asking you to confirm that you wish to delete the Contact (see below). Figure 16: Delete Contact confirmation dialog 3. To confirm to deletion of the Contact, click ‘Yes’ button . To keep the Contact, click the ‘No’ button . 4. The system will provide confirmation of the deletion and the Contact will no longer appear as a tile on the User Contact List Page. 5. Managing Wearers The Link–Mobile dashboard Home page will display a list of all the Wearers that your account has access to view. These will be presented a grid of tiles that contain a photo (if supplied) and overview details, see below. Page 17 of 46 Figure 27: Wearer Tile Grid (multiple Wearers) The process of managing and maintaining Wearers will always start from this view. 5.1. Accessing Wearer Details To access the details of a particular Wearer, simply click on the tile within the Grid that represents the required Wearer. This will display the Wearer page that contains the various options that are now available to you. You may register a location for the Dock. This allows the unit to conserve battery power by disabling GPS while in range of the Dock. WARNING: It is important to update this address should you relocate the Dock. Failure to do so can result in incorrect location reporting. You may also put the Clip and Wristband into a very lower power mode to comply with FAA regulations by toggling the “airplane” mode button to ON. You can return the device to normal power by returning the Clip and Wristband to your powered Dock or by squeezing both buttons. Page 18 of 46 Figure 28: Wearer Account Summary The following sections outline the functionality provided by each option. 5.1.1. Zones ‘Zones’ define the areas that a Wearer is permitted to be. Each Zone is defined by a geospatial area and a time frame for which the area is to be monitored. When you first click on the ‘Zone’ tile from the Wearer Settings page, a list of the currently defined Zones for the selected Wearer will be displayed, see below. Page 19 of 46 Figure 29: Zone list Each tile in the Zone list gives an overview of the Zone and its current status. This is explained below. A B C D E Figure 30: Zone Tile description A: B: C: D: Name of the Zone. Zone status. If set to ‘On’, the Zone is currently being monitored. This is the time of day that the Zone starts and ends being monitored. These are the days of the week that the Zones is monitored. E: This is the active ‘indicator’. The cloud symbol means that the Zone is being download to the device, the tick symbol indicates that the Zone has been successfully downloaded to the device. Page 20 of 46 5.1.1.1. Adding a New Zone To add a new Zone, follow these instructions: 1. Click on the ‘Add a Zone’ button Zone list page. located in the top right hand corner of the Figure 31: Add Zone page 2. This will display the Add Zone page 3. Enter the name of the Zone in the Name box Figure 17: Zone Name box 4. Enter the complete street address or simply a zip code near the location of the Zone area into the ‘Enter the address or zip code that the zone will reside’ box (see below). Page 21 of 46 Figure 18: Zone location search box 5. Click the ‘search’ button next to that box. The map will then center on the location entered. If this location is wrong, follow steps 4 and 5 again. You may move around the map using the map control buttons. You may also select to view streets, hybrid, satellite and other map views. 6. Define the Zone area on the map by clicking on the map to place markers which indicate the corners of the Zone (see below). You may make up to 8 points per map. When the Zone has been defined on the map, double click on the last placed marker. The Zone will turn orange. Figure 34: Defining Zone on the map 7. Set the type of zone. Safe zones are areas you expect the Wearer to be in. Unsafe zones are areas you expect the Wearer to not enter. Enter the date and time parameters for the Zone in using the Date and Time parameter controls (see below) Page 22 of 46 Figure 35: Zone Date and Time Parameters 8. Once you have defined all the required parameters, click on the ‘Add’ button . 9. The system will commit these details and once successfully completed, a visual indication will be given and you will be returned to the Zones list grid. 5.1.1.2. Enabling / Disabling a Zone To enable or disable a Zone, follow these steps: 1. Locate the tile in the Zone list grid that you wish to enable or disable. 2. To enable the Zone, slide the slider in the top right hand corner to the ‘ON’ position . 3. To disable the Zone, slide the slider to the ‘OFF’ position 5.1.1.3. . Viewing a Zone To view a Zone, simply click on the required Zone tile from the list displayed. This will load the Zone page that displays the details for the selected Zone Page 23 of 46 Figure 36: Zone page 5.1.1.4. Amending a Zone To amend a Zone, follow these steps: 4. Follow the instructions for ‘Viewing a Zone’ (section 5.1.1.3) to load the Zone details page displaying the Zone configuration. 5. Update the required details on the page. This includes: a. The Zone. This is completed by clicking and moving the points of the defining zone on the map provided (see below). Page 24 of 46 Figure 19: Zone Map b. The Zone name in the name box Figure 20: Zone Name box c. The date and time parameters for the Zone Page 25 of 46 Figure 21: Zone Date and Time parameters 6. Once all the necessary amendments have been made, click the Update button to commit the changes. 7. When successful, the system will give a visual indication that the update was successful and you will be returned to the Zone list page. 5.1.1.5. Removing a Zone To remove a Zone, follow these instructions: 5. Hover over the tile that represents the Zone that you wish to remove. This will display the ‘Remove’ icon in the top right hand corner of the tile (see below) Figure 22: Remove Zone icon 6. The system will display a confirmation dialog asking you to confirm that you wish to delete the Zone (see below) Figure 23: Delete Zone confirmation dialog 7. To confirm to deletion of the Zone, click ‘OK’ button ‘Cancel’ button Page 26 of 46 . . To keep the Zone, click the 5.1.2. Locate and Trace ‘Locate and Trace’ provides the ability for you to view the location of the Wearer for any given time period (while a device has been assigned to that Wearer). Locate displays both a map of the Wearer locations as well as a list of historic locations. Data is available reaching back up to six months. By default, the Locate page will display the last 10 locations for the selected Wearer. The Locate and Trace page is shown below. 5.1.2.1. Highlighting a Location To highlight a location that is listed in the locations grid, simply click the ‘Locate’ icon that is associated with that record. This will zoom and centre the map about the selected location and display the date and time that the location was recorded Figure 24: Locate Page 5.1.2.2. Viewing More or Less Locations To change the number of locations that are displayed on the map or in the locations grid, change the value in the ‘Number per page’ control at the bottom of the grid. The options are 10, 25, 50 or 100 locations. Figure 46: Number per page control Page 27 of 46 5.1.2.3. Filtering Locations The Locate page also allows you to filter the displayed locations by a date and time range. This allows you to view historic locations for the Wearer. To filter the locations follow these steps: 1. Navigate to the Locate page for the selected Wearer. 2. Under the displayed map you will see a ‘Search Criteria’ box that allows you to end the date and time range required (see below) Figure 25: Date Range selection box 3. Enter the required start date in the ‘Start Date’ controls (see below). Figure 48: Start Date control 4. Enter the required end date in the ‘End Date’ controls. 5. Click the ‘Search’ button to execute the filtering. 6. The system will automatically fill the grid and update the map with any locations that meet the date range specified. 5.1.2.4. Address Lookup By default, the locations grid will display the Wearer locations with a latitude and longitude as the location. This is because the Link–Mobile dashboard does not carry out any address lookups by default. You can look up the street address for each of these latitude and longitude values one of two ways. The first method is to click the ‘lookup’ option next to the latitude and longitude you wish to lookup. The second option is to check one or more of the check boxes that are listed next to the locations in the grid. Once you have checked the boxes against all required locations, click the ‘Address Lookup’ button in turn. Page 28 of 46 and the system will look up each selected address Figure 49: Location check boxes checked. Page 29 of 46 5.1.3. Notifications ‘Notifications’ provide the ability for you to view a history of events reported for the Wearer by their associated devices. By default, the Locate page will display the last 10 notifications for the selected Wearer. The Notifications page is shown below. Figure 26: Notification Page 5.1.3.1. Viewing More or Less Notifications To change the number of notifications that are displayed in the list, simply change the value in the ‘Number per page’ control at the bottom of the grid. The options are 10, 25, 50 or 100 locations. Figure 27: Number per page control 5.1.3.2. Filtering Notifications List The Notifications page also allows you to filter the displayed notifications by a date and time range. This allows you to view historic notifications for the Wearer. To filter the notifications follow these steps: 1. Navigate to the Notifications page for the selected Wearer. 2. At the top of the page you will see a ‘Search Criteria’ box that allows you to end the date and time range required (see below) Page 30 of 46 Figure 28: Date Range selection box 3. Enter the required start date in the ‘Start Date’ controls (see below). Figure 29: Start Date control 4. Enter the required end date in the ‘End Date’ controls. 5. Click the ‘Search’ button to execute the filtering. 6. The system will automatically fill the list with any notifications that meet the date range criteria specified. 5.1.3.3. Viewing Notification Location To view the location of a particular notification, click the ‘Locate’ icon that is associated with that notification in the list. This show a popup map that is zoomed and centred about the selected notification location, see below. Page 31 of 46 Figure 54: Notification location map popup 5.1.4. Activity ‘Activity’ provides the ability to view relative activity levels of the Wearer based on by their associated Wristband. By default, the Activity page will display the last seven days of activity. The Activity page is shown below. Page 32 of 46 Figure 55: Activity graphic These may be helpful in spotting on changes in Wearer’s activity patterns. Alerts can be configured should activity fall low during the day or go high during the night. Select and drill into any particular day to see activity by hour. Page 33 of 46 5.1.5. Profile The Profile page allows you to view and manage the details and information that is configured for the selected Wearer. The information is split into a number of sections that are displayed on the page in collapsing panels, see below. From this page you can update any of the details listed for the Wearer (including the photo associated with the account). It is important that these details are kept up to date in the case of emergency. Each panel contains a number of fields of which some are mandatory. These mandatory fields are identified by the asterisk next to the fields. Page 34 of 46 Figure 30: Wearer Profile page 5.1.5.1. Viewing Wearer Details As stated above, the Wearer details are split across a number of collapsible panels on the Profile page. Each of these panels is described below: 5.1.5.1.1. Details The Details contain the basic information related to the Wearer. This includes: • • Set Associated (found on product packaging and bottom of Dock) Salutation, Page 35 of 46 • • • • • • • • First name, Last name, Email address, Time Zone Date of birth, Gender, Contact telephone number, Photograph The Emergency Information section contains the information that is used in the event of an emergency. This includes local numbers (NOTE: do not enter “911”, enter the local number including area code to direct dial to these services): • • • • • • • Language Spoken, Hospital of Preference, Police Telephone Number, Ambulance Telephone Number, Hidden Key Location, Hospital Telephone Number, Fire Telephone Number. The address panel holds the address information for the selected Wearer. This includes: Address line 1 (street), 2 (apartment), City, State, Zipcode The Appearance section contains the information that can be used to positively identify the Wearer is required. This includes: • • • • • • • • • Ethnicity, Height, Hair Color, Blood Type, Build, Complexion, Eye Color, Glasses, School or Work – a place to enter alternative addresses. The Medical section allows you to provide details on any drugs that are taken regularly by the Wearer and any medical conditions that the Wearer suffers from. 5.1.5.2. Updating Wearer Information To update the Wearer information, correct any incorrect information on the relevant section and once completed, click the ‘Update’ button Page 36 of 46 at the bottom of the page. To update the photograph for the selected Wearer, follow these steps: 1. Navigate to the Wearer Profile page for the Wearer. 2. Expand the ‘Details’ panel (see below) 3. Click on the ‘Change Photo’ button panel. 4. This will display the ‘Upload New Image’ dialog box in the bottom right hand side of the Figure 31: Upload new image dialog 5. Click the ‘Browse’ button from the dialog to locate the image file on your computer using the ‘Open File Dialog’ Figure 32: Open File Dialog 6. Click on the file required and click the ‘Open’ button Page 37 of 46 at the bottom of the dialog. 7. This will close the Open File Dialog and return you to the ‘Upload New Image’ dialog box with the path to the file included. 8. Click the ‘Upload’ button to upload the new photograph file. 9. The system will provide visual confirmation that the upload was successful Figure 33: Wearer photo updated successfully notification 5.1.5.3. Clearing Wearer Photograph To clear the photograph for the selected Wearer, follow these steps: 1. Navigate to the Wearer Profile page for the Wearer. 2. Expand the ‘Details’ panel (see below) 3. Click on the ‘Clear Photo’ button in the bottom right hand side of the panel. 4. The system will remove the photograph associated with the Wearer account and provide a visual indication it was successful. 5.1.6. Contacts Each Wearer will have a number of Contacts assigned to it that will be alerted or contacted in the event of an emergency or notification generated by the device. The Contacts Page allows you to configure the Contacts for the selected Wearer. This includes parameters specific to that Wearer / Contact pair, and also the order in which Emergency Contacts are contacted by the Monitoring Centre. Figure 34: Contacts Page 5.1.6.1. Adding Contact to Wearer Any Contact that has been correctly configured in the User Contacts section (see x) can be added to each Wearer on your account. To associate a Contact with a Wearer, follow these steps: 1. Navigated to the Contacts Page for the required Wearer. Page 38 of 46 2. Select the Contact from the ‘Select Contact’ drop down list Figure 35: Select Contact drop down list 3. Click the ‘Add’ button to add the Contact to the Wearer. 4. Confirmation that the Contact has been added to the Wearer will be displayed. Figure 36: Contact added confirmation 5. The selected Contact will now appear in the Contact list for the Wearer. 5.1.6.2. Amending Contact for Wearer To amend the settings for an associated Contact, click on the required Contact in the Contact list to display the settings panel on the right hand side Figure 37: Setting Panel Page 39 of 46 The settings that can be amended are: Has Key: This indicates whether the Contact has a key for the Wearer’s primary residence and can gain access in an emergency. Available as Responder: Indicates whether the Contact is available to respond to the Wearer in the event of an emergency. Relationship: The relationship that the Wearer and Contact share. Contact Times: The days of the week and times of day that the Contact can be contacted regarding the Wearer. Notify in Event of: This section indicates which alerts that will result in the Contact being notified. These are: • • • • • • • Panic – if the Wearer activates the Panic alarm on a device. Zone – if the Wearer violates an exclusion or inclusion zone. Low Battery – if the Wearer’s device detects a low battery level. Fall – if the Wearer’s Wristband indicates they have fallen Out of Range – Indicates the distance between the Wristband and Clip has exceeded effective range. This could indicate the Wearer has left the Clip behind on the Dock and exited the residence or moved into an area of the residence with interference from structure or other devices. Carrying the Clip while leaving the residence or straying into these areas will help ensure communications with monitoring center computers. No Comms – Indicates the Clip is no longer in an area where cell phone coverage is available. This will delay or even prevent alert signals from reaching the monitoring center computers. Activity Mon – Indicates the Wear’s activity has exceeded either high or low thresholds established on the Activity monitoring page. You can update the settings as required and, when satisfied, click the ‘Update’ button commit the changes to the system. 5.1.6.3. to Ordering Emergency Contacts for Wearer To update the order that the Emergency Contacts are contacted for a Wearer, follow these steps: 1. Navigated to the Contacts Page for the required Wearer. 2. Scroll to the bottom of the page and find the ‘Sort Emergency Contacts’ section, see below. Page 40 of 46 Figure 38: Sort Emergency Contacts section 3. Drag and drop the listed Contacts into the required order. 4. Once satisfied with the selected order, click the ‘Update Order’ button 5. The system will confirm that the ordering has been successfully saved. 6. . Safety/Regulatory Information Installation Guidelines 1) 2) 3) 4) 5) 6) 7) 8) 9) 10) Read and understand all instructions and save them for future reference. Follow all warnings and instructions marked on the product. Do not install Charging Dock near a bath tub, sink, or shower. Operate this device using only the power source that is indicated on the marking label. If you are unsure of the power supply to your home, consult with your dealer or local power company. Do not place this product on an unstable cart, stand, or table. This product may fall, causing serious damage to the product. Adjust only those controls that are covered by the operating instructions. Improper adjustment of other controls may result in damage and will often require extensive work to restore the product to normal operation. Clean this product with a soft, damp cloth. Do not use chemicals or cleaning agents to clean this device. Use only the power supply that came with this unit. Using other power supplies may damage the unit. Because this device operates on electricity, you should have at least one device in your home that could operate without electricity in case the power in your home goes out. To avoid interference to nearby appliances, do not place the base of the device on or near a TV, microwave oven, or VCR. Safety Information for Your Device Read this information before using your device. Driving safety Talking on the Communications Clip while driving can distract the driver, result in extreme danger and may be illegal in some states. Remember, safety comes first. Check the laws and regulations on Page 41 of 46 the use of device in the areas where you drive. Always obey them. If you must use your device while driving, please: • Give full attention to driving. Driving safely is your first responsibility. • Pull off the road and park before making or answering a call. An air bag inflates with great force. DO NOT place objects, including either installed or portable wireless equipment, in the area over the air bag or in the air bag deployment area. If in-‐vehicle wireless equipment is improperly installed and the air bag inflates, serious injury could result. Electronic devices Your mobile personal emergency response device is a wireless telephone. When it is ON, it receives and also sends out radio frequency (RF) signals. Most modern electronic equipment is shielded from RF energy. However, certain electronic equipment may not be shielded against the RF signals from your wireless device. Therefore, use of your device must be restricted in certain situations. Pacemakers The Health Industry Manufacturers Association recommends that a minimum separation of six (6) inches be maintained between a device and a pacemaker to avoid potential interference with the pacemaker. These recommendations are consistent with the independent research and recommendations of Wireless Technology Research. Never come closer than six (6) inches to a person with a heart pacemaker implant when using your device. Doing so could result in interference with the function of the pacemaker. Persons with pacemakers: • ALWAYS keep the device more than six (6) inches from your pacemaker when the device is turned on. • Do not carry the device in a breast pocket. • Use the ear opposite the pacemaker to minimize the potential for interference. • If you have any reason to suspect that interference is taking place, turn your device OFF immediately. Important Safety Instructions Follow these safety precautions when using your device to reduce the risk of fire, electric shock, and injury to persons or property: 1) Keep all vents and openings of the Communications Clip unblocked. Do not set the device on a heating register or over a radiator. Insure that proper ventilation is provided at the installation site. 2) Link–Mobile Wristband is water-‐proof (splash/rain resistant) IPX6 certified, it offers superior water protection. It can sustain temporary immersion in one meter (39 inches) of water for up to 30 minutes, so you can wear it while in the shower. However, it’s not suitable for extended and continuous water submersion, such as swimming, snorkelling, diving. Any misapplied usage of the device in water submersion conditions may cause permanent damage or may cause it to malfunction. 3) Do not allow anything to rest on the charging Dock. 4) Place the A/C adaptor cable so that it will not be walked on. 5) Never insert objects of any kind into the product slits as that may result in fire or shock. 6) Unplug this product from the wall outlet before cleaning. 7) Do not use liquid cleaners or aerosol cleaners. Use a damp cloth for cleaning. 8) Do not disassemble this product. If service or repair work is required, contact the customer service helpline found in this user’s guide. 9) Do not overload wall outlets and extension cords. 10) Avoid using during an electrical storm. 11) Use a surge protector to protect the equipment. Page 42 of 46 12) Do not use this device to report a gas leak, especially if you are in the vicinity of the gas line. Charger Charger safety The charger designed by Personal Communications Devices for this unit requires the use of a standard 120 V AC power source for its operation. • Never attempt to disassemble or repair a charger. • Never use a charger if it has a damaged or worn wall charger cable or plug. • Always contact a Personal Communications Devices authorized service center, if repair or replacement is required. • Never alter the AC cord or plug on your charger. If the plug will not fit into the available outlet, have a proper outlet installed by a qualified electrician. General Safety Precautions Your device is a high quality piece of equipment. Before operating, read all instructions and cautionary markings on the product, battery and adapter/charger. Failure to follow the directions below could result in serious bodily injury and/or property damage due to battery liquid leakage, fire or rupture. • • • • • DO NOT use or store this equipment in a place where it will be exposed to high temperatures, such as near an open flame or heat-‐emitting equipment. DO NOT drop your device or subject it to severe shock. When not using, laydown the unit to avoid possible damage due to instability. DO NOT expose this equipment to rain or spilled beverages. DO NOT use unauthorized accessories. DO NOT disassemble the device or its accessories. If service or repair is required, return unit to an authorized Personal Communications Devices cellular service center. If unit is disassembled, the risk of electric shock or fire may result. Page 43 of 46 FCC This device complies with Part 15 of FCC Rules including interference that may cause undesired operation.. Operation is subject to the following two conditions: (1) This device may not cause harmful interference, and (2) This device must accept any interference received. This equipment has been tested and found to comply with the limits for a Class B digital device, pursuant to part 15 of the FCC Rules. These limits are designed to provide reasonable protection against harmful interference in a residential installation. This equipment generates uses and can radiate radio frequency energy and, if not installed and used in accordance with the instructions, may cause harmful interference to radio communications. However, there is no guarantee that interference will not occur in a particular installation. If this equipment does cause harmful interference to radio or television reception, which can be determined by turning the equipment off and on, the user is encouraged to try to correct the interference by one or more of the following measures: -‐ Reorient or relocate the receiving antenna. -‐ Increase the separation between the equipment and receiver. -‐ Connect the equipment into an outlet on a circuit different from that to which the receiver is connected. -‐ Consult the dealer or an experienced radio / TV technician for help. Compliance with Other FCC Regulations Operating procedures Never violate any of the following Rules and Regulations of the FCC when using your device. Such violations are punishable by fine, imprisonment or both. • Never use obscene, indecent, or profane language. • Never use your device to send false distress calls. • Never wiretap or otherwise intercept a phone call, unless you have first obtained the consent of the parties participating in the call. • Never make any anonymous calls to annoy, harass, or molest other people. • Never charge another account without authorization, to avoid payment for service. • Never wilfully or maliciously interfere with any other radio communications. • Never refuse to yield the line when informed that it is needed for an Emergency Call. Also, never take over a line by stating falsely that it is needed for an emergency. Page 44 of 46 7. Contact us Questions? Require assistance? Contact Customer Care Telephone: (855) 885-‐CARE (2273) (M-‐F, 8am-‐5pm Pacific) E-‐mail: [email protected] DHF-7715 Revision History Author Frank Napoleon, Jr Frank Napoleon, Jr Frank Napoleon, Jr Frank Napoleon, Jr Page 46 of 46 Version 0.1 0.2 0.3 1.0 Date March/10/2014 May 2, 2014 June 23, 2014 Oct 22, 2014 Comments Initial draft Cleaned Images Update to match SW Update to match release