1
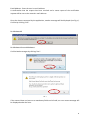
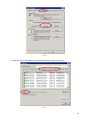
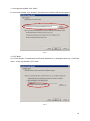
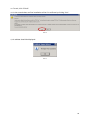
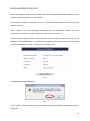
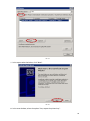
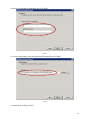
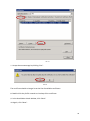
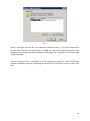
"Trade Repository" User Guide Version 1.0 Table of Contents System Requirements ........................................................................................................................... 3 Access to the Trade Repository ............................................................................................................ 4 First Use .................................................................................................................................................. 4 Certification Request............................................................................................................................. 5 Certification Request Status .............................................................................................................. 11 Installing the CA Certificate (only for Windows Vista and Windows 7) .......................................... 13 Installing User Certificate ................................................................................................................... 17 Backup of User Certificate .................................................................................................................. 18 Installing User Certificate with Strong Private Key Protection Option (Optional) ........................ 23 Revocation Of Certificate .................................................................................................................... 27 Trade Repository User Login .............................................................................................................. 30 Trade Repository Functions ................................................................................................................ 32 1. Multiple Transaction Information File Upload ...................................................................... 32 2. Manual Transaction Registration ........................................................................................... 32 3. Manual Transaction Modification .......................................................................................... 32 4. Viewing Transaction History ................................................................................................... 33 2 SYSTEM REQUIREMENTS 1. Operating system: Windows XP, Windows Vista or Windows 7 plus the latest Service Pack Permissions to write in the Windows certificate store Installed controller xenroll.dll for Windows XP (default installation during system installation in the folder C:\windows\system32) or certenroll.dll for Windows Vista and Windows 7 2. Web browser: Microsoft Internet Explorer version 6.0 or higher Cookies enabled Permissions to enable Microsoft ActiveX controls 3 ACCESS TO THE TRADE REPOSITORY FIRST USE Before using the Trade Repository, users must do the following: 1. Check the minimum system requirements specified in the section “System Requirements”. 2. File a certification request. For details, see the section “Certification Request”. 3. Send to KDPW the original declaration to the certification request which confirms that the certification request has been filed. For details, see the section “Confirming the Certification Request”. 4. Install the certificate according to the section “Installing User Certificate”. 5. Make a back-up copy of the security certificate. For details, see the section “Backup of User Certificate”. 6. Log in the Trade Repository. For details, see the section “Trade Repository User Login”. 4 CERTIFICATION REQUEST In order to issue a certificate, file a certification request by means of completing a relevant form available on the KDPW website under Business Trade Repository Application. When the page opens, the system may display a message which requests the user to enable the Microsoft Certificate Enrollment Control add-on for Windows XP or the Certificate Enrollment Control for Windows Vista and Windows 7. Click the highlighted bar and select the option “Run Add-on” for Windows XP (see Fig. 1) or “Run ActiveX Control” for Windows Vista and Windows 7 (see Fig. 2). Windows Vista and Windows 7 users should additionally change the security level for the selected internet zone. Open the browser preferences by clicking the menu Tools Internet Options and select the tab Security. Select the zone “Internet” and click “Custom Level”. Under the option “Initialise and script ActiveX controls not marked as safe” select “Prompt”. Accept the settings by clicking the button “OK”. for Windows XP FIG. 1 for Windows Vista and Windows 7 FIG. 2 The forms for direct participants (see Fig. 3) and indirect participants (see Fig. 4) are available on the website. Enter all data necessary to send the certification request. The fields marked with an asterisk are mandatory. After you have completed the form, select the option “Find participants”. If the user data are correct, select the option “Send request”. 5 FIG. 3 6 FIG. 4 Description of the form: All fields in the form are mandatory. First Name - Enter the user’s first name, no more than 256 characters. Last Name - Enter the user’s last name, no more than 256 characters. Participant's ID - Enter the participant’s identifier in the format CCNIP where CC is the country code and NIP is the user’s tax identification number (no hyphens), e.g., PL1234567890. Direct Participant's ID - Enter the direct participant’s identifier in the format CCNIP where CC is the country code and NIP is the direct participant’s tax identification number (no hyphens), e.g., PL1234567890. 7 Email Address - Enter the user’s e-mail address. A confirmation that the request has been received and a status report of the certification request will be sent to the entered e-mail address. Once the data are accepted by the application, another message will be displayed (see Fig. 5). Confirm by clicking “Yes”. For Windows XP For Windows Vista and Windows 7 Confirm both messages by clicking “Yes”. FIG. 5 If the entered data are incorrect or mandatory fields are left void, an error reason message will be displayed under the form. 8 If the form is completed correctly, after the user clicks “Send request”, the following message will be displayed: Certification request No. Number for user First name Last name has been accepted for execution on YYYY-MM-DD at HH24:MM:SS. The declaration to be sent to KDPW and the activation code below will be sent to the e-mail address entered in the request. Your activation code fe970a5d429fd2e76f2f415c90966a28 FIG. 6 A message confirming that the certification request has been accepted will be sent to the e-mail address entered in the form, together with the Declaration for the Certification Request, which should be signed by the authorised representatives and delivered to KDPW in the original. If the request is accepted or rejected, a feedback message will be sent. Message topic: Trade repository – acceptance of the certification request No. XXXX. Message content: Certification request No. XXXX for user First name Last name has been accepted for execution on YYYY-MM-DD at HH24:MM:SS. To confirm the request, the attached declaration for the certification request must be signed by the authorised representatives and delivered to KDPW in the original together with the following activation code: Your activation code fe970a5d429fd2e76f2f415c90966a28 The declaration for the certification request is attached to this message. FIG. 7 The Declaration for the Certification Request is generated automatically on the basis of the data entered in the registration form. Note !!! A certification request and a private key are saved in the user’s system profile of the computer from which the request was sent. If the user is deleted from the system or information of the generated request is lost (lack of access to the computer from which the request was sent ), 9 the form has to be completed once again and the certification request has to be re-sent. The list of registered requests can be viewed under the Certificates tab available in the Microsoft Management Console (MMC) or by entering the command “certmgr.msc” in the Run window. 10 CERTIFICATION REQUEST STATUS Upon receipt of the declaration for the certification request and a check of signatures in the declaration, KDPW decides whether to approve the filed certification request. If the data delivered match the data entered in the request and the signatures match the signatures in the card of specimen signatures delivered to KDPW, the certification request will be approved. Otherwise, the request will be rejected. The approval or rejection of the request is notified to the user in an e-mail message sent to the e-mail address entered in the request. If the request is approved, the user receives the message shown in Fig. 8 and can download the certificate and install it in the user profile. Message topic: Trade repository – approval of the certification request No. XXXX Message content: Certification request No. XXXX for user First name Last name of YYYY-MM-DD has been approved. To install the certificate, follow these instructions: 1. (Only for WINDOWS VISTA and WINDOWS 7) Download the CA certificate by clicking the link below and install the certificate according to the CA certificate installation instructions in the user guide: http://csp.kdpw.pl/pki/KDPW%20Root.crt 2. Download the user certificate by clicking the link below and install the certificate according to the user certificate installation instructions in the user’s manual: http://www.kdpw.pl/Strony/certrsp.aspx?ActivationCode=fe970a5d429fd2e76f2f415c90966 a28 FIG. 8 If the request is rejected, the user receives the message shown in Fig. 9. 11 Message topic: Trade repository – rejection of the certification request No. XXXX. Message content: Certification request No. XXXX for user First name Last name of YYYY-MM-DD has been rejected. Rejection reason: Content depending on rejection reason To issue a certificate, complete the certification form again and send a new declaration for the certification request. For detailed explanations, contact the Operator (e-mail: [email protected]) or send the request again. FIG. 9 12 INSTALLING AND THE CA CERTIFICATE (ONLY FOR WINDOWS VISTA WINDOWS 7) For Windows XP, ignore this section. Before installing the CA certificate, make sure that the system requirements specified in the section “System Requirements” are fulfilled. The certificate should be installed only in Windows Vista and Windows 7 in the user’s system account from which the certification request was sent. Upon receipt of an e-mail message confirming that the certification request has been approved, the CA certificate may be installed by means of clicking the link in point 1. Please follow these installation instructions: 1. Click the link in point 1 provided in the e-mail message and save the file, e.g. on the user desktop. The file name is “KDPW Root.crt”. 2. Launch the Internet Explorer. 3. In the browser menu, select the option Tools Internet Options. 4. Select the tab “Content”. The tab “Content” may not be visible if the user’s access to the certificate store is restricted in the system. To get access, contact the local administrator of your computer. 5. Click the button “Certificates”. 13 FIG. 10 6. Select the tab “Trusted Root Certification Authorities” and click “Import”. FIG. 11 14 7. In the pop-up window, click “Next”. 8. In the next window, click “Browse” and select the certificate file saved in point 1. FIG. 12 9. Click “Next”. 10. Check whether “Trusted Root Certification Authorities” is displayed under the “Certificate store”. In the next window, click “Next”. FIG. 13 15 11. To end, click “Finish”. 12. In the new window, confirm installation of the CA certificate by clicking “Yes”. FIG. 14 13. A window should be displayed. FIG. 15 16 INSTALLING USER CERTIFICATE Before installing the user certificate, make sure that the system requirements specified in the section “System Requirements” are fulfilled. The certificate should be installed in the user’s system account from which the certification request was sent. Upon receipt of an e-mail message confirming that the certification request has been approved, the certificate may be installed by clicking the link in point 2. A window will be displayed with certificate details and an installation option (see Fig. 16). For Windows Vista and Windows 7, an additional message concerning ActiveX control interaction will also be displayed (see Fig. 17); accept it by clicking “Yes”. FIG. 16 For Windows Vista and Windows 7 FIG. 17 Click “Install Certificate” and accept all messages until the installation complete message is displayed. 17 BACKUP OF USER CERTIFICATE It is recommended to make a backup copy immediately after the first installation of the certificate in the operating system. In case of any failure or re-installation, the user can promptly recover the certificate without having to re-send the certification request. To make back-up copies, please follow these instructions: 1. Launch the Internet Explorer. 2. In the browser menu, select the option Tools Internet Options. 3. Select the tab “Content”. The tab “Content” may not be visible if the user’s access to the certificate store is restricted in the system. To get access, contact the local administrator of your computer. 4. Click the button “Certificates” FIG. 18 5. Click the tab “Personal”. 6. Select the certificate to back up and click “Export”. 18 FIG. 19 7. In the export wizard window, click “Next”. FIG. 20 8. In the next window, select the option “Yes, export the private key”. 19 FIG. 21 9. Select the options as in the Figure below and click “Next”. FIG. 22 20 10. Enter a certificate file password and click “Next”. FIG. 23 11. In the next window, enter the certificate file name and click “Next”. FIG. 24 12. Confirm by clicking “Finish”. 21 13. A window should be displayed. FIG. 25 The export creates a pfx file on the hard drive. It can be saved on any data device. As certificates are issued for a term of three years, it is recommended to save the file on a CD or DVD. 22 INSTALLING USER CERTIFICATE WITH STRONG PRIVATE KEY PROTECTION OPTION (OPTIONAL) Note: Instructions to be followed only after creating a backup of the user certificate. In the standard certificate installation, the user’s private key is protected by the system profile without an additional password being required at system login. To add extra protection, create a backup of the certificate according to the section “Backup of User Certificate” and then follow these instructions. 1. Launch the Internet Explorer. 2. In the browser menu, select the option Tools Internet Options. 3. Select the tab “Content”. The tab “Content” may not be visible if the user’s access to the certificate store is restricted in the system. To get access, contact the local administrator of your computer. 4. Click the button “Certificates” FIG. 26 5. Click the tab “Personal”. 6. Select the certificate and click “Remove”. 23 FIG. 27 7. Accept the next message by clicking “Yes”. FIG. 28 The certificate should no longer be on the list of available certificates. 8. Double-click the pfx file created as a backup of the certificate. 9. In the installation wizard window, click “Next”. 10. Again, click “Next”. 24 11. Enter the file password assigned to the back-up copy, select the options as in the Figure below, and click “Next”. FIG. 29 12. Again, click “Next”. 13. Click “Finish”. 14. In the next step, set up strong private key protection. Select the option “Set Security Level”. FIG. 30 In the next window, select the option “High” and click “Next”. 25 FIG. 31 15. Enter the user’s password required at trade repository login and click “Finish”. FIG. 32 16. Click OK. 17. An installation complete message will be displayed. FIG. 33 26 REVOCATION OF CERTIFICATE It is possible to revoke a user certificate and thus deny user access to the Trade Repository. In order to revoke a certificate, send to KDPW the original “Application for certificate revocation” available on the website www.kdpw.pl, then click the link Business Trade Repository and select “Application” in the right-hand menu. If the selected person holds more than one certificate, enter the identifier of the certificate to be revoked. Otherwise, all of the user’s certificates will be revoked. The user certificate identifier is the certificate serial number or the activation code or the certification request number. The activation code and the certification request number are sent in the user certification process in an e-mail message to the e-mail address entered in the certification form. The certificate serial number can be found as follows: 1. Launch the Internet Explorer. 2. In the browser menu, select the option Tools Internet Options. 3. Select the tab “Content”. The tab “Content” may not be visible if the user’s access to the certificate store is restricted in the system. To get access, contact the local administrator of your computer. 4. Click the button “Certificates” 27 FIG. 34 5. Click the tab “Personal”. 6. Select the certificate to be revoked and click “View”. FIG. 35 7. Click the tab “Details” and read the “Serial number”. 28 FIG. 36 Upon a check of the application for certificate revocation in KDPW and revocation of the certificate, the user receives an e-mail message with a confirmation: Message topic: Trade repository – Revocation of certificate for certification request No. XXXX Message content: The certificate for certification request No. XXXX issued to First name Last name has been revoked on YYYY-MM-DD. Revocation reason: Certificate revoked by request of the Participant. FIG. 37 29 TRADE REPOSITORY USER LOGIN To log in the Trade Repository, go to http://www.kdpw.pl/en and click the link Business Trade Repository. In the right-hand menu, select the link Application. The Trade Repository login page will be displayed (see Fig. 38). FIG. 38 If the user holds a valid certificate, select the login option by clicking the button Trade Repository. A window will be displayed (see Fig. 39) with a request to select one of the available certificates. 30 FIG. 39 Select a certificate and click OK. If the selected certificate is valid, i.e., it has not expired and has not been revoked by the administrator in KDPW, the user will be authorised and the Trade Repository main window should be displayed to the logged user. Otherwise, an Error 403 page may be displayed. If the user doesn’t have a certificate yet or the certificate has expired, send a certification request to KDPW by means of completing the relevant form. For details, see the section “First Use”. 31 TRADE REPOSITORY FUNCTIONS The internet application supports the following functions: multiple transaction information file upload; manual transaction registration; manual transaction modification; viewing transaction history. 1. Multiple Transaction Information File Upload Select the menu option Import from XML to upload an XML file with multiple transaction definitions. The file can be used to import new transactions and to modify and delete existing transactions. After successfully uploading the file and importing data from the file, the user will be informed by e-mail about the successful import and receive the imported file enriched with transaction identifiers (TradeID). The transaction identifier is necessary to find the transaction in order to modify or delete it in the repository. The XML Schema document in an XSD file is available on the service page together with an example of XML document. 2. Manual Transaction Registration Select the Register option to manually register transactions in the repository. All mandatory fields must be completed. If a mandatory field is left void, the application cannot register the transaction in the repository and reports the error reason. 3. Manual Transaction Modification Users may modify transactions by means of the Modify option. Select the option to display a screen similar to the transaction registration screen but already completed with data. After modifying the data, the user saves the data in the repository. 32 The Delete option deletes a transaction from the repository. 4. Viewing Transaction History By clicking the History option, the user can view the history of transaction operations. The repository stores the history of all modifications made by the users. The History option can be used to see who modified the transaction, when and how. 33