1
Downloading, Installing and Configuring WinAVR
Author: Colin O'Flynn
Editor: Eric Weddington
Table of Contents
1.0 Introduction to WinAVR........................................................................................................................1
2.0 Getting WinAVR.................................................................................................................................... 1
3.0 Installing WinAVR................................................................................................................................. 3
4.0 Makefiles................................................................................................................................................ 4
5.0 Setting up Programmers Notepad.......................................................................................................... 7
6.0 Your First WinAVR Project................................................................................................................. 10
7.0 More Information................................................................................................................................. 16
8.0 Glossary................................................................................................................................................ 16
1.0 Introduction to WinAVR
WinAVR is not just one tool, like many other software names. WinAVR is instead a set of tools, these
tools include avr-gcc (the command line compiler), avr-libc (the compiler library that is essential for avrgcc), avr-as (the assembler), avrdude (the programming interface), avarice (JTAG ICE interface), avr-gdb
(the de-bugger), programmers notepad (editor) and a few others. These tools are all compiled for
Microsoft Windows and put together with a nice installer program.
When referring to the version, you are most of the time referring to the version of the compiler, avr-gcc.
For example currently WinAVR includes version 3.3 of avr-gcc. However, it is not WinAVR 3.3 as some
people call it, to refer to which release you are using that is done by date. For example WinAVR
20030424. The 20030424 is a date code, which is discussed later.
2.0 Getting WinAVR
The WinAVR website is located at:
http://winavr.sourceforge.net/
This site contains information on WinAVR, including some very useful links, notes, and news. You
should first go to this site to see if there is any important information you should know about WinAVR
before downloading (different releases, etc).
You should now go to the SourceForge.net project site for WinAVR, the exact address being:
http://sourceforge.net/projects/winavr/
Then scroll to around the middle of the page, and click on the 'Download' link for the latest version of
WinAVR:
When you click on this link you are brought to the files page, with your choice highlighted in colour:
In this case the latest version is dated 20030424, which means Year 2003, 4th month (April), 24th day.
You will want the WinAVR-xxxxxxxx-bin-install.exe, where xxxxxxxx is the date code for that file. The
WinAVR-xxxxxxxxsrc-install.exe includes the source code, which you probably won't need.
After you click on the filename, you will be asked to select a mirror. This is the server you will download
the file from. You can select any mirror, although it is best to select a location close to you. If one mirror
doesn't have the file (which can happen if the file has just been released), or is slow, go back to this page
and select a new mirror:
Now save the file to a location where you will be able to get it, or optionally just open it from the current
location.
Now that you have WinAVR there might be some other packages you need. For example for the
20030424 release you can also update the COFF file creation (this is the file type used by AVRStudio).
This is recommended, and you can go back to the 'files' page to find this. The file is called
WinAVR-avrcoffbeta-install.exe at the writing of this document. However that is no longer needed
anymore, since chances are you are reading this document after the next release of WinAVR came out
(sometime in September 2003), which has everything included.
3.0 Installing WinAVR
First you must run the file you downloaded, and then you will be presented with several licenses which
you must accept. As WinAVR is actually a combination of many different pieces software, there are many
different licenses for each one. Many use the GNU GPL license, but not all. You can scroll down to see
what licenses are used.
Then you can set the directory to install WinAVR to, c:\WinAVR being default.
Finally click 'install' and let WinAVR install everything! When its done the README file will pop up,
please read it! It contains a lot of important information on WinAVR and how to use it.
4.0 Makefiles
You may or may not have used other compilers, but most have a nice simple GUI and a 'compile' button.
The avr-gcc compiler is different though, in a way that makes it more powerful. It can be used right on
the command line, without a GUI at all. However it can also be configured to work with many different
GUIs, and customised as much as you like.
One of the reasons this can be done is avr-gcc uses makefiles. A makefile tells the compiler what
commands to run, what files to compiler and link, the sort of output to create, and can also do other
things (such as program the chip). A makefile can really just be thought of as a file that contains a list of
commands to run, although in reality it is more powerful than that as it also has variables and other
features. Makefiles have the name Makefile (there is no extension) by default, and are processed by a
program called make. To use it, simply type at the command line (assuming you were in the
d:\mydir\myproj1\ directory already):
d:\mydir\myproj1> make <CR>
(the <CR> means press the enter key). The make program will then find the makefile in the current
directory and execute this makefile. If there is no makefile, it will create an error. If make is not found, it
means that the proper directories are not in your path. This is where Windows looks for the program to
execute, and should have been done by the WinAVR install process. See the WinAVR README file for
more information on how to solve this.
Another important thing to note is that the Makefiles have different targets. Each target can do a different
thing, depending on your Makefile. To use these targets, you simply append the target name as an
argument to make:
d:\mydir\myproj1> make <target> <CR>
All of the Makefiles that you use with the AVR have at least two targets:
all
clean
The 'make all' is the same as also typing just 'make'. Make all is the default, and in the case of the AVR
will compile all your source code files and create a .hex for you. Make clean will remove all the temporary
files, the .hex file, and the .cof file. This gets you ready for an entirely new compile.
When working on a project, you will probably have several source code files. If you compile all of them
then change one, and run make again the make program will only re-compile the minimum number of files
(ie: the ones that changed). This can save a lot of time, especially if you have many source code files.
However sometimes you have to do a complete re-compile, the is the case if you for example change the
optimization level. When you change the optimization level none of the source files have changed, so just
running 'make' won't do anything as it thinks there is no need to re-compile anything. You must first run
'make clean' then 'make' to have the change take effect.
As well the WinAVR release has this target:
coff
This target creates the .cof file, which you use in conjunction with AVRStudio to debug your project.
This simple COFF format is older now, and is used for AVRStudio 4.06 and earlier (including
AVRStudio 3.x). As a result the new extended COFF format (extcoff) has been created. For this reason
this target was added to the makefile:
extcoff
This format should be used with AVRStudio 4.07 or later (the file still has the extension .cof).
Another target you likely will have is:
program
This will take the .hex file created by make and program it into the FLASH memory of your AVR.
At this point it is suggested that you look at a sample makefile to see what they look like. You should find
one in your WinAVR sample directory (c:\WinAVR\sample). The file should be called Makefile with no
extension. If you have installed the COFF upgrade though it may be called Makefile.cof. In that case
rename Makefile to Makefile.old and rename Makefile.cof to Makefile.
Since makefiles have no extension you can't set a default program to open them. However you can use
any text editor to edit them; lets use Programmers Notepad. A shortcut should have appeared on your
desktop for it, but if not you can find it in the pn directory of your WinAVR install
(c:\WinAVR\pn\pn.exe).
There is one more very important thing to discuss before finally editing our makefile though. This is the
issue of tabs in the makefiles. For almost every other program, three or four spaces and a tab character
are exactly the same. However for a makefile they are not. A tab character indicates the beginning of a
command, and as such you should not use tabs in your makefile unless you are adding a command that
should be executed (ie: a program name). A handy way to see the difference is to goto the 'View' menu of
PN and check the 'mark whitespace' box. Here is an example of improper makefile editing:
I have attempted to add an 'echo' command here. As you can see with the 'mark whitespace' feature the
'tab' is marked with a long arrow, while spaces are dots. This makefile uses spaces in front of the 'echo'
command, which will result in an error. Instead it should look like this:
If you are getting errors about an improper separator, you likely either used a tab where you shouldn't
have, didn't use a tab where you should have, or forgot a space somewhere.
Now we can look at our makefile and change it; open up Makefile in PN. The first line of interest should
be a line where you set the MCU type, and might look like:
# MCU name
MCU = atmega128
To change this just erase the atmega128 and write in the processor you used. You can find a list of all the
supported types and their names in the avr-libc documentation (see end of this document for link). It is
fairly straightforward, some examples are: at90s2313 at90s8515 atmega8 attiny22 at86rf401
The next line of interest is where you specify the 'project name' essentially. For example if you want your
project name to be myproj1 then the main C source file (the one with the main() routine in it) should be
myproj1.c. The resulting hex file will be myproj1.hex, and the COFF file will be myproj1.cof. The line will
look like:
# Target file name (without extension).
TARGET = main
You can also specify additional C source files that your project uses. So for example you might have foo.c
which includes the interface routines, which are accessed by main.c. To add this there are a few ways of
doing it. You can just append it onto the end of the 'SRC =' line like this:
SRC = $(TARGET).c foo.c
Or you could use the += function to addend it on but at a different spot:
SRC = $(TARGET).c
SRC += foo.c
Finally you can use a '\' so that foo.c is listed on the next line but still read as being on the same line as the
'SRC =' line.
SRC = $(TARGET).c \
foo.c
If you have assembly files to link you can add them to the 'ASRC =' lines. Assembly files must end with .S
(capital S), and NOT .s (small s). It is beneficial to take back-ups of your assembly files before the first
time you compile, for the reason that if you accidentally changed the extension or an error occurred that
results in your asm files being deleted on a 'make clean'. See the avr-libc manual for more information on
how to create ASM files with avr-gcc.
ASRC = myasmfile.S
You will also see a optimization level as well. This is how well the compiler will optimise the code, and
legal levels are 0 (no optimization), 1, 2, 3, and s. Each level is different, and level 3 is not always the
best. Each level will perform different tasks on the code in order to make it as fast and small as possible
(except level 0, which does nothing). If you use level 3 it is most likely to create the largest code size, but
also may create the fastest. Level s is an optimization for code size, but is a good all-around level.
OPT = s
If your makefile supports a 'program' target, you will also find some options for programming the AVR.
However this is not very universal, so refer to the comments in the makefile for more detailed
information.
The final topic to adding additional include directories when compiling. This is a fairly simple thing to do,
and you may have to change the makefile a bit if it doesn't have an apparent place to add them in. The
first thing to do is check if your makefile already has a line that looks like this:
EXTRAINCDIRS =
If it doesn't that proceed with the following instructions. Locate the compiler flags line. It may look
something like this:
CFLAGS = -g -O$(OPT) \
-funsigned-char -funsigned-bitfields -fpack-struct -fshort-enums \
-Wall -Wstrict-prototypes \
-Wa,-ahlms=$(<:.c=.lst)
The change it by adding $(patsubst %,-I %,$(EXTRAINCDIRS)) so it will look like this:
CFLAGS = -g -O$(OPT) \
-funsigned-char -funsigned-bitfields -fpack-struct -fshort-enums \
-Wall -Wstrict-prototypes \
-Wa,-ahlms=$(<:.c=.lst) $(patsubst %,-I %,$(EXTRAINCDIRS))
This is telling the compiler to take the contents of EXTRAINCDIRS and insert a -I before every word
and include them on the compiler line. This is the syntax of how the compiler adds extra include
directories in. Now we need to define this variable somewhere. Go near the top of the makefile and write
this line:
EXTRAINCDIRS = c:\foo\inc c:\myproj2\inc c:\salvo\inc
This example will add the directory c:\foo\inc, c:\myproj2\inc, and c:\salvo\inc to the include locations. Of
course you don't have these directories likely so you would want to remove them from the
EXTRAINCDIRS line so the line just reads
EXTRAINCDIRS =
As well if you want these directories available for assembly files, add the $(patsubst %,-I %,
$(EXTRAINCDIRS)) to the end of the assembly flags ('AFLAGS =' line).
The makefile is a very powerful tool. The make manual is available in the WinAVR\doc\gnu directory
(C:\WinAVR\doc\gnu\make.html) and it is highly suggested to take a look at it.
5.0 Setting up Programmers Notepad
Programmers Notepad (PN) is a editing tool with syntax highlighting. As well it can be configured so that
you don't have to do much command line typing, which makes it easier to work with. First open up PN
using either the shortcut on your desktop or doing to your WinAVR directory, opening the pn folder and
running pn.exe (c:\WinAVR\pn\pn.exe).
The main window is fairly bland right now, as nothing is open. However first lets set up PN for use with
WinAVR. Go to the Tools→Options menu, and click on the 'Tools' text at the side of the dialogue that
comes up.
Now click on the 'Add' button to add a tool. Then enter the data you want (examples are in a table). For
example my 'Make All' target looks like this:
Lets talk about the options. The 'Name' option is just the name of the tool as you see it on the tools menu.
The 'Command' is the command-line tool to run, and its ran with the parameters in the 'Parameters' text
box, in the directory specified by 'Folder'. So the example above is the same as opening a MS-DOS
prompt, going to the current working directory of the file you have active, and typing “make all”. The
'Capture Output' option should be selected and set to 'Use the main output window.', this will print the
result of running 'make all' into a little window normally at the bottom of the screen. There is an option to
clear the window before running, I don't like the window cleared as that way I can scroll back in history
and look at what my previous compiles or actions were. Also the 'Save' option might be handy, as this lets
you save the current file before running the command. Remember that if you run 'make all' on an unsaved
file, it means your changes won't be included in the compile. So setting this to save the current file (or all
files) makes one less step you have to do. The final option of importance is one that asks to use the builtin error parser, which is what you want to do. This error parser has handy features like click on the error
message to jump to the line.
You can continue to add more tools, the following table shows what my set-up is:
Name
Command Folder Paramete Capture
rs
Output?
This tool Save: Clear Use Built-in
will
Output?
Parser.
modify..
Make All
make
%d
all
Main
No
Curren No
t File
Yes
Make Clean
make
%d
clean
Main
No
None
No
Yes
Make Extcoff make
%d
extcoff
Main
No
None
No
Yes
Name
Command Folder Paramete Capture
rs
Output?
This tool Save: Clear Use Built-in
will
Output?
Parser.
modify..
Make Coff
make
%d
coff
Main
No
None
No
Yes
Program
Device
make
%d
program
Main
No
None
No
Yes
Now hit OK and your tools are set up.
At this point if you go to the 'Tools' menu nothing will have changed, as you have to open a file for the
tools to become visible, but Programmers Notepad is now set up for use.
6.0 Your First WinAVR Project
This simple project will show you how to use WinAVR to actually do something. You will have to be
familiar with the C language, and also familiar with Atmel AVRs.
Open Programmers Notepad, and start a new C file:
In that C file write out this program (don't worry about errors, they are supposed to be there):
#include <avr/io.h>
#include <avr/delay.h>
void main (void)
{
unsigned char counter;
//set PORTB for output
DRB = 0xFF;
while (1)
{
//set PORTB.2 high
PORTB |= 1<<2;
//wait (10 * 120000) cycles = wait 1200000 cycles
counter = 0;
while (counter != 5)
{
//wait (30000 x 4) cycles = wait 120000 cycles
_delay_loop_2(30000);
counter++
}
//set PORTB.2 low
PORTB &= ~(1<<2);
//wait (10 * 120000) cycles = wait 1200000 cycles
counter = 0;
while (counter != 5)
{
//wait (30000 x 4) cycles = wait 120000 cycles
_delay_loop_2(30000);
counter++
}
}
return 1;
}
Lets look at some of this programs important points. The first line (#include <avr/io.h>) includes the main
header file for the AVR. It defines all the various registers for the AVR you have selected in the makefile
(such as DDRB, PORTB, etc). All of the include will be in the avr/include part of the WinAVR directory
(c:\WinAVR\avr\include), and the files that you would only find on the AVR platform are in the avr
directory (for example stdio.h is available across many platforms, but interrupt.h is not).
The next line includes the delay.h file, which has some functions for holding the program execution for a
while. In this case it makes the LED blink visible.
The next line of interest sets PORTB to be an output. If you read the AVR data-sheet you will discover
that the DDRB is written to 0xFF to set all of PORTB to an output. In this example program DDRB has
been written incorrectly as DRB to show the error-reporting mechanisms of AVR-GCC.
The while(1) statement results in an endless execution of the loop, as while(1) is equivalent to writing a
statement such as while(2==2) which always equates to true.
To set an individual port pin high, the format PORTB |= 1<<2; is used. This means take the current value
of PORTB, and logically OR it with the result of 1 shifted left 2 times.
To set an individual port pin low, a bit-mask is used that takes the format PORTB &= ~(1<<2);. This
means take the value of PORTB, and logically AND it with the 'opposite' of 1 left right 2 times. So 1
shifted left 2 times is 00000100, and the complement (opposite) of this is 11111011. No matter what
value you AND this with, the result will be xxxxx0xx (where x could be anything).
There is a few errors in the program, they are supposed to be there. Save the file to a new folder as
test1.c . Open the c:\WinAVR\sample\Makefile in Programmers Notepad and immediately save it to the
same directory as your new C file you just saved (make sure it is called Makefile with no extension). You
will have to edit the Makefile to work with your project (try it for yourself first). Now attempt to compile
the program by going to Tools→Make All.
If you get an error that looks like this:
make: *** No rule to make target `main.o', needed by `main.elf'.
Then you didn't set the source code files properly. Check your Makefile to make sure the 'TARGET ='
line looks like:
TARGET = test1
and the 'SRC =' line looks like:
SRC = $(TARGET)
and try again. You should get some errors that look this:
test1.c:9: warning: return type of `main' is not `int'
test1.c: In function `main':
test1.c:13: error: `DRB' undeclared (first use in this function)
test1.c:13: error: (Each undeclared identifier is reported only once
test1.c:13: error: for each function it appears in.)
test1.c:28: error: parse error before '}' token
test1.c:40: error: parse error before '}' token
test1.c:45:10: warning: no newline at end of file
make: *** [test1.o] Error 1
Start with the first one, even though it is a warning. It tells you that the return type of main is not an 'int',
which according to ANSI C it should be. So you should change that in your source file. To save time, just
click on the error and it will jump to the line in your source code as shown:
Next look at the error about DRB being undeclared. Go to line 13 in test1.c, and you will notice DRB
was written when it should have been DDRB. Change that.
Now head over to line 28 where it talks about a parse error. Since there is only a bracket there, there is
probably nothing wrong with it. But look around it, and you will see one line up that the ; was forgotten
at the end of counter++, so change counter++ to counter++; now. When you go over to line 40 it is the
same problem, so correct that as well. Note that a lot of the time one error (especially if it is something
like forgetting the ; at the end of the line or forgetting a closing brace (the '}') will create a whole list of
errors. So it is a good idea to correct the first few if you have a lot and try re-compiling the code to see
what errors exist now.
The final warning is that there is no newline at the end of the file (you may or may not get this).
Essentially it means go to the end of the test1.c file (the last line), and hit enter after it a few times.
Now try running 'Make All' again, and this time it should work. You can then run 'Make Program',
provided you have set up the makefile properly for programming. Instead you may want to just simulate
the program, in which case AVR Studio is to be used.
Before you can do this, you need to change the program around. However the current format involves
very large delays, these won't simulate well. So instead change the code around to this:
#include <avr/io.h>
void main (void)
{
//set PORTB for output
DRB = 0xFF;
while (1)
{
//set PORTB.2 high
PORTB |= 1<<2;
//set PORTB.2 low
PORTB &= ~(1<<2);
}
return 1;
}
Save the file, and run Make Coff (if you plan on using AVR Studio 3.x or AVR Studio 4.06 or earlier) or
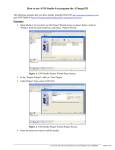
Make Extcoff (if you plan on using AVR Studio 4.07 or later). Then open up AVR Studio, and open the
test1.cof file. You may also have to select a chip type; set it to what it was in your Makefile. At this point
your screen should look something like this (AVR Studio 4.07):
There is a lot that you can do with this screen, so much in fact its recommended you consult the help-file
of AVR Studio in the Help→AVR Studio User Guide menu.
If you are missing some of the windows you can find them in the 'View' menu.
Now in the workspace expand the 'I/O' tree, then expand 'PORTB'. Finally press the AutoStep button and
watch PORTB.2 toggle between 1 and 0. You can also single-step using the F11 key, which is the 'Step
Into' shortcut.
7.0 More Information
There is lots to learn about WinAVR and the tools it contains. You can look in the WinAVR doc
directory (c:\WinAVR\doc) directory for more documentation. As well the WinAVR site at
http://winavr.sourceforge.net provides a lot of useful information including news and links. If you have
not already gone to this site it is suggested to do this.
Likely the most useful documentation will be the avr-libc documentation
(C:\WinAVR\doc\avr-libc\avr-libc-user-manual\index.html), which you can find in the doc\avr-libc
directory, available in many formats. You can find the latest avr-libc information at the avr-libc website
which is http://www.nongnu.org/avr-libc Please check out the FAQ in the avr-libc user manual at least, as
it includes all sorts of useful information if you are new to the AVR and/or avr-gcc.
8.0 Glossary
ANSI – the American National Standards Institute. Normally in reference to AVRs it will be about a
compiler being 'ANSI C compliant'. This means that it follows a certain set of standards, and hopefully
code written on one ANSI C compiler can be compiled on another ANSI C compiler with minimal
changes.
ASM – Assembly files, assembly being the actual machine language the AVR uses.
COFF – Common Object File Format. However in the context of the AVR it is referred to as the file
format that AVR Studio uses for its debugging. AVR Studio 4.07 and later also supports an extended
COFF format that has a few extra features. The WinAVR package is able to make both types of COFF
files, although you may need to add the COFF extension package on.
GNU – A recursive ancronm for GNU's Not Unix and is pronounced “guh-NEW”. GNU is responsible
for a good part of the tools in WinAVR, such as gcc. In reality though since the tools are open source it is
really many people's hard work that makes the tools what they are today.
GPL – The GNU Public License. The GPL is what the gcc compiler and a few other tools is released
under, and it sets the terms of its use.
GUI – Graphical User Interface. This is where the interface for a program has buttons and windows and
whatnot, as opposed to using the command line.
ihex – The Intel Hex file format, which is what most of the AVR programmers use. This is the normal file
type generated by avr-gcc.
PN – Programmers Notepad. A versatile editor for several different types of files, and is included in
WinAVR.