1
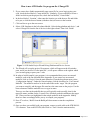
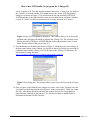
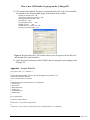
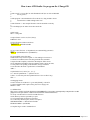
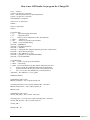
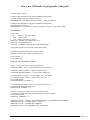
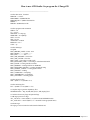
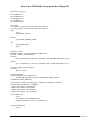
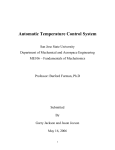
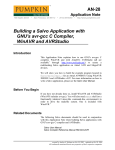
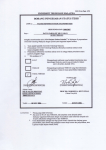
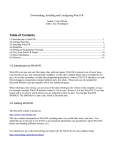
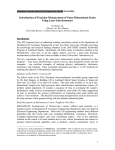
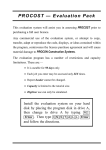
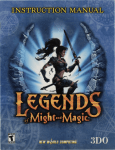
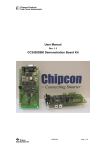
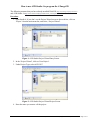
How to use AVR Studio 4 to program the ATmega128
The following assumes that you have already installed WinAVR (http://sourceforge.net/projects/winavr)
and AVR Studio 4 (http://www.atmel.com/dyn/products/tools_card.asp?tool_id=2725).
Procedure
1. Open Studio 4. If you don’t see the Project Wizard screen as shown below, click on
‘Project’ from the main menu bar, and select, ‘Project Wizard’.
Figure 1. AVR Studio Project Wizard Entry Screen.
2. In the ‘Project Wizard’, click on ‘New Project’.
3. Under Project Type, select AVR GCC
Figure 2. AVR Studio Project Wizard Project Screen.
4. Enter the name you want to call the project
BJ Furman | ME 106 Intro to Mechatronics | Using AVRStudio 4.doc | 24FEB2007
Page 1 of 11
How to use AVR Studio 4 to program the ATmega128
5. If you want to have Studio automatically open a new file for you to begin typing your
code, check the box labeled, ‘Create initial file’. Similarly, if you would like to create a
folder in which to put the project files, check the box labeled, ‘Create folder’.
6. In the box labeled, ‘Location’, either enter the location you wish the new file and folder
to be put, or click the browse button (with three dots) to browse to the location.
7. Click on Next to go to the next screen.
8. Select AVR Simulator in the left column labeled, ‘Select debug platform and device’, and
select ATmega128 from the list of devices in the right column. Then click ‘Finish’
Figure 3. AVR Studio Project Wizard Debug Platform and Device Screen.
9. The Wizard will set up the project file structure, which will appear on the left window
pane, and if you checked ‘Create initial file’, it will open a window to the right in which
you can start typing or paste your C code.
10. In order to build (compile) your program, it is recommended that you use an external
makefile, such as the one included in the Appendix. If you want to use an external
makefile, click on ‘Project’ from the main menu bar. From the drop-down menu, select,
‘Configuration Options’. Under the General option, click the checkbox for ‘Use External
Makefile’. The makefile needs to be in the same folder as the ‘target’ file (the program
you want to compile), and the target file must have the same name as the project. Use the
browse button to find the makefile to use or type its name.
There are two lines in the makefile that you will typically need to modify, that for the
target file name, and that for the C source files, which are needed in addition to the target
file. (These two lines are highlighted in the sample makefile in the Appendix. Modify
these two lines accordingly before you try to compile your program).
11. Press F7 or select, ‘Build’ from the Build pull-down menu to start the compilation
process.
12. Once you have successfully built your program, connect a serial cable to the STK500 RS232 connector. Turn on the STK500, then click on ‘Tools’ from the main menu bar,
BJ Furman | ME 106 Intro to Mechatronics | Using AVRStudio 4.doc | 24FEB2007
Page 2 of 11
How to use AVR Studio 4 to program the ATmega128
select ‘Program AVR’ from the drop-down menu, then select, ‘Connect’ (or just click on
the ‘Connect’ icon on the toolbar. You should then see the ‘Select AVR Programmer’
dialog box as shown in Figure 4. The selection on the left side should be STK500 or
AVRISP and that on the right should be Auto (to auto-detect for an available COM port
on your PC). Make sure these selections have been made, and click on ‘Connect’.
Figure 4. Select AVR Programmer dialog box. This window allows you to choose the
platform and COM port with which to program the ATmega 128. The selection on the
left side should be STK500 or AVRISP and that on the right should be Auto (to autodetect for an available COM port on your PC).
13. You should then see the dialog box shown in Figure 5, which shows the fuse settings. In
the pane at the bottom of the window, you should see that AVR Studio was successful in
communicating with the ATmega 128. See the Intro to the ATmega 128 laboratory for
information on setting the fuses
(http://www.engr.sjsu.edu/bjfurman/courses/ME106/ME106pdf/intro-atmel.pdf).
Figure 5. Fuse dialog box. This window allows you to select the fuses on the ATmega
128.
14. Once you have verified that the fuse settings are correct, click on the ‘Program’ tab, and
you should see the dialog box shown in Figure 6. In the section titled, ‘Flash’, the ‘Input
Hex File’ radio button should be checked and a path to the hex file corresponding to
target filename should be in the path box. You can also navigate to another folder to
download an alternate hex file if desired.
BJ Furman | ME 106 Intro to Mechatronics | Using AVRStudio 4.doc | 24FEB2007
Page 3 of 11
How to use AVR Studio 4 to program the ATmega128
15. Click on the button labeled, ‘Program’ to download the hex file to the microcontroller.
You should see the following lines appear at the bottom of the window:
Reading FLASH input file.. OK
Setting mode and device parameters.. OK!
Entering programming mode.. OK!
Erasing device.. OK!
Programming FLASH .. OK!
Reading FLASH .. OK!
FLASH contents is equal to file.. OK
Leaving programming mode.. OK!
Figure 6. Program dialog box. This window allows you to navigate to the hex file to be
downloaded to the microcontroller.
16. Voila! Press the Reset button on the STK500, and your program is now running on the
ATmega 128.
Appendix – Sample Makefile
# Hey Emacs, this is a -*- makefile -*#
# WinAVR Sample makefile written by Eric B. Weddington, Jörg Wunsch, et al.
# Released to the Public Domain
# Please read the make user manual!
#
# Additional material for this makefile was submitted by:
# Tim Henigan
# Peter Fleury
# Reiner Patommel
# Sander Pool
# Frederik Rouleau
# Markus Pfaff
#
# On command line:
#
# make all = Make software.
#
# make clean = Clean out built project files.
#
# make coff = Convert ELF to AVR COFF (for use with AVR Studio 3.x or VMLAB).
BJ Furman | ME 106 Intro to Mechatronics | Using AVRStudio 4.doc | 24FEB2007
Page 4 of 11
How to use AVR Studio 4 to program the ATmega128
#
# make extcoff = Convert ELF to AVR Extended COFF (for use with AVR Studio
#
4.07 or greater).
#
# make program = Download the hex file to the device, using avrdude. Please
#
customize the avrdude settings below first!
#
# make filename.s = Just compile filename.c into the assembler code only
#
# To rebuild project do "make clean" then "make all".
#
# MCU name
MCU = atmega128
# Output format. (can be srec, ihex, binary)
FORMAT = ihex
# Target file name (without extension).
TARGET = BlinkTestStudio
# List C source files here. (C dependencies are automatically generated.)
SRC = $(AVRLIB)/timer.c $(TARGET).c
# List Assembler source files here.
# Make them always end in a capital .S. Files ending in a lowercase .s
# will not be considered source files but generated files (assembler
# output from the compiler), and will be deleted upon "make clean"!
# Even though the DOS/Win* filesystem matches both .s and .S the same,
# it will preserve the spelling of the filenames, and gcc itself does
# care about how the name is spelled on its command-line.
ASRC =
# Optimization level, can be [0, 1, 2, 3, s].
# 0 = turn off optimization. s = optimize for size.
# (Note: 3 is not always the best optimization level. See avr-libc FAQ.)
OPT = s
# Debugging format.
# Native formats for AVR-GCC's -g are stabs [default], or dwarf-2.
# AVR (extended) COFF requires stabs, plus an avr-objcopy run.
DEBUG = stabs
# (11FEB06 from
http://www.avrfreaks.com/index.php?name=PNphpBB2&file=viewtopic&t=35003&postdays=0&postorder=asc&hi
ghlight=include+quotes&start=15&sid=a3b79ce2eba748c1910b2629249f072f)
# List any extra directories to look for include files here.
# Each directory must be separated by a space.
# Use forward slashes for directory separators.
# For a directory that has spaces, enclose it in quotes.
#EXTRAINCDIRS = c:/WinAVR/avr/include
EXTRAINCDIRS = $(AVRLIB)
# Compiler flag to set the C Standard level.
BJ Furman | ME 106 Intro to Mechatronics | Using AVRStudio 4.doc | 24FEB2007
Page 5 of 11
How to use AVR Studio 4 to program the ATmega128
# c89 - "ANSI" C
# gnu89 - c89 plus GCC extensions
# c99 - ISO C99 standard (not yet fully implemented)
# gnu99 - c99 plus GCC extensions
CSTANDARD = -std=gnu99
# Place -D or -U options here
CDEFS =
# Place -I options here
CINCS =
# Compiler flags.
# -g*:
generate debugging information
# -O*:
optimization level
# -f...:
tuning, see GCC manual and avr-libc documentation
# -Wall...: warning level
# -Wa,...: tell GCC to pass this to the assembler.
# -adhlns...: create assembler listing
CFLAGS = -g$(DEBUG)
CFLAGS += $(CDEFS) $(CINCS)
CFLAGS += -O$(OPT)
CFLAGS += -funsigned-char -funsigned-bitfields -fpack-struct -fshort-enums
CFLAGS += -Wall -Wstrict-prototypes
CFLAGS += -Wa,-adhlns=$(<:.c=.lst)
CFLAGS += $(patsubst %,-I%,$(EXTRAINCDIRS))
CFLAGS += $(CSTANDARD)
# Assembler flags.
# -Wa,...: tell GCC to pass this to the assembler.
# -ahlms: create listing
# -gstabs: have the assembler create line number information; note that
#
for use in COFF files, additional information about filenames
#
and function names needs to be present in the assembler source
#
files -- see avr-libc docs [FIXME: not yet described there]
ASFLAGS = -Wa,-adhlns=$(<:.S=.lst),-gstabs
#Additional libraries.
# Minimalistic printf version
PRINTF_LIB_MIN = -Wl,-u,vfprintf -lprintf_min
# Floating point printf version (requires MATH_LIB = -lm below)
PRINTF_LIB_FLOAT = -Wl,-u,vfprintf -lprintf_flt
PRINTF_LIB =
# Minimalistic scanf version
SCANF_LIB_MIN = -Wl,-u,vfscanf -lscanf_min
# Floating point + %[ scanf version (requires MATH_LIB = -lm below)
SCANF_LIB_FLOAT = -Wl,-u,vfscanf -lscanf_flt
SCANF_LIB =
MATH_LIB = -lm
BJ Furman | ME 106 Intro to Mechatronics | Using AVRStudio 4.doc | 24FEB2007
Page 6 of 11
How to use AVR Studio 4 to program the ATmega128
# External memory options
# 64 KB of external RAM, starting after internal RAM (ATmega128!),
# used for variables (.data/.bss) and heap (malloc()).
#EXTMEMOPTS = -Wl,-Tdata=0x801100,--defsym=__heap_end=0x80ffff
# 64 KB of external RAM, starting after internal RAM (ATmega128!),
# only used for heap (malloc()).
#EXTMEMOPTS = -Wl,--defsym=__heap_start=0x801100,--defsym=__heap_end=0x80ffff
EXTMEMOPTS =
# Linker flags.
# -Wl,...: tell GCC to pass this to linker.
# -Map: create map file
# --cref: add cross reference to map file
LDFLAGS = -Wl,-Map=$(TARGET).map,--cref
LDFLAGS += $(EXTMEMOPTS)
LDFLAGS += $(PRINTF_LIB) $(SCANF_LIB) $(MATH_LIB)
# Programming support using avrdude. Settings and variables.
# Programming hardware: alf avr910 avrisp bascom bsd
# dt006 pavr picoweb pony-stk200 sp12 stk200 stk500
#
# Type: avrdude -c ?
# to get a full listing.
#
AVRDUDE_PROGRAMMER = stk500v2
# com1 = serial port. Use lpt1 to connect to parallel port.
AVRDUDE_PORT = com1 # programmer connected to serial device
AVRDUDE_WRITE_FLASH = -U flash:w:$(TARGET).hex
#AVRDUDE_WRITE_EEPROM = -U eeprom:w:$(TARGET).eep
# Uncomment the following if you want avrdude's erase cycle counter.
# Note that this counter needs to be initialized first using -Yn,
# see avrdude manual.
AVRDUDE_ERASE_COUNTER = -y
# Uncomment the following if you do /not/ wish a verification to be
# performed after programming the device.
#AVRDUDE_NO_VERIFY = -V
# Increase verbosity level. Please use this when submitting bug
# reports about avrdude. See <http://savannah.nongnu.org/projects/avrdude>
# to submit bug reports.
#AVRDUDE_VERBOSE = -v -v
AVRDUDE_FLAGS = -p $(MCU) -P $(AVRDUDE_PORT) -c $(AVRDUDE_PROGRAMMER)
AVRDUDE_FLAGS += $(AVRDUDE_NO_VERIFY)
AVRDUDE_FLAGS += $(AVRDUDE_VERBOSE)
AVRDUDE_FLAGS += $(AVRDUDE_ERASE_COUNTER)
BJ Furman | ME 106 Intro to Mechatronics | Using AVRStudio 4.doc | 24FEB2007
Page 7 of 11
How to use AVR Studio 4 to program the ATmega128
# --------------------------------------------------------------------------# Define directories, if needed.
DIRAVR = c:/winavr
DIRAVRBIN = $(DIRAVR)/bin
DIRAVRUTILS = $(DIRAVR)/utils/bin
DIRINC = .
DIRLIB = $(DIRAVR)/avr/lib
# Define programs and commands.
SHELL = sh
CC = avr-gcc
OBJCOPY = avr-objcopy
OBJDUMP = avr-objdump
SIZE = avr-size
NM = avr-nm
AVRDUDE = avrdude
REMOVE = rm -f
COPY = cp
# Define Messages
# English
MSG_ERRORS_NONE = Errors: none
MSG_BEGIN = -------- begin -------MSG_END = -------- end -------MSG_SIZE_BEFORE = Size before:
MSG_SIZE_AFTER = Size after:
MSG_COFF = Converting to AVR COFF:
MSG_EXTENDED_COFF = Converting to AVR Extended COFF:
MSG_FLASH = Creating load file for Flash:
MSG_EEPROM = Creating load file for EEPROM:
MSG_EXTENDED_LISTING = Creating Extended Listing:
MSG_SYMBOL_TABLE = Creating Symbol Table:
MSG_LINKING = Linking:
MSG_COMPILING = Compiling:
MSG_ASSEMBLING = Assembling:
MSG_CLEANING = Cleaning project:
# Define all object files.
OBJ = $(SRC:.c=.o) $(ASRC:.S=.o)
# Define all listing files.
LST = $(ASRC:.S=.lst) $(SRC:.c=.lst)
# Compiler flags to generate dependency files.
GENDEPFLAGS = -Wp,-M,-MP,-MT,$(*F).o,-MF,.dep/$(@F).d
# Combine all necessary flags and optional flags.
# Add target processor to flags.
ALL_CFLAGS = -mmcu=$(MCU) -I. $(CFLAGS) $(GENDEPFLAGS)
ALL_ASFLAGS = -mmcu=$(MCU) -I. -x assembler-with-cpp $(ASFLAGS)
# Default target.
all: begin gccversion sizebefore build sizeafter finished end
BJ Furman | ME 106 Intro to Mechatronics | Using AVRStudio 4.doc | 24FEB2007
Page 8 of 11
How to use AVR Studio 4 to program the ATmega128
build: elf hex eep lss sym
elf: $(TARGET).elf
hex: $(TARGET).hex
eep: $(TARGET).eep
lss: $(TARGET).lss
sym: $(TARGET).sym
# Eye candy.
# AVR Studio 3.x does not check make's exit code but relies on
# the following magic strings to be generated by the compile job.
begin:
@echo
@echo $(MSG_BEGIN)
finished:
@echo $(MSG_ERRORS_NONE)
end:
@echo $(MSG_END)
@echo
# Display size of file.
HEXSIZE = $(SIZE) --target=$(FORMAT) $(TARGET).hex
ELFSIZE = $(SIZE) -A $(TARGET).elf
sizebefore:
@if [ -f $(TARGET).elf ]; then echo; echo $(MSG_SIZE_BEFORE); $(ELFSIZE); echo; fi
sizeafter:
@if [ -f $(TARGET).elf ]; then echo; echo $(MSG_SIZE_AFTER); $(ELFSIZE); echo; fi
# Display compiler version information.
gccversion :
@$(CC) --version
# Program the device.
program: $(TARGET).hex $(TARGET).eep
$(AVRDUDE) $(AVRDUDE_FLAGS) $(AVRDUDE_WRITE_FLASH)
$(AVRDUDE_WRITE_EEPROM)
# Convert ELF to COFF for use in debugging / simulating in AVR Studio or VMLAB.
COFFCONVERT=$(OBJCOPY) --debugging \
--change-section-address .data-0x800000 \
--change-section-address .bss-0x800000 \
--change-section-address .noinit-0x800000 \
--change-section-address .eeprom-0x810000
coff: $(TARGET).elf
@echo
@echo $(MSG_COFF) $(TARGET).cof
$(COFFCONVERT) -O coff-avr $< $(TARGET).cof
extcoff: $(TARGET).elf
@echo
BJ Furman | ME 106 Intro to Mechatronics | Using AVRStudio 4.doc | 24FEB2007
Page 9 of 11
How to use AVR Studio 4 to program the ATmega128
@echo $(MSG_EXTENDED_COFF) $(TARGET).cof
$(COFFCONVERT) -O coff-ext-avr $< $(TARGET).cof
# Create final output files (.hex, .eep) from ELF output file.
%.hex: %.elf
@echo
@echo $(MSG_FLASH) $@
$(OBJCOPY) -O $(FORMAT) -R .eeprom $< $@
%.eep: %.elf
@echo
@echo $(MSG_EEPROM) $@
-$(OBJCOPY) -j .eeprom --set-section-flags=.eeprom="alloc,load" \
--change-section-lma .eeprom=0 -O $(FORMAT) $< $@
# Create extended listing file from ELF output file.
%.lss: %.elf
@echo
@echo $(MSG_EXTENDED_LISTING) $@
$(OBJDUMP) -h -S $< > $@
# Create a symbol table from ELF output file.
%.sym: %.elf
@echo
@echo $(MSG_SYMBOL_TABLE) $@
$(NM) -n $< > $@
# Link: create ELF output file from object files.
.SECONDARY : $(TARGET).elf
.PRECIOUS : $(OBJ)
%.elf: $(OBJ)
@echo
@echo $(MSG_LINKING) $@
$(CC) $(ALL_CFLAGS) $(OBJ) --output $@ $(LDFLAGS)
# Compile: create object files from C source files.
%.o : %.c
@echo
@echo $(MSG_COMPILING) $<
$(CC) -c $(ALL_CFLAGS) $< -o $@
# Compile: create assembler files from C source files.
%.s : %.c
$(CC) -S $(ALL_CFLAGS) $< -o $@
# Assemble: create object files from assembler source files.
%.o : %.S
@echo
@echo $(MSG_ASSEMBLING) $<
$(CC) -c $(ALL_ASFLAGS) $< -o $@
# Target: clean project.
clean: begin clean_list finished end
clean_list :
@echo
BJ Furman | ME 106 Intro to Mechatronics | Using AVRStudio 4.doc | 24FEB2007
Page 10 of 11
How to use AVR Studio 4 to program the ATmega128
@echo $(MSG_CLEANING)
$(REMOVE) $(TARGET).hex
$(REMOVE) $(TARGET).eep
$(REMOVE) $(TARGET).obj
$(REMOVE) $(TARGET).cof
$(REMOVE) $(TARGET).elf
$(REMOVE) $(TARGET).map
$(REMOVE) $(TARGET).obj
$(REMOVE) $(TARGET).a90
$(REMOVE) $(TARGET).sym
$(REMOVE) $(TARGET).lnk
$(REMOVE) $(TARGET).lss
$(REMOVE) $(OBJ)
$(REMOVE) $(LST)
$(REMOVE) $(SRC:.c=.s)
$(REMOVE) $(SRC:.c=.d)
$(REMOVE) .dep/*
# Include the dependency files.
-include $(shell mkdir .dep 2>/dev/null) $(wildcard .dep/*)
# Listing of phony targets.
.PHONY : all begin finish end sizebefore sizeafter gccversion \
build elf hex eep lss sym coff extcoff \
clean clean_list program
BJ Furman | ME 106 Intro to Mechatronics | Using AVRStudio 4.doc | 24FEB2007
Page 11 of 11