1
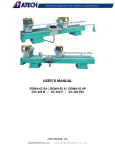
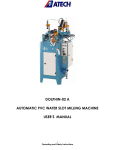
ZIGMA-02 AP/550 (DC 550)
AUTOMATIC DOUBLE HEAD MITRE SAW
USER’S MANUAL
ATECH MACHINE, INC.
[email protected]
www.ATechMachinery.com
WARRANTY CONDITIONS
1.The warranty period is 2 years from the delivery date of the machine.
2.All parts of the machine are under the warranty of our company.
3.If the machine has a defect within the warranty period, the warranty period is extended by the repair period.
The repair period of the machine is max. 30 working days. This period begins with the date of notofication of
the defect to the service station, or if there is no service station, to the authorized dealer, representative,
agent, importer or manufacturer. If the defect cannot be repaired within 15 working days, the manufacturer or
importer has to deliver the customer another machine with similar features until the repair has been
completed.
4.If the machine has a defect due to material, workmanship and assembly fault, the repair will be carried out
without any charge for parts, labor or any other charges.
5. The customer can request the replacement of the machine, or the return of the purchase price or discount in
proportion with the fault if;
- the same defect occurs more than twice within the stipulated warranty period after the delivery, or in case of
more than four different defects within the stipulated warranty period., or if the total defects of different defects
exceeds six defects, and makes the machine unusable,
-the repair period for the machine is extended,
- it is determined with a report of the service station, or in case that there is no service station, by the dealer,
representative, agent, importer or manufacturer, that a repair of the machine is not possible,
6.Defects due to use of the machine in contrary with the features described in the machine’s user’s manual
are excluded from the warranty.
Page 1
CONTENTS
1.0. General Information
1.1. Introduction
1.2. Information about the manufacturer
2.0. Machine’s Description and Purpose of Use
2.1. Machine’s description
2.1.1. DC 550 M-P-PB double head saw machinies definition
2.1.2. Accessories
2.1.3. Residual risks
2.1.4. Technical features
2.1.5. Overall dimensions
2.1.6. Cutting diagram
2.1.7. Part lists and technical drawings
3.0. Safety
3.1. Safety information
3.1.1. Machine safety information
3.1.2. Safety of the personnel operating the machine
3.1.3. Personnel protective equipments
3.1.4. Machine safety
3.1.5. Safety of working area
3.1.6. Procedure for isolation of machine
3.1.7. Safety during maintenance
3.2. Accident prevention
4.0. Placement directives
4.1. Safe transport of the machine
4.1.1. Installation of your machine
4.2. Preliminary works
4.3. Installation of conveyor
4.4. Pneumatic connections
4.4.1. Adjusting the air pressure
4.5. Electric information
4.6. Preliminary checks
4.7. Cutting speed adjustment
5.0. Operation
5.1. Operation genearal information
5.1.1. Dimensional and angel adjustment
5.2. DC 550 M double miter saw distance adjustment at 90° cutting
5.3. DC 550 M double miter saw, cutting degree angle adjustment processes
5.4. Making the cut
5.5. Stopping the cut
6.0. Replacing the batery on the display
6.1. Display parameter list
6.2. Display calibration adjustment
6.3. Changing the intial values
7.0. DC 550 PB Computer controlled automatic cutting machine information
7.1. DC 550 Calibration settings
7.2. PLC Software update
7.2. Display alarms descriptions
8.0. Safe installation of the saw blade information
8.2. Maintenance and cleaning of saw
9.0. Maintenance
9.1. Routine controls and maintenance
9.2. Maintenance at the end of working day
9.3. General lubrication
9.4. Special precautions
10.0. Noise emission values
10.1. Characteristic informations of machine
10.2. Specifications of filing evacuation manifold
10.3. Characteristic values of saw
10.4. Noise values
11. Troubleshooting guide
Page 2
1. GENERAL INFORMATION
1.1. INTRODUCTION
The user’s manual given by the manufacturer contains necessary information about the machine parts. Each
machine operator should read these instructions carefully, and the machine should be operated after fully
understanding them.
Safe and efficient use of the machine for long term depends on understanding and following the instructions
contained in this manual. The technical drawings and details contained in this manual constitute a guide for
the operator.
1.2. DISTRIBUTOR
ATech Machine, Inc.
10752-A Tucker Street – Beltsville, MD 20705 USA
Phone: +1-301-595-1816 Fax: +1-301-560-6627
Website: www.ATechMachinery.com E-mail: [email protected]
In case of any technical problem please contact your nearest ATECH dealer, or ATECH head office
through the above mentioned phone, fax or e-mail address.
Technical labels with the model description of the machine are fixed onto the front side of each
machine.
The machine’s serial number and manufacturing year are stipulated on the technical label.
Average life of the machine is 10 years. If you have any further failure and complaint, please inform
our head office as above or your dealer.
Technical labels with the model description of the machine are fixed onto the front side of each machine.
To minimize documentation, it is necessary to mention the below information in case of service requests.
1. Machine model
2. Machine serial number
3. Voltage and frequency
4. Name of dealer where machine was purchased
5. Date of purchase
6. Description of the machine fault
7. Average daily operation period
Machine’s serial numbers and production date are written on technical labels
Page 3
2.0. MACHINE’S DESCRIPTION and PURPOSE OF USE
2.1 GENERAL
Double head miter saws with 550 mm (22”) diameter circular saw for cutting PVC and Aluminum profiles in right
angle or various angles in required lengths.
Left cutting unit is fixed, right cutting unit is mobile.
Both cutting unit, internal and external angles are available feature to make the cutting process,
Cutting the inner cutting operations units, 45 degrees, the outer cutting operations ability to cut angles, 22.5
degrees
All degress, cutting units, set the angle automatic income (For Details, see article 5.3.1)
Right mobile cutting unit is equipped with conveyor system attached on it.
Saw movements during cutting processes are controlled via hydraulic / pneumatically, thus required movement
speed according to material type can be adjusted preciously
To ensure worker’s safety double hand controlling is provided.
Pneumatic brake system exists on mobile right cutting unit; it fixes mobile unit at the beginning of cutting
process pneumatically.
The machine has been designed according to UL & CSA Safety Directives.
2.1.1.1. DC 550 M SEMI-AUTOMATIC DOUBLE HEAD MITER SAW:
Digital length display exists on mobile cutting unit.
Easiness of setting right mobile cutting unit to desired length quickly by hand is provided.
2.1.1.2. DC 550 P AUTOMATIC DOUBLE HEAD MITER SAW:
Cutting amount can be entered and programmed through entering data on the screen.
Slicing opportunity, Min 24mm
There is stroke of feeder. Multiple stroke adjustment is possible up to a minimum length of 9999 mm
2.1.1.3. DC 550 PB AUTOMATIC DOUBLE HEAD MITER SAW (COMPUTERIZED):
Computerized system. (Windows based operating system)
It is possible to transfer profile specifications from the program with the aid of an USB memory,
It has slicing feature (min. 25 mm)
Slicing opportunity, Min 24mm
There is stroke of feeder. Multiple stroke adjustment is possible up to a minimum length of 9999 mm
STANDARD EQUIPMENT
2 x 550 mm (22”) Diamond Tipped Circular
Saw
Air Gun
Extra Conveyor Attached on Mobile Unit
Profile Support Apparatus
OPTIONAL EQUIPMENT
Spray Cooling System (Standard in DC 550 PB
Model)
Barcode Print System (Only in 550 PB Model)
Extra Circular Saw
2.1.3. RESIDUAL RISKS
Normal using conditions necessitate only one operator around the area of control panel. As the operator will use
the buttons of control panel during cutting for operating, stopping and for material feeding; he should take care of
persons inside his risky working area.
Please do also keep in mind the risks related with wrong installation of electric system and saw or due to
wrong installation of machine/ work piece
Page 4
1
4
6
5
3
2
FIGURE 1
No
1
2
3
4
5
6
DESCRIPTION
FIXED CUTTING UNIT
FIXED CONTROL PANEL
MOVABLE CONTROL PANEL
MOVABLE CUTTING UNIT
FRAME
PROFILE SUPPORT CONVEYOR
QTY
1
1
1
1
1
1
2.1.4. TECHNICAL FEATURES
H
TEKNİK ÖZELLİKLER
TECHNICAL FEATURES
d
BAR
Hava Tük
Air Const
L
D
W
cm
Kg
DC 550 M
3 kW x 2 50
50-60
60 Hz
400 V AC 3 N PE
d= 30 / 32 mm 3000 dev/dak
64 Lt/dak
6-8
- Bar
124x512x187 1380 1730
D=550 mm .
Lt/Min
RPM
DC 550 P
3 kW x 2 50-60 Hz
400 V AC 3 N PE
d= 30
0 / 32 mm 3000 dev/dak
64 Lt/dak
6-8
- Bar
124x512x187 1406 1756
D=550
550 mm .
Lt/Min
RPM
DC 550 PB
3 kW x 2 50-60 Hz
400 V AC 3 N PE
d= 30
0 / 32 mm 3000 dev/dak
64 Lt/dak 124x512x187 1436
1786
6-8
- Bar
D=550
550 mm .
RPM
Lt/Min
Page 5
2.1.5. OVERALL DIMENSIONS
FIGURE 2
2.1.6. CUTTING DIAGRAM
At 90˚
At 45˚
Min. 400 mm
Max. 4000 mm
Min. 580 mm
Max. 4000 mm
There is stroke of feeder. Multiple stroke adjustment is possible up to a minimum length of 9999 mm
FIGURE 3
Page 6
At 90˚
At 45˚
Min. 400 mm
Max. 4000 mm
Min. 400 + (2xH) mm
Max. 4000 + (2xH) mm
FIGURE 4
Page 7
2.1.7. TECHNICAL DRAWINGS
1
10
2
3
9
4
5
8
6
11
No
Order No
Item
1
2TU012510-0356
2
2
2TU011441-0462
2
3
2TU011441-0461
2
4
2TU013210-0079
2
5
2TU011441-0465
2
6
2TU012410-0114
2
7
1PN020000-0144
2
8
3UA110030-0020
1
9
2TU011510-0050
2
10
2TU011441-0469
2
11
1PN020000-0144
2
FIGURE 5
Page 8
3. SAFETY
3.1. SAFETY INFORMATION
The symbols shown hereunder are necessary to be read with special attention. Not reading or observing of them
may cause damage to the equipment or personal injury.
IMPORTANT
The IMPORTANT symbol above is one telling to apply special care and to be careful at carrying out the specified
operation.
CAUTION !
The CAUTION! Symbol above warns you against specific dangers, and requires to read the text. Not observing
may cause damage to the equipment.
DANGER WARNING
The above symbol DANGER WARNING, warns you against specific dangers, and you have definitely to read
them. Negligence may cause damage to the equipment and bodily injury.
Read the user’s manual carefully before using the machine or carrying out maintenance works.
3.1.1. MACHINE SAFTEY INFORMATION
Taking into consideration that using of machine and its equipments bears risks any job that will be
performed with it should be performed with utmost care. Aluminum and PVC cutting machines are
classified as most dangerous machinery because of its high speed of rotation and high speed of forward
movement. For these reasons utmost care and focusing is necessary while operating it.
• For perfect efficiency all security and protection equipments should be used. Warning signals on the machine
and advices on the User’s manual should always be conformed.
• It is totally forbidden to operate the machine removing the top protection cover and other protection equipments.
• For lifting, moving, transporting the machine or performing maintenance to electrical or pneumatical system
qualified and authorized personnel is required.
• By no means is any modification on any of the part/place of the machine is not permitted.
• With the machine running any adjustment, cleaning or maintenance is forbidden.
3.1.2. SAFETY OF THE PERSONNEL OPERATING THE MACHINE
Operator of the machine should wear appropriate clothing fitting on him / her. Loose fitting clothes or any sort of
jewelry that might be pulled by the moving parts of the machine should not be used.
The operator should not use the machine in case of lose of focusing on the work and discomfort of body which
will lead to lose of reflex and scattering of attention.
3.1.3. PERSONAL PROTECTIVE EQUIPMENTS
•
•
•
•
•
Using protective equipments mentioned below are advised:
Heavy type hand gloves to protect against cutting, puncturing or piercing during transportation of materials,
Ear protectors / plugs against extreme noise,
Glasses against particles that might be spread as dust, filings, etc,
Heavy duty shoes when carrying materials with certain weights and dimensions,
Use of mask when using cooling liquid
Page 9
3.1.4. MACHINE SAFETY
•
•
•
•
•
Always use well sharpened and balanced original saws
When changing the saw clean perfectly the saw and connection flange, check whether it is damaged or not.
Sharpening should be performed with regular intervals and appropriate to the angle of the saw.
Use an appropriate tool not your hand for cleaning of the fillings on the plate.
Never put any foreign substance, tool, etc. on the working plate.
3.1.5. SAFETY OF WORKING AREA
• Provide enough and regular lighting of the working area.
• Arrange the surrounding of working area with materials to be processed and have already processed for easy
walking.
• Clean the dust, filling, chips on the ground to get rid of untidiness and accident risks.
3.1.6. PROCEDURE FOR ISOLATION OF MACHINE
• Before performing any maintenance, repair, cleaning or such works the electricity of the machine should be cut
off from the main schalter. Turn off the pneumatic air supply. Release the pressurized air that remains in the
machines pneumatic circuit.
• Maintenance, repair, cleaning and such works should be performed by personnel who have taken all the
precautions listed above. If it is a simple work it can be the operator to perform it after taking these precautions.
• If the machine is not in use turn off the main schalter and pneumatic air.
3.1.7. SAFETY DURING MAINTENANCE
• Regular maintenance of mechanical and electrical components is an important security factor in terms of leading
to a long lasting life and preserves better performance values
• It is forbidden to perform any maintenance work on any mechanical part without first performing the isolation
procedure of the machine (turning of the electrical and pneumatic circuits).
• During changing of any item appropriateness of the item should be checked and pay attention to not to forget any
foreign item or tool inside the machine.
• Do not step on the machine.
• Use gloves when changing saw.
• Original parts should be used when changing. Electrical components should be the same or should have the
equivalent characteristics with those mentioned in electrical diagram. In case of hesitation contact with the
manufacturer. No responsibility will be accepted by the manufacturer if these directives are not fulfilled.
•
IMPORTANT
The safety information has been given above. Please read the instructions carefully and keep this manual
at an easy accessible place for reference.
3.2. ACCIDENT PREVENTION
3.2.1. Our machines are manufactured in accordance with
international safety directives.
CE safety directives, which cover national and
3.2.2. It is the task of the employer to warn his staff against accident risks, to train them on prevention of accidents,
to provide for necessary safety equipment and devices for the operator’s safety.
3.2.3. Before starting to work with the machine, the operator should check the features of the machine, learn all
details of the machine's operation.
3.2.4. Machine should be operated only by staff members, who have read and understood the contents of this
manual.
Page 10
3.2.5. All directives, recommendations and general safety rules contained in this manual have to be observed fully.
The machine cannot be operated in any way for purposes other than those described herein. Otherwise, the
manufacturer shall not be deemed responsible for any damages or injuries. And such circumstances would lead to
the termination of the warranty.
FIGURE 6
4. PLACEMENT DIRECTIVES
All of our machines are packed in perfect installation conditions after careful inner inspection and
control. In overseas or TIR transportations machines are delivered inside wooden boxes after coating them
with special oils against oxidation. In case of any damages that have occurred during transportation,
the
transporter should be informed. Additionally, existence of all standard and optional accessories should be
confirmed.
Minimal dimensions for secure working are given in Figure 6 for machine settlement. These dimensions are:
L : Machine length 4000 mm (There is stroke of feeder Multiple stroke adjustment is possible up to a min.
length of 9999 mm.
L1 : Min. 3000 mm
L2 : Min. 6000 mm
Min L : Necessary working area 13000 mm
G : Machine width 1700 mm
G1 : The necessary work space min. 1500 mm (safely performing maintenance and cleaning works)
G2 : 1500 mm
Min G : 4320 mm
4.1 HANDLING THE MACHINE SAFELY
Machine can be moved with a fork-lift. Please keep in mind weight of the machine: 1.127 kg.
When using fork-lift for moving do not lift the machine before checking that the transferring apparatus such as
fork is full inserted under the machine .
In order to get more stability when hanging the machine in case of move it, hang it from bottom insofar. Move
the machine without shaking it in slow movements. Be sure to take care of persons in dangerous places.
4.1.1. INSTALLATION OF THE MACHINE
4.1.1.1 It is advised to make a general control of the items whether any of them is missing during
transportation, loading before starting up the machine
4.1.1.2. See Figure 6 for opening the top cover towards back, using filing evacuation manifold, and for doing
proper maintenance and cleaning
4.1.1.3.The place where machine will be placed should be hard, smooth and able to withstand the
weight of the machine.
4.1.1.4. In order to preserve machine’s stability be sure that the legs are touching ground When it is
necessary adjust it with the adjusting screw at feet. (See figure 11)
Page 11
ADVISED TRANSPORTATION TYPE
4.2. PRELIMINARY WORKS
4.2.1. Before operating the machine, dismantle transportation security parts (see Figure 7) Do not install neither
electrics nor pneumatic connections before dismantling transportation security parts.
4.2.3. Keep the dismantled transportation security parts for possibility of using in future transports
CAUTION !
Safety part
Setting gauge
degrees
first
NOTE: Safety part must be removed before the
run.
Transport safety -2
Transport safety -1
Part of the shaft
determined
FIGURE 7
Page 12
FIGURE 8
4.2.4. In order to secure the front control panel it is delivered separately. Assemble front control panel on to the
machine as shown in Figure 8.
Conveyor
connection plate
Roller
conveyor
FIGURE 9
FIGURE 10
Dust collector
connection
4.2.5. View the feed conveyor for the assembly, see figure 9
4.2.6. To use shaving manifolde, the absorbtion flowrate of air for dry chips has to be thought min.20m/sec.
4.2.7. 28 m/sec absobtion flowrate of air wet chips (>=%18 humidity) can be decided to operate the manifolde
4.2.8. Assemble conveyor driving shaft to the driving shaft on the chassis (see Figure 11)
4.2.9. For support and fixing operation you can use the places marked as A by screwing to the ground
A
Adjustment screw
FIGURE 11
Conveyor shaft
support
Conveyor shaft
support plate
M10*30 Hex
screw
Page 13
4.3. INSTALLATION OF CONVEYOR
After placing and balancing the machine
• Fix KN 300 Material Feeding Conveyor, which is supplied as a standard accessory, to the right side face of the
machine over the moveable cutting unit with the supplied screws on the machine
(See Figure 9)
• With an accurate and calibrated water balancer check that the planes of the machine and conveyor are parallel
to the ground and that the machine plate and conveyor wheels are on the same plane. (After all these adjustments
fix the machine’s adjustable feet screw’s nuts, and conveyor’s adjustable feet screw’s nuts)
4.4. PNEUMATIC CONNECTIONS
• Machine’s pneumatic system is numbered on the pneumatic hoses
• In order to isolate the machine from pneumatic air that remains when the machine is shut down please use the
air gun.
• Use the valve shown in Figure T for opening/closing of pneumatic system.
• Pneumatic air pressure for working should be 6 - 8 bars.
• For pneumatic air feeding to the machine prepare Ø8 mm pneumatic hose
4.4.1. AIR PRESSURE ADJUSTMENT
• Pull the adjustment button of the oil unit upwards. (see Figure 12)
• Turning the adjustment button in clockwise direction increases the pressure. Turning the adjustment button in
counter clockwise direction decreases the pressure.
• Once you read 7-8 Bar on the manometer, push the adjustment button of the conditioner down and lock it in that
position. (See Figure 12)
• The conditioner unit collects the water within the air system in a receptacle in order to prevent damage to the
pneumatic system components. Discharge this water periodically (at the end of the working day) by pressing or
opening the button under the conditioner. (See Figure 12)
• The manufacturer recommends to use the following oils with the conditioner: TELLLUS C 10 / BP ENERGOL
HLP 10/ MOBIL DTE LIGHT / PETROL OFISI SPINDURA 10.
Make the adjustment of oil unit level so that for 10 work cycle 1 droplet is sent to the system.
Pressure
Adjustment Button
Manometer
Oil Depot
FIGURE 12
Oil filling cup
Air pressureand water
discharge screw
Page 14
4.5. ELECTRIC CONNECTION
First of all, supplied voltage and frequency from power source has to adapted according to the voltage and
frequency values for the electrical system of machine.
• Use a connection cable socket in accordance with the CE Safety Directives.
• Make the electric socket connections after switching the MAIN SWITCH on the machine to 0
• Electrical connections of machine has to be connected according to the electrical diagram.
• Perform the machine connections according to the electric circuit diagram.
FIGURE 13
The electric connections have to be carried by qualified electricians only. Check the direction of the saw
blade rotation. If the saw blade rotates in reverse direction, check the cable connections and re-connect if
necessary.
A saw blade rotating in reverse direction causes danger both for the operator and the equipment. The
teeth of the saw blade would be damaged and even broken.
4.6. PRELIMINARY CHECKS BEFORE CUTTING
Before going through cutting process, performing a few preparation checks is advised:
• Check the supply voltage and frequency information written on the machine plate to comply with your electrical
system,
• Whether the power cord is chosen in the right cross sectional area,
• Whether the saw is fixed properly; turning without rolling/secretion and the direction of rotation is as indicated on
the label of machine (see Figure 13).
• Whether pneumatic air is supplied to the system (otherwise the machine will not work),
• Whether sufficient oil exists in the air conditioners oil reservoir,
• Whether conveyor(s) fixed appropriately to the machine chassis
4.7. CUTTING SPEED ADJUSTMENT
4.7.1. The saw blade cutting speed adjustment and simultaneous operating of both cutting heads at the double
head miter saw is important for preventing loss of time and to ensure high-quality clean cuts.
4.7.2. The two saw blade groups can be adjusted independently from each other through the reducer valves
located on the hydro-pneumatic system at both cutting heads. (See Figure 14)
4.7.3. If the cutting speed is too high, turn the cutting speed adjustment screw (See Figure 14) in clockwise
direction until the desired speed has been reached. If the speed is too low, turn the adjustment screw in reverse
direction.
Ensure simultaneous operation of both saw blades.
Page 15
Cutting speed
adjustment valve
Clamping speed
adjustment valve
Coolant spray
valve
FIGURE 14
NOTE: ENSURE THAT THE PNEUMATIC CLAMPS ARE OUTSIDE THE CUTTING RANGE OF THE SAW
BLADE AFTER ADJUSTING THE DESIRED ANGLE. See Figure 15
x
CORRECT
WRONG
FIGURE 15
5.0. OPERATION
5.1. GENERAL WORKING INFORMATION
5.1.1 Our double head miter saws DC 550 M and DC 550 P are for the cutting of non-ferrous metals like
aluminum, wood and PVC materials. The operator adjusts the cutting speed of the saw blade according to the
material to be cut (manually). The carbide tipped saw blade equipped with these machines ensure high quality
clean cuts of the material. The measurement system on the machine and the digital display enables you adjust
the cutting length precisely.
The cutting length of materials to be cut at
DC 550 M Semi-automatic double head miter saw, is adjusted precisely using the measuring tape on the
machine and the digital read-out attached to it. (See Figure 17-18) Both of the unit, turn in 90 and 45 degrees
angles are automatic.
DC 550 P fully automatic double head miter saw, applications like moving, positioning at the cutting point,
braking, cutting and tilting of both cutting heads to 90 and 45 degree angles are carried out automatically via
electronic positioning. Item feature is available in slicers.
DC 550 PB Computer Controlled Automatic Double Head Cutting Machines; All movements are computer
controlled, with item slicing facility. (Windows based operating system.)
Page 16
* Display
* Turn Wheel
Brake Activation
Button
Angle Display
FIGURE 16 DC 550 M
* Only machines 'DC 550 'M'' Model
5.2. DIMENSIONAL AND ANGULAR ADJUSTMENTS
After completion of the electric and pneumatic connections of the double head saw ZIGMA, the appropriateness of
the cutting length and angle depends on;
a) Proper length adjustment and
b) Angle adjustment.
5.2.1. ''DC 550 M'' DOUBLE HEAD MITER SAW
Distance adjustment at 90º cutting;
5.2.1.1. Deactivate the brake by turning the brake button on the movable cutting head.(see Figure 16 )
5.2.1.2. Move the movable cutting head via the hand wheel to the cutting start point using the measuring tape on
the machine frame and the magnifier (see Figure 16).
5.2.1.3. Make the precise and final (+ / - 0.2) length adjustment by turning the hand wheel to the right or left.
5.2.1.4. Fix the movable head by activating the pneumatic braking system
NOT: DC 550 P and DC 550 PB Model, all data is entered via the screen. Display the information described in
the following pages
IMPORTANT
NOTE: FOR THE OPERATOR’S SAFETY, THE CLAMPS WILL NOT WORK AND THE CUTTING HEAD WILL
NOT MOVE BEFORE THE BRAKING SYSTEM ON THE MOVABLE HEAD HAS BEEN ACTIVATED.
5.3. DC 550 DOUBLE CUTTING MACHINES ANGLE CUTTING OPERATION
Angle selection
button
Clamping button
Page 17
Heads cut direction angels, is determined by the upper-left button in the picture. Button Surrouned which direction
(internal or external) to head in that direction will go to the angle. Working position angle adjustment, should be
made to other unit.
5.3.1. Internal Angel Adjustment; Cutting units setting the direction of the internal angle, first of all cutting unit
(Figure button) tilt direction of the external angle. ''Internal Angle Adjustment Stop'' biring the desired angle. Article
5.3.3 Apply
5.3.2. Extenal Angel Adjustment; Cutting units setting the direction of the external angle, first of all cutting unit
(Figure button) tilt direction of the internal angle. ' Extenal Angle Adjustment Stop'' bring the desired angle Article
5.3.3 Apply
5.3.3. Setting Gauge Degrees; Bring the ''Angle adjustment stop (Setting gauge degrees)'' to the demanded
angle value and tighten the two screws (see Fig.17). If the angle adjustment value of the piece to be cut is within
15-22.5-30-45-90, ensure that ''spring spindle'' engages with the recess hole in the channel. If the cutting will be
performed at the intermediate angles other than those mentioned above, there will be no hole (recess) at the
opposite of the spring spindle. Tightening the screws on the angle adjustment stopper will suffice.
Shock absorber
piston rod
Shock absorber
piston
Setting gauge
Angle adjustment
stop (external angle)
Catch shaft
fixing holes
5.4. MAKING THE CUT
FIGURE 17
5.4.1 Cutting at 90° at DC 550 M Double Head Miter Saw: After adjusting the cutting speed according to the
material to be cut as described under Item 4.7
5.4.2. Turning the hand wheel, move the movable head to the cutting start point by reading the measurementon the
display. After adjusting the cutting length, fix the movable head by activating the brake on the movable head (by
turning the ON/OFF brake switch).
5.4.3. Push the profile or material to be cut from the direction of the movable head to the direction of the fixed head.
Fix the profile by using the clamp switch
5.4.4. Operate the saw blades by pressing the Motor Start 1 and 2 buttons on the control panel
5.4.5. Keep the the cutting buttons pressed simultaneously until the work piece is cut off.
5.4.6. Release the buttons after the cutting operation is finished. Both saw blades return to their start position.
5.4.7. Release the clamps and remove the cut work pice.
CAUTION !
Page 18
In case of emergency or danger release the cutting buttons or press the emergency stop button.
After pressing the Motor Stop button, the saw blades terminate their free rotation within 15 secs. and stop
completely.
5.5. STOPPING THE CUT
5.5.1. To pvevent turning of saw blade, push the motor s top button.
5.5.2. Position the main switch to ''0'' position.
6.0. * REPLACING THE BATTERY ON THE DISPLAY :
(Only DC 550 M Serial machines)
No
Part Name
İtem
1
Display protection box
1
2
Display
1
3
Battery box cover
1
4
Battery
1
5
M5x6 Hexagonal head screw
2
6.1. CHANGING DISPLAY PARAMETERS
(Only for DC 550 M Series Machines)
Parameter List :
Program Number
6.1.1
P O1
Initial Factory Settings
:
X
01
X
00
0 = Counting Direction (+)
1 = Counting Direction (-)
0 = mm Modu
1 = Inch (0.001 ) Accuracy
6.1.1.1
6.1.1.2
P 03 Point of decimals 0T..3 (Only in mm Model)
P 05
1
Buton Functions
X
X
0 = Set Button Aktive
1 = Set Button Inaktive
0 = Incremental Button Aktive
1 = Incremental Button Inaktive
6.1.1.3
1
P 08 Coefficient (Value of factor)
6.1.1.4
P 09 Referans Point
6.1.1.5
P 99 Software Version
00
1,0000
000000,0
00
1,0000
000200,0
6.1.1.6 When F & Set buttons are pressed simultaneously the value of reference point appears (200 mm)
6.2. CALIBRATION OF DISPLAY (Only for DC 550 M Series Machines)
Page 19
6.2.1. If there exist a problem about the length of cut, make get in touch with the referancing screw of movable
head to the fixed head. Use the movable head break piston to fix the movable head. Cut a sample profile in that
situation without changing the referance position and measure note that length. (Factory setting value is 200mm)
Measure the cut profile with a calibrated measurement device (caliper, ruler, etc). If the value differs from the
factory setting value, then write that value to the P 09 paremeter as shown. For example:
Mesaured Value: 231mm
P 09 Paremeter value must be as fallows : 000231,0
If the cutting length is less than 230 mm then change the value by decreasing 000230,0
After this process cut another profile with a length of 4000 mm, Measure and note the length of cut piece by
means of a calibrated equipment. For example if the cut profile is measured to be 4001 mm instead of 4000,
change the value of P O8 COEFFICIENT VALUE as 1,0003 instead of 1,0000 1,0003.
1,0001
1,0002
0,3mm
1,0003
0,6 mm
0,9mm
NOTE: CUT ACCURACY ON DISPLAY IS 0.2mm.
6.3. CHANGING THE INITIAL VALUES
6. 3.1. Press and hold F button for 3 seconds, Parameter P 01 will appear on the display.
6.3.2. Pressing F button for once parameter value of P 01 will appear, if it is pressed again one can pass to
parameter P 03, and it can be changed. (Other parameters could also be passed through P 05, P 08, P 09T etc.)
6.3.3. For example: When P 01 parameter appears the first digit flashes, inc/abs button (blinking) changes the
value. Passing to the second digit can be accomplished by pressing Set button. This time second digit flashes,
inc/abs button changes the value. This procedure can be used to change all other parameter values.
7.0 DC 550 PB OPERATION DATA FOR COMPUTER CONTROLLED AUTOMATIC CUTTING MACHINE;
This is the initial screen; machine should be sent to reference when this screen displays
Machine can be sent to the reference point by clicking the button in the figure.
Program will be terminated when this button is pressed
Note : Vices should be open while moving unit moves to the Reference point
Page 20
This page displayed on the screen is the cutting page.
Two operating modes are available when performing regular cuttings with the machine. One of them is “cutting
from the list (Auto)”, and the other is manual cutting. After the required measures and angles are entered to the
machine (either manually or from the Cutting List), they are sent to the length value related with the cutting. After
this, cutting process should be performed with two hands for job safety purposes. As long as you press the cutting
buttons the saws will continue the cutting process. When you retreat your hands off the button, saws will
automatically return to their original positions.
Machine will not perform the cutting job if one of the covers is open. In addition, when the housing covers of the
saw are open,the machine will not run.
Counters will be displayed on the screen if the cutting process is being performed in the manual cutting mode.
Number of pieces to be cut shall be inputted to the counter fields. In case no number has been entered or the
entered number of pieces is completed, machine will display a warning and stop the cutting process. Number of
pieces to be cut should be updated in order to resume the cutting process.
When this button is pressed, running modes are selected either from the list or by manually. Button
is lit green if the cutting is performed from the list and a “cutting from list” text displays on the button. In this case,
machine automatically reads the cutting measures from the list. Button is lit red if the cutting is performed manually
and a “manual cutting” text displays on the button. Cutting measures can be entered manually in this mode.
When performing the cutting process from the list, machine stores the performing of a profile-cut and
the button in the picture turns green. If the button is green, re-cutting of the profile inadvertently by the operator is
prevented. However, if the same profile is required to be re-cut, button in the figure next to the active line is
pressed and the machine allows the re-cutting of the profile. Button turns red when the re-cutting is allowed.
Page 21
When this button is pressed, all the profiles in the list are allowed to be cut regardless of the
abovementioned button that allows the re-cutting of the profile.
.
Profiles in the cutting list are shown in the visible section of the figure. Operator is capable of seeing the next
profiles to be cut via the screen that displays the profile data.
Active cutting measure in the list in Auto mode is displayed here. Machine is sent to the measure
given in this section. If the cutting is being performed manually and not from the list, required cutting measure is
entered here and the machine is sent to the suitable measure.
If the cutting will be performed by using the external angles or slicing will be performed on the
profiles that have been framed from the meeting rail, profile height should be entered. Profile height is entered here.
Machine makes a calculation using the height displayed here and sets its measures. In case internal angles are used,
entering a value is not necessary.
If a mould is used for the profile when performing a cutting, mould height should be entered here.
Machine performs the cutting process by calculating the profile length value here.
This is the start button that runs the saws of the machine. There are two of them on the left and right.
The saw on the side where the button is pressed starts to run.
It stops the saw motors of the machines
If the automatic switchover is active when performing a cutting from list, machine switches to
the next measure automatically after completing the profile cut and waits for the cutting to be performed. Operator
does not have to send the machine to the measurement manually. However, if the manual switchover is active,
operator should select the next profile to be cut after a profile has been cut, and send the machine to the
measurement manually. Green button is the active one. For instance, in this figure the manual switchover is active.
Button of the ve mode to be activated is pressed
Slicing screen of the machine is displayed when this button is pressed.
Page that displays the barcodes to be printed is opened when this button is pressed.
When this button is pressed, a page that contains various setting and calibration options of the machine is
opened.
Page 22
When this button is pressed, a page where the units and angles of the machine can be moved freely is
opened.
Page on the figure is the page where the print settings are performed. Barcode data to be printed can be monitored
on this page. If the print is automatically selected, barcode will automatically print the label of the cut profile. If
manual printing is selected, printing will be performed when you press the print button, rather than automatically
printing.
This is the page that allows moving the machine’s moving unit to right/left and its head angle to in/out.
Moving unit of the machine can be moved to left/right by using the arrow buttons.
Machines current position can be monitored on the window that is displayed.
.
Via these buttons on this figure, machine angles can be moved in and out manually
(on the direction of the arrows). A green light is lit under the direction arrow whose path the machine follows.
In some cases, page can be opened automatically in order to adjust the head angles of the machine manually.
When the page is displayed automatically, simply locate the machine to a position where you can adjust its angles
and click OK; machine will close the page automatically and keep on running.
Setting the range locations of the machine head angles:
Page 23
Setting the internal angle side: To adjust the angle of the inner side, concerned head angle is laid through the
angle on the external side. Spring bolts in the inner side is loosened, spring is drawn inside, required angle is set
and spring is released. Finally, fixing bolts are re-tightened and setting of the inner side is completed.
Setting the external angle side: To adjust the angle of the external side, concerned head angle is laid through the
angle on the internal side. Spring bolts in the outer side is loosened, spring is drawn inside, required angle is set
and spring is released. Finally, fixing bolts are re-tightened and setting of the outer side is completed.
For instance; if the internal angle is set 45° and external angle is set 45°, machine runs between those angles. In
case the cutting should be performed out of this range, angles should be regulated. Inner side should be set to 45°,
and outer side should be set to 90° if only the internal angles will be used.
Screen on this figure is the slicing screen. Use of the buttons shown on this screen is identical with those of the
normal cutting mode screen.
5 different automatic profile slicing is possible with this method. These are explained as follows:
Slicing On Position: When the machine is in this position, it slices the profile in the demanded angle and as
standard.
I.e.: Enter 90° for the constant head angle.
• Enter 3500 mm for the raw material height.
• Enter 500 mm for the length.
• Press “send to measurement” button.
• After machine is sent to measurement, raw material height will be lit green. So we can be sure that the machine
has been sent to suitable section.
• After the machine has been sent to the suitable section, slicing process is started by pressing the double-hand
cutting buttons.
When the abovementioned sample values are inputted, a profile in 3500 mm height is sliced equally in 500 mm
heights. Slicing process is over once the entered number of slices is completed or the profile laid to the machine is
finished.
Slicing Off \ Serial Cutting \ Free: In this position, machine performs the slicing process by laying one measure
to internal angle and the other measure to external angle. You should adjust the angle range before starting the
process.
Page 24
For instance; a 3600 mm profile is demanded to be sliced in 600 mm height and as to be 4 sides of 45° each;
Stop springs that set the head angles are adjusted according to the angles.
Head is sent 45°to inner side in order to set the constant head angle.
External angle block gage is set in such a way that the head lays 45° outside and its screws are tightened.
Head is laid 45°to external angle.
Internal angle block gage is set to 45°.
After the block gage is set;
Enter 3,600 mm for the raw material height.
Enter 600 mm for the length.
Press “go to measurement” button.
• After machine is sent to measurement, raw material height will be lit green. So we can be sure that the machine
has been sent to suitable section.
•
•
•
•
•
•
•
•
•
•
Slicing Off \ Serial Cutting \ From the list: Machine performs the slicing by laying a constant measure to both
internal and external angles. Inner side should be set to 45°, and outer side should be set to 45° before the process
is started. In this position, machine cuts a 6000 mm profile in the measures stored in the profile cutting list and as
their angles to be 45°automatically.
For instance;
• Enter 6,000 mm for the raw material height.
• You don’t need to enter a value for the length as is automatically selected from the list.
• Press “go to measurement” button.
• After machine is sent to measurement, raw material height will be lit green. So we can be sure that the machine
has been sent to suitable section.
• After the machine has been sent to the suitable section, slicing process is started by pressing the double-hand
cutting buttons.
• After this process is over, machine will automatically cut the 6000 mm profile in the measures defined in the list.
Slicing Off \ Meeting rail \ Free: In this position, machine is used by the companies that manufacture boxes from
the meeting rail profiles. As both sides of the meeting rail are the same, no loss occurs in the cutting processes.
Machine performs the cutting process by laying a constant measure to inner and outer angles. You should adjust
the angle range before starting the process.
• For instance; a 3600 mm profile is demanded to be sliced in 600 mm height and as to be 4 sides of 45° each;
• Stop springs that set the head angles are adjusted according to the angles.
• After the block gage is set;
• Enter 6,000 mm for the raw material height.
• Enter 600 mm for the length.
• Profile height is entered here.
• Press “go to measurement” button.
• After machine is sent to measurement, raw material height will be lit green. So we can be sure that the machine
has been sent to suitable section.
• After the machine has been sent to the suitable section, slicing process is started by pressing the double-hand
cutting buttons.
• After this process is over, machine will have completed the slicing process by slicing the 6000 mm profile in such
a way that the both sides are 45° and no loss occurred.
Slicing Off \ Meeting rail \ From the list: Machine performs the slicing by laying a constant measure to both
internal and external angles. As both sides of the meeting rail profiles are the same, no loss occurs during the
cutting processes. Inner side should be set to 45°, and outer side should be set to 45° before the process is
started. In this position, machine cuts a 6000 mm profile in the measures stored in the profile cutting list and as
their angles to be 45°automatically.
For instance;
• Enter 6,000 mm for the raw material height.
• Profile height is entered here.
• You don’t need to enter a value for the length as is automatically selected from the list.
• Press “go to measurement” button.
• After machine is sent to measurement, raw material height will be lit green. So we can be sure that the machine
has been sent to the suitable section.
• After the machine has been sent to the suitable section, slicing process is started by pressing the double-hand
cutting buttons.
• After this process is over, machine will cut the 6000 mm profile in the measures defined in the list and without any
loss.
Page 25
Page on the figure is the page where the language is selected. Simply click on the flag that symbolizes the
language and activate it. Page will automatically close after the selection is made.
Page shown in the screen is the page where the formula records are kept, monitored and modified if required.
Values on each line refer to a cutting. Other values that are not displayed on the screen but required to be modified
button next to it and can be modified. New cutting list can be prepared
can be selected by pressing the
manually if required.
Clicking on the line to be modified opens a keypad and the required modifications can be entered by using this
keypad. Similarly, if modifications are required to be made on the sections that are not displayed on the screen,
button right to the line is pressed and the relevant page that keeps all the data is opened. Through that page,
required values can be modified.
Upside and downside switches can be performed via the direction buttons on the
figure above. Top line is the active line.
When this button is pressed, the page that is required to add a new formula record is opened.
When this button is pressed, a page where an operator confirmation window pops-up to delete the
active formula record.
If the operator selects “NO (Hayır)” on the window, deleting is cancelled. If “YES
(Evet)” is selected and OK is pressed, a numerator is displayed where the operator can enter the number of
formula records to be deleted.
Page 26
If the operator enters “0” and confirms, only the selected record is deleted. If “1” is entered and
confirmed, the next record is deleted.
When the button on the figure is pressed, you will be asked if you will delete all the records.
When “YES (Evet)” is selected, all the records will be deleted. If “NO (Hayır)” is selected, deletion is cancelled.
Page in the figure is the page where all data of a record are kept and can be modified when required. Field to be
modified is clicked once and keypad is opened. Modification made is approved and saved. A new record can also
be added when demanded. If Add button is clicked after the values are inputted, system saves the new values as a
formula record on the next record number.
Page on the figure is the page where various machine calibration and settings are made.
Position
: Value here indicates the position of the machine.
Offset
: Indicates the position of the machine in the zero point. It is used for calibrating the machine.
Calibration process has been explained separately.
Saw thickness
: Tooth thickness of the saw connected to the machine is entered in here.
Page 27
Clicking on this button opens the language selection page.
Clicking on this button opens the cutting page.
This button opens the factory default settings page. Access is password protected and is used
by the service staff.
Clicking on this button sends the machine to the reference point.
7.1 Setting the machine cutting calibration;
• Settings page is opened and machine is sent to the resetting point by clicking on the reference button.
• Operation page is opened.
• Position of the machine in zero point (shown in the screen) is entered in the length field, head angles are set to
90° and “send to measurement” button is pressed.
• Cutting is performed in this position.
• Settings page is opened.
• Cut piece is measured and entered in the “offset” field on settings page. Click on Password button and type
“1234” in order to access to this field and enter the value. No value can be entered on the page without typing the
password. After the measured value is entered to the offset field, calibration of the machine at 90° is completed.
o Another method;
o Assume that you wanted to perform a 1000 mm cutting, but the output is 999 mm. In such case, value in the
offset is reduced 1 mm and the cutting calibration at 90° is performed practically.
Or assume that you wanted to perform a 1000 mm cutting, but the output is 1,001 mm. In this case, value in the
offset field is increased 1 mm.
Calibration at 45° Length Measurement;
Constant Head 45
If a difference occurs between the cutting performance of the machine at 90° and 45°, moving unit head angle is
set to 90° (left) and laid to 45° without changing the length value after 90°calibration is over.
Cutting is performed in this position and the outputted piece is measured. Difference between the cutting processes
at 90°and the 45° (left internal angle) is entered into the “Constant internal angle difference” field. I.e.: If the
cutting at 90° is 780 mm and the cutting with constant head at 45° is 780 mm, 0,4 mm is entered to “Constant
internal angle difference field. If this difference is reverse, the same value is typed as minus (-).
Similarly, moving unit is set to 90° and the constant head (left) is laid 45°outer without changing the machine length
value. Cutting is performed in this position and the outputted piece is measured. Difference between the cutting
processes at 90°and the 45° (left external angle) is entered into the “Constant external angle difference field.
I.e.: If the cutting at 90° is 780 mm and the cutting with constant head at 45° is 780.2 mm, 0.2 mm is entered to
“Constant external angle difference” field. If this difference is reverse, the same value is typed as minus field.
I.e.: If the cutting at 90° is 780 mm and the cutting with moving head at 45° is 780 mm, 0,4 mm is entered to
“Moving internal angle difference” field. If this difference is reverse, the same value is typed as minus (-).
Moving Head 45
After the 90°calibration is complete, constant head angle of the unit is set to 90° and the moving head (right) angle
is laid to 45° inwards.
Cutting is performed in this position and the outputted piece is measured. Difference between the cutting processes
at 90°and the 45° (right internal angle) is entered into the “Moving internal angle difference
7.2 Updating the PLC Software;
Simply please copy the update software to be sent to you by the manufacturer when required to the system
location specified to you.
• Open the settings page by running the machine program.
Page 28
• Click on “Password” button and enter your password. (Password=5678.)
• Click on “Plc_Stop” button. Text on the button turns green.
• After the button is lit green, click on “Download” button. Once the button is pressed, machine will start to save
the new program. Button will turn green once the loading of the program is completed.
• After the download button turned green, click on “PIc_Run” button and wait the button turns green.
• After this, computer will re-start. Once the computer is turned on again, update process is complete and ready to
run.
7.3 Definitions of Screen Alarms
1
ALARM
Emergency stop is
pressed
CAUSE
REMEDY
• Emergency stop button is pressed
• Alarm has not been reset
•
•
Release the emergency stop
button
Reset the alarm
2
Quantity completed
Number of pieces to be cut are
completed
Enter a new amount or reset the old
amount
3
4
Low pressure
Power supply off
Air pressure is low
A breakout or sudden fluctuation with
the mains supply
Inspect the air
If the computer shuts off, plug the
computer off and reboot it.
5
Moving head should move
backwards
You should adjust the head angle in
order to cut in the angle in the list.
Move the head to a backwards
position, adjust the angle and click
on OK button
6
Moving head should move
forwards
You should adjust the head angle in
order to cut in the angle in the list.
Move the head to a forwards
position, adjust the angle and click
on OK button
7
Moving head saw cover is •
open
•
•
8
Moving head motor
thermic is blown
Inverter alarm
Motor may have faced a strain.
10
Constant head should
move backwards
You should adjust the head angle in
order to cut in the angle in the list.
11
Constant head should
move forwards
You should adjust the head angle in
order to cut in the angle in the list.
12
Constant head should
move forwards
You should adjust the head angle in
order to cut in the angle in the list.
13
Constant head saw cover
is open
9
Motor thermic maybe blown
•
•
•
14
Constant head motor
thermic is blown
Moving head saw cover may be open
Cover may not be fitted firmly.
Sensor may be malfunctioning.
Constant head saw cover may be
open
Cover may not be fitted firmly.
Sensor may be malfunctioning.
Motor thermic maybe blown
• Close the cover in case it is
open.
• Inspect the cover and re-install
it if it is not firm.
• Check the condition of the
sensor if everything seems fine.
Check the thermic and bring it to its
normal position if it is blown.
Cut the machine power and restart it
after shutting off the computer.
Move the head to a backwards
position, adjust the angle and click
on OK button
Move the head to a forwards
position, adjust the angle and click
on OK button
Move the head to a forwards
position, adjust the angle and click
on OK button
• Close the cover in case it is
open.
• Inspect the cover and re-install
it if it is not firm.
• Check the condition of the
sensor if everything seems fine.
Check the thermic and bring it to its
normal position if it is blown.
8.0 SAFE INSTALLATION OF THE SAW BLADE
8.1. To remove the circular saw blade from the blade shaft, follow the instructions below.
8.1.1. Apply the isolation procedure. (see Item 3.1.6.)
Page 29
8.1.2. Remove the M10 screw (Figure 21, No 159) with a 8mm hexagonal key by turning in counter clockwise
direction ( hold the blade shaft with a 17 mm wrench key )
8.1.3. Remove the washer No 158, the outer nut washer no 155, the saw blade bracket II no 29.
8.1.4. Take out the saw blade carefully.
8.1.5. Install the new saw blade on the shaft, ensuring that the rotation direction is correct.
8.1.6. Insert the other parts (washer and outer nut washer ) on to the shaft in the correct.
8.1.7. T ighten the M10 screw by turning to counter clockwise.
8.1.8. The saw blade needs to be sharpened in cetain intervals depending on the material you cut. It is necessary
to sharpen the blade if the cutting result is not clean and the blade is stressed
during cutting.
CAUTION !
8.1.9. Please control the saw blade before the use. The saw blade has to be assembled and fixed perfectly to the
saw blade shaft. (Without run out and from the suitable place) Please do not use deformed and functionality loosen
saw blades. Try the machine operating freely for 20 sec .
8.1.10. When replacing the saw blade, use the part of the blade washer Figure 21 No.122, which is appropriate
for the blade shaft diameter. The outer diameter of the blade washer is 30 and 32 mm.
8.1.11. During saw blade chnage operations, use protective gloves.
8.1.12. Saw must be selected according to standart DIN EN 847-1
No
Stok no / Parça Adı
Adet
6
4
6
FIGURE 21
2TU012510-0180
1SC021000-0012
2
8
9
2TU011110-0456
2
29
2TU011110-0423
2
38
45
1SK010000-0005
2TU011110-0422
2
2
122
2TU011110-0122
2
132
1EL070000-0001
2
138
155
2TU012510-0179
2TU011441-0016
2
2
158
2TU011110-0203
2
159
1SC011000-0002
2
8.2. MAINTENANCE AND CLEANING OF SAW
8.2.1. Advises for maintenance and cleaning of saw are:
• Use an appropriate cleaner for cleaning of saw against the filings that stuck on them.
• If the tooth of saw is worn immediately change with anew sharpened / brand new saw.
• Considering angular values of the saw, use appropriate sharpening machines.
• Store the saw in good conditions without touching each other.
CAUTION !
Page 30
9.0. MAINTENANCE
9.1. ROUTIN CONTROLLS and MAINTENANCE
9.1.1. Before performing any maintenance or cleaning work, be sure to turn the MAIN SCHALTER to 0
position. Together with this, close pneumatic system’s inlet valve.
9.1.2. If the machine is not active because of maintenance or service, put a warning message that can be easily
seen, indicating the situation
9.1.3. Ensure that the table and all kind of parts are clean and dry. Degrease and dry the table. Especially ensure
that the holding grips are clean and dry.
9.1.4. Remove all burr, chip and foreign materials from all surfaces of the machine. Use protective eye glasses.
9.1.5. Check the saw blade before each use. Turn the saw blade carefully (after removing the blade guard) to see
the teeth of the saw blade. Replace the saw blade if it is damaged.
9.1.6. Check the pressure of the air pressure system. If necessary, adjust the air pressure between 7-8 Bar.
9.1.7. Check the air pressure filters and the oil level of the conditioner. Fill up if the oil level is low
Unplug and disconnect the air pressure connections first, before carrying out these works.
9.2. MAINTENANCE AT THE END OF THE WORKING DAY
9.2.1 Disconnect the electric and pneumatic connections.
9.2.2 Remove all burr, chip and foreign materials from the machine surfaces.
9.2.3 Clean and dry the tables.
9.2.4 Apply a thin layer of machine oil to protect the table against corrosion. If the machine will not be used for a
long time, lubricate with a protective oil.
9.2.5 Lubricate both surfaces of the saw blade with machine oil in order to protect it against corrosion.
9.3. GENERAL LUBRICATION
9.3.1. Oil-free bearings are used in machine that does not require special lubrication or greasing. Periodically
control the level of oil inside oil-conditioner’s oil reservoir. For the oil to be used
refer
to
Item 4.3.1)
9.4. SPECIAL PRECAUTIONS
9.4.1. If the machine will not be working for a couple of days, prevent form of oxidation on nonsurfaces by lubricating. When it will be used again, clean this oil.
painted
9.4.2. If the machine will not be used for a long time:
• Set the Main Switch to “0” position
• Turn off the pneumatic system
• Apply 9.3.1 and 9.4.1 Items.
Page 31
10. NOISE EMISSION VALUES
10.1. CHARACTERISTIC INFORMATIONS OF MACHINE:
• Rotation Speed of Saw: 3000 rpm
• Motor Power: 3 kW x 2
• Nominal Voltage: 400 V
10.2. SPECIFICATIONS OF DUST COLLECTOR CONNECTION:
• Inner diameter of the manifold : 92 mm
• Outer diameter of the manifold : 100 mm
10.3. CHARACTERISTIC VALUES OF SAW :
• Saw Diameter : 550 mm (22”)
• Thickness of Saw : 4.2 mm
• Shaft Thickness of Saw : 3.4 mm
•
Saw forward movement speed: (According to the aluminium material) 64 m / sn
10.4. NOISE VALUES:
10.4.1. NOISE VALUES TEST MATERIALS SPECIFICATIONS:
•
•
•
•
Material : Aluminum
Length : 1000 mm
Width : 70 mm
Height : 50 mm
LwA : 98 dB (Measured Value)
LpA : 96 dB
K : 4 dB ( Indefinite in Measurements)
Values given above indicate emission level and do not indicate safe working level. There is no direct relation
between emission and level of exposing, and this can not be used reliably to make a decision for further measures.
Factors affecting real level of exposing to emission that affects work power are characteristics of working area, time
of exposure in other words all noise sources and number of machines around. Also, permitted level of expose
changes from country to country. Nevertheless this information is for healthy evaluation of the operator about
dangers and risks
Page 32
11. TROUBLESHOOTING GUIDE
Here are some recommendations for solving urgent problems. If the trouble cannot be solved, or if you have a
problem other than those described hereunder, please contact our technical service or your nearest dealer.
TROUBLE
Low surface quality (at
aluminum and similar
materials) :
Rough surface,
Large chip,
Not homogenous surface,
Saw blade traces visible
CAUSES
Not cooling the saw blade surfaces
REMEDY
Lubricating the saw blade cutting
surfaces,
Using of cooling liquid
Using of damaged or blunt saw
blade
Check the saw blade teeth.
Replace if necessary
Saw blade moves to quick
The cutting speed is too high for the
material. Decrease the cutting
speed.
Motor does not work (Start
button is pressed, not
working)
No Power supply to the machine
Check the electric cable
connections
Motor is working but the
saw blades don’t move
down
Air supply connections missing or
faulty
The brake system on the movable
head has not been activated
Check the air compressor
connections Adjust the air
pressure between 6-8 Bar on the
conditioner.
Activate the brake system button on
the movable head
The saw blade rotates in
reverse direction.
The electric connection, the power
cable or the connection at the panel
is wrong.
Air supply connection missing or air
pressure is too low
The brake system on the movable
head has not been activated .
Let the electric connections carry
out by a qualified electrician
Profile clamps don’t work
Barcode Printer does not
print
Printer might be in OFF position.
Print Ready button is not pressed.
Check the air supply connections.
Activate the brake system button on
the movable head
Bring to Print ON position in Service
page.
Activate it pressing Print button.
If tries do not give a result, turn
main schalter OFF and the turn it
on again.
Page 33


![Forms [packet] specific to Licensed Child Care](http://vs1.manualzilla.com/store/data/005750447_1-ace0dbf587046d14d311f9d21e5da3df-150x150.png)